
You must be looking for a process to uninstall Fences 4. As we all know there are multiple reasons for a PC to run slow. Having lots of unused installed apps are the main reasons for slow functioning of the system. Within this post we will learn how to fix these issues by uninstalling problem creatings apps from the Pc. Here is the productive solution to completely uninstall Fences 4
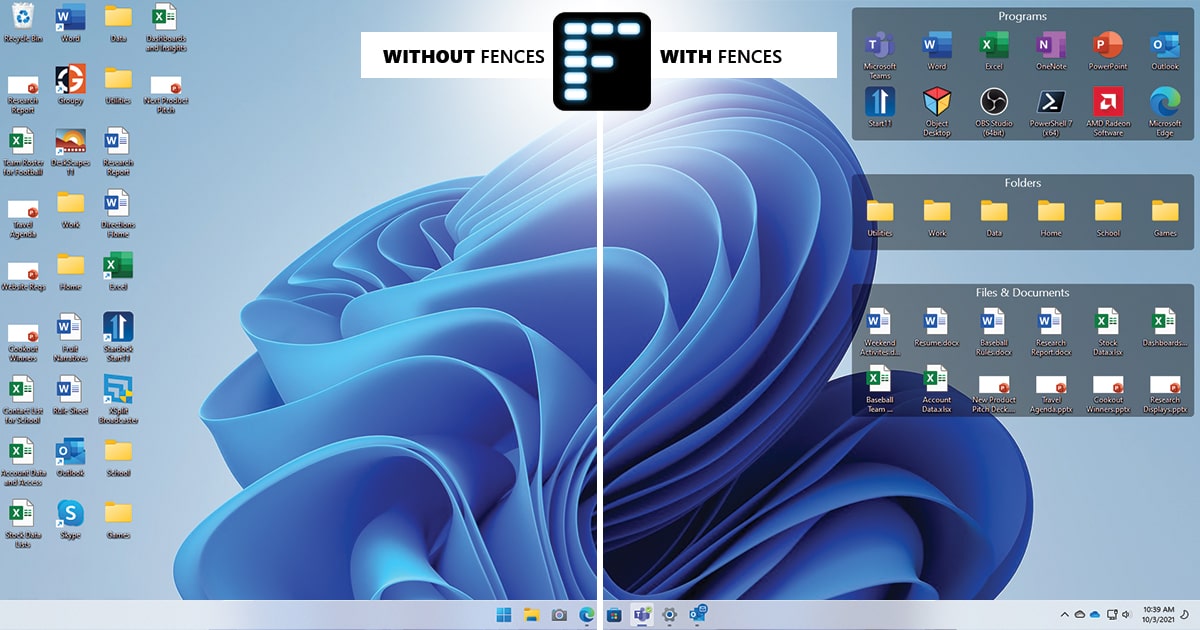
Table of Contents
Various Issues While Uninstalling Fences 4
- Fences 4 is not accessible in the Programs and Features of the system.
- One of the most pumping error is ‘You do not have sufficient access to uninstall Fences 4‘.
- You may also get error ‘file required for the uninstallation to complete could not be run‘.This is the most common error.
- An error has occurred.
- Not all of the files were successfully uninstalled.
- Uninstallation process may trigger error ‘another process that is using the file stops Fences 4 being uninstalled‘.
Fences 4 cannot be removed due to many other problems. An incomplete uninstallation of Fences 4 may also cause many hitch. So, it’s really important to completely uninstall Fences 4 and remove all of its files and folders.
How to Uninstall Fences 4 Completley?
Method 1: Uninstall Fences 4 via Programs and Features.
When a Windows app is installed on your laptop, that software is added to the inventory in Programs and Features. When you want to uninstall the program, you can go to the Programs and Features to remove it.
So when you want to uninstall Fences 4, the first thing is to uninstall it via Programs and Features.
Method 2: Remove Fences 4 with its uninstaller.exe.
Most of the computer programs have an executable file named uninst000.exe or uninstall.exe or something related to these lines. You can find these files in the installation folder of Fences 4.
Method 3: Delete Fences 4 With System Restore.
Windows PC comes with lots of advanced features and System Restore is one of them. It is a utility of the Windows Operating System which comes with Windows operating systems and computer end users to reform the system to a preceding state like a way back machine and remove programs interfering with the functioning of the computer.
If you have executed a system restore point previous to installing a software, then you can employ System Restore to restore your system and completely uninstall the unwanted programs like Fences 4. You should backup your personal files and data before executing a System Restore.
Method 4: Uninstall Fences 4 with Antivirus.
Nowadays, Pc malware appear like common computer app but they are much more strenuous to delete from the computer.
These malware get into the computer with the guidance of the Trojans and spyware. There are lots of malware programs available online and most of them are potentially unwanted malicious programs are also very hard to remove. They usually get installed on your Computer by linking with freeware software like pirated software, games or PDF convertors. They can easily bypass the detection of the antivirus programs installed on your system. If you cannot remove Fences 4 like other programs, then it’s worth checking.
It’s always recommended to check the .exe of any software with an antivirus before installing it.
Method 5: Reinstall Fences 4 to Uninstall.
When the files required to remove Fences 4 are corrupted or missing, it will not be able to remove the program. In such circumstance, reinstalling Fences 4 may do the wonders. Run the installer either in the original disk or the download file to reinstall the program again. Sometimes, the installer may allow you to repair or uninstall the program easily.
Method 6: Fences 4 from the Registry.
When a program is installed on the computer, Windows will save its settings and information in the registry, including the uninstall command to remove the program. You can endeavour this method to uninstall Fences 4. Please carefully rewrite the registry, because any mistake there may make your system bang.
Method 7: Uninstall Fences 4 with Third-party Cleaners.
Fences The manual uninstallation of Fences 4 requires just a few taps with no techical knowledge. Also, there is no guide available online that claims to resolve all installation issues and uninstall Fences 4 . The Incomplete uninstallation may leave some invalid items in the registry and affect your computer performance in a bad way.
If you have garbage files then that may occupy the free space of your hard disk and make your PC run slow and lag sometimes. So, it’s recommended that you uninstall Fences 4 with a trusted third-party uninstaller to your system occassionally, identify all files of Fences 4 and completely remove them.
Frequently Asked Questions [FAQ]
How do I remove Fences 4?
We have written lots of ways to removeFences 4 but in most of the cases the uninstallation through Programs and Features is the most effective one. If this mechanism doesn’t work for you then you can stab a good third party uninstaller to do the job.
Why is Fences 4 not uninstalling?
If Fences 4 is not uninstalling normally then the possibility are high that some of its files are manipulated that are causing the error while uninstalling. Reinstall Fences 4 from the original source and then try to uninstall. This will solve all your problems.
Is Fences 4 necessary?
Fences 4 is a third party software developed for a specific purpose. Its not a window tool, essential for windows OS to run smoothly. You can uninstall it if its not required for you.
Fences 4 showing error while uninstalling?
Most of the applications shows this error if something is blocking them from uninstalling from the system. Reinstall the Fences 4 and try to perform the uninstallation procedure again.
Can’t uninstall Fences 4
3rd Party software are rigid to uninstall entirely as they are designed to be stuck inside your system if you ever try to delete. You have to get rid of all traces of Fences 4 from your PC registry and then it will be removed from your system.
Fences 4 file location in Windows 7,8 and 10
All software that gets installed on your PC, provides a shortcut icon on the Desktop screen. Just right click on the Fences 4 icon on the desktop and select properties. From there you’ll get the location of Fences 4 where it is installed by the Windows.
Fences helps you organize your PC by automatically placing your shortcuts and icons into resizable shaded areas on your desktop called fences.
Are you having trouble uninstalling Fences?
Are you looking for a solution that will completely uninstall and remove all of its files from your computer?
This guide will provide you with detailed instructions and all the information that you require to remove and uninstall
Fences.
What usually makes people to uninstall Fences?
It seems that there are many users who have difficulty uninstalling programs like Fences from their systems. Some experience issues during uninstallation, whereas other encounter problems after the program is removed.
These are the main reasons why Fences is uninstalled by users:
- The program is not compatible with other installed applications.
- The program crashes or hangs periodically/frequently.
- The program is not as good as the user expected.
- The program is being re-installed (uninstalled and installed again afterwards).
- The program is regarded by the user and/or some websites as a potentially malicious.
- The program is not listed in the Windows Settings or Control Panel.
- After removing the program, some of its related processes still run on the computer.
- Some traces of the program can still can be found on the computer.
- Removing process running for a long time and does not come to the end.
Possible problems that can arise during uninstallation of Fences
- The program’s built-in uninstaller does not start or does not operate properly.
- A file required for the uninstallation to complete could not be run.
- Due to an error, not all of the files were successfully uninstalled.
- Another process is preventing the program from being uninstalled.
There could be other causes why users may not be able to uninstall Fences. An incomplete uninstallation of a program may cause problems, which is why thorough removal of programs is recommended.
How to uninstall Fences completely?
Method 1: Uninstall Fences with a third-party uninstaller.
-
1
Download and install Revo Uninstaller Pro — 30 days fully functional trial version
-
2
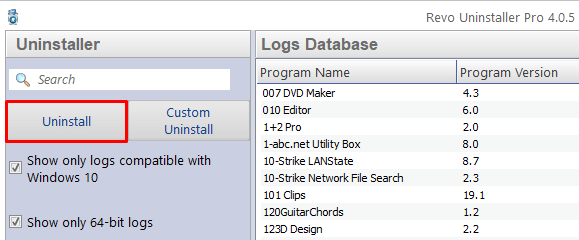
Start Revo Uninstaller Pro and open the module «Logs Database»

-
3
In the Search field type «Fences» and you will see all logs of «Fences» in the database compatible with your Windows Version.
-
4
Select the appropriate log by version from the list and press the «Uninstall» button from the toolbar
-
5
You will see few popping up windows showing the download and import of the log to your Revo Uninstaller Pro and then the main Uninstall dialog that shows the progress of the uninstall of Fences.

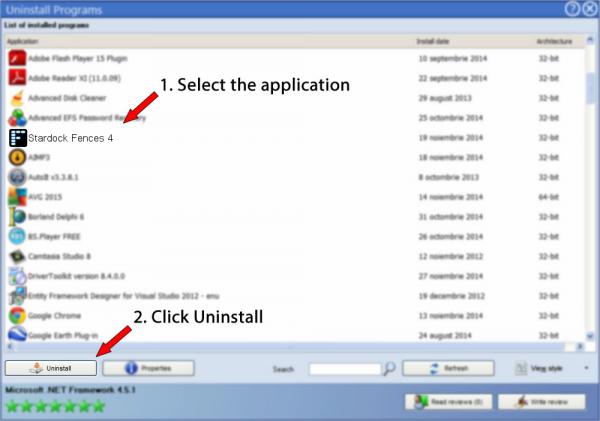
Method 2: Uninstall Fences via Apps and Features/Programs and Features.
-
1
Open the Start Menu and type Apps and Features
-
2
Look for Fences in the list and click on it. The next step is to click on uninstall, so you can initiate the uninstallation.

Method 3: Uninstall Fences with its uninstaller.exe.
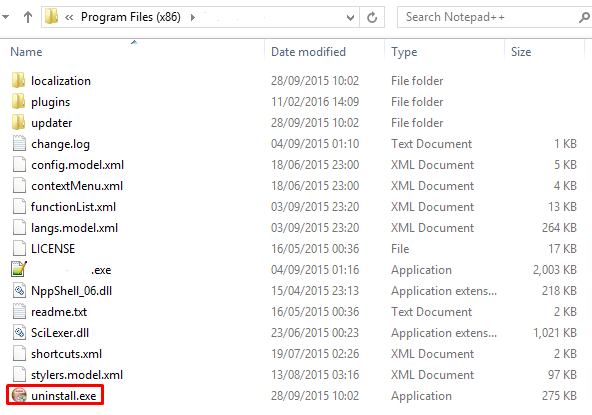
Most of the computer programs have uninstall.exe or uninst000.exe in their installation folders. You need to execute these files in order to start the uninstallation process. Here are the steps:
-
1
Go to the installation folder of Fences. Most of the times it is located in C:\Programs files or C:\Program files(x86)
-
2
Locate uninstall.exe or uninst000.exe
-
3
Double click the file to start the uninstallation process.
Method 4: Uninstall String with Run
-
1
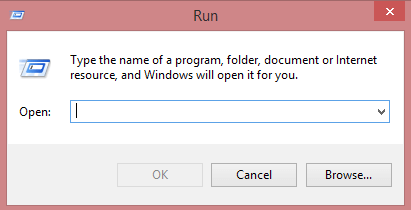
Hold the Windows + R keys to open the Run command.
-
2
this uninstallation string
"C:\Program Files (x86)\Stardock\Fences\uninstall.exe" "/U:C:\Program Files (x86)\Stardock\Fences\Uninstall\uninstall.xml"and paste it in the Run command window and click OK.
-
3
Follow the instructions to complete the uninstallation.
We can help you every time when…
- you cannot find the program in the Apps & Features list
- the program’s built-in uninstaller is non-functional
- you have a lot of leftovers slowing down your computer’s performance
- you want to batch uninstall
- many more things
Download now
Available logs
Fences 3.0 on Windows 7 64-bit
Fences 3.0 on Windows 7 32-bit
Fences 3.0 on Windows 8.1 64-bit
Fences 3.0 on Windows 10 64-bit
Fences 3.0 on Windows 10 32-bit
Related programs
No related products
How to uninstall Stardock Fences 4 from your PC
Stardock Fences 4 is a computer program. This page holds details on how to uninstall it from your computer.
It is developed by Stardock Software, Inc..
You can find out more on Stardock Software, Inc. or check for application updates here.
Click on https://www.stardock.com to get more facts about Stardock Fences 4 on Stardock Software, Inc.’s website.
Stardock Fences 4 is typically installed in the C:\Program Files (x86)\Stardock\Fences directory, depending on the user’s option.
The full command line for uninstalling Stardock Fences 4 is C:\Program Files (x86)\Stardock\Fences\uninstall.exe. Note that if you will type this command in Start / Run Note you may be prompted for administrator rights.
Stardock Fences 4’s primary file takes about 4.88 MB (5112704 bytes) and is named Fences.exe.
The following executables are contained in Stardock Fences 4. They take 7.45 MB (7811392 bytes) on disk.
- BsSndRpt.exe (322.52 KB)
- BsSndRpt64.exe (414.02 KB)
- DeElevate.exe (8.24 KB)
- DeElevate64.exe (10.24 KB)
- Fences.exe (4.88 MB)
- SasUpgrade.exe (462.96 KB)
- SdDisplay.exe (60.46 KB)
- uninstall.exe (1.33 MB)
…click to view all…
The current web page applies to Stardock Fences 4 version 3.98 alone.
For other Stardock Fences 4 versions please click below:
- 4.05.21
- 4.1.9.2
- 4.21.2
- 4.1.0.6
- 4.2.2.1
- 4.22.1
- 4.07.02
- 4.2.1.2
- 4.1.7.3
- 4.10.6
- 4.21.02
- 4.05.09
- 4.1.1.5
- 4.1.0.2
- 4.03
- 4.05.11
…click to view all…
If you are manually uninstalling Stardock Fences 4 we suggest you to verify if the following data is left behind on your PC.
You should delete the folders below after you uninstall Stardock Fences 4:
- C:\Program Files (x86)\Stardock\Fences
- C:\Users\%user%\AppData\Local\Stardock\Fences4
- C:\Users\%user%\AppData\Local\Stardock_Corporation\Fences.exe_Url_hhdwc2synnlpcqpyx5iy0hdnhonkuszh
- C:\Users\%user%\AppData\Roaming\Stardock\Fences
Check for and remove the following files from your disk when you uninstall Stardock Fences 4:
- C:\Program Files (x86)\Stardock\Fences\1xuninstall.cmd
- C:\Program Files (x86)\Stardock\Fences\AVGTBInstall.exe
- C:\Program Files (x86)\Stardock\Fences\BsSndRpt.exe
- C:\Program Files (x86)\Stardock\Fences\BsSndRpt64.exe
- C:\Program Files (x86)\Stardock\Fences\BugSplat.dll
- C:\Program Files (x86)\Stardock\Fences\BugSplat64.dll
- C:\Program Files (x86)\Stardock\Fences\BugSplatRc.dll
- C:\Program Files (x86)\Stardock\Fences\BugSplatRc64.dll
- C:\Program Files (x86)\Stardock\Fences\DeElevate.exe
- C:\Program Files (x86)\Stardock\Fences\DeElevate64.exe
- C:\Program Files (x86)\Stardock\Fences\DeElevator.dll
- C:\Program Files (x86)\Stardock\Fences\DeElevator64.dll
- C:\Program Files (x86)\Stardock\Fences\default.spak
- C:\Program Files (x86)\Stardock\Fences\DesktopDock.dll
- C:\Program Files (x86)\Stardock\Fences\DesktopDock64.dll
- C:\Program Files (x86)\Stardock\Fences\DesktopDockARM64.dll
- C:\Program Files (x86)\Stardock\Fences\eula.txt
- C:\Program Files (x86)\Stardock\Fences\Fences.exe
- C:\Program Files (x86)\Stardock\Fences\FencesControlPanel.dll
- C:\Program Files (x86)\Stardock\Fences\FencesControlPanel64.dll
- C:\Program Files (x86)\Stardock\Fences\FencesMenu.dll
- C:\Program Files (x86)\Stardock\Fences\FencesMenu64.dll
- C:\Program Files (x86)\Stardock\Fences\FencesMenuARM64.dll
- C:\Program Files (x86)\Stardock\Fences\FencesRegRes.dll
- C:\Program Files (x86)\Stardock\Fences\Fonts\segoeui.ttf
- C:\Program Files (x86)\Stardock\Fences\Fonts\segoeuib.ttf
- C:\Program Files (x86)\Stardock\Fences\Fonts\segoeuii.ttf
- C:\Program Files (x86)\Stardock\Fences\Fonts\segoeuiz.ttf
- C:\Program Files (x86)\Stardock\Fences\Images\AcrylicNoise.png
- C:\Program Files (x86)\Stardock\Fences\Images\CloseIcon@100.png
- C:\Program Files (x86)\Stardock\Fences\Images\CloseIcon@125.png
- C:\Program Files (x86)\Stardock\Fences\Images\CloseIcon@150.png
- C:\Program Files (x86)\Stardock\Fences\Images\CloseIcon@175.png
- C:\Program Files (x86)\Stardock\Fences\Images\CloseIcon@200.png
- C:\Program Files (x86)\Stardock\Fences\Images\CloseIcon@225.png
- C:\Program Files (x86)\Stardock\Fences\Images\CloseIcon@250.png
- C:\Program Files (x86)\Stardock\Fences\Images\CloseIcon@275.png
- C:\Program Files (x86)\Stardock\Fences\Images\CloseIcon@300.png
- C:\Program Files (x86)\Stardock\Fences\Images\CloseIcon@325.png
- C:\Program Files (x86)\Stardock\Fences\Images\CloseIcon@350.png
- C:\Program Files (x86)\Stardock\Fences\Images\ConfigIcon@100.png
- C:\Program Files (x86)\Stardock\Fences\Images\ConfigIcon@125.png
- C:\Program Files (x86)\Stardock\Fences\Images\ConfigIcon@150.png
- C:\Program Files (x86)\Stardock\Fences\Images\ConfigIcon@175.png
- C:\Program Files (x86)\Stardock\Fences\Images\ConfigIcon@200.png
- C:\Program Files (x86)\Stardock\Fences\Images\CreateFence@100.png
- C:\Program Files (x86)\Stardock\Fences\Images\CreateFence@125.png
- C:\Program Files (x86)\Stardock\Fences\Images\CreateFence@150.png
- C:\Program Files (x86)\Stardock\Fences\Images\CreateFence@175.png
- C:\Program Files (x86)\Stardock\Fences\Images\CreateFence@200.png
- C:\Program Files (x86)\Stardock\Fences\Images\CreateFolderFence@100.png
- C:\Program Files (x86)\Stardock\Fences\Images\CreateFolderFence@125.png
- C:\Program Files (x86)\Stardock\Fences\Images\CreateFolderFence@150.png
- C:\Program Files (x86)\Stardock\Fences\Images\CreateFolderFence@175.png
- C:\Program Files (x86)\Stardock\Fences\Images\CreateFolderFence@200.png
- C:\Program Files (x86)\Stardock\Fences\Images\DropdownIcon@100.png
- C:\Program Files (x86)\Stardock\Fences\Images\DropdownIcon@125.png
- C:\Program Files (x86)\Stardock\Fences\Images\DropdownIcon@150.png
- C:\Program Files (x86)\Stardock\Fences\Images\DropdownIcon@175.png
- C:\Program Files (x86)\Stardock\Fences\Images\DropdownIcon@200.png
- C:\Program Files (x86)\Stardock\Fences\Images\DropdownIcon@225.png
- C:\Program Files (x86)\Stardock\Fences\Images\DropdownIcon@250.png
- C:\Program Files (x86)\Stardock\Fences\Images\DropdownIcon@275.png
- C:\Program Files (x86)\Stardock\Fences\Images\DropdownIcon@300.png
- C:\Program Files (x86)\Stardock\Fences\Images\DropdownIcon@325.png
- C:\Program Files (x86)\Stardock\Fences\Images\DropdownIcon@350.png
- C:\Program Files (x86)\Stardock\Fences\Images\FencesSmall@100.png
- C:\Program Files (x86)\Stardock\Fences\Images\FencesSmall@125.png
- C:\Program Files (x86)\Stardock\Fences\Images\FencesSmall@150.png
- C:\Program Files (x86)\Stardock\Fences\Images\FencesSmall@175.png
- C:\Program Files (x86)\Stardock\Fences\Images\FencesSmall@200.png
- C:\Program Files (x86)\Stardock\Fences\Images\FolderIcon@100.png
- C:\Program Files (x86)\Stardock\Fences\Images\FolderIcon@125.png
- C:\Program Files (x86)\Stardock\Fences\Images\FolderIcon@150.png
- C:\Program Files (x86)\Stardock\Fences\Images\FolderIcon@175.png
- C:\Program Files (x86)\Stardock\Fences\Images\FolderIcon@200.png
- C:\Program Files (x86)\Stardock\Fences\Images\FolderIcon@225.png
- C:\Program Files (x86)\Stardock\Fences\Images\FolderIcon@250.png
- C:\Program Files (x86)\Stardock\Fences\Images\FolderIcon@275.png
- C:\Program Files (x86)\Stardock\Fences\Images\FolderIcon@300.png
- C:\Program Files (x86)\Stardock\Fences\Images\FolderIcon@325.png
- C:\Program Files (x86)\Stardock\Fences\Images\FolderIcon@350.png
- C:\Program Files (x86)\Stardock\Fences\Images\FolderIcon@75-.png
- C:\Program Files (x86)\Stardock\Fences\Images\Icons\1.home.ico
- C:\Program Files (x86)\Stardock\Fences\Images\Icons\2.color.ico
- C:\Program Files (x86)\Stardock\Fences\Images\Icons\3.pages.ico
- C:\Program Files (x86)\Stardock\Fences\Images\Icons\4.portals.ico
- C:\Program Files (x86)\Stardock\Fences\Images\Icons\5.rollup.ico
- C:\Program Files (x86)\Stardock\Fences\Images\Icons\6.quickhide.ico
- C:\Program Files (x86)\Stardock\Fences\Images\Icons\6.quickshow.ico
- C:\Program Files (x86)\Stardock\Fences\Images\Icons\7.layout.ico
- C:\Program Files (x86)\Stardock\Fences\Images\Icons\8.sorting.ico
- C:\Program Files (x86)\Stardock\Fences\Images\Icons\9.about.ico
- C:\Program Files (x86)\Stardock\Fences\Images\MenuIcon@100.png
- C:\Program Files (x86)\Stardock\Fences\Images\MenuIcon@125.png
- C:\Program Files (x86)\Stardock\Fences\Images\MenuIcon@150.png
- C:\Program Files (x86)\Stardock\Fences\Images\MenuIcon@175.png
- C:\Program Files (x86)\Stardock\Fences\Images\MenuIcon@200.png
- C:\Program Files (x86)\Stardock\Fences\Images\MenuIcon@225.png
- C:\Program Files (x86)\Stardock\Fences\Images\MenuIcon@250.png
Use regedit.exe to manually remove from the Windows Registry the data below:
- HKEY_CLASSES_ROOT\Local Settings\Software\Microsoft\Windows\Shell\Bags\3107\Stardock.Fences3
- HKEY_CLASSES_ROOT\Local Settings\Software\Microsoft\Windows\Shell\Bags\3536\Stardock.Fences3
- HKEY_CLASSES_ROOT\Local Settings\Software\Microsoft\Windows\Shell\Bags\3715\Stardock.Fences3
- HKEY_CLASSES_ROOT\Local Settings\Software\Microsoft\Windows\Shell\Bags\3824\Stardock.Fences3
- HKEY_CLASSES_ROOT\Local Settings\Software\Microsoft\Windows\Shell\Bags\3843\Stardock.Fences3
- HKEY_CLASSES_ROOT\Local Settings\Software\Microsoft\Windows\Shell\Bags\3844\Stardock.Fences3
- HKEY_CLASSES_ROOT\Local Settings\Software\Microsoft\Windows\Shell\Bags\3847\Stardock.Fences3
- HKEY_CLASSES_ROOT\Local Settings\Software\Microsoft\Windows\Shell\Bags\3851\Stardock.Fences3
- HKEY_CLASSES_ROOT\Local Settings\Software\Microsoft\Windows\Shell\Bags\3854\Stardock.Fences3
- HKEY_CLASSES_ROOT\Local Settings\Software\Microsoft\Windows\Shell\Bags\3855\Stardock.Fences3
- HKEY_CLASSES_ROOT\Local Settings\Software\Microsoft\Windows\Shell\Bags\3856\Stardock.Fences3
- HKEY_CLASSES_ROOT\Local Settings\Software\Microsoft\Windows\Shell\Bags\3857\Stardock.Fences3
- HKEY_CLASSES_ROOT\Local Settings\Software\Microsoft\Windows\Shell\Bags\3858\Stardock.Fences3
- HKEY_CLASSES_ROOT\Local Settings\Software\Microsoft\Windows\Shell\Bags\3859\Stardock.Fences3
- HKEY_CLASSES_ROOT\Local Settings\Software\Microsoft\Windows\Shell\Bags\3868\Stardock.Fences3
- HKEY_CLASSES_ROOT\Local Settings\Software\Microsoft\Windows\Shell\Bags\3873\Stardock.Fences3
- HKEY_CLASSES_ROOT\Local Settings\Software\Microsoft\Windows\Shell\Bags\3904\Stardock.Fences3
- HKEY_CLASSES_ROOT\Local Settings\Software\Microsoft\Windows\Shell\Bags\3930\Stardock.Fences3
- HKEY_CLASSES_ROOT\Local Settings\Software\Microsoft\Windows\Shell\Bags\4036\Stardock.Fences3
- HKEY_CLASSES_ROOT\Local Settings\Software\Microsoft\Windows\Shell\Bags\766\Stardock.Fences3
- HKEY_CURRENT_USER\Software\Stardock\Fences
- HKEY_LOCAL_MACHINE\Software\Microsoft\Windows\CurrentVersion\Uninstall\Stardock Fences 4
- HKEY_LOCAL_MACHINE\Software\Stardock\Misc\Fences2
- HKEY_LOCAL_MACHINE\Software\Stardock\Misc\Fences4
How to uninstall Stardock Fences 4 with the help of Advanced Uninstaller PRO
Stardock Fences 4 is an application by Stardock Software, Inc..
Some computer users want to remove this application. Sometimes this is easier said than done because deleting this manually takes some advanced knowledge related to Windows program uninstallation. The best QUICK approach to remove Stardock Fences 4 is to use Advanced Uninstaller PRO. Here are some detailed instructions about how to do this:
1. If you don’t have Advanced Uninstaller PRO already installed on your Windows PC, install it. This is a good step because Advanced Uninstaller PRO is the best uninstaller and all around tool to clean your Windows system.
DOWNLOAD NOW
- go to Download Link
- download the program by pressing the green DOWNLOAD button
- set up Advanced Uninstaller PRO
2. Run Advanced Uninstaller PRO. Take your time to get familiar with the program’s design and number of tools available. Advanced Uninstaller PRO is a very useful Windows tool.
3. Press the General Tools button

4. Click on the Uninstall Programs tool

5. All the applications existing on the computer will be made available to you
6. Scroll the list of applications until you find Stardock Fences 4 or simply activate the Search feature and type in «Stardock Fences 4». If it exists on your system the Stardock Fences 4 app will be found very quickly. Notice that after you click Stardock Fences 4 in the list of applications, some data regarding the program is shown to you:
- Star rating (in the lower left corner). This tells you the opinion other users have regarding Stardock Fences 4, ranging from «Highly recommended» to «Very dangerous».
- Reviews by other users — Press the Read reviews button.
- Technical information regarding the application you wish to uninstall, by pressing the Properties button.
For example you can see that for Stardock Fences 4:
- The web site of the program is: https://www.stardock.com
- The uninstall string is: C:\Program Files (x86)\Stardock\Fences\uninstall.exe
7. Click the Uninstall button. A confirmation page will appear. accept the uninstall by pressing Uninstall. Advanced Uninstaller PRO will automatically uninstall Stardock Fences 4.
8. After uninstalling Stardock Fences 4, Advanced Uninstaller PRO will offer to run an additional cleanup. Press Next to perform the cleanup. All the items that belong Stardock Fences 4 that have been left behind will be found and you will be asked if you want to delete them. By uninstalling Stardock Fences 4 with Advanced Uninstaller PRO, you can be sure that no registry entries, files or directories are left behind on your disk.
Your PC will remain clean, speedy and able to serve you properly.
Disclaimer
The text above is not a recommendation to remove Stardock Fences 4 by Stardock Software, Inc. from your PC, we are not saying that Stardock Fences 4 by Stardock Software, Inc. is not a good application for your computer. This text simply contains detailed info on how to remove Stardock Fences 4 in case you want to. Here you can find registry and disk entries that our application Advanced Uninstaller PRO discovered and classified as «leftovers» on other users’ PCs.
Last update on: 2021-10-20 23:12:12.207
Need Space in PC or only want to remove or uninstall Fences On PC ( Windows 7, 8, 10, and Mac )? but how to, after it still having files in C: drive? If the application run on the pc, windows 7, 8, & 10 so you can uninstall using Control Panel or CMD Or If this applicaion run in Mac so you know that how to uninstall in MAC. With this article, you will able to delete or kick out all of those files also after uninstalling the Fences.
Are you bored, or tired of using Fences? Now, wanna kick-off this software from your PC ( Windows 7, 8, 10, and Mac )? There is no condition to follow up before installing, so, you can remove it without getting any confusion about it.
There are 10 methods that users can adapt if they want to uninstall Fences :
Method #1
- Go to Start Menu, then click on the Control Panel.
- In Control Panel, under programs, go through the list of the ones that are installed on your computer
- Right-click on Fences, and then click on uninstall a program
- Follow the prompt on the screen, and you will get to see a progress bar that will take you to remove the Fences from the computer.


Method #2
The second method involves uninstaller.exe, through which Fences can be uninstalled. Just follow the instructions below to execute this step:
- Go to the installation folder of Fences.
- Find a file that is named uninstall.exe or unins000.exe
- Double click on the file, and then follow the instructions that appear on the screen.


Method #3
The third method involves System Restore. For those who don’t know, System Restore is a utility, which helps the user restore their system to its previous state. System Restore removes all those programs, which interfere with the operation and performance of the computer.


If you have created a system restore point before you installed Fences, then you can use this software to restore the system, and remove such unwanted programs. However, before you do so, make sure that you save all the important data.Follow the steps below to know more from this method:
- Close all the files and programs, which are currently running on your PC
- Open Computer from the desktop, and then select Properties
- System Window will open
- On the left side and click on System Protection
- System Properties will open.
- Then do click on the option of System Restore, and a new window will again open.
- Now, choose the ‘different restore point’ option, and click on Next.
- You have to select a date and time from the given options; when you select a date, the drivers that you installed after the chosen date won’t work.
- Click on Finish and then Confirm the ‘Restore Point’ on the screen.
- When you click Yes to confirm, the Fences would be uninstalled.
Method #4
If you have an antivirus, then you can use it to uninstall Fences.There is much malware or Fences software in the computer applications that we download nowadays. They have become very difficult to remove from the system, like Trojan and spyware.
- If you cannot remove Fences with the above methods.
- It means that there is malware or Fences in it, and only a good antivirus can be used for removing it.
You can either download Norton Antivirus or AVG antivirus, as these are reputable software and will surely remove the malware, Fences on the system.

Method #5
If you want to uninstall Fences, then you can do so using Command Displayed in the Registry. A registry is a place where all the settings of Windows, along with information, are stored. This also includes the command to uninstall a software or program.
You can try this method with Fences as well, but it is a very risky method. If you make any mistake and delete the wrong information, then the system is most likely to crash. It would become difficult for you to bring it back from deletion.

To execute this method, To follow the steps given below:
- Hold Windows + R together, and then Run command
- When the command box opens, type Regedit in the box and then click on OK
- You have to navigate and find the registry key for the Fences
- You will see an uninstall string on the next window; double click on it, and also copy ‘Value Data’
- Again hold Windows + R keys, and run the Command; paste the value data that you just copy and click on OK
Follow what comes on the screen and then uninstall Fences.
Method #6
The seventh method is to uninstall the Fences using a third-party uninstaller.
At times, those who don’t have any knowledge of computer language, won’t be able to manually uninstall the software fully.
Many files occupy the hard disk of the computer, so it is best to use third-party software to uninstall them.

Method #7
There are some codes that users can type into the command prompt, and they would be able to uninstall the Fences. For example, if they want to remove the package, then just type.
sudo apt-get remove Fences
If you want to uninstall Fences and its dependencies as well, then type:
sudo apt-get remove –auto-remove Fences
For those who don’t know, some of the dependencies of Fences are GCC-5, libc6, libgcc1, Fences dev, and gc++-5.

Method #8
If the user wants to remove the configuration and data files of Fences, then they need to run the following code on the Command Prompt:
sudo apt-get purge Fences

Method # 9
It depends on you that are you willing to kick-out the data or you want to remove the configuration data or data files, along with the dependencies, then the following code is most likely to work for you:
sudo apt-get auto-remove -purge Fences

To uninstall Fences on mac because anytime we need space or only want to remove from pc due to some viruses and also many problems which are needed to remove or uninstall from pc.
So I will show you some steps of uninstalling Fences on the mac so follow my this step or method if you have still confusion so you may contact with us for uninstall of Fences on pc or mac.
How to Uninstall Fences on Mac?
For uninstalling Fences on the mac so as I told you that there is a simple method to uninstall apps on mac. As there are installed some apps on your Mac and now you want to remove or uninstall from your pc successfully and want to install some other apps on my mac so follow my these steps to uninstall Fences on mac.
Method #1
In method 1, you have to open mac on your pc as I’m showing in the image follow the images to uninstall Fences on your mac.

In the image, there is a Fences app on your mac dashboard and now we have to uninstall it from our mac we will uninstall this app and will remove it in of mac now double-click-on-app showing in the image.

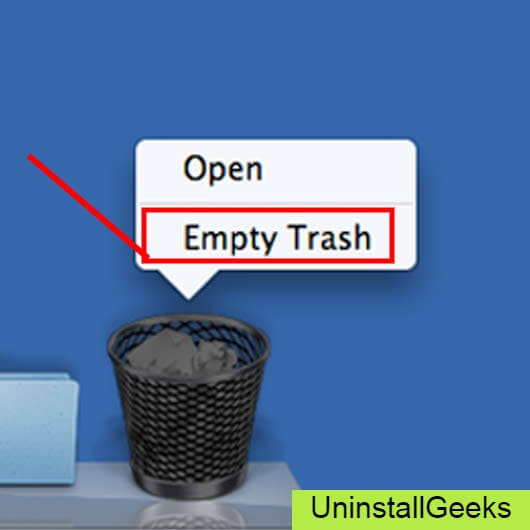
Now you double-clicked on the app mac will ask that are you sure to uninstall Fences click on the Delete button so go to Trash of mac to uninstall completely from mac. Showing in image trash bin click on trash bin and go inside there will be Fences which we had to delete before so have to uninstall completely from mac.

Not right-click on trash to remove all data or app which we had uninstalled before seeing in the image. Click on Empty Trash the whole data which is in the trash will auto remove successfully.
Now we uninstalled Fences on the mac so as you see that how to uninstall or remove any app on the mac so if you liked this so share once. This method doesn’t require any antivirus or uninstaller software from them we are to uninstall.
I described only a simple method of uninstalling Fences on mac. This method more people are using but some people take it is too hard uninstalling in mac but in this step, anyone can understand this simple method.
How To Install?
For those who don’t know much about Fences, they might lean more towards uninstalling it. These Fences create an environment, where users can create a high GPU-accelerated application. If you want to install this Fences, then make sure that your system is compatible with it.
Firstly, verify that the system you are using has a Fences capable GPU, and then download the Fences. Install it, and then test that the software runs smoothly on the system. If it doesn’t run smoothly, then it could be because its communication with the hardware is corrupted.


Conclusion
There are other methods of uninstalling the Fences as well as in pc or windows, but these could be difficult for those, who don’t have much technical expertise. Execute these methods, and they will surely work. These methods don’t require the user to have much knowledge of the technical side of an operating system. They can follow simple steps and uninstall Fences.
Hello, I hope all is well.
Fences 4 is an interesting program but I couldn’t make it 100% like I would want it with the options available and was not ready to purchase when I got locked out of the options because I needed to purchase it.
So I was going to uninstall it but you get this warning that you need to close it before uninstalling it.
This is surprisingly difficult and I still haven’t been able to do it.
I disabled the two Windows 10 startup processes and restarted, but Fences still runs and the uninstaller still complains it is running.
I looked through the Stardock Forum threads and the Fences Forum FAQ but couldn’t find anything more authoritative on how to stop Fences 4 in order to uninstall it.
Should I use the *.bat file to purge Fences? There wasn’t an explanation of what exactly that is or what it does…
So how do I proceed and why is this so difficult? Not everyone who evaluates a piece of software are going to buy it… and I’d rather not lose my desktop files…
*****
If I upgrade/update to the brand new Fences 5 will that have an uninstaller?
Why is there no guide in the FAQ as to how to uninstall Fences!
Should I just proceed to uninstall it with the standard uninstaller while it is running?
Thanks in advance for any direction here….

Ronen H.