
Если компьютер настроен на загрузку Fedora и другой операционной системы, удаление Fedora без удаления разделов, содержащих другую систему и ее данные, значительно усложняется. Ниже приведена информация для некоторых операционных систем. Процесс удаления обеих систем, Fedora и другой ОС, аналогичен описанному здесь: Раздел 18.1, «Fedora является единственной операционной системой»
18.2.1. Настроена двойная загрузка (Fedora и Microsoft Windows)
18.2.1.1. Windows 2000, Windows Server 2000, Windows XP, Windows Server 2003
Внимание
Удостоверьтесь, что вы полностью следуете инструкциям, иначе может оказаться так, что компьютер будет невозможно загрузить. Прежде чем приступить к удалению, внимательно ознакомьтесь с приведенными инструкциями. Более того, рекомендуется их распечатать; это можно сделать с другого компьютера.
Восстановление этих систем полагается на среду восстановления Windows, для загрузки которой требуется наличие установочного диска Windows. Если вы начали такое восстановление, но не завершили его, может оказаться так, что компьютер будет невозможно загрузить. Поставляемые с некоторыми компьютерами Windows диски восстановления системы не всегда включают это окружение.
Консоль восстановления Windows запросит пароль администратора. Не продолжайте работу, если вы не знаете пароля администратора.
-
Удалите разделы Fedora
-
Загрузите компьютер в окружение Microsoft Windows.
-
Нажмите Пуск, в поле поиска введите
diskmgmt.mscи нажмите Enter. Откроется окно утилиты управления дисками.В окне будет представлена графическая диаграмма диска с разделами. Первый раздел обычно соответствует диску
C:и отмечен какNTFS. Кроме него должно быть показано как минимум два раздела Fedora. Windows не покажет тип файловой системы разделов Fedora, но может назначить букву диска. -
Выберите раздел Fedora и откройте контекстное меню, нажав правую клавишу мыши, выберите пункт Удалить раздел и нажмите Да для подтверждения своего выбора. Повторите эти действия для других разделов. По мере их удаления Windows будет отмечать ранее занятое место как
свободное.
-
-
Разрешите Windows использовать освобожденное после удаления Fedora пространство (необязательно).
Замечание
Этот шаг не требуется для удаления Fedora. Но если его пропустить, часть пространства на жестком диске будет недоступна Windows.
Выберите между расширением существующего раздела WIndows и созданием нового раздела Windows. При создании нового раздела Windows присвоит ему букву диска и будет воспринимать его как отдельный диск.
Увеличение существующего раздела Windows
Замечание
Упоминаемая здесь утилита diskpart входит в выпуск Windows XP и Windows 2003. При выполнении этих действий на компьютерах Windows 2000 и Windows Server 2000 сначала загрузите diskpart с сайта Microsoft.
-
Нажмите Пуск>Выполнить…, введите
diskpartи нажмите Enter. Откроется окно утилиты. -
Введите
list volumeи нажмите Enter. Будет показан список системных разделов с номерами томов, буквами устройств, метками томов, типами файловых систем и размерами. Найдите в списке раздел Windows, который будет занимать освободившееся после удаления Fedora пространство, и запомните его номер тома (например, «Volume 0»). -
Введите
select volume, заменивNNномером тома расширяемого раздела Windows и нажмите Enter. Теперь введитеextendи снова нажмите Enter. Размер выбранного раздела будет расширен до пределов диска.
Добавление нового раздела Windows
-
В окне управления дисками щелкните правой клавишей мыши на области
незанятогопростанства и выберитеСоздать раздел. Откроется окно мастера создания разделов. -
Следуйте инструкциям мастера. Если вы примете предложенные по умолчанию значения, будет создан новый раздел, заполняющий все доступное на жестком диске пространство. Ему будет присвоена первая доступная буква диска и он будет отформатирован как NTFS.
-
-
Восстановите загрузчик Windows
-
Вставьте установочный диск Windows и перезагрузите компьютер. На экране должно появиться следующее сообщение:
Нажмите любую клавишу для загрузки с CDPress any key while the message is still showing and the Windows installation software will load.
-
После появления окна
Добро пожаловать в программу установкиможно запустить консоль восстановления Windows. Этот процесс несколько отличается в разных версиях Windows:-
В Windows 2000 и Windows Server 2000 нажмите R, затем C.
-
В Windows XP и Windows Server 2003 нажмите R.
-
-
Консоль восстановления Windows выполняет поиск установок Windows на жестких дисках, присваивает каждой установке номер и выводит список на экран. Введите номер установки Windows, которую вы хотите восстановить.
-
Консоль восстановления Windows запросит пароль администратора. Введите пароль и нажмите Enter. Если пароль администратора изначально не был задан, просто нажмите Enter.
-
В строке приглашения выполните команду
fixmbrдля восстановления MBR. -
После появления приглашения ввода введите
exitи нажмите Enter. -
Компьютер загрузит операционную систему Windows.
-
18.2.1.2. Windows Vista и Windows Server 2008
Внимание
Удостоверьтесь, что вы полностью следуете инструкциям, иначе может оказаться так, что компьютер будет невозможно загрузить. Прежде чем приступить к удалению, внимательно ознакомьтесь с приведенными инструкциями. Более того, рекомендуется их распечатать; это можно сделать с другого компьютера.
Восстановление этих систем полагается на среду восстановления Windows, для загрузки которой требуется наличие установочного диска Windows. Если вы начали такое восстановление, но не завершили его, может оказаться так, что компьютер будет невозможно загрузить. Поставляемые с некоторыми компьютерами Windows диски восстановления системы не всегда включают это окружение.
-
Удалите разделы Fedora
-
Загрузите компьютер в окружение Microsoft Windows.
-
Нажмите Пуск, в поле поиска введите
diskmgmt.mscи нажмите Enter. Откроется окно Управление дисками.В окне будет представлена графическая диаграмма диска с разделами. Первый раздел обычно соответствует диску
C:и отмечен какNTFS. Кроме него должно быть показано как минимум два раздела Fedora. Windows не покажет тип файловой системы разделов Fedora, но может назначить букву диска. -
Выберите раздел Fedora и откройте контекстное меню, нажав правую клавишу мыши, выберите пункт Удалить раздел и нажмите Да для подтверждения своего выбора. Повторите эти действия для других разделов. По мере их удаления Windows будет отмечать ранее занятое место как
свободное.
-
-
Разрешите Windows использовать освобожденное после удаления Fedora пространство (необязательно).
Замечание
Этот шаг не требуется для удаления Fedora. Но если его пропустить, часть пространства на жестком диске будет недоступна Windows.
Выберите между расширением существующего раздела WIndows и созданием нового раздела Windows. При создании нового раздела Windows присвоит ему букву диска и будет воспринимать его как отдельный диск.
Увеличение существующего раздела Windows
-
В окне управления дисками щелкните правой клавишей мыши на разделе Windows, размер которого вы хотите увеличить и в меню выберите Расширить том. Откроется окно мастера расширения тома.
-
Следуйте инструкциям мастера. Если вы примете предложенные по умолчанию значения, том заполнит все доступное на жестком диске пространство.
Добавление нового раздела Windows
-
В окне управления дисками щелкните правой клавишей мыши на области
незанятогопростанства и выберитеСоздать простой том. Откроется окно мастера создания простых томов. -
Следуйте инструкциям мастера. Если вы примете предложенные по умолчанию значения, будет создан новый раздел, заполняющий все доступное на жестком диске пространство. Ему будет присвоена первая доступная буква диска и он будет отформатирован как NTFS.
-
-
Восстановите загрузчик Windows
-
Вставьте установочный диск Windows и перезагрузите компьютер. На экране должно появиться следующее сообщение:
Press any key to boot from CD or DVDPress any key while the message is still showing and the Windows installation software will load.
-
В окне Установить Windows выберите язык, время, формат денежной единицы и тип клавиатуры. Нажмите кнопку продолжения.
-
Выберите Восстановить компьютер.
-
Среда восстановления Windows покажет обнаруженные установки Windows. Выберите установку для восстановления и нажмите кнопку продолжения.
-
Чтобы открыть окно командной строки, выберите Командная строка.
-
Введите
bootrec /fixmbrи нажмите Enter. -
Дождитесь завершения команды, закройте окно и выберите Перезагрузить.
-
Компьютер загрузит операционную систему Windows.
-
- To safely remove Linux from a dual-boot setup using Windows 11 (or 10), you must first access WinRE to start the device in the UEFI firmware settings and change the boot manager from Linux to Windows.
- The next step is to boot into Windows, delete the partition containing the Linux installation, and either extend or create a new partition using the unallocated space.
- The third step is to delete the Linux boot manager from the Windows system partition and then remove the Linux Grub entry from the UEFI firmware.
If you have a dual-boot system using a Linux distribution (such as Ubuntu, Mint, or Fedora) and Windows 11 (or 10), but it’s now time to remove the Linux installation to revert to a single boot using only Windows, this is possible, but it’s not a straightforward process.
Setting up a dual-boot configuration with Linux and Windows isn’t complicated. You have to shrink the Windows partition or use a secondary drive to install Linux. However, if you no longer need the Linux installation, you have to complete several steps, including switching the bootloader in the UEFI firmware settings, deleting the partition with the Linux distro, relocating the unallocated space, modifying the Windows recovery partition to remove the Linux bootloader and changing the UEFI settings to remove the Linux bootloader entry.
In this guide, I’ll outline the steps to safely uninstall or remove the Linux installation from a dual-boot system alongside Windows 11 or 10.
Warning: It’s important to note that you will be modifying the system partitions, which can carry some risks if not corrected. Creating a full computer backup before proceeding in case you need to roll back is still recommended. Also, to avoid potential problems, it’s recommended to disable BitLocker before proceeding. You can turn encryption on again after reconfiguring the system.
To remove Linux from a dual-boot system to start with the Windows 11 (or 10) boot manager, use these steps:
-
Start the computer on Windows.
-
Open Settings.
-
Click on System.
-
Click the Recovery page.
-
Click the Restart now button from the “Advanced startup” section.

Quick note: On Windows 10, the option is available on Settings > Update & Security > Recovery.
-
Click the Restart button again.
-
Click on Troubleshoot.
-
Click on Advanced options.
-
Click the “UEFI Firmware Settings” option.

-
Click the Restart button.
-
Open the setup page.
Quick note: I’m using the UEFI (BIOS) available with VMware. Since most manufacturers build their firmware experience differently, you may have to check their documentation to find the boot order settings.
-
Open the “Configure boot options” page.

-
Click the “Change boot order” option.

-
Change the boot order to make the Windows Boot Manager the first option and Linux the second option.

-
Save the changes and exit to restart the computer on Windows 11 (or 10).
-
Open Start.
-
Search for Create and format hard disk partitions and select the top result to open the Disk Management tool.
-
Confirm the partition containing the Linux setup in dual-boot.
Quick tip: The best way to identify the correct partition is to remember the size you assigned to the volume. Also, it’ll probably be the one without a drive letter without a file system label or label from a Linux file system. However, don’t remove the “Healthy (EFI System)” or “Healthy (Recovery Partition)” since these are partitions in the Windows setup.
-
Right-click the partition and select the Delete Volume option.

-
Click the Yes button to confirm.
-
(Optional) Right-click the Unallocated space and choose the Extend Volume.
Quick tip: If the smaller recovery partition is on the way to the main “C” partition, you won’t be able to extend the partition. You will have to use third-party software, such as GParted, or you will have to create a secondary partition.
-
Click the Next button.
-
Confirm the volume information.
-
Click the Next button.
-
Click the Finish button.
-
Open Start.
-
Search for Command Prompt, right-click the top result, and choose the Run as administrator option.
-
Type the following command to launch the DiskPart tool and press Enter:
DiskPart
-
Type the following command to view the available drives and press Enter:
List Disk
-
Type the following command to select the primary drive and press Enter:
Select Disk 0
-
Type the following command to list the partitions and press Enter:
List Partition

-
Type the following command to select the “System” partition and press Enter:
Select Partition 1
In the command, change “1” to the number corresponding to your “System” partition.
-
Type the following command to mount the storage with a drive letter and press Enter:
Assign Letter=E

Quick note: You can assign virtually any drive letter that hasn’t already been taken.
-
Type the following command to exit from DiskPart and press Enter:
Exit
-
Type the following command to enter the new system drive and press Enter:
E:
-
Type the following command to access the boot manager configuration and press Enter:
CD efi
-
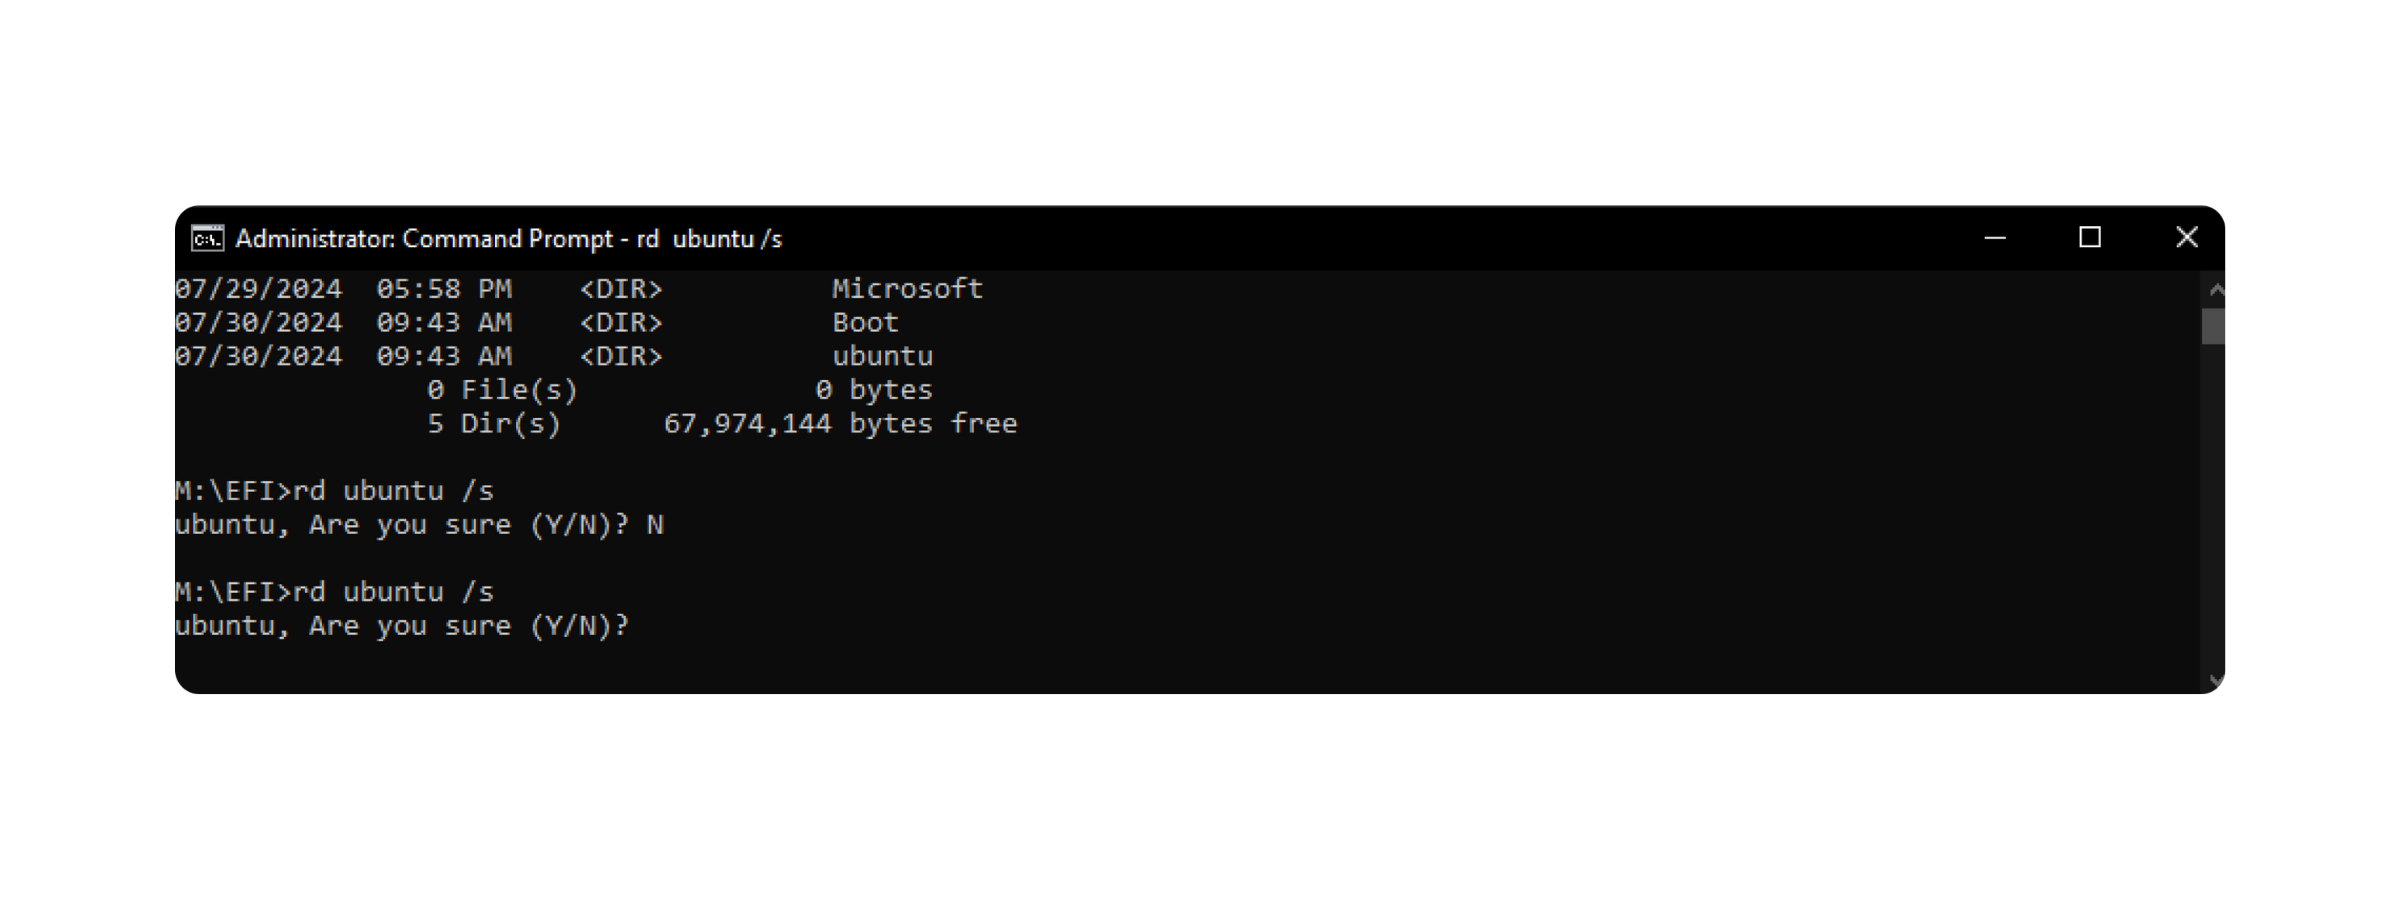
Type the following command to view the boot manager options, identify the Linux bootloader, and press Enter:
Dir
-
Type the following command to remove the Linux boot manager from your computer and press Enter:
RD ubuntu /s

In the command, change “ubuntu” to the name of the Linux bootloader installed on your computer.
-
Type the “Y” key and press Enter.
-
Type the following command to confirm the Linux bootloader has been deleted and press Enter:
Dir
-
Type the following command to launch the DiskPart tool and press Enter:
DiskPart
-
Type the following command to view the available volumes and press Enter:
List Volume
-
Type the following command to select the volume with the letter to delete and press Enter:
Select Volume 4
-
Type the following command to remove the drive letter and press Enter:
Remove Letter=E
-
Type the following command to exit from DiskPart and press Enter:
Exit
-
Open Settings.
-
Click on System.
-
Click the Recovery page.
-
Click the Restart now button from the “Advanced startup” section.
-
Click the Restart button again.
-
Click on Troubleshoot.
-
Click on Advanced options.
-
Click the “UEFI Firmware Settings” option.
-
Click the Restart button.
-
Open the setup page.
-
Open the “Configure boot options” page.
-
Click the “Delete boot option” setting.

-
Choose the Linux Grub entry to remove from the UEFI (in my case, Ubuntu).

-
Save the changes to the delete entry and exit to restart the computer on Windows 11 (or 10).


Once you complete the steps, you will have successfully removed Linux from the dual-boot setup, and now, Windows should start correctly in a single-boot setup.
You may also use the bcdedit with the “enum” option to delete the Linux bootloader from the dual-boot setup, but while creating this guide, the Ubuntu entry did not show up in the list of bootloaders. As a result, I opted to mount the recovery drive and delete the entry manually.
Although it’s possible to revert to a single boot system, ideally, you want to restore the previous configuration from a backup or perform a clean install of Windows 11 to ensure the stability and reliability of the system.
If you have any questions or problems uninstalling Linux from your dual-boot setup, leave me a comment below.
Download Windows Speedup Tool to fix errors and make PC run faster
You may have installed Ubuntu or any other Linux distro on your PC alongside Windows 11/10. But maybe now if you don’t want to use Linux anymore. In this case, you will end up having a Linux partition on your hard drive that is taking up some disk space. In this post, we will show you how to safely uninstall Linux in Windows dual boot without losing data or applications.
If you installed Ubuntu or a similar Linux distribution like Linux Mint with Wubi, you can easily uninstall the distro via the Programs and Features applet in Windows 10. Find Ubuntu in the list of installed programs, then uninstall it like any other program. The uninstaller automatically removes your computer’s Ubuntu files and boot loader entry.
On the other hand, if you installed Linux to its own partition in a dual-boot configuration, uninstalling it requires removing the Linux partitions from your computer and then expanding your Windows partitions to use the now-free hard disk space.
This procedure is divided into two parts: the first is to remove the Linux operating system, and the second is to repair the Master Boot Record, as just deleting the Linux partition will result in a Grub rescue error.
Before you begin, you can back up your files and make sure you have a Windows installation media handy. If you don’t have one readily available, you can create it on a Windows computer or on a Linux or Mac computer.
1] Delete Linux partition from Windows

To delete the Linux partition from Windows 11/10, do the following:
- Log into Windows.
Alternatively, you can run the command below in an elevated CMD prompt to set the correct EFI executable as the default boot entry:
bcdedit /set “{bootmgr}” path \efi\microsoft\boot\bootmgfw.efi
To see if the above command worked, reboot your computer. If successful, it should boot directly to Windows.
- At the desktop, press Windows key + R to invoke the Run dialog.
- In the Run dialog box, type
diskmgmt.msc, hit Enter to open the Disk Management tool.
Linux partitions are differentiated from Windows because they don’t have a drive number and file system. While, Windows partitions can be identified by the drive label such as C, D, and E. They are also usually FAT or NTFS files.
- To delete the Linux partitions, right-click on each one and choose Delete Volume.
- A warning will pop-up letting you know that you are trying to delete a partition that Windows didn’t create. Then, you will be asked if you want to delete it.
- Select Yes.
- Repeat the process to delete other Linux partitions.
Deleting the partitions will free up space on your drive. Now, you’ll need to extend your Windows partition to occupy the free space.
After the process is complete, you will see only one volume meaning you have claimed all your disk space back to Windows.
You can now proceed with the next step.
2] Repair the Master Boot Record (MBR)
Linux has now been removed from your computer, but its boot loader persists. We’ll need to use a Windows installation media to repair and rebuild MBR so as to overwrite the Linux boot loader with the Windows boot loader.
Note: If the bootrec.exe /fixmbr command didn’t work, you can try Automatic Repair from the Advanced troubleshooting options.
Once done, you can now restart your computer. It will boot from its hard drive, starting Windows normally. All traces of Linux should now be erased – but, if when you boot the computer and you’re presented with the dual-boot menu, listing the Linux distro you’ve just removed along with the Windows OS, you can remove the dual-boot menu, so that the PC boots directly into Windows when you restart your computer, by following these steps:
- Press Windows key + R to invoke the Run dialog.
- In the Run dialog box, type
msconfigand hit Enter. - Go to Boot tab.
- Select the Windows 10 entry.
- Click Set as Default button.
- You can delete the Linux entry by selecting it and then clicking the Delete button.
- Click Apply.
- Click OK.
- Restart your computer.
That’s it!
Read: Install Linux over or alongside Windows using Tunic software.
Obinna has completed B.Tech in Information & Communication Technology. He has worked as a System Support Engineer, primarily on User Endpoint Administration, as well as a Technical Analyst, primarily on Server/System Administration. He also has experience as a Network and Communications Officer. He has been a Windows Insider MVP (2020) and currently owns and runs a Computer Clinic.
The steps for uninstalling Linux Mint from a Windows dual boot setup are the same for any other Linux distro, be it Ubuntu, Debian, Fedora, Arch, etc.
1. Boot into Windows.
2. Open Disk Management:
- Press
Windows + Xto open the Power User Menu. - Click on Disk Management.
3. Identify the Linux partition:
- Look for a partition that is formatted with
Healthy (Primary Partition)because it is not showing asext4(Linux filesystem).
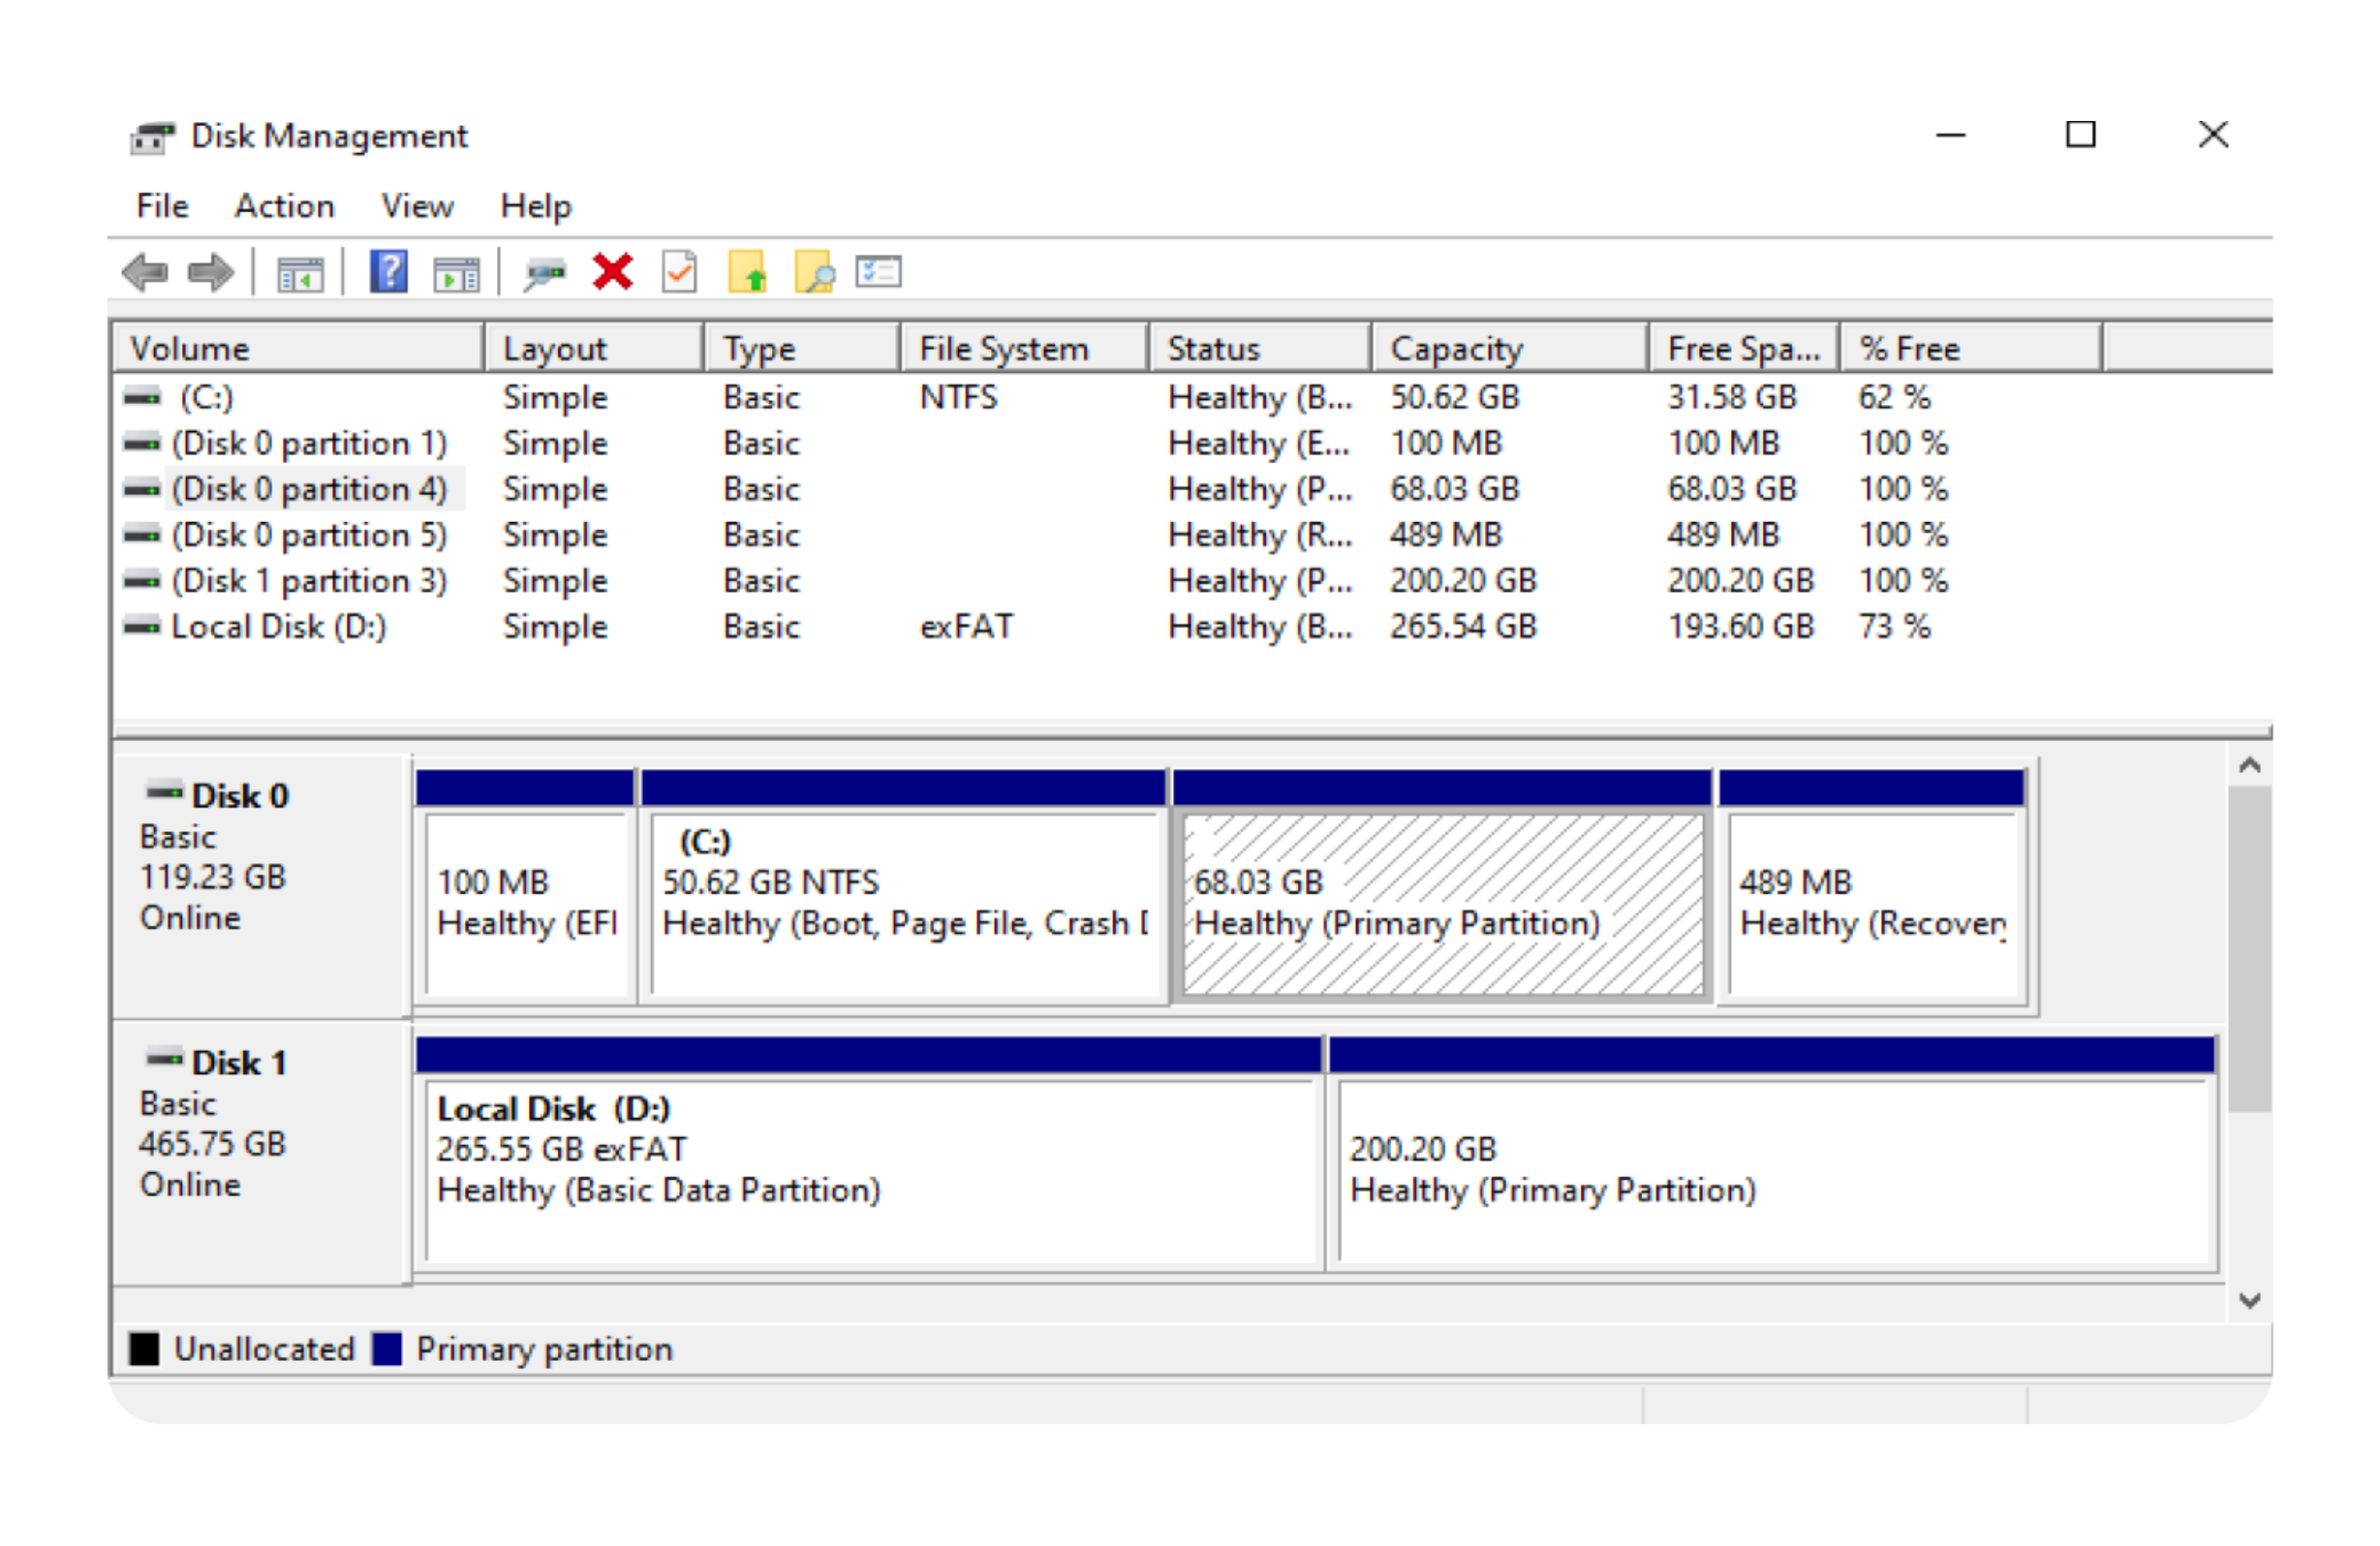
4. Delete the Linux partition:
- Right-click on the Linux partition and select Delete Volume.
5. Remove the Linux boot entry:
- Open Command Prompt as Administrator.
- Run the following command to show the boot configuration details:
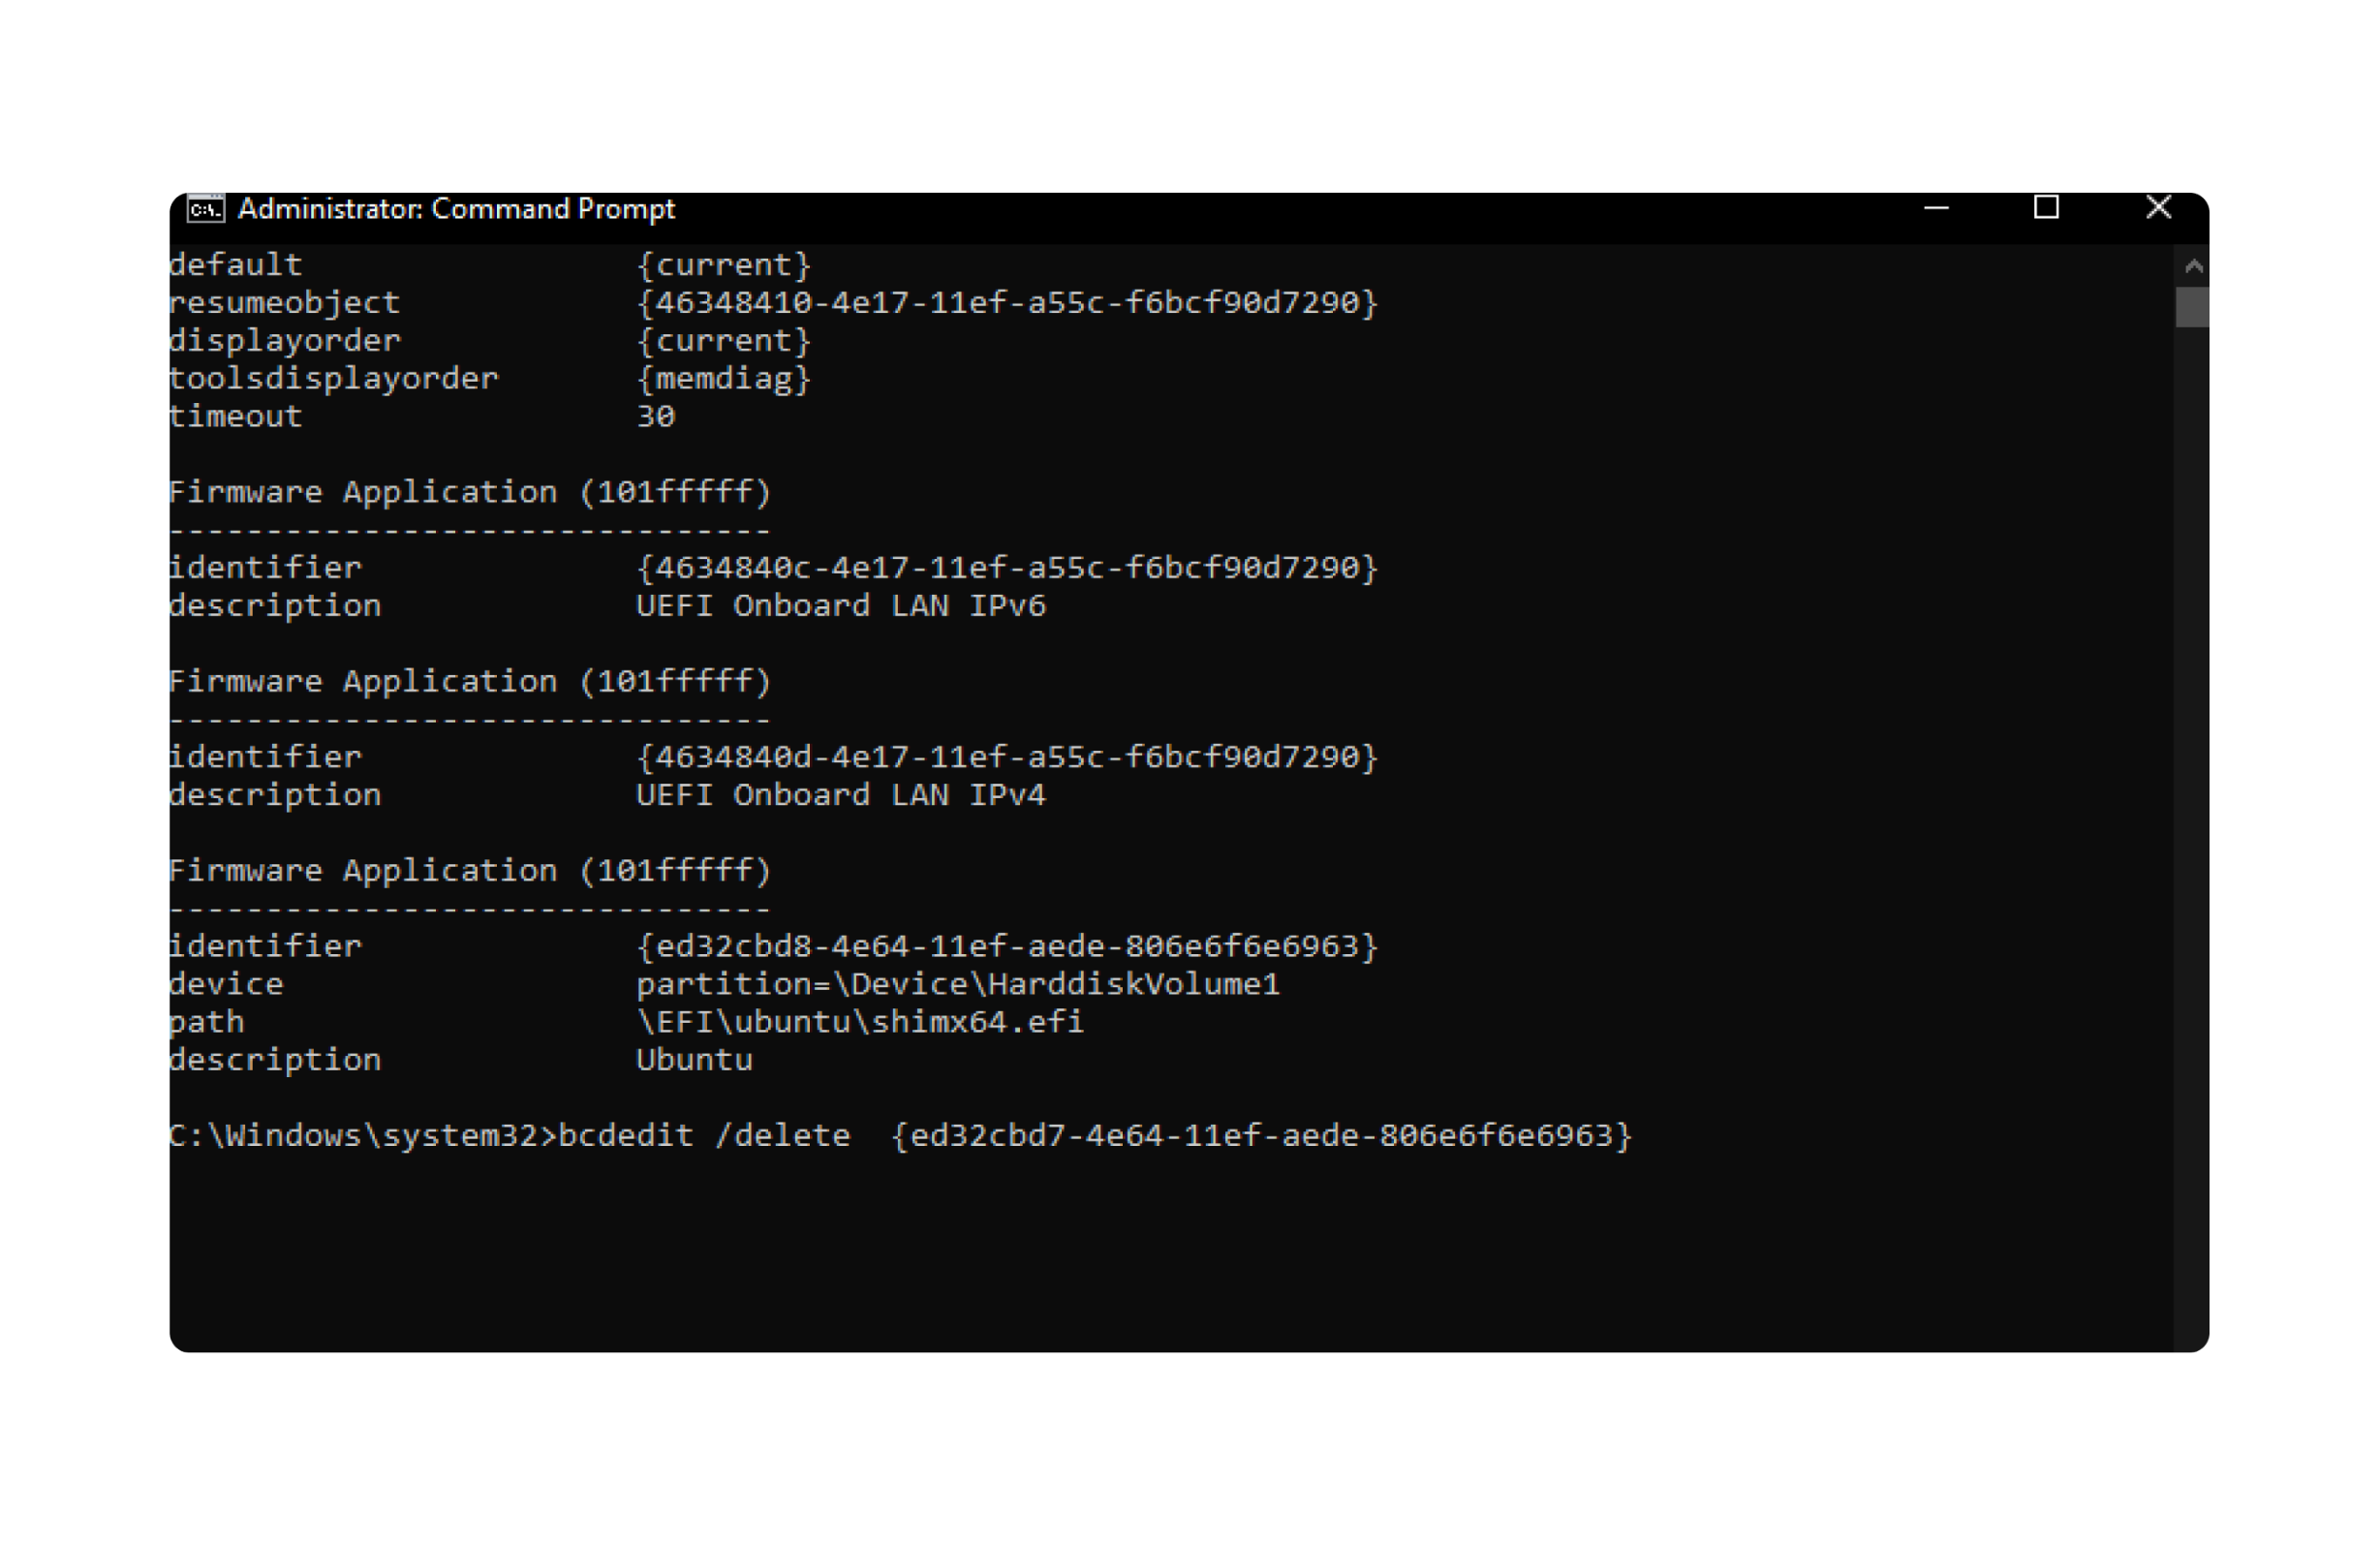
- Identify the Linux boot entry using its identifier.
- Delete the Linux boot entry by running:
bcdedit /delete {identifier}
6. Open Diskpart:
- Run the following command to open Diskpart:
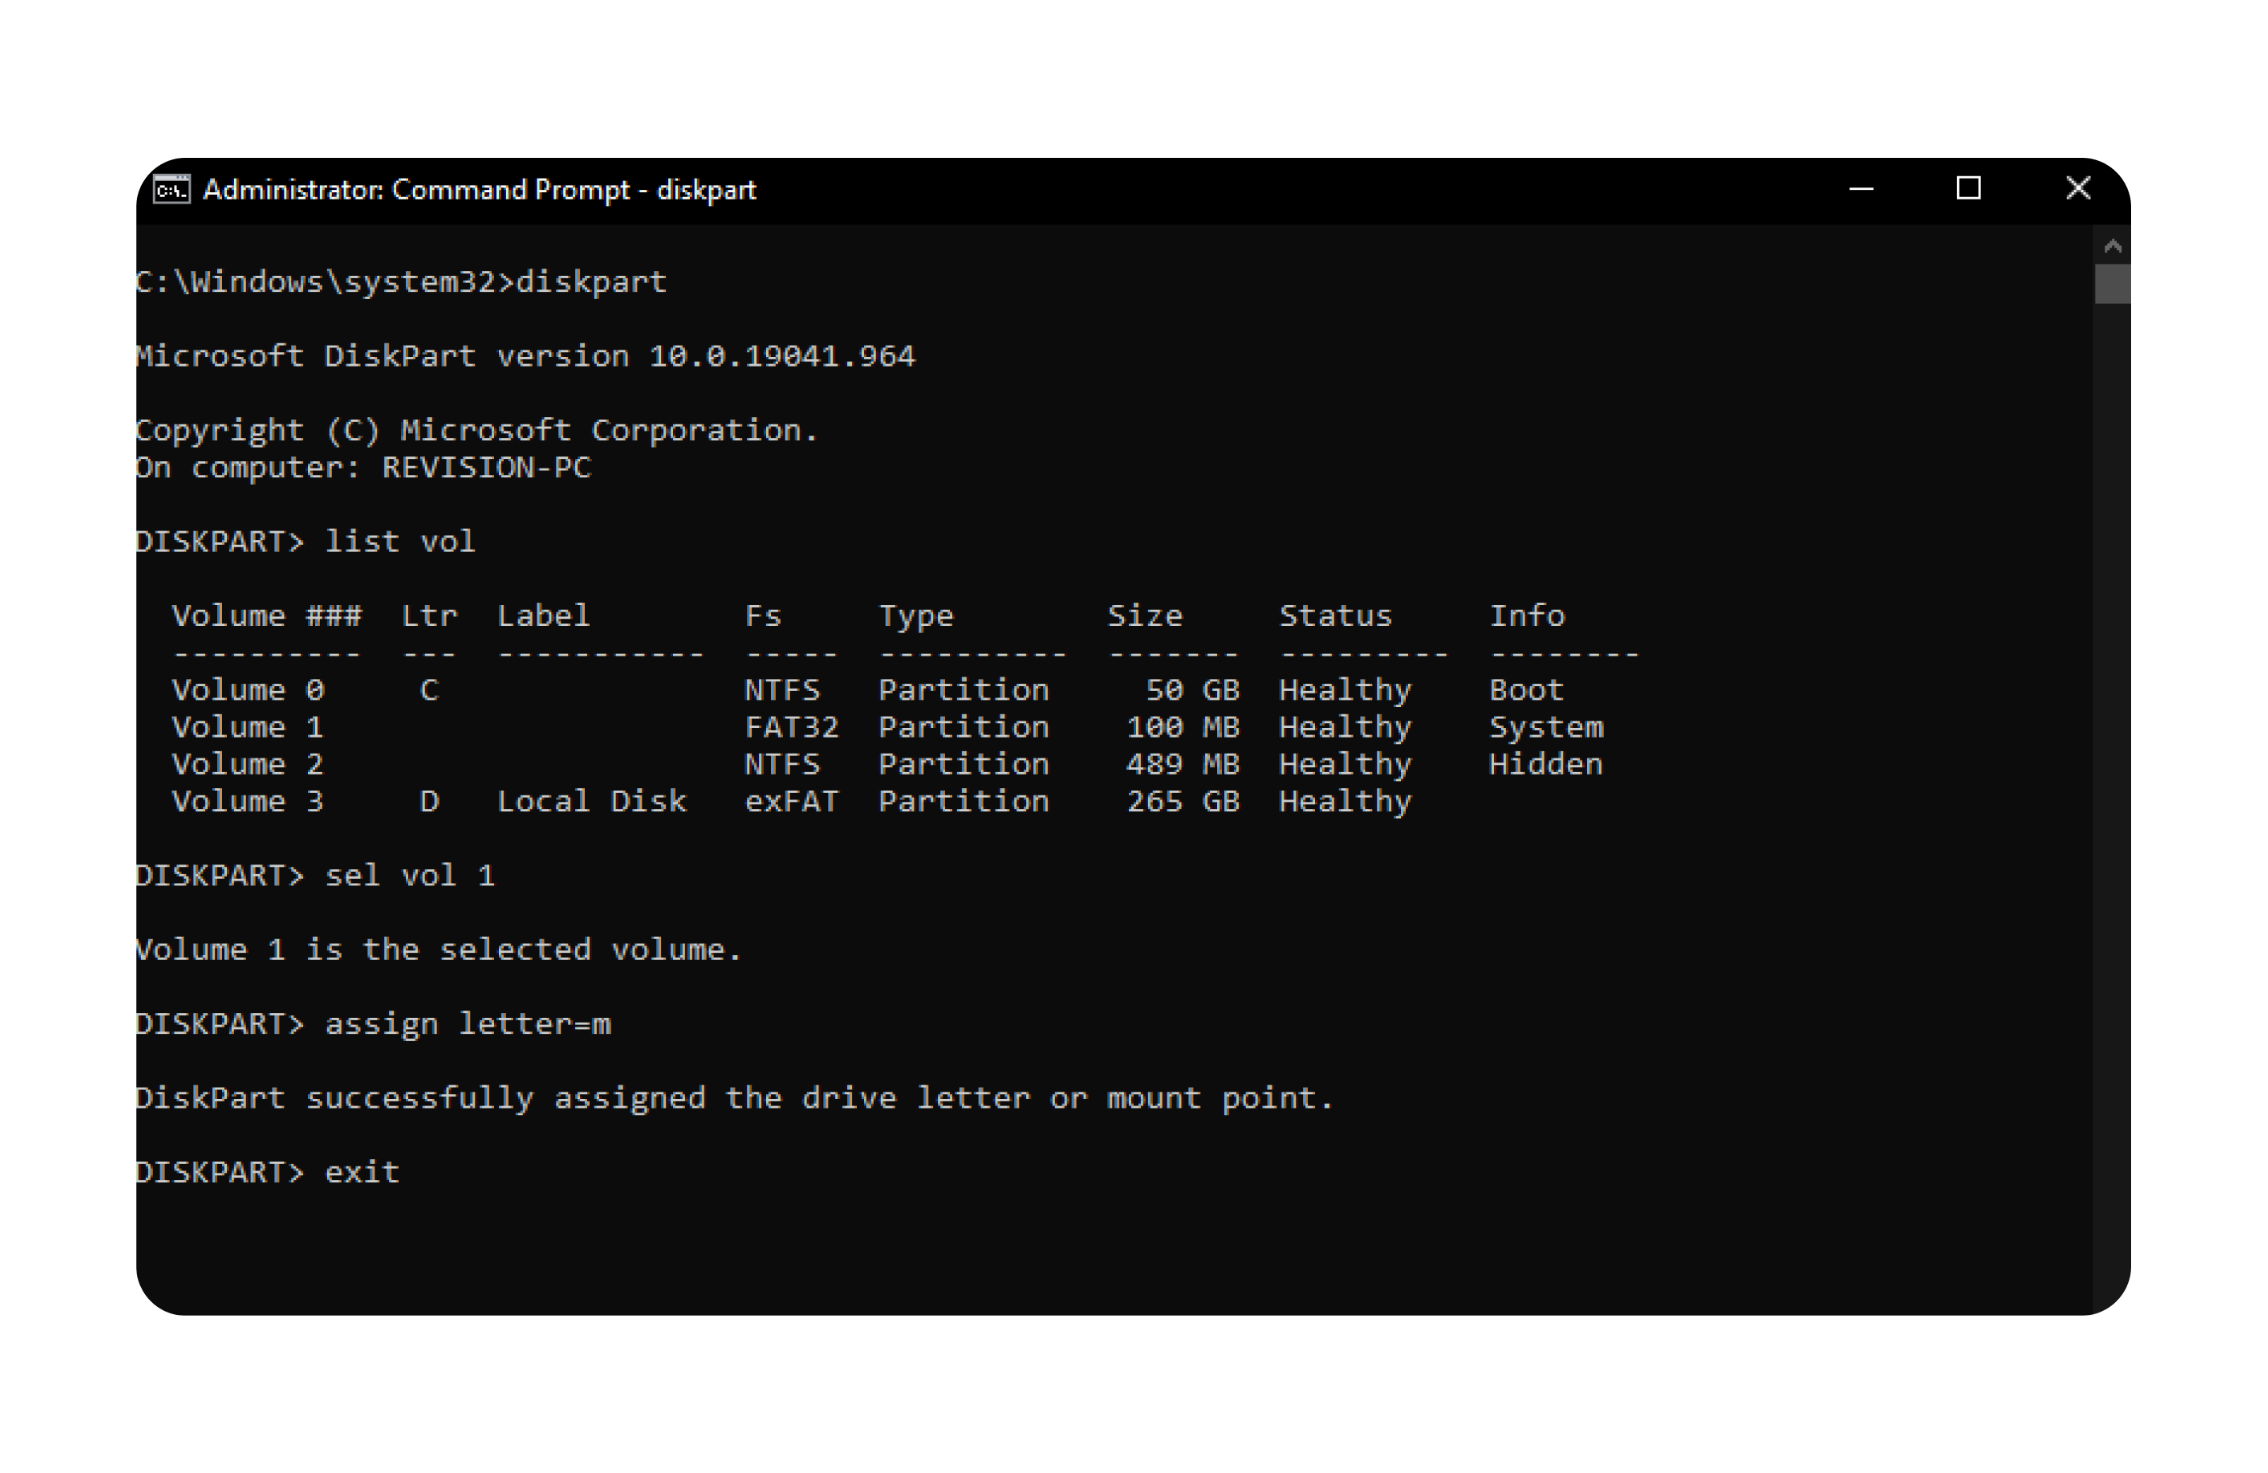
-
Select the volume formatted in FAT32 with the info
system. In my system, it isVolume 1. Replace1with your volume number: -
Assign a drive letter (e.g.,
M) to the selected volume: -
Exit Diskpart:
7. Navigate to the assigned volume:
- Run the following commands to navigate EFI folder:
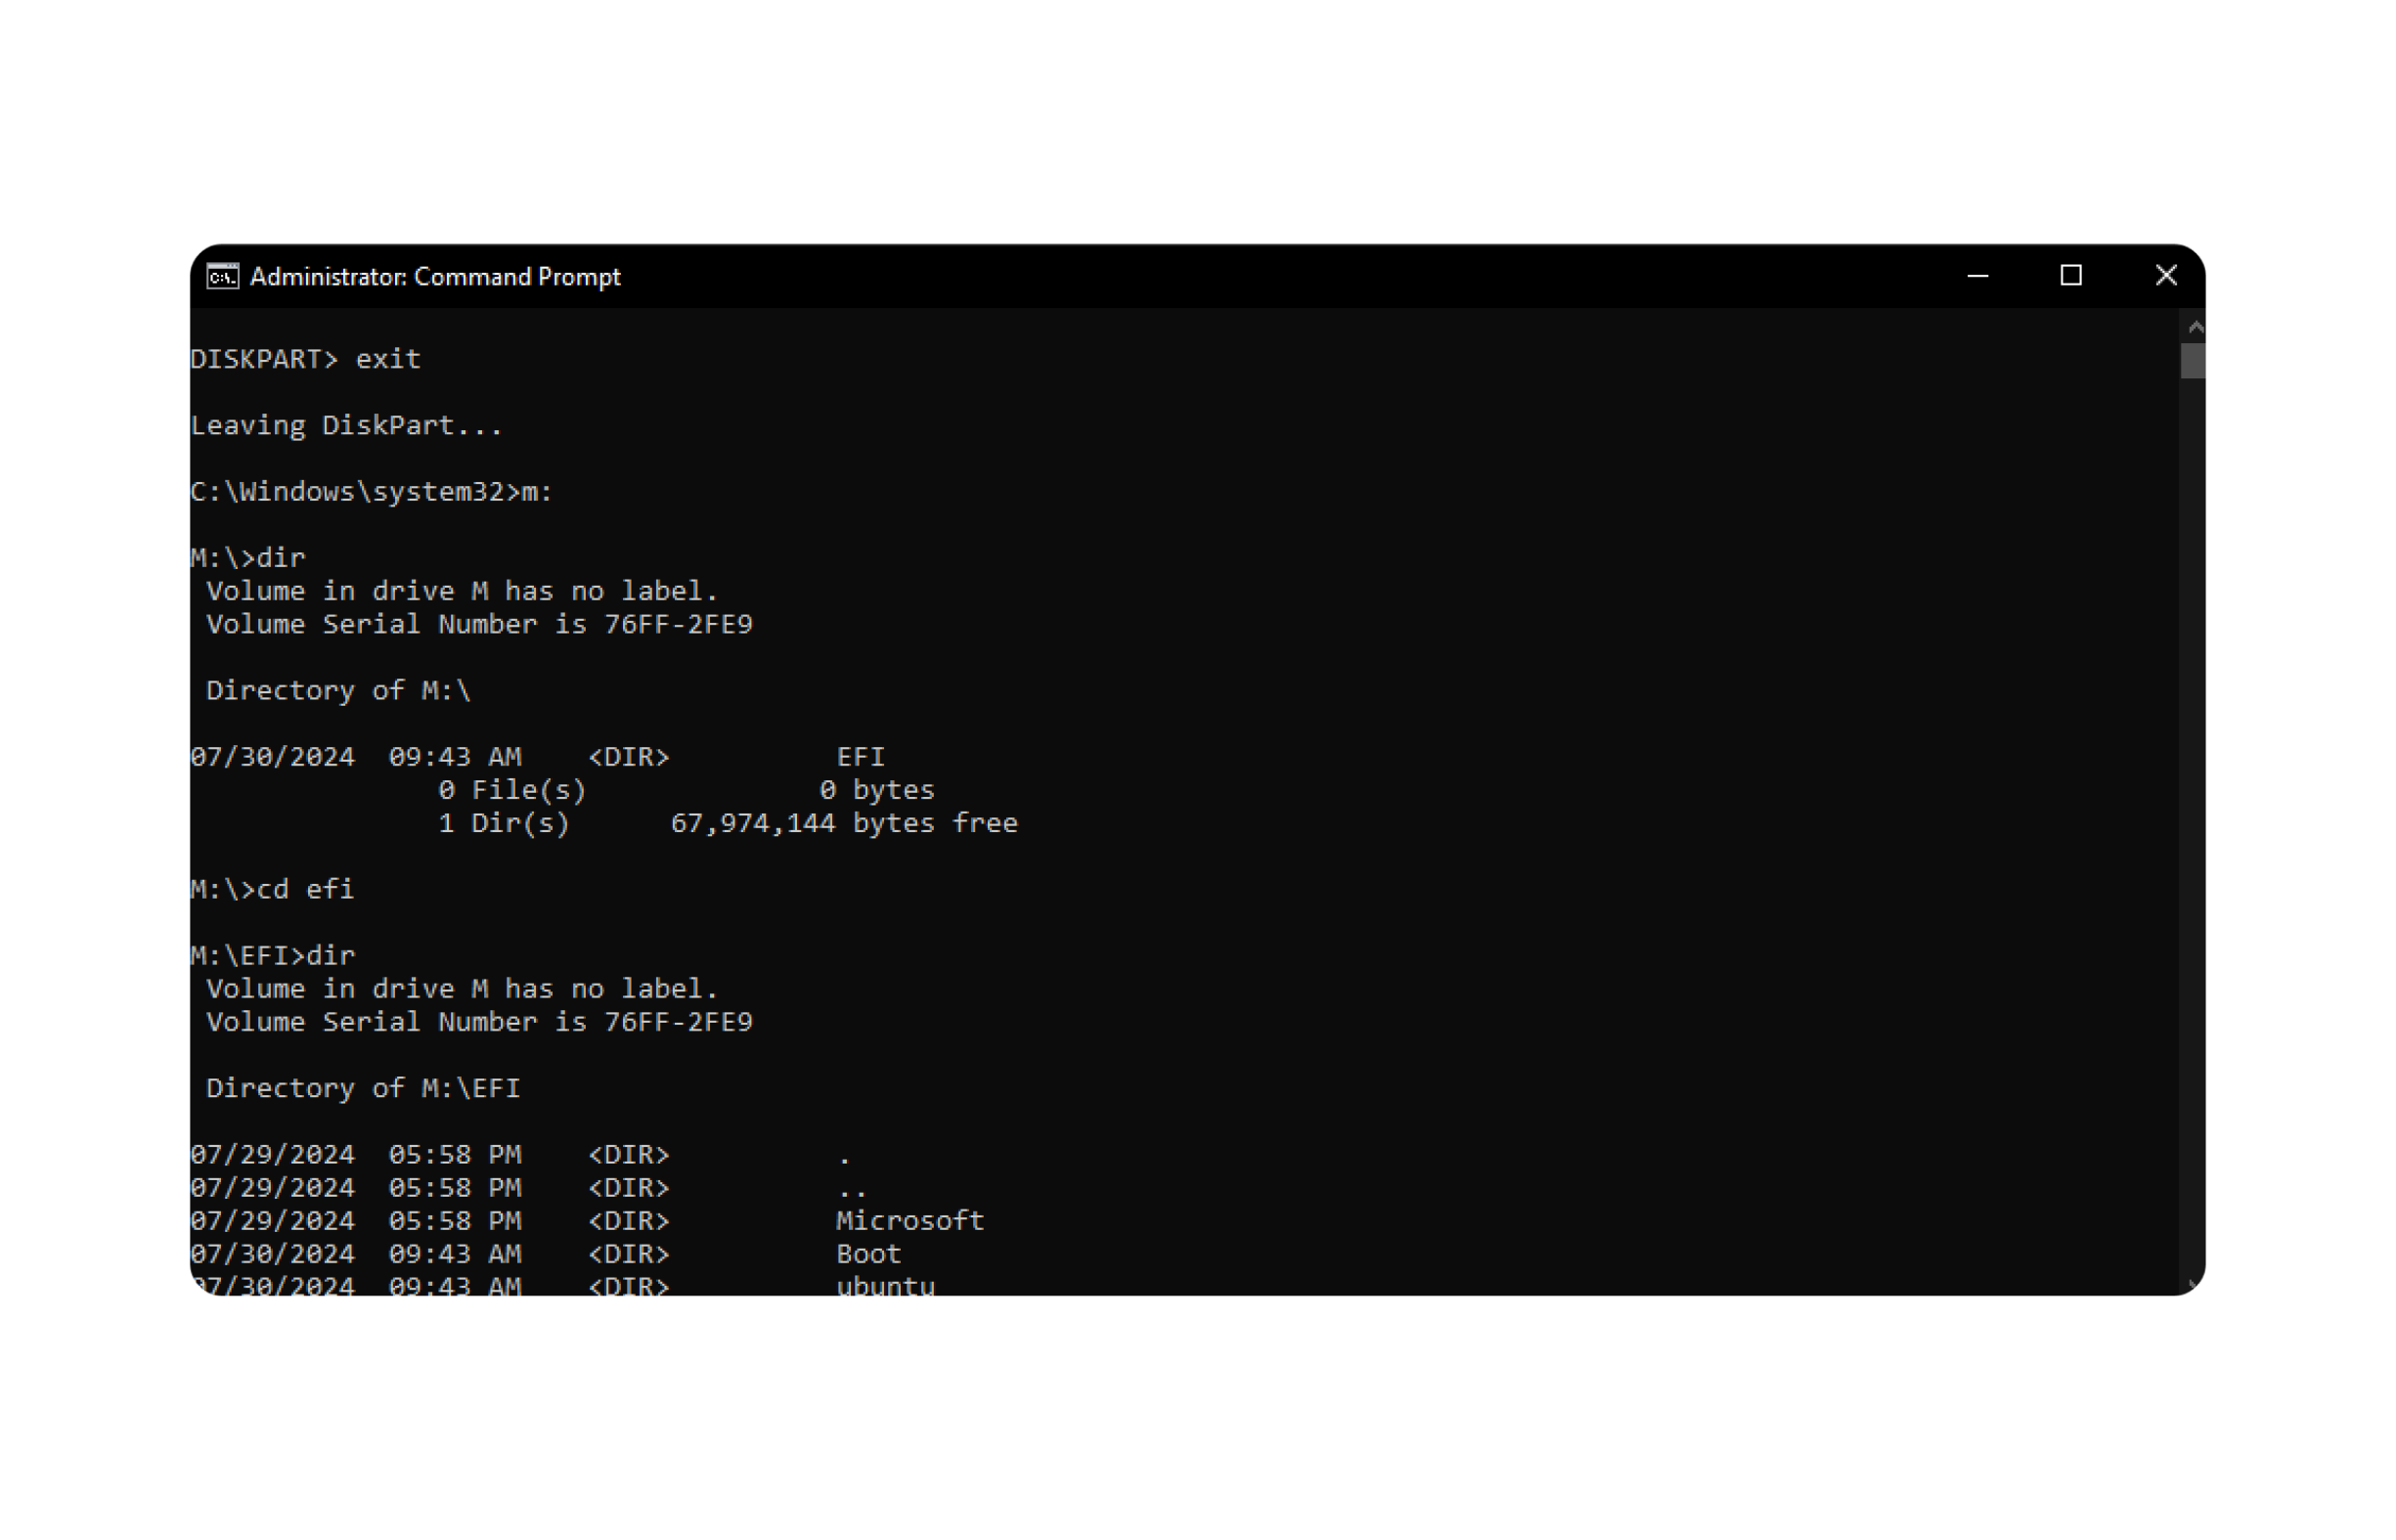
8. Delete the Ubuntu Folder:
rd ubuntu /s
ubuntu, Are you sure (Y/N)? Y
Reboot your system and enjoy Windows or try another Linux distro.