
Brief overview of Remove-Item cmdlet
Managing files and directories is a common task in computing, especially in the Windows PowerShell environment. The Remove-Item in PowerShell is a key cmdlet for deleting files and directories, as well as other types of items in PowerShell. Remove-Item can be used for local file systems as well as other PowerShell providers like the Registry, Certificate Store, and Environment variables. Remove-Item can also accept input from other cmdlets through the pipeline, enabling more dynamic operations and automation of file management tasks. It is important to note that by default, items deleted with Remove-Item are permanently removed from the system and not sent to the Recycle Bin. It is important to be certain about actions when using this cmdlet.
Importance and common use cases
The Remove-Item cmdlet in PowerShell is important for keeping systems organized and ensuring they run smoothly. It is crucial for effective file and directory management, allowing users to clean up unnecessary files and free up disk space. In scripting and automation, it helps streamline workflows by enabling the removal of outdated or temporary files without manual intervention. The PowerShell Remove-Item cmdlet is useful for regular maintenance tasks, such as cleaning up log files or temporary folders that accumulate over time.
Common Use Cases
Below are some common use cases for using the Remove-Item command:
- Deleting Temporary Files: Regularly removing temporary files to maintain system performance.
- Cleaning Up Old Backups: Automatically deleting old backup files to save space.
- Batch Deletion: Removing multiple files with a specific extension.
- Removing Empty Directories: Cleaning up empty folders in a directory structure.
- Registry Key Cleanup: Deleting specific registry keys that are no longer needed.
- Deployment Scripts: In deployment scripts, removing old versions of applications before installing new ones.
Supported providers and item types
The Remove-Item PowerShell command supports variety of providers and item types. Primarily, it is used within file systems to delete files and folders, but its functionality extends beyond just the file system. It can also delete registry keys and entries. This is useful for cleaning up or modifying system configurations. Though less commonly used for this purpose, Remove-Item can work with other PowerShell providers, allowing for the deletion of items such as variables and aliases.
Basic Syntax
The basic syntax for Remove-Item is as follows.
Remove-Item [-Path] <string[]> [-Force] [-Recurse] [-LiteralPath <string[]>] [-Confirm] [-WhatIf] [-ErrorAction <ActionPreference>] [-WarningAction <ActionPreference>] [-InformationAction <ActionPreference>] [-InformationVariable <string>] [<CommonParameters>]
Below is an example of cmdlet with common parameters.
Remove-Item -Path C:\Backups\Design.txt -Force -Recurse -WhatIf
Remove-Item cmdlet parameters
The following are the most common parameters used with Remove-Item cmdlet:
Parameters |
Explanation |
|---|---|
| -Path | Specifies the path to the items that you want to remove. This parameter accepts wildcard characters, allowing for pattern matching. The path element can mean either absolute or relative. |
| -LiteralPath | Similar to -Path, but treats the path exactly as specified, without interpreting wildcards. |
| -Force | This is a remove item cmdlet that is used to force a command to remove items that cannot otherwise be deleted. For example, this can include hidden or read-only files or items with child items that are not empty. Use this parameter with caution, as it can result in data loss. |
| -Include | Specifies only the items that match the specified pattern or type of item to be removed. This works in conjunction with the -Path parameter to filter out items within the path. |
| -Exclude | Specifies items that should not be removed. This is used to exclude certain items from the operation based on the pattern provided. |
| -Recurse | If the item being removed is a directory, this parameter will ensure that all its child items are also removed. Without this parameter, the command will not delete directories that are not empty. |
| -WhatIf | This is a safety parameter that shows what would happen if the cmdlet ran, without performing the deletion. It is useful for verifying what will be deleted before committing to the action. |
| -Confirm | Prompts you for confirmation before executing the cmdlet. This can be a useful safety check to prevent accidental deletion of important items. |
| -Credential | Allows you to specify a user account with permission to perform the deletion, if necessary. |
| -Stream | This parameter is used to delete alternate data streams (ADS) from files and folders. |
How to find and copy full paths using File Explorer
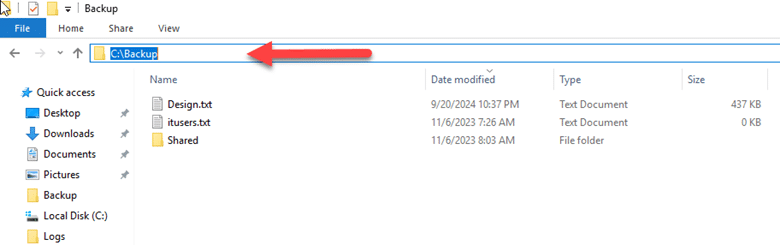
You can find full paths of files and folders using File Explorer in Windows. It can be useful when you need to reference files and folders in applications, scripts, or in PowerShell cmdlets. Follow the steps below to find the path of files and folders.
- Open File Explorer, navigate to the folder containing the file or folder for which you want the full path.
- Once you are in the desired folder, click on the address bar at the top of File Explorer. This will highlight the full path.
- Right-click the highlighted path and select “Copy” from the context menu to copy the full path to your clipboard.
- If you need the full path of a specific file, type the file name with extension at the end of the path in the address bar to complete it e.g., “C:\Backup\Design.txt”.
Delete basic files and folders via Remove-Item cmdlet
How to delete a single file
To delete a single file using PowerShell by Remove-Item, follow the below steps.
- Open PowerShell,
- Type the “Remove-Item” cmdlet followed by the “-Path” parameter and the full path of the file you want to delete.
The basic cmdlet will be as follows.
Remove-Item -Path "C:\Backup\Report.txt"
How to delete a specific folder
To delete a specific folder, follow the cmdlet below.
To delete a folder named “OldProjects” located in “C:\Backups, the command would be.
Remove-Item -Path "C:\Backups\OldProjects"
Delete multiple files and folders
How to delete a folder and all its contents
To delete a folder and all its contents, you will need to use the “-Recurse” parameter to ensure that the folder, along with all its files and subfolders, is deleted. Without this parameter, cmdlet will not delete the folder if it contains files or other folders. You can use the below example cmdlet.
Remove-Item -Path "C:\Backups\OldDocuments" -Recurse
How to delete multiple files in a directory
If you want to delete all files of a specific type within a directory, you can use a wildcard (*) with the file extension. For example, to delete all “.txt” files in a specific folder, you can use below cmdlet.
Remove-Item -Path "C:\Backups\OldDocuments\*.txt"
How to delete files of multiple types
To delete files of different types within a directory, you can execute multiple “Remove-Item” commands or use PowerShell’s ability to accept an array of strings for the “-Path” parameter. However, combining multiple wildcard patterns directly in one command is not supported in the “-Path” parameter. You can handle this by using “Get-ChildItem” with piping it to Remove-Item. For example, to delete “.txt” and “.log” files in a directory, use the below example cmdlet.
Get-ChildItem -Path "C:\Backups\OldDocuments\*.*" -Include *.txt, *.log | Remove-Item
How to delete specific multiple files
To delete multiple specific files, you can list multiple paths separated by commas using the delete file PowerShell command.
Remove-Item -Path "C:\Backups\OldDocuments\Design.txt", "C:\Backups\OldBackups\Backup_20_09_2024.bak"
How to use wildcards to delete multiple files
To use wildcards for deleting multiple files you can use the asterisk (*) symbol in your command. The asterisk serves as a wildcard character that can represent any number of characters in a file name, allowing you to target multiple files at once based on naming patterns. Below is an example.
You can delete files using PowerShell that start with a certain name or contain a specific pattern. For example, to delete files that start with “Report” regardless of their file extension.
Remove-Item -Path "C:\Backups\OldDocuments\Report*"
Include specific file types and exclude others
The -Include and -Exclude parameters can be very useful when using the Remove-Item cmdlet in PowerShell to filter the files and folders you want to delete.
-Include Parameter
This parameter allows you to specify patterns for items to include in the operation. It is used together with the -Path parameter.
To delete all .txt files in a folder while excluding all other files, use below cmdlet.
Remove-Item -Path "C:\Backup\*" -Include "*.txt"
-Exclude Parameter
This parameter allows you to specify patterns for items to exclude from the operation.
To delete all files in a folder but exclude .txt files, use the below cmdlet.
Remove-Item -Path "C:\Backup\*" -Exclude "*.txt"Delete read-only and hidden files via Remote-Item
To delete read-only and hidden files, you will need to use -Force parameter, which allows cmdlet to override restrictions that would normally prevent an item from being deleted, such as read-only or hidden attributes. You can use the below example cmdlet.
How to delete a single file
To delete a single file, use the following syntax for Remove-item cmdlet
Remove-Item -Path "C:\Backups\Design.txt" -Force
How to delete multiple read-only or hidden files in a directory using wildcard
Use the following syntax to delete multiple read-only or hidden files:
Remove-Item -Path "C:\Backups\*.txt" -Force
You can also use Get-ChildItem cmdlet to first get all read-only files and hidden files in a specific directory, and then use Remove-Item with -Force parameter to delete them. Below are some examples.
How to delete all read only files
Use the following syntax to delete all read only files.
Get-ChildItem -Path "C:\Backups" -File -Attributes ReadOnly | Remove-Item -Force
How to delete all hidden files in a directory
Use the following syntax to delete all hidden files:
Get-ChildItem -Path "C:\Backups" -File -Attributes Hidden | Remove-Item -Force
How to delete both read-only and hidden files
Get-ChildItem -Path "C:\Backups" -File -Attributes ReadOnly,Hidden | Remove-Item -Force
Using -Recurse to delete files and subfolders
To delete files and subfolders within a specified directory, you can use the -Recurse parameter. This parameter removes the item and all its children recursively. It’s particularly useful when you want to clear a directory and of all its contents, including all nested files and subdirectories. Below are some examples.
Delete All Files and Subfolders in a Directory
Remove-Item -Path "C:\Backups\*" -Recurse
If some of the items are read-only or hidden, you can add the -Force parameter.
Remove-Item -Path "C:\Backups\*" -Recurse -Force
Delete files with special characters
Deleting files with special characters in their names can sometimes be tricky, as special characters might be interpreted differently by PowerShell or require special handling. Below are some examples.
Quoting the path
If the filename contains spaces or special characters such as (&, $, #, (), []), enclose the path in single quotes. This is the simplest way to ensure that PowerShell treats the entire string as the path. Using single quotes will ensure that PowerShell doesn’t expand the $ as a variable.
Remove-Item -Path 'C:\Backups\$Design(1).txt'Wildcards for Matching Special Characters
If you are having trouble specifying a file directly, or if it has a complex name with many special characters, you can use wildcard (*) to match the file without typing out the full name. For example, if you have a file name as “@#Name(1).txt”, your cmdlet will be as below.
Remove-Item -Path "C:\Backups\*Name*.txt"
Remove alternate data streams
Alternate data streams (ADS) allow files to contain more than one stream of data. This feature is specific to NTFS file systems and can be used to store additional information in a file without affecting its primary content, which could be misused for hiding malicious data. To remove an alternate data stream from a file, you need to specify the path to the file, including the stream name. The syntax for specifying an alternate data stream is “filename:streamname”.
How to Identify Alternate Data Streams
You need to identify what alternate data streams are attached to a file. You can use the below cmdlet with the -Stream parameter for this purpose.
Get-Item -Path "C:\Backups\Design.txt" -Stream *How to Remove an Alternate Data Stream
Once you know the name of the stream you want to remove, you can use “Remove-Item” to delete it. Suppose the file “Design.txt” has an alternate data stream named “hiddenstream”, and you want to remove it. You can use the below cmdlet including the -Stream parameter, which will only delete the stream without deleting the file.
<Remove-Item -Path “C:\Backups\Design.txt" -Stream hiddenstream
Delete files based on specific conditions
Deleting files based on specific conditions can help you manage and automate the cleanup of directories. Conditions can be based on a variety of file attributes, such as creation date, modification date, size, name pattern, etc. Below are some example cmdlets.
How to delete files older than a specific date
To delete files older than a specific date, you can use the “Get-ChildItem” cmdlet to list all the files in the target directory, filter them with “Where-Object” based on their last write time, and then use “Remove-Item” to delete those files.
$DateLimit = (Get-Date).AddDays(-30)
Get-ChildItem -Path "C:\Backups\" -File | Where-Object { $_.LastWriteTime -lt $DateLimit } | Remove-Item
This command will permanently delete files. It is a good practice to first run the command without “| Remove-Item” to see which files would be deleted.
Get-ChildItem -Path "C:\Backups\" -File | Where-Object { $_.LastWriteTime -lt $DateLimit }
How to delete files larger than a specific size
To delete files larger than a specific size, you can leverage the Get-ChildItem cmdlet, filter the results with the “Where-Object” cmdlet based on their size, and then delete them using Remove-Item.
$SizeLimit = 5MB
Get-ChildItem -Path "C:\Backups\" -File -Recurse | Where-Object { $_.Length -gt $SizeLimit } | Remove-Item
It is a good practice to first run the command without “| Remove-Item” to see which files would be deleted.
Get-ChildItem -Path "C:\Backups\" -File -Recurse | Where-Object { $_.Length -gt $SizeLimit }
How to delete files based on attributes (read-only, hidden)
You can delete files based on their attributes, such as read-only or hidden, using the combination of Get-ChildItem, Where-Object for filtering files by their attributes, and then delete using Remove-Item. It is important to note that attempting to delete read-only files will result in an error unless you use the -Force parameter.
Get-ChildItem -Path "C:\Backups\" -File | Where-Object { $_.Attributes -match "ReadOnly" } | Remove-Item -Force
You can also filter the results directly by using -Attributes parameter in Get-ChildItem with value as read only.
Get-ChildItem -Path "C:\Backups\" -File -Attributes ReadOnly | Remove-Item -Force
Hidden files can be removed in a similar manner.
Get-ChildItem -Path "C:\Backups\" -File | Where-Object { $_.Attributes -match "Hidden" } | Remove-Item -Force
Alternatively, you can delete by specifying -Attributes parameter.
Get-ChildItem -Path "C:\Backups\" -File -Attributes Hidden | Remove-Item -ForceHow to delete all empty folders in a directory
Get-ChildItem cmdlet can be used to find the empty folders and then use the delete them using Remove-Item.
Get-ChildItem -Path "C:\Backups\" -Directory -Recurse | Where-Object { $_.GetFileSystemInfos().Count -eq 0 } | Remove-Item -Force
To see which empty folders would be deleted before actually removing them, replace Remove-Item -Force with Select-Object FullName.
Get-ChildItem -Path "C:\Backups\" -Directory -Recurse | Where-Object { $_.GetFileSystemInfos().Count -eq 0 } | Select-Object FullName
Best Practices and Common Pitfalls
Remove-Item powershell cmdlet is a powerful way to delete files and directories, but like any powerful tool, it requires careful handling to avoid unintended consequences. Below are some best practices and common pitfalls when using the delete files item path.
Best Practices while using Remove-Item Cmdlet
- Before executing command that could potentially delete important files or directories, append the -WhatIf parameter. This will simulate the command without actually performing the deletion, showing you what would be affected.
- For an extra layer of protection, especially when running scripts or commands that delete items in bulk, use the -Confirm parameter. PowerShell will prompt you to confirm each deletion, preventing accidental loss of data.
- To avoid deleting the wrong files or directories, specify the full path to the item you are removing. This helps ensure that the command targets only the intended items.
- The -Recurse parameter is extremely useful for deleting directories and their contents, but it can also lead to data loss if not used carefully. Always review which items will be deleted, either by listing them first with Get-ChildItem or by using -WhatIf with your Remove-Item command.
- Use -ErrorAction to specify how PowerShell should handle errors encountered during deletion. In scripts, consider wrapping Remove-Item commands in try/catch blocks to manage exceptions more effectively.
- Before running a deletion command that affects a significant number of files or critical data, ensure that you have up-to-date backups.
- When writing scripts that include Remove-Item, document your code thoroughly. Explain why items are being deleted and any specific considerations you have put in place.
- Periodically review and audit scripts and commands that perform deletions to ensure they still meet current needs and adhere to best practices.
- When scripting bulk deletions, test in a non-production environment first to avoid accidental data loss.
Common Pitfalls
- While wildcards (*) allowing you to target multiple files or directories at once, they can also increase the risk of deleting unintended items. Use them carefully and always review which items will be affected.
- By default, Remove-Item will not delete read-only and hidden files unless you use the -Force parameter.
- Attempting to delete files or directories without sufficient permissions can result in errors. Running PowerShell as an administrator can resolve some of these issues.
- NTFS file systems support features like alternate data streams, which can be overlooked during deletion. Make sure that you include -Stream parameter where you suspect there could be alternate streams.
Using -WhatIf and -Confirm for safe deletion
When it comes to using Remove-Item in for deleting files or directories, -WhatIf and -Confirm parameters can significantly enhance the safety of your operations. These parameters can help prevent accidental deletions by providing a preview of the action or prompting for confirmation before proceeding.
-WhatIf
The -WhatIf parameter simulates the execution of the command without actually making any changes.
Remove-Item -Path "C:\Backups\Design.txt" -WhatIf

-Confirm
The -Confirm parameter prompts you to confirm each deletion before it happens.
Remove-Item -Path "C:\Backups\Design.txt" -Confirm

Handling common errors (Access Denied, File Not Found)
You might encounter common errors like “Access Denied” or “File Not Found”, when using Remove-Item cmdlet.
Access Denied Errors
This error occurs when you do not have the required permissions in PowerShell to delete a file or directory.
- The -Force parameter can sometimes overcome this error by allowing the deletion of read-only files, but it won’t override security permissions.
- If -Force doesn’t work, you may need to manually adjust the file or directory permissions. You can change permissions via the file or folder properties in Windows Explorer or using PowerShell cmdlets like “Set-Acl”.
- Running your PowerShell session with elevated permissions (as an administrator) can help bypass “Access Denied” errors for files that require higher privileges to delete.
File Not Found Errors
This error occurs if the path specified in Remove-Item does not exist.
- First, ensure the path you’re trying to delete actually exists. Typos or incorrect path specifications are common sources of this error.
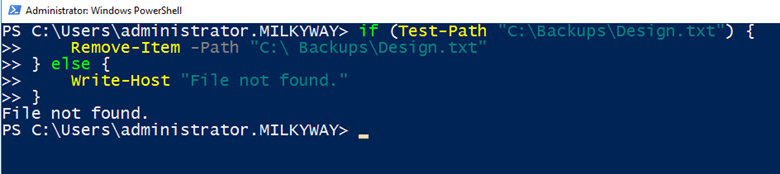
- Before attempting to delete, use “Test-Path” to check if the file or directory exists. This can prevent the error from occurring.
if (Test-Path "C:\Backups\Design.txt") {
    Remove-Item -Path "C:\ Backups\Design.txt"
} else {
    Write-Host "File not found."
}
- You can suppress the error message by using “-ErrorAction SilentlyContinue”, which is useful in scripts where a missing file isn’t considered a critical failure.
Remove-Item -Path "C:\ Backups\Design.txt" -ErrorAction SilentlyContinueReal-world scenarios
Cleaning Up Temporary Files
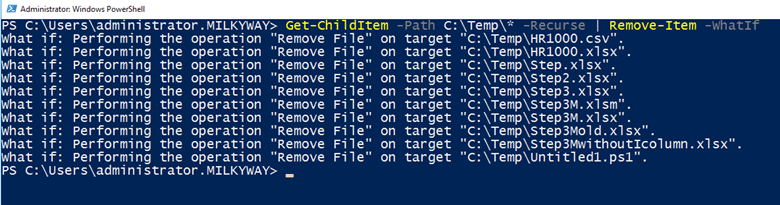
Use the below cmdlet to delete files in the “C:\Temp” directory.
Get-ChildItem -Path C:\Temp\* -Recurse | Remove-Item -WhatIfAs we have used the -WhatIf parameter, this cmdlet will show the output as below, remove the -WhatIf and run the cmdlet again to delete all files in temp directory.
Archiving and Deleting Old Logs
Move “.log” files from one location to another, that are older than 30 days, then delete logs older than 90 days from the archive.
$sourcePath = "C:\Backups"
$archivePath = "C:\ArchivedLogs"
Get-ChildItem -Path $sourcePath\*.log -Recurse | Where-Object { $_.LastWriteTime -lt (Get-Date).AddDays(-30) } | ForEach-Object {
Move-Item -Path $_.FullName -Destination $archivePath -WhatIf
}
Review the action with “-WhatIf”, then remove “-WhatIf” to proceed.
Above script will move all the files from “Backups” folder to “ArchivedLogs” which are older than 30 days, now you can delete old logs from Archive folder which are 90 days old, by running the below cmdlet.
Get-ChildItem -Path $archivePath\*.log -Recurse | Where-Object { $_.LastWriteTime -lt (Get-Date).AddDays(-90) } | Remove-Item -WhatIf
Confirm the targets, then execute without “-WhatIf”.
Conclusion
Remove-Item cmdlet is designed to delete one or more items, primarily files and directories. However, its functionality extends beyond just files and folders, including the deletion of registry keys and variables. One of the most critical aspects of Remove-Item is safety. Deleting files and directories can have irreversible consequences if not handled carefully. Remove-Item provides mechanisms to ensure that such operations are performed safely using -WhatIf and -Confirm parameters. Remove-Item can be incorporated into scripts for automating routine cleanup tasks or managing file systems more efficiently, it can be used to remove temporary files periodically or to clean up log files that are no longer needed. The ability to use wildcards and filters makes it especially useful in scenarios where you need to delete files or folders based on specific patterns or conditions.
FAQs on deleting files and folders via Remove-Item cmdlet
How to delete a folder without deleting its contents?
Deleting the folder will delete its content too. The only way is to first move the contents to another folder and then delete the folder you want.
How to delete files from the Recycle Bin using PowerShell?
To delete files from the Recycle Bin using PowerShell, you can use the Clear-RecycleBin cmdlet. This cmdlet empties the Recycle Bin for specified drives or for all drives. Below cmdlet empties the Recycle Bin for all drives without prompting for confirmation.
Clear-RecycleBin -Confirm:$false
How to handle deletion of files in use or locked by the system?
Handling the deletion of files that are in use or locked by the system can be challenging, as these files are typically protected from being modified or deleted while they are in use. If you know which application is using the file, you can close that application or the process using the Stop-Process cmdlet. If the file cannot be deleted immediately, you can create a scheduled task that runs a script to delete the file on the next system restart. As a last resort, you can always restart your computer. Most files that are locked will be released after a reboot, allowing you to delete them afterward.
Kevin Horvatin is a Lead Software Architect at Netwrix and responsible for Netwrix Privilege Secure. A software developer for over 20 years, he has worked with PowerShell and C# since they were introduced.
To delete a file in PowerShell, you can use the `Remove-Item` cmdlet followed by the file path.
Remove-Item 'C:\path\to\your\file.txt'
What is PowerShell?
PowerShell is a powerful scripting language and command-line shell developed by Microsoft, primarily designed for system administration and automation. It provides users with the ability to perform complex tasks in an efficient manner, leveraging cmdlets that streamline the management of systems, applications, and files.
Delete File PowerShell If Exist: A Simple Guide
Why Use PowerShell for File Management?
Using PowerShell for file management offers several advantages over traditional methods:
- Efficiency: PowerShell enables batch processing of files, allowing users to execute multiple commands at once, saving time and effort.
- Automation: Automate repetitive tasks with scripts, reducing the potential for human error and increasing productivity.
- Robustness: Provides advanced options for error handling, filtering, and recursive operations.
Open File in PowerShell: A Quick Guide to Mastery
Basic Deletion Command
Deleting a file in PowerShell is straightforward using the `Remove-Item` cmdlet. The basic syntax is as follows:
Remove-Item -Path "C:\example\file.txt"
This command specifies the location of the file you want to delete. It is crucial to ensure the path is correct to avoid accidental deletion of important files.
Confirming File Deletion
To add a layer of safety, you can use the `-Confirm` switch. This prompts you for confirmation before the file is deleted, helping prevent unintentional removal:
Remove-Item -Path "C:\example\file.txt" -Confirm
By doing so, you help mitigate the risk of deleting the wrong file.
Deleting Multiple Files
Using Wildcards
PowerShell supports the use of wildcards, making it easy to delete multiple files at once. For instance, to delete all text files in a directory, you can use:
Remove-Item -Path "C:\example\*.txt"
Here, the `*` wildcard matches any file with a `.txt` extension in the specified folder.
Specifying Multiple File Paths
You can also specify multiple files explicitly. This method is useful when you want to delete various individual files:
Remove-Item -Path "C:\example\file1.txt", "C:\example\file2.txt"
This command ensures that only the specified files are removed.
Clear File PowerShell: A Simple Guide to Start Fresh
Advanced File Deletion Techniques
Deleting Files Recursively
For bulk deletion within a folder, the `-Recurse` switch comes in handy. It allows you to delete all files and subfolders within a specified path:
Remove-Item -Path "C:\example\*" -Recurse
Be cautious when using this command, as it removes everything in the directory without further prompts.
Deleting Read-Only Files
Some files may be set to read-only, which requires additional handling. Using the `-Force` switch forces the deletion of read-only files without additional warning:
Remove-Item -Path "C:\example\readonly.txt" -Force
This command should be used judiciously to avoid unintentionally deleting important data.
Using the `Where-Object` Cmdlet for Conditional Deletion
You can filter files based on specific conditions before deleting them. This adds a layer of control to your file management tasks. For example, to delete files larger than 1MB in a directory, you can use:
Get-ChildItem "C:\example\" | Where-Object { $_.Length -gt 1MB } | Remove-Item
This command retrieves all items in the specified path, filters them by size, and then deletes those that meet the condition.
Using Like in PowerShell: A Simple Guide
Error Handling in PowerShell Commands
Common Errors and Their Solutions
Errors may occur during file deletion. Two common issues are:
- File Not Found Error: If you attempt to delete a file that does not exist, you will receive an error message. Always verify the file’s existence before running the delete command.
- Access Denied Error: If you do not have sufficient permissions to delete the file, you will encounter this error. Running PowerShell with elevated privileges may resolve this issue.
Using Try/Catch for Robust Scripts
To enhance your script’s robustness, implement error handling using the `try/catch` construct. This could look like:
try {
    Remove-Item -Path "C:\example\file.txt" -ErrorAction Stop
} catch {
    Write-Host "An error occurred: $_"
}
This approach provides feedback if something goes wrong during the deletion process.
Find a File in PowerShell: Quick and Easy Methods
Tips for Safe File Deletion in PowerShell
Best Practices for Removing Files
When deleting files, adhere to these best practices:
- Verify File Paths: Always double-check the file paths provided in your commands to avoid accidental data loss.
- Importance of Backups: Regularly back up critical data before running deletion commands.
Using `-WhatIf` for Simulation
To preview what would happen if you execute a deletion command without actually deleting files, use the `-WhatIf` switch:
Remove-Item -Path "C:\example\file.txt" -WhatIf
This command outputs what would occur if the command were run, allowing you to verify the action without making changes.
Mastering Selenium PowerShell: Quick Guide and Tips
Conclusion
In conclusion, deleting a file in PowerShell is a straightforward process that can be tailored to meet various needs—whether you’re deleting single files, multiple files, or even large directories. Understanding how to safely and efficiently manage file deletions can significantly enhance your productivity and reduce the risk of errors.
Call to Action
Practice these commands in a safe environment to build your skill set. For more tips and tutorials on PowerShell commands, consider subscribing to our updates for the latest insights and resources.
Elevated PowerShell: A Quick Start Guide
Additional Resources
For further reading, consider exploring the official Microsoft documentation to gain deeper insights into PowerShell and its capabilities. You may also find tools and extensions beneficial for enhancing your PowerShell experience.
Unblock File PowerShell: Quick Steps to Safety
Frequently Asked Questions
Can I recover deleted files using PowerShell?
Recovering deleted files can be challenging, especially if they have been permanently removed. However, third-party tools or restore options may help recover lost data. Always ensure you have a robust backup plan.
Is PowerShell safe for file management?
PowerShell is generally safe when used correctly, but users must remain vigilant. Always double-check commands and utilize features like `-Confirm` and `-WhatIf` to ensure safe operations.
Deleting files and cleaning up directories can be a time-consuming task, especially when you need to perform the same task on multiple computers regularly. But with PowerShell, we can create small scripts that will delete a file quickly and efficiently by using the Remove-Item cmdlet.
PowerShell allows us not to only delete a single file, but even an entire directory or a group of files based on specific criteria. And did you know it’s also possible to only delete a file if it exists, files that are older than x days, or delete files based on a wildcard pattern?
In this article
In this article, we are going to take a look at how to delete a file in PowerShell. And how to use the different options to delete only specific files, verify the delete action, and more.
To delete files with PowerShell we need to use the Remove-Item cmdlet. This cmdlet can delete one or more items based on the criteria. The Remove-Item cmdlet can not only be used to delete files but also for deleting folders, registry keys, variables, functions, and more. We will focus on deleting files in this article.
With the Remove-Item cmdlet, we can use the following parameters:
| Parameter | Description |
|---|---|
| -Path | Specify the path of the items that need to be removed. |
| -LiteralPath | The exact path the item |
| -Include | Specifies a path element to include, for example, *.txt |
| -Exclude | Specifies a path element to exclude, for example, *.txt |
| -Recurse | Delete items in the specified location and in all subfolders |
| -Force | Used to delete read-only files or hidden items |
| -Confirm | Prompt for confirmation |
So to delete a single file with PowerShell we only need to specify the full path to the file including the file name. For example, if we want to delete the readme.txt file from the folder below we can do:
Remove-Item -Path C:\temp\files\readme.txt
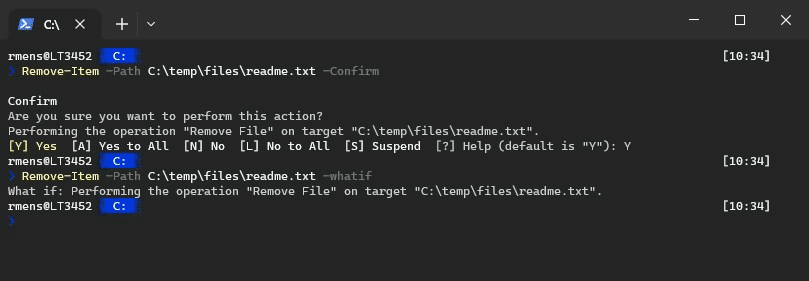
Note that the cmdlet won’t ask for confirmation, the file will be deleted instantly. So when you are writing your PowerShell script that is going to delete one or more files, it’s important to test it first. We can do this by using either the -confirm or -whatif parameter. Confirm will give a prompt if you want to delete the file or not, where what if shows what the cmdlet would do without actually deleting the item:
# Using Confirm
Remove-Item -Path C:\temp\files\readme.txt -Confirm

Confirm
Are you sure you want to perform this action?
Performing the operation "Remove File" on target "C:\temp\files\readme.txt".
[Y] Yes  [A] Yes to All  [N] No  [L] No to All  [S] Suspend  [?] Help (default is "Y"):

# Or using WhatIf
Remove-Item -Path C:\temp\files\readme.txt -whatif
What if: Performing the operation "Remove File" on target "C:\temp\files\readme.txt".
Delete all Files in a Folder
We can use the Remove-Item cmdlet in PowerShell also to delete all files in a folder. Now important to note here is that the cmdlet can also remove folders. So to delete only the files, we are going to use a wildcard to select only the items that include a dot . in the name. This way only files are deleted and not any subfolders:
# Remove all files from the path c:\temp\files
# Tip: test the results first with the -whatif parameter
Remove-Item -Path C:\temp\files\*.*
Another option is to use the cmdlet Get-ChildItem with the parameter -File to get only the files and then pipe the Remove-Item cmdlet to remove the files with PowerShell:
Get-ChildItem -Path C:\temp\files\ -File | Remove-Item
Remove Files in Folder and SubFolders
To delete files not only in the folder but in the subfolder as well, you will need to use the -Recurse parameter. There is only one problem, you can’t use -Recurse recombination with the files-only selection method *.*. Take the example below:
Remove-Item -Path C:\temp\files\*.* -Recurse
You probably expect that this will delete only the files in the folder and subfolder. However, by using the wildcard in the path, only items (files) that contain an . in the path name are selected. So the cmdlet won’t go through any subfolders.
To remove all the files in the folder and all subfolders we will have to specify only the path of the parent folder and use the -Include parameter to select only the files:
# Delete all files from the folder c:\temp\files and it's subfolders
Remove-Item -Path C:\temp\files\ -Recurse -Include *.*
Another option is to first get the files from the folder and subfolder with the Get-ChildItem cmdlet and then remove them:
Get-ChildItem -Path C:\temp\files\ -File -Recurse | Remove-Item
Delete Read-Only and Hidden Files
Read-Only and hidden files are protected from deletion by default. Let’s take a look at the example below, the file “la-srv-dc01.log” is marked read-only and the template.html is a hidden file.
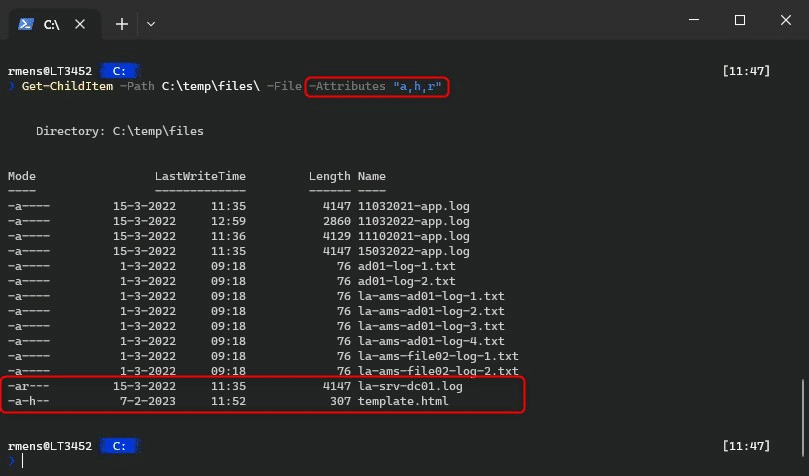
If we would try to delete all the files in the folder, then you will get an error on the read-only file that you do not have sufficient access rights to perform this operation. The hidden file isn’t even deleted at all.
So how do we delete those files? To delete the read-only and hidden files as well we will need to use the -Force parameter:
# Remove all files, including read-only and hidden
Remove-Item -Path C:\temp\files\*.* -Force
PowerShell Delete File if Exists
When using the Remove-Item cmdlet inside scripts, it’s a good idea to test if the file exists before you try to delete it. We can do this by using the Test-Path cmdlet. This will check if the file exists and return true or false based on the result. By using this inside an if statement we can make sure that the file is only deleted if it exists:
$file = C:\temp\files\readme.txt

if (Test-Path -Path $file) {
    Remove-Item -Path $file
}
Using Filters to Delete Files in PowerShell
We now have looked at the some of principles to delete files with PowerShell. But besides simply deleting a single file or all the files in the folder, you will often encounter situations where you only need to delete files older than x days, or files with a specific file type.
We can use a variety of methods to select only those files and delete them with PowerShell. When working with filters always make sure that you first test and verify the selection, before you actually delete the files.
Using the Include Filter
The Include parameter allows us to select all files that have a specific string or part of a string in its file name. For example, if you only want to remove the .log files from the folder, you can do:
# Remove all .log items
Remove-Item -Path C:\temp\files\ -Include *.log
The include parameter isn’t limited to file extensions, you can also select files based on part of their filename. And it’s also possible to specify multiple “keywords” that you want to select:
# Get all files that have the word app or process in their name.
Remove-Item -Path C:\temp\files\ -Include *app*, *process* -Recurse -WhatIf

# Result
What if: Performing the operation "Remove File" on target "C:\temp\files\subfolder\LT3452-process-errors.log".
What if: Performing the operation "Remove File" on target "C:\temp\files\subfolder\LT3452-process.log".
What if: Performing the operation "Remove File" on target "C:\temp\files\11032021-app.log".
What if: Performing the operation "Remove File" on target "C:\temp\files\11032022-app.log".
Using the Exclude Filter
Following the principle of the include parameter, we can also exclude files. Include and exclude can be used together, so you could for example remove all log files except the process log files:
Remove-Item -Path C:\temp\files\ -Include *.log -Exclude *process* -Recurse -WhatIf

# Result
What if: Performing the operation "Remove File" on target "C:\temp\files\11032021-app.log".
What if: Performing the operation "Remove File" on target "C:\temp\files\11032022-app.log".
What if: Performing the operation "Remove File" on target "C:\temp\files\la-srv-dc01.log".
Delete Files Older than x Days with PowerShell
A common practice when cleaning up directories is to delete only files that are older than x days. To do this, we will first need to calculate the file date. let’s say we want to delete all files that are older than 30 days, we then first need to get the date from 30 days ago:
# Get the date from today minus 30 days
$dateTime = (Get-Date).AddDays(-30)
The next step is to get all files that are older than the given date. To do this we are going to compare the lastwritetime of the file with the datetime that we calculated:
Get-ChildItem -Path $Path -Recurse -File | Where-Object { $_.LastWriteTime -lt $dateTime }
We then only have to pipe the Remove-Item cmdlet behind it to actually delete the files:
$dateTime = (Get-Date).AddDays(-30)
$path = "C:\temp\files\"

Get-ChildItem -Path $Path -Recurse -File | Where-Object { $_.LastWriteTime -lt $dateTime } | Remove-Item
Delete Files Larger Than
To delete all files that are larger than a given size, we will first need to convert the file size from Mb to kbits. With the correct size, we can then select all files that are larger than the givne size and remove them with the Remove-Item cmdlet:
$path = "C:\temp\files\"

# Set file size
$sizeInMb = 500

# Calculate actual file size
$size = $sizeInMb*1024*1024

# Delete all files that are larger then given size
Get-ChildItem -Path $Path -Recurse -File | Where-Object { $_.length -gt $size } | Remove-Item
Wrapping Up
PowerShell is a great tool when it comes to managing and deleting files automatically. You can write scripts that will clean up old files every week to quickly find and delete large files from the given folder.
Keep in mind that files are deleted permanently, so make sure that you test your commands first using the parameter before you actually delete the files.
I hope you found this article useful, if you have any questions, just drop a comment below.
Learn Powershell Delete files and folders with commands and script examples..
This tutorial demonstrates how to remove files and directories using PowerShell commands and scripts.
The Remove-Item cmdlet is used to delete files and folders.
To remove a file from a specified path.
remove-item -Path "c:\\test.txt"
To remove a folder
remove-item -Path "c:\folder"
This command removes files inside the folder. If the folder contains subfolders, the above command might not work.
To remove all subfolders recursively, use the -Recurse option.
remove-item -Path "c:\folder" -Recurse
Additionally, apply -Force to remove files and folders forcefully without confirmation prompt.
Powershell Script to delete files and folder
PowerShell Script to Delete Files and Folders
Let’s write a script to delete files and folders.
Create a file named test.ps1 and write the following code/
test.ps1:
$file = "C:\test.txt"
$folder = "C:\mydir"
Remove-Item -Path $file
Remove-Item -Path $folder -Recurse
This script will fail if the file or folder is not present.
To handle this, use an if-else statement to test a conditional expression for file existence.
The conditional expression contains the Test-Path cmdlet, which checks whether a given path exists or not. The path may contain individual files or folders.
Test-Path check given path exists or not, Path might contains indididual files or folders.
if (Test-Path $folder) {
    Remove-Item -Path $folder -Force
    Write-Host "folder  '$folder' Removed"
} else {
    Write-Host "folder '$folder' not exists."
}