
Все способы:
- Полностью удаляем эмулятор BlueStacks в Windows
- Способ 1: Сторонние программы
- Способ 2: Фирменный деинсталлятор
- Способ 3: Встроенные средства Windows
- Вопросы и ответы: 1
BlueStacks — самая популярная программа для виртуализации операционной системы Android на компьютерах под управлением Windows. Она всегда должным образом выполняет свои функции и практически никогда не провоцирует сбои в работе ОС. Однако некоторые пользователи больше не заинтересованы во взаимодействии с данным софтом, поэтому желают удалить его со своих компьютеров. Далее мы хотим продемонстрировать три доступных метода.
Полностью удаляем эмулятор BlueStacks в Windows
Все приведенные далее способы в итоге приводят к одному и тому же результату — полному очищению ПК от следов рассматриваемого эмулятора. Однако алгоритм выполнения каждого такого варианта отличается, поэтому перед пользователем и открывается выбор. Рекомендуется просмотреть все представленные инструкции, чтобы в итоге подобрать для себя оптимальную.
Способ 1: Сторонние программы
Сейчас существует множество самых разнообразных решений от сторонних разработчиков, функциональность которых сосредоточена на упрощении взаимодействия с компьютером и софтом. К списку таких инструментов относятся и программы для удаления других приложений. Сейчас мы возьмем за пример IObit Uninstaller, поскольку этот представитель автоматически очистит систему и от остаточных файлов, чего не умеют делать стандартные варианты удаления ПО.
Скачать IObit Uninstaller
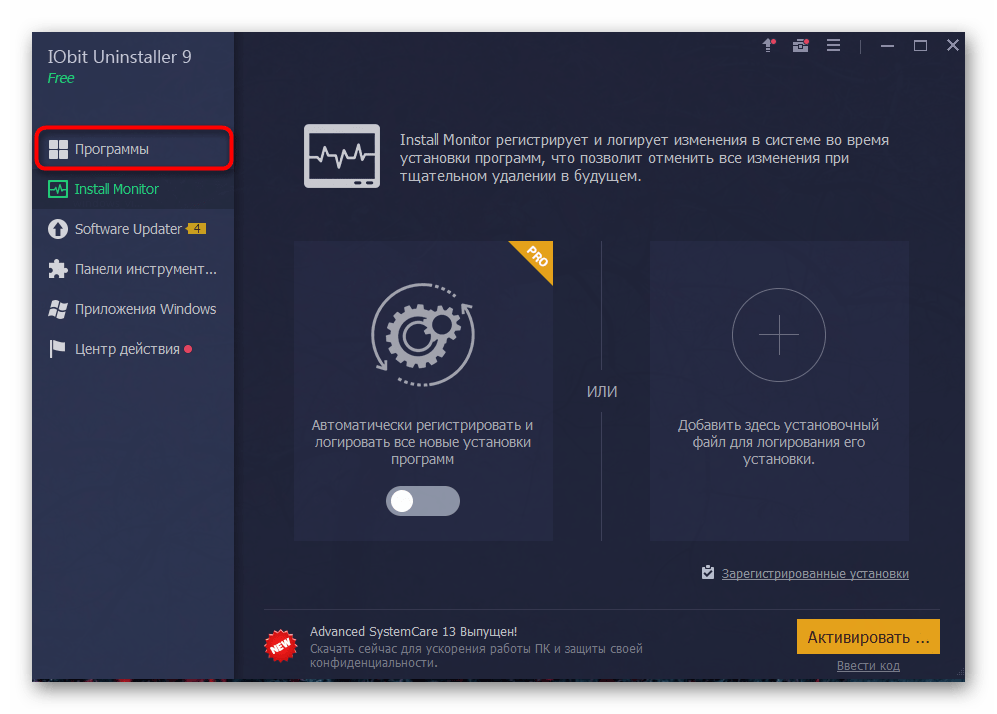
- Скачайте IObit Uninstaller, перейдя по указанной выше ссылке, а затем установите и запустите его. В главном меню переместитесь в раздел «Программы».
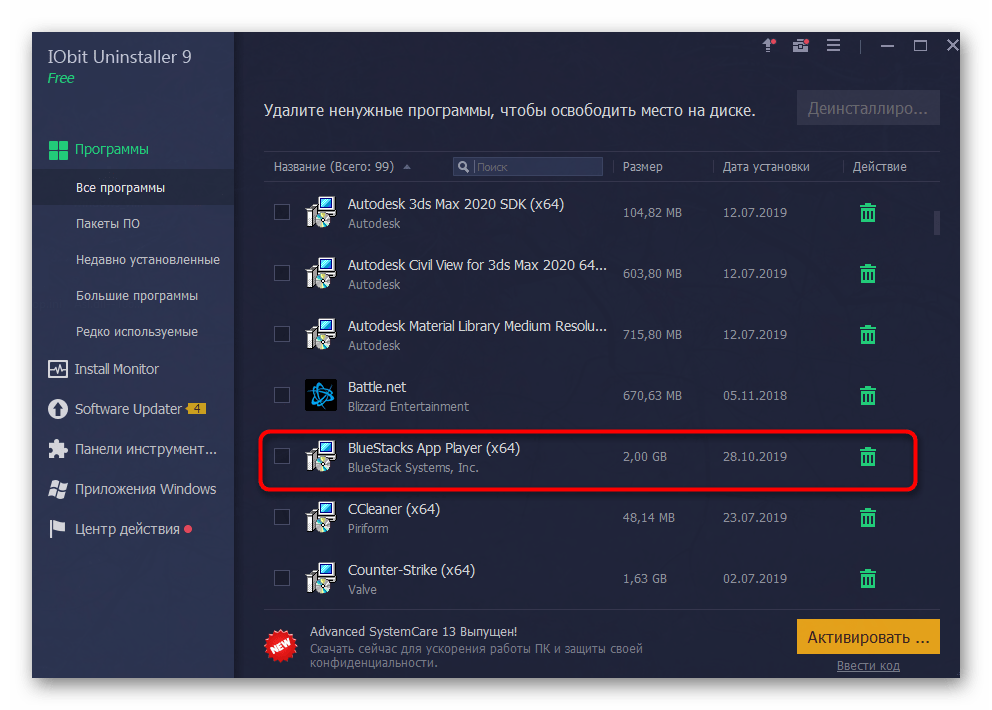
- Здесь в списке отыщите BlueStacks и выделите эту строку галочкой.
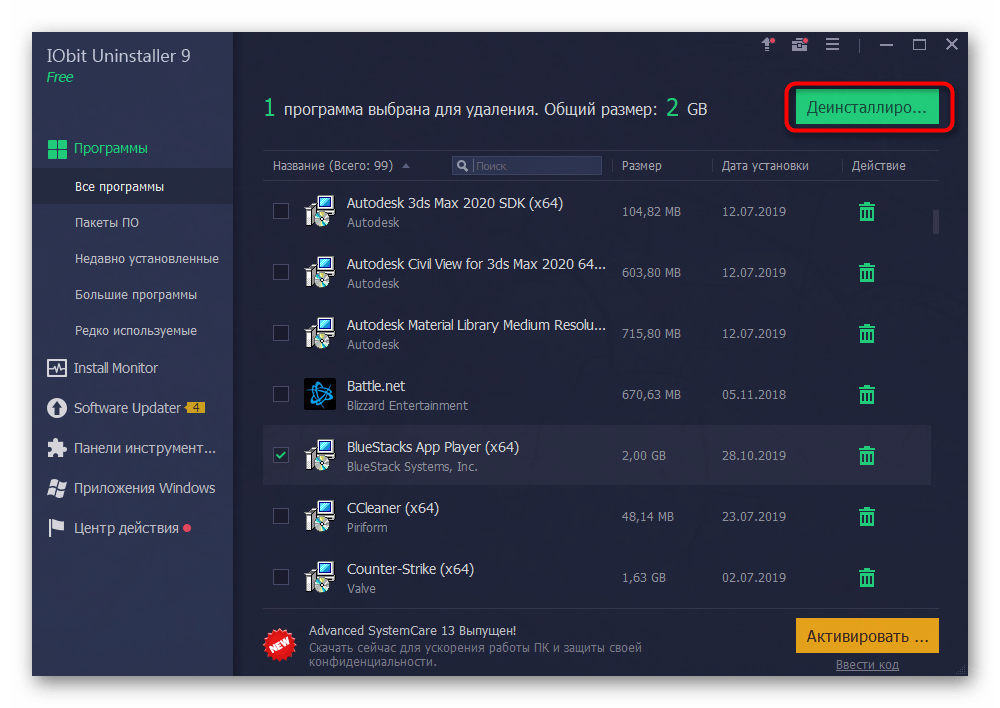
- Щелкните по появившейся сверху зеленой кнопке «Деинсталлировать».
- Убедитесь в том, что стоит галочка возле пункта «Автоматически Удалять все остаточные файлы», а затем повторно нажмите на «Деинсталлировать».
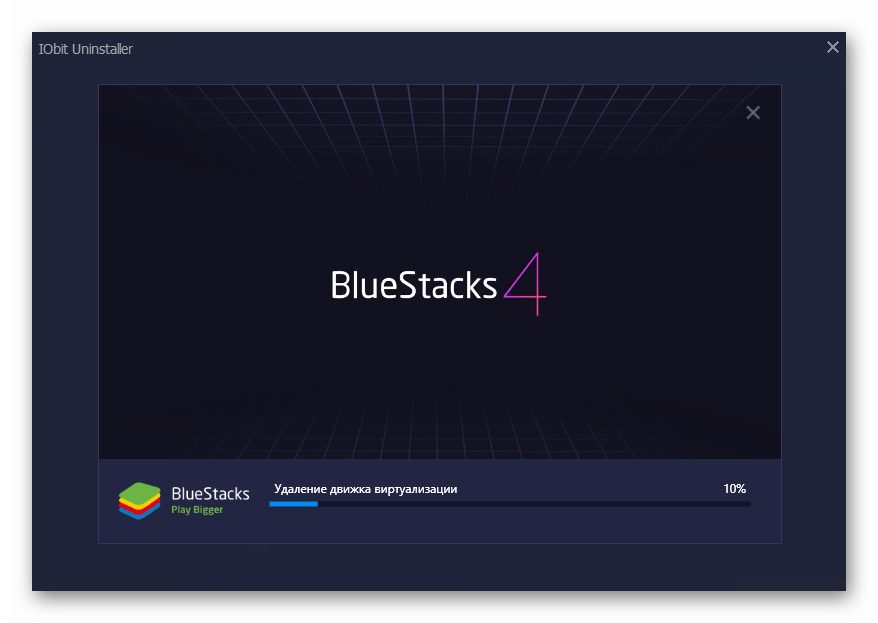
- Ожидайте завершения данного процесса.
- Во время самой операции откроется окно эмулятора, где потребуется подтвердить свое намерение удалить софт.
- После подтвердите предупреждение о том, что все персональные данные будут потеряны.
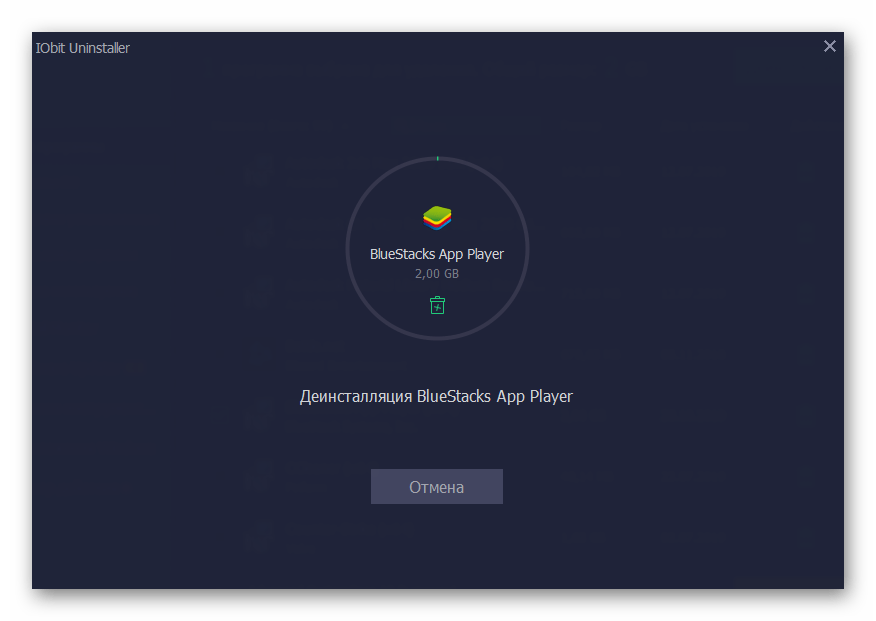
- Дождитесь, пока внутренний деинсталлятор софта удалит движок виртуализации и все остальные файлы.
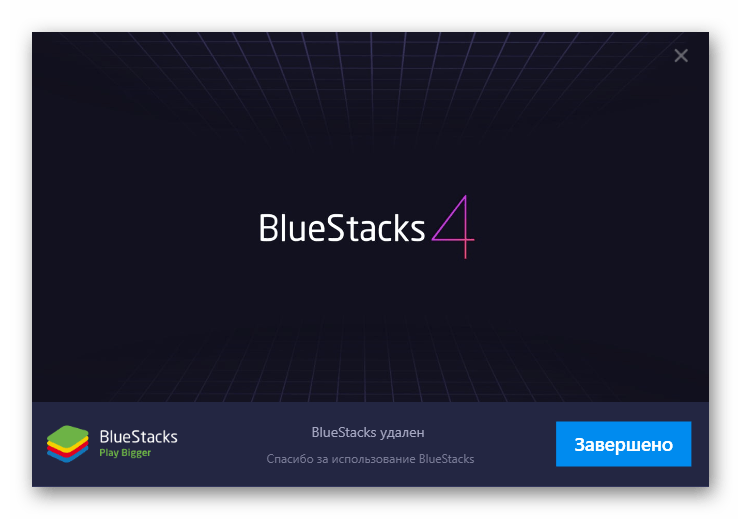
- Вы будете уведомлены об успешном окончании операции.
- Дополнительно появится уведомление и от IObit Uninstaller, в котором будет сказано, сколько файлов и записей реестра удалено.


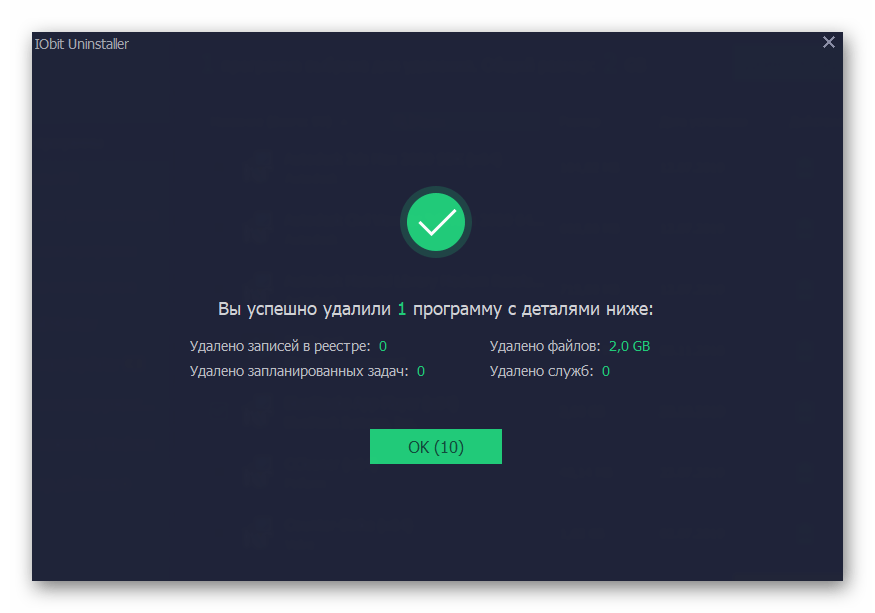
В конце останется только перезагрузить ПК, чтобы все изменения вступили в силу, и вы можете быть уверены: BlueStacks точно был полностью удален из операционной системы. Если приведенная выше программа вас по каким-то причинам не устроила, воспользуйтесь любым другим подобным решением. Преимущественное большинство такого софта функционирует одинаково, поэтому с пониманием процесса деинсталляции не возникнет никаких трудностей.
Подробнее: Программы для удаления программ
Способ 2: Фирменный деинсталлятор
Разработчики рассматриваемого сегодня ПО предлагают пользователям в случае необходимости задействовать один из фирменных Мастеров по удалению BlueStacks, который придется скачать дополнительно. Этот метод подойдет в тех ситуациях, когда хочется максимально быстро выполнить это действие, не прибегая при этом к использованию сторонних решений.
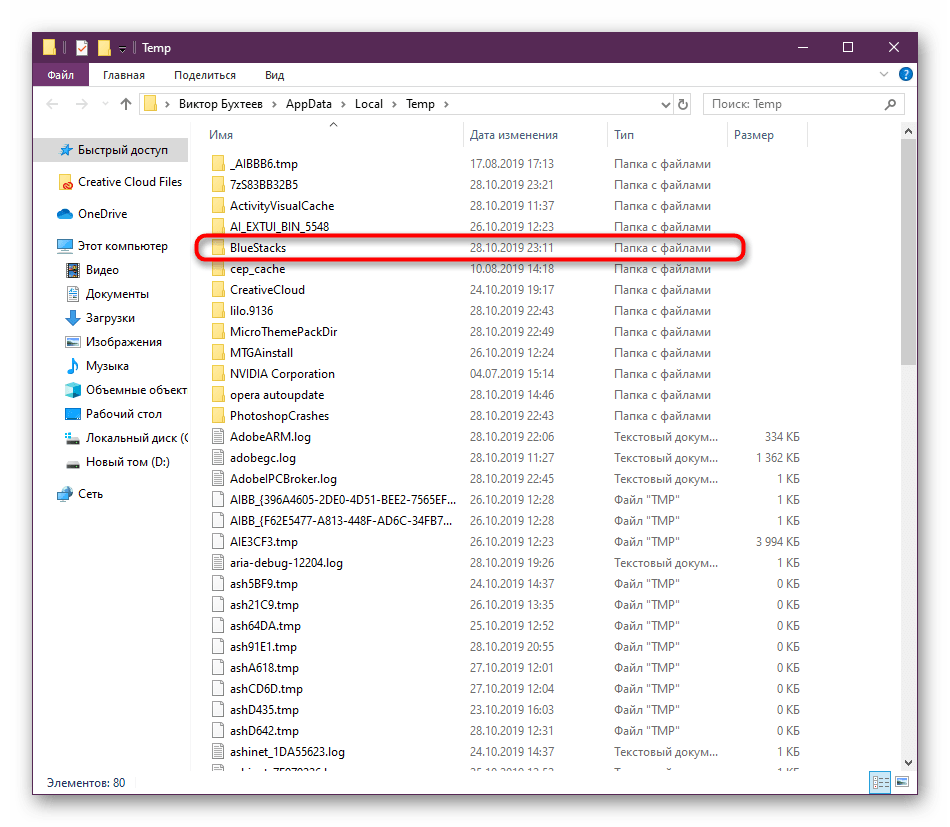
- Для начала потребуется выполнить официальные рекомендации. Откройте утилиту «Выполнить», зажав комбинацию клавиш Win + R, а затем введите там
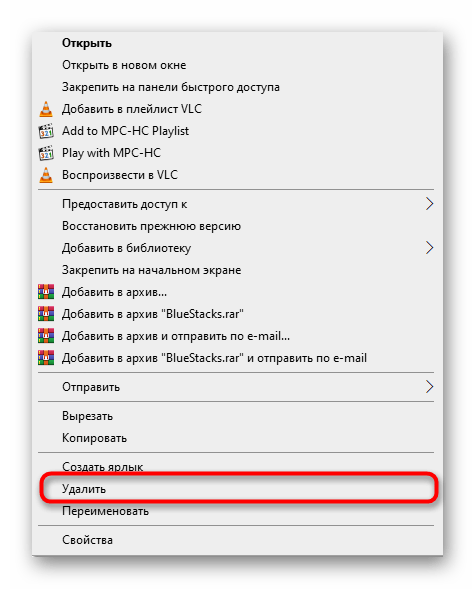
%temp%и нажмите на клавишу Enter. - В открывшемся каталоге отыщите директорию под названием «BlueStacks», кликните по ней правой кнопкой мыши.
- При появлении контекстного меню укажите вариант «Удалить».
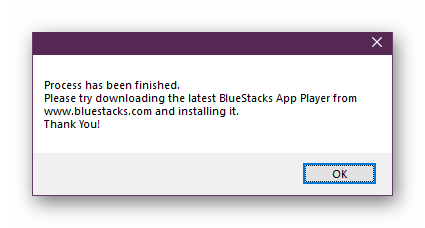
- Перейдите по прямой ссылке для загрузки официального деинсталлятора BlueStacks, чтобы получить исполняемый файл. После получения запустите его. На экране появится окно, в котором отобразится процесс удаления.
- Вы будете уведомлены о том, что операция успешно окончена.

Дополнительно отметим, что этот способ также рекомендуют разработчики в тех ситуациях, когда вы хотите сначала удалить текущую версию софта, а затем скачать новую с официального сайта.
Способ 3: Встроенные средства Windows
Последний метод нашей сегодняшней статьи — самый сложный, поскольку здесь пользователю придется выполнять каждое действие собственными руками. Как известно, в Виндовс имеется встроенная опция, позволяющая удалять ПО. Мы и предлагаем воспользоваться ей, а затем удалить остаточные файлы.
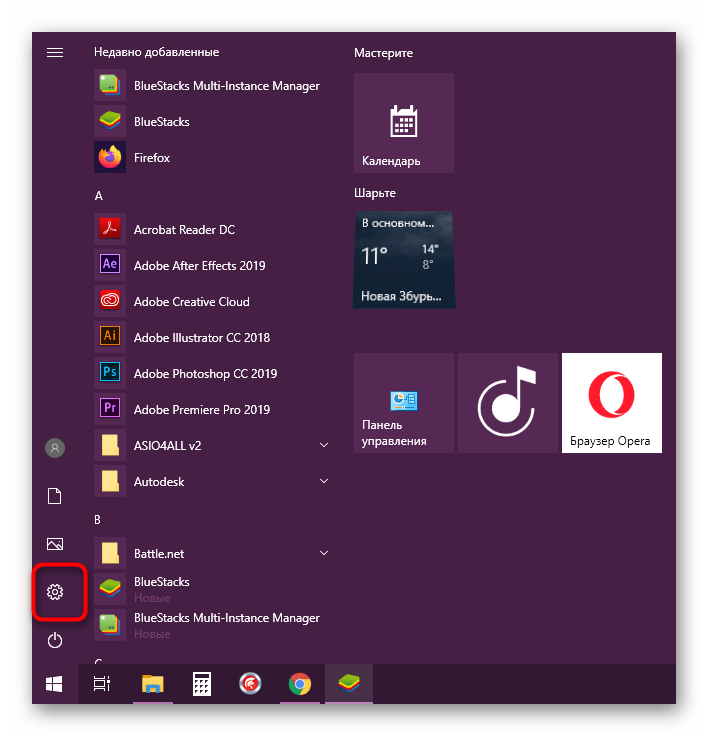
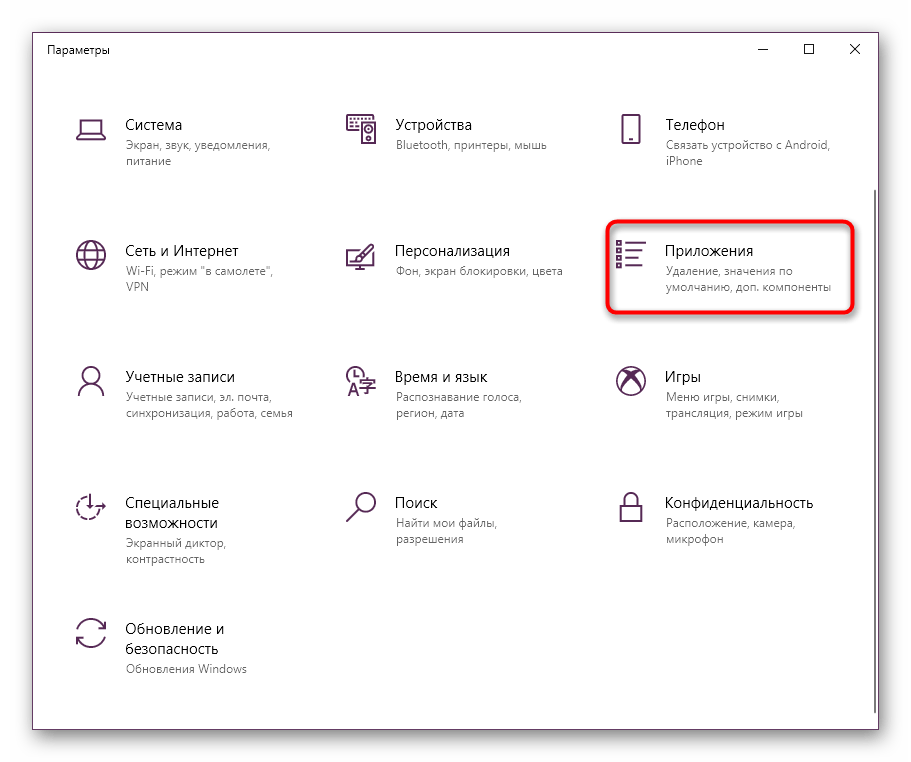
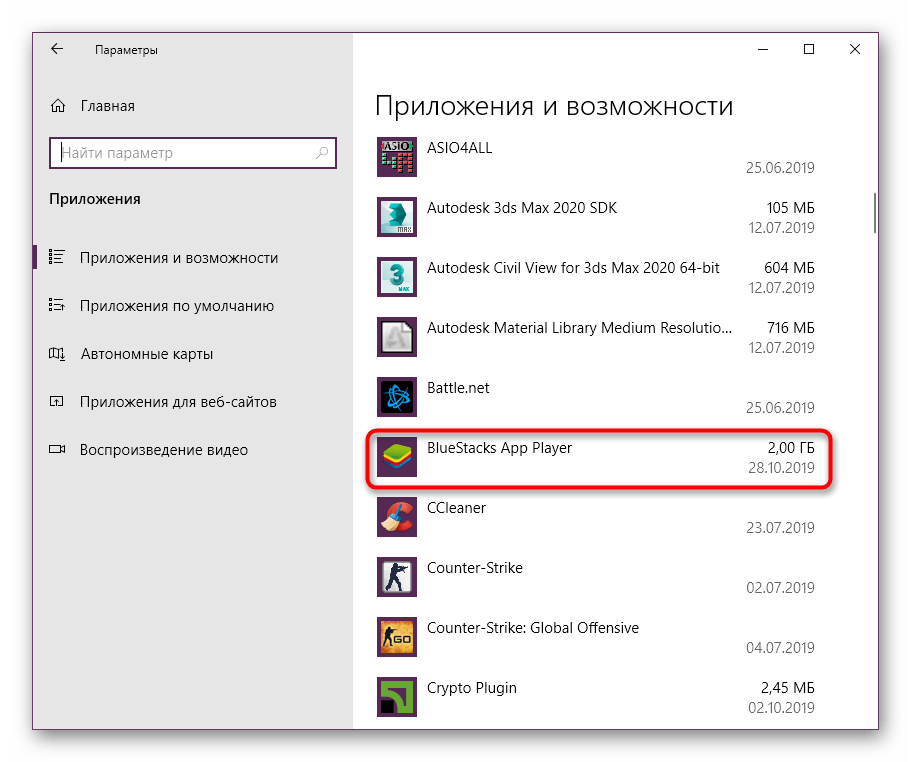
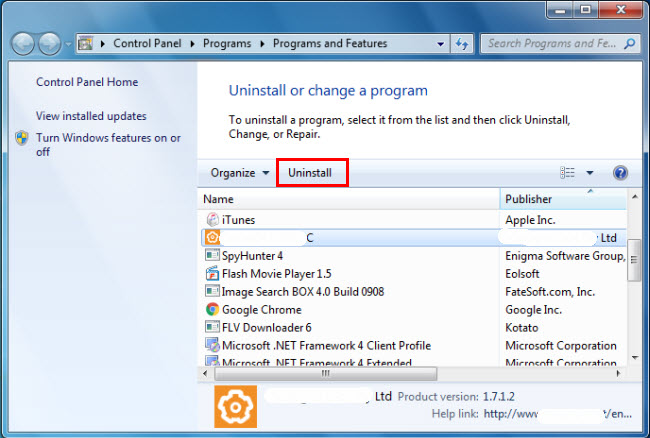
- Откройте «Пуск» и перейдите в «Панель управления» или «Параметры» (зависит от версии Windows).
- В появившемся меню выберите категорию «Программы и компоненты» или «Приложения».
- Опуститесь вниз по списку, чтобы найти там BlueStacks, а затем кликните по этой строке ЛКМ.
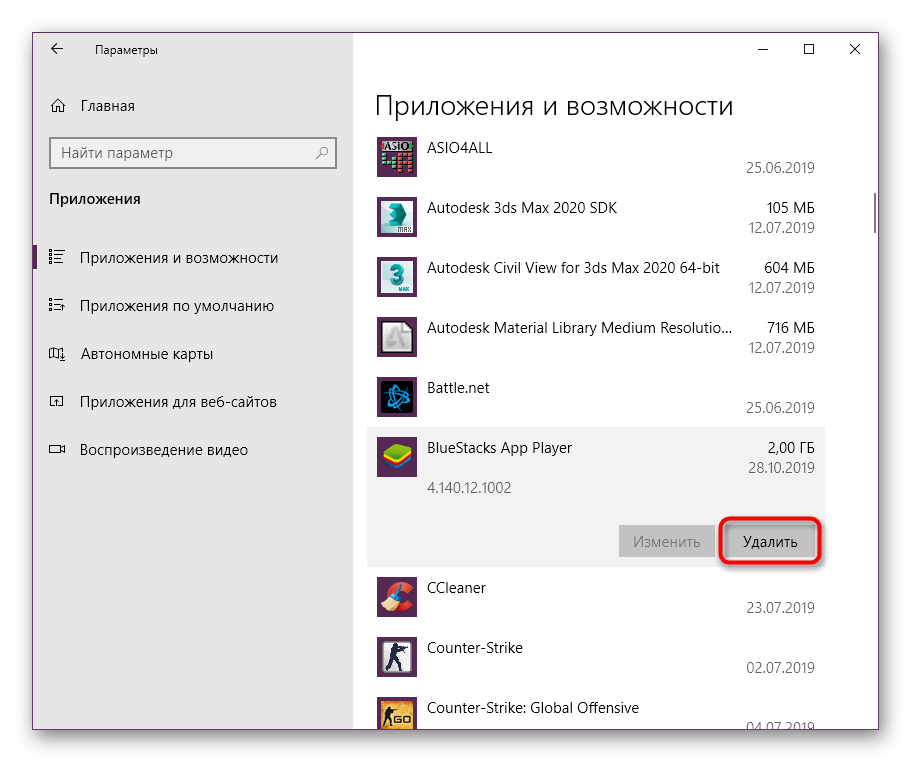
- Нажмите на появившуюся кнопку «Удалить».
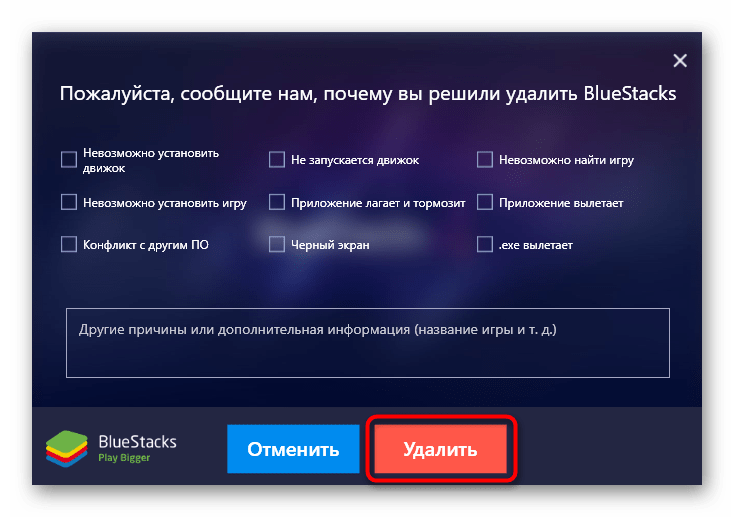
- Откроется стандартный деинсталлятор эмулятора. В нем щелкните по красной кнопке «Удалить».
- Ожидайте завершения удаления.
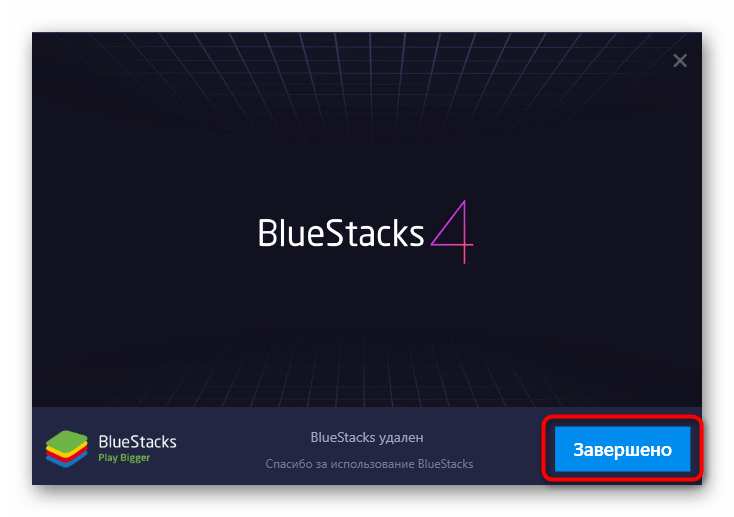
- Вы будете уведомлены о том, что все прошло удачно. После этого можно кликнуть на «Завершено».
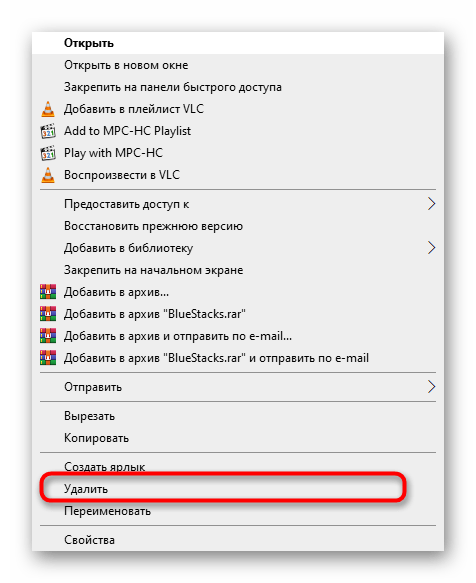
- Теперь приступим к очистке остаточных файлов. Для начала запустите «Выполнить» (Win + R), где введите
%temp%и нажмите на Enter. - Кликните ПКМ по папке «BlueStacks» для открытия контекстного меню.
- В нам нажмите на «Удалить».
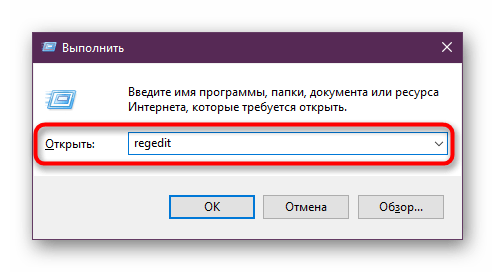
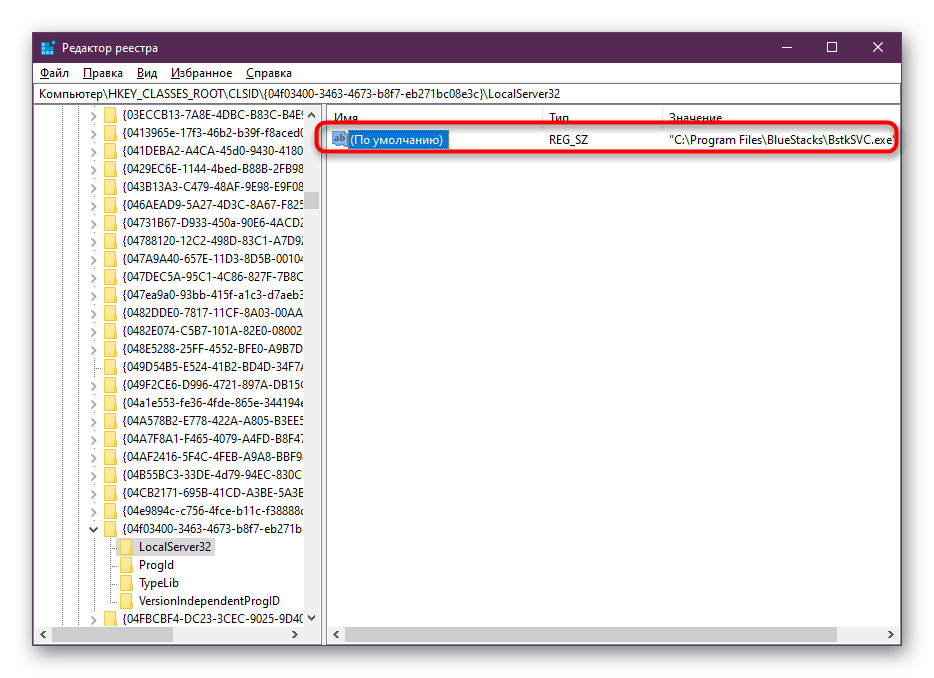
- Далее через ту же утилиту «Выполнить» запустите «Редактор реестра», введя
regedit. - Воспользуйтесь функцией «Найти» в разделе «Правка» (Ctrl + F) для вызова окна поиска значений.
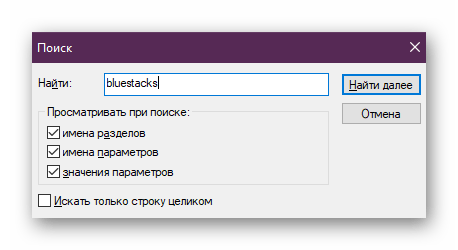
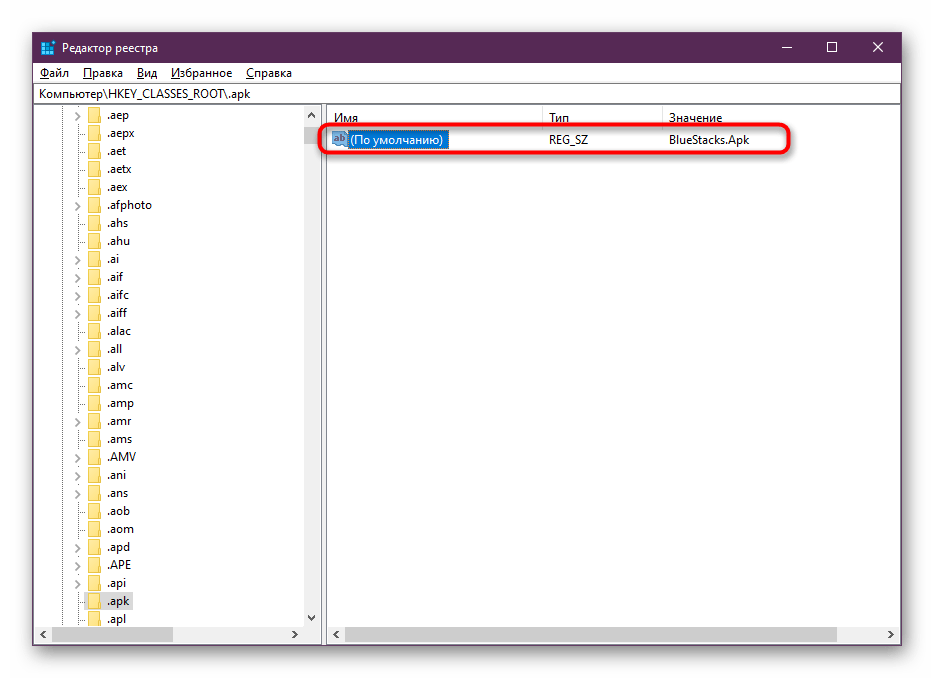
- Введите в поле название софта и приступите к поиску.
- Удалите найденное значение через вызов контекстного меню.
- Жмите клавишу F3, чтобы продолжать поиск значений и очищать все их.


Теперь вы можете быть уверенными на сто процентов, что BlueStacks полностью удален с компьютера, поскольку каждое действие по очищению выполнили вручную. Этот вариант не является самым легким, но он позволит обойтись без применения сторонних инструментов, поэтому имеет место.
Вы узнали о трех методах удаления BlueStacks на ПК под управлением Windows. Выберите подходящую инструкцию и по очереди осуществляйте каждый шаг, чтобы решить поставленную задачей.
Наша группа в TelegramПолезные советы и помощь
Home
Virtualization
By
Anup Thapa
As with any other application, VirtualBox can run into a number of issues, from file corruption and malware infection to degraded performance. And while it’s not a common occurrence, Windows Updates sometimes get interrupted due to system incompatibility with VirtualBox.
In such cases, the obvious solution is to uninstall and, if required, reinstall VirtualBox. This sounds easy enough, but things don’t always go smoothly. As such, we’ve detailed how to uninstall VirtualBox properly using various methods in this article.
How to Uninstall VirtualBox on Windows
The first couple of methods are easy to follow, but if they don’t work, you can also use the latter two CLI methods to force uninstall VirtualBox. If your issue isn’t resolved despite that, we recommend checking the final section for steps to perform a thorough removal.
Through App Settings
Windows 11 introduced the ability to uninstall applications easily via App Settings. Here are the necessary steps for this:
- Press Win + R, type
ms-settings:appsfeatures, and press Enter. - Click on the triple-dot button next to VirtualBox and select Uninstall > Uninstall.

- Accept the prompt to remove VirtualBox.

Through Control Panel
On older Windows versions, you can apply the traditional way of uninstalling applications via the Control Panel. Of course, you can use this method on Windows 11 as well if you want. With that said, here are the necessary steps:
- Press Win + R, type
appwiz.cpl, and press Enter. - Select VirtualBox and click on Uninstall.

- Select Yes > Yes to accept the prompts and proceed with the installation.

Note: If you try to uninstall VirtualBox from the start menu, then the same steps are applicable for that as well. And secondly, if VirtualBox isn’t listed in Apps and Features, you can workaround the issue by downloading the installer for the same VirtualBox version you had before and using said installer to remove VirtualBox. In case of an incomplete uninstall, you may need to reinstall VirtualBox first before you can properly uninstall it again.
Through CLI
If you need to force-uninstall VirtualBox, you can use the Get-Package and Uninstall-Package cmdlets in PowerShell. Here are the steps for this:
- Press Win + R, type
powershell, and press CTRL + Shift + Enter. - Enter
Get-Packageand note the full VirtualBox name.
- Replace
packagenamewith the value from Step 2 and execute the following command:Uninstall-Package -Name "packagename"


Provided that VirtualBox is registered with WMI, you can also uninstall VirtualBox with the WMIC utility. Here are the necessary steps:
- Press Win + R, type
cmd, and press CTRL + Shift + Enter. - Type
wmic product get nameand press Enter.
- It may take a minute to get the output. Once it shows up, note the full VirtualBox name.
- Replace
program namewith the value from Step 3 and execute the following command:product where name="program name" call uninstall
- Press Y if asked for a confirmation prompt.


How to Uninstall VirtualBox Completely?
If the CLI methods didn’t work either, then you’ll need to perform manual steps for complete removal. But before you start, let’s get the Windows Update incompatibility issue out of the way.
If you have any Android Emulators installed, such as LDPlayer, BlueStacks, Genymotion, Nox, Memu, etc., that are based on VirtualBox, you’ll want to remove these as we’ve found these to be the major cause for the incompatibility error.
When removing such emulators, the first step is obviously to uninstall them. You can do this using the uninstaller executable, via settings, or via the control panel. But the second part is also important. Often, the error will persist because some residual files remain on the system despite uninstalling.
As such, you’ll want to clear the files from the locations like the Temp folder, AppData, ProgramData, etc., and check the registry. The steps will slightly differ depending on the emulator you’ve installed, but you can check the sections below to get a general idea of how to thoroughly remove an application.
Now, to remove all VirtualBox traces from your system, you’ll want to log in to an admin account first. If you plan to reinstall VirtualBox afterward, temporarily disabling security programs and clean booting might also be a good idea.
Remove VirtualBox Files
First, we’ll stop the VirtualBox background services and then proceed to delete the VirtualBox files from AppData, ProgramData, UserProfile, and System32. Here are the steps for this:
- Press Win + R, type
services.msc, and press Enter. - Stop the VirtualBox system service.

- If you want to delete the Virtual Machine files, navigate to the location where you stored them and delete them first.
- Now, press Win + R, type
%userprofile%, and press Enter. - Click on View > Show > Hidden Files.

- Now delete the
.VirtualBoxfolder here. It might also be located atC:\Users\<username>\Appdata\Local\. - Delete the Oracle folder from
C:\Program Files. - Also, delete the VirtualBox folder from
C:\ProgramData. - Finally, navigate to
C:\Windows\system32\driversand delete the following files:VBoxNetAdp6.sysVBoxNetLwf.sysVBoxSup.sysVBoxUSB.sysVBoxUSBMon.sys


Uninstall VirtualBox Network Components
Now, we’ll remove the VirtualBox network adapters and drivers. Here are the steps for this:
- Press Win + R, type
devmgmt.msc, and press Enter. - Select View > Show hidden devices.
- In the Network Adapters section, right-click the VirtualBox Adapter and select Uninstall device > Uninstall.

- Now, press Win + R, type
ncpa.cpl, and press Enter. - Right-click on the VirtualBox network and select Properties.

- Select the VirtualBox Bridged Networking Driver and click Uninstall.


Delete VirtualBox Registry Entries
The final part of the puzzle is to clear all VirtualBox entries from the registry. Before making any changes to your registry, we highly recommend following the steps from the linked guide to back up your registry. This is important in case you need to revert any changes. Once that’s done, you can follow the steps listed below:
- Press Win + R, type
regedit, and press Enter. - Navigate to:
Computer\HKEY_CLASSES_ROOT\Installer\Products\. - Select the first key and check the Product Name. Repeat the same with the rest of the keys until you find the VirtualBox key.

- First, note down the key identifier and the product icon value.
- Then, right-click the VirtualBox key and select Delete > Yes.
- Now, navigate to
Computer\HKEY_CLASSES_ROOT\Installer\Features\. - Use the values from Step 4 to ease your search and delete the VirtualBox key.
- Delete VirtualBox keys from the following locations in the same manner:
Computer\HKEY_LOCAL_MACHINE\SOFTWARE\Classes\Installer\Features\Computer\HKEY_LOCAL_MACHINE\SOFTWARE\Classes\Installer\Products\Computer\HKEY_LOCAL_MACHINE\SOFTWARE\Microsoft\Windows\CurrentVersion\Installer\UserData\S-1-5-18\Products\Computer\HKEY_CLASSES_ROOT\Installer\UpgradeCodes\Computer\HKEY_LOCAL_MACHINE\SOFTWARE\OracleComputer\HKEY_LOCAL_MACHINE\SOFTWARE\Microsoft\Windows\CurrentVersion\Uninstall\


Как удалить эмулятор
В этой заметке рассмотрим удаление любого эмулятора с компьютера. Это применимо и для других программ. Рассмотрим удаление на примере AndY. Для деинсталляции AndY выполните следующие действия.
- Откройте «Приложения и возможности» через Win + X.
- Щёлкните по названию приложения, затем – по двум кнопкам «Удалить».

- Отметьте флажками все опции, чтобы избавиться от пользовательских данных среды виртуализации.

- Дождитесь завершения удаления файлов программы.

Если хотите удалить все остаточные данные (настройки, записи в реестре), воспользуйтесь сторонней утилитой вроде Revo Uninstaller.
How to uninstall Microsoft Device Emulator (64 bit) version 3.0 — ENU from your PC
Microsoft Device Emulator (64 bit) version 3.0 — ENU is a software application. This page is comprised of details on how to uninstall it from your computer.
It is developed by Microsoft Corporation.
Go over here for more info on Microsoft Corporation.
Microsoft Device Emulator (64 bit) version 3.0 — ENU is usually installed in the C:\Program Files (x86)\Microsoft Device Emulator\1.0 directory, but this location can differ a lot depending on the user’s option while installing the program.
You can uninstall Microsoft Device Emulator (64 bit) version 3.0 — ENU by clicking on the Start menu of Windows and pasting the command line MsiExec.exe /X{EF8B1A2E-9CCB-3AB2-91E3-4EEDAB1294E1}. Note that you might get a notification for administrator rights.
The application’s main executable file is titled DeviceEmulator.exe and its approximative size is 1.28 MB (1342472 bytes).
The executables below are part of Microsoft Device Emulator (64 bit) version 3.0 — ENU. They occupy an average of 1.62 MB (1695760 bytes) on disk.
- DeviceEmulator.exe (1.28 MB)
- dvcemumanager.exe (253.51 KB)
- imagegen.exe (91.50 KB)
The information on this page is only about version 9.0.21022 of Microsoft Device Emulator (64 bit) version 3.0 — ENU.
Some files and registry entries are regularly left behind when you remove Microsoft Device Emulator (64 bit) version 3.0 — ENU.
Folders remaining:
- C:\Program Files (x86)\Microsoft Device Emulator\1.0
The files below were left behind on your disk when you remove Microsoft Device Emulator (64 bit) version 3.0 — ENU:
- C:\Program Files (x86)\Microsoft Device Emulator\1.0\1033\DeviceEmulator.chm
- C:\Program Files (x86)\Microsoft Device Emulator\1.0\1033\DeviceEmulatorUI.dll
- C:\Program Files (x86)\Microsoft Device Emulator\1.0\1033\dvcemumanagerui.dll
- C:\Program Files (x86)\Microsoft Device Emulator\1.0\1033\ImageGenRes.dll
- C:\Program Files (x86)\Microsoft Device Emulator\1.0\custsat.dll
- C:\Program Files (x86)\Microsoft Device Emulator\1.0\DEMComInterface.tlb
- C:\Program Files (x86)\Microsoft Device Emulator\1.0\DESqmWrapper.dll
- C:\Program Files (x86)\Microsoft Device Emulator\1.0\DeviceEmulator.exe
- C:\Program Files (x86)\Microsoft Device Emulator\1.0\DeviceEmulatorProxy.dll
- C:\Program Files (x86)\Microsoft Device Emulator\1.0\DeviceEmulatorTabletInk.dll
- C:\Program Files (x86)\Microsoft Device Emulator\1.0\dvcemumanager.exe
- C:\Program Files (x86)\Microsoft Device Emulator\1.0\emulator.ico
- C:\Program Files (x86)\Microsoft Device Emulator\1.0\imagegen.exe
- C:\Program Files (x86)\Microsoft Device Emulator\1.0\Microsoft.DeviceEmulatorManager.Interop.9.0.dll
Many times the following registry data will not be uninstalled:
- HKEY_CLASSES_ROOT\Installer\Assemblies\C:|Program Files (x86)|Microsoft Device Emulator|1.0|Microsoft.DeviceEmulatorManager.Interop.9.0.dll
- HKEY_LOCAL_MACHINE\SOFTWARE\Classes\Installer\Products\E2A1B8FEBCC92BA3193EE4DEBA21491E
- HKEY_LOCAL_MACHINE\Software\Microsoft\Windows\CurrentVersion\Uninstall\{EF8B1A2E-9CCB-3AB2-91E3-4EEDAB1294E1}
- HKEY_LOCAL_MACHINE\Software\Wow6432Node\Classes\Installer\Assemblies\C:|Program Files (x86)|Microsoft Device Emulator|1.0|Microsoft.DeviceEmulatorManager.Interop.9.0.dll
Additional registry values that are not cleaned:
- HKEY_LOCAL_MACHINE\SOFTWARE\Classes\Installer\Products\E2A1B8FEBCC92BA3193EE4DEBA21491E\ProductName
- HKEY_LOCAL_MACHINE\Software\Microsoft\Windows\CurrentVersion\Installer\Folders\C:\Program Files (x86)\Microsoft Device Emulator\1.0\
A way to delete Microsoft Device Emulator (64 bit) version 3.0 — ENU from your PC with Advanced Uninstaller PRO
Microsoft Device Emulator (64 bit) version 3.0 — ENU is a program offered by the software company Microsoft Corporation.
Frequently, people want to uninstall it. This can be troublesome because uninstalling this manually takes some experience regarding PCs. One of the best EASY solution to uninstall Microsoft Device Emulator (64 bit) version 3.0 — ENU is to use Advanced Uninstaller PRO. Here is how to do this:
1. If you don’t have Advanced Uninstaller PRO on your Windows PC, add it. This is a good step because Advanced Uninstaller PRO is the best uninstaller and general utility to take care of your Windows computer.
DOWNLOAD NOW
- go to Download Link
- download the program by clicking on the green DOWNLOAD NOW button
- install Advanced Uninstaller PRO
2. Start Advanced Uninstaller PRO. It’s recommended to take some time to get familiar with the program’s interface and wealth of functions available. Advanced Uninstaller PRO is a powerful system optimizer.
3. Press the General Tools button

4. Press the Uninstall Programs tool

5. A list of the applications existing on the computer will be made available to you
6. Navigate the list of applications until you find Microsoft Device Emulator (64 bit) version 3.0 — ENU or simply click the Search feature and type in «Microsoft Device Emulator (64 bit) version 3.0 — ENU». If it exists on your system the Microsoft Device Emulator (64 bit) version 3.0 — ENU app will be found very quickly. When you select Microsoft Device Emulator (64 bit) version 3.0 — ENU in the list of apps, the following data regarding the application is made available to you:
- Safety rating (in the left lower corner). This tells you the opinion other people have regarding Microsoft Device Emulator (64 bit) version 3.0 — ENU, ranging from «Highly recommended» to «Very dangerous».
- Reviews by other people — Press the Read reviews button.
- Details regarding the program you are about to uninstall, by clicking on the Properties button.
7. Click the Uninstall button. A confirmation page will come up. accept the removal by clicking Uninstall. Advanced Uninstaller PRO will remove Microsoft Device Emulator (64 bit) version 3.0 — ENU.
8. After uninstalling Microsoft Device Emulator (64 bit) version 3.0 — ENU, Advanced Uninstaller PRO will offer to run a cleanup. Click Next to proceed with the cleanup. All the items that belong Microsoft Device Emulator (64 bit) version 3.0 — ENU which have been left behind will be found and you will be asked if you want to delete them. By removing Microsoft Device Emulator (64 bit) version 3.0 — ENU with Advanced Uninstaller PRO, you are assured that no Windows registry items, files or directories are left behind on your PC.
Your Windows computer will remain clean, speedy and able to run without errors or problems.
Geographical user distribution
Disclaimer
This page is not a recommendation to remove Microsoft Device Emulator (64 bit) version 3.0 — ENU by Microsoft Corporation from your computer, we are not saying that Microsoft Device Emulator (64 bit) version 3.0 — ENU by Microsoft Corporation is not a good application for your computer. This text simply contains detailed instructions on how to remove Microsoft Device Emulator (64 bit) version 3.0 — ENU supposing you decide this is what you want to do. The information above contains registry and disk entries that Advanced Uninstaller PRO stumbled upon and classified as «leftovers» on other users’ computers.
Last update on: 2016-06-19 07:47:14.443
Are you in need of uninstalling Microsoft Device Emulator version — ENU to fix some problems? Are you looking for an effective solution to completely uninstall it and thoroughly delete all of its files out of your PC? No worry! This page provides detailed instructions on how to completely uninstall Microsoft Device Emulator version — ENU.
Possible problems when you uninstall Microsoft Device Emulator version — ENU
* Microsoft Device Emulator version — ENU is not listed in Programs and Features.
* You do not have sufficient access to uninstall Microsoft Device Emulator version — ENU.
* A file required for this uninstallation to complete could not be run.
* An error has occurred. Not all of the files were successfully uninstalled.
* Another process that is using the file stops Microsoft Device Emulator version — ENU being uninstalled.
* Files and folders of Microsoft Device Emulator version — ENU can be found in the hard disk after the uninstallation.
Microsoft Device Emulator version — ENU cannot be uninstalled due to many other problems. An incomplete uninstallation of Microsoft Device Emulator version — ENU may also cause many problems. So, it’s really important to completely uninstall Microsoft Device Emulator version — ENU and remove all of its files.
How to Uninstall Microsoft Device Emulator version — ENU Completley?
Method 1: Uninstall Microsoft Device Emulator version — ENU via Programs and Features.
When a new piece of program is installed on your system, that program is added to the list in Programs and Features. When you want to uninstall the program, you can go to the Programs and Features to uninstall it. So when you want to uninstall Microsoft Device Emulator version — ENU, the first solution is to uninstall it via Programs and Features.
Steps:
a. Open Programs and Features.
Windows Vista and Windows 7
Click Start, type uninstall a program in the Search programs and files box and then click the result.
Windows 8, Windows 8.1 and Windows 10
Open WinX menu by holding Windows and X keys together, and then click Programs and Features.
b. Look for Microsoft Device Emulator version — ENU in the list, click on it and then click Uninstall to initiate the uninstallation.
Method 2: Uninstall Microsoft Device Emulator version — ENU with its uninstaller.exe.
Most of computer programs have an executable file named uninst000.exe or uninstall.exe or something along these lines. You can find this files in the installation folder of Microsoft Device Emulator version — ENU.
Steps:
a. Go to the installation folder of Microsoft Device Emulator version — ENU.
b. Find uninstall.exe or unins000.exe.
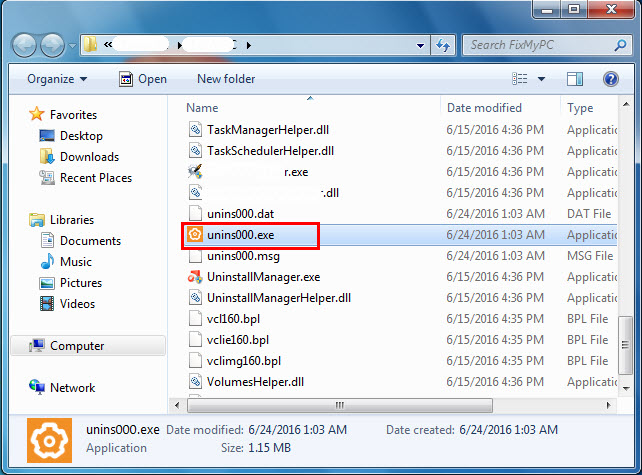
c. Double click on its uninstaller and follow the wizard to uninstall Microsoft Device Emulator version — ENU.
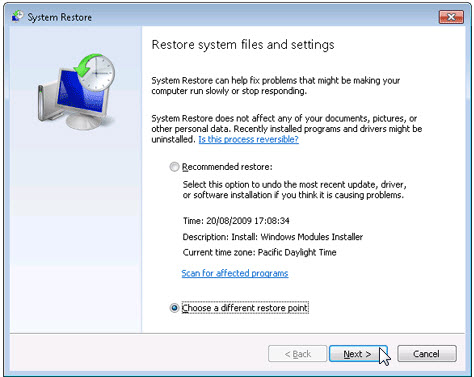
Method 3: Uninstall Microsoft Device Emulator version — ENU via System Restore.
System Restore is a utility which comes with Windows operating systems and helps computer users restore the system to a previous state and remove programs interfering with the operation of the computer. If you have created a system restore point prior to installing a program, then you can use System Restore to restore your system and completely eradicate the unwanted programs like Microsoft Device Emulator version — ENU. You should backup your personal files and data before doing a System Restore.
Steps:
a. Close all files and programs that are open.
b. On the desktop, right click Computer and select Properties. The system window will display.
c. On the left side of the System window, click System protection. The System Properties window will display.
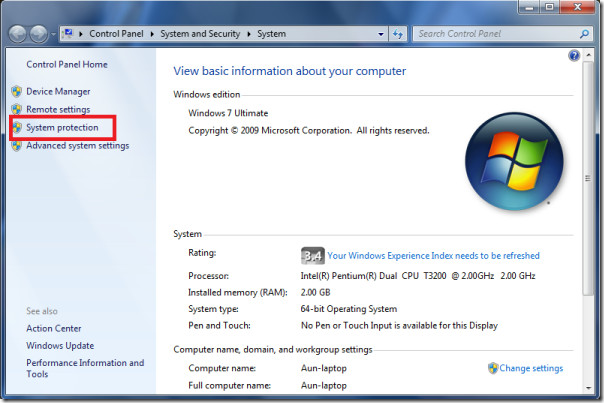
d. Click System Restore and the System Restore window will display.
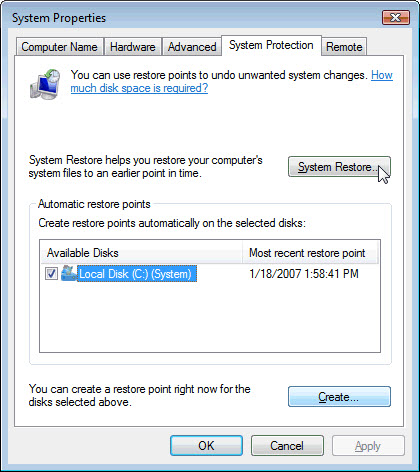
e. Select Choose a different restore point and click Next.
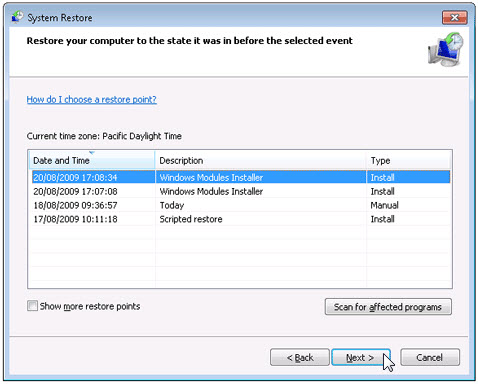
f. Select a date and time from the list and then click Next. You should know that all programs and drivers installed after the selected date and time may not work properly and may need to be re-installed.
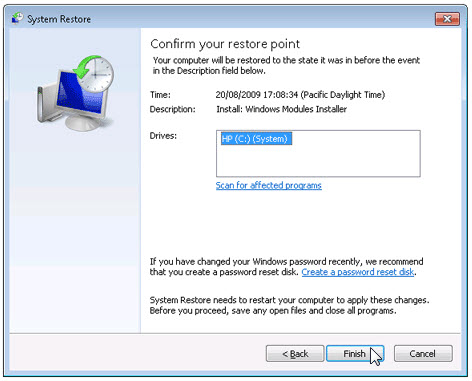
g. Click Finish when the «Confirm your restore point» window appears.
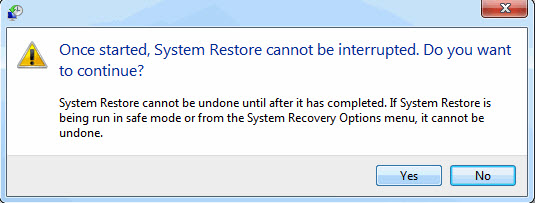
h. Click Yes to confirm again.
Method 4: Uninstall Microsoft Device Emulator version — ENU with Antivirus.
Nowadays, computer malware appear like common computer applications but they are much more difficult to remove from the computer. Such malware get into the computer with the help of Trojans and spyware. Other computer malware like adware programs or potentially unwanted programs are also very difficult to remove. They usually get installed on your system by bundling with freeware software like video recording, games or PDF convertors. They can easily bypass the detection of the antivirus programs on your system. If you cannot remove Microsoft Device Emulator version — ENU like other programs, then it’s worth checking whether it’s a malware or not.
Method 5: Reinstall Microsoft Device Emulator version — ENU to Uninstall.
When the file required to uninstall Microsoft Device Emulator version — ENU is corrupted or missing, it will not be able to uninstall the program. In such circumstance, reinstalling Microsoft Device Emulator version — ENU may do the trick. Run the installer either in the original disk or the download file to reinstall the program again. Sometimes, the installer may allow you to repair or uninstall the program as well.
Method 6: Use the Uninstall Command Displayed in the Registry.
When a program is installed on the computer, Windows will save its settings and information in the registry, including the uninstall command to uninstall the program. You can try this method to uninstall Microsoft Device Emulator version — ENU. Please carefully edit the registry, because any mistake there may make your system crash.
Steps:
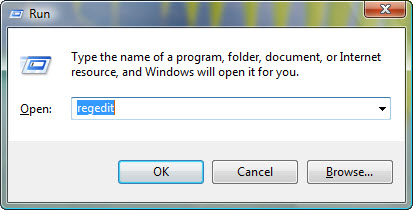
a. Hold Windows and R keys to open the Run command, type in regedit in the box and click OK.
b. Navigate the following registry key and find the one of Microsoft Device Emulator version — ENU:
HKEY_LOCAL_MACHINE\SOFTWARE\Microsoft\Windows\CurrentVersion\Uninstall
c. Double click on the UninstallString value, and copy its Value Data.
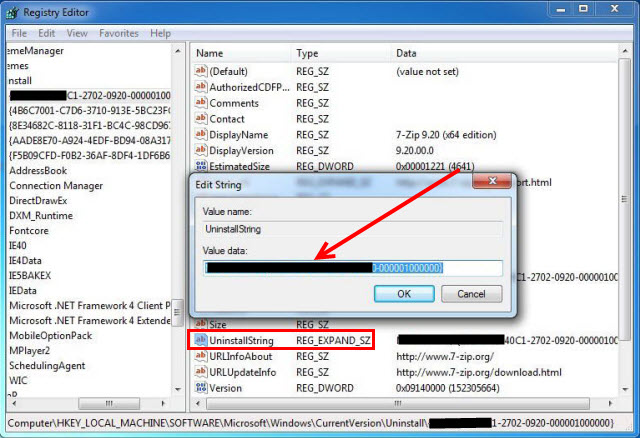
d. Hold Windows and R keys to open the Run command, paste the Value Data in the box and click OK.
e. Follow the wizard to uninstall Microsoft Device Emulator version — ENU.
Method 7: Uninstall Microsoft Device Emulator version — ENU with Third-party Uninstaller.
The manual uninstallation of Microsoft Device Emulator version — ENU requires computer know-how and patience to accomplish. And no one can promise the manual uninstallation will completely uninstall Microsoft Device Emulator version — ENU and remove all of its files. And an incomplete uninstallation will many useless and invalid items in the registry and affect your computer performance in a bad way. Too many useless files also occupy the free space of your hard disk and slow down your PC speed. So, it’s recommended that you uninstall Microsoft Device Emulator version — ENU with a trusted third-party uninstaller which can scan your system, identify all files of Microsoft Device Emulator version — ENU and completely remove them. Download this powerful third-party uninstaller below.