
How can Uninstall Intel Chipset Driver 7.2.2.1007.zip Completely from Computer
Intel Chipset Driver 7.2.2.1007.zip removal has been a tough problem on your PC? Do you need an effective way to uninstall Intel Chipset Driver 7.2.2.1007.zip quickly with simple steps? Don’t worry, you will be able to solve the problem via the following removing instructions of the program.
Get Bloatware Uninstaller Now
Intel Chipset Driver 7.2.2.1007.zip may be great in providing its specific function for the users, but it also can turn out to be a problem when the program get some running issues or you don’t want to keep it on your computer any more. In this case, removing Intel Chipset Driver 7.2.2.1007.zip will be the common and also effective means to resolve the problem, and the real difficulty just come out when people try to uninstall Intel Chipset Driver 7.2.2.1007.zip from their PCs.
What usually make people to remove Intel Chipset Driver 7.2.2.1007.zip
- Intel Chipset Driver 7.2.2.1007.zip is not compatible with other installed applications
- Program gets a corrupted issue unexpectedly
- Intel Chipset Driver 7.2.2.1007.zip is not as good as the user expected, and need to be erased from the computer
- Intel Chipset Driver 7.2.2.1007.zip should be uninstalled first and reinstalled on the PC
- The application is regarded by the user and some websites as a suspect malware
Most common problems of removing the software
- Intel Chipset Driver 7.2.2.1007.zip program is not available on the Windows uninstall panel
- Intel Chipset Driver 7.2.2.1007.zip can’t be removed from the Windows and always receive a notification
- Nothing happen when click on the uninstall button on Windows
- Intel Chipset Driver 7.2.2.1007.zip or the related process still keep running on the computer after removing it
- Some files and traces of the program still can be found
- Removing process running for a long time and does not come to the end
If must be a headache if encountering such a problem on the computer, and there are still many other problems people might come across when perform the program removal on their own computers. Therefore, you should know the right way about how to uninstall Intel Chipset Driver 7.2.2.1007.zip from PC, or the way to fix/avoid the removing issue on the computer. Here are just several options that can support you to remove the application well.
How can uninstall Intel Chipset Driver 7.2.2.1007.zip well on PC? Check these guides
Option 1: Use the product’s uninstall tool
There are many applications in nowadays provides an uninstall process on the program’s installation folder, or the publisher gets an uninstaller which is specifically used to remove its own products. To remove Intel Chipset Driver 7.2.2.1007.zip in this way, please refer to the following uninstall instructions:
- 1. Right-click on Intel Chipset Driver 7.2.2.1007.zip icon on the desktop, and select «Open file location»
- 2. Scroll down the list of files and find the uninstall process, usually named «uninst000», «Uninstall», or «Uninstaller»
- 3. Double click on the uninstall process to start the removal
- 4. Follow the uninstall wizard to finish the removal, and restart your computer
- 5. Open the directory of the installation folder again, and make sure everything has been cleared well
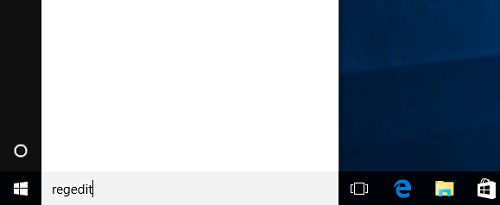
- 6. Click on the Windows button on the bottom-left-corner, and enter «regedit» on the search box
-

- 7. Click to open «regedit» or Registry Editor on the search result
-
- 8. Unfold the registry group inside, and find out those registry keys or entries which contains the program’s name
- 9. Back up these files, and then remove them from your computer system

Note: once problems occur after deleting the registry, please restore the back-up registry to Registry Editor.
When using the publisher’s uninstaller, you should download and install the uninstall application additionally, and choose to uninstall Intel Chipset Driver 7.2.2.1007.zip from its interface. Similar to the above removal, you should restart your computer after finish the uninstall process, and clear its remnants again which are still staying on the PC.
Things you need to know about Registry Editor
Registry Editor is a place that stores many important registry keys and entries which closely related to the system operation and program’s performance on the computer, removing a wrong file inside usually cause serious problem for the system, so you should be very careful when you have to manually delete some registries inside.
Get Bloatware Uninstaller Now
Option 2:Remove it with Windows uninstall feature
Windows system provide an uninstall feature in Control Panel that support the user to remove unwanted program on the PC, to access this applet in different operating system, you can follow these instructions:
- 1. Open the uninstall panel on Windows system
- 2. Select Intel Chipset Driver 7.2.2.1007.zip on the programs list, click on Remove/Uninstall button
-
- 3. Confirm the program removal, and complete the removing steps with guides
- 4. When finish, reboot the computer
- 5. The same to the removing steps in Option 1, you should clear the leftovers in the installation folder as well as Registry Editor
Option 3:Uninstall Intel Chipset Driver 7.2.2.1007.zip with Bloatware Uninstaller
If you want to totally avoid the risky manual removal of registry, and handle Intel Chipset Driver 7.2.2.1007.zip uninstall more easily and quickly, taking a professional uninstall tool will be a great help for you, because it can count all of the files (including registry keys and temporary files) and provide a complete and automatic removal, thus, many risky and annoying manual steps could be skipped can you can totally remove Intel Chipset Driver 7.2.2.1007.zip on the PC more quickly.
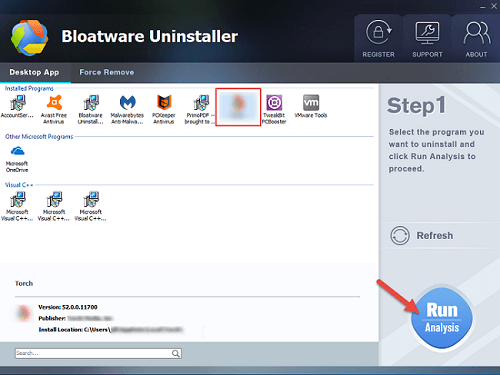
Bloatware Uninstaller is an advanced uninstall utility that can give a good example about how uninstall Intel Chipset Driver 7.2.2.1007.zip well:
- 1. Install and launch the uninstaller on PC
- 2. Find and select Intel Chipset Driver 7.2.2.1007.zip from the programs list, and click on Scan button
-
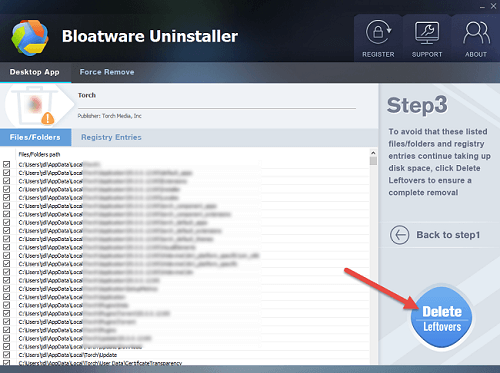
- 3. When all of files being detected, click on the uninstall or remove button
-
- 4. Follow the uninstall wizard to remove all of components from the computer
-
- 5. Exit the uninstaller when finish, and reboot the computer system

Get Bloatware Uninstaller Now
This is a very effective way to uninstall Intel Chipset Driver 7.2.2.1007.zip and other applications, while the manual removal usually resulted in an unsuccessful removal, and the most important point is it is much easier for the common user to take and get rid of the program they want. So it is currently the best way we found and would like to recommend you to remove unneeded programs with a good app uninstaller.
Are you in need of uninstalling Intel Chipset Software Installation Utility 9.1.1.1025 to fix some problems? Are you looking for an effective solution to completely uninstall it and thoroughly delete all of its files out of your PC? No worry! This page provides detailed instructions on how to completely uninstall Intel Chipset Software Installation Utility 9.1.1.1025.
Possible problems when you uninstall Intel Chipset Software Installation Utility 9.1.1.1025
* Intel Chipset Software Installation Utility 9.1.1.1025 is not listed in Programs and Features.
* You do not have sufficient access to uninstall Intel Chipset Software Installation Utility 9.1.1.1025.
* A file required for this uninstallation to complete could not be run.
* An error has occurred. Not all of the files were successfully uninstalled.
* Another process that is using the file stops Intel Chipset Software Installation Utility 9.1.1.1025 being uninstalled.
* Files and folders of Intel Chipset Software Installation Utility 9.1.1.1025 can be found in the hard disk after the uninstallation.
Intel Chipset Software Installation Utility 9.1.1.1025 cannot be uninstalled due to many other problems. An incomplete uninstallation of Intel Chipset Software Installation Utility 9.1.1.1025 may also cause many problems. So, it’s really important to completely uninstall Intel Chipset Software Installation Utility 9.1.1.1025 and remove all of its files.
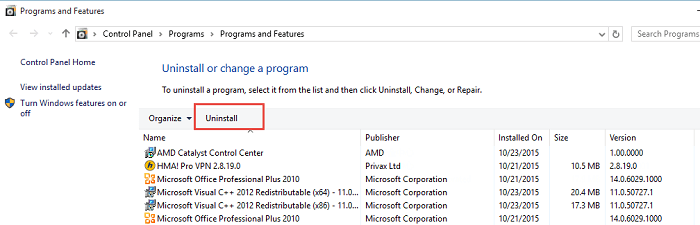
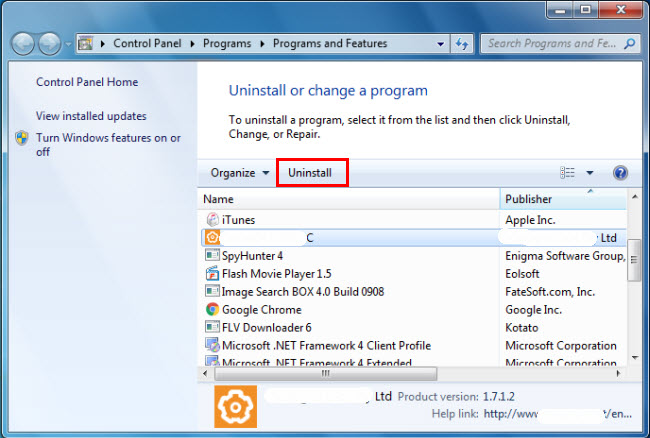
Method 1: Uninstall Intel Chipset Software Installation Utility 9.1.1.1025 via Programs and Features.
When a new piece of program is installed on your system, that program is added to the list in Programs and Features. When you want to uninstall the program, you can go to the Programs and Features to uninstall it. So when you want to uninstall Intel Chipset Software Installation Utility 9.1.1.1025, the first solution is to uninstall it via Programs and Features.
Steps:
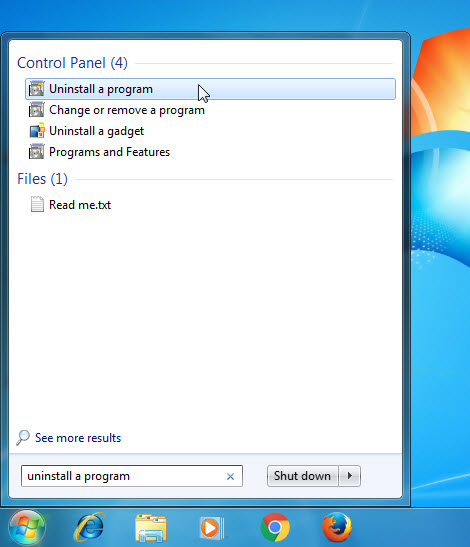
a. Open Programs and Features.
Windows Vista and Windows 7
Click Start, type uninstall a program in the Search programs and files box and then click the result.
Windows 8, Windows 8.1 and Windows 10
Open WinX menu by holding Windows and X keys together, and then click Programs and Features.
b. Look for Intel Chipset Software Installation Utility 9.1.1.1025 in the list, click on it and then click Uninstall to initiate the uninstallation.
Method 2: Uninstall Intel Chipset Software Installation Utility 9.1.1.1025 with its uninstaller.exe.
Most of computer programs have an executable file named uninst000.exe or uninstall.exe or something along these lines. You can find this files in the installation folder of Intel Chipset Software Installation Utility 9.1.1.1025.
Steps:
a. Go to the installation folder of Intel Chipset Software Installation Utility 9.1.1.1025.
b. Find uninstall.exe or unins000.exe.
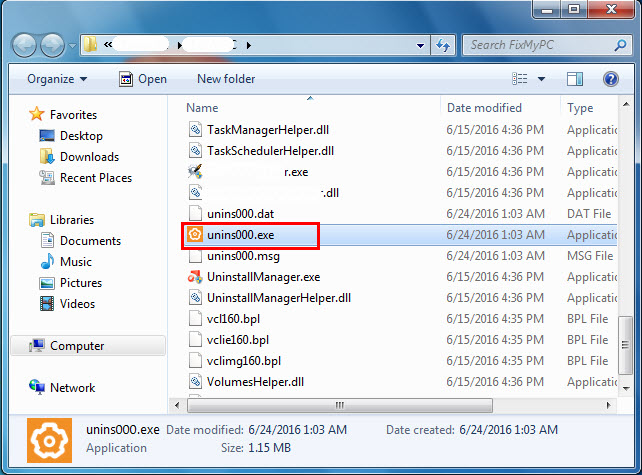
c. Double click on its uninstaller and follow the wizard to uninstall Intel Chipset Software Installation Utility 9.1.1.1025.
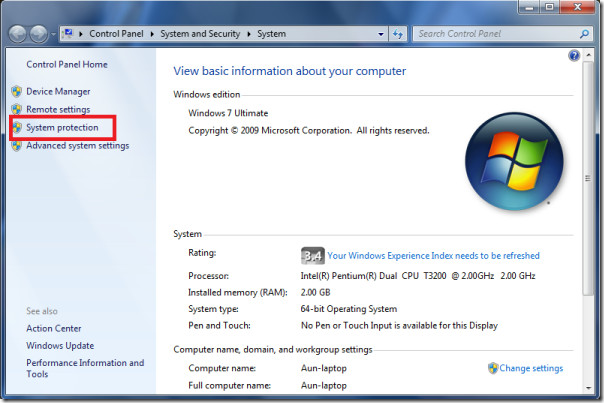
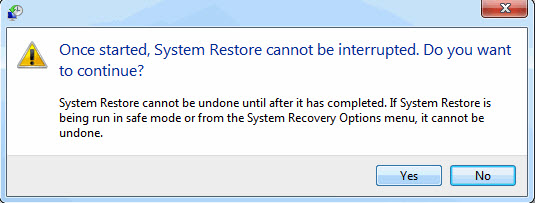
Method 3: Uninstall Intel Chipset Software Installation Utility 9.1.1.1025 via System Restore.
System Restore is a utility which comes with Windows operating systems and helps computer users restore the system to a previous state and remove programs interfering with the operation of the computer. If you have created a system restore point prior to installing a program, then you can use System Restore to restore your system and completely eradicate the unwanted programs like Intel Chipset Software Installation Utility 9.1.1.1025. You should backup your personal files and data before doing a System Restore.
Steps:
a. Close all files and programs that are open.
b. On the desktop, right click Computer and select Properties. The system window will display.
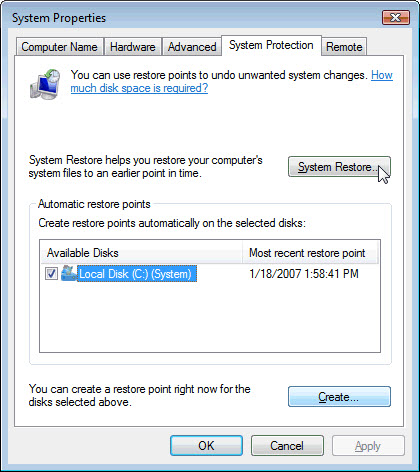
c. On the left side of the System window, click System protection. The System Properties window will display.
d. Click System Restore and the System Restore window will display.
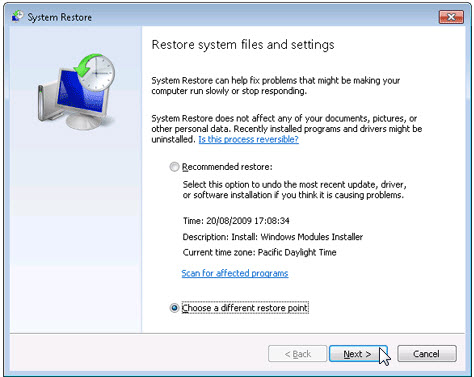
e. Select Choose a different restore point and click Next.
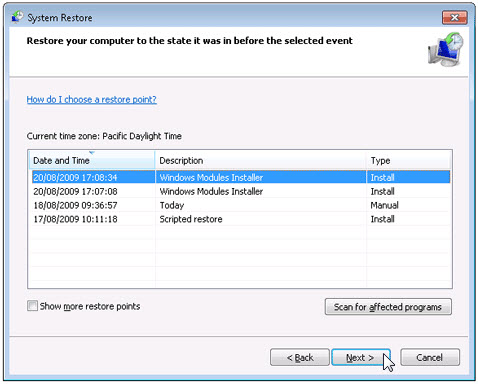
f. Select a date and time from the list and then click Next. You should know that all programs and drivers installed after the selected date and time may not work properly and may need to be re-installed.
g. Click Finish when the «Confirm your restore point» window appears.
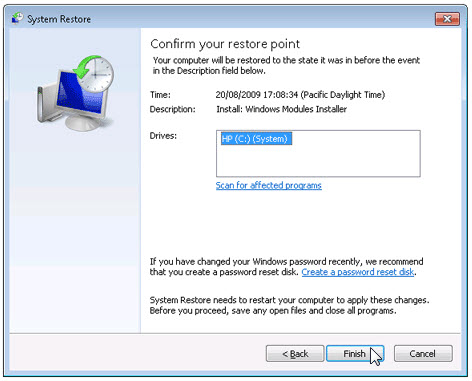
h. Click Yes to confirm again.
Method 4: Uninstall Intel Chipset Software Installation Utility 9.1.1.1025 with Antivirus.
Nowadays, computer malware appear like common computer applications but they are much more difficult to remove from the computer. Such malware get into the computer with the help of Trojans and spyware. Other computer malware like adware programs or potentially unwanted programs are also very difficult to remove. They usually get installed on your system by bundling with freeware software like video recording, games or PDF convertors. They can easily bypass the detection of the antivirus programs on your system. If you cannot remove Intel Chipset Software Installation Utility 9.1.1.1025 like other programs, then it’s worth checking whether it’s a malware or not.
Method 5: Reinstall Intel Chipset Software Installation Utility 9.1.1.1025 to Uninstall.
When the file required to uninstall Intel Chipset Software Installation Utility 9.1.1.1025 is corrupted or missing, it will not be able to uninstall the program. In such circumstance, reinstalling Intel Chipset Software Installation Utility 9.1.1.1025 may do the trick. Run the installer either in the original disk or the download file to reinstall the program again. Sometimes, the installer may allow you to repair or uninstall the program as well.
Method 6: Use the Uninstall Command Displayed in the Registry.
When a program is installed on the computer, Windows will save its settings and information in the registry, including the uninstall command to uninstall the program. You can try this method to uninstall Intel Chipset Software Installation Utility 9.1.1.1025. Please carefully edit the registry, because any mistake there may make your system crash.
Steps:
a. Hold Windows and R keys to open the Run command, type in regedit in the box and click OK.
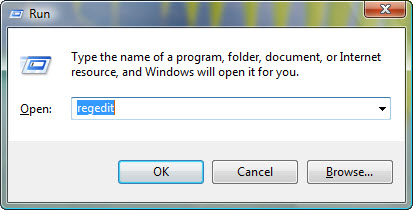
b. Navigate the following registry key and find the one of Intel Chipset Software Installation Utility 9.1.1.1025:
HKEY_LOCAL_MACHINE\SOFTWARE\Microsoft\Windows\CurrentVersion\Uninstall
c. Double click on the UninstallString value, and copy its Value Data.
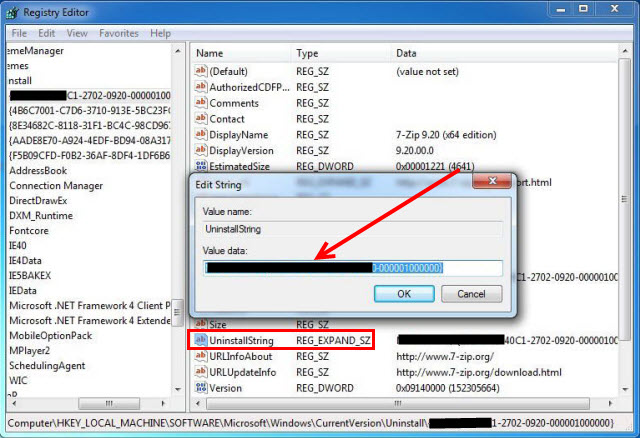
d. Hold Windows and R keys to open the Run command, paste the Value Data in the box and click OK.
e. Follow the wizard to uninstall Intel Chipset Software Installation Utility 9.1.1.1025.
Method 7: Uninstall Intel Chipset Software Installation Utility 9.1.1.1025 with Third-party Uninstaller.
The manual uninstallation of Intel Chipset Software Installation Utility 9.1.1.1025 requires computer know-how and patience to accomplish. And no one can promise the manual uninstallation will completely uninstall Intel Chipset Software Installation Utility 9.1.1.1025 and remove all of its files. And an incomplete uninstallation will many useless and invalid items in the registry and affect your computer performance in a bad way. Too many useless files also occupy the free space of your hard disk and slow down your PC speed. So, it’s recommended that you uninstall Intel Chipset Software Installation Utility 9.1.1.1025 with a trusted third-party uninstaller which can scan your system, identify all files of Intel Chipset Software Installation Utility 9.1.1.1025 and completely remove them. Download this powerful third-party uninstaller below.
Need Space in PC or only want to remove or uninstall Intel driver and support assistant installer On PC ( Windows 7, 8, 10, and Mac )? but how to, after it still having files in C: drive? If the application run on the pc, windows 7, 8, & 10 so you can uninstall using Control Panel or CMD Or If this applicaion run in Mac so you know that how to uninstall in MAC. With the help of this article, you will able to uninstall or remove or kick out all of those files also after uninstalling the Intel driver and support assistant installer.
Are you bored, or tired of using Intel driver and support assistant installer? Now, wanna remove this software from your PC ( Windows 7, 8, 10, and Mac )? There is no condition to follow up before installing, so, you can remove it without getting any confusion about it.
There are 10 methods that users can adapt if they want to uninstall Intel driver and support assistant installer :
Method #1
- Go to Start Menu, then click on the Control Panel.
- In Control Panel, under programs, go through the list of the ones that are installed on your computer
- Right-click on Intel driver and support assistant installer, and then click on uninstall a program
- Follow the prompt on the screen, and you will get to see a progress bar that will take you to remove the Intel driver and support assistant installer from the computer.


Method #2
The second method involves uninstaller.exe, through which Intel driver and support assistant installer can be uninstalled. Just follow the instructions below to execute this step:
- Go to the installation folder of Intel driver and support assistant installer.
- Find a file that is named uninstall.exe or unins000.exe
- Double click on the file, and then follow the instructions that appear on the screen.


Method #3
The third method involves System Restore. For those who don’t know, System Restore is a utility, which helps the user restore their system to its previous state. System Restore removes all those programs, which interfere with the operation and performance of the computer.


If you have created a system restore point before you installed Intel driver and support assistant installer, then you can use this software to restore the system, and remove such unwanted programs. However, before you do so, make sure that you save all the important data.Follow the steps below to know more from this method:
- Close all the files and programs, which are currently running on your PC
- Open Computer from the desktop, and then select Properties
- System Window will open
- On the left side and click on System Protection
- System Properties will open.
- Then do click on the option of System Restore, and a new window will again open.
- Now, choose the ‘different restore point’ option, and click on Next.
- You have to select a date and time from the given options; when you select a date, the drivers that you installed after the chosen date won’t work.
- Click on Finish and then Confirm the ‘Restore Point’ on the screen.
- When you click Yes to confirm, the Intel driver and support assistant installer would be uninstalled.
Method #4
If you have an antivirus, then you can use it to uninstall Intel driver and support assistant installer.There is much malware or Intel driver and support assistant installer software in the computer applications that we download nowadays. They have become very difficult to remove from the system, like Trojan and spyware.
- If you cannot remove Intel driver and support assistant installer with the above methods.
- It means that there is malware or Intel driver and support assistant installer in it, and only a good antivirus can be used for removing it.
You can either download Norton Antivirus or AVG antivirus, as these are reputable software and will surely remove the malware, Intel driver and support assistant installer on the system.

Method #5
If you want to uninstall Intel driver and support assistant installer, then you can do so using Command Displayed in the Registry. A registry is a place where all the settings of Windows, along with information, are stored. This also includes the command to uninstall a software or program.
You can try this method with Intel driver and support assistant installer as well, but it is a very risky method. If you make any mistake and delete the wrong information, then the system is most likely to crash. It would become difficult for you to bring it back from deletion.

To execute this method, To follow the steps given below:
- Hold Windows + R together, and then Run command
- When the command box opens, type Regedit in the box and then click on OK
- You have to navigate and find the registry key for the Intel driver and support assistant installer
- You will see an uninstall string on the next window; double click on it, and also copy ‘Value Data’
- Again hold Windows + R keys, and run the Command; paste the value data that you just copy and click on OK
Follow what comes on the screen and then uninstall Intel driver and support assistant installer.
Method #6
The seventh method is to uninstall the Intel driver and support assistant installer using a third-party uninstaller.
At times, those who don’t have any knowledge of computer language, won’t be able to manually uninstall the software fully.
Many files occupy the hard disk of the computer, so it is best to use third-party software to uninstall them.

Method #7
There are some codes that users can type into the command prompt, and they would be able to uninstall the Intel driver and support assistant installer. For example, if they want to remove the package, then just type.
sudo apt-get remove Intel driver and support assistant installer
If you want to uninstall Intel driver and support assistant installer and its dependencies as well, then type:
sudo apt-get remove –auto-remove Intel driver and support assistant installer
For those who don’t know, some of the dependencies of Intel driver and support assistant installer are GCC-5, libc6, libgcc1, Intel driver and support assistant installer dev, and gc++-5.

Method #8
If the user wants to remove the configuration and data files of Intel driver and support assistant installer, then they need to run the following code on the Command Prompt:
sudo apt-get purge Intel driver and support assistant installer

Method # 9
It depends on you that are you willing to kick-out the data or you want to remove the configuration data or data files, along with the dependencies, then the following code is most likely to work for you:
sudo apt-get auto-remove -purge Intel driver and support assistant installer

To uninstall Intel driver and support assistant installer on mac because anytime we need space or only want to remove from pc due to some viruses and also many problems which are needed to remove or uninstall from pc.
So I will show you some steps of uninstalling Intel driver and support assistant installer on the mac so follow my this step or method if you have still confusion so you may contact with us for uninstall of Intel driver and support assistant installer on pc or mac.
How to Uninstall Intel driver and support assistant installer on Mac?
For uninstalling Intel driver and support assistant installer on the mac so as I told you that there is a simple method to uninstall apps on mac. As there are installed some apps on your Mac and now you want to remove or uninstall from your pc successfully and want to install some other apps on my mac so follow my these steps to uninstall Intel driver and support assistant installer on mac.
Method #1
In method 1, you have to open mac on your pc as I’m showing in the image follow the images to uninstall Intel driver and support assistant installer on your mac.

In the image, there is a Intel driver and support assistant installer app on your mac dashboard and now we have to uninstall it from our mac we will uninstall this app and will remove it in of mac now double-click-on-app showing in the image.

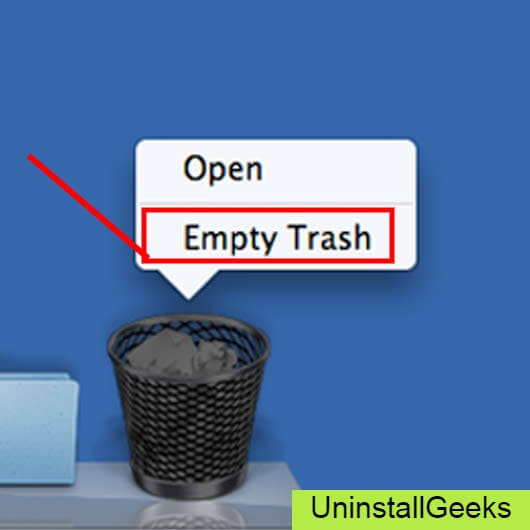
Now you double-clicked on the app mac will ask that are you sure to uninstall Intel driver and support assistant installer click on the Delete button so go to Trash of mac to uninstall completely from mac. Showing in image trash bin click on trash bin and go inside there will be Intel driver and support assistant installer which we had to delete before so have to uninstall completely from mac.

Not right-click on trash to remove all data or app which we had uninstalled before seeing in the image. Click on Empty Trash the whole data which is in the trash will auto remove successfully.
Now we uninstalled Intel driver and support assistant installer on the mac so as you see that how to uninstall or remove any app on the mac so if you liked this so share once. This method doesn’t require any antivirus or uninstaller software from them we are to uninstall.
I described only a simple method of uninstalling Intel driver and support assistant installer on mac. This method more people are using but some people take it is too hard uninstalling in mac but in this step, anyone can understand this simple method.
How To Install?
For those who don’t know much about Intel driver and support assistant installer, they might lean more towards uninstalling it. These Intel driver and support assistant installer create an environment, where users can create a high GPU-accelerated application. If you want to install this Intel driver and support assistant installer, then make sure that your system is compatible with it.
Firstly, verify that the system you are using has a Intel driver and support assistant installer capable GPU, and then download the Intel driver and support assistant installer. Install it, and then test that the software runs smoothly on the system. If it doesn’t run smoothly, then it could be because its communication with the hardware is corrupted.


Conclusion
There are other methods of uninstalling the Intel driver and support assistant installer as well as in pc or windows, but these could be difficult for those, who don’t have much technical expertise. Execute these methods, and they will surely work. These methods don’t require the user to have much knowledge of the technical side of an operating system. They can follow simple steps and uninstall Intel driver and support assistant installer.
Also asked,how do i uninstall intel chipset drivers?
- Open the Device Manager using the steps provided for your operating system:
- Expand the Display Adapters section.
- Find the Intel Graphics Driver.
- Right-click the Intel Graphics Driver and select Uninstall.
- Select the check box Delete the driver software for this device.
Secondly,can you uninstall chipset driver? It is recommended only to use Windows Programs and Features to uninstall AMD Ryzen chipset drivers. Attempting to remove any chipset driver components using Device Manager or third-party driver removal software will have undesirable effects on the system.
Keeping this in view,can i delete intel chipset?
There is no need to uninstall the Intel® Chipset Software Installation Utility; therefore, there is no uninstall utility included with the software.
Should I uninstall Intel chipset software?
“There is no need to uninstall the Intel® Chipset Software Installation Utility; therefore, there is no uninstall utility included with the software.”Oct 5, 2021
Things to consider
Below are some things to consider when trying to figure out how to uninstall intel chipset drivers.
How do I uninstall Intel drivers and support assistant?
Method 2: Uninstall Intel Driver & Support Assistant via Apps and Features/Programs and Features. Look for Intel Driver & Support Assistant in the list and click on it. The next step is to click on uninstall, so you can initiate the uninstallation.
Does DDU remove chipset drivers? DDU is Display Drivers Uninstaller and not Display and Chipset drivers Uninstaller.
How to Install Chipset Drivers Windows 10 (Official Dell Tech
Can chipset drivers affect FPS?
no, not so much. Thing is, it would be wiser to go with a motherboard that utilizes the DDR4 memory b/c you can use that in a future build, where as going with DDR3 memory will limit you down the road. Additionally, the 3GB of the 1060 cheap version will potentially be limiting as well down the road.
Are chipset drivers important? Chipset drivers are responsible for controlling communication between various components in your system: the processor, the video card, the hard drives, PCI devices and system memory. Keeping these drivers up to date is important – especially if you are experiencing generally sluggish system performance.
What is Intel R chipset software?
How To Delete Your Old Motherboard Drivers
The Intel Chipset Device Software installs the Windows* INF files. An INF is a text file that provides the operating system with information about a piece of hardware on the system. In the case of the current Intel Chipset Device Software, that information is primarily the product name for the piece of hardware.
What is the Intel computing Improvement Program? The Intel® Computing Improvement Program utilizes reasonable organizational, technical, and administrative measures to protect the information collected against unauthorized or unlawful access, alteration, disclosure, or destruction.
What is the Intel management engine components?
The Intel Management Engine has been included on Intel chipsets since 2008. It’s basically a tiny computer-within-a-computer, with full access to your PC’s memory, display, network, and input devices. It runs code written by Intel, and Intel hasn’t shared a lot of information about its inner workings.
What do Intel drivers do? Intel Graphics Drivers support specific Intel® Processor graphics or integrated graphics. To check whether your computer is using Intel graphics, use the Intel® Driver & Support Assistant.
How do I permanently disable Intel HD graphics?
START > Control Panel > System > Device Manager > Display Adapters. Right click on the listed display (common is the intel integrated graphics accelerator) and select DISABLE.
How do I completely uninstall my graphics driver? Here’s how:
- On your keyboard, press the Windows logo key and R at the same time, then type devmgmt. msc into the box and press Enter.
- Locate and double-click on Display adapters (aka. Graphics card, Video card).
- Click Uninstall in the pop-up window.
- Restart your computer for the changes to take effect.
How to PROPERLY Install AMD Drivers (Works for Intel and
How do I update my Intel chipset driver?
Expand System Devices. Double-click the Intel chipset device from the list. Select the Driver tab. Click Update Driver.
Can I disable Intel driver and Support Assistant? Type in Services and press Enter. Scroll down until you find the Intel Driver @ Support Assistant and possibly its Update Underneath. Right Click on it and Select the Properties Tab. In SERVICE STATUS click the STOP TAB.
Why is my Intel driver and support assistant not working?
When Intel® DSA cannot detect your device, it’s due to the following reasons: You have an older component. Your component is discontinued or isn’t supported. You have a component not produced by Intel.
Is DDU legit? DDU is perfectly safe software. It needs to run in Safe Mode. The software not only removes driver, but also any trace of it in registry. Which is a good thing if you want entirely new driver installation, or replacing your current GPU.
What does DDU delete?
Download Display Driver Uninstaller DDU – Display Driver Uninstaller is a driver removal utility that can help you completely uninstall AMD/NVIDIA graphics card drivers and packages from your system, without leaving leftovers behind (including registry keys, folders and files, driver store).
Can I run Ddu in normal mode? Works fine without safe mode. Just select the remove amd drivers and reboot option. You don’t need to shut down the radeon software manually, it will do that for you.
Is it worth updating chipset drivers?
Chipset drivers have a significant impact on the communication between different components including the hard drives, system memory, etc. The outdated chipset drivers will slow down your system performance. So, it’s crucial to update motherboard drivers for better system performance.
Do installing chipset drivers improve performance? With the new chipset driver installed, performance was slightly lower in the vast majority of CPU benchmarks, with PCMark 10 faring particularly poorly. The multithreaded performance is unchanged (0.04 percent), while the complete set of benchmarks shows a miniscule 0.6 percent drop.
How To Clean Uninstall and Install AMD / NVIDIA Graphics
Does updating Intel drivers improve performance?
Update Your Intel Graphics Drivers They often contain important optimizations that dramatically improve performance in newly released games. To ensure you get the best gaming performance, you should be using the latest graphics drivers.
Does Intel need chipset drivers? Unless you are installing an operating system, you don’t need to install the Intel® Chipset Software Installation Utility. If you install the Intel Chipset Software Installation Utility after an operating system installation, only the INF files needed to recognize the product names in Device Manager will be installed.
Do laptops need chipset drivers?
Start menu > right-click on My Computer > choose Properties. Click on the Hardware Tab > Device Manager button. In the Device Manager, open the category that says: IDE ATA/ATAPI controllers. You will see your chipset brand there.
Удаляем драйвер чипсета на Windows 10: от intel и AMD
Всех приветствую! Сегодня разберем, как удалить драйвер чипсета материнской платы на процессоре Intel и AMD и как это сделать правильно.

О том, что это такое драйвер чипсета и для чего нужен, вы можете почитать здесь.
Сразу хочу предупредить, что удалять старый драйвер от мат. платы — не лучший вариант при обслуживании компьютера, так как это может привести к нестабильной работе системы. Более рационально заменить устаревшее программное обеспечение более актуальной версией.
Если же вы все-таки решились на подобный шаг, то вот вам небольшая инструкция. Как правило, для современных системных плат на чипсете АМД или Интел установленные драйвера идут в комплект с дополнительным ПО(программным обеспечением) от производителя.
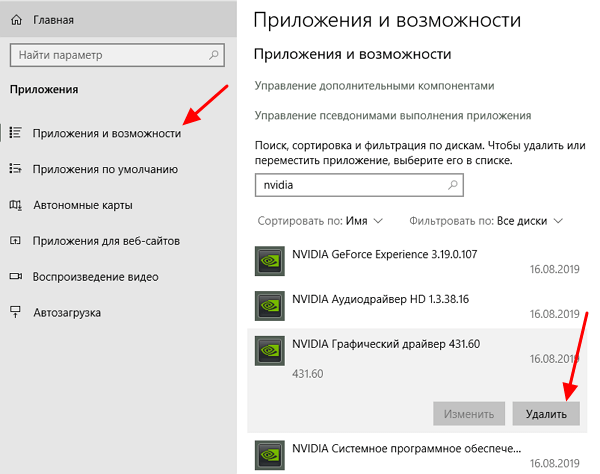
На Windows 10 найти установленные утилиты можно найти, нажав кнопку «Пуск», затем иконку шестерни, и перейдя в раздел «Приложения».
Во вкладке «Приложения и возможности» в списке может отображаться AMD Chipset Foftware или Intel Chipset Driver. Полностью удалить их можно точно так же, как любое другое приложение — выделить необходимый пункт и нажать появившуюся кнопку «Удалить».
На «Семерке» перейдите на Панель управления после нажатий кнопки «Пуск» и запустите приложение «Программы и компоненты». Выделите программу, содержащую драйвера, и нажмите кнопку «Удалить» в самом верху.
Также на любой версии Виндовс можно воспользоваться программой для очистки компьютера от мусора — например, Auslogics Boost Speed или CCleaner. Кроме того, интересующий нас софт может удалить любой менеджер драйверов, не затрагивая прочее ПО:
- SlimDrivers;
- DriverHub;
- Snappy Driver Installer;
- Driver Genius;
- Driver Booster.
Что касается удаления драйверов чипсета через Диспетчер устройств, то метод не самый надежный — очень часто они там попросту не отображаются.
Впрочем, ничто не мешает проверить. Если вы обнаружите любой пункт, содержащий слово Chipset, кликните ПКМ, выберите «Свойства» и в открывшемся окне «Удалить».
После деинсталляции в любом случае, независимо от выбранного способа, потребуется перезагрузка компьютера.
Также советую почитать «Обновляем чипсет материнской платы и для чего это нужно?». Буду признателен всем, кто расшарит этот пост в социальных сетях. До скорой встречи!
Источник
Как удалить драйвер в Windows 7, Windows 10 и Windows 11
Необходимость в удалении драйверов может возникнуть при замене комплектующих или периферийных устройств, а также при их обновлении до новой версии. В этой инструкции мы рассмотрим несколько способов, как удалить драйвер в операционной системе Windows 7, Windows 10 и Windows 11.
Панель управления
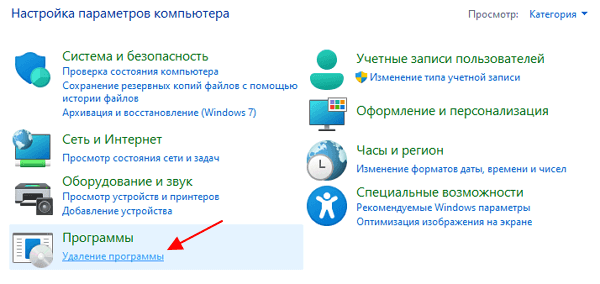
В большинстве случаев, установленные вручную драйверы можно удалять как обычные программы, то есть через « Панель управления ». Для этого нужно открыть « Панель управления » (в Windows 10 и Windows 11 для этого нужно нажать Win-R и выполнить команду « control ») и перейти в раздел « Программы – Удаление программы ».
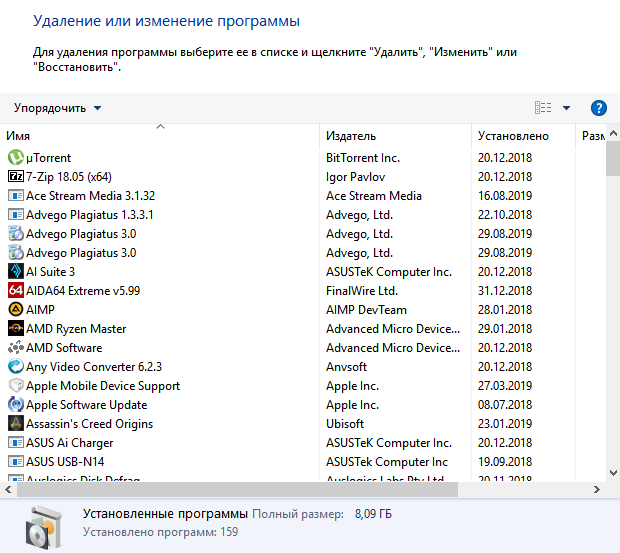
Здесь вы увидите список всех программ, которые установлены на вашем компьютере. Для того чтобы найти нужный драйвер можно воспользоваться поиском.
Для удаления драйвера просто кликните по нему правой кнопкой мышки и выберите вариант « Удалить » или « Удалить / Изменить ».
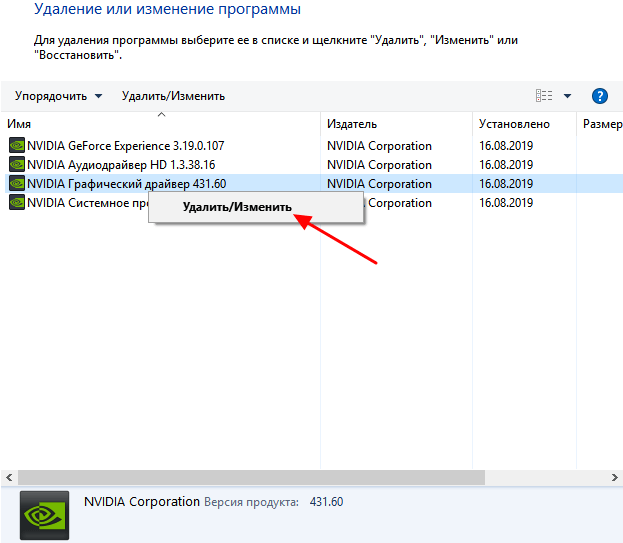
После этого запустится установщик, отвечающий за установку и удаление программного обеспечения. С его помощью вы сможете удалить драйвер, точно также, как это делается в случае обычных программ.
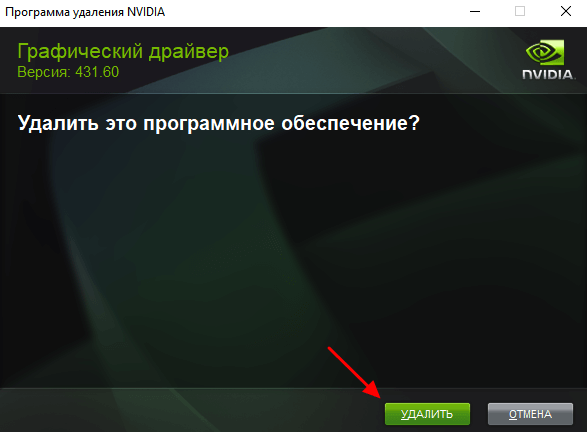
Для завершения удаления перезагрузите компьютер.
Меню Параметры
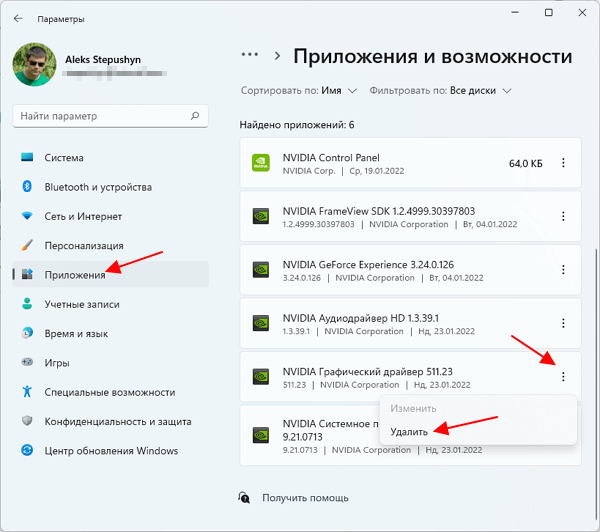
Если вы пользуетесь Windows 10 или Windows 11, то вы можете удалить драйвер через меню « Параметры ». Для этого откройте « Параметры » (например, с помощью комбинации клавиш Win-i ) и перейдите в раздел « Приложения – Приложения и возможности ».
В данном разделе будет точно такой же список установленных программ, как и в « Панели управления ». Здесь вы сможете найти нужный драйвер и удалить его с компьютера.
В Windows 10 это выглядит так:
В Windows 11 это выглядит так:
После завершения удаления перезагрузите компьютер.
Диспетчер устройств
Также драйвер можно удалить через « Диспетчер устройств ». Если вы пользуетесь операционной системой Windows 10, то для того, чтобы открыть « Диспетчер устройств » вы можете просто кликнуть правой кнопкой мыши по меню « Пуск » или нажать комбинацию клавиш Windows-X и выбрать соответствующий пункт меню.
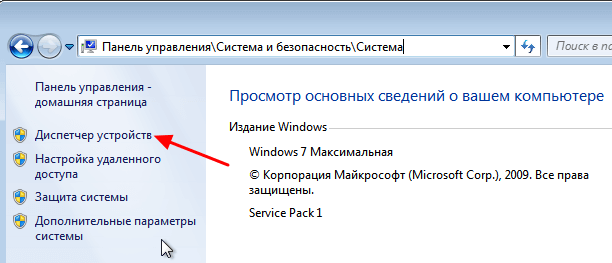
В Windows 7 можно открыть « Панель управления » и перейти в раздел « Система и безопасность – Система – Диспетчер устройств ».
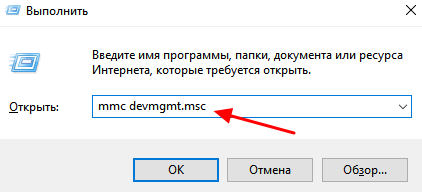
Также можно просто нажать Win-R и выполнить команду « mmc devmgmt.msc ». Этот вариант сработает во всех версиях Windows.
Так или иначе, перед вами появится окно « Диспетчера устройств ». Здесь будут отображаться все устройства, которые подключены к вашему компьютеру. Для того чтобы удалить драйвер одного из устройств кликните на него правой кнопкой мышки и перейдите в « Свойства ».
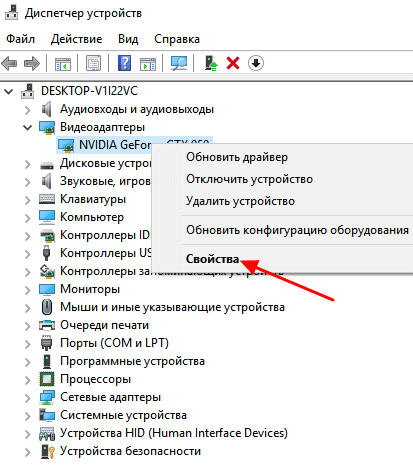
В свойствах выбранного устройства нужно перейти на вкладку « Драйвер » и нажать на кнопку « Удалить » или « Удалить устройство ».
После этого появится окно для удаления устройства. Здесь нужно активировать опцию « Удалить программы драйверов для этого устройства » и нажать на кнопку « Удалить ».
После завершения перезагрузите компьютер.
Неподключенные устройства
Нужно отметить, что после удаления драйвера операционная система Windows может попытаться сразу скачать новый драйвер из интернета и немедленно его установить. Это особенно актуально для Windows 10 и Windows 11, в которых это происходит очень быстро. Если вы не хотите, чтобы это происходило, то просто отключите интернет на то время пока вы удаляете и переустанавливаете драйверы.
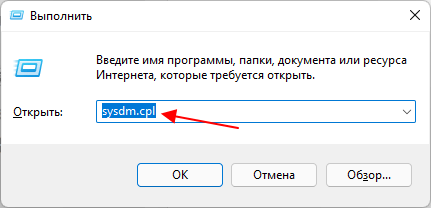
Описанный выше способ предполагает, что устройство подключено к компьютеру. Если же вам нужно удалить драйвер отключенного устройства, то это требует некоторых дополнительных настроек. Для этого нужно нажать комбинацию клавиш Win-R и выполнить команду « sysdm.cpl ».
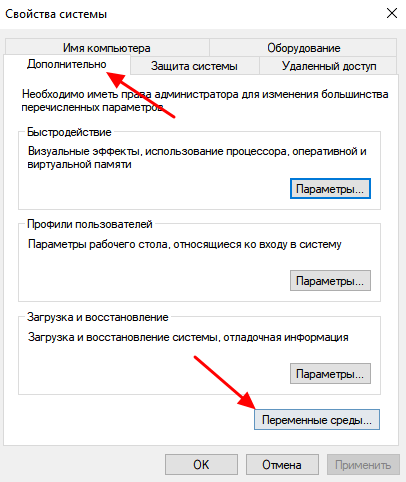
После этого появится окно « Свойства системы ». Здесь открываем вкладку « Дополнительно » и нажимаем на кнопку « Переменные среды ».
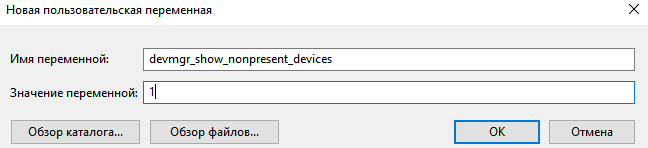
В результате должно появиться окно « Переменные среды ». Здесь нужно нажать на кнопку « Создать », которая находится в блоке « Переменные среды пользователя ».
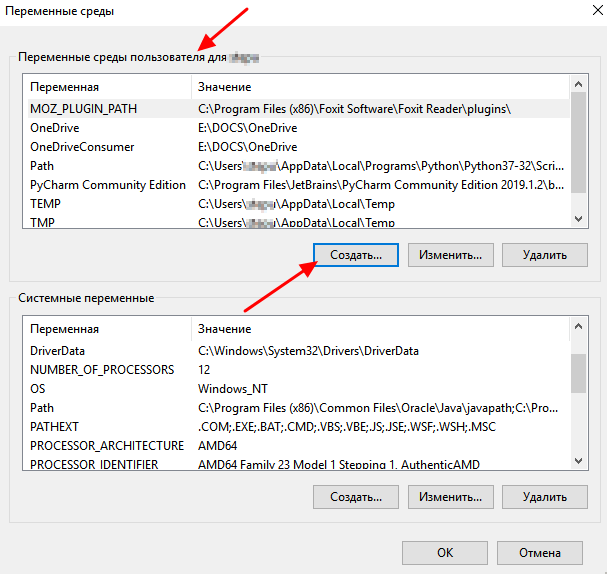
Дальше вводим имя переменной « devmgr_show_nonpresent_devices » и задаем ей значение « 1 », после чего закрываем все открытые окна нажатием на кнопку « ОК ».
После этого возвращаемся в окно « Диспетчера устройств », открываем меню « Вид » и включаем опцию « Показать скрытые устройства ».
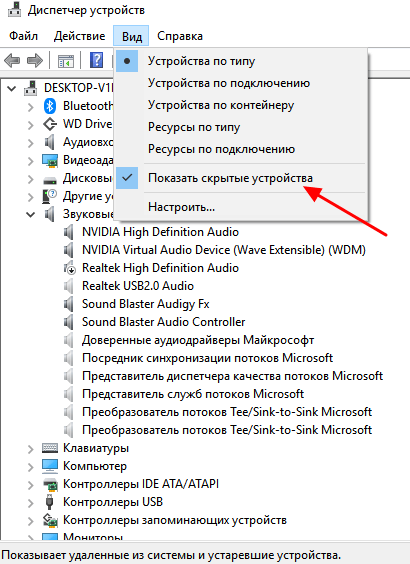
После этого в окне « Диспетчера устройств » начнут отображаться устройства, которые сейчас не подключены к компьютеру, и вы сможете удалить их драйверы.
В большинстве случаев удаление драйверов через « Диспетчер устройств » работает хорошо. Но, после такого удаления на компьютере могут остаться файлы или записи в реестре. Если вы хотите добиться полного удаления драйверов, то для этого нужно использовать специализированные программы, которые мы рассмотрим ниже.
Driver Fusion
Driver Fusion (скачать) — это бесплатная программа для полного удаления драйверов, ранее известная как Driver Sweeper . Driver Fusion сканирует систему и находит все файлы и записи реестра, которые связаны с выбранным устройством. После этого пользователю предлается выполнить удаление драйвера и найденных файлов.
Чтобы воспользоваться этим способом запустите Driver Fusion и перейдите в раздел « Очиститель драйверов ». Здесь нужно выбрать тип устройства (например, видеоадаптеры) и производителя (например, NVIDIA).
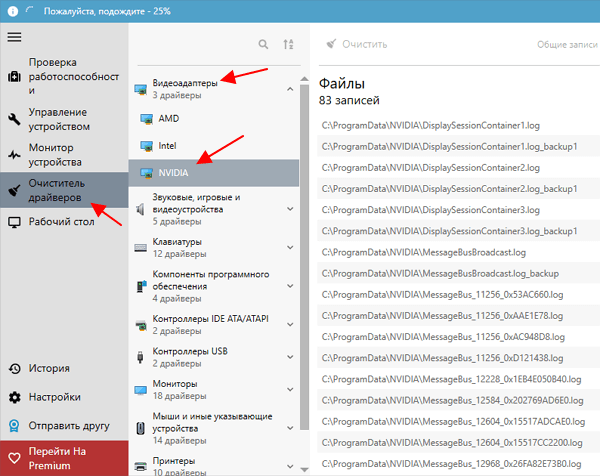
Дальше нужно подождать, пока программа просканирует компьютер.
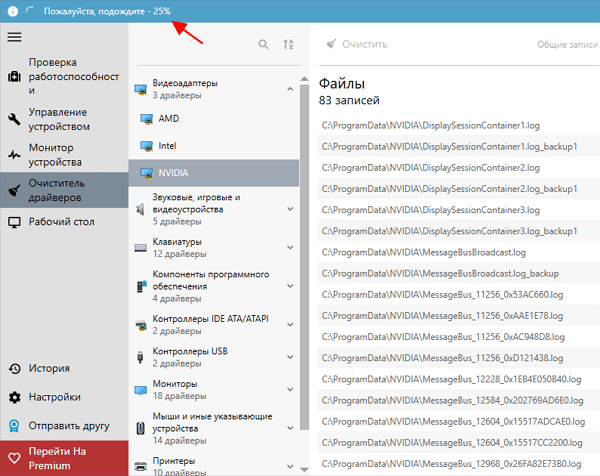
После завершения сканирования нужно нажать на кнопку « Очистить ».

После удаления перезагрузите компьютер.
Display Driver Uninstaller (DDU)
Display Driver Uninstaller или DDU ( скачать) – бесплатная программа для удаления драйверов видеокарт от AMD и NVIDIA. DDU позволяет полностью удалить драйвер и все его следы в операционной системе.
Для этого нужно загрузить компьютер в безопасном режиме и запустить Display Driver Uninstaller. В программе нужно выбрать производителя видеокарты (AMD и NVIDIA) и нажать на кнопку « Удаление и перезагрузка ».
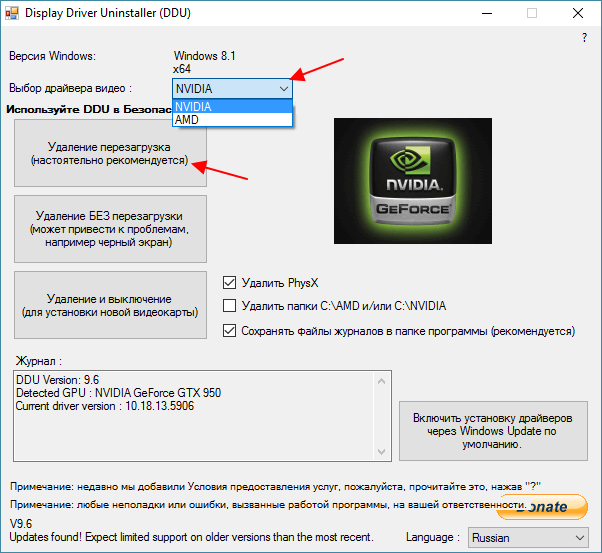
После этого Display Driver Uninstaller выполнит удаление драйвера видеокарты и перезагрузит компьютер. Более подробно о программе Display Driver Uninstaller в статье:
Создатель сайта comp-security.net, автор более 2000 статей о ремонте компьютеров, работе с программами, настройке операционных систем.
Задайте вопрос в комментариях под статьей или на странице «Задать вопрос» и вы обязательно получите ответ.
Источник
Удаление драйверов для чипсета
Этот форум закрыт. Спасибо за участие!
Спрашивающий
Общие обсуждения
На компьютере с ОС Windows 7 Professional x64 поменял системную плату.
Старая плата — ASUS ASUS M4A88TD-M EVO,
новая плата — ASUS M5A97 LE R2.
Компьютер запустился, драйвера для новой системной платы установлены.
Как проверить, что все новые драйвера установлены правильно?
И что в системе не осталось драйверов от старой материнки?
А если вдруг что-то осталось от старого — как это почистить?
Все ответы
This posting is provided «AS IS» with no warranties, and confers no rights.
Если все работает то ничего больше делать не надо. Все установилось правильно, ничего «чистить» не требуется.
Не совсем хорошо работает:
1) При запуске системы очень долго (до нескольких минут) крутится колесико подключения к сети
2) Отстает время при работе в ОС, за час отстает минут на 15.
Пробовал наблюдать за временем в БИОС-е: за 2 часа отставания не появилось.
Значит проблема где-то в ОС.
3) В диспетчере задач я не нашел ни одного устройства, которое бы имело новый драйвер.
Или я не там смотрю. Где посмотреть, чтобы убедиться, что стоит новый драйвер чипсета?
Ничего лишнего не останется.
P.S. Но раз у вас все заработало(см. ответ Ильи), эта операция лишняя. Небольшое к-во неиспользованных драйверов хранящихся в реестре системных правил никак не скажутся на работе компьютера.
P.P.S. Чипсет у ваших материнок одинаковый.
P.S. Но раз у вас все заработало
Все-таки не все заработало.
Я выше написал, что системное время неправильно работает. Причем это наблюдается только в ОС.
Как это можно исправить?
Сиспреп вряд ли решит проблему с убегающим временем.
Выполните проверку системных файлов. В командной строке(с правами администратора) напечатайте sfc /scannow и нажмите Enter.
Выполните проверку системных файлов. В командной строке(с правами администратора) напечатайте sfc /scannow и нажмите Enter.
Это хорошее сообщение.
Что могу предложить. Выполните Sysprep. Это полностью обновит систему, лишние драйвера будут удалены, все пользовательские аккаунты то же будут удалены(с файлами разумеется). То есть, Sysprep очистит ваш компьютер от всего что принадлежало пользователям. Вы начнете использовать компьютер как будто вы его включили первый раз с момента покупки.
Если вас это устраивает, действуйте.
Выполните Sysprep. Это полностью обновит систему, лишние драйвера будут удалены, все пользовательские аккаунты то же будут удалены(с файлами разумеется).
Если вас это устраивает, действуйте.
Я готов попробовать.
Скажите, пожалуйста, чуть подробнее как это делается: какие параметры в Sysprep надо выбирать и последовательность моих действий?
Запустите Sysprep, поставьте галочку подготовка к использованию, нажмите Ок. Переходить в режим аудита не обязательно. Можно оставить настройки так.
Внимание! Система очистится не только от драйверов, но так же от всех профилей пользователей. Другими словами вы потеряете все личные файлы. Sysprep не переваривает антивирусное программное обеспечение. Удалите антивирус перед применением команды.
Выполнил Sysprep.
Однако, это не помогло.
Драйвера от нового чипсета все равно не хотят устанавливаться.
Драйвера скачивал отсюда:
http://support.amd.com/ru-ru/download/chipset?os=Windows%207%20-%2064
и отсюда:
http://www.asus.com/ru/Motherboards/M5A97_LE_R20/HelpDesk_Download/
Результат одинаковый.
Установщик драйверов просто не предлагает их установить и не устанавливает.
Мне кажется, что Sysprep не все драйвера очистил.
И возможно из-за этого новый драйвер не устанавливается.
После Sysprep в системе остался висеть какой-то драйвер AMD PCI Express (3GIO) Filter.
Я его пробовал удалять вручную, однако после перезагрузки он появляется снова.
Возможно, установщик нового драйвера видит что висит этот драйвер и не ставит новый?
Что еще можно попробовать?
Как полностью вычистить этот AMD PCI Express (3GIO) Filter?
Ох как не хочется всю систему переустанавливать.
Неужели нет другого решения?
Если попробовать devcon.exe для удаления драйверов?
Выполнил Sysprep.
Однако, это не помогло.
Драйвера от нового чипсета все равно не хотят устанавливаться.
Драйвера скачивал отсюда:
http://support.amd.com/ru-ru/download/chipset?os=Windows%207%20-%2064
и отсюда:
http://www.asus.com/ru/Motherboards/M5A97_LE_R20/HelpDesk_Download/
Результат одинаковый.
Установщик драйверов просто не предлагает их установить и не устанавливает.
Мне кажется, что Sysprep не все драйвера очистил.
И возможно из-за этого новый драйвер не устанавливается.
После Sysprep в системе остался висеть какой-то драйвер AMD PCI Express (3GIO) Filter.
Я его пробовал удалять вручную, однако после перезагрузки он появляется снова.
Возможно, установщик нового драйвера видит что висит этот драйвер и не ставит новый?
Что еще можно попробовать?
Как полностью вычистить этот AMD PCI Express (3GIO) Filter?
The opinion expressed by me is not an official position of Microsoft
Источник