
Applies ToWindows 11 Windows 10
If you’ve recently installed a Windows Update and the update is causing your device to have errors or other issues, uninstall the update to try to resolve the issue.
Uninstall an update from Settings
-
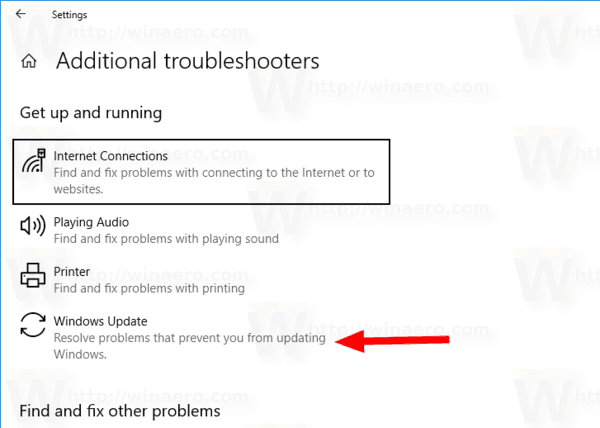
Select Start > Settings > Windows Update . Under Related settings, select Update history> Uninstall updates or use the following shortcut:View update history
Note: In Windows 10, you can access from Update & Security > Windows Update > View your update history > Uninstall updates
-
From the list, select update you want to remove, and then select Uninstall.
Note: Some updates cannot be uninstalled.
Uninstall an update from Windows RE
If you can’t access Windows and you want to uninstall an update, you can do so from Windows RE. Here are the steps:
-
Access the Windows Recovery Environment.
-
Once in Windows RE, select Troubleshoot > Advanced options > Uninstall Updates.
-
Select either Uninstall latest quality update or Uninstall latest quality update.
Need more help?
Want more options?
Explore subscription benefits, browse training courses, learn how to secure your device, and more.
Существует огромное количество задокументированных случаев, когда в Центре обновления Windows возникали проблемы и он не мог произвести обновление компонентов операционной системы с помощью ранее загруженных файлов. Возможно вы и сами столкнулись с такой проблемой.

Что же делать в таком случае? Все довольно просто: вам нужно удалить файлы обновлений и файлы, имеющие к ним отношение, а затем повторить загрузку и установку обновлений для системы. Звучит сложно, но на самом деле — все просто. Итак, вам потребуется сделать следующее:
- удалить содержимое папки Temp;
- удалить содержимое папки SoftwareDistribution;
- удаленить XML-файлов;
- сбросить папку CatRoot2.
Давайте начнем двигаться по порядку. Нажмите на клавиатуре комбинацию клавиш Windows+R для открытия программы «Выполнить». Далее впишите в пустую строку значение «%Temp%»(без кавычек) и нажмите Enter, после чего перед вами откроется одноименная папка. Теперь нажмите комбинацию клавиш CTRL+A для выделения всего содержимого папки, после чего нажмите комбинацию SHIFT+DELETE для удаления файлов без их помещения в Корзину.
Теперь давайте займемся папкой SoftwareDistribution. С ней все немного посложнее, так как вам понадобится сделать кое-что перед удалением ее содержимого. Нажмите правой кнопкой мыши на Пуск и выберите пункт «Командная строка (администратор)». Как только перед вами откроется консоль, выполните в ней следующие две команды:
- net stop wuauserv
- net stop bits
Не закрывайте Командную строку, так как она нам еще понадобится в будущем. Теперь пройдите в директорию C:\Windows\SoftwareDistribution и удалите все еe содержимое. Альтернативный метод — переименование папки SoftwareDistribution в SoftwareDistribution.old. Что делать — решать исключительно вам.
Снова возвращаемся к Командной строке и вводим следующие две команды:
- net start wuauserv
- net start bits
Теперь перейдем к удалению XML-файлов. В данных файлах содержатся списки всех загруженных файлов обновления, которые стоят на очереди для загрузки. Нажмите Windows+R для вызова «Выполнить». Впишите в пустую строку директорию C:\Windows\WinSxS\ и нажмите Enter. Воспользуйтесь встроенным поисковиком Проводника и найдите все XML-файлы с припиской «pending». Удалите их и перезагрузите компьютер.
И последнее, что вам понадобится сделать — это сбросить и очистить папку CatRoot2. Снова вызовите Командную строку с правами администратора и выполните в ней следующие две команды:
- net stop cryptsvc
- md %systemroot%\system32\catroot2.old
- xcopy %systemroot%\system32\catroot2 %systemroot%\system32\catroot2.old /s
Теперь нажмите перейдите в директорию C:\Windows\Windows\System32\catroot2 и удалите ее содержимое. После очистки папки введите в Командную строку команду net start cryptsvc. На этом дела с папкой CatRoot2 можно считать законченными. Перезагружаем компьютер и пробуем выполнить процесс обновления своей операционной системы. Если у вас наблюдались какие-то проблемы с файлами обновления для Windows — они должны были разрешиться.
How to Delete Downloaded Windows Update Files in Windows 10
If you are running into issues with Updates, you can try to delete downloaded Windows Update files. When an update package is damaged or fails to install, Windows 10 may keep the corrupted file on the drive, so it will further cause issues with updates. Here is how to delete the downloaded Windows Update files that Windows 10 doesn’t delete itself.
Windows 10 checks for updates automatically unless you disable this feature manually. The operating system comes with the Windows Update service, which automatically downloads and installs the updates from Microsoft. The downloaded update files are stored on your system drive in the C:\Windows folder.
There are certain reasons for having corrupted Windows Update files. It can be an improper shutdown, OS crash, power failure, or something gone wrong with your Registry. After that, Windows Update may fail to do its job properly. The OS may fail to check for updates, or fail to install them. Sometimes, the Windows Update page in Settings cannot be opened!
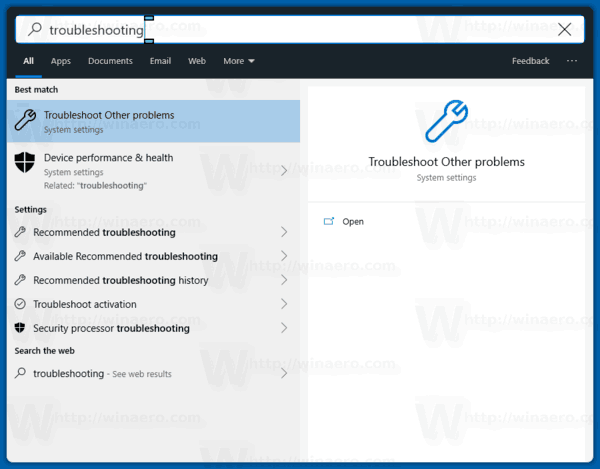
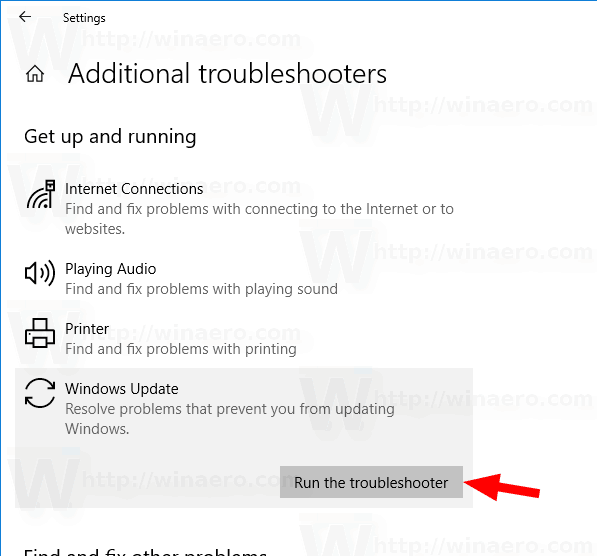
To fix most of the Windows Update issues in Windows 10, usually it is enough to run the built-in Windows Update troubleshooter.
Run the built-in Windows Update troubleshooter.
- Open the Start menu and type: troubleshooting and press Enter.

- Click «Windows Update».

- Click «Run as administrator» in the Troubleshooter’s dialog and complete the Windows Update troubleshooter. See if Windows Update works properly.

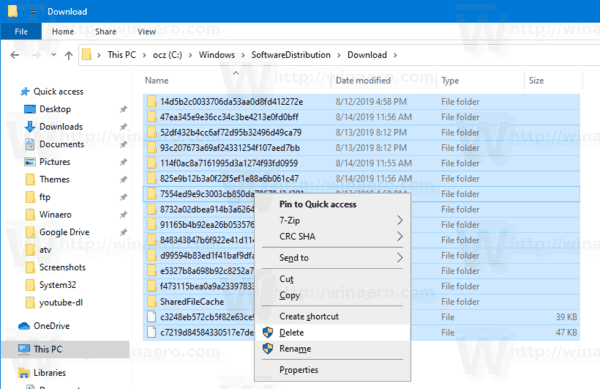
When you run into issues though with updates, you may spend hours or even days figuring out what is going wrong. In such case, you can try to delete downloaded Windows Update files to start over. The SoftwareDistribution folder contains files related to updates obtained via Windows Update, it is present on all versions of Windows. It could have a couple of hundreds megabytes of size. But if this folder is much larger, this indicates that some updates are corrupted.
- Press Win + R on the keyboard and type
services.mscin the Run box. - Stop the service named Windows Update.
- Open File Explorer.
- Go to C:\WINDOWS\SoftwareDistribution\Download. Copy-paste this path to the explorer’s address bar.
- Select all files of the folder(press the Ctrl-A keys).
- Press the
Deletekey on the keyboard.
- Windows may request for administrator privileges to delete those files. Turn on the option «Do this for all current items» in the dialog and click on Continue.
Restart Windows 10 and check for updates. See if this fixed your issues.
Alternatively, you can create a batch file to automate the process.
Delete Downloaded Windows Update Files with a Batch File
- Open Notepad.
- Paste the following text:
net stop wuauserv
cd /d %SystemRoot%\SoftwareDistribution
del /s /q /f Download
net start wuauserv - Save it to a file with a *.cmd extension. You can place it on the Desktop.

- Right-click the file you have created and start it as Administrator from the context menu.
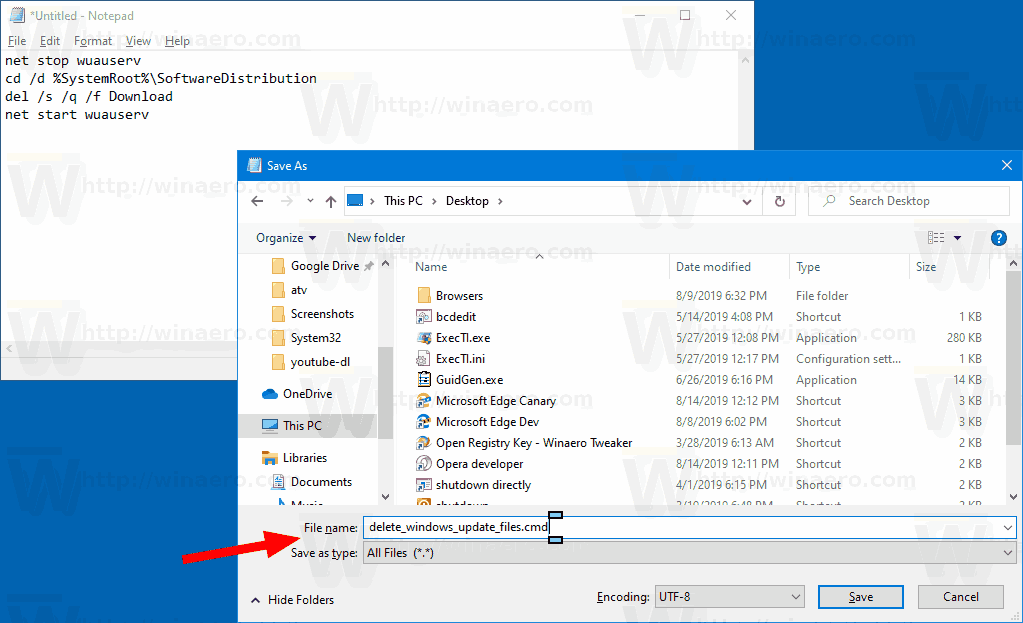
You are done. Now restart the PC and check for available updates.
Here’s how does it work
The command net stop wuauserv stops the Windows Update service. Next, the cd command switches the current folder to C:\Windows\SoftwareDistribution. The del command erases the contents of the Download folder and its subfolders. Finally, the last command, net start wuauserv, starts the Windows Update service again.
To save your time, you can download this ready-to-use batch file.
Download the file
That’s it!
Articles of interest:
- Windows Update Error Codes in Windows 10
- How to Create Windows Update Shortcut in Windows 10
- Clear Windows Update History in Windows 10
- Limit Windows Update Bandwidth in Windows 10
- Fix Windows Update issues in Windows 10 by resetting its options and files
Support us
Winaero greatly relies on your support. You can help the site keep bringing you interesting and useful content and software by using these options:
If you like this article, please share it using the buttons below. It won’t take a lot from you, but it will help us grow. Thanks for your support!
Если после установки обновлений Windows на компьютере наблюдаются проблемы или ошибки, допустимо удалить конкретное обновление или все последние установленные обновления, чтобы попытаться устранить проблему. Рассмотрим, как удалить установленные обновления в Windows из командной строки или PowerShell.
Удалить обновление из командной строки Windows
Для вывода списка обновлений из командной строки можно использовать команду:
wmic qfe list brief /format:table

Вывод команды содержит номера обновлений (KB, HotFixID) и дату установки. Для удаления определенного обновления, скопируйте его ID и выполните команду:
wusa /uninstall /kb:5048667
Подтвердите удаление обновления.
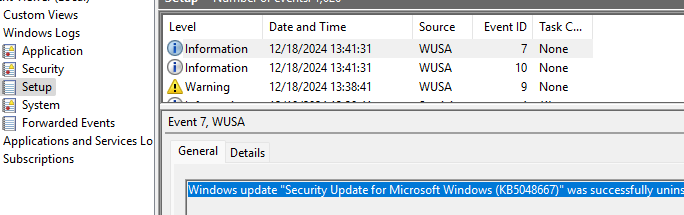
В случае успешного удаления обновления в журнале Setup в Event Viewer появится событие от WUSA с EventID 7 и описанием:
Windows update "Security Update for Microsoft Windows (KB5048667)" was successfully uninstalled. (Command line: ""C:\Windows\system32\wusa.exe" /uninstall /kb:5048667")
Чтобы Windows не пыталась повторно установить удаленное обновление, можно поставить обновления на паузу на срок до 35 дней.
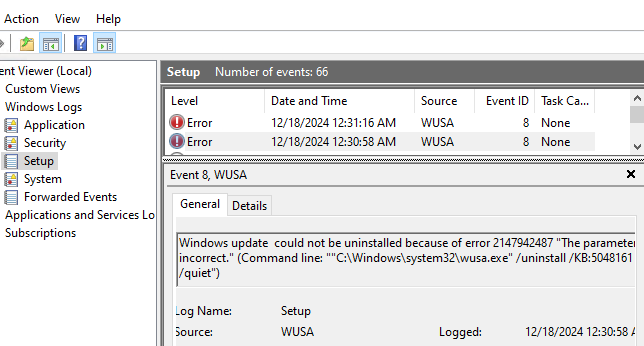
В предыдущих версиях Windows команду wusa можно было использовать для удаления обновлений в фоновом (тихом режиме) без подтверждения и с отложенной перезагрузкой. Использовалась такая команда:
wusa.exe /uninstall /KB:5048161 /norestart /quiet
Однако фоновый режим удаления обновлений был отключен начиная с Windows 10 1507. Теперь команда wusa.exe игнорирует параметр
/quiet
. При этом в журнале событий появляется ошибка Event ID 8:
Windows update could not be uninstalled because of error 2147942487 "The parameter is incorrect." (Command line: ""C:\Windows\system32\wusa.exe" /uninstall /KB:5048161 /norestart /quiet")
PowerShell: удаление установленных обновлений
Для более гибкого удаления обновлений можно использовать PowerShell. Следующие команды выведут список установленных обновлений Windows, отсортированных начиная с последних.
Get-CimInstance -ClassName Win32_QuickFixEngineering| select HotFixID, InstalledOn | sort InstalledOn -Descending
Или
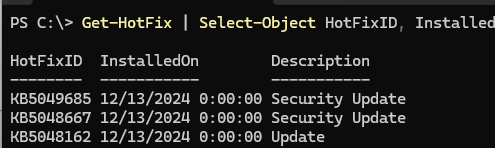
Get-HotFix | Select-Object HotFixID, InstalledOn, Description| sort InstalledOn -Desc
С помощью следующих команд можно удалить все обновления Windows, установленные в определенную дату:
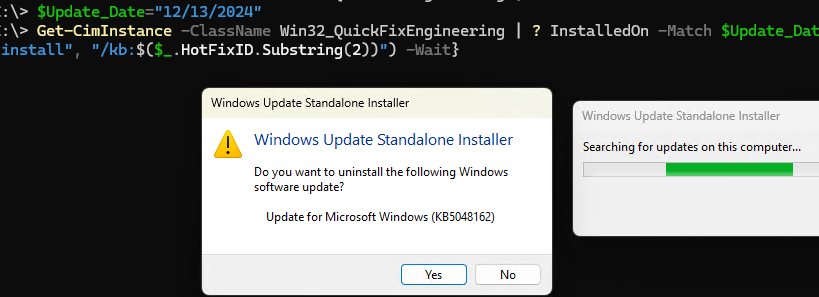
$Update_Date="12/13/2024"
Get-CimInstance -ClassName Win32_QuickFixEngineering | ? InstalledOn -Match $Update_Date | %{start "wusa.exe" @("/uninstall", "/kb:$($_.HotFixID.Substring(2))") -Wait}
Также для удаления обновлений можно исопльзовать PowerShell модуль PSWindowsUpdate. Установите модуль на компьютер:
Install-Module -Name PSWindowsUpdate
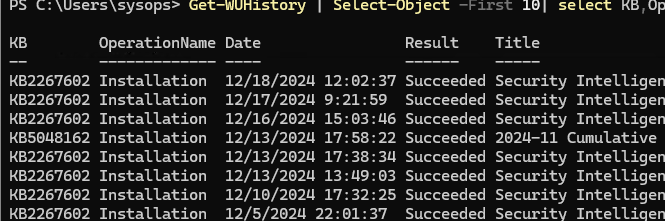
Выведите список 10 последних установленных обновлений:
Get-WUHistory | Select-Object -First 10| select KB,OperationName,Date,Result,title|ft
Чтобы удалить обновление, укажите его номер в команде (в этом примере используется тихий режим с подавлением запроса на подтверждение удаления):
Remove-WindowsUpdate -KBArticleID KB5048667 -Confirm:$false -Verbose

Если команда Remove-WindowsUpdate вернет код
-2145124318
, это означает что такое обновление удалить нельзя.
Чтобы предотвратить автоматическую установку этого обновления, нужно скрыть его от службы Windows Update:
Hide-WindowsUpdate -KBArticleID KB5048667
Если нужно удалить обновление с удаленного компьютера, можно использовать:
- Утилиту PSExec:
psexec \\192.168.158.100 -u root -s cmd.exe /c "dism /online /remove-package /packagename:Package_for_DotNetRollup_481~31bf3856ad364e35~amd64~~10.0.9290.1 /quiet /norestart" - Или PowerShell Remoting:
Invoke-Command -ComputerName 192.168.158.100 -ScriptBlock { Remove-WindowsUpdate -UpdateID KB5048161 -Force -Confirm:$false }
Удаление обновлений из образа Windows (DISM, Remove-WindowsPackage)
При удалении некоторых обновлений может появится ошибка:
Windows Update Standalone Installer
Servicing Stack 10.0.26100.2592 is required by your computer and cannot be uninstalled.
Дело в том, что это обновление служебного стека (Servicing Stack Update, SSU). Microsoft указывает, что обновления SSU нельзя удалить после установки, т.к. это критический компонент системы, без которого вы не сможете установить последующие кумулятивные обновления (Latest Cumulative Update, LCU)
Однако есть обходной способ, позволяющий удалить LCU после установки Servicing Stack Update.
Способ потенциально опасный, которые может привести вашу Windows в неработоспособное состояние. Поэтому используйте его на свой страх и риск, понимая последствия.
Выведите список установленных компонентов обновлений в образе Windows:
Get-WindowsPackage -Online | where ReleaseType -like "*Update*"|ft
Чтобы удалить пакет обновления из образа, скопируйте его имя и выполните команду:
Remove-WindowsPackage -Online -NoRestart -PackageName Package_for_RollupFix~31bf3856ad364e35~amd64~~26100.2314.1.10
