
Applies ToWindows 11 Windows 10
Вы можете изменить фотографию учетной записи пользователя, выбрав существующий снимок или создав новую фотографию. Вот как это сделать:
Изменение рисунка учетной записи пользователя
-
В приложении «Настройки» на устройстве с Windows, выберите Учетные записи > сведения или используйте следующий ярлык:
Ваши сведения
-
В разделе Настройка фотографии выберите Выбрать файл > Просмотр файлов , чтобы выбрать существующую фотографию. Или, если на устройстве есть камера, выберите Открыть камеру и сделайте новую фотографию.
Примечание: Windows запоминает последние три рисунка, которые вы использовали. Выберите рисунок на странице Ваши сведения, чтобы переключиться на нее.
Удаление рисунка учетной записи пользователя
Windows позволяет переключаться между тремя последними изображениями на странице ваших сведений. Если вы хотите удалить одну из фотографий учетной записи:
-
Откройте проводник на панели задач.Если проводник не закреплены на панели задач, выберите Пуск и введите проводник
-
Перейдите в раздел C:\Users\ yourname \AppData\Roaming\Microsoft\Windows\AccountPictures
-
Замените имя вашей учетной записью
-
-
Если не удается найти папку AppData в проводник, она может быть скрыта. Выберите Вид > Показать > скрытые элементы , чтобы отобразить все элементы в папке.
-
Удаление изображения учетной записи, которую вы больше не хотите использовать
Нужна дополнительная помощь?
Нужны дополнительные параметры?
Изучите преимущества подписки, просмотрите учебные курсы, узнайте, как защитить свое устройство и т. д.
Как для учетной записи Майкрософт, так и для локальной учетной записи в Windows 11 есть возможность задать изображение учетной записи — картинку или фото, которое будет отображаться при входе в систему и в других расположениях, например, в параметрах или меню Пуск.
В этой простой пошаговой инструкции о способах установить, изменить или удалить изображение для учетной записи Windows 11 в параметрах системы или в параметрах учетной записи на сайте Майкрософт.
Установка, изменение или удаление аватара в Параметрах Windows 11
Первый способ подойдет как для учетной записи Майкрософт, так и для автономной учетной записи, но будет работать только в активированной Windows 11. Для установки или изменения картинки учетной записи потребуется выполнить следующие шаги:
- Откройте Параметры учетной записи. Для этого можно нажать по её имени в меню «Пуск» и выбрать пункт «Изменить параметры учетной записи», либо открыть Параметры, щелкнуть по имени учетной записи вверху слева, а затем выбрать пункт «Ваши данные».

- Используйте кнопки в пунктах «Сделать фото» или «Выберите файл» для того, чтобы использовать веб-камеру или выбрать имеющееся на компьютере изображение в качестве аватара. Внимание: в последнее время при изменении аватара пользователи сталкиваются с ошибкой 0x80070520, подробней о ней в этой статье.

- Сразу после выполнения шагов, без какого-либо подтверждения будет установлено новое изображение для учетной записи.

В случае, если вы меняли картинку для учетной записи Майкрософт, она будет синхронизирована с вашим аккаунтом на всех устройствах.
Опции удаления картинки учетной записи в Параметрах нет, однако, вы можете поступить следующим образом:
- Зайти в настройки ваших данных в Параметрах учетной записи и нажать кнопку «Обзор файлов» в разделе «Настройка фотографии».
- Перейти в папку
C:\ProgramData\Microsoft\User Account Pictures
и выбрать стандартное изображение — user.png для вашей учетной записи.
Изменение картинки учетной записи в настройках учетной записи Майкрософт на сайте
Если вы используете учетную запись Майкрософт, вы можете установить, изменить или удалить аватар на официальном сайте управления учетной записью, для этого:
- Перейдите на страницу https://account.microsoft.com/ и выполните вход с данными вашей учетной записи при необходимости (вход может быть выполнен автоматически в Microsoft Edge).
- Нажмите по аватару, либо перейдите в раздел «Сведения» и нажмите кнопку «Изменить фотографию».
- Далее вы можете либо нажать кнопку «Добавить фотографию» и выбрать нужное фото или другую картинку, либо удалить фотографию.


Сделанные таким методом изменения также синхронизируются на всех устройствах, использующих эту учетную запись Майкрософт, однако это может происходить не сразу, а только после перезагрузки при условии наличия подключения к Интернету.
Key Takeaways
- You can change your user account picture through the Settings app or by visiting the Microsoft account page online.
- Windows 11 does not provide an option to remove the account image, but you can replace it with a transparent image file to hide it from view.
You can quickly change your user account image on Windows 11 using the Settings app. This method works for all users, regardless of account type.
Step 1: Press the Windows key + I to launch the Settings app.
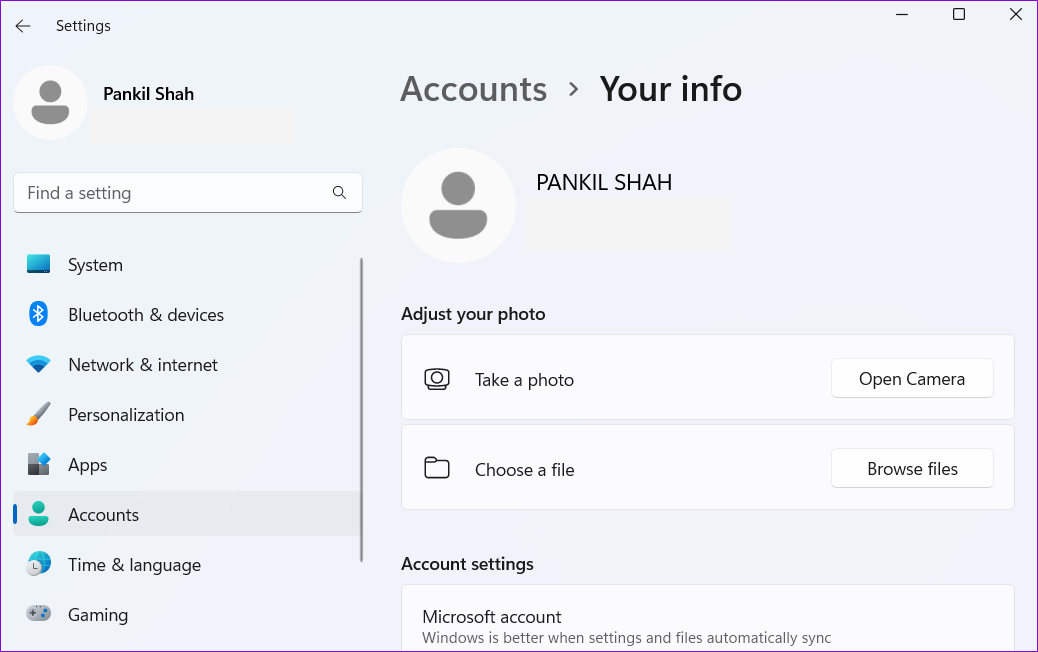
Step 2: Switch to the Accounts tab and click on Your info.

Step 3: In the Adjust your photo section, click the Browse files button.
Tip: Alternatively, if your Windows computer has a camera attached, you can also take your photo. Click the Open Camera button > capture your photo > click on Done.

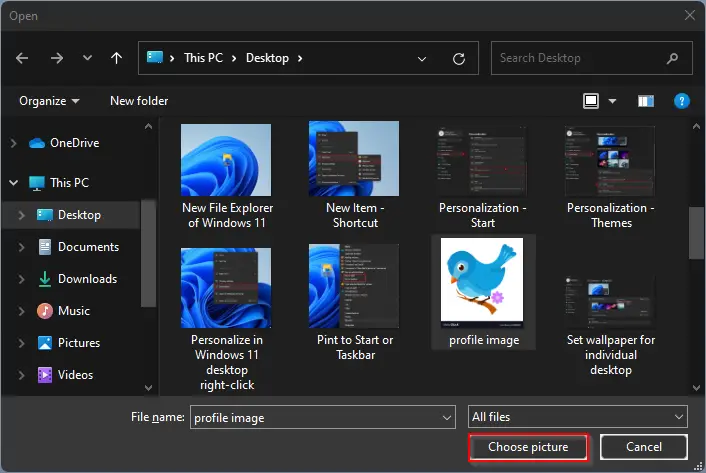
Step 4: Locate the picture you’d like to use as your account image and click on Choose picture.

Windows will automatically resize and crop the image you select.
After you complete the above steps, your new account image will appear in the Settings app, Start menu, and sign-in screen. Further, if you have signed in to Windows with your Microsoft account, the change will also reflected in all Microsoft services you use.
How to Change User Account Image for Microsoft Accounts
When you sign in with a Microsoft account on Windows, it automatically downloads and displays the image associated with your account. Changing your Microsoft account picture from the web also changes your Windows 11 user account picture.
Step 1: Visit the Microsoft account page from your preferred browser and sign in to your Microsoft account if you haven’t already.
Step 2: Navigate to the Your info tab and click on Change photo.

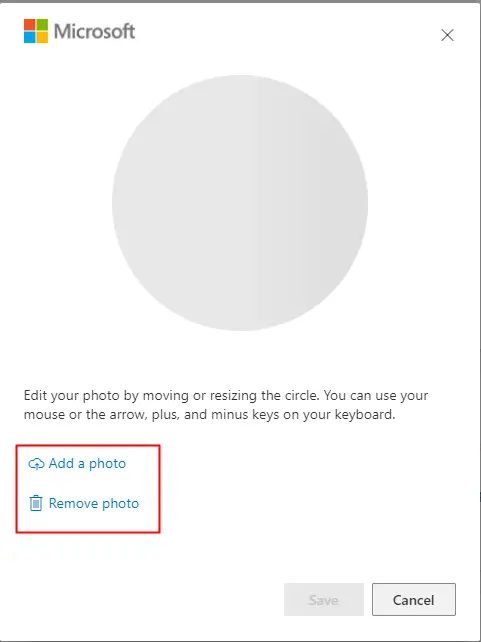
Step 3: Click on Add a photo and upload a new photo from your PC.
Step 4: Edit your photo by moving or resizing the circle and click on Save.

Windows will update your Microsoft account photo. Although, it may take some time before the account image change is reflected on your computer.
How to Remove or Delete User Account Image
While you can change the user account image via the Settings app, you won’t find an option to remove or delete it in Windows 11. However, it’s still possible to do so.
Remove User Account Image
Step 1: Press the Windows key + S to open the search menu. Type your account info in the box and press Enter.
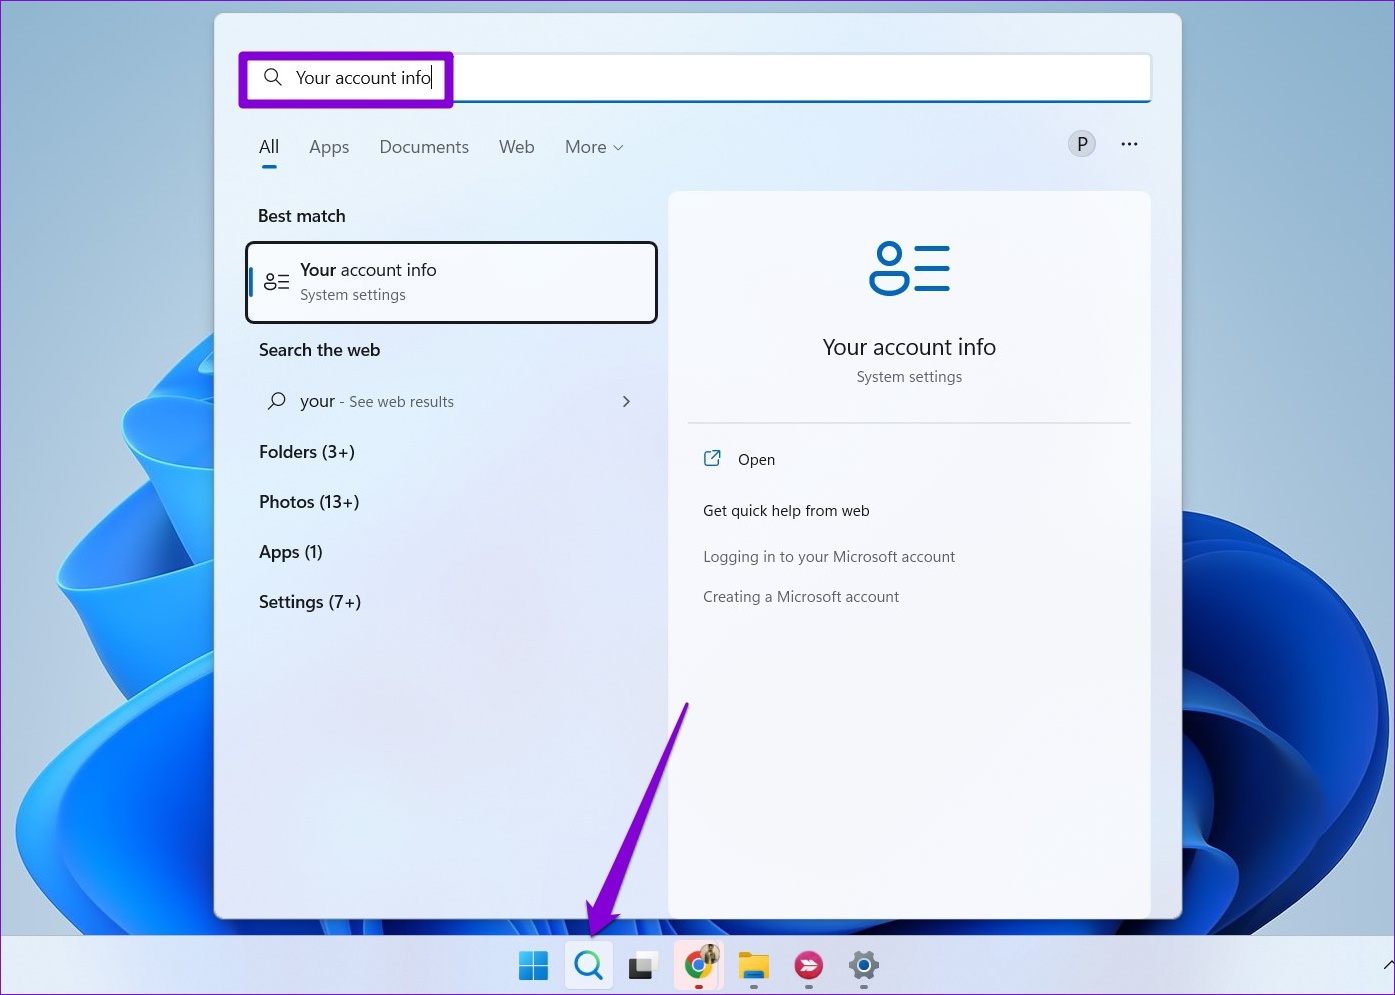
Step 2: Click on Browse files.
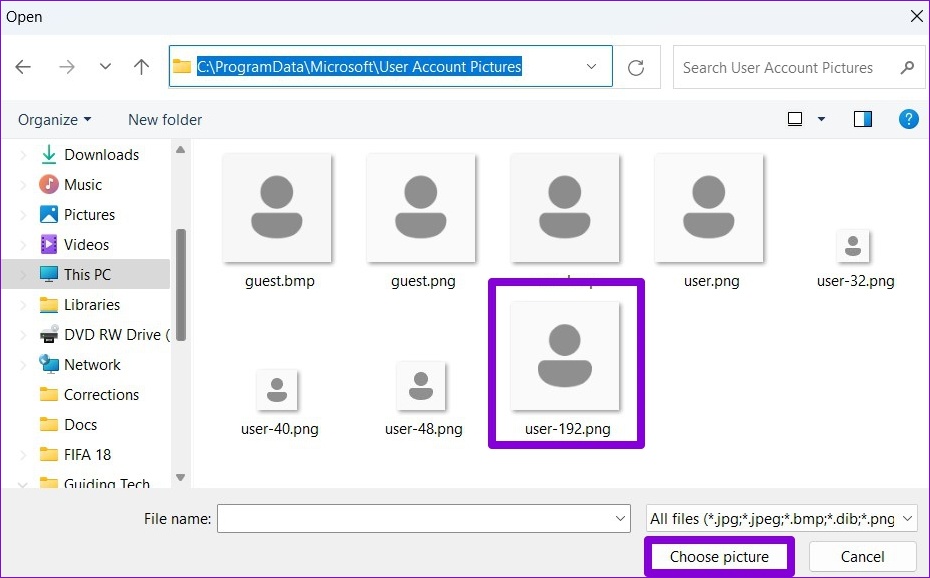
Step 3: In the Open dialog, navigate to the following folder.
C:\ProgramData\Microsoft\User Account Pictures
Step 4: Select user.png or user-192.png and click Choose picture.
This will replace your user profile photo with the default one. Note that if you’re signed in with your Microsoft Account, the change will also reflect on all Microsoft services linked to your account.
Delete User Account Image
Windows saves all your account images in the Account Pictures folder. However, if you no longer want to use those images, here’s how you can delete them.
Step 1: Press the Windows key + E to open File Explorer.
Step 2: Paste the following path in the address bar at the top and press Enter to navigate to the Account Pictures folder.
Note: Ensure you replace yourname in the following path with your account name.
C:\Users\yourname\AppData\Roaming\Microsoft\Windows\AccountPictures
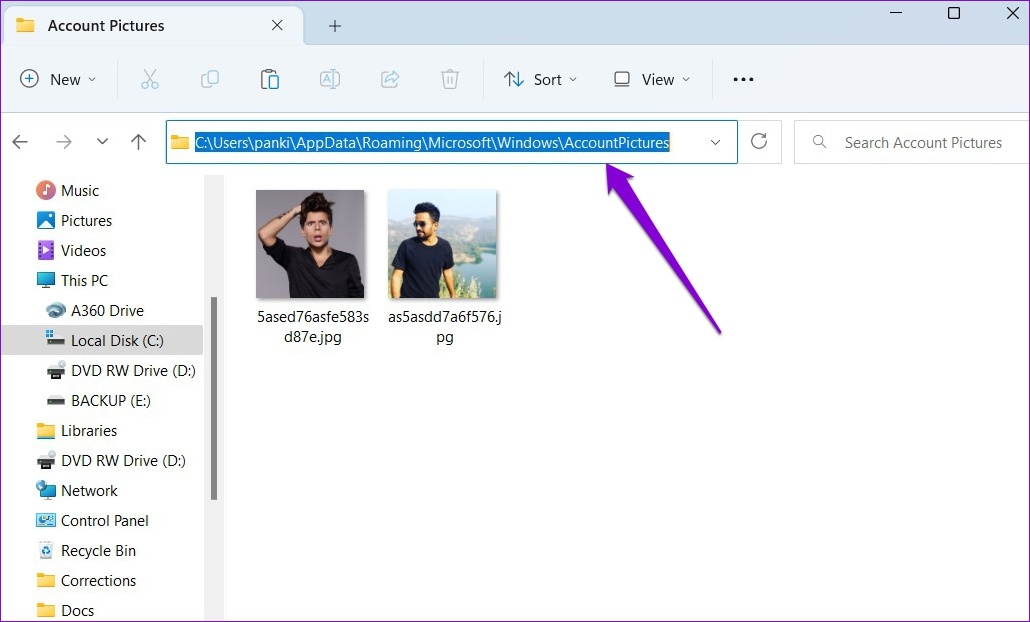
Step 3: In the Account Pictures folder, you’ll see all the pictures you’ve used as your account image. Select the images you want to delete and click the trash icon at the top.
Tip: After deleting the pictures, don’t forget to empty the Recycle Bin to remove them completely.

Was this helpful?
Thanks for your feedback!
The article above may contain affiliate links which help support Guiding Tech. The content remains unbiased and authentic and will never affect our editorial integrity.
Download Windows Speedup Tool to fix errors and make PC run faster
When the computer boots, and you get to the login screen, The user image with the name is displayed. The image is one you have uploaded in the User account picture or the profile picture connected with your Microsoft account. In this post, we will share how to remove the default Windows 11/10 Sign in Picture.

Many a time, users don’t want to use a personal image, and the default image looks terrible. So it’s best to remove it. Follow these steps remove the Windows 11/10 sign in picture by following these steps:
- Replace the picture holder from Account pictures.
- Disable the feature via Registry or using Group Policy Editor
Make sure to create a restore point before going ahead with the methods.
1] Replace the Default PNG

Open the File Explorer, and under view, options enable hidden folder option and also enable the option to allow visibility option for extensions of files.
Then, navigate to C:\ProgramData\Microsoft\User Account Pictures.
Locate images with the name user.png, user-32.png, user-40.png, user-48.png, and user-192.png files. Rename the extension to anything random like user.png.twc and so on.
Create a PNG or transparent image of size 192X192 using your favorite image editor. Save it with the same respective names. As the photos will be transparent, it will be not visible.
If you want to have a different default image, you can create pictures with the same name, and resolution and place it here.
2] Disable via Registry or Group Policy Editor
In both cases, we are forcing the OS to use the default image placed by us for all users.
Using Registry

Open the Registry Editor and navigate to:
HKEY_LOCAL_MACHINE\SOFTWARE\Microsoft\Windows\CurrentVersion\Policies\Explorer
Now follow these steps:
- Right-click anywhere in the blank space in the right pane.
- Select New > DWORD (32-bit) Value.
- Set the name as UseDefaultTile.
- Double-click on UseDefaultTile to edit value
- Set the Value Data to 1.
Disable via Group Policy Editor

Open the Group Policy Editor and navigate to:
Computer Configuration\Administrative Templates\Control Panel\User accounts
Find the policy which says Apply the default account picture to all users. Double-click on it to open its configuration panel. Select Enabled and click on OK/Apply and exit.
We hope you found the steps easy to follow, and you were successful in making the changes.
Ashish holds a Bachelor’s in Computer Engineering and is a veteran Windows. He has been a Microsoft MVP (2008-2010) and excels in writing tutorials to improve the day-to-day experience with your devices.
How do I change my login picture on Windows 11? Do you don’t want to see a boring black-and-white Windows 11 profile picture? You can change or set your user account profile image to something else. Your account picture or profile picture is what you see on the Windows sign-in screen and the Start menu. When you create an account on your Windows 11 PC, it assigns a generic profile picture. However, it’s easy to change that to any image you want.

If you are using a Microsoft account that already has a picture associated with it, Microsoft sets your profile picture to the default user picture for Windows. In this gearupwindows article, we will show the steps to change or assign a picture to your user account profile. Whether you are using a local account or a Microsoft account, you can use this article steps to set or change your user profile picture.
How to Change a User Profile Picture in Windows 11?
On Windows 11, Local account profile pictures are controlled by the Settings app. That means you need to access the Settings app to set or change your account profile picture. You can also use this method to change your account profile picture for your Microsoft account.
Step 1. Open the Settings app.
To access the Settings app, click on the Start button from the Windows 11 Taskbar and then click Settings. However, if you prefer to use the keyboard shortcut to open the Settings app, then press the Windows + I keys simultaneously.
Step 2. In the Settings window left side, click on the Accounts category. On the right side of it, click on the Your info tab.
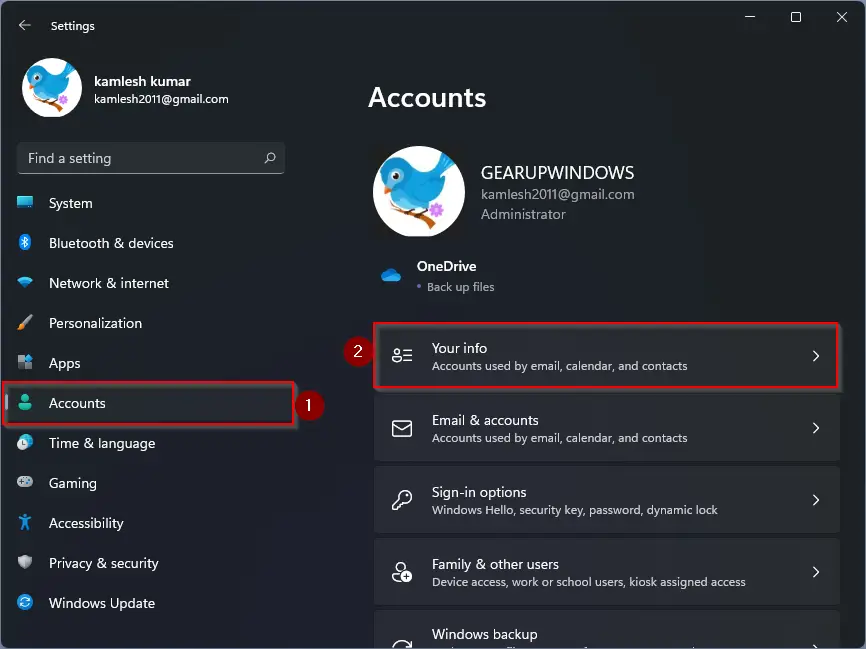
Step 3. In the “Adjust your photo” section, you will see two options to set your profile picture:-
- Take a photo – Click on the “Open Camera” button and take a photo to save it as a profile picture.
- Choose a file – This is handy when you don’t have an inbuilt camera on your computer or want to upload an image from your PC as a profile picture.
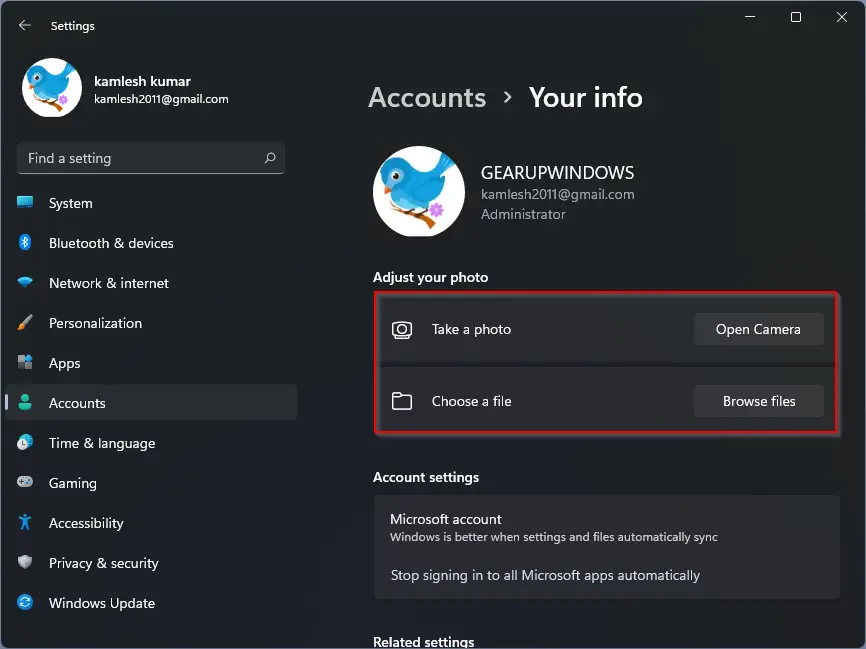
Step 4. If you prefer to upload an image from your PC, click the Browse files button next to Choose a file and select the photo from your computer. Finally, click on the Choose picture button to set or change your profile picture.
How to Change a User Profile Picture of a Microsoft Account in Windows 11?
This is another method to change or set a Microsoft account user profile picture in Windows 11. The change will apply across all Microsoft services where your profile picture is displayed. Since this process goes through a Microsoft server, it might take a little while for all sites and devices to display the new picture. You need to perform the following steps:-
Step 1. Login to your Microsoft account and then click the Your info button at the top of the page.
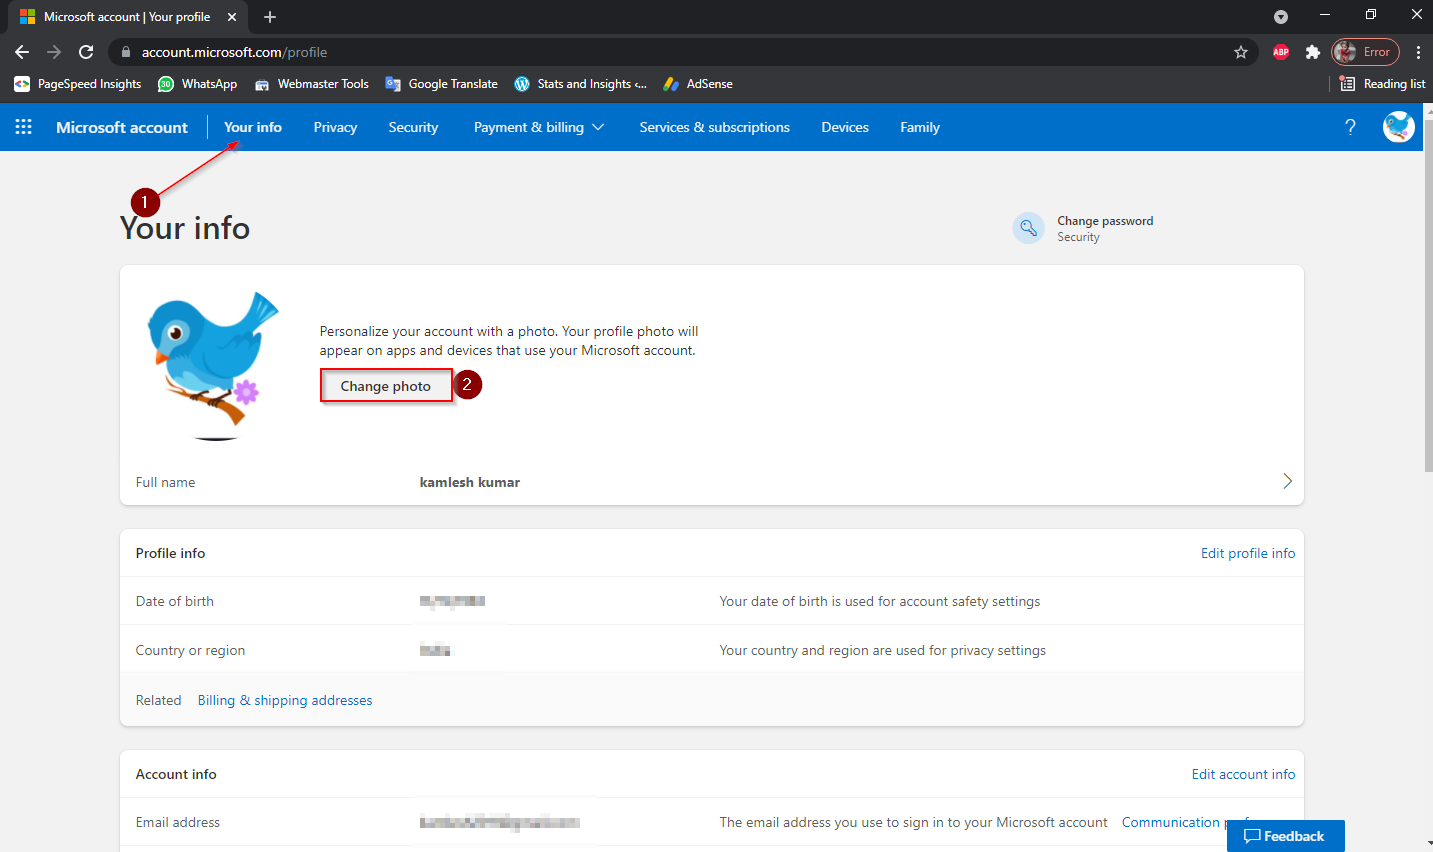
Step 2. Now, click the Change photo button.
Step 3. A pop-up window will open. Here, you can add a new photo or remove an existing photo.
That’s all.
Conclusion
In conclusion, changing or setting your user account profile picture on Windows 11 is a simple process that can be done through the Settings app. Whether you are using a local account or a Microsoft account, you can follow the steps mentioned in this article to change your profile picture. With a new and personalized profile picture, you can add a touch of personality and creativity to your Windows 11 experience. So, don’t settle for the default profile picture and follow the steps to set or change your profile picture on Windows 11 today.