
Все способы:
- Способ 1: Встроенные возможности Windows
- Вариант 1: Инструменты Windows 10
- Вариант 2: Меню «Программы и компоненты» (универсальный)
- Очистка остаточных файлов
- Способ 2: Использование сторонних инструментов
- Вариант 1: CCleaner
- Вариант 2: IObit Uninstaller
- Вариант 3: Другие программы
- Вопросы и ответы: 2
Способ 1: Встроенные возможности Windows
Всем тем, чьи компьютеры работают под управлением Windows 10, подойдет любой из рассмотренных далее методов для удаления программы, а вот пользователи более старых операционных систем ограничены в выборе. При этом по своей эффективности все эти способы равнозначны.
Вариант 1: Инструменты Windows 10
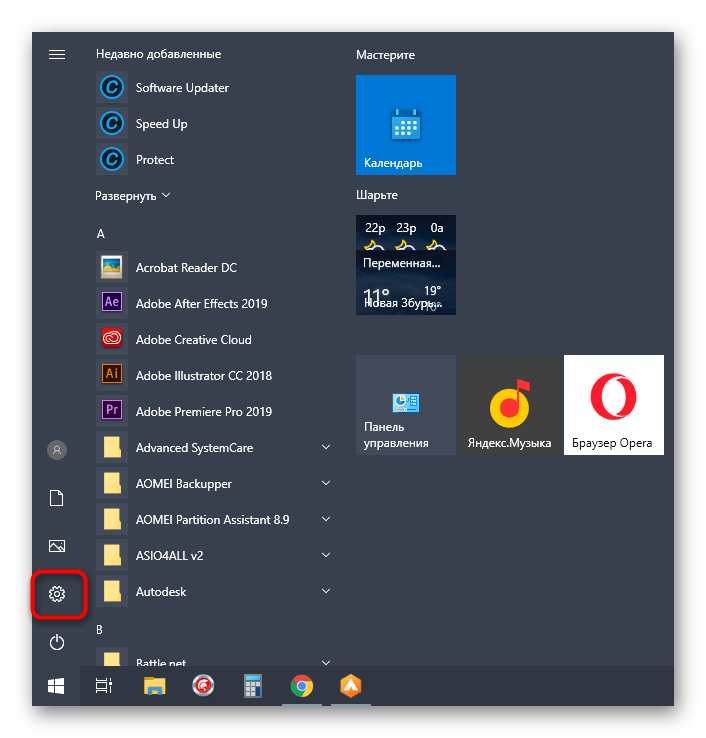
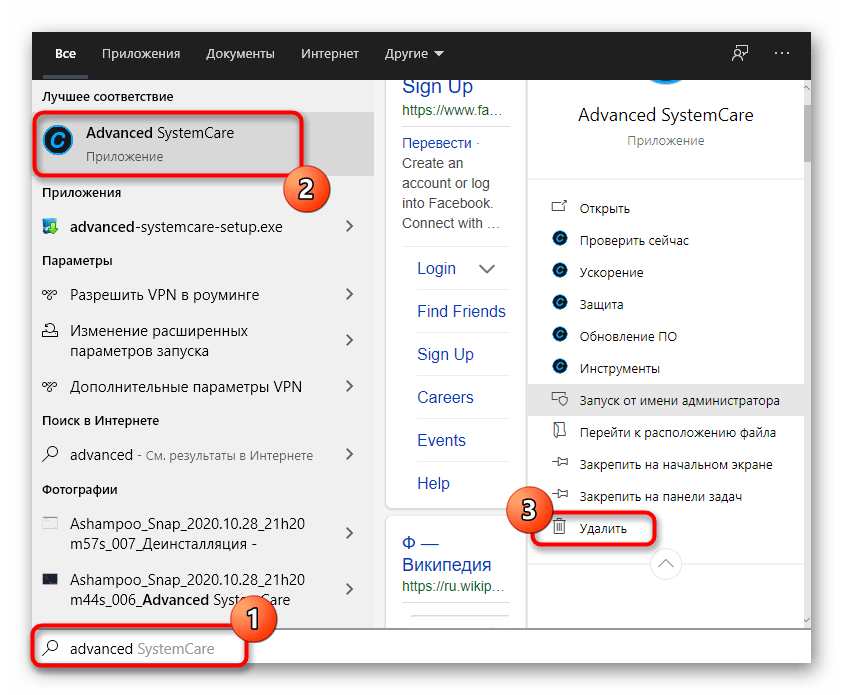
У обладателей операционной системы Windows 10 есть возможность избавиться от Advanced SystemCare в отдельном меню приложения «Параметры» или прямо через поиск в «Пуске». Принцип деинсталляции софта в таком случае крайне прост и состоит из нескольких шагов.
- Откройте меню «Пуск» и нажмите по значку в виде шестеренки, чтобы перейти к упомянутому приложению.
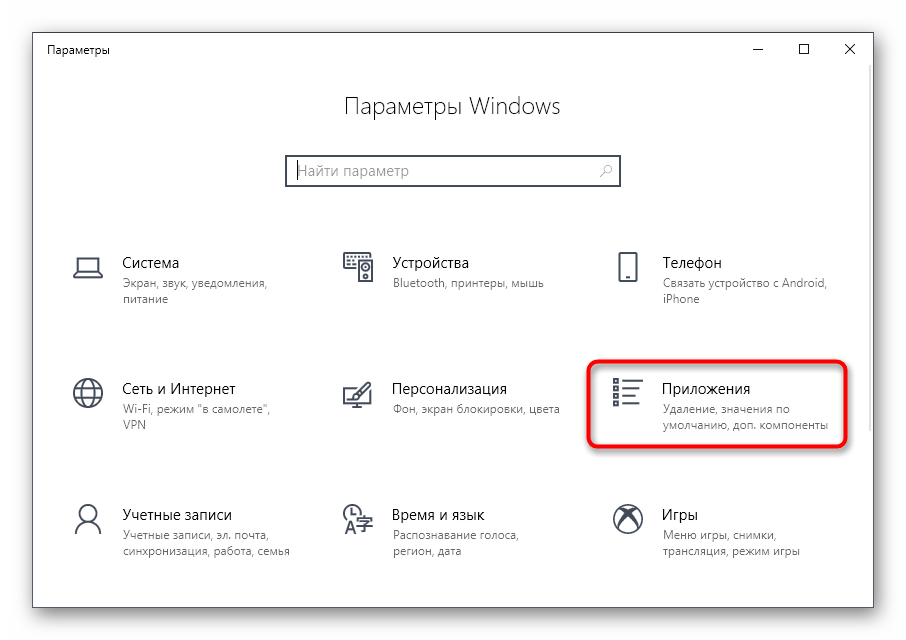
- Там вас интересует плитка «Приложения», по которой и необходимо кликнуть.
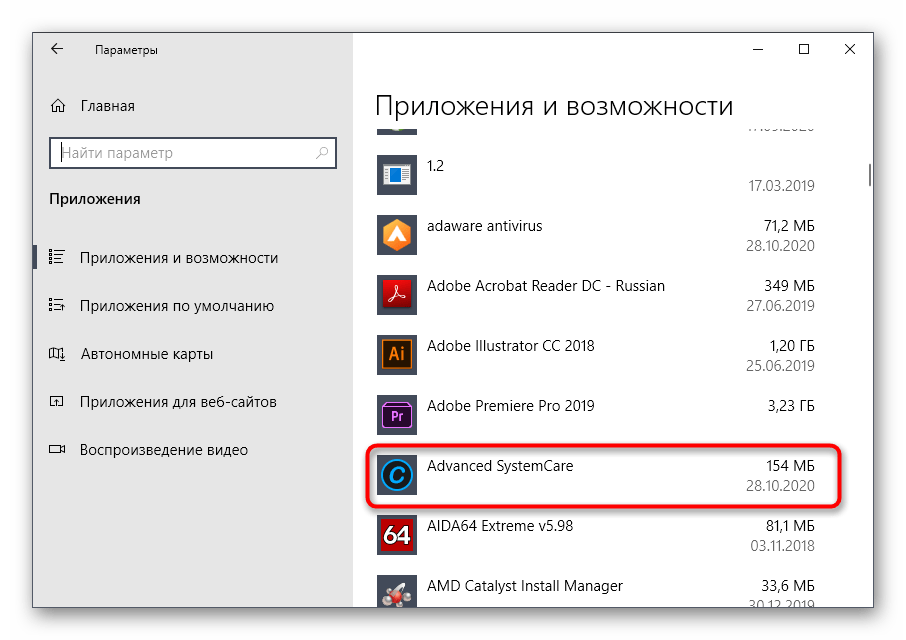
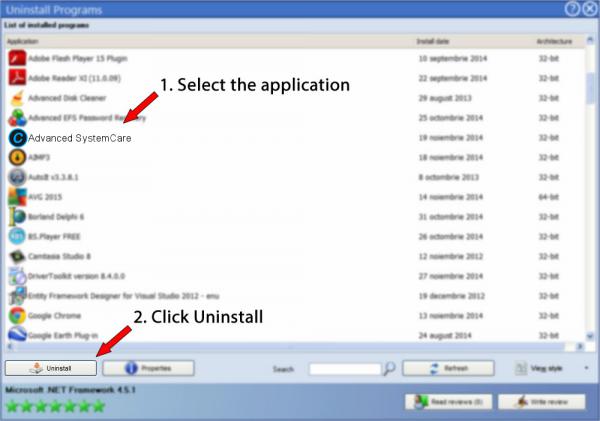
- В списке найдите пункт с «Advanced SystemCare». Сделайте клик ЛКМ для отображения кнопок действий.
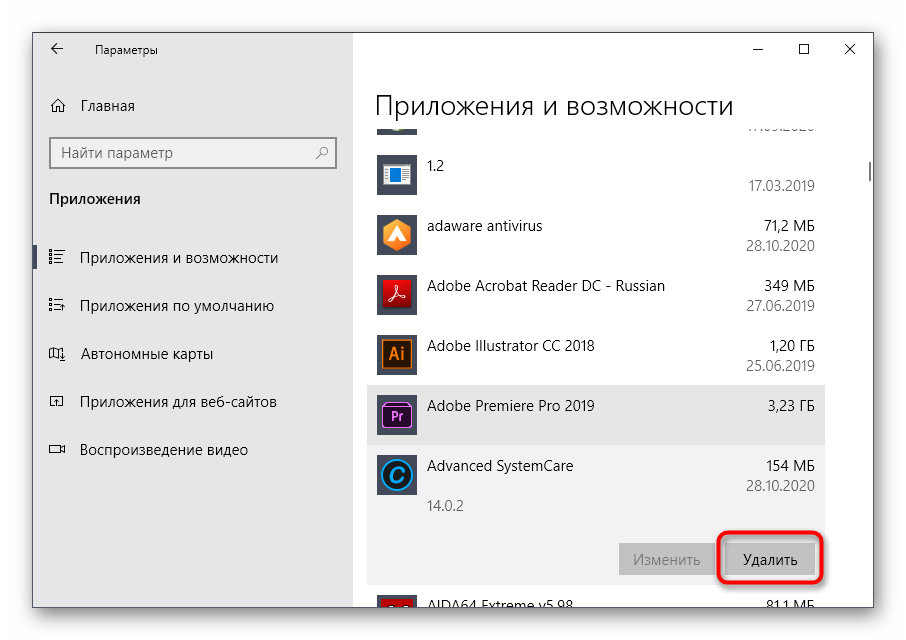
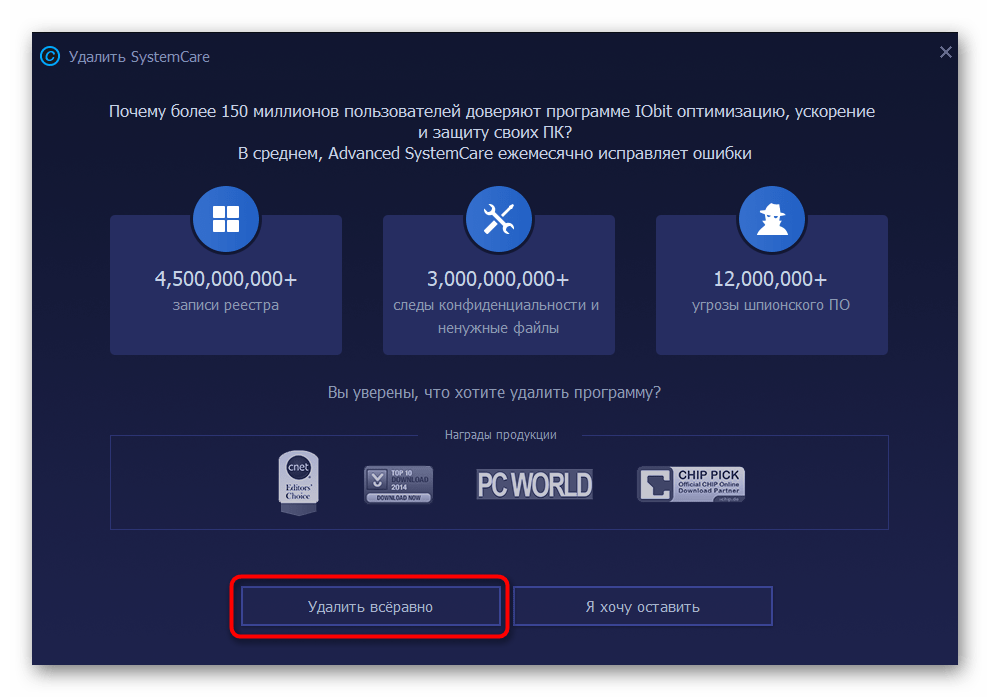
- Активируйте кнопку «Удалить».
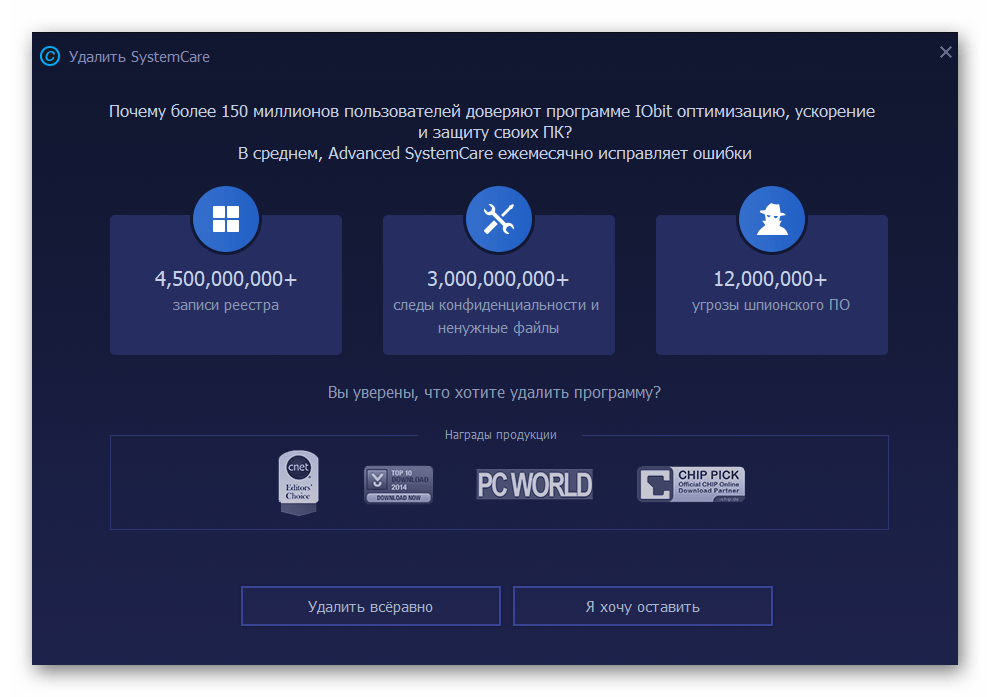
- Появится фирменное окно программы, в котором кликните на «Удалить все равно».
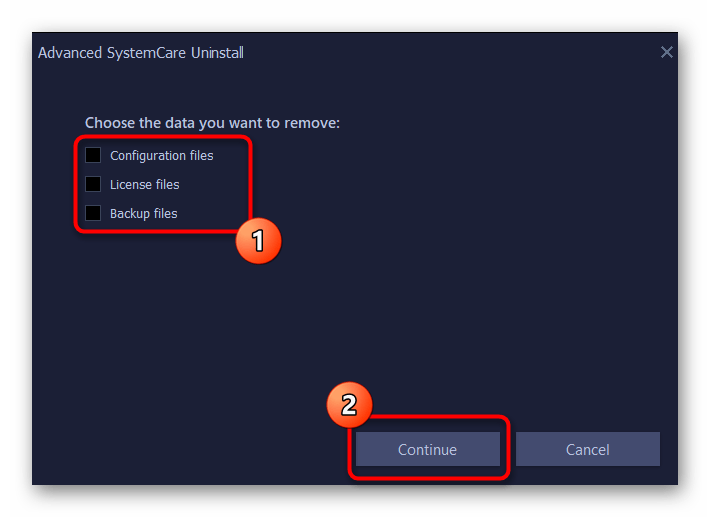
- Отметьте галочками все пользовательские файлы, чтобы избавиться и от них тоже, а затем продолжите деинсталляцию.
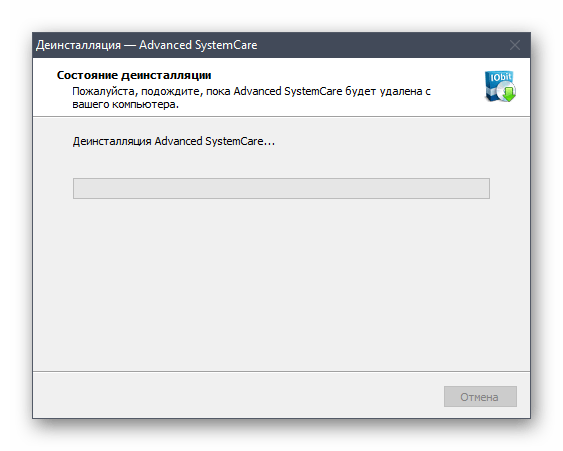
- Ожидайте окончания данного процесса, занимающего около минуты. На экране появится уведомление об успешном удалении, а это значит, что можно перейти к очистке остаточных файлов. Об этом пойдет речь немного позже.
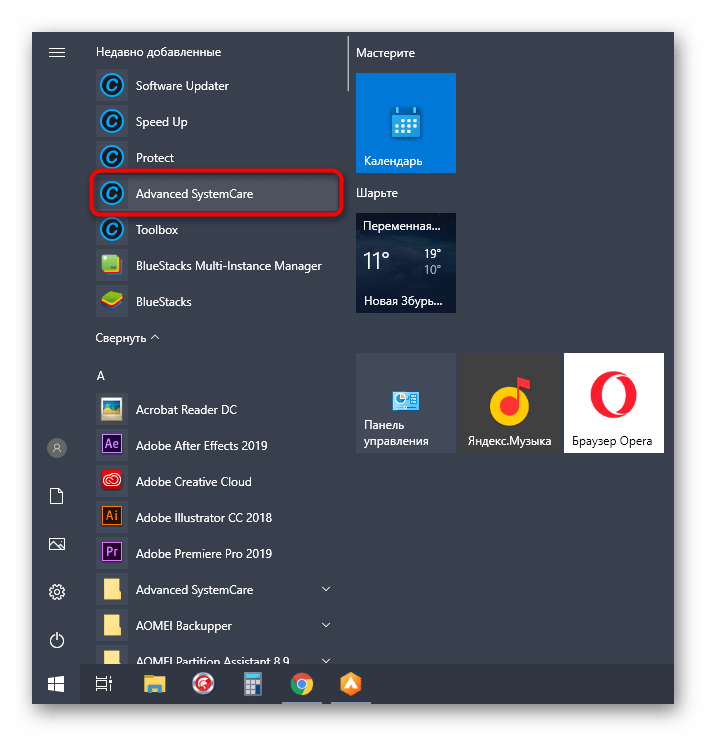
Для компьютеров с последней версией операционной системы от Microsoft есть еще один метод удаления Advanced SystemCare, который подразумевает использование контекстного меню в «Пуске».
- Для этого откройте «Пуск», найдите само программное обеспечение в списке по алфавиту и вызовите его контекстное меню.
- Если сделать это не удается, начните писать его название, чтобы найти соответствие по приложениям, и через меню справа щелкните на «Удалить».
- Произойдет переход в «Программы и компоненты» — о взаимодействии с этим окном мы поговорим в следующем универсальном способе (шаг 3).
Вариант 2: Меню «Программы и компоненты» (универсальный)
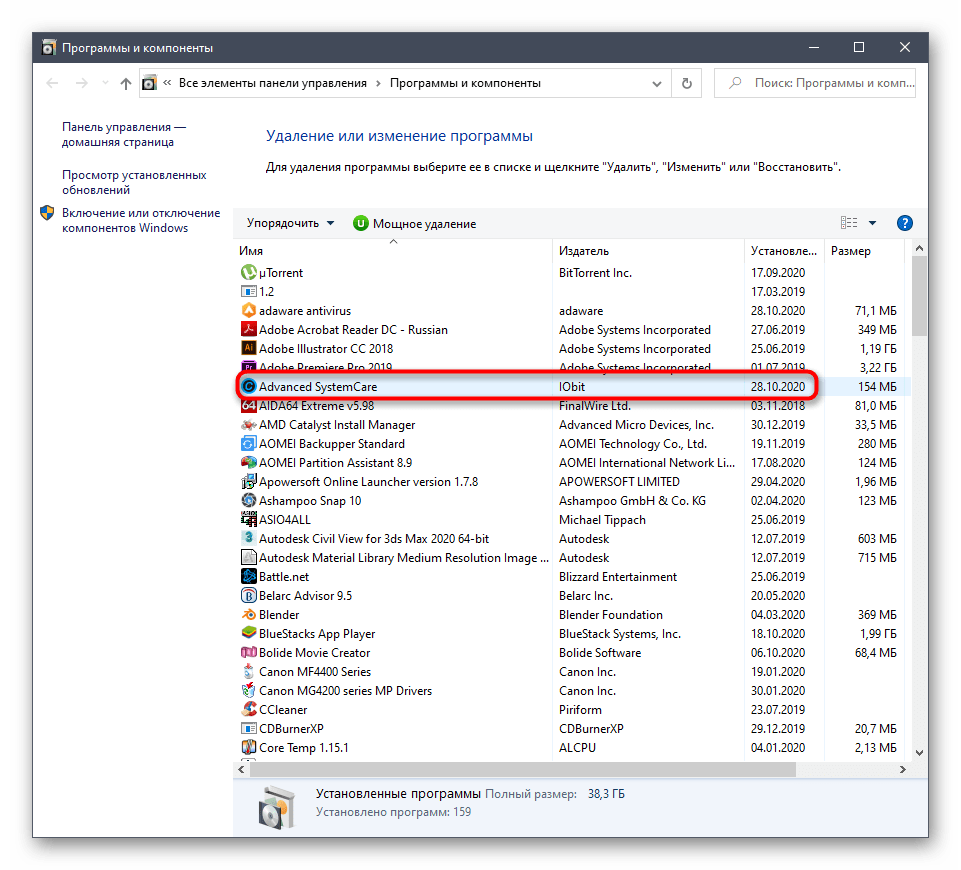
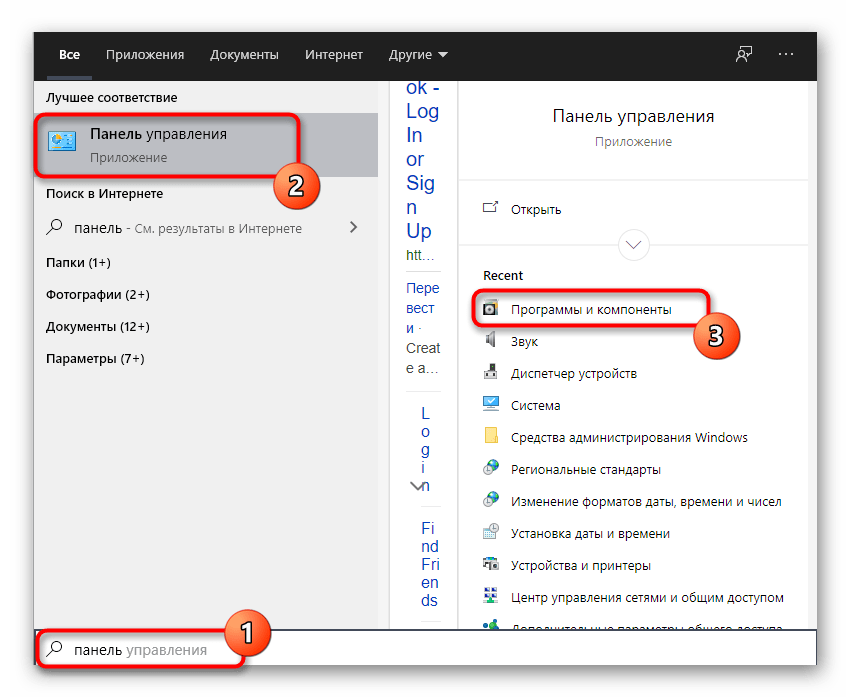
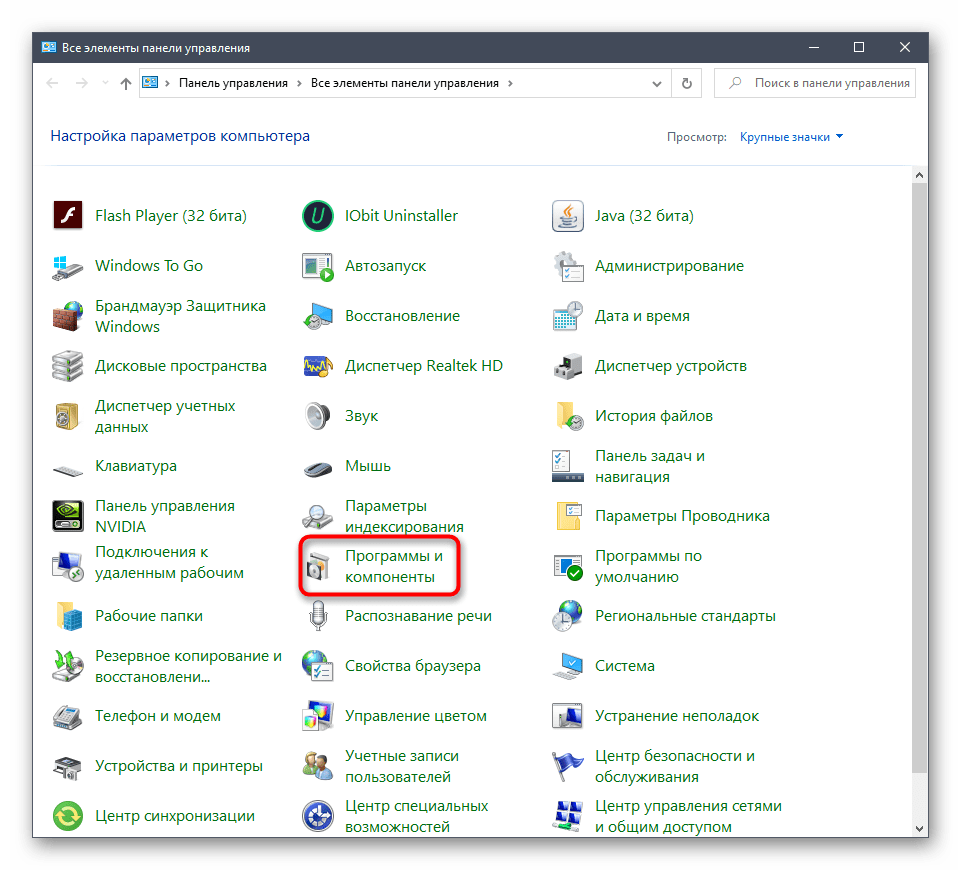
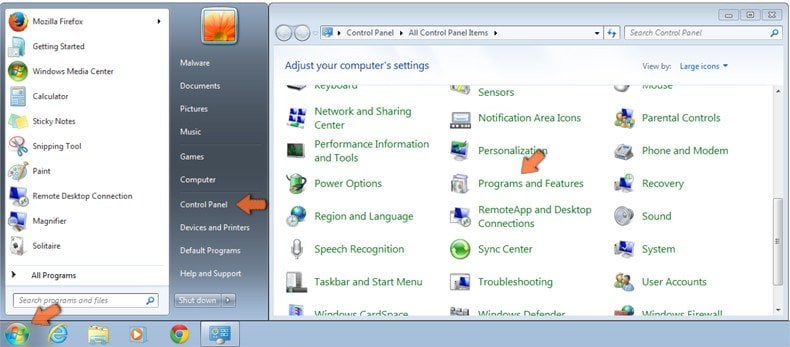
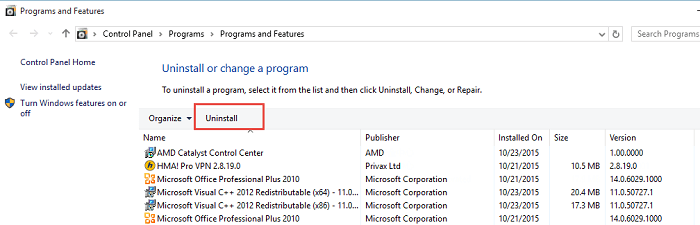
Не у всех пользователей на компьютере установлена Windows 10, поэтому предлагаем ознакомиться с универсальным способом, который поможет быстро избавиться от Advanced SystemCare. Для этого понадобится использовать приложение «Панель управления».
- В Windows 7 и ниже к нему можно перейти, нажав по кнопке «Панель управления» на панели этого меню справа. В «семерке» для этого также можно воспользоваться поиском по «Пуску».
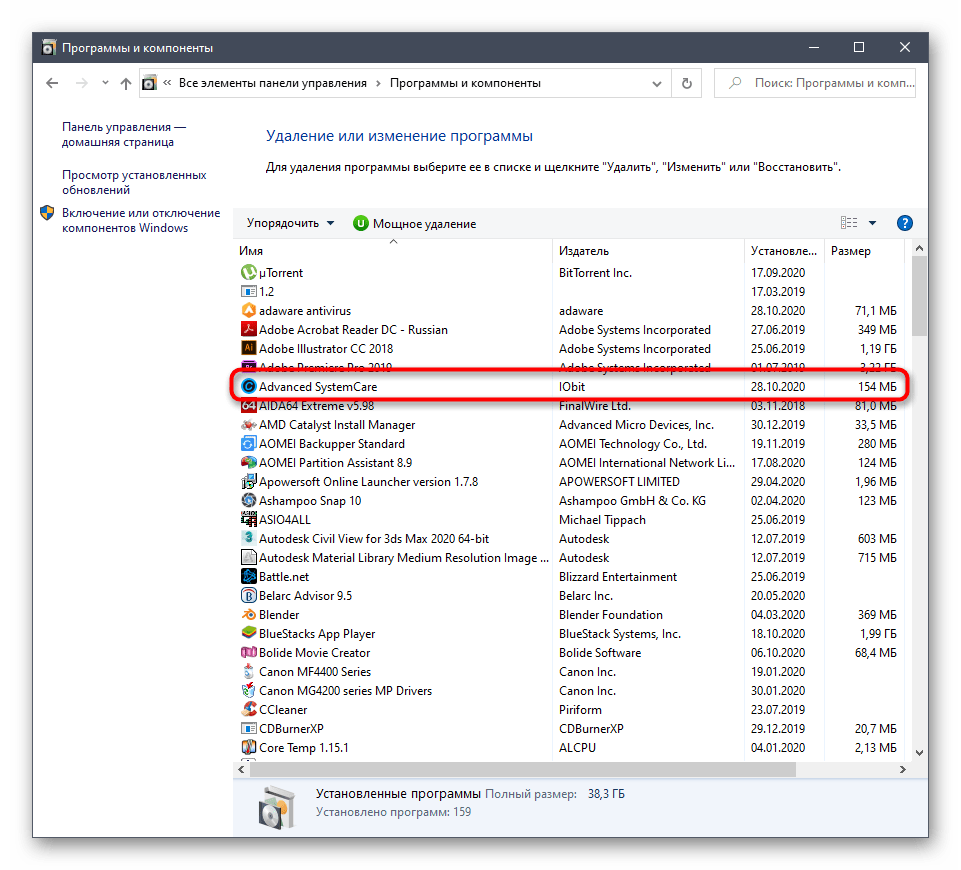
- Выберите раздел «Программы и компоненты».
- Найдите в списке рассматриваемую программу и дважды кликните по ней ЛКМ.
- Подтвердите удаление и выполните точно такие же действия, о которых уже говорилось выше, чтобы завершить деинсталляцию.

Очистка остаточных файлов
В завершение описанных выше методов поговорим об очистке остаточных файлов, которая может потребоваться, например, когда есть желание переустановить Advanced SystemCare или просто не хочется оставлять в системе мусор.
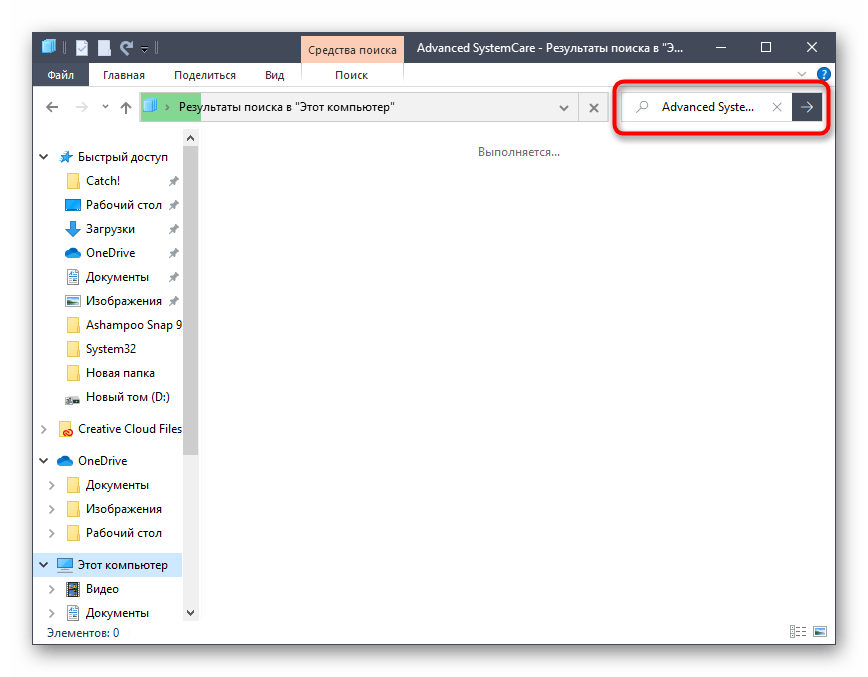
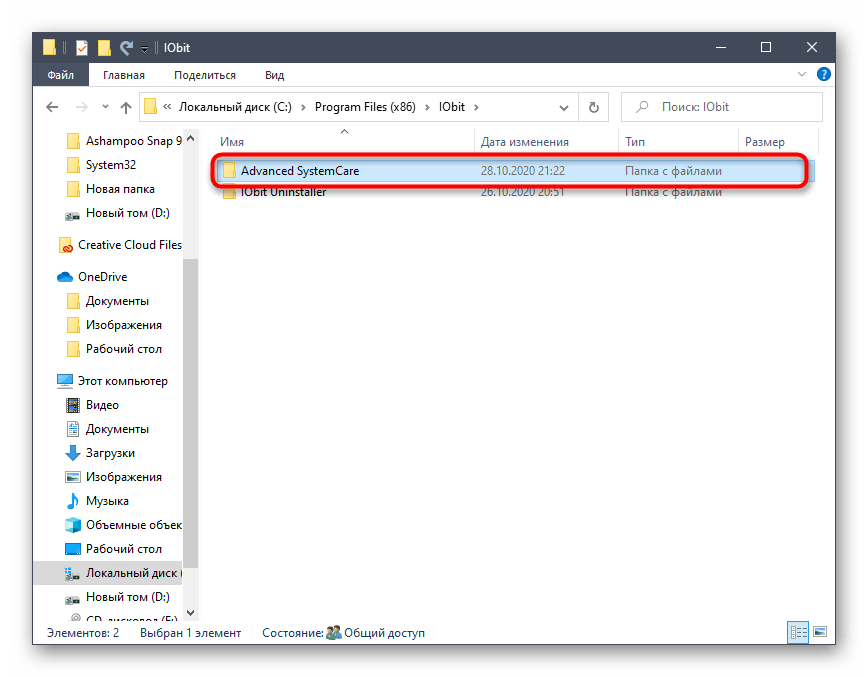
- Первый этап — поиск связанных файлов через «Проводник», для чего используйте встроенную функцию.
- Найдите все папки и файлы, относящиеся к данному ПО, кликайте по ним ПКМ и в контекстном меню выбирайте пункт «Удалить».
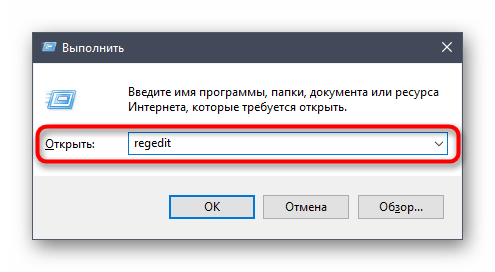
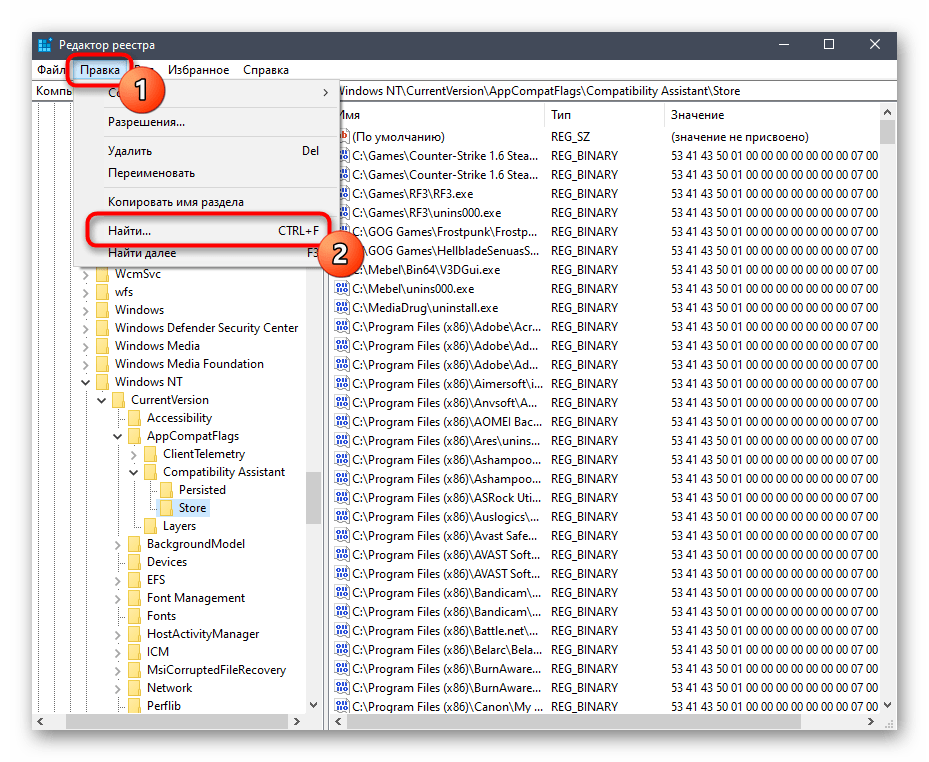
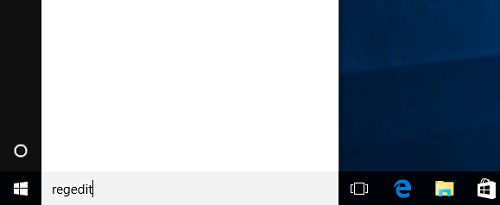
- Сразу же после этого откройте утилиту «Выполнить» стандартным сочетанием клавиш Win + R, в доступное поле введите
regeditи нажмите по клавише Enter. - Используйте выпадающее меню «Правка» и функцию «Найти», которую можно вызвать и сочетанием клавиш Ctrl + F.
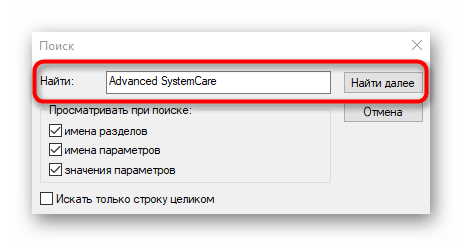
- В поисковую строку напишите название приложения и выполните поиск совпадений.
- Удалите все найденные ключи и отправьте компьютер на перезагрузку, чтобы применить изменения.
Способ 2: Использование сторонних инструментов
Существуют сторонние программы, предназначенные для удаления других приложений на компьютере. Иногда пользователям проще задействовать их, а не системные инструменты, особенно когда речь идет об очистке остаточных файлов. На примере двух вариантов рассмотрим, как происходит взаимодействие с такими решениями.
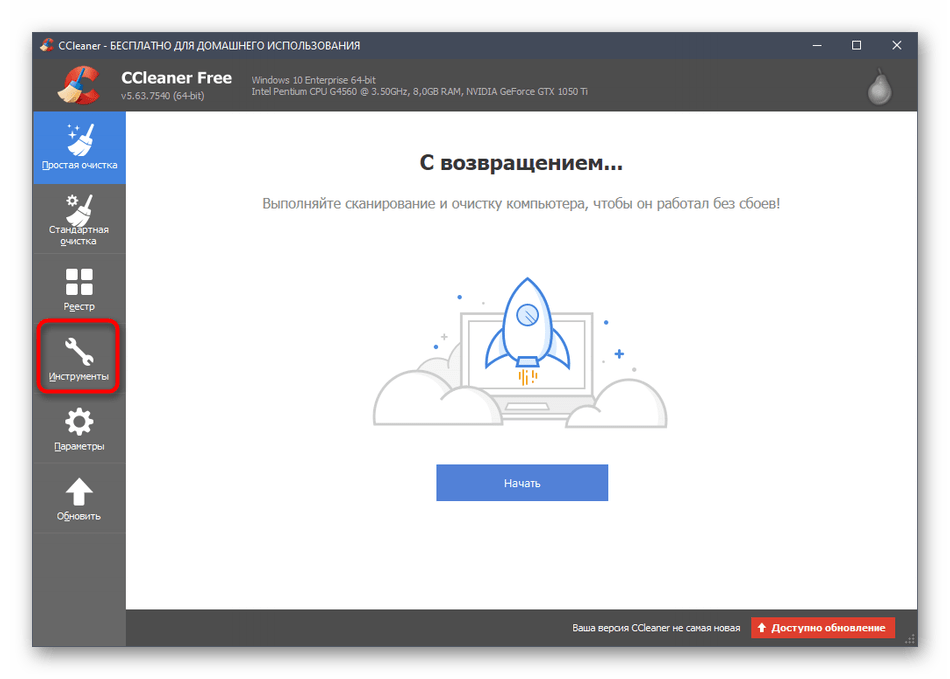
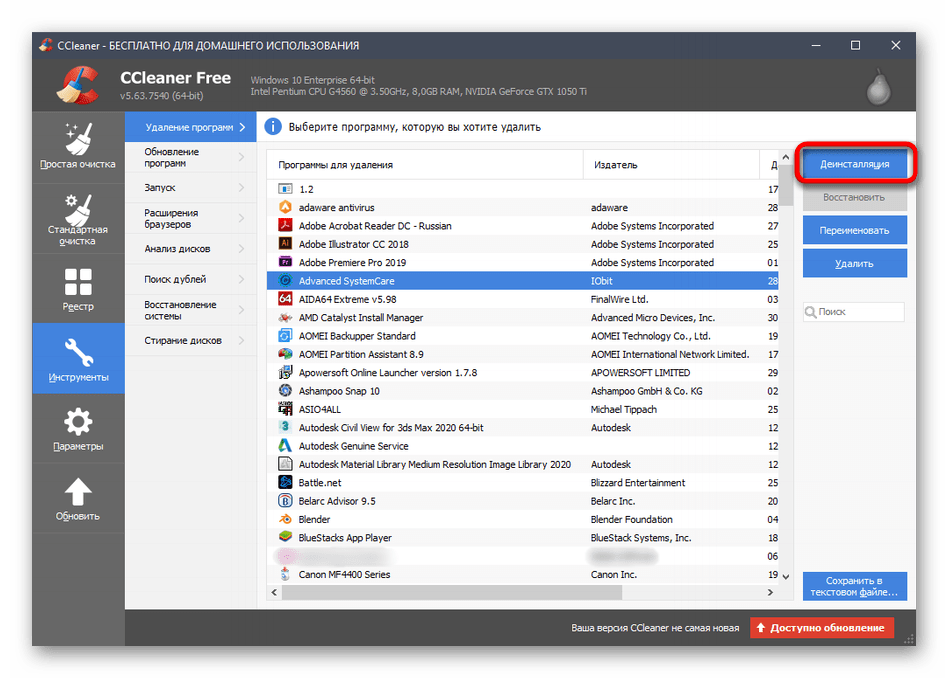
Вариант 1: CCleaner
CCleaner — одна из самых популярных вспомогательных программ для Windows, функциональность которой сосредоточена на очистке мусора, исправлении реестра и других действиях с ОС. В ней есть отдельный инструмент, позволяющий деинсталлировать софт, а управление им происходит так:
Скачать CCleaner
- Запустите CCleaner, а затем через меню слева перейдите в «Инструменты».
- В пером же меню «Удаление программ» найдите рассматриваемое приложение и выделите его левой кнопкой мыши.
- Синим загорится кнопка «Деинсталляция», по которой необходимо нажать для запуска этого процесса.
- В новом окне деинсталляции Advanced SystemCare выполните все те же действия, о которых мы говорили в предыдущих инструкциях.


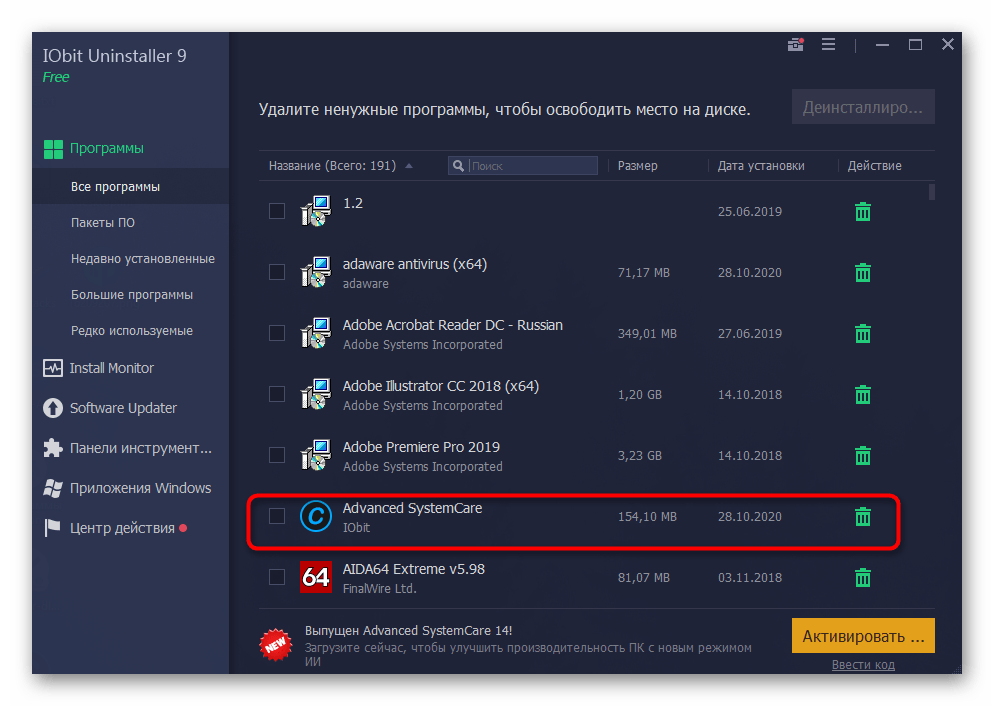
Вариант 2: IObit Uninstaller
Программы IObit Uninstaller и Advanced SystemCare создал один и тот же разработчик, но решение для удаления софта пользуется большей популярностью из-за наличия встроенной опции по быстрой очистке остаточных файлов. Как раз ее мы и упомянем далее, разбирая деинсталляцию SystemCare.
Скачать IObit Uninstaller
- После запуска IObit Uninstaller вы сразу же окажетесь в требуемом меню, где кликните по кнопке в виде корзины напротив нужной программы.
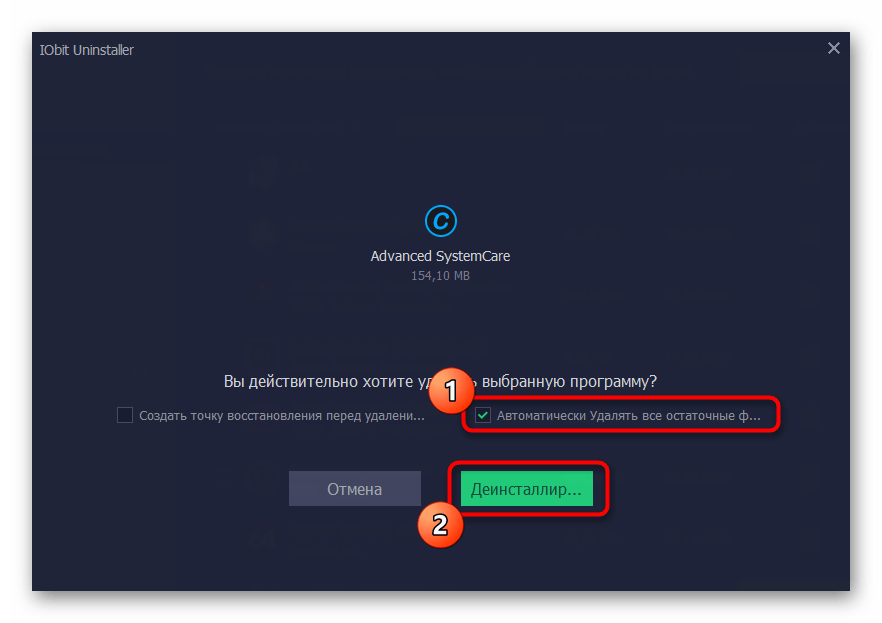
- Отметьте галочкой автоматическое удаление остаточных файлов и запустите деинсталляцию.
- Ожидайте старта этого процесса.
- При появлении уведомления с вопросом об удалении подтвердите свои намерения.
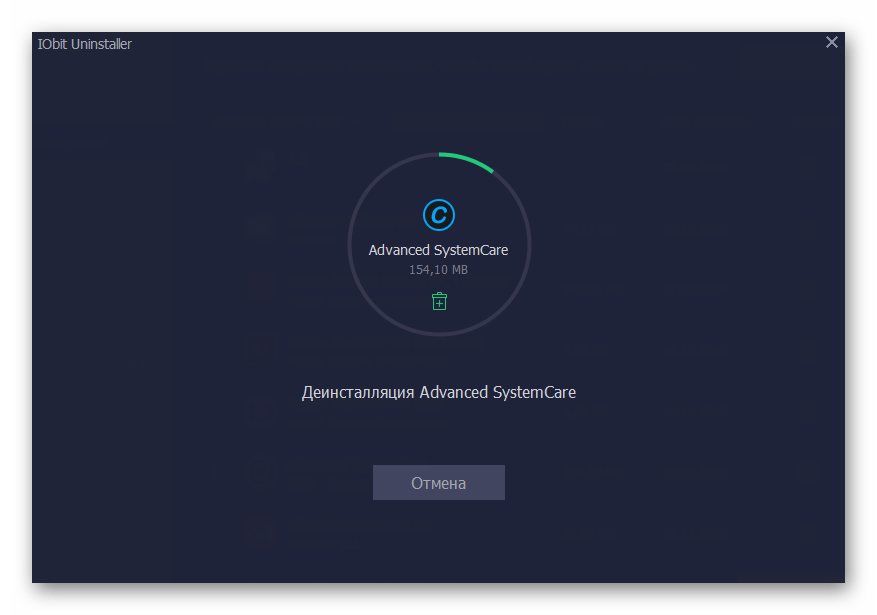
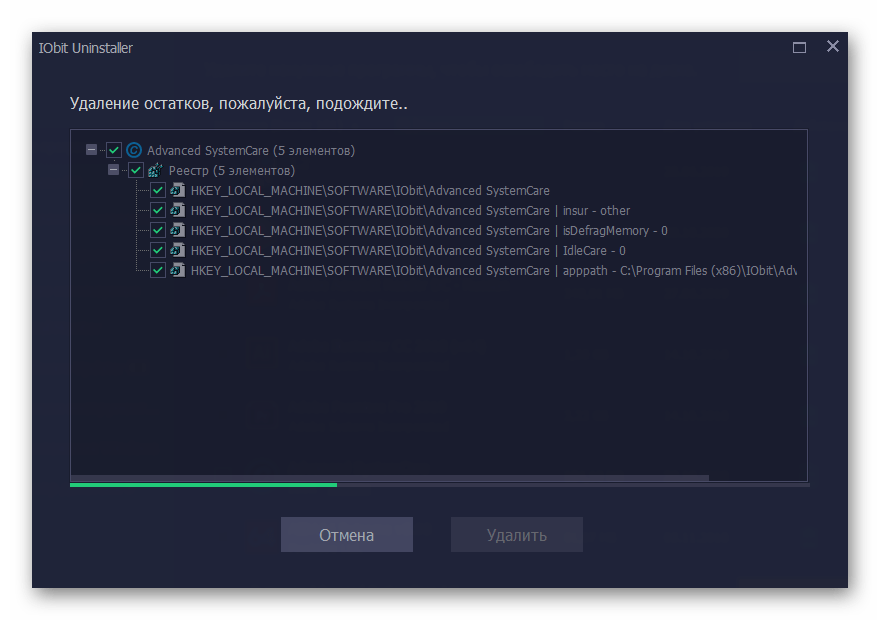
- В IObit Uninstaller следите за тем, как происходит удаление ключей реестра и других элементов софта.
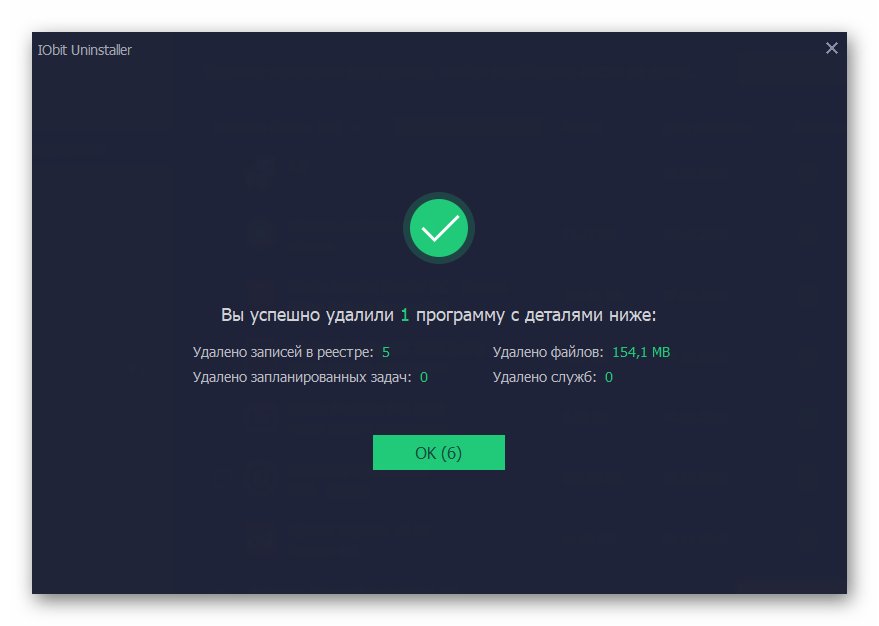
- По завершении вы получите сообщение об успешном выполнении операции.
Вариант 3: Другие программы
Мы описали только две программы, предназначенных для удаления другого софта. Существует немалое количество их аналогов, и среди них есть как удачные решения, так и не очень. Ознакомиться со списком лучших из них и подобрать альтернативный вариант, если предыдущие оказались неподходящими, вы можете в отдельном обзоре на нашем сайте. Принцип деинсталляции при этом остается примерно таким же, как было описано выше.
Подробнее: Программы для удаления программ
Наша группа в TelegramПолезные советы и помощь
What is Advance System Care?
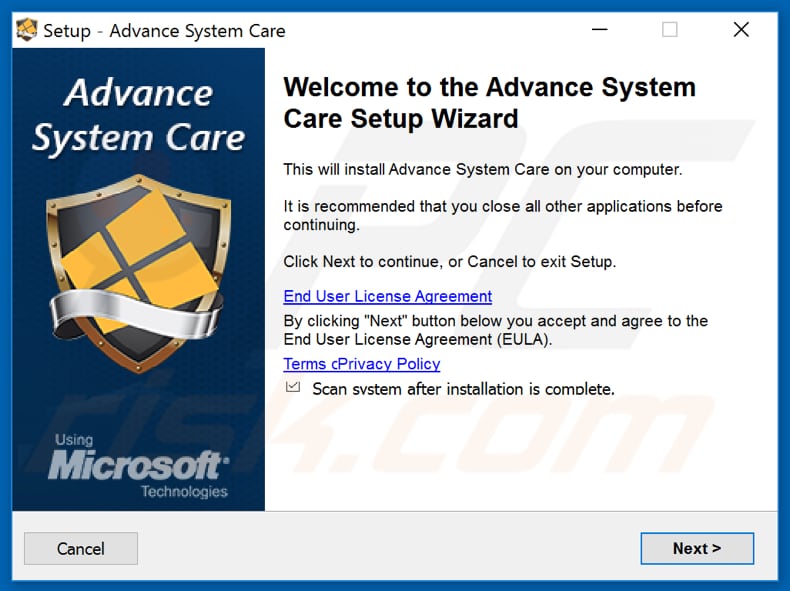
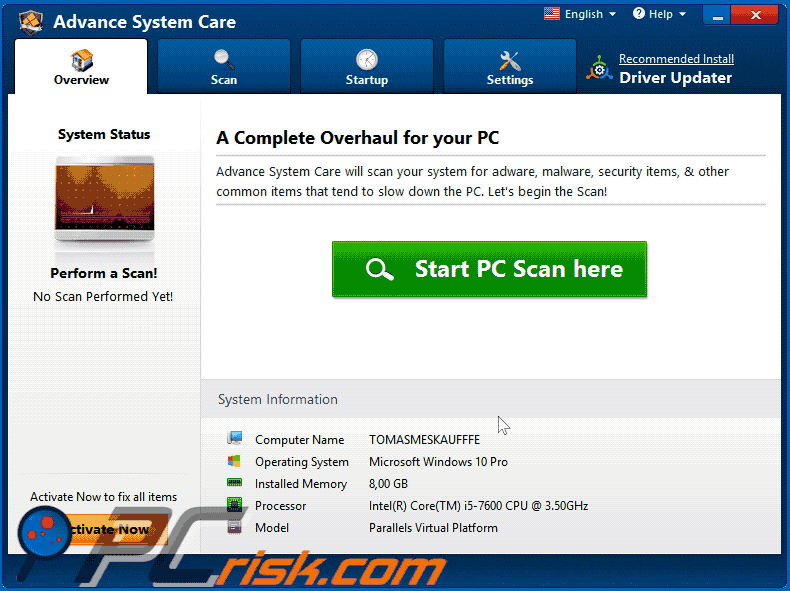
Advance System Care is one of many system optimization tools that supposedly cleans, optimizes, and improves computer performance, however, developers distribute this program through the set-ups of other software.
People often download and install these programs inadvertently and, for this reason, they are classified as potentially unwanted applications (PUAs). Do not trust Advance System Care or other PUAs. Furthermore, Advance System Care is used to promote other apps of this type called Driver Updater and Driver Tuneup.

Advance System Care allows users to scan their systems for various threats, unwanted software, items that might impact system performance, and so on. Despite this, it is impossible to fix any detected problems/remove items without having to pay for this software.
Therefore, users cannot perform any further actions without activating Advance System Care. PUAs are often designed to provide false results, and thus they will not fix any problems. They are generally used to trick people into paying for activation. It is unknown whether Advance System Care provides false results, however, most PUAs do.
Furthermore, their set-ups usually contain offers to download additional software such as browser hijackers, adware, etc. It is possible therefore that people who have downloaded and installed Advance System Care, also unintentionally allowed other PUAs to be downloaded and installed.
Browser hijackers are applications that promote various fake search engines.
They do this by changing certain browser settings. These apps also collect various user-system information (IP addresses, geolocations, entered search queries, addresses of visited websites, and so on), which developers share with other parties (potentially cyber criminals) who misuse private data to generate revenue.
If installed, adware-type software deploys unwanted ads such as coupons, banners, surveys, pop-ups, etc. When clicked, these can open untrustworthy websites or even run scrips that download or install unwanted programs. Do not to trust Advance System Care and uninstall all PUAs immediately.
Threat Summary:
| Name | Advance System Care potentially unwanted application |
| Threat Type | PUP (potentially unwanted program), PUA (potentially unwanted application). |
| Supposed Functionality | Advance System Care supposedly optimizes operating systems. |
| Detection Names | AVG (FileRepMetagen [Malware]), DrWeb (Program.Unwanted.2219), ESET-NOD32 (A Variant Of MSIL/GT32SupportGeeks.B Potentially Unwanted), Kaspersky (Hoax.Win32.PCFixer.gen), Full List Of Detections (VirusTotal) |
| Symptoms | A program that you do not recall installing suddenly appeared on your computer. New application is performing computer scans and displays warning messages about found issues. Asks for payment to eliminate the supposedly found errors. |
| Distribution Methods | Deceptive pop-up ads, free software installers (bundling), fake flash player installers. |
| Related Domains | advancepctools[.]net |
| Additional Information | Advance System Care promotes two other programs of the same kind: Driver Updater and Driver Tuneup. |
| Damage | Monetary loss (unnecessary purchase of fake software), unwanted warning pop-ups, slow computer performance. |
| Malware Removal (Windows) |
To eliminate possible malware infections, scan your computer with legitimate antivirus software. Our security researchers recommend using Combo Cleaner. Download Combo Cleaner To use full-featured product, you have to purchase a license for Combo Cleaner. 7 days free trial available. Combo Cleaner is owned and operated by RCS LT, the parent company of PCRisk.com. |
There are many other programs similar to Advance System Care including, for example, Auto PC Care, IOByte System Care, and CompuClever PC TuneUp. In most cases, developers present them as legitimate and useful programs, however, few operate as promised.
They are designed to provide users with fake results to encourage them to pay for activation of bogus software.
How did potentially unwanted applications install on my computer?
To distribute unwanted apps, developers use a deceptive marketing method called «bundling». They use this to trick people into downloading and installing unwanted apps through the set-ups of other software by hiding the details in «Custom», «Advanced», and other similar settings.
They include unwanted apps as additional offers. People who download or install software without checking settings included in the set-ups often allow PUAs to be downloaded and/or installed. These unwanted apps can also be downloaded or installed inadvertently by clicking intrusive, deceptive ads.
How to avoid installation of potentially unwanted applications
Do not use third party downloaders, installers, unofficial websites, various Peer-to-Peer networks, or other similar channels/tools to download or install software. The best and safest way to achieve this is to download everything from official and trustworthy websites, and using direct download links.
Furthermore, check all download or installation setup settings and dismiss offers to download/install unwanted, additionally-included programs. Do not click intrusive ads, since they can redirect to untrustworthy websites or lead to unwanted downloads and installations.
Browsers often open dubious web pages or display ads when PUAs are installed on them. Therefore, check installed extensions, plug-ins, and add-ons and remove suspicious entries immediately. Also remove all programs of this kind that are installed on the operating system.
If your computer is already infected with PUAs, we recommend running a scan with
Combo Cleaner Antivirus for Windows to automatically eliminate them.
Website promoting Advance System Care application:
Advance System Care installation setup:
Appearance of Advance System Care application (GIF):
Instant automatic malware removal:
Manual threat removal might be a lengthy and complicated process that requires advanced IT skills. Combo Cleaner is a professional automatic malware removal tool that is recommended to get rid of malware. Download it by clicking the button below:
DOWNLOAD Combo Cleaner
By downloading any software listed on this website you agree to our Privacy Policy and Terms of Use. To use full-featured product, you have to purchase a license for Combo Cleaner. 7 days free trial available. Combo Cleaner is owned and operated by RCS LT, the parent company of PCRisk.com.
Quick menu:
- What is Advance System Care?
- STEP 1. Uninstall deceptive applications using Control Panel.
- STEP 2. Remove malicious plug-ins from Internet Explorer.
- STEP 3. Remove rogue extensions from Google Chrome.
- STEP 4. Remove potentially unwanted plug-ins from Mozilla Firefox.
- STEP 5. Remove rogue extensions from Safari.
- STEP 6. Remove rogue plug-ins from Microsoft Edge.
Removal of potentially unwanted applications:
Windows 11 users:
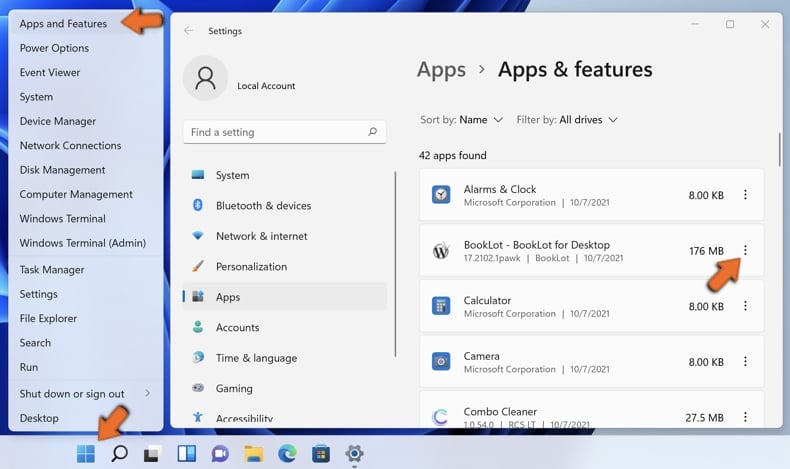
Right-click on the Start icon, select Apps and Features. In the opened window search for the application you want to uninstall, after locating it, click on the three vertical dots and select Uninstall.
Windows 10 users:
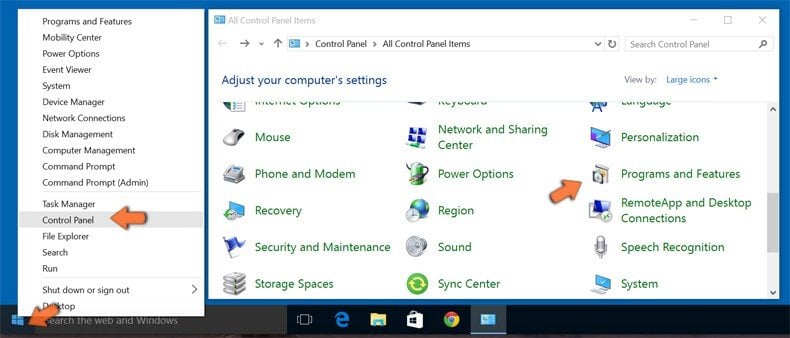
Right-click in the lower left corner of the screen, in the Quick Access Menu select Control Panel. In the opened window choose Programs and Features.
Windows 7 users:
Click Start (Windows Logo at the bottom left corner of your desktop), choose Control Panel. Locate Programs and click Uninstall a program.
macOS (OSX) users:
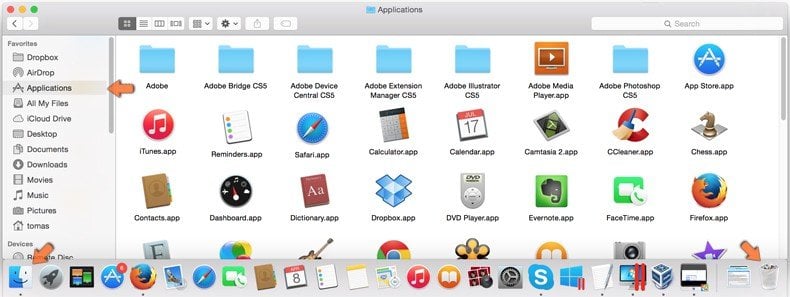
Click Finder, in the opened screen select Applications. Drag the app from the Applications folder to the Trash (located in your Dock), then right click the Trash icon and select Empty Trash.
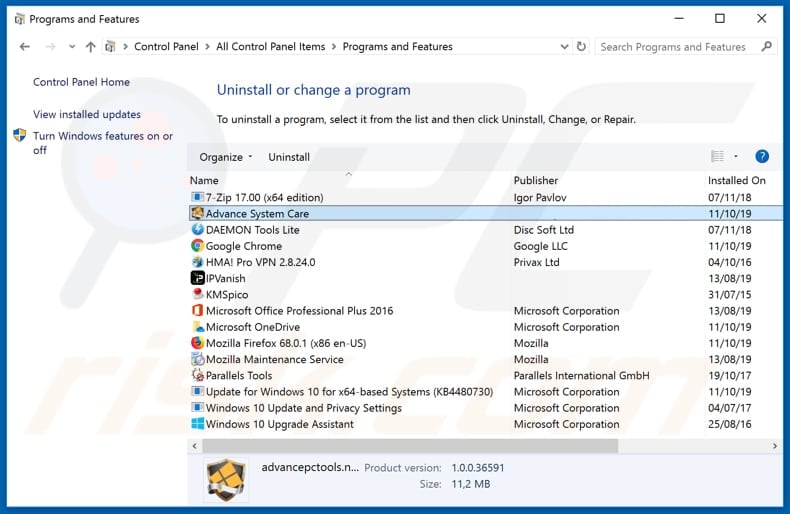
In the uninstall programs window, look for «Advance System Care» and other suspicious/recently-installed applications, select these entries and click «Uninstall» or «Remove«.
After uninstalling the potentially unwanted application, scan your computer for any remaining unwanted components or possible malware infections. To scan your computer, use recommended malware removal software.
DOWNLOAD remover for malware infections
Combo Cleaner checks if your computer is infected with malware. To use full-featured product, you have to purchase a license for Combo Cleaner. 7 days free trial available. Combo Cleaner is owned and operated by RCS LT, the parent company of PCRisk.com.
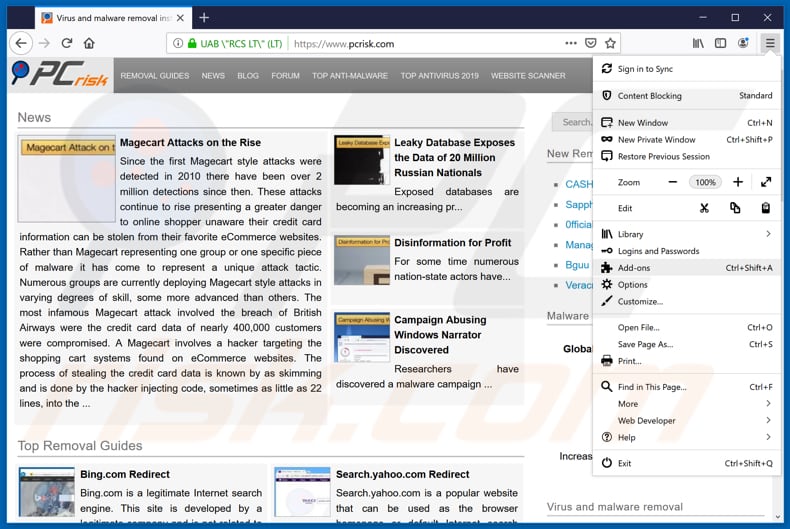
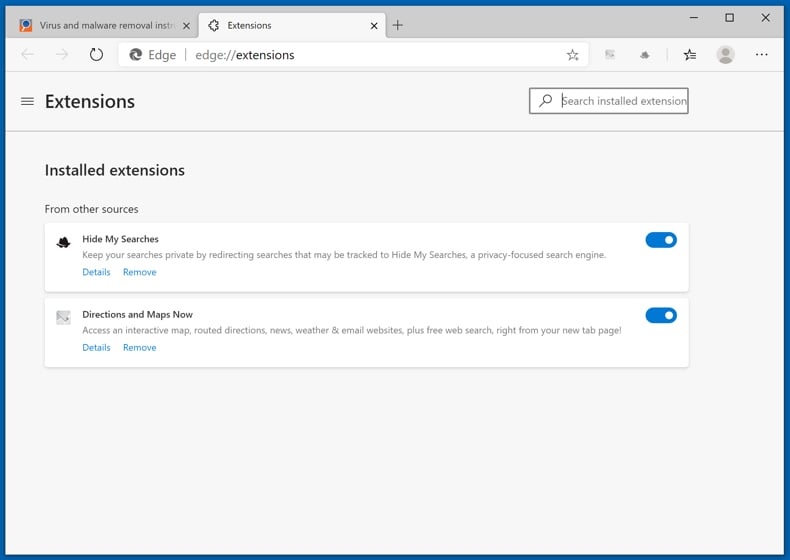
Remove rogue extensions from Internet browsers:
At the time of research, Advance System Care did not install any unwanted browser extensions, however, some unwanted applications can be installed together with adware and browser hijackers. If you experience unwanted ads or redirects when browsing the internet, continue with the removal guide below.
Video showing how to remove potentially unwanted browser add-ons:
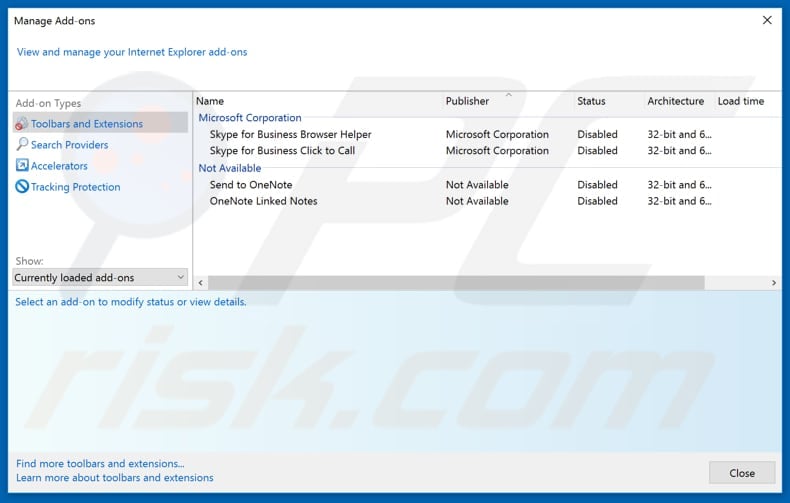
Remove malicious add-ons from Internet Explorer:
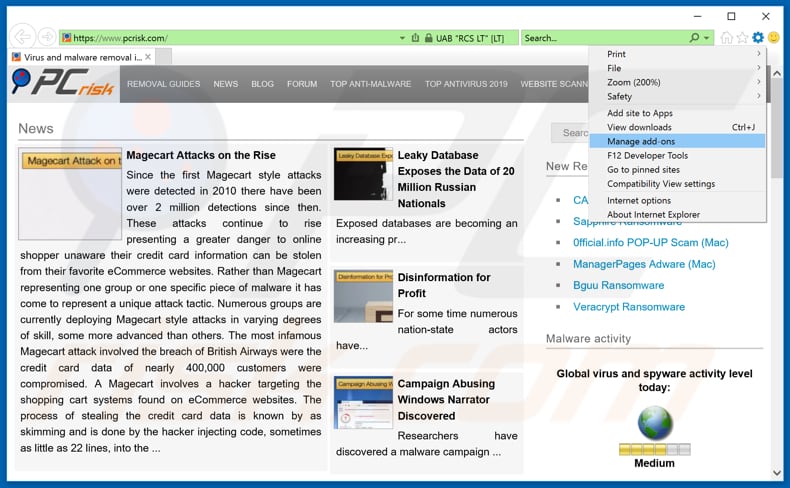
Click the «gear» icon (at the top right corner of Internet Explorer), select «Manage Add-ons». Look for any recently-installed suspicious browser extensions, select these entries and click «Remove».
Optional method:
If you continue to have problems with removal of the advance system care potentially unwanted application, reset your Internet Explorer settings to default.
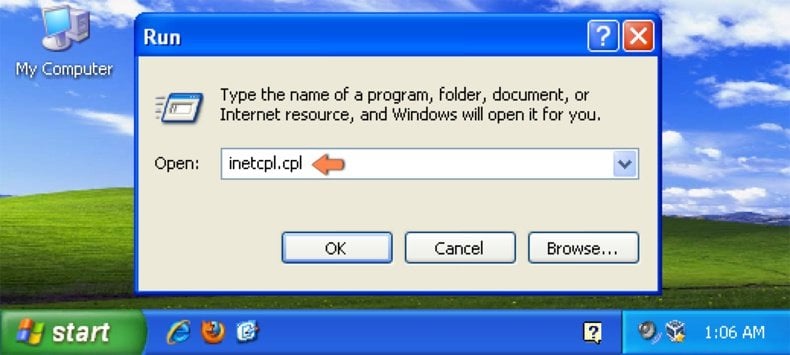
Windows XP users: Click Start, click Run, in the opened window type inetcpl.cpl In the opened window click the Advanced tab, then click Reset.
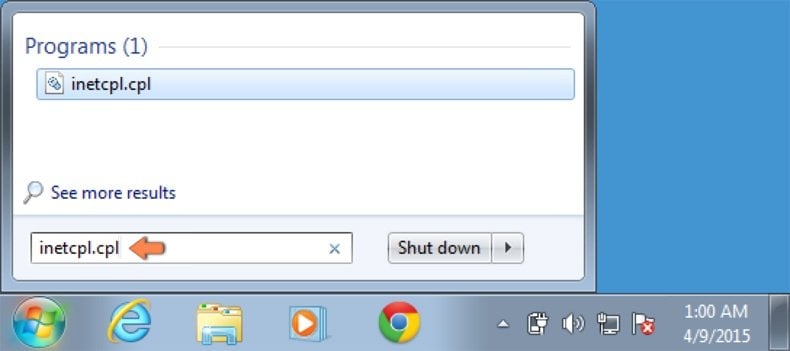
Windows Vista and Windows 7 users: Click the Windows logo, in the start search box type inetcpl.cpl and click enter. In the opened window click the Advanced tab, then click Reset.
Windows 8 users: Open Internet Explorer and click the gear icon. Select Internet Options.
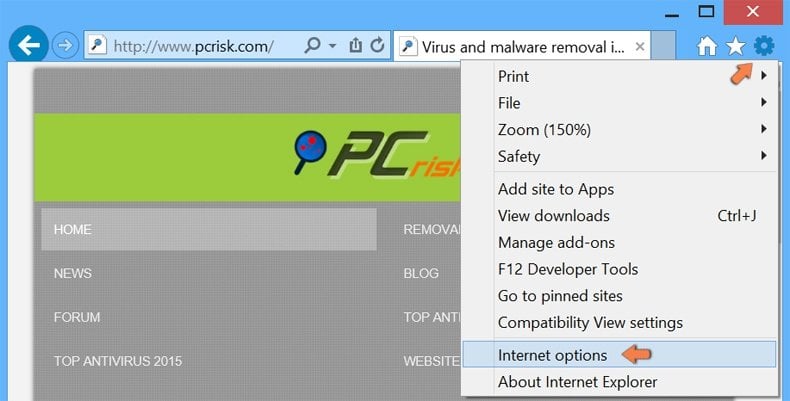
In the opened window, select the Advanced tab.
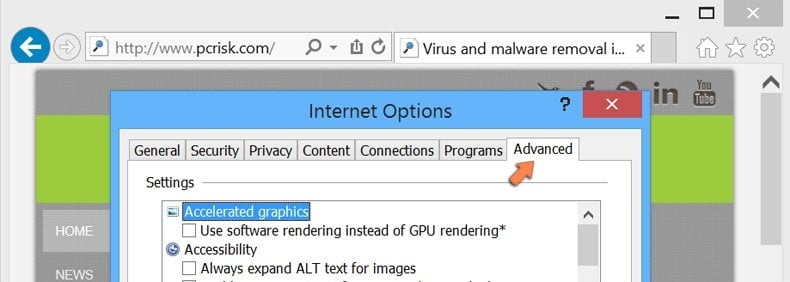
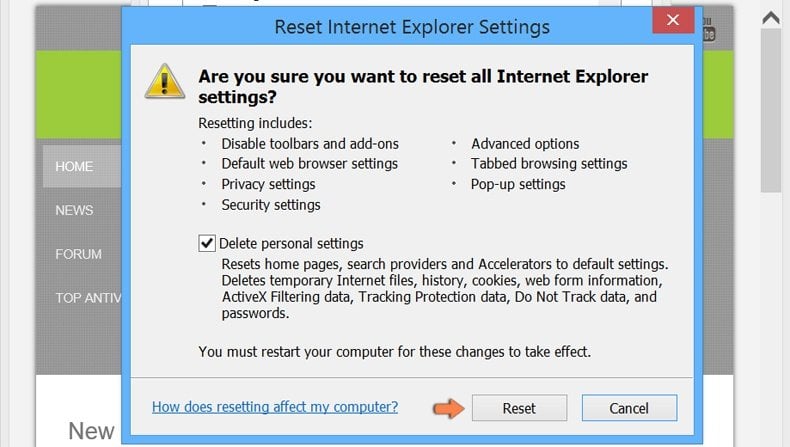
Click the Reset button.

Confirm that you wish to reset Internet Explorer settings to default by clicking the Reset button.
Remove malicious extensions from Google Chrome:
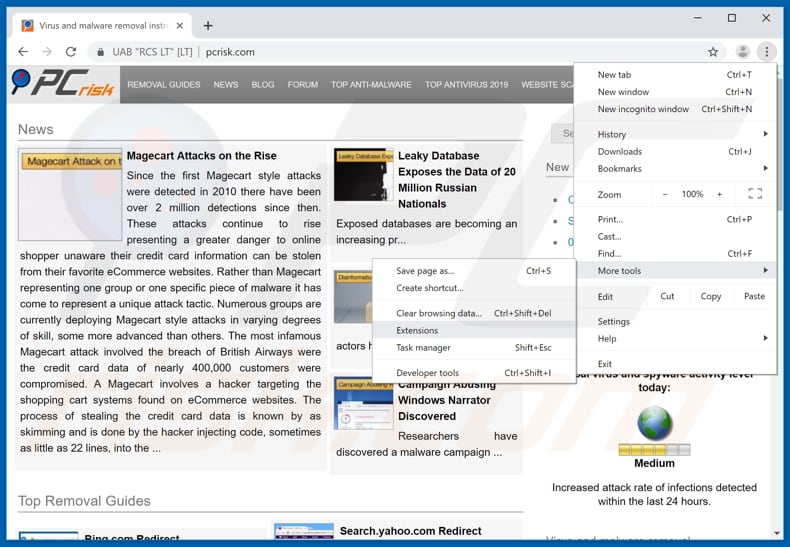
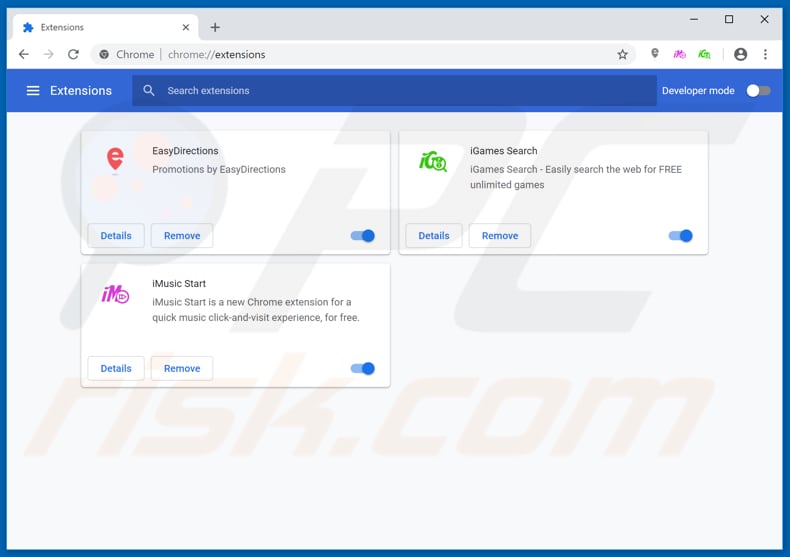
Click the Chrome menu icon (at the top right corner of Google Chrome), select «More tools» and click «Extensions». Locate all recently-installed suspicious browser add-ons and remove them.
Optional method:
If you continue to have problems with removal of the advance system care potentially unwanted application, reset your Google Chrome browser settings. Click the Chrome menu icon (at the top right corner of Google Chrome) and select Settings. Scroll down to the bottom of the screen. Click the Advanced… link.
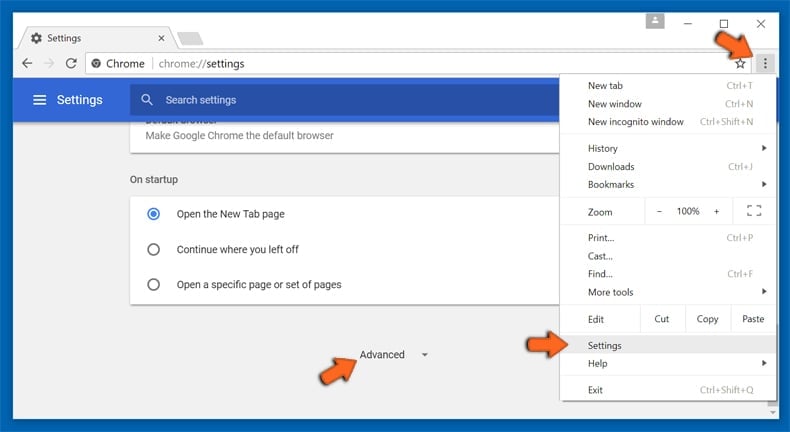
After scrolling to the bottom of the screen, click the Reset (Restore settings to their original defaults) button.
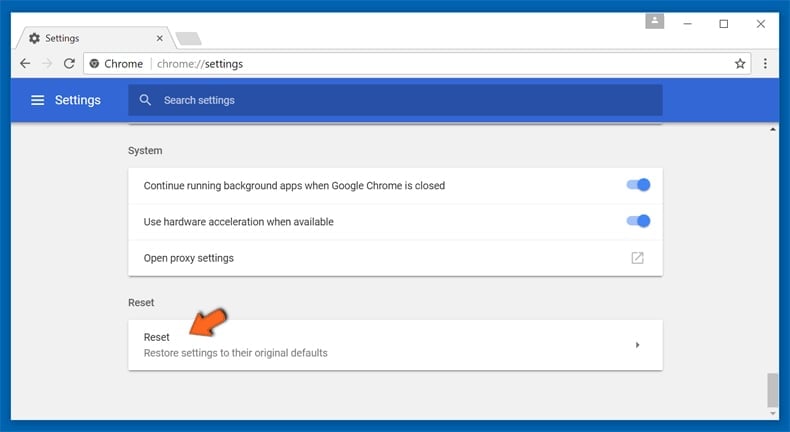
In the opened window, confirm that you wish to reset Google Chrome settings to default by clicking the Reset button.

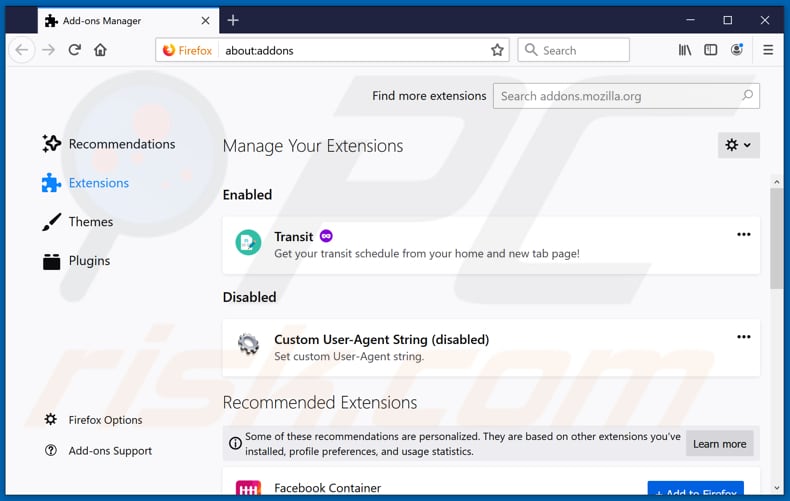
Remove malicious plug-ins from Mozilla Firefox:
Click the Firefox menu (at the top right corner of the main window), select «Add-ons». Click on «Extensions», in the opened window remove all recently-installed suspicious browser plug-ins.
Optional method:
Computer users who have problems with advance system care potentially unwanted application removal can reset their Mozilla Firefox settings.
Open Mozilla Firefox, at the top right corner of the main window, click the Firefox menu, in the opened menu, click Help.
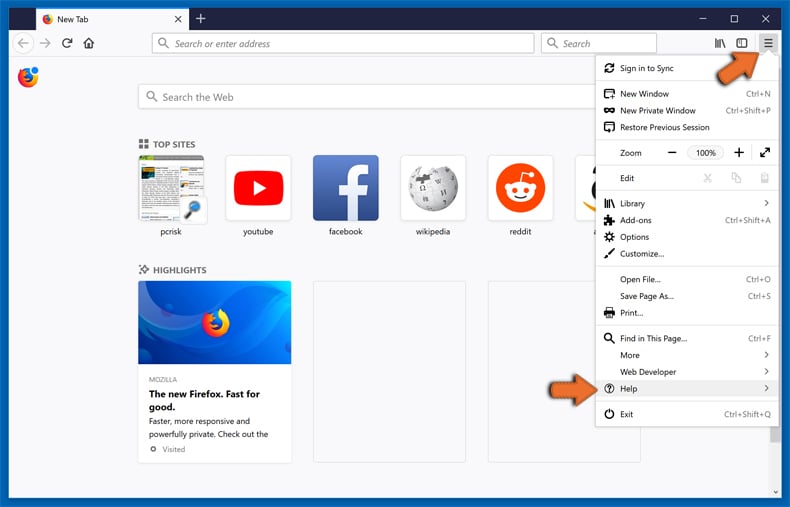
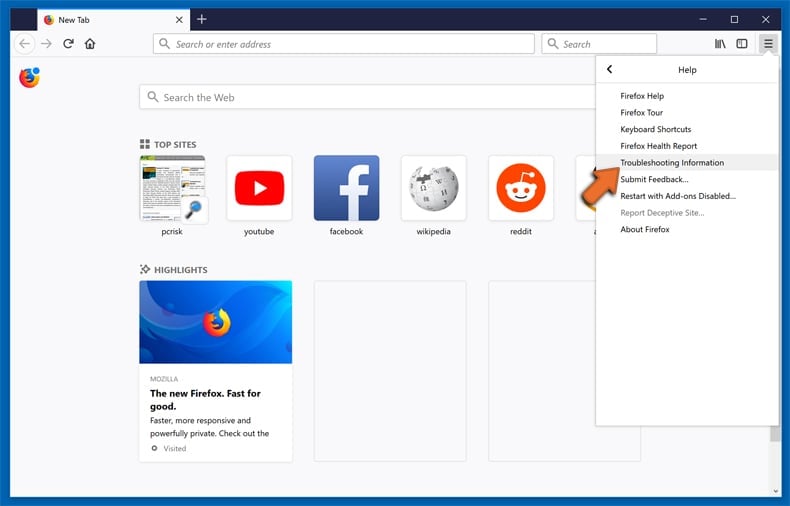
Select Troubleshooting Information.
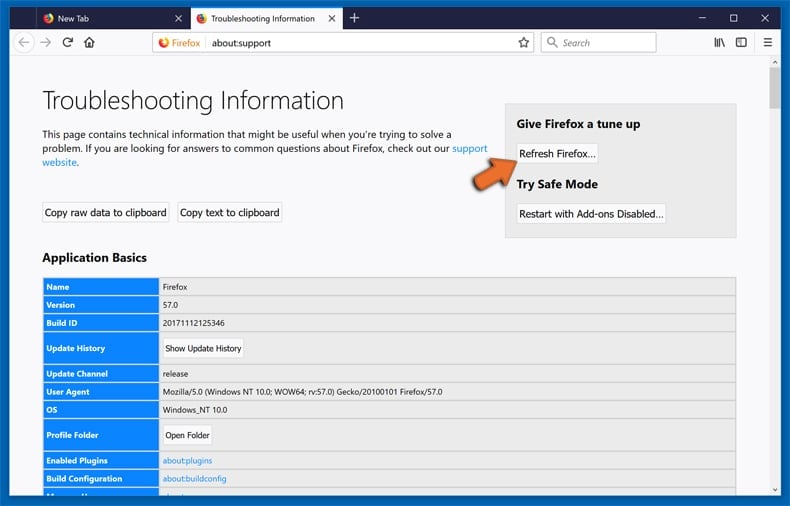
In the opened window, click the Refresh Firefox button.
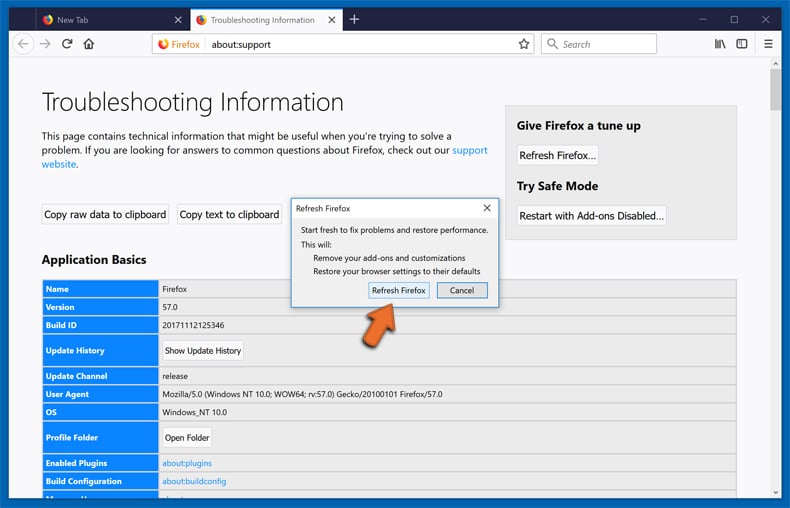
In the opened window, confirm that you wish to reset Mozilla Firefox settings to default by clicking the Refresh Firefox button.
Remove malicious extensions from Safari:

Make sure your Safari browser is active, click Safari menu, and select Preferences….
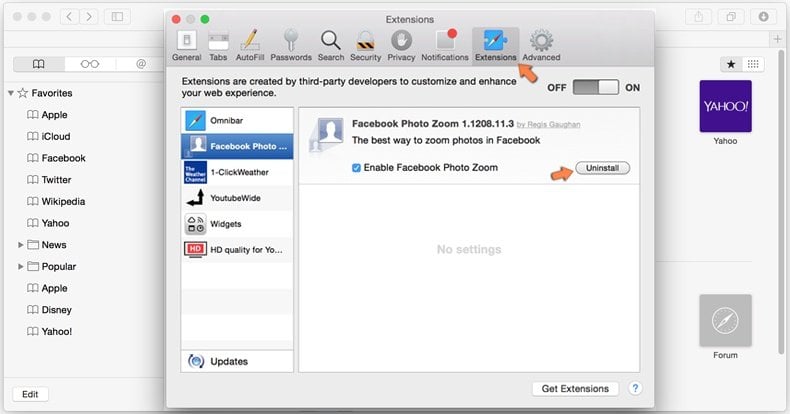
In the opened window click Extensions, locate any recently installed suspicious extension, select it and click Uninstall.
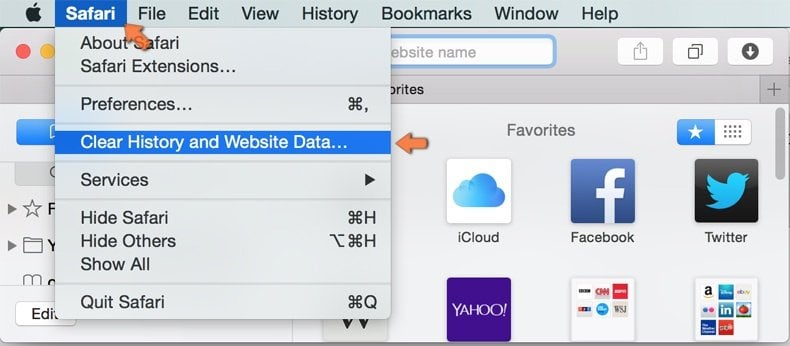
Optional method:
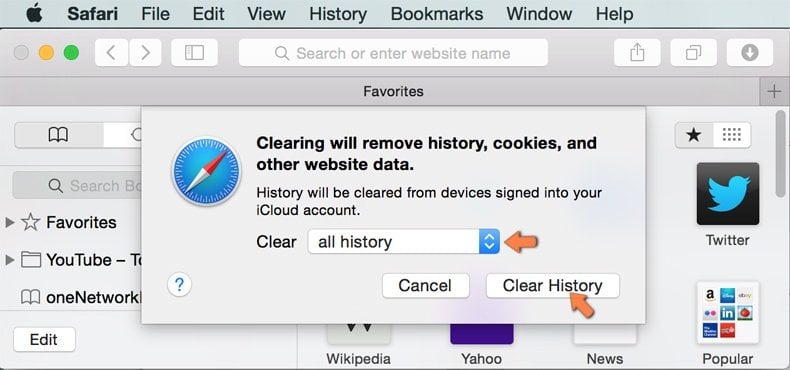
Make sure your Safari browser is active and click on Safari menu. From the drop down menu select Clear History and Website Data…
In the opened window select all history and click the Clear History button.
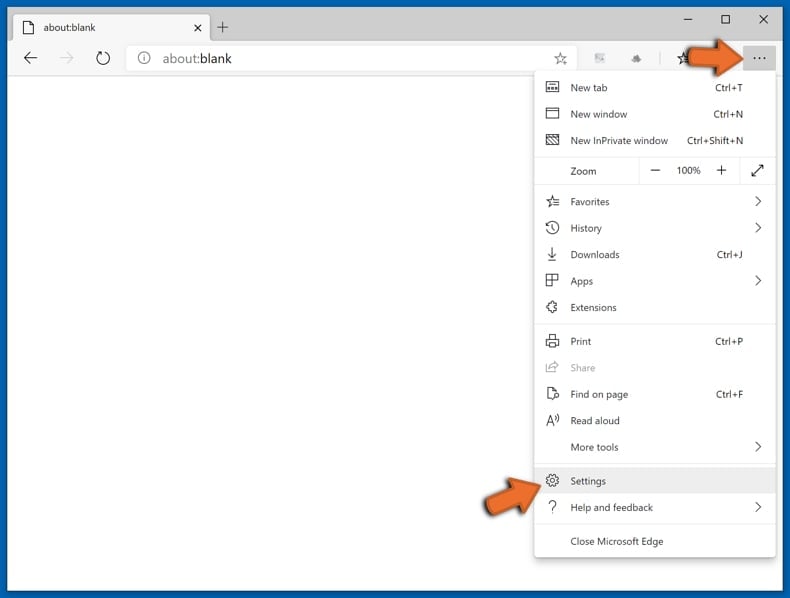
Remove malicious extensions from Microsoft Edge:
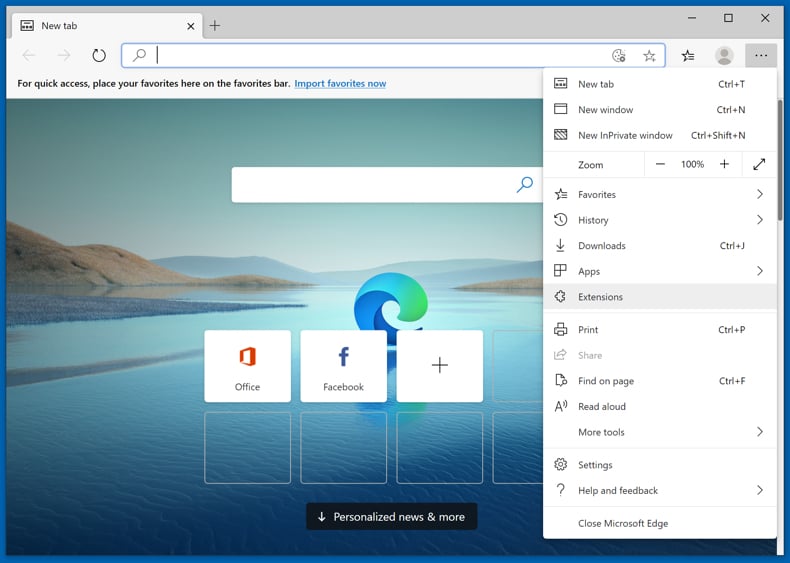
Click the Edge menu icon (at the upper-right corner of Microsoft Edge), select «Extensions«. Locate all recently-installed suspicious browser add-ons and click «Remove» below their names.
Optional method:
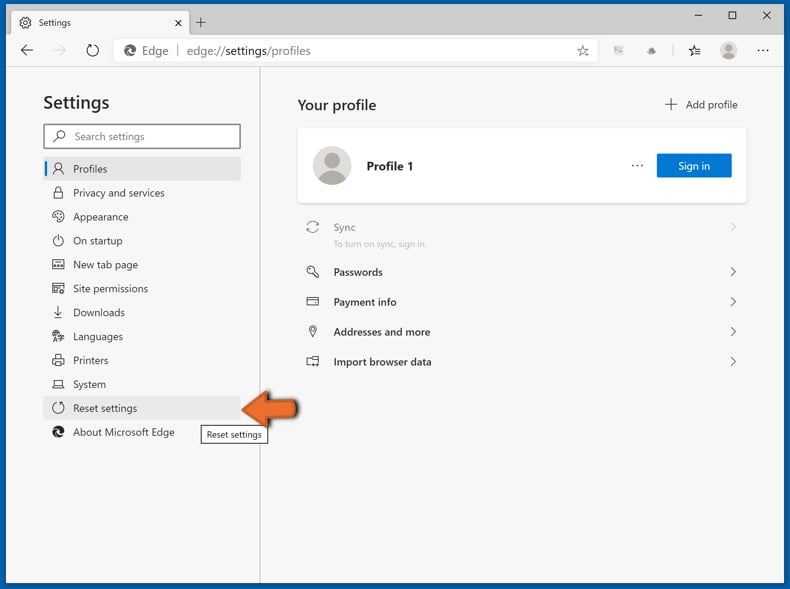
If you continue to have problems with removal of the advance system care potentially unwanted application, reset your Microsoft Edge browser settings. Click the Edge menu icon (at the top right corner of Microsoft Edge) and select Settings.
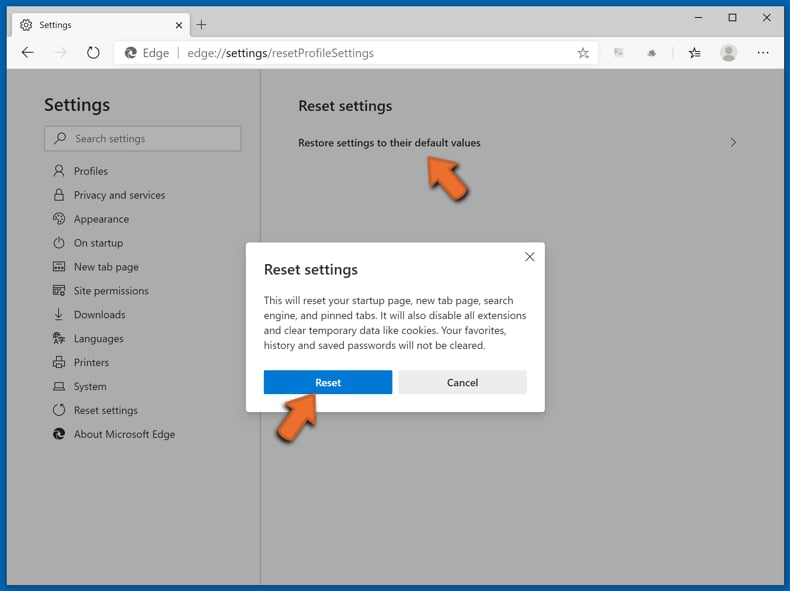
In the opened settings menu select Reset settings.
Select Restore settings to their default values. In the opened window, confirm that you wish to reset Microsoft Edge settings to default by clicking the Reset button.
- If this did not help, follow these alternative instructions explaining how to reset the Microsoft Edge browser.
Summary:
Commonly, adware or potentially unwanted applications infiltrate Internet browsers through free software downloads. Note that the safest source for downloading free software is via developers’ websites only. To avoid installation of adware, be very attentive when downloading and installing free software. When installing previously-downloaded free programs, choose the custom or advanced installation options – this step will reveal any potentially unwanted applications listed for installation together with your chosen free program.
Post a comment:
If you have additional information on advance system care potentially unwanted application or it’s removal please share your knowledge in the comments section below.
Advance System Care allows users to scan their systems for various threats, unwanted software, items that may impact system performance, and so on, however, it is impossible to fix any detected problems/remove items without having to pay for this software. Therefore, users cannot perform any further actions without activating Advance System Care. PUAs can be designed to provide fake results, which means they will not fix any problems. Quite often apps of this type are used to trick people into paying money for their activation. It is unknown whether Advance System Care provides fake results, however, most PUAs do. Besides, very often their set-ups contain offers to download additional software
A guide to uninstall Advanced SystemCare from your system
Advanced SystemCare is a software application. This page contains details on how to uninstall it from your computer.
The Windows version was created by IObit.
Go over here for more details on IObit.
More information about Advanced SystemCare can be found at https://www.iobit.com/.
Usually the Advanced SystemCare program is installed in the C:\Program Files (x86)\IObit\Advanced SystemCare directory, depending on the user’s option during setup.
The complete uninstall command line for Advanced SystemCare is C:\Program Files (x86)\IObit\Advanced SystemCare\unins000.exe.
The program’s main executable file occupies 9.00 MB (9440016 bytes) on disk and is named ASC.exe.
Advanced SystemCare is composed of the following executables which take 81.36 MB (85314503 bytes) on disk:
- About.exe (581.77 KB)
- ActionCenterDownloader.exe (2.38 MB)
- ASC.exe (9.00 MB)
- ASCDownload.exe (1.36 MB)
- ASCFeature.exe (123.27 KB)
- ASCInit.exe (649.27 KB)
- ASCService.exe (1.78 MB)
- ASCTray.exe (3.47 MB)
- ASCUpgrade.exe (1.45 MB)
- ASCVER.exe (2.41 MB)
- AutoCare.exe (2.56 MB)
- AutoRamClean.exe (1.05 MB)
- AutoReactivator.exe (298.77 KB)
- AutoSweep.exe (1.15 MB)
- AutoUpdate.exe (3.14 MB)
- BrowserCleaner.exe (1.73 MB)
- BrowserProtect.exe (1.52 MB)
- delayLoad.exe (242.27 KB)
- DiskDefrag.exe (25.77 KB)
- Display.exe (136.27 KB)
- DNSProtect.exe (589.27 KB)
- FaceIDSetting.exe (1.24 MB)
- FeedBack.exe (1.98 MB)
- Fimon.exe (1.49 MB)
- IObitLiveUpdate.exe (2.81 MB)
- LocalLang.exe (222.77 KB)
- Monitor.exe (3.02 MB)
- MonitorDisk.exe (114.27 KB)
- PPUninstaller.exe (807.27 KB)
- PrivacyShield.exe (1.60 MB)
- QuickSettings.exe (2.49 MB)
- RealTimeProtector.exe (911.27 KB)
- Register.exe (2.19 MB)
- ReProcess.exe (147.27 KB)
- RescueCenter.exe (2.18 MB)
- sdproxy.exe (91.27 KB)
- SendBugReportNew.exe (974.77 KB)
- smBootTime.exe (1.60 MB)
- SoftUpdateTip.exe (859.77 KB)
- StartupInfo.exe (492.27 KB)
- Suo12_StartupManager.exe (3.73 MB)
- Suo13_RegistryDefrag.exe (456.27 KB)
- Sur11_ShortcutFixer.exe (2.57 MB)
- Sur12_DiskDoctor.exe (910.77 KB)
- unins000.exe (1.15 MB)
- UninstallPromote.exe (3.24 MB)
- RegistryDefragBootTime.exe (45.87 KB)
- RegistryDefragBootTime.exe (65.93 KB)
- RegistryDefragBootTime.exe (42.75 KB)
- RegistryDefragBootTime.exe (28.38 KB)
- RegistryDefragBootTime.exe (48.41 KB)
- RegistryDefragBootTime.exe (25.33 KB)
- RegistryDefragBootTime.exe (28.38 KB)
- RegistryDefragBootTime.exe (25.33 KB)
- RegistryDefragBootTime.exe (27.36 KB)
- RegistryDefragBootTime.exe (24.83 KB)
- RegistryDefragBootTime.exe (28.38 KB)
- RegistryDefragBootTime.exe (24.83 KB)
- RegistryDefragBootTime.exe (27.39 KB)
- ICONPIN32.exe (373.27 KB)
- ICONPIN64.exe (571.77 KB)
- SPNativeMessage.exe (1.45 MB)
- PluginInstall.exe (1.33 MB)
- SPUpdate.exe (1.39 MB)
- MyWin10.exe (1.66 MB)
…click to view all…
The current page applies to Advanced SystemCare version 13.0.1 only.
You can find here a few links to other Advanced SystemCare versions:
- 18.1.0.201
- 14.0.1
- 5.4.0
- 18.0.0
- 15.5.0.267
- 16.5.0
- 17.4.0
- 16.3.0
- 18.3.0
- 13.2.0
- 15.2.0
- 15.0.1.125
- 10.5.0
- 17.4.0.242
- 16.4.0.225
- 17.3.0
- 17.6.0
- 14.6.0
- 15.6.0
- 17.0.1.107
- 15.4.0.250
- 13.7.0.308
- 15.5.0
- 18.1.0
- 17.1.0.157
- 13.5.0
- 14.4.0
- 16.2.0
- 11.00
- 13.6.0
- 14.0.0
- 14.5.0
- 14.3.0
- 15.0.0
- 16.4.0
- 15.4.0.246
- 17.0.1
- 13.3.0
- 15.3.0
- 15.1.0
- 16.4.0.226
- 17.2.0.191
- 17.6.0.322
- 18.2.0
- 17.1.0
- 14.1.0
- 15.4.0
- 13.1.0
- 16.0.0
- 13.0.0
- 16.0.1
- 16.1.0
- 13.7.0
- 18.0.1.156
- 17.5.0
- 15.3.0.226
- 16.5.0.237
- 17.0.0
- 17.3.0.204
- 18.2.0.222
- 13.4.0
- 6.4
- 15.0.1
- 13.0.2
- 17.5.0.255
- 17.2.0
- 18.0.1
- 14.2.0
- 15.2.0.201
- 15.6.0.274
- 15.1.0.183
- 10.4.0
- 16.0.1.82
- 16.6.0.259
- 15.3.0.228
- 14.0.2
- 8.2.0.795
- 16.6.0
…click to view all…
Advanced SystemCare has the habit of leaving behind some leftovers.
Directories left on disk:
- C:\Program Files\IObit\Advanced SystemCare
- C:\Users\%user%\AppData\Roaming\IDM\DwnlData\UserName\advanced-systemcare-pre_1
- C:\Users\%user%\AppData\Roaming\IObit\Advanced SystemCare
- C:\Users\%user%\AppData\Roaming\Mozilla\Firefox\Profiles\hgcrm6k4.default\storage\default\https+++advanced-systemcare-free.en.uptodown.com
The files below remain on your disk by Advanced SystemCare’s application uninstaller when you removed it:
- C:\Program Files\IObit\Advanced SystemCare\About.exe
- C:\Program Files\IObit\Advanced SystemCare\ActionCenterDownloader.exe
- C:\Program Files\IObit\Advanced SystemCare\ASC.exe
- C:\Program Files\IObit\Advanced SystemCare\ASC.log
- C:\Program Files\IObit\Advanced SystemCare\ASC_1.log
- C:\Program Files\IObit\Advanced SystemCare\ASCDownload.exe
- C:\Program Files\IObit\Advanced SystemCare\ASCExtMenu.dll
- C:\Program Files\IObit\Advanced SystemCare\ASCExtMenu_64.dll
- C:\Program Files\IObit\Advanced SystemCare\ASCFeature.exe
- C:\Program Files\IObit\Advanced SystemCare\ASCInit.exe
- C:\Program Files\IObit\Advanced SystemCare\ASCInit.log
- C:\Program Files\IObit\Advanced SystemCare\ASCService.exe
- C:\Program Files\IObit\Advanced SystemCare\ASCService.log
- C:\Program Files\IObit\Advanced SystemCare\ASCTray.exe
- C:\Program Files\IObit\Advanced SystemCare\ASCTray.log
- C:\Program Files\IObit\Advanced SystemCare\ASCUpgrade.exe
- C:\Program Files\IObit\Advanced SystemCare\ASCVER.exe
- C:\Program Files\IObit\Advanced SystemCare\AutoCare.exe
- C:\Program Files\IObit\Advanced SystemCare\AutoCare.log
- C:\Program Files\IObit\Advanced SystemCare\AutoRamClean.exe
- C:\Program Files\IObit\Advanced SystemCare\AutoReactivator.exe
- C:\Program Files\IObit\Advanced SystemCare\AutoSweep.exe
- C:\Program Files\IObit\Advanced SystemCare\AutoSweep.log
- C:\Program Files\IObit\Advanced SystemCare\AutoUpdate.exe
- C:\Program Files\IObit\Advanced SystemCare\AutoUpdate.log
- C:\Program Files\IObit\Advanced SystemCare\BrowserCleaner.exe
- C:\Program Files\IObit\Advanced SystemCare\BrowserProtect.exe
- C:\Program Files\IObit\Advanced SystemCare\Config\BigUpgrade.ini
- C:\Program Files\IObit\Advanced SystemCare\Config\Common.ini
- C:\Program Files\IObit\Advanced SystemCare\CPUIDInterface.dll
- C:\Program Files\IObit\Advanced SystemCare\cpuidsdk.dll
- C:\Program Files\IObit\Advanced SystemCare\Database\ActiveBoost.db
- C:\Program Files\IObit\Advanced SystemCare\Database\AutoUpdate.dat
- C:\Program Files\IObit\Advanced SystemCare\Database\Cus.dbd
- C:\Program Files\IObit\Advanced SystemCare\Database\Def.dbd
- C:\Program Files\IObit\Advanced SystemCare\Database\defaultProgramTzm.db
- C:\Program Files\IObit\Advanced SystemCare\Database\HomepageWhite.dbd
- C:\Program Files\IObit\Advanced SystemCare\Database\HomepageWhiteExe.dbd
- C:\Program Files\IObit\Advanced SystemCare\Database\HotHole.dat
- C:\Program Files\IObit\Advanced SystemCare\Database\ignore.dbd
- C:\Program Files\IObit\Advanced SystemCare\Database\InBoxDriverFeature\vista32.ini
- C:\Program Files\IObit\Advanced SystemCare\Database\InBoxDriverFeature\vista64.ini
- C:\Program Files\IObit\Advanced SystemCare\Database\InBoxDriverFeature\win1032.ini
- C:\Program Files\IObit\Advanced SystemCare\Database\InBoxDriverFeature\win1064.ini
- C:\Program Files\IObit\Advanced SystemCare\Database\InBoxDriverFeature\win732.ini
- C:\Program Files\IObit\Advanced SystemCare\Database\InBoxDriverFeature\win764.ini
- C:\Program Files\IObit\Advanced SystemCare\Database\InBoxDriverFeature\win8_132.ini
- C:\Program Files\IObit\Advanced SystemCare\Database\InBoxDriverFeature\win8_164.ini
- C:\Program Files\IObit\Advanced SystemCare\Database\InBoxDriverFeature\Win832.ini
- C:\Program Files\IObit\Advanced SystemCare\Database\InBoxDriverFeature\Win864.ini
- C:\Program Files\IObit\Advanced SystemCare\Database\Opt.dbd
- C:\Program Files\IObit\Advanced SystemCare\Database\Prishield.dbd
- C:\Program Files\IObit\Advanced SystemCare\Database\PrishieldIgnore.dbd
- C:\Program Files\IObit\Advanced SystemCare\Database\PriTemp.dbd
- C:\Program Files\IObit\Advanced SystemCare\Database\Reg.dbd
- C:\Program Files\IObit\Advanced SystemCare\Database\Register.dat
- C:\Program Files\IObit\Advanced SystemCare\Database\startupBlack.db
- C:\Program Files\IObit\Advanced SystemCare\Database\StartupDRate.db
- C:\Program Files\IObit\Advanced SystemCare\Database\StartupInfoBlack.db
- C:\Program Files\IObit\Advanced SystemCare\Database\startupService.db
- C:\Program Files\IObit\Advanced SystemCare\Database\startupSignature.db
- C:\Program Files\IObit\Advanced SystemCare\Database\startupWhite.db
- C:\Program Files\IObit\Advanced SystemCare\Database\SysSpeed.dbd
- C:\Program Files\IObit\Advanced SystemCare\Database\TurboBoostGame.dbd
- C:\Program Files\IObit\Advanced SystemCare\Database\UninstallRote.dbd
- C:\Program Files\IObit\Advanced SystemCare\dataexchange.dll
- C:\Program Files\IObit\Advanced SystemCare\datastate.dll
- C:\Program Files\IObit\Advanced SystemCare\delayLoad.exe
- C:\Program Files\IObit\Advanced SystemCare\DetectionEx.ini
- C:\Program Files\IObit\Advanced SystemCare\DiskDefrag.exe
- C:\Program Files\IObit\Advanced SystemCare\DiskScan.dll
- C:\Program Files\IObit\Advanced SystemCare\Display.exe
- C:\Program Files\IObit\Advanced SystemCare\Display.log
- C:\Program Files\IObit\Advanced SystemCare\DNSProtect.exe
- C:\Program Files\IObit\Advanced SystemCare\Downloader.log
- C:\Program Files\IObit\Advanced SystemCare\DriverClean.dll
- C:\Program Files\IObit\Advanced SystemCare\DriverCleanAppLog.log
- C:\Program Files\IObit\Advanced SystemCare\drivers\Monitor_win10_x64.sys
- C:\Program Files\IObit\Advanced SystemCare\drivers\Monitor_win7_x64.sys
- C:\Program Files\IObit\Advanced SystemCare\drivers\Monitor_x86.sys
- C:\Program Files\IObit\Advanced SystemCare\drivers\win10_amd64\AscFileControl.sys
- C:\Program Files\IObit\Advanced SystemCare\drivers\win10_amd64\AscFileFilter.sys
- C:\Program Files\IObit\Advanced SystemCare\drivers\win10_amd64\AscRegistryFilter.sys
- C:\Program Files\IObit\Advanced SystemCare\drivers\win10_amd64\RegistryDefragBootTime.exe
- C:\Program Files\IObit\Advanced SystemCare\drivers\win10_ia64\AscFileControl.sys
- C:\Program Files\IObit\Advanced SystemCare\drivers\win10_ia64\AscFileFilter.sys
- C:\Program Files\IObit\Advanced SystemCare\drivers\win10_ia64\AscRegistryFilter.sys
- C:\Program Files\IObit\Advanced SystemCare\drivers\win10_ia64\RegistryDefragBootTime.exe
- C:\Program Files\IObit\Advanced SystemCare\drivers\win10_x86\AscFileControl.sys
- C:\Program Files\IObit\Advanced SystemCare\drivers\win10_x86\AscFileFilter.sys
- C:\Program Files\IObit\Advanced SystemCare\drivers\win10_x86\AscRegistryFilter.sys
- C:\Program Files\IObit\Advanced SystemCare\drivers\win10_x86\RegistryDefragBootTime.exe
- C:\Program Files\IObit\Advanced SystemCare\drivers\win7_amd64\AscFileControl.sys
- C:\Program Files\IObit\Advanced SystemCare\drivers\win7_amd64\AscFileFilter.sys
- C:\Program Files\IObit\Advanced SystemCare\drivers\win7_amd64\AscRegistryFilter.sys
- C:\Program Files\IObit\Advanced SystemCare\drivers\win7_amd64\RegistryDefragBootTime.exe
- C:\Program Files\IObit\Advanced SystemCare\drivers\win7_ia64\AscFileControl.sys
- C:\Program Files\IObit\Advanced SystemCare\drivers\win7_ia64\AscFileFilter.sys
- C:\Program Files\IObit\Advanced SystemCare\drivers\win7_ia64\AscRegistryFilter.sys
- C:\Program Files\IObit\Advanced SystemCare\drivers\win7_ia64\RegistryDefragBootTime.exe
Registry that is not uninstalled:
- HKEY_CLASSES_ROOT\*\shellex\ContextMenuHandlers\Advanced SystemCare
- HKEY_CLASSES_ROOT\Directory\shellex\ContextMenuHandlers\Advanced SystemCare
- HKEY_CLASSES_ROOT\Drive\shellex\ContextMenuHandlers\Advanced SystemCare
- HKEY_CLASSES_ROOT\lnkfile\shellex\ContextMenuHandlers\Advanced SystemCare
- HKEY_LOCAL_MACHINE\Software\IObit\Advanced SystemCare
- HKEY_LOCAL_MACHINE\Software\Microsoft\Windows\CurrentVersion\Uninstall\Advanced SystemCare_is1
Registry values that are not removed from your computer:
- HKEY_CLASSES_ROOT\Local Settings\Software\Microsoft\Windows\Shell\MuiCache\C:\Program Files\IObit\Advanced SystemCare\ASC.exe.FriendlyAppName
- HKEY_LOCAL_MACHINE\System\CurrentControlSet\Services\AdvancedSystemCareService13\ImagePath
- HKEY_LOCAL_MACHINE\System\CurrentControlSet\Services\AscFileControl\ImagePath
- HKEY_LOCAL_MACHINE\System\CurrentControlSet\Services\AscFileFilter\ImagePath
- HKEY_LOCAL_MACHINE\System\CurrentControlSet\Services\AscRegistryFilter\ImagePath
- HKEY_LOCAL_MACHINE\System\CurrentControlSet\Services\iobit_monitor_server\ImagePath
A way to uninstall Advanced SystemCare from your computer using Advanced Uninstaller PRO
Advanced SystemCare is an application offered by the software company IObit.
Frequently, people decide to remove this program. This is difficult because uninstalling this by hand requires some advanced knowledge related to PCs. The best SIMPLE manner to remove Advanced SystemCare is to use Advanced Uninstaller PRO. Here is how to do this:
1. If you don’t have Advanced Uninstaller PRO already installed on your system, add it. This is good because Advanced Uninstaller PRO is a very useful uninstaller and general tool to maximize the performance of your PC.
DOWNLOAD NOW
- visit Download Link
- download the setup by pressing the green DOWNLOAD NOW button
- set up Advanced Uninstaller PRO
2. Start Advanced Uninstaller PRO. Take some time to admire Advanced Uninstaller PRO’s design and number of functions available. Advanced Uninstaller PRO is a very good package of tools.
3. Press the General Tools button

4. Activate the Uninstall Programs button

5. All the programs installed on the PC will be shown to you
6. Navigate the list of programs until you locate Advanced SystemCare or simply click the Search feature and type in «Advanced SystemCare». The Advanced SystemCare application will be found very quickly. Notice that after you select Advanced SystemCare in the list of applications, the following data regarding the program is shown to you:
- Safety rating (in the lower left corner). This tells you the opinion other people have regarding Advanced SystemCare, from «Highly recommended» to «Very dangerous».
- Opinions by other people — Press the Read reviews button.
- Details regarding the program you wish to uninstall, by pressing the Properties button.
For instance you can see that for Advanced SystemCare:
- The publisher is: https://www.iobit.com/
- The uninstall string is: C:\Program Files (x86)\IObit\Advanced SystemCare\unins000.exe
7. Press the Uninstall button. A window asking you to confirm will show up. Confirm the removal by clicking the Uninstall button. Advanced Uninstaller PRO will automatically remove Advanced SystemCare.
8. After removing Advanced SystemCare, Advanced Uninstaller PRO will ask you to run a cleanup. Press Next to go ahead with the cleanup. All the items that belong Advanced SystemCare which have been left behind will be detected and you will be asked if you want to delete them. By removing Advanced SystemCare using Advanced Uninstaller PRO, you can be sure that no registry entries, files or folders are left behind on your computer.
Your computer will remain clean, speedy and ready to run without errors or problems.
Disclaimer
This page is not a piece of advice to remove Advanced SystemCare by IObit from your computer, nor are we saying that Advanced SystemCare by IObit is not a good application. This page simply contains detailed info on how to remove Advanced SystemCare supposing you decide this is what you want to do. Here you can find registry and disk entries that other software left behind and Advanced Uninstaller PRO stumbled upon and classified as «leftovers» on other users’ computers.
Last update on: 2019-09-27 02:20:41.130
Are you looking to remove Advanced SystemCare from your computer? While Advanced SystemCare is a popular system optimization tool for many users, some may find it unnecessary or prefer an alternative. Uninstalling the program can free up resources and space on your device, allowing for a cleaner and more streamlined experience.
In this article, we will guide you through a few easy steps to uninstall Advanced SystemCare from your computer. Whether you are switching to a different optimization tool or simply no longer need its services, following these steps will ensure a smooth and complete removal process. Say goodbye to Advanced SystemCare and regain control over your system’s performance.
Key Takeaways
To uninstall Advanced SystemCare, you can go to the Control Panel, then click on “Programs and Features” or “Add or Remove Programs,” locate Advanced SystemCare in the list of installed programs, and then click on “Uninstall” or “Remove.” Follow the on-screen prompts to complete the uninstallation process. After the software is removed, it’s a good idea to restart your computer to ensure that any remaining components are fully removed.
Are you considering uninstalling Advanced SystemCare but unsure why you should? There are several reasons why you might want to say goodbye to this software. Some users find that Advanced SystemCare can slow down their computer instead of optimizing its performance. Others have privacy concerns, as the software collects various types of data from users’ systems. Additionally, some users may simply prefer to use alternative system optimization tools that better suit their needs.
Uninstalling Advanced SystemCare might also be necessary if the software is causing compatibility issues with other programs or if you’re experiencing technical difficulties with its operation. Furthermore, if you’re looking to free up system resources or streamline your device, removing Advanced SystemCare can be a step towards achieving those goals. Ultimately, understanding the reasons behind uninstalling Advanced SystemCare can help you decide whether it’s the right choice for your system and computing habits.
How To Uninstall Advanced Systemcare On Windows 10
To uninstall Advanced SystemCare on Windows 10, begin by clicking on the Start button and selecting Settings. From the Settings menu, go to Apps, then locate and click on Advanced SystemCare. Next, select Uninstall and follow the prompts to complete the uninstallation process. Alternatively, you can also use the Control Panel to uninstall Advanced SystemCare. Simply open the Control Panel, navigate to Programs, and then click on Uninstall a program. Find Advanced SystemCare in the list of installed programs, right-click on it, and select Uninstall.
Once the uninstallation process is complete, it is recommended to restart your computer to ensure that any remaining components are removed. After restarting, be sure to check your system to confirm that Advanced SystemCare has been successfully uninstalled. Additionally, you may want to run a system scan using an antivirus program to ensure that there are no traces of Advanced SystemCare left on your computer.
By following these simple steps, you can easily uninstall Advanced SystemCare from your Windows 10 computer and free up valuable system resources.
How To Uninstall Advanced Systemcare On Windows 7
To uninstall Advanced SystemCare on Windows 7, start by clicking on the Start button and selecting Control Panel from the menu. Within the Control Panel, navigate to “Programs” and then click on “Uninstall a program.” Look for Advanced SystemCare in the list of installed programs and select it. Click the “Uninstall” button and follow the prompts to complete the uninstallation process. Once the uninstallation is complete, restart your computer to ensure that all files and processes related to Advanced SystemCare are completely removed.
Alternatively, you can also use the Advanced SystemCare’s own uninstaller. To do this, simply locate the Advanced SystemCare folder in the Start menu, select “Uninstall Advanced SystemCare,” and follow the uninstallation prompts.
After uninstalling Advanced SystemCare, it’s recommended to perform a system scan using an antivirus or anti-malware program to ensure that there are no remaining files or potential threats left behind. This will help to ensure a clean and secure system after removing Advanced SystemCare from your Windows 7 computer.
Uninstalling Advanced Systemcare On Mac
To uninstall Advanced SystemCare on a Mac, follow these steps:
1. Go to the Applications folder and look for the Advanced SystemCare app icon.
2. Drag the icon to the Trash or right-click on the app and select “Move to Trash”.
3. Next, go to the Trash folder and right-click on the Advanced SystemCare app. Then choose “Empty Trash” to completely remove the app from your Mac.
4. After emptying the Trash, restart your Mac to complete the uninstallation process.
By following these simple steps, you can easily uninstall Advanced SystemCare from your Mac and free up space on your device. Keep in mind that removing any app from your Mac using this method will also delete all associated files and settings, so be sure you won’t need them in the future.
Removing Advanced Systemcare From Startup
To remove Advanced SystemCare from startup, you can use the Task Manager on Windows. Simply right-click the Start button and select Task Manager. In the Task Manager window, navigate to the Startup tab, where you’ll see a list of programs that launch automatically when your computer boots up. Locate Advanced SystemCare in the list, right-click it, and select Disable. This will prevent Advanced SystemCare from running every time your computer starts.
If you’re using a different version of Windows, such as Windows 7, you can access the Startup folder by typing “msconfig” in the search bar and pressing Enter. In the System Configuration window, go to the Startup tab, where you can uncheck Advanced SystemCare to prevent it from launching at startup.
By following these simple steps, you can effectively remove Advanced SystemCare from your computer’s startup process, allowing you to take greater control over the programs that automatically run when you boot up your system.
Cleaning Up Residual Files And Registry Entries
After you have uninstalled Advanced SystemCare, it’s crucial to clean up any residual files and registry entries to ensure a thorough removal. Start by using a reliable software uninstaller to scan and remove any remaining files associated with Advanced SystemCare. This will help to eliminate any leftover components that may cause potential conflicts or system slowdowns.
Next, you can manually clean up any remaining registry entries using the Windows Registry Editor. Be cautious while doing this, as deleting the wrong entries can lead to system instability. Always back up the registry before making any changes. Search for any leftover Advanced SystemCare keys or entries and delete them carefully.
Lastly, consider using a system cleaner tool to scan for any leftover junk files and temporary data that might have been left behind. This can help to free up valuable disk space and ensure that your system remains clean and optimized after the uninstallation process.
Replacing Advanced Systemcare With Alternative Programs
When replacing Advanced SystemCare with alternative programs, it’s essential to consider the specific features and functions you value most in a system optimization tool. One popular alternative is CCleaner, which offers robust cleaning and optimization tools, including the ability to remove junk files, fix registry issues, and manage startup programs. Another option is Glary Utilities, known for its comprehensive suite of optimization tools, including disk cleanup, registry repair, and system tweaking.
If you’re looking for a more comprehensive security and performance suite, Avira System Speedup or AVG TuneUp could be suitable choices. Both of these programs offer a wide range of features, including disk cleanup, system optimization, and real-time performance monitoring.
It’s important to explore these alternatives to find the best fit for your needs. As you transition away from Advanced SystemCare, take the time to evaluate the features and functionality of each alternative program to ensure that it meets your system optimization requirements and provides a seamless replacement for your former software.
Final Tips For Complete Uninstallation
When uninstalling Advanced SystemCare, it’s important to ensure that all its components are completely removed from your system. After completing the standard uninstallation process, it’s recommended to scan your computer using a reliable antivirus program to detect and remove any residual files or potential threats that may have been left behind. Additionally, running a registry cleaner can help ensure that all traces of the program are eliminated.
Furthermore, consider using a dedicated uninstaller tool to thoroughly remove any remaining files and registry entries associated with Advanced SystemCare. These tools are designed to scan for and delete leftover files and settings that may have been missed during the regular uninstallation process. Finally, it’s essential to restart your computer after performing these steps to allow the changes to take effect and ensure that Advanced SystemCare is completely uninstalled from your system. Following these final tips will help ensure a thorough and complete uninstallation of Advanced SystemCare from your computer.
Final Thoughts
In light of the potential concerns related to the Advanced SystemCare software, it becomes crucial for users to have the ability to uninstall it swiftly and efficiently. By following the simple steps outlined in this guide, users can take control of their system and ensure that their devices are running optimally and securely. As technology advances, it is essential for users to have the knowledge and tools to manage and maintain their systems effectively, and the process of uninstalling Advanced SystemCare serves as an important aspect of this endeavor. By empowering users with the ability to easily remove this software, they can take proactive steps to protect their devices and optimize their computing experience.
How can Uninstall Advanced SystemCare Free Completely from Computer
Advanced SystemCare Free removal has been a tough problem on your PC? Do you need an effective way to uninstall Advanced SystemCare Free quickly with simple steps? Don’t worry, you will be able to solve the problem via the following removing instructions of the program.
Get Bloatware Uninstaller Now
Advanced SystemCare Free may be great in providing its specific function for the users, but it also can turn out to be a problem when the program get some running issues or you don’t want to keep it on your computer any more. In this case, removing Advanced SystemCare Free will be the common and also effective means to resolve the problem, and the real difficulty just come out when people try to uninstall Advanced SystemCare Free from their PCs.
What usually make people to remove Advanced SystemCare Free
- Advanced SystemCare Free is not compatible with other installed applications
- Program gets a corrupted issue unexpectedly
- Advanced SystemCare Free is not as good as the user expected, and need to be erased from the computer
- Advanced SystemCare Free should be uninstalled first and reinstalled on the PC
- The application is regarded by the user and some websites as a suspect malware
Most common problems of removing the software
- Advanced SystemCare Free program is not available on the Windows uninstall panel
- Advanced SystemCare Free can’t be removed from the Windows and always receive a notification
- Nothing happen when click on the uninstall button on Windows
- Advanced SystemCare Free or the related process still keep running on the computer after removing it
- Some files and traces of the program still can be found
- Removing process running for a long time and does not come to the end
If must be a headache if encountering such a problem on the computer, and there are still many other problems people might come across when perform the program removal on their own computers. Therefore, you should know the right way about how to uninstall Advanced SystemCare Free from PC, or the way to fix/avoid the removing issue on the computer. Here are just several options that can support you to remove the application well.
How can uninstall Advanced SystemCare Free well on PC? Check these guides
Option 1: Use the product’s uninstall tool
There are many applications in nowadays provides an uninstall process on the program’s installation folder, or the publisher gets an uninstaller which is specifically used to remove its own products. To remove Advanced SystemCare Free in this way, please refer to the following uninstall instructions:
- 1. Right-click on Advanced SystemCare Free icon on the desktop, and select «Open file location»
- 2. Scroll down the list of files and find the uninstall process, usually named «uninst000», «Uninstall», or «Uninstaller»
- 3. Double click on the uninstall process to start the removal
- 4. Follow the uninstall wizard to finish the removal, and restart your computer
- 5. Open the directory of the installation folder again, and make sure everything has been cleared well
- 6. Click on the Windows button on the bottom-left-corner, and enter «regedit» on the search box
-

- 7. Click to open «regedit» or Registry Editor on the search result
-
- 8. Unfold the registry group inside, and find out those registry keys or entries which contains the program’s name
- 9. Back up these files, and then remove them from your computer system

Note: once problems occur after deleting the registry, please restore the back-up registry to Registry Editor.
When using the publisher’s uninstaller, you should download and install the uninstall application additionally, and choose to uninstall Advanced SystemCare Free from its interface. Similar to the above removal, you should restart your computer after finish the uninstall process, and clear its remnants again which are still staying on the PC.
Things you need to know about Registry Editor
Registry Editor is a place that stores many important registry keys and entries which closely related to the system operation and program’s performance on the computer, removing a wrong file inside usually cause serious problem for the system, so you should be very careful when you have to manually delete some registries inside.
Get Bloatware Uninstaller Now
Option 2:Remove it with Windows uninstall feature
Windows system provide an uninstall feature in Control Panel that support the user to remove unwanted program on the PC, to access this applet in different operating system, you can follow these instructions:
- 1. Open the uninstall panel on Windows system
- 2. Select Advanced SystemCare Free on the programs list, click on Remove/Uninstall button
-
- 3. Confirm the program removal, and complete the removing steps with guides
- 4. When finish, reboot the computer
- 5. The same to the removing steps in Option 1, you should clear the leftovers in the installation folder as well as Registry Editor
Option 3:Uninstall Advanced SystemCare Free with Bloatware Uninstaller
If you want to totally avoid the risky manual removal of registry, and handle Advanced SystemCare Free uninstall more easily and quickly, taking a professional uninstall tool will be a great help for you, because it can count all of the files (including registry keys and temporary files) and provide a complete and automatic removal, thus, many risky and annoying manual steps could be skipped can you can totally remove Advanced SystemCare Free on the PC more quickly.
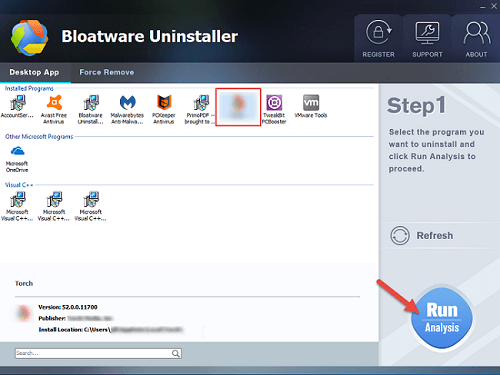
Bloatware Uninstaller is an advanced uninstall utility that can give a good example about how uninstall Advanced SystemCare Free well:
- 1. Install and launch the uninstaller on PC
- 2. Find and select Advanced SystemCare Free from the programs list, and click on Scan button
-
- 3. When all of files being detected, click on the uninstall or remove button
-
- 4. Follow the uninstall wizard to remove all of components from the computer
-
- 5. Exit the uninstaller when finish, and reboot the computer system

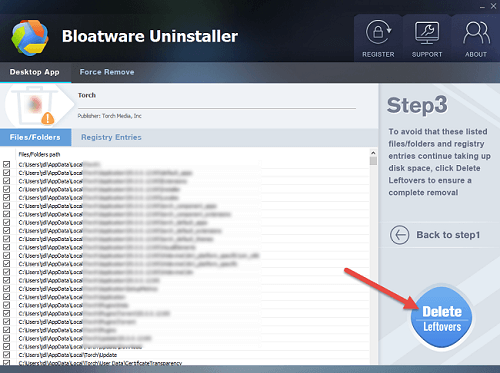
Get Bloatware Uninstaller Now
This is a very effective way to uninstall Advanced SystemCare Free and other applications, while the manual removal usually resulted in an unsuccessful removal, and the most important point is it is much easier for the common user to take and get rid of the program they want. So it is currently the best way we found and would like to recommend you to remove unneeded programs with a good app uninstaller.