
This wikiHow teaches you how to uninstall and delete the Creative Cloud app without deleting any of your Adobe apps, using a computer.
-
1
Download the Creative Cloud Uninstaller for Windows from Adobe. This program will allow you to completely uninstall and remove the Creative Cloud app from your computer.
- You can click here to download the uninstaller, or download it from the Adobe CC help website.
- This will download a compressed ZIP file to your computer.
-

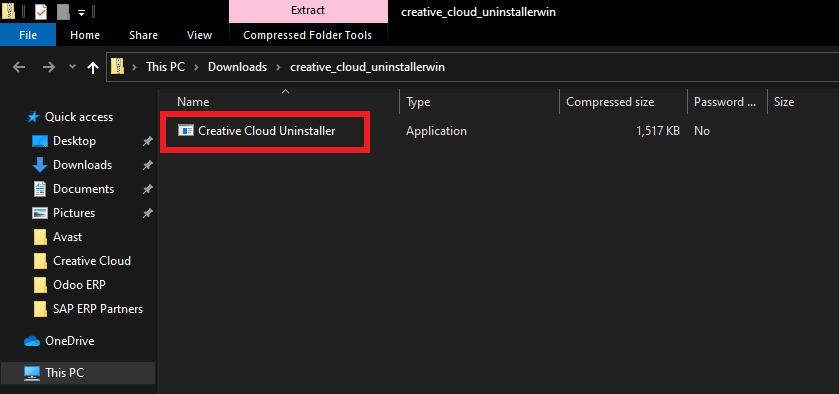
Right-click the ZIP file you’ve downloaded, and select Extract here to extract the EXE file at the same location.
-
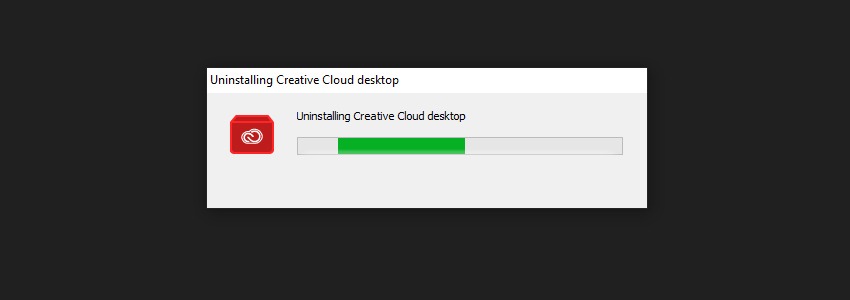
Double-click the extracted EXE file to run the uninstaller on your computer.
-

This will confirm your decision, and begin the uninstallation process.
-

When you see this message in the uninstaller window, it means the Creative Cloud is completely removed from your system.


-
1
-

Depending on the unarchive app you’re using, you may need to double-click the ZIP file, or right-click on it and select Extract.
-

Double-click the uninstaller DMG to mount it, and run the uninstaller.
-
Since the uninstaller file is downloaded from a different source than the App Store, you may need to confirm opening the application on your computer.
- Depending on your security settings, you may not see this window, and automatically skip to the next step.
-
This will confirm your action, and delete the Creative Cloud app from your computer.
-

It means you’ve successfully uninstalled the Creative Cloud app from your computer, and removed all of its components.


Ask a Question
200 characters left
Include your email address to get a message when this question is answered.
Submit
About this article
Article SummaryX
1. Download the uninstaller for your system from Adobe.
2. Extract and run the uninstaller file.
3. Click Uninstall.
Did this summary help you?
Thanks to all authors for creating a page that has been read 700 times.
Is this article up to date?
Adobe is a company we’re well acquainted with. Its products even supersede the company’s fame. Premiere Pro, Photoshop, After Effects and so many more are familiar names to most with any technical knowledge.
Adobe Creative Cloud houses them all. There might come a day when you’re ready to leave and move on from Adobe Creative Cloud. Uninstalling Adobe Creative Cloud can sometimes prove difficult. Adobe itself strongly discourages uninstalling the desktop app of Creative Cloud, unless it’s absolutely necessary. This could be due to Creative Cloud corruption, installation error, and also problems when you update Creative Cloud.
Contents
- How to Uninstall the Adobe Creative Cloud Desktop App
- Uninstall the Creative Cloud Desktop App on Windows
- Uninstall the Creative Cloud Desktop App on macOS
- How to Uninstall Adobe Creative Cloud Apps
- Conclusion
How to Uninstall the Adobe Creative Cloud Desktop App
When you need to uninstall the Creative Cloud desktop app, you’d need to download and run the uninstallation tool. This tool has to be appropriate for your operating system. To complete the uninstall process you’ll need to have administrative privileges. Through this article, we’ll guide you through the uninstallation of the desktop app by the Operating System type.
Uninstall the Creative Cloud Desktop App on Windows
Make sure you’ve synced all your files before you move ahead with the uninstall process. Folders that are not synced to your Creative Cloud account could be potentially lost.
Step 1: Download the Creative Cloud uninstaller for your version of Windows
Adobe itself offers its users links to creative cloud installers depending on your version of Windows. Currently, they haven’t provided their users with a Windows 11 Creative Cloud uninstaller. Though you have our promise to provide you with a link to it as soon as they do. There are however links to Windows 10,8,7 (64-bit), Windows 10(ARM), and Windows 10,8,7(32-bit).
Step 2: Extract the contents of the zipped folder
Step 3: Double-Click on the Executable File
When you double-click on the executable file you may be prompted to allow the uninstaller to proceed.
Step 4: Select Uninstall
The uninstaller of the Creative Cloud prompts you to confirm that you want to uninstall Adobe’s Creative Cloud desktop application. Once you review the issue go ahead and click uninstall.

Step 5: Select Close
The Adobe Creative Cloud uninstaller removes the Creative Cloud from your desktop. It then shows you a confirmation message. Click on close in the confirmation window.

Step 6: Reinstall
If you ever need to use the Creative Cloud app again just download Creative Cloud and Reinstall it.
Uninstall the Creative Cloud Desktop App on macOS
On the macOS when you go to uninstall creative cloud, make sure you’ve synced all your files before you uninstall. The folders that you have not synced on your Adobe Creative Cloud could be potentially lost.
Step 1: Download the Creative Cloud uninstaller for your version of macOS
Adobe provides multiple uninstallers for whatever version of macOS that you have. Here’s what you’re provided with; macOSv10 or later, Apple M1 computers, macOS v10.11 or earlier.
Step 2: Extract the contents of the zipped files
Step 3: Double click the installer file: Creative Cloud Uninstaller.app
Step 4: Select Open
Your security settings might cause you to receive a warning to open the uninstaller from the mounted DMG file. Select Open to continue.

Step 5: Uninstall
You will be prompted by the uninstaller apps to confirm if you want to uninstall the Creative Cloud app. Review this prompt message and select Uninstall.

Step 6: Select Close
The uninstaller; like the name suggests uninstalls. This app displays a confirmation message when the uninstall is complete. Then you go ahead and select Close.

Step 7: Reinstall if necessary
If you find that you need to reinstall creative cloud. Just download and reinstall the software.
How to Uninstall Adobe Creative Cloud Apps
If you don’t want an app on the Creative Cloud or Creative Cloud apps. Uninstall the app using the Creative Cloud desktop app. Avoid using the trash bin or recycle bin and use the cc desktop app instead.
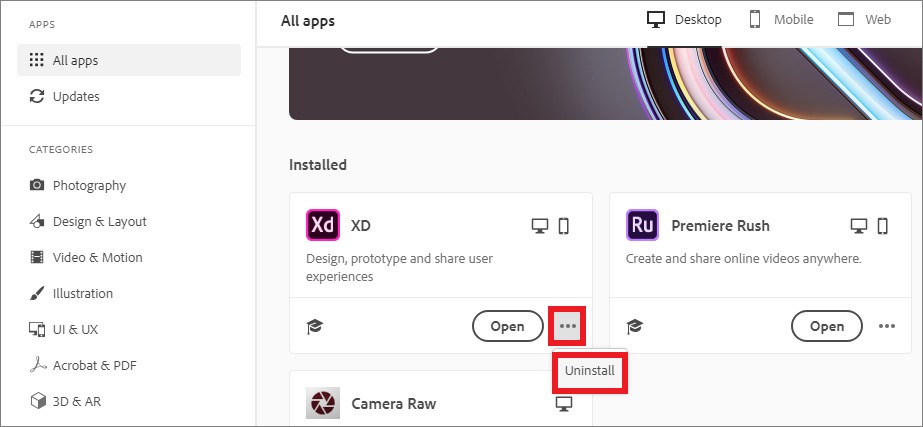
Step 1: Open the Creative Cloud desktop app
Step 2: On the All apps page, select the more actions icon next to the app you want to uninstall
Step 3: In the drop-down list, select uninstall
Step 4: Select Cancel, Remove or Keep based on your preference
- Cancel: When you click on cancel, it stops and cancels the uninstallation
- Remove: When you click remove, it removes the app notifications, interface settings and other preferences
- Keep: When you click on Keep it retains the app notifications, plugins, alerts and other preferences
Your app begins to uninstall, you can then find the app in your Available in your plan section.
Conclusion
We hope this has been the solution you were looking for and has answered many of your burning questions. Our Postudio Blog should have everything relating to post-production that you’re looking for.
You can use Adobe Creative Cloud and other popular post-production tools directly on Postudio without any worries of installations and uninstallations. Register today for an early access to Postudio and enjoy seamless creative freedom!
It seems every single popular app has a cloud solution bundled with it. Cloud drives are no doubt popular but that doesn’t necessarily mean a cloud option needs to be added to every single app that we use. Users generally tend to favor one or two cloud drives and use it to sync files, regardless what type they are. Adobe is one such company that bundles its cloud solution with its apps. You might buy a Photoshop or Illustrator license but when you install these app, Adobe Creative Cloud is installed as well. This app makes a place for itself in the File Explorer navigation pane, and in the system tray It’s always running. Here’s how you can remove Adobe Creative Cloud but still keep your apps.
In order to remove Adobe Creative Cloud from your system, you need to download the official uninstaller app for it. It’s provided by Adobe and (https://helpx.adobe.com/content/dam/help/en/creative-cloud/help/uninstall-creative-cloud-desktop-app/_jcr_content/main-pars/download_section/download-1/Creative%20Cloud%20Uninstaller.zip) it can be downloaded here. Clicking the link will begin the download.
Once downloaded, you need to extract the zipped file. Make sure that you do not have any Adobe apps open. Run the EXE inside the extracted folder. It will show you a warning saying you have apps that use Creative Cloud and removing it will affect them. What this essentially means is that the apps e.g. Photoshop and Illustrator will not be able to save files to Adobe’s Creative Cloud which you weren’t using to begin with.
Accept the on-screen prompt, and proceed with the uninstaller. You will get an on-screen prompt telling you the app has been uninstalled.
Remove Adobe Creative Cloud From File Explorer
Once you remove Adobe Creative Cloud, you will no longer see its icon in the System Tray, and you will not see it listed in Startup tab in Task Manager. Unfortunately, you will still see it in File Explorer. The uninstaller doesn’t edit the Windows Registry on its way out so the folder is still there. To remove it, open the Windows Registry by typing regedit in the run box or in Windows Search. Navigate to the following location;
HKEY_CURRENT_USER\SOFTWARE\Microsoft\Windows\CurrentVersion\Explorer\Desktop\NameSpace\
Look for a key named {0E270DAA-1BE6-48F2-AC49-960EE002A5DE}, select it, and delete it.
That’s about it. Open File Explorer and Creative Cloud will no longer appear in the navigation pane. If you ever install Creative Cloud again, the registry entry will be added back automatically.
If you use Adobe Creative Cloud but do not want it to appear in File Explorer, you can skip the uninstaller and just edit the Windows Registry to remove it from the navigation pane.
If you have any files saved to this folder, they will not be deleted. The folder is still there and you will need to remove it manually.

Fatima Wahab
Fatima has been writing for AddictiveTips for six years. She began as a junior writer and has been working as the Editor in Chief since 2014.
Fatima gets an adrenaline rush from figuring out how technology works, and how to manipulate it. A well-designed app, something that solves a common everyday problem and looks
ThinkMobiles is one of most trusted companies conducting IT & software reviews since 2011.
Our mission
is to provide best reviews, analysis, user feedback and vendor profiles.
Learn
more about review process.
I have founded company in 2011 with mission to provide IT & Software experience worldwide.
Subscribe to our YouTube channel, to get our best video reviews, comparisons and performance tips:
Surely everyone involved in mobile and web design is familiar with Adobe products. Photoshop, Adobe Illustrator, Indesign, Premiere, After Effects and others, 20+ in total, are available for $79 per month as a package, or each one separately. This is a stellar set of applications, no doubt. But say, you’ve had enough with it, and to move on you need to uninstall Adobe Creative Cloud. Maybe you seek another software, or maybe CC applications were installed incorrectly. To remove Creative Cloud from a computer, we have three methods, basically or use one of the best uninstallers.
How to uninstall Adobe Creative Cloud manually
Step 1: Sign in to Adobe Creative Cloud desktop app.
Step 2: You can only uninstall the Creative Cloud desktop app if all Adobe applications such as Photoshop, Illustrator, Premiere Pro have been removed from the system. To uninstall Adobe apps, tap the dotted icon next to the Open button, then click Uninstall.
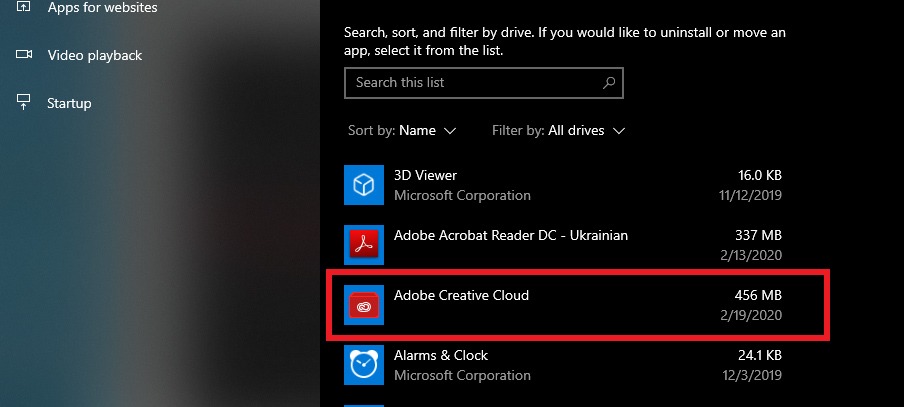
Step 3: When all Adobe apps are gone, remove CC desktop software. To do this, navigate to Settings in the Windows menu. After that, go to Apps and find Adobe Creative Cloud there.
Step 4: Locate Creative Cloud and choose to uninstall.
Step 5: Confirm the action in a warning pop up, and the process will start – you’ll see a green progress bar.
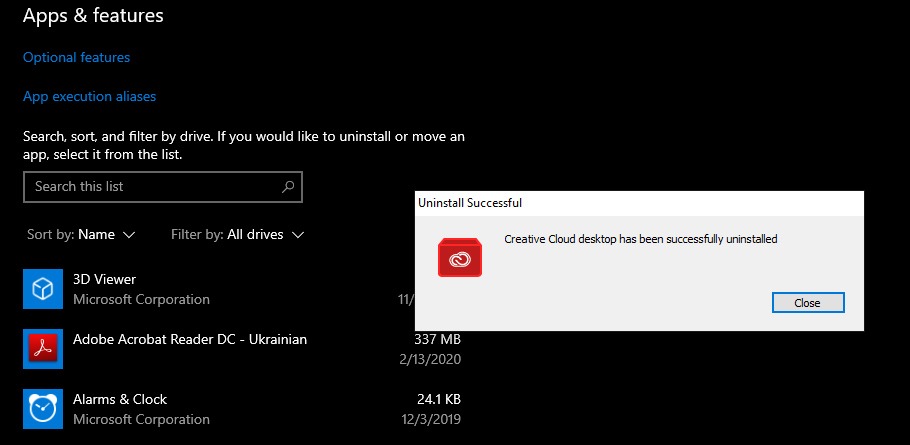
Step 6: When it is completed, click the Close button. If there are other program components or leftovers still, get rid of them by following the same instructions.
If you find this method difficult or you are not sure that the system has been thoroughly cleaned, there are several other ways to uninstall Adobe Creative Cloud. For example, by using a special
How to delete Creative Cloud with its uninstaller
Step 1: To use the uninstaller, download a ZIP file from the official Adobe website, and extract the content.
Step 2: Run the file to start things off. In the confirmation message click Uninstall.
Step 3: Wait for the process to finish. Click the Close button afterwards.
If you do not want to install anything to uninstall apps (sounds counter-intuitive, right?), there’s another way. Third-party tools, specifically designed for proper uninstallation and/or PC optimization, a.k.a. cleanup. For example, a globally popular CCleaner utility.
Use CCleaner as uninstaller
It is a disk cleanup / uninstaller tool, suitable for cleaning cookies, disabling unnecessary startup programs, fixing the registry, cleaning the browser. CCleaner works on all versions of Windows, and is available in 57 languages.
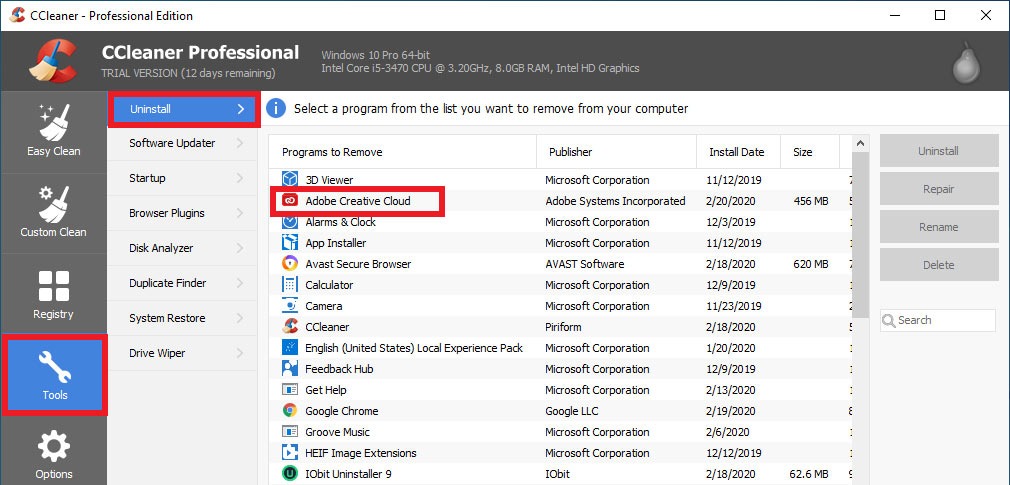
Step 1: Sign in to CCleaner. Go to the Tools section of the main menu. Then select the Uninstall tab and find Adobe desktop app there.
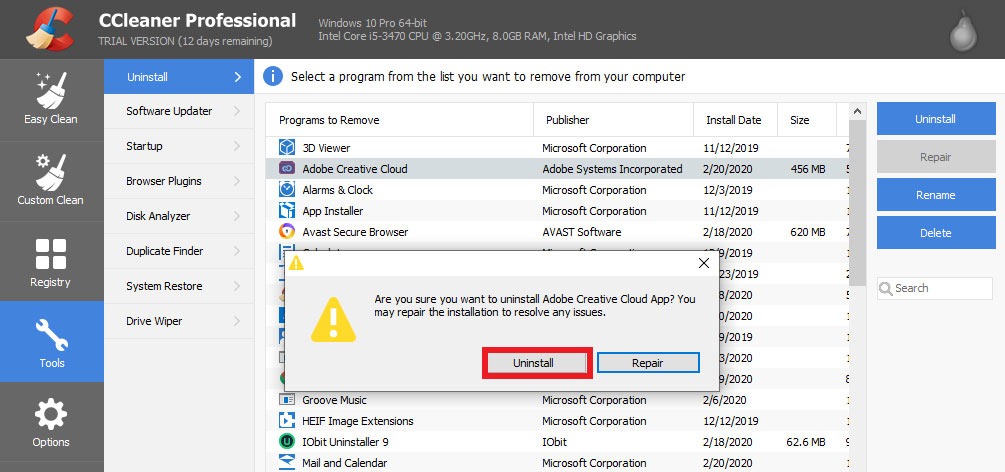
Step 2: To start the process, hit the Uninstall button in the upper right corner. The removal tool will ask you to confirm to uninstall Adobe Creative Cloud Desktop, so do it.
Step 3: Wait for the removal process to complete. It will take no more than 30 seconds. You will get a confirmation message, if all is OK, click Close.
Use IObit Uninstaller
CCleaner isn’t the only utility for such tasks, of course. Consider another equally popular third-party tool – IObit Uninstaller, as an alternative. It has a free version, 37 interface languages, and more importantly, it is superfast – typically it takes 20-30 seconds to uninstall a program.
Step 1: Sign in to IObit Uninstaller. You will see a list of all the programs installed on your PC, find Creative Cloud.
Step 2: Tick the checkbox next to Adobe Creative Cloud, and then press the green Uninstall button on the right.
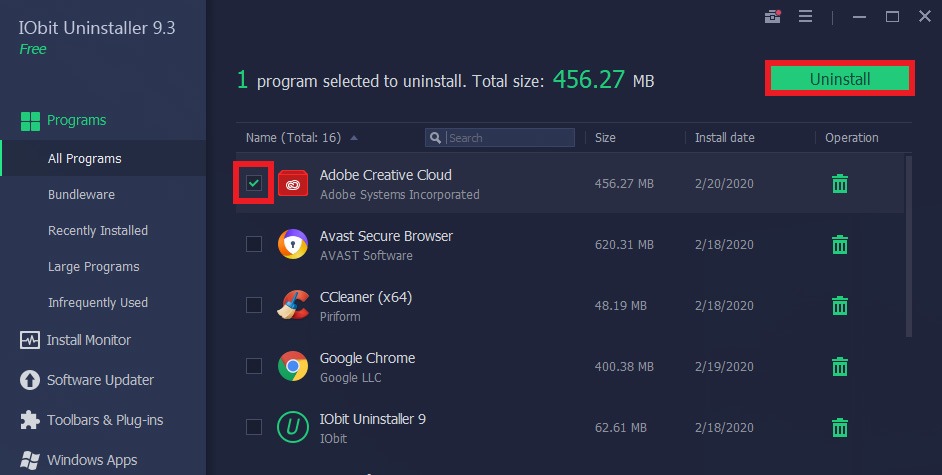
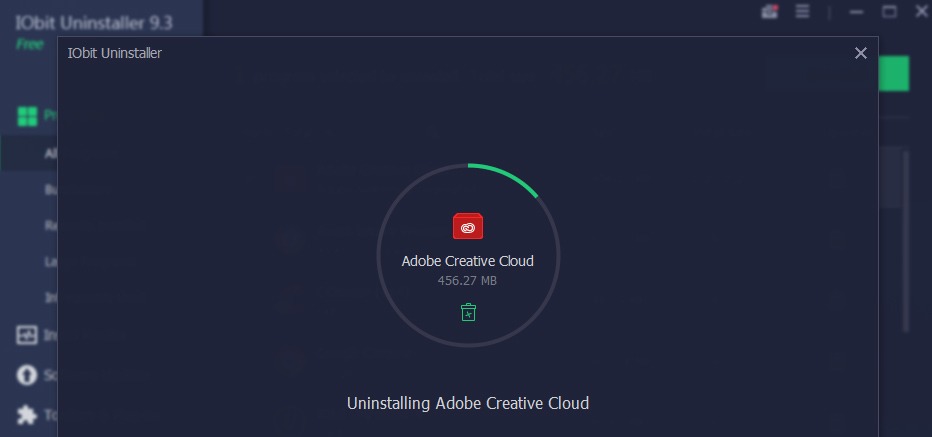
Step 3: IObit will ask to confirm the deletion. As the process starts, just wait several moments until it’s over and done (but without the confusion by similar puns from the “Airplane” movie).
Read more about PC optimization and malware cleaning in our best pc optimization and best antimalware software articles.
Use Revo Uninstaller
Revo uninstaller is just another alternative third-party uninstaller that can help you to completely remove Adobe Cloud. Revo Uninstaller (Free/Pro/Portable) has a 30-day trial with the same functionality as the full version. As we’ve mentioned before, close all running Adobe apps before the uninstall process, otherwise, removal could be incorrect.
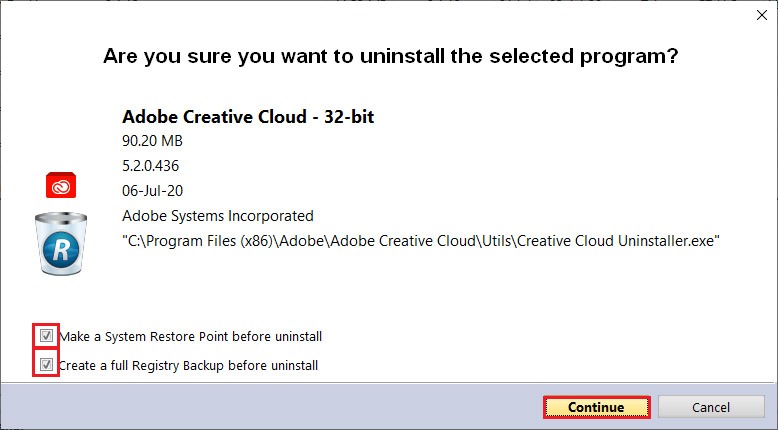
Step 1: Open Revo, choose All Programs item on the left sidebar, find Adobe Creative Cloud in the programs list. Click the Uninstall button in the top-left corner.
Step 2: You will see the information about the software in the pop-up window. We recommend to tick both Make a System Restore point and Create a Full Registry Backup boxes. Then clicking Continue.
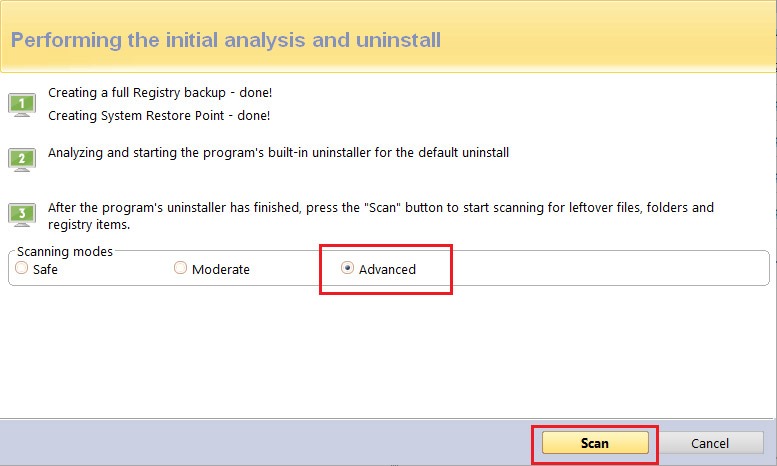
Step 3: Revo calls up Adobe uninstaller, though in our case, it did not launch correctly, so we continue an alternative route. Wait for a while, until 3 options appear: Safe, Moderate, Advanced. We recommend choosing the advanced scanning mode.
Step 4: Another pop-up displays leftover registry items. Click the Select All option and Delete items. Repeat this procedure several times until the list is empty.
P.S. Each of these methods is not particularly difficult to apply and requires only a few steps to dispose of Creative Cloud. Although, the fastest and the most effective one would be uninstaller software, we reckon. IObit Uninstaller, CCleaner, Revo, BCUninstaller and others have been analyzed and tested by us and you can read all about it in 7 best uninstallers.
Adobe offers many suitable applications for today’s art and designing industry. If you are some sort of designer yourself, you must have heard if not used applications like Photoshop, Premiere Pro, Illustrator…
Although these apps are handy to use sometimes, they can be challenging to use, especially for beginners. So, if you are one of those people who have installed Adobe product for a test, want to move on, or looking for alternate software, then you must have encountered the problem of uninstalling Adobe Creative Cloud.
A process that seems very easy can be pretty lengthy and painful to execute. But don’t worry; in this guide, we will show you how you can uninstall Adobe Creative Cloud with all its components. So, let’s get started.
Table of Contents

There are many ways where one can uninstall Adobe CC, but the most efficient ones are listed below:
- Uninstalling using the Adobe Creative Cloud app.
- Uninstalling using official Adobe Creative Cloud Uninstaller.
- Uninstalling using third-party uninstaller software.
Method 1: Use the Adobe Creative Cloud option
The first method includes the built-in option of Adobe Creative Cloud. This way, you will uninstall the Adobe CC on your Windows without using any third-party application.
Step 1: Log in to your Adobe Creative Cloud desktop app.
Step 2: First, you have to uninstall all the other Adobe products (that includes Photoshop, Illustrator, After Effect…) in order to uninstall Adobe CC. To uninstall the other applications, you are going to click on the three-dot under and click on Uninstall.
Step 3: After uninstalling all the other apps, go to Setting > Apps or open Control Panel on Windows 7 or any earlier versions of Windows OS.

Step 4: Locate Adobe Creative Cloud and click on uninstall.
Step 5: Confirm your uninstallation, and wait for the program to finish.

Step 6: Once the installation is done, click on the Close button.
That’s it; Adobe CC is uninstalled, but if you find this method difficult to follow or can’t locate your Adobe CC, try to follow the following method.
Method 2: Use Adobe Creative Cloud Uninstaller
In this method, you are going to use Adobe Creative Cloud Uninstaller for uninstalling the Creative Cloud from your Windows. There are two pros to using the Creative Cloud Uninstaller.
- First is that you will uninstall not only Creative Cloud but any Adobe product.
- the second one is that you can also remove all the residue files too.
Step 1: First, download Creative Cloud Uninstaller from this link (https://www.softrar.com/download-adobe-creative-cloud-uninstaller-for-windows-10/).

Step 2: Once downloaded, then you will extract the zip file with a third-party application (such as WinRAR or 7Zip) and then run the installer. Here you are going to install the Uninstaller on your Windows.
Step 3: After the installation got completed then you will run the application. Select the creative cloud and uninstall it. A message will pop up to confirm the uninstallation; click on Uninstall.
Step 4: Wait for uninstallation to complete, and click on Close once done.
This method is much easier and straightforward, but there is another method that uninstalls Adobe CC which not only removes the CC but also removes all the registry files, residue files, and junk files that can’t be pulled off with the first two methods.
Method 3: Use Third-Party applications
This method requires you to install third-party applications. There are tons of uninstaller, but only a few of them does the job and on the top of the list include IObit Uninstaller, Revo Uninstaller, and Wise Program Uninstaller.
1- IObit Uninstaller
IObit Uninstaller has a subscription service where for only 19.99$/year, you can use all the premium features like Removal of Malicious and Advertising Plug-ins, Uninstall Stubborn, and Bundled Programs, Clean Residual Left by other Uninstallers, and Revert System Changes.
Step 1: Download and Install the IObit Uninstaller.

Step 2: Run the application, locate the Adobe CC and mark it by clicking on the empty box beside it.
Step 3: Click on the Uninstall button and wait for it to uninstall Adobe CC completely.
2- Revo Uninstaller
Revo Uninstaller is a 30 days Free-Trial app that lets you uninstall any application completely. The subscription costs $24.95/year, which brings the premium features like Autorun Manager, Junk File Cleaner, Windows Tool, History Cleaner, Evidence Remover, Unrecoverable Delete.
Step 1: Download and install Revo Uninstaller and run it.
Step 2: Select your Adobe Creative Cloud and click on Uninstall option in the sidebar.
Step 3: You can also make a backup or System Restore point by marking the box in the given options. Once marked, click on the Continue button.

Step 4: In the following windows, select Advance in scanning modes and click on Scan.
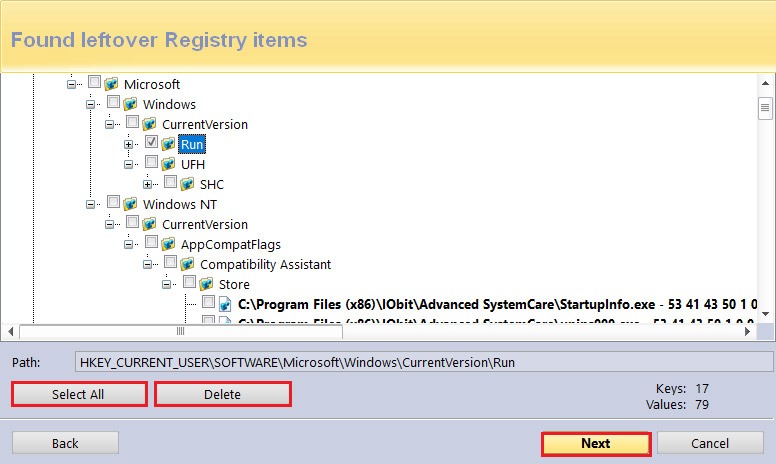
Step 5: Now, you might be asked if you want to remove the leftover registry; if so, select the registry you want to remove (or select the “Select All” option) and click on Delete. Once all the files are deleted, click Next.
Related Topic: Download Revo Uninstaller Portable for free
3- Wise Program Uninstaller
Wise Program Uninstaller is an entirely free application that lets the user uninstall any software with all the registries. It is free for personal use as well as for commercial use.
Step 1: Download Wise Program Uninstaller and install.
Step 2: Open it, and locate Adobe CC click on it, three options will appear.
Step 3: Click on Force Uninstall and confirm your uninstallation.
Step 4: Now select the registries that you want to delete and click on Remove.
In conclusion, Adobe CC can be a little tricky to uninstall, but with enough help and guidance, anyone can uninstall this stubborn application. I hope this tutorial has been helpful for you; if so, please consider sharing it with your friends. Thank you.
Question: How do I completely remove Adobe Creative Cloud from my system?
There are discussions on uninstalling the application by using the built-in uninstall option or with Adobe Creative Cloud Uninstaller. However; we would recommend you uninstall the CC with third-party applications such as IObit Uninstaller or Revo Uninstaller. As applications like these will help you to remove CC with junk files, residue files, registry files, and all the leftovers.
So, instead of using the built-in option or using the adobe creative cloud uninstaller, try to get your hands on third-party applications.