
Отключение звука, разделение и удаление звука из видео
Applies ToClipchamp for personal accounts Clipchamp for work accounts
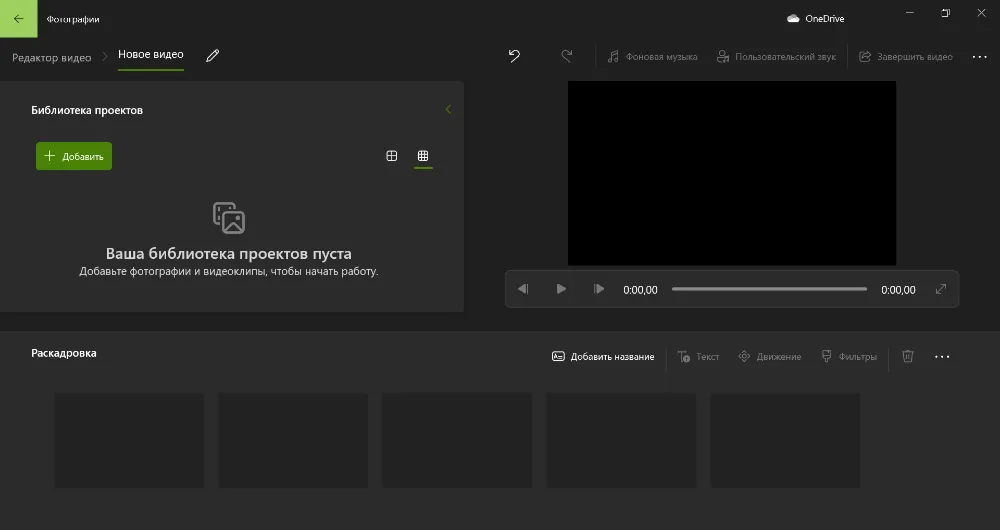
В Clipchamp можно отключить звук видео или отсоединить звук от видео в отдельный клип, чтобы его можно было удалить, скопировать или переместить в другое место независимо от видео.
Отключение звука в видео
-
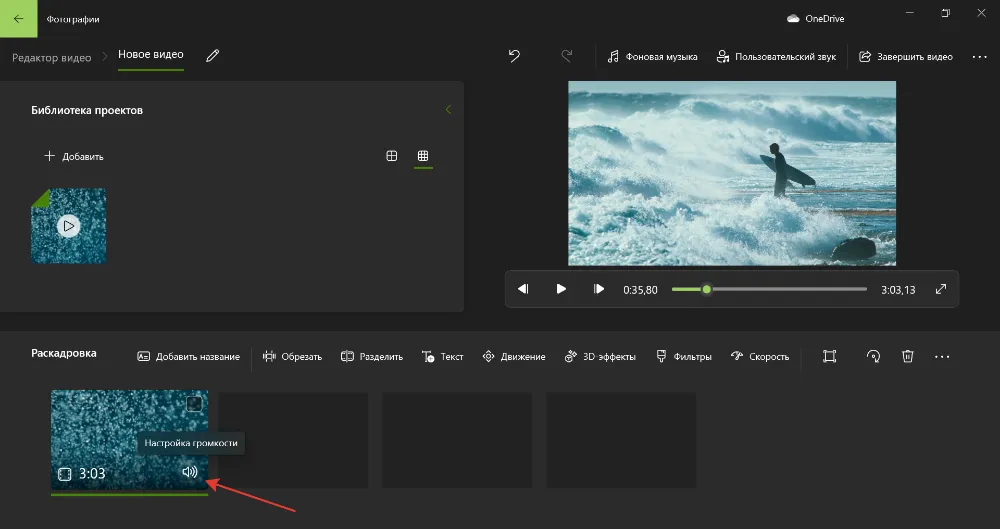
Щелкните видео на временная шкала, чтобы оно было выделено.
-
Если видеоклип содержит звук, вы увидите символ динамиков в левой части клипа на временная шкала.
-
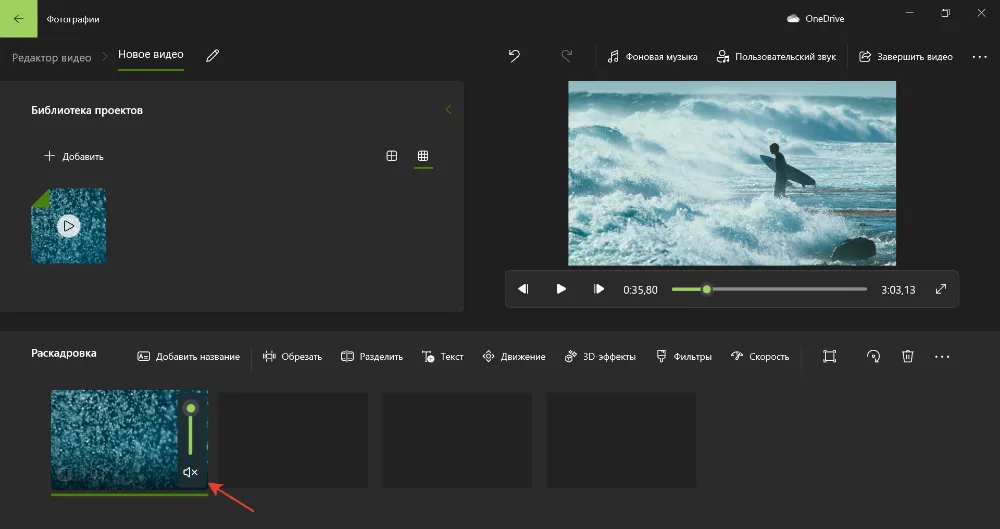
Чтобы отключить звук видео, щелкните символ говорящего. Это автоматически отключит звук, и символ изменится на динамик с крестиками рядом с ним. При экспорте видео будет выполняться без звука.
-
Вы также можете использовать вкладку «Звук» на панели свойств, чтобы отключить звук видео, отключив громкость. Чтобы включить клип, просто щелкните символ говорящего еще раз.
Отключение звука от видео
-
Выберите видео на временная шкала, чтобы оно было выделено.
-
Щелкните вкладку «Звук» на панели свойств.
-
Нажмите кнопкуотсоединения звука.
-
Видео аудио будет отображаться в виде отдельного клипа в новой строке на временная шкала. Отключенный звуковой файл также автоматически скачан на компьютер и отображается под видео на временная шкала.
-
Теперь вы можете редактировать аудио- и видеоклипы отдельно, включая удаление, ускорение или уменьшение скорости, а также обрезку одного или другого перед экспортом видео.
Повторное присоединение аудио- и видеоматериалов
-
Чтобы повторно подключить аудио к видео, нажмите кнопку отменить в левом верхнем углу этапа.
-
Вы также можете добавить исходное видео в временная шкала, чтобы повторно подключить его к видео.
-
Удалите аудио- и видеоматериалы из временная шкала, нажав кнопку удаления.
-
Затем перетащите исходное видео с вкладки мультимедиа на временная шкала.
Удаление звука из видео
-
Щелкните звуковой ресурс на временная шкала, чтобы он был выделен.
-
Щелкните клавишу удаления на клавиатуре.
-
Если звук является частью видео на временная шкала, выполните описанные выше действия, чтобы отсоединить звук от видео.
-
После отключения щелкните звуковой ресурс на временная шкала затем нажмите кнопку удалить. Это удалит его из временная шкала и при экспорте видео не будет содержать звук.
Нужна дополнительная помощь?
Нужны дополнительные параметры?
Изучите преимущества подписки, просмотрите учебные курсы, узнайте, как защитить свое устройство и т. д.
Is it possible to remove audio from videos using Windows 11/10? The answer to this question is Yes, and it is easier than you might think. In fact, we will discuss two ways you can get this done, and they are both super easy Using the Video Editor app or VLC.
We should point out that Windows 11/10 comes with a built-in feature for users to easily remove audio from supported video files. The tool in question is the Video Editor app, and from what we can tell, it works quite well, even better than what we were expecting, seeing as the features are primarily basic.
The second option is VLC Media Player, so for those who are not too keen on using the default program in Windows 10, then this third-party option should help a great deal. Plus, it is free to use and open source.
To remove audio from video using the Windows 11/10 Video Editor app, do the following:
- Open the Video Editor app
- Select New Video Project
- Add a name for your new project
- Add video to the project
- Add video to the Storyboard
- Remove audio from the video
- Export new video without audio.
Let us talk about this in more detail.
1] Open the Video Editor app
The first thing to do here is to fire up Video Editor app. We can do this by clicking on the Windows key, then scroll until you come across Video Editor. Click on it to open the app.
2] Select New Video Project
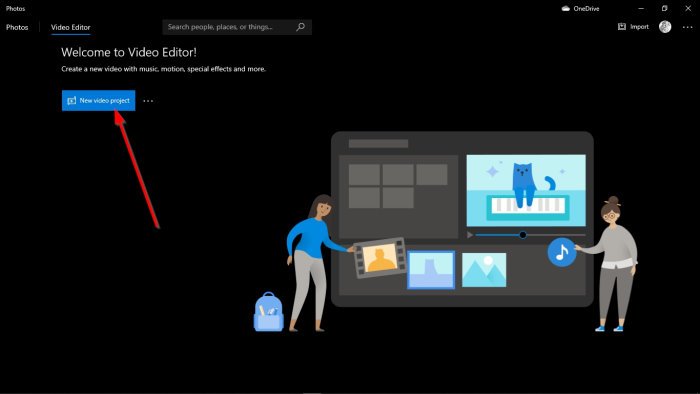
Once the tool is up and running, please look to the top for a button with the words, New Video Project. Please click on it in order to create a new project. If you do not see the button, then click on New Video > New Video Project to begin the process.
3] Add a name for your new project
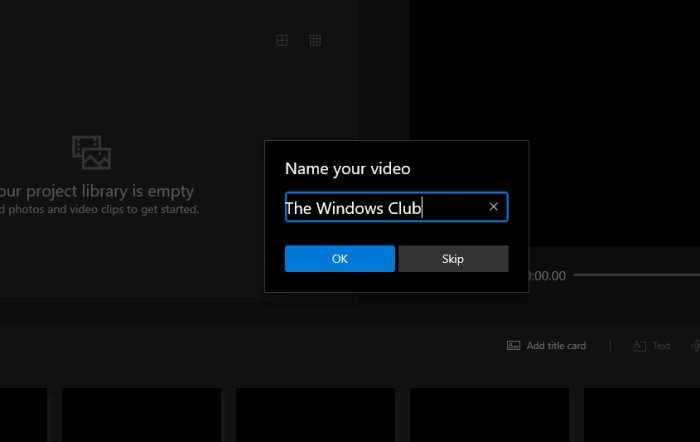
The next step you will need to take is to add a name to your project. After typing the name, click the OK button, and right away, your project will be created.
4] Add video to the project

You should see a blue button called Add. Please click on it right away to reveal a dropdown menu. From here, select From This PC to add a video saved on your computer.
5] Add video to the Storyboard
It is not possible to remove the audio from the video without attaching it to the Storyboard first. Do this by dragging the video to the Storyboard, or simply right-click on the video and select Place In Storyboard.
6] Remove audio from the video
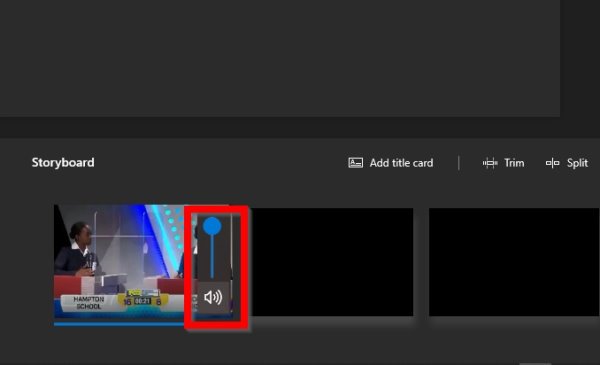
Removing the audio from the video you recently added is super easy. Just look at the video on your Storyboard and click on the audio icon. Clicking on it a second time should be enough to mute the video.
7] Export new video without audio

Choose the button to the top-right with the words Finish Video. You’ll be asked to select your preferred video quality. Do that, then click on the Export button right away. Save the file by selecting the Export button once more, then sit back and wait for the program to produce the content without audio.
The time it takes to complete will depend on the size of the video and your machine’s power.
Remove audio from video using VLC Media Player
We can also use VLC Media Player to remove audio from videos, but it is not as straightforward though just as capable.
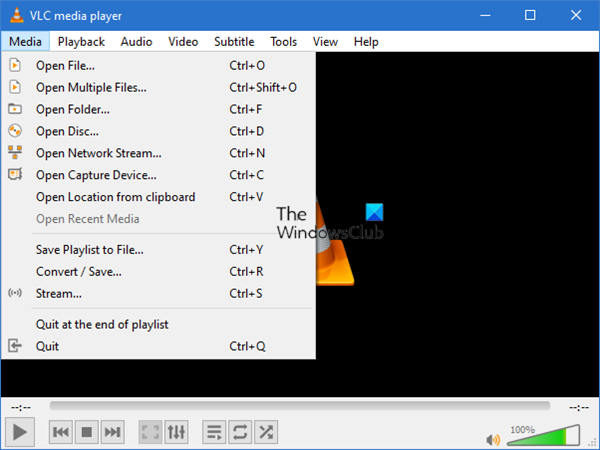
To do this, download VLC Media Player from the official website and install it on your computer. From there, open the tool, then navigate to Media > Convert/Save.
From the screen that appears, click on Add, then go to the section where the video is saved and select it.
Once the video is opened in VLC, you are required to navigate back to Convert/Save. A video conversation window should appear.
Under the section that reads, Profile, go on ahead and select the preferred Output mode, then click on Edit selected profile. From here, you should see the Encapsulation tab, and under it, a list of options to choose from.
Choose the Video container that best suits your needs, then move on to the Video codec tab. Tick the checkbox beside Keep original video track, then open the Audio codec tab.
Deselect the checkbox beside Audio, then hit the Save button below. The next step is to select the destination for the converted file by clicking on Browse. Be sure to add a file name, then hit Save.
Finally, hit Start and wait for VLC to convert your new video without audio.
How to extract audio from video on Windows?
To extract audio from a video on Windows, open Windows Movie Maker and click on “Add Videos and Photos” to select your video. Once loaded, go to the File menu, choose “Save Movie,” and select “Audio Only.” Name your audio file, which will automatically save in MP4/AAC format.
How do I remove sound from a video in Windows?
To remove sound from a video for free, use tools like VLC Media Player or online services such as Kapwing. Upload your video, select the option to mute or remove audio, and process the file. These methods are quick, efficient, and do not require any software purchase, making them ideal for users seeking cost-effective solutions.
Looking to remove audio from video in Windows 10?
In this article, we’ll show you the 4 best free ways to remove audio from video in Windows 10.
Here’s everything we’ll cover, feel free to jump around:
How to remove audio from video in Windows Movie Maker
How to remove audio from video in VLC
How to remove audio from video in Premiere Pro
How to remove audio from video on Windows 10: The Easy Way
How to Remove Audio from Video in Windows Movie Maker
Windows Movie Maker is a part of the Windows Essentials Suite 2012. Microsoft ended the support for this suite in 2010. However, you can download the original installer using this download link. It was retrieved with the help of Wayback Machine, a free web archiving service.
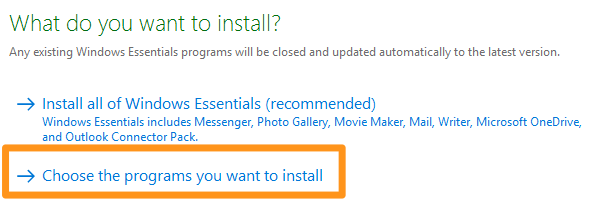
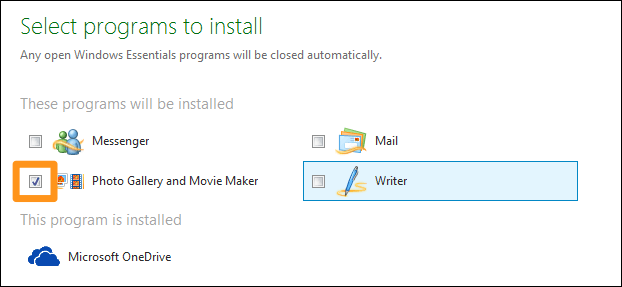
- First, install Windows Movie Maker. Now, double-click the installer file you just downloaded. Then, pick the Choose the programs you want to install option.

- Let the Photo Gallery and Movie Maker checkbox remain ticked. You can untick the checkboxes associated with the tools you won’t need and click on the Install button.

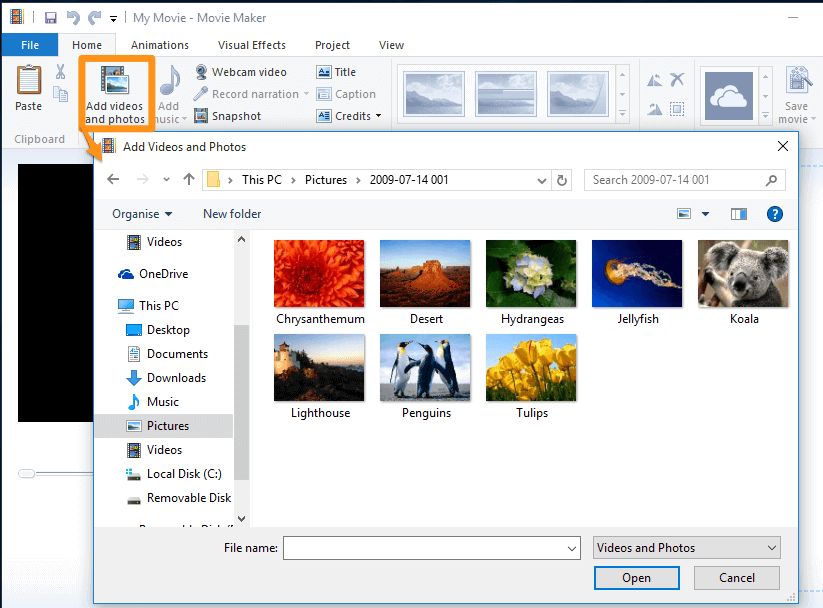
- Once it’s been installed, open it and import the video you want to mute. Simply drag and drop the video onto the app window. Or you can import the video by going to the Home tab and clicking on the Add photos and videos button.

- Now go to the Edit tab and click on the Video Volume button.

- Click on the Mute icon to the left of the slider to mute your video. Or you can drag the slider handle to the complete left to mute your video.
- If you’re just looking to remove audio from a portion of your video, you’re going to have to split the video into several parts and then pick the part that you want to remove the audio for. Head to the Edit tab and click on the Video Volume button, and then mute the video clip with the mute icon or the slider handle.
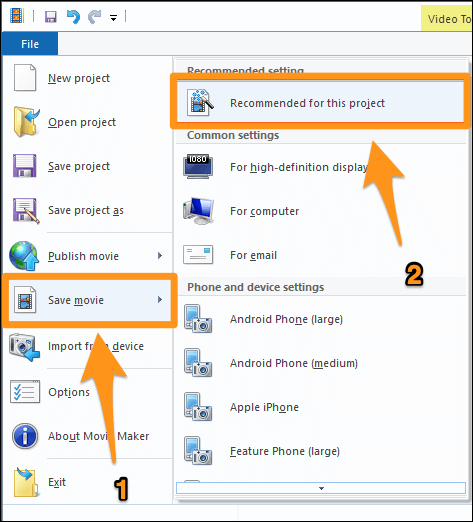
- Now save the video you just muted. To save the video, navigate to the File tab, select Save movie, and select Recommended for this project from the resulting dropdown menu. This option will save your video as MP4 with no sound.


How to Remove Sound from Video in Windows using VLC
It’s likely that you already have VLC media player installed on your Windows 10 OS. If that’s the case, you can use it to mute your videos. There are various steps you’d need to take to mute and save videos using VLC. Check out our article on how to mute a video in VLC.
How to Remove Audio from Video on Windows using Premiere Pro
You can also use Adobe Premiere Pro, a professional video editing software, to mute your videos. If you haven’t used it before and are merely looking to mute your video, we wouldn’t recommend using the tool to mute your videos. If you’re into video editing and you have it installed on your Windows 10 PC, here’s an article from us that shows you how to mute a video in Adobe Premiere Pro.
How to Remove Audio from a Video: The Super Quick Way
If you’re a Windows user, you can use Animaker’s video muter to easily mute videos for free! All it takes is 3 simple steps to remove audio or sound and download your videos using our super-simple video muting tool.
For those who are unaware of Animaker, it is an all-in-one DIY video-making app designed to help non-designers make professional-quality videos from the comfort of their browser.
Our video muting tool works on Chrome, Firefox, Safari, Internet Explorer, etc., and if you use one of these browsers, you can easily mute your videos on your Windows computer.
If you’re looking to quickly mute your videos for Instagram, YouTube, or Facebook, then Animaker’s video muter is the best tool for the job. Also, you can mute videos in MP4, MPG, WebM, MOV, and more formats.
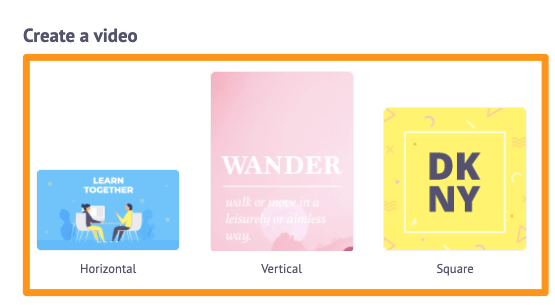
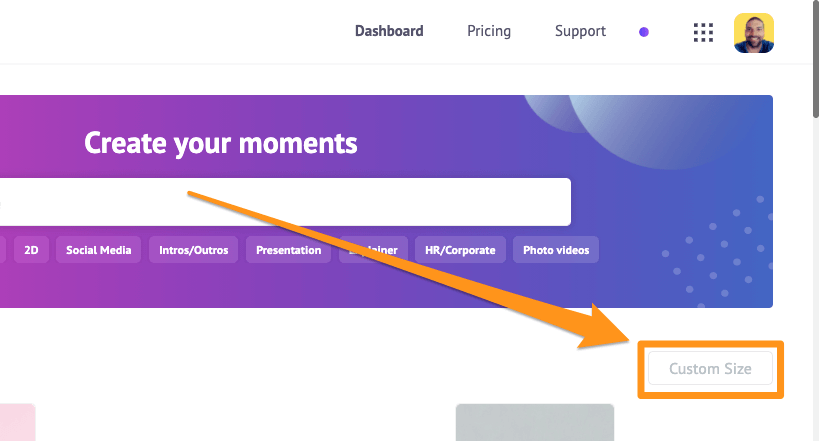
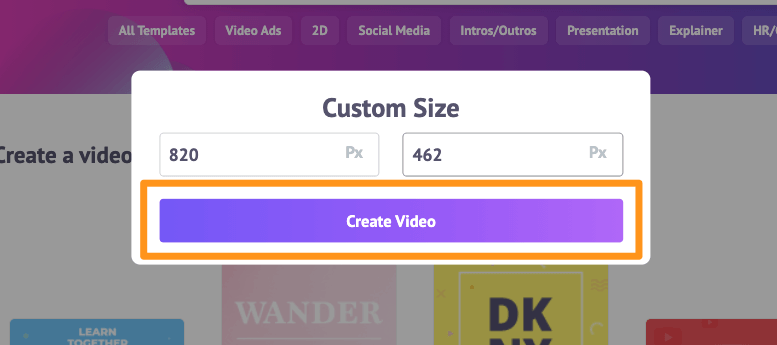
Step 1: Sign Up/Sign In and Pick the Dimensions
First, sign in to your account or create a free one. Then, choose the dimensions or the social platform for your video. What aspect ratio or dimensions you’d want your output video to be in? You can pick Square, Landscape, or Vertical from the Create a video section in your dashboard. Or, you can use the Custom Size button to pick the dimensions of your choice.
Step 2: Upload the Video and Remove the Audio From It
Upload the video you want to mute or remove audio from. Animaker lets you upload videos up to 20 GB in size. Go to the Upload tab in the Animaker asset library and click on the Upload button at the bottom of the tab window.
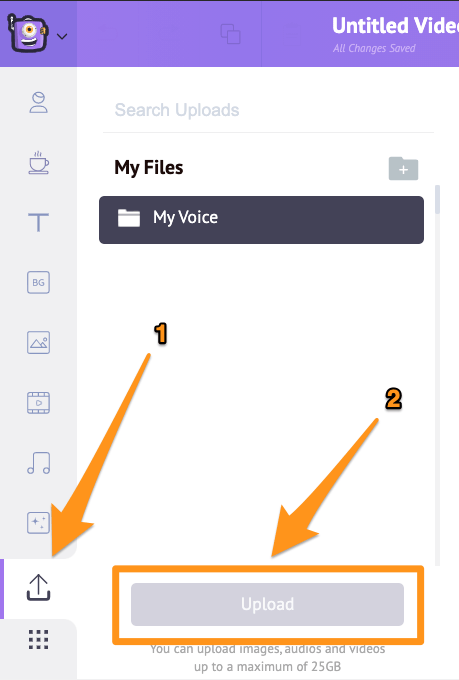
Now click on the video to set it onto the canvas.
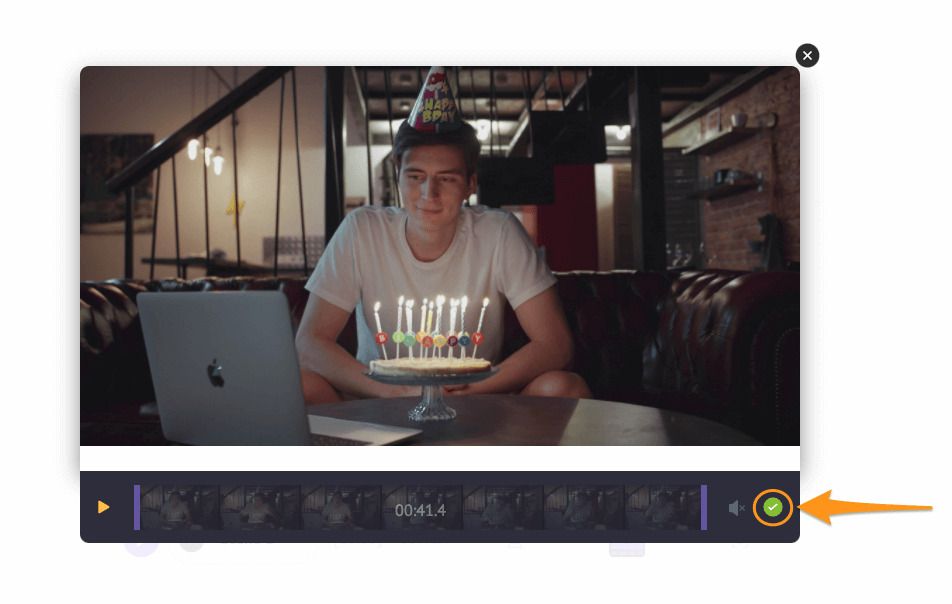
Then, click on the scissor icon in the top right corner of the canvas.
Now in the popup window that appears next, you’ll find an audio button in the bottom right corner.
Now click on the speaker icon to mute your video. Once you click on the icon, you’ll now notice that it’ll display the mute icon to indicate that the sound has been removed. Now click on the round green button in the bottom right corner to save the changes.
Optionally, you can also add a voiceover, or add background music to your video. If you want to add a voiceover, you’ve got three ways to do that: you can record your own voiceover, upload a voiceover file, or generate voiceover using text. To add a voiceover, click on the Video Timeline icon, then click on the Voiceover icon in the bottom left corner of the app screen, and pick an option from the dropdown menu.
To add background music to your video, simply head to the Music tab and pick a background music track from our huge, free music library.
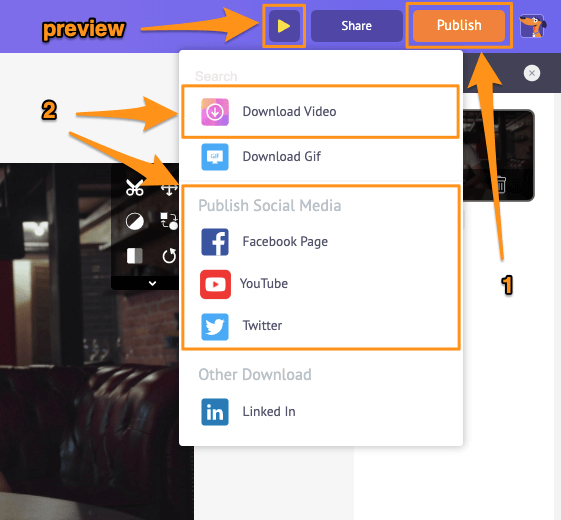
Step 3: Preview and Download
You can preview the video by clicking on the play button beside the Share button. You can then download the video to your computer by clicking on the Publish button and then selecting Download Video from the dropdown menu. Or share it directly to various social media platforms from within the app.
Apart from letting you mute videos, Animaker offers other essential video editing tools you’d need to edit your videos for your social media channels and website.
You can use Animaker’s video editor to:
- Trim videos
- Rotate videos
- Flip videos
- Adjust video brightness, contrast, etc.
- Add filters to videos
- Merge or combine videos
And the list goes on… feel free to check out these tools and learn why it’s the go-to video editor for marketers and content creators.
Got any questions about muting your videos on Windows 10? Any interesting tips or tools to mute videos on Windows that we seem to have left out? Please let us know about them in the comment section below.

Как удалить аудиодорожку из видео на компьютере, телефоне и онлайн
Дата публикации: 12 декабря 2022
Записали ролик, а на нем посторонний шум? Хотите убрать разговор незнакомцев на фоне или поменять музыку? Для этого нужно удалить аудиодорожку и заменить ее на новую. В статье расскажем про 5 способов, как убрать звук из видео в программах на персональный компьютер, на телефоне и онлайн.
Содержание:
Убираем звук из видео с помощью программ
Убираем музыку из видео онлайн
Удаляем аудиодорожку на мобильном устройстве
Убираем звук из видео с помощью программ
Компьютерные видеоредакторы лучше всего справляются с этой задачей: в них можно работать с записями любой длины и размера и сохранять результаты в высоком качестве. Расскажем, как удалить аудиодорожку из видео в трех программах.
ВидеоМОНТАЖ
ВидеоМОНТАЖ — программа российского разработчика. Это редактор с простым и интуитивно понятным интерфейсом, в котором разберется даже новичок. Здесь можно как смонтировать фильм, так и простой ролик для личного архива.
В видеоредакторе множество инструментов: можно обрезать и склеивать ролики, менять аудио, накладывать запись с микрофона, добавлять титры, эффекты и переходы из встроенной библиотеки. Вы можете удалить звук из видео и наложить вместо него музыку из каталога или записать озвучку. Дополнительный софт не потребуется.
Шаг 1. Откройте редактор и добавьте файл
Скачайте инсталлятор с нашего сайта и установите программу. Затем откройте ее и выберите «Новый проект». Добавьте исходник, нажав на одноименную кнопку или перетащив его в рабочее поле из Проводника.
Шаг 2. Уберите аудио целиком
Если нужно полностью убрать аудиодорожку, это можно сделать за два клика. Щелкните правой кнопкой мыши по клипу, а левой выберите в меню «Выключить звук».
Аудиодорожка удалится автоматически, появится соответствующий значок:
Если в ходе редактирования вы передумаете и захотите вернуть аудио — можно точно так же нажать правой кнопкой на файл и включить звук снова.
Шаг 3. Заглушите аудио частично
Если вам нужно не полностью убрать звук, а сделать его более тихим — например, чтобы добавить озвучку сверху, — это можно сделать с помощью другой настройки. Так же кликните правой кнопкой и выберите «Изменить громкость».
В открывшемся поле перетяните бегунок влево, чтобы уменьшить громкость:
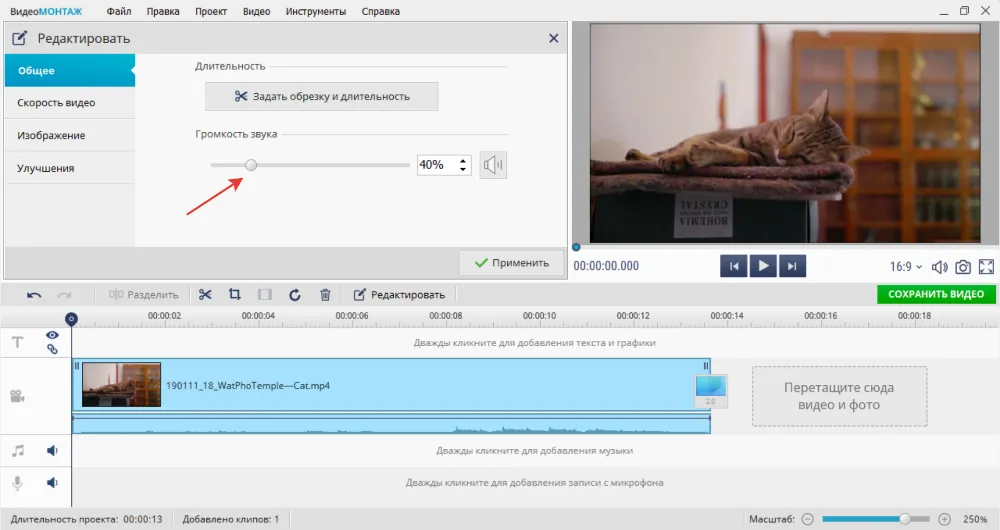
Когда результат вас устроит, кликните «Применить».
Шаг 4. Сохраните итог
Чтобы экспортировать результат, нажмите на кнопку «Сохранить видео» или перейдите в меню «Файл» и выберите нужный формат.
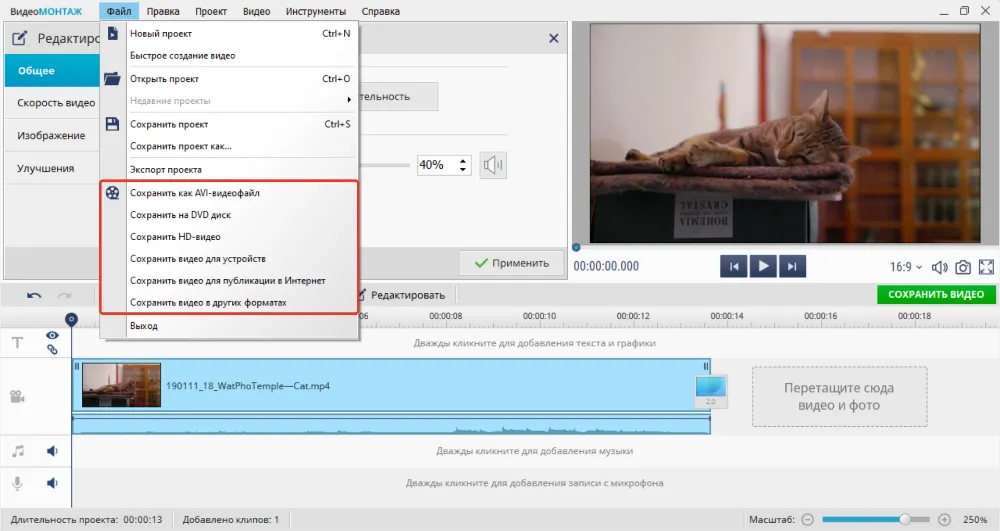
Если не знаете, какой формат лучше, — выберите «Сохранить HD-видео». Тогда вы экспортируете файл в высоком разрешении.
ВидеоМОНТАЖ — самый простой и быстрый способ заглушить аудио. Это делается всего за несколько секунд, и качество записи не пропадает.
Скачайте программу для удаления звука из видео
Скачать бесплатно!
Отлично работает на Windows 11, 10, 8, 7
VSDC Video Editor
VSDC — бесплатный редактор для монтажа. В нем множество функций: наложение слоев и масок, создание анимации, сложная цветокоррекция. Софт рассчитан в первую очередь на профессионалов, но сделать видео без звука сможет и новичок.
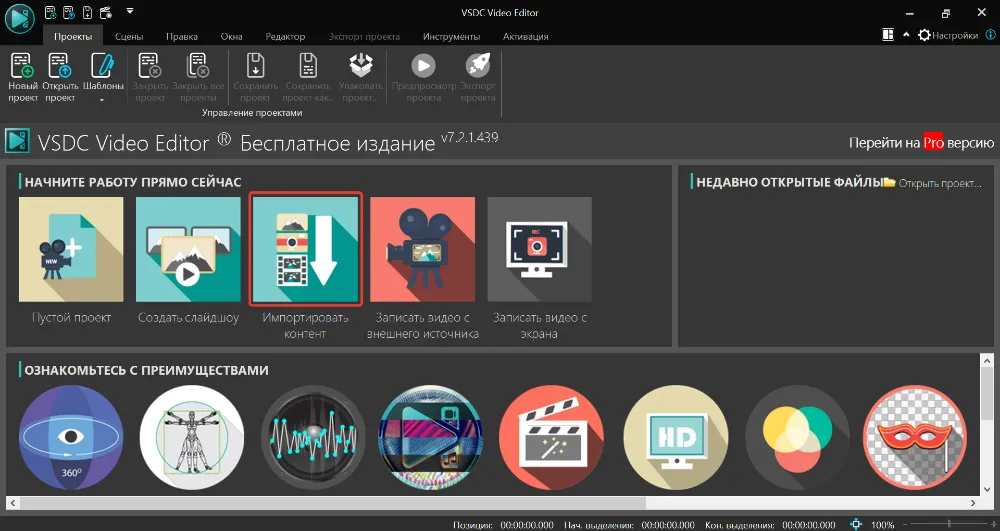
Шаг 1. Установите редактор и откройте файл
Скачайте установщик с официального сайта и запустите его. Затем откройте VSDC и выберите «Импортировать контент».
При необходимости поменяйте параметры и нажмите «Принять».
Шаг 2. Удалите аудиодорожку
Найдите на экране «Свойства»:
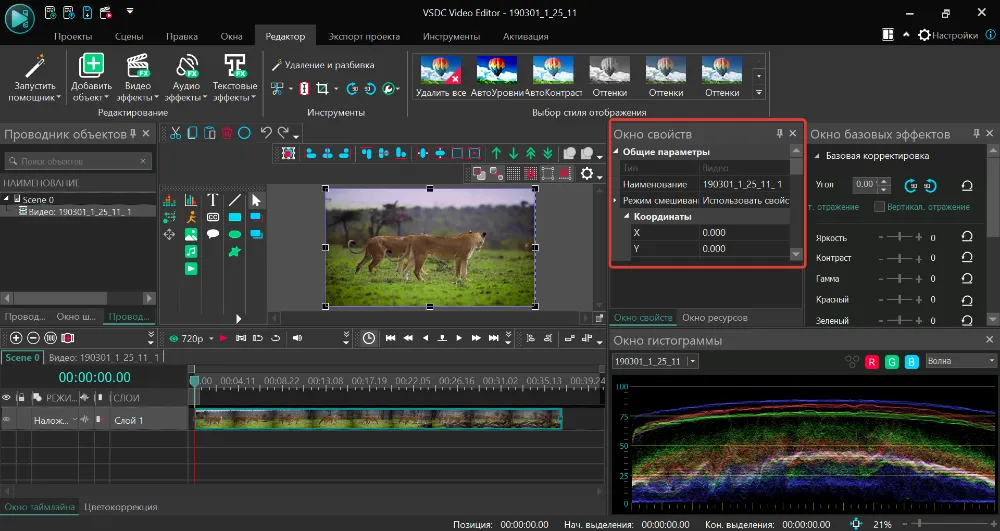
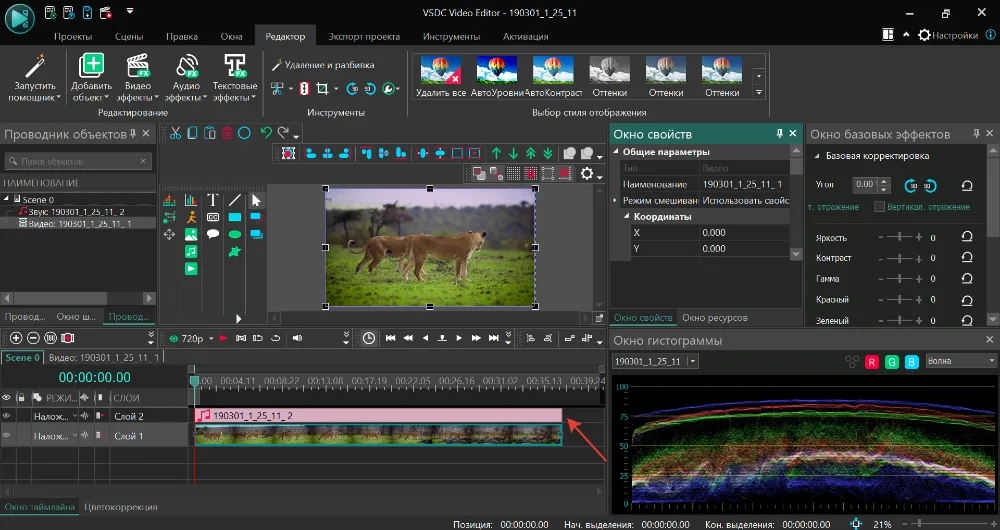
Промотайте список до самого конца и выберите «Разбить объект на видео и аудио».
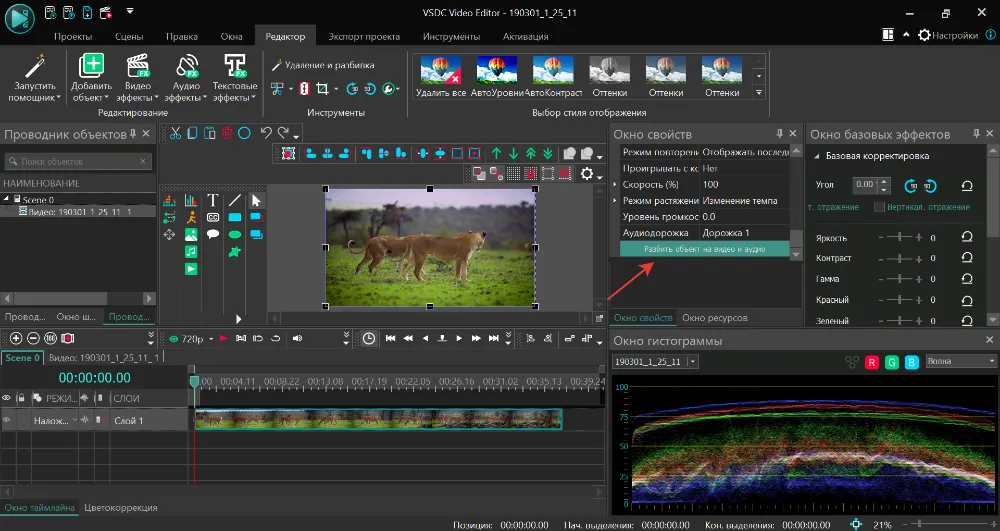
У вас появится две отдельные дорожки. Выберите аудиодорожку и нажмите «Delete».
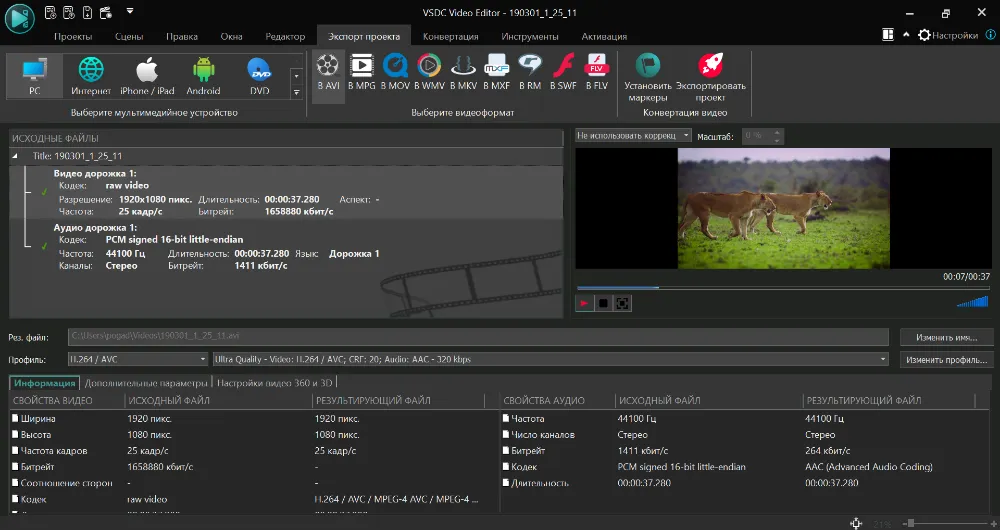
Шаг 3. Сохраните итог
Перейдите наверху во вкладку «Экспорт проекта». Наверху кликните на требуемый формат, а затем — «Экспортировать видео».
Чтобы разобраться с VSDC Video Editor, потребуется больше времени, зато он подходит для продвинутого редактирования фильмов.
Видеоредактор Windows 10
Если на компьютере установлена ОС Windows 10 — можно воспользоваться встроенным редактором. В нем есть только базовые функции: нарезка и склеивание файлов, небольшой выбор эффектов и простых фильтров. Однако для решения нашей задачи их будет достаточно.
Шаг 1. Запустите программу и откройте файл
Зайдите в поиск и введите «Видеоредактор». Откройте предложенное приложение.
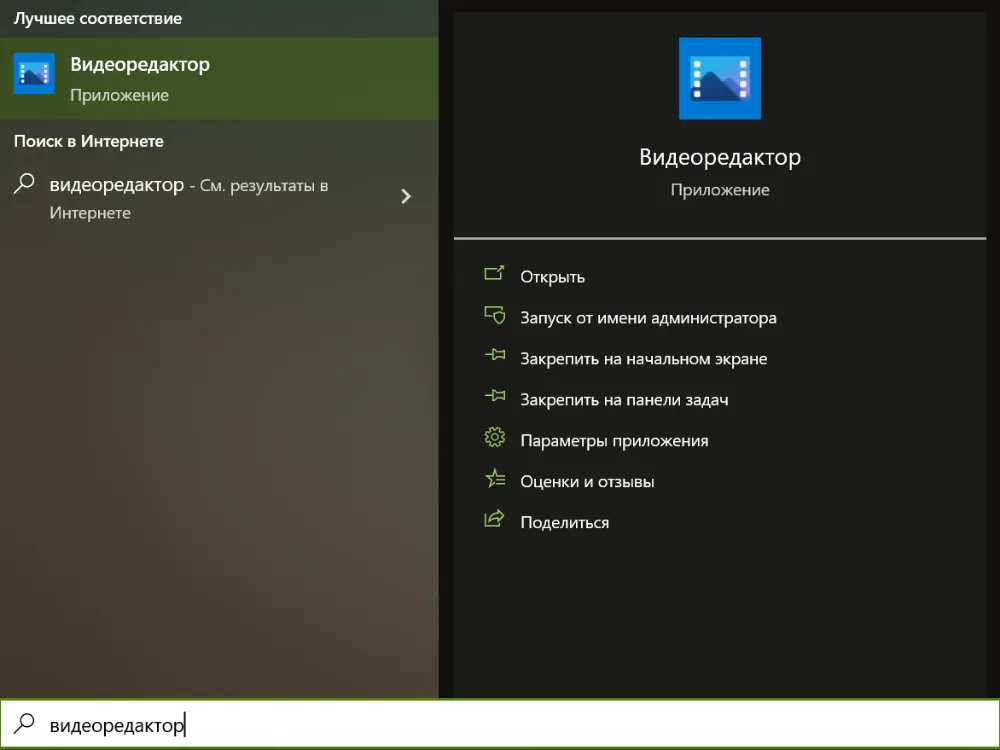
Затем нажмите «Добавить», чтобы открыть нужный файл.
Шаг 2. Удалите звук
Наведите курсор на настройку громкости на рабочей панели:
Кликните на значок, отмеченный на скриншоте. После передвиньте бегунок вниз, чтобы уменьшить громкость до нужного значения. А если нужно полностью отключить звук, еще раз нажмите на значок левой кнопкой мыши.

Проверьте, что звук отключен: значок должен измениться.
Шаг 3. Сохраните результат
Выберите «Завершить видео» в правом верхнем углу.

В открывшемся окне кликните «Экспортировать». Результат сохранится на ваш ПК.
Убираем музыку из видео онлайн
Если не хочется устанавливать на компьютер новые программы ради редактирования одного-двух роликов, можно воспользоваться онлайн-сервисом.
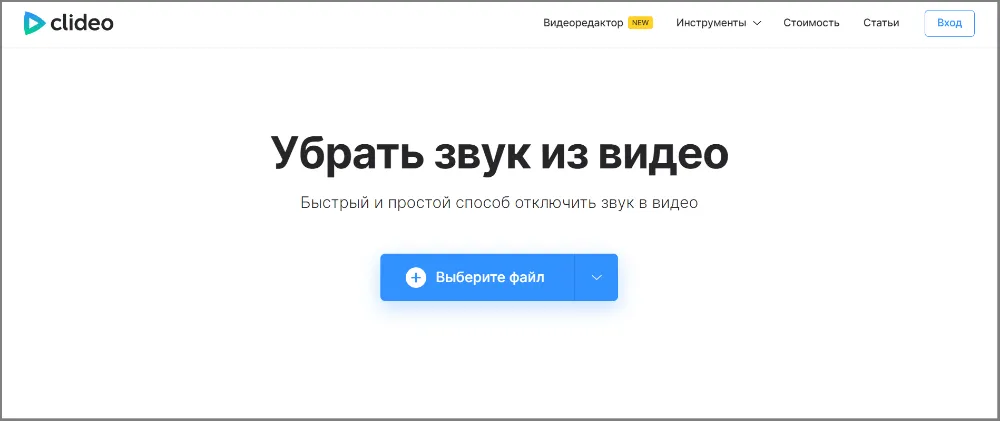
Clideo
Бесплатный сервис Clideo для редактирования видеороликов. Он позволяет быстро убрать музыку из видео онлайн: достаточно загрузить файл и немного подождать.
Шаг 1. Откройте сервис и загрузите файл
Перейдите на сайт и нажмите на кнопку «Выберите файл». Можно добавлять записи с компьютера или с облачных сервисов — Google Drive, Dropbox.
Редактирование начнется автоматически.
Шаг 2. Скачайте итог
Когда файл будет готов, вы увидите такой экран:
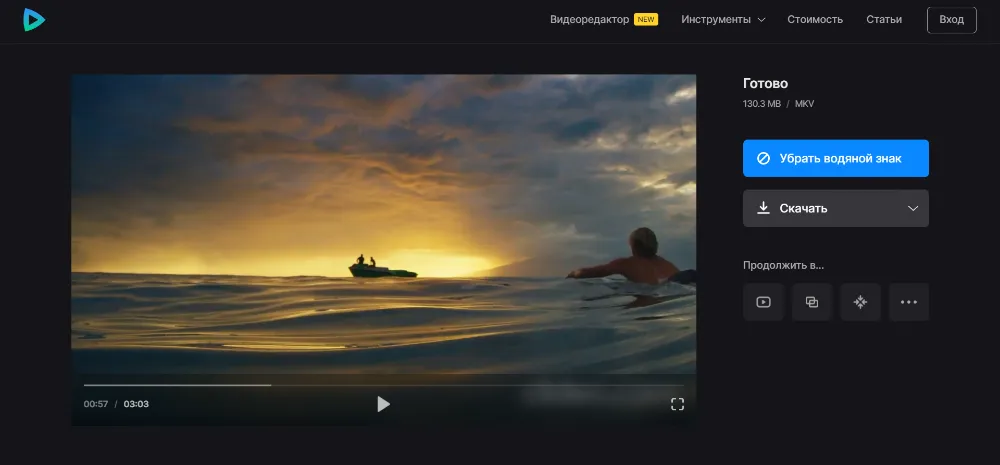
Здесь вы можете предварительно посмотреть результат и скачать его, нажав на соответствующую кнопку. В бесплатной версии на итог накладывается водяной знак, чтобы убрать его — нужно оплатить подписку от $6 в месяц.
Удаляем аудиодорожку на мобильном устройстве
Если вы сняли ролик на смартфон, можно сразу убрать из видео голос с помощью приложений. Рассмотрим на примере.
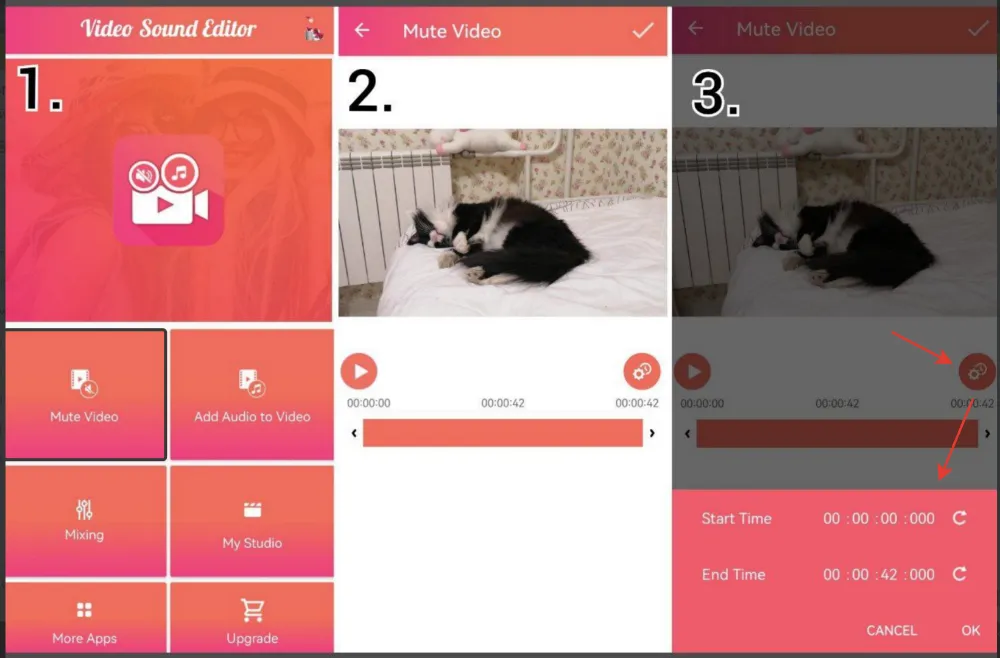
Video Sound Editor
Video Sound Editor — бесплатное приложение для удаления, добавления и микширования аудио. Заглушить звук в нем получится с помощью автоматических настроек.
Шаг 1. Откройте видеофайл
Скачайте приложение и запустите. Нажмите «Mute Video» и выберите файл с устройства.
Шаг 2. Сохраните результат
Подождите, пока запись обработается. Затем проверьте и экспортируйте результат в галерею, нажав на галочку наверху.
Шаг 3. При необходимости — измените настройки
Если нужно удалить шум с определенного интервала — перед сохранением нажмите на значок с настройками. Там вы сможете выбрать время начала и окончания удаления.
Итоги
Мы рассмотрели 5 способов, как с видео убрать наложенную музыку. Для удаления аудиодорожки на телефоне воспользуйтесь Video Sound Editor, если хотите убрать звук онлайн — вам поможет сервис Clideo.
Лучший вариант для ПК — ВидеоМОНТАЖ. Софт быстро обрабатывает тяжелые записи в высоком разрешении, работает даже на слабых компьютерах, а в функциях разберется кто угодно. Скачивайте редактор и удаляйте аудио с роликов всего за несколько кликов.
Скачайте программу для удаления аудио из видео
Скачать сейчас!
Отлично работает на Windows 11, 10, 8, 7