
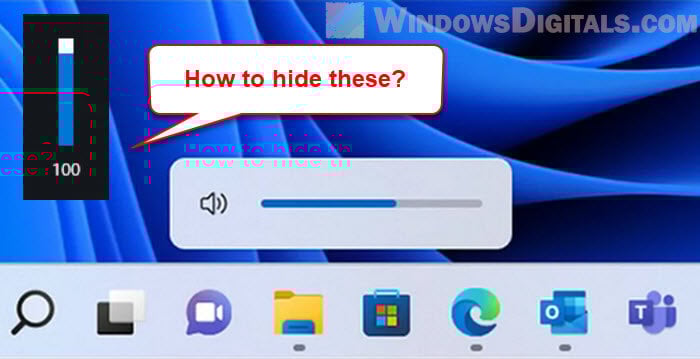
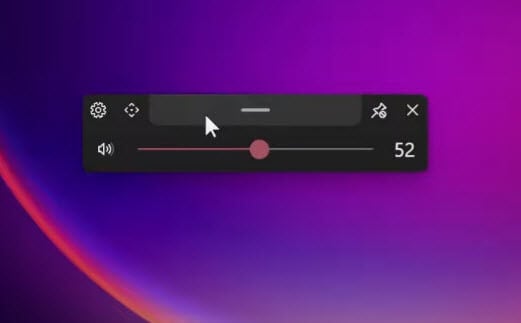
Windows 11 comes with a lot of new improvements in the interface to make things look cooler and more high tech. But, some users find that some features are pretty unnecessary and annoying. One of such things is the volume bar, or the slider pop-up, that often appears on the screen whenever you adjust the volume in Windows 11. It can sometimes block things on the screen as it will appear regardless of what you’re doing, including playing a full-screen game.
In this short guide, we’ll show you two methods to hide that volume bar in Windows 11 so that it will not pop up again when you change the volume.
What is the problem?
When you’re adjusting the volume, this pop-up slider might show up at the top left or sometimes in the middle of the screen. It’s really annoying, especially if you’re in the middle of a game, watching a movie, or on a video call. Basically, it’s not the best part of the user experience.
Related issue: How to Stop Mouse Scroll From Changing Volume
How to get rid of the volume bar on screen in Windows 11
Here are a couple of ways to make that volume bar go away in Windows 11.
Method 1: Using HideVolumeOSD
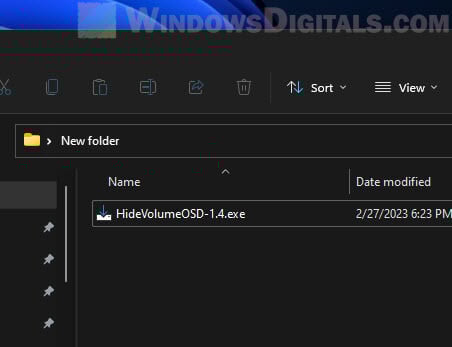
A handy tool called HideVolumeOSD can help. It’s free, open-source, and lets you hide that volume pop-up in Windows 11.
- First up, grab HideVolumeOSD from here:
http://wordpress.venturi.de/
- Open the “HideVolumeOSD-1.4.exe” file you just downloaded to install it.

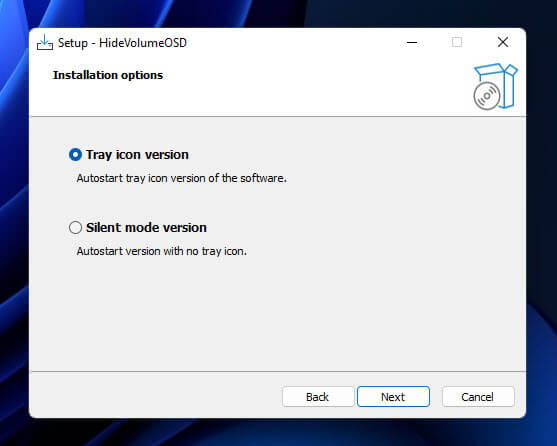
- Pick the Tray icon option in the setup and follow the steps to finish installing.

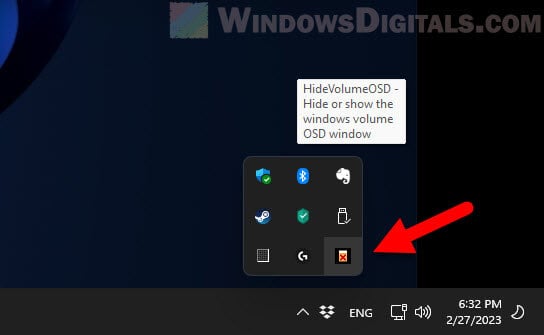
- Look for the Hide Volume OSD icon in the system tray, and click it to switch the volume bar on or off.

For extra settings, right-click the HideVolumeOSD icon in the tray and hit Settings. You can tweak things like how long the bar shows after pressing volume, and choose its look and size.
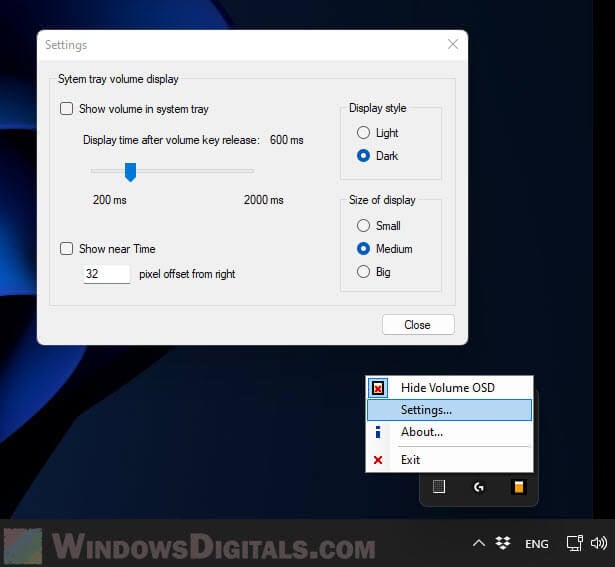
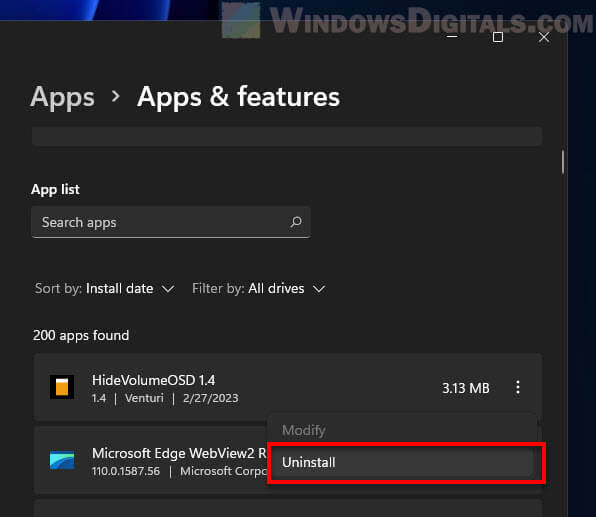
If you decide you want the volume bar back, just click the icon again or hit “Exit” to shut down the app. And if you’re done with it for good, you can uninstall it from the Apps & features settings.
Read next: How to Change Volume of Different Apps on Windows 11
Method 2: Using ModernFlyouts
Another tool you can use is a tool called ModernFlyouts, which can kind of replace the default Windows 11 volume pop-up with something else more customizable. You can configure things like its colors, layout, and whether it should pop up or not when you adjust the volume. Here’s how to use it:
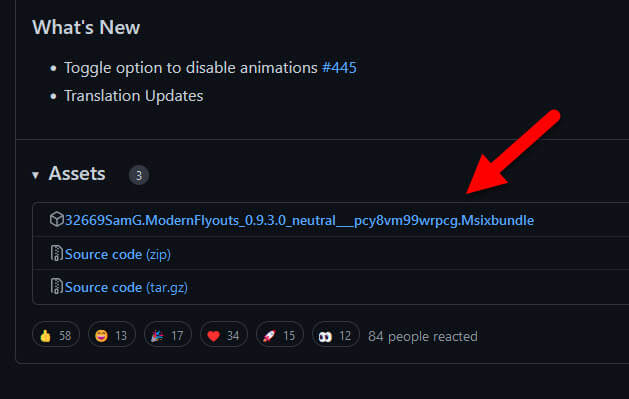
- Download it from the GitHub page.

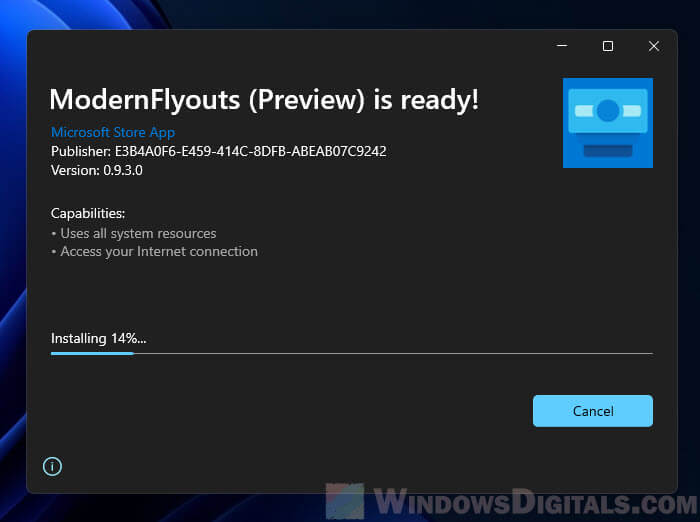
- Install it by running the installer and following the steps.

- Open ModernFlyouts from the Start menu.
- Change the volume and check out the new look.

- To change the settings, right-click the ModernFlyouts tray icon and pick Settings.
- Adjust the settings to your liking, and they’ll kick in right away.

Or, you can play around with the settings to change how the volume pop-up looks and behaves. ModernFlyouts gives you more control, making it less annoying.
Method 3: Remapping the volume keys using AHK
Another way to remove the volume pop-up in Windows 11 is to remap the volume keys using AHK (AutoHotkey). AutoHotkey is a very popular, free and open-source software that allows you to automate repetitive tasks. One of its many features is that it lets you remap keys in Windows.
You can remap the volume keys using the following script.
Volume_Up::SoundSet, +10
Volume_Down::SoundSet, -10
The catch is you will have to learn a bit about AHK before you actually know how to use it. When you have the script set up, you can adjust the volume in Windows 11 without the volume bar popping up.
My two cents
That volume bar in Windows 11 can sometimes get on your nerves, but these tips should help you deal with it. Whether you use HideVolumeOSD, ModernFlyouts, AHK, or another tool, you should be able to make that pop-up go away or at least make it less bothersome.
If you’re reading this at a later date, you should first try to run Windows Update to see if there are any changes to this behavior. Microsoft might have already changed the volume bar’s behavior in a later update.
Readers help support Windows Report. We may get a commission if you buy through our links.
Read our disclosure page to find out how can you help Windows Report sustain the editorial team. Read more
If you are curious to know how to hide the microphone icon in Windows 11, this article is for you.
After enabling or setting up the microphone on Windows 11, you may have noticed that sometimes a mic icon appears on the taskbar. It helps to understand if any app or OS is using your mic. You also can control some basic functionalities by clicking on this icon.
However, you also may want to hide it from the taskbar. But is it possible? If yes, how?
Why does the microphone icon appear on the taskbar in Windows 11?
If your microphone is not working, you will not see such symbols on the taskbar. But, if it works perfectly, you may see the icon due to the following things:
- Something is recording: When someone or something is using your microphone and probably recording your voice activity, either it can be by you or an app or a third party, the microphone button will appear on your taskbar.
- Cortana: Cortana is a voice assistant from Microsoft which is built-in with Windows 11. It may use your microphone to determine your instruction to it. You may see the icon in this case unless you manually disable Cortana.
- Other app’s mic usage: If any app, like a screen recorder, video or voice chatting app, etc., uses the mic, you will often see the microphone icon.
Is it possible to hide the mic icon?
Usually, there is no standard way to hide the microphone icon on Windows 11, as you may expect. However, if you do some tricks and follow some unusual methods, you can disable that icon.
How can I hide the microphone icon in Windows 11?
To hide, we have prepared some methods that you can try. Before that, make sure you have done the following things:
- First, update Windows to at least one of the recent versions.
- Make sure Windows 11 is genuine and activated.
After ensuring the above things, follow these methods.
1. Disable some apps’ access
- Press Win + I on the keyboard to open Windows 11 Settings.
- Go to Privacy & security and click on Microphone.

- Now, toggle the switch off next to the apps you want.

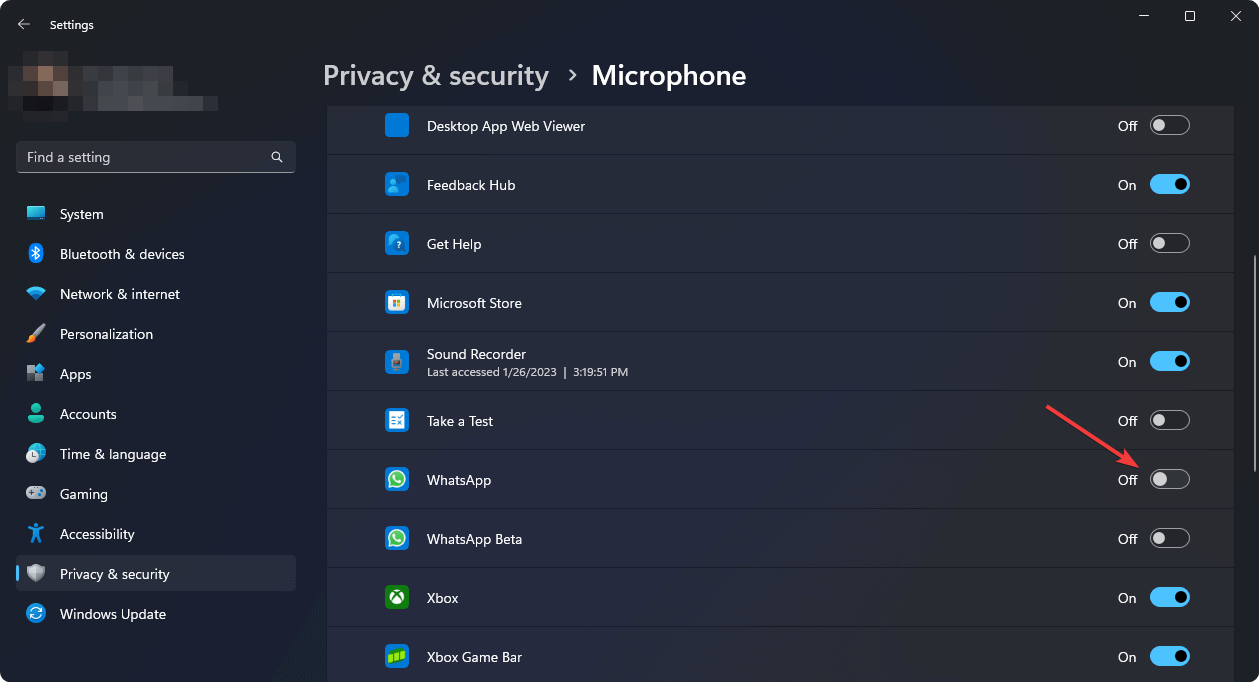
Doing this will disable mic access to specific apps. If the icon frequently appears while you are not using your microphone, it means any of the installed apps are using it. Disabling the access will permanently hide the icon from your taskbar.
2. Disable at all
- Go to the Microphone privacy settings like before.
- Toggle the switch off next to the Microphone access.
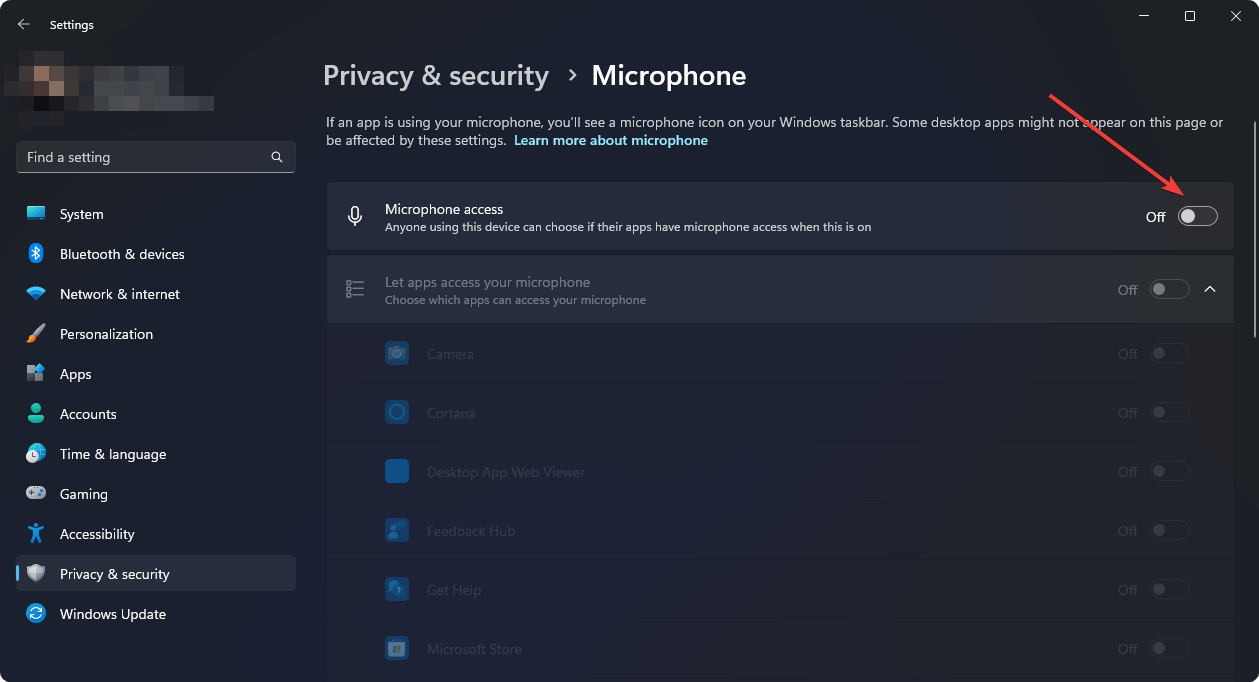
It will prevent all of the applications from accessing your mic, which will also turn off the microphone icon on your taskbar.
- Recent Windows 11 update lets you disable profanity filter in voice typing
- Microsoft wants Windows 10 users to upgrade to Windows 11 or Copilot + PCs
- Windows 11 KB5055627 update makes File Explorer more fluid
- A few keyboard settings are moving from Control Panel to Settings app in Windows 11
- Details of Windows 11 25H2 spotted in the wild; likely to be a smaller update
3. Use Device Manager
- Open the Start Menu, type device manager, and hit Enter.
- Expand Sound, Video & Game controllers.
- Right-click on your microphone and click on Disable.

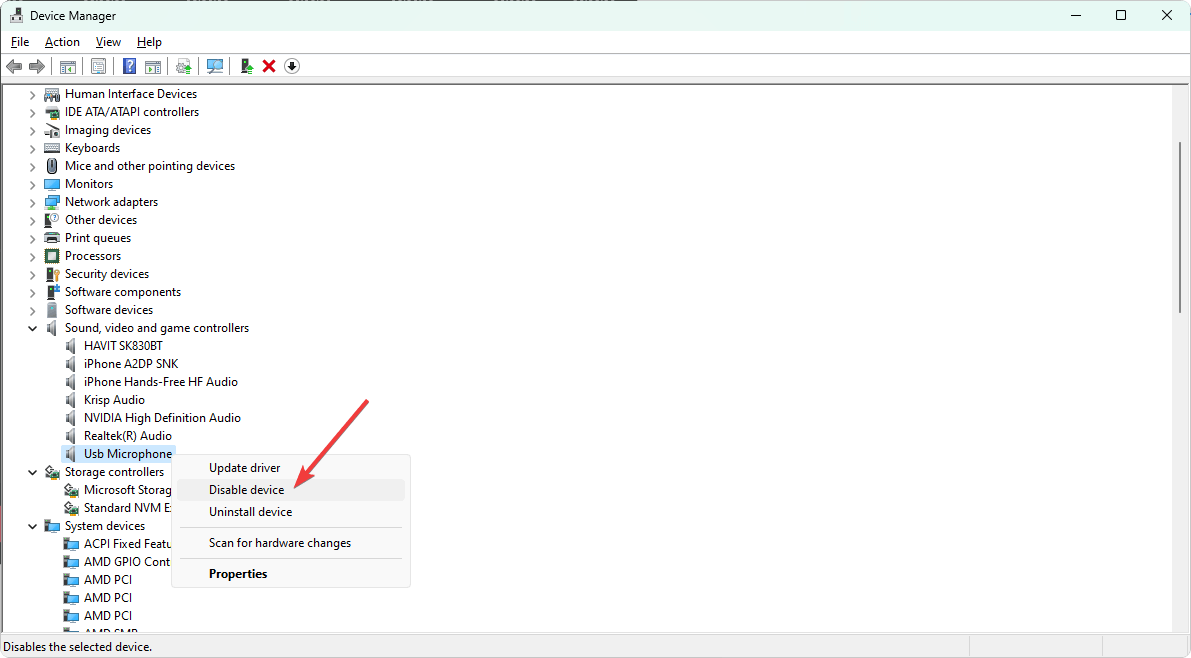
From the Device Manager, you also can update drivers, including the mic driver. But, for best, it is wise to use a tool like Outbyte Driver Updater.
After disabling it, the microphone will be inaccessible for all services on your PC. So, there will be no mic icon appearing on the taskbar.
Else, if you are using an external microphone, you can keep it disconnected when you are not using it. This will ensure that no mic symbol appears on the Windows 11 taskbar.
If you are interested, learn how to solve the microphone volume that is too low on Windows 11.
The primary purpose of showing the icon is to make you aware that an app or service is using your audio input device. For example, it may be recording your voice or something.
To protect your privacy, till now, Microsoft has not brought an option to disable this feature. As a result, you cannot follow a standard method to put the symbol out of your sight.
So, when you apply our tricks to conceal the icon, it will also disable the microphone access so that your privacy remains protected.
This article has shown how you can hide the microphone icon in Windows 11. Please let us know in the comment box if you have an opinion.
Hasibul Kabir
Windows Software Expert
Hasibul Kabir is a Tech-Enthusiast Blogger, Web Developer & Hobbyist Game Developer. Writing about Technology, mainly Windows, Mac, iOS, etc., is his main focus, besides doing some computer science-related work.
He loves exploring new technology and presenting it with simple words to the audience. When not at work, Hasibul plays video games, explores nature, tastes delicious foods, or learns new things.
Содержание статьи:
- Настройки панели задач (taskbar)
- Вариант 1: через персонализацию
- Вариант 2: через редактор групповой политики
- Вариант 3: через спец. приложения твикеры
- Вопросы и ответы: 0
Доброго времени!
Если кто вдруг не знал: то панель задач (на англ. taskbar) — это небольшая область в нижней части экрана (серая полоска), на которой располагаются значки ПУСК’а, поиска, наиболее популярных программ, состояние подкл. к сети, время и т.п.
Разумеется, по умолчанию, панель задач не всегда удобно настроена: например, с нее часто требуется удалить лишние значки, поставить ее авто-скрытие, изменить ее цвет, и т.д. Про это как раз и будет сегодняшняя заметка (кратко рассмотрим, где эти параметры можно найти).
Примечание: если у вас не активированная версия Windows — то часть этих параметров вы не сможете изменить! Рекомендую вам в первую очередь ознакомиться с заметкой по 📌активации ОС Windows.
*
Настройки панели задач (taskbar)
Вариант 1: через персонализацию
Попробуйте кликнуть правой кнопкой мыши в любом свободном месте (от значков) панели задач — должно появиться небольшое окно с возможностью открыть ее параметры (см. пример ниже на скрине). 👇

Параметры панели задач — Windows 11
Есть другой способ — нажать Win+i, когда откроются параметры системы, необходимо открыть вкладку «Персонализация \ панель задач».
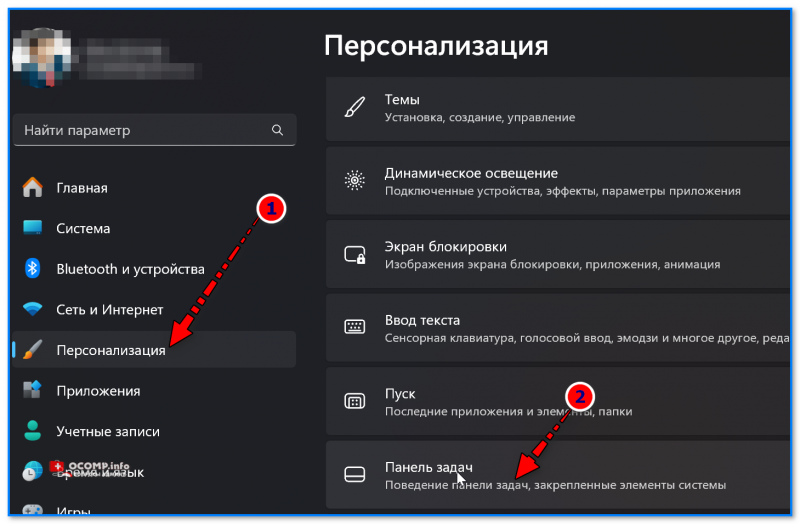
Персонализация — панель задач
Далее я бы посоветовал начать с отключения всего ненужного. Например, я откл.: поиск, мини-приложения, представление задач, чат, меню пера, сенсорную клавиатуру, панель и т.п. (см. скрин ниже).
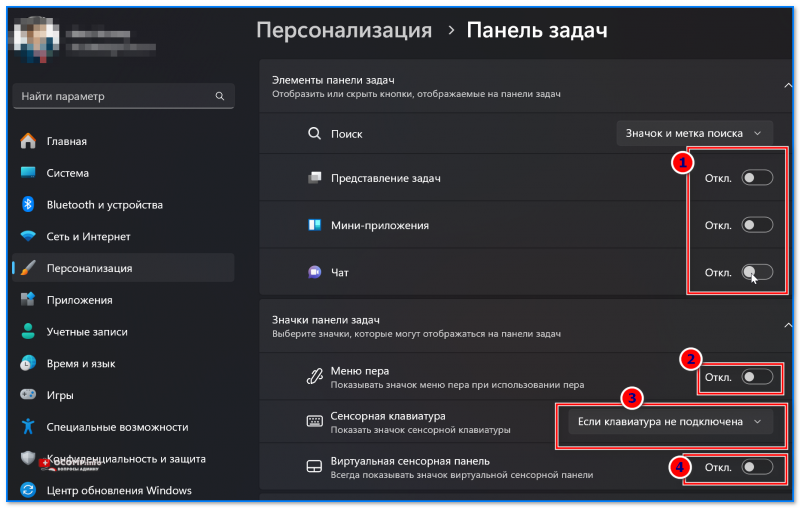
Откл. отобр. ненужных значков в панели задач Windows 11
Сразу после этого на панели задач стало больше места (это особенно будет заметно на ноутбуках, где каждый значок «оттяпывает» достаточно много места… 😉).
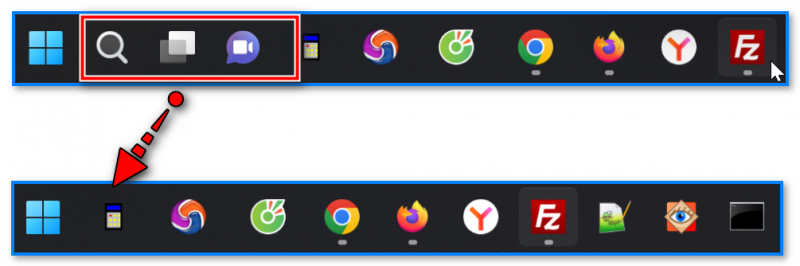
Было — стало
Кстати, насчет «лишних» значков: также посоветовал бы откл. меню пера, сенсорную клавиатуру, вирт. панельку и значки от установленного ПО (которое вы редко используете). Всё это добро изрядно отвлекает и мешает сфокусироваться на работе… 😉
Примечание: настраиваются эти значки также в том же разделе «Персонализация \ панель задач».
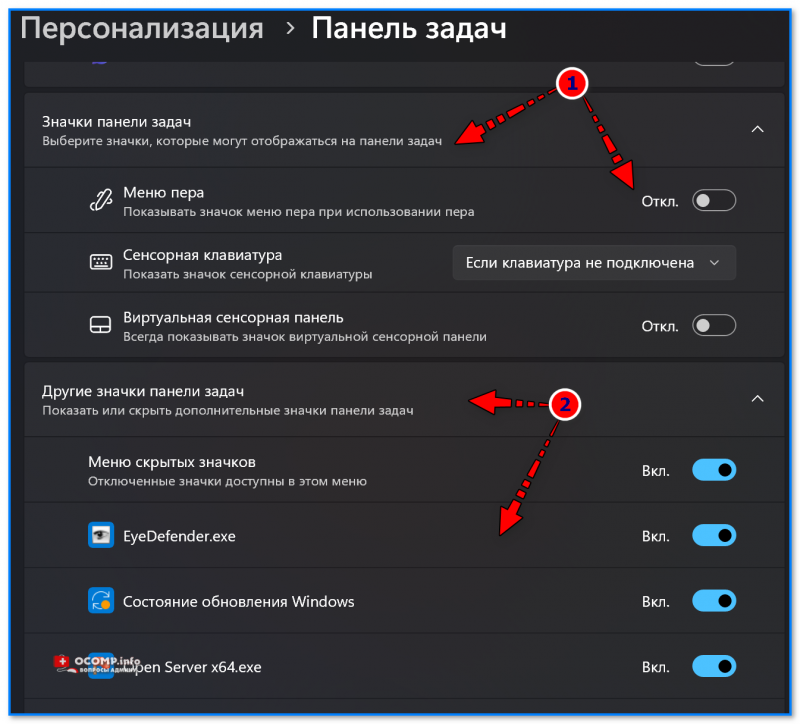
Другие значки панели задач
📌 Примечание!
Если вы хотите добавить день недели и дату к часам на панели задач — см. вот эту заметку: https://ocomp.info/dobavit-den-v-sistemnom-tree.html
Насчет скрытия панели задач (и ее поведения): это можно вкл. в разделе «Персонализация / панель задач / поведение панели задач». Скрытие может быть удобно на ноутбуках, где есть смысл расширить полезную площадь экрана (либо в тех случаях, когда панель мешает и отвлекает при просмотре фильмов, запуске игр, и т.п.).
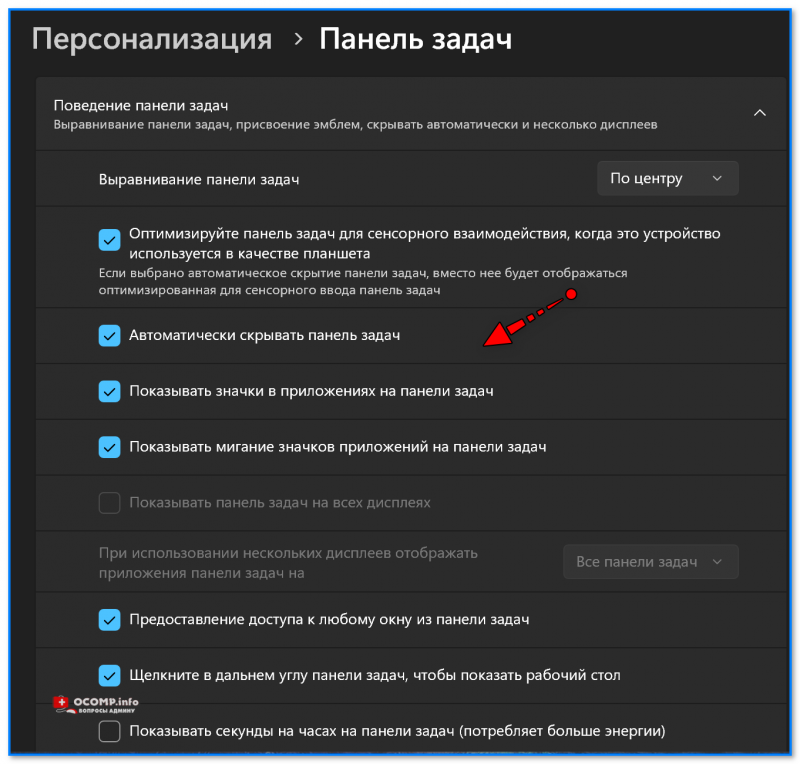
Скрывать ли панель задач
Ну и посл. штрих насчет цвета панели задач: самый быстрый способ изменить оформление системы в целом — зайти в раздел «Персонализация\ темы» и выбрать другую тему (со своими цветами, фоном, звуком…).
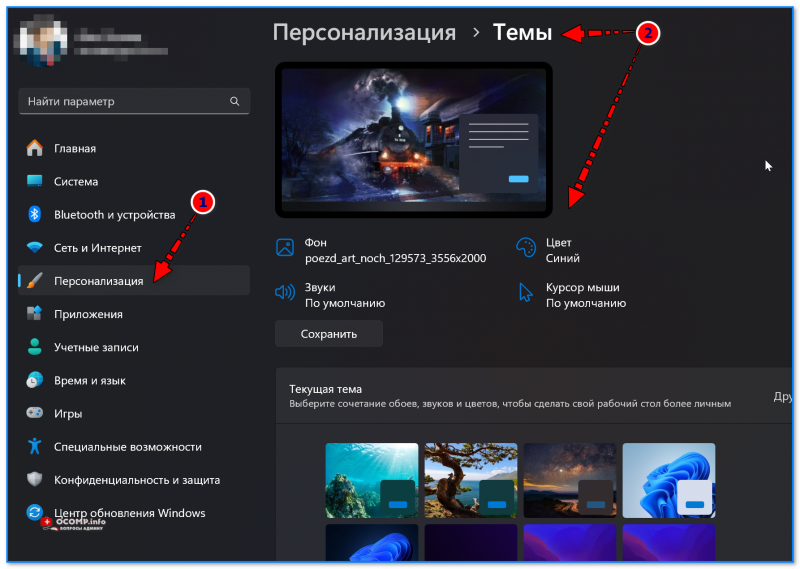
Персонализация — темы (Windows 11)
*
Вариант 2: через редактор групповой политики
Если настроек в разделе «Персонализация» вам не хватает (или нужно что-то более тонко настроить, запретить от изменения другими пользователями и т.п.) — то стоит воспользоваться редактором групповых политик. Чтобы его открыть — нужно нажать Win+R, и воспользоваться командой gpedit.msc (см. другие способы).
После необходимо открыть раздел «Конфигурация пользователи / Меню ПУСК и панель задач» (см. пример на скрине ниже). В этом разделе представлен целый список параметров, доступных для редактирования (чтобы что-то изменить — просто откройте нужный параметр и вкл. его).
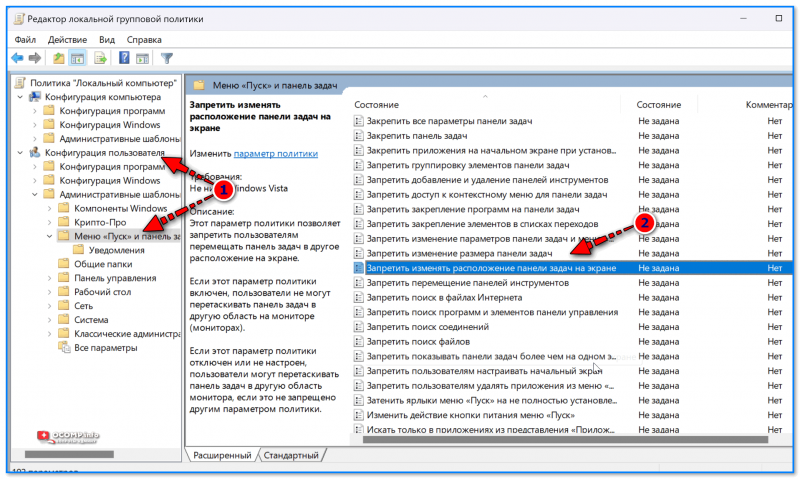
Конфигурация пользователи — меню ПУСК и панель задач
*
Вариант 3: через спец. приложения твикеры
Также стоит отметить, что для тонкой настройки Windows (в том числе и панели задач) — сейчас есть много различных утилит (их называют твикерами): Winaero Tweaker, Windhawk, TweakerXP, TweakerPro, и пр. (мне больше импонирует первая 😉).
Преимущества твикеров: они позволяют изменить те параметры, которые более недоступны нигде (плюс всё собрано в одном месте). Их минус: нужно выбирать надежного разработчика, иначе есть риск подцепить вирус или что-нибудь «сломать» в системе…
👉 Например, если взять тот же Winaero Tweaker — то работать с ним крайне просто:
- сначала слева нужно выбрать конкретный раздел настроек, что требуется изменить (см. скрин ниже: Taskbar Thumbnails — это значки на панели задач). Если не знаете англ. — рекомендую в помощь Google Lens (работает «на лету» с телефона);
- далее в окне справа задать параметры и сохранить настройки. В большинстве случаев они тут же будут применены (только в некоторых случаях требуется перезагружать ПК).
- Согласитесь, это просто? Даже не зная англ. — можно методом «тыка» настроить все под-себя! 👌
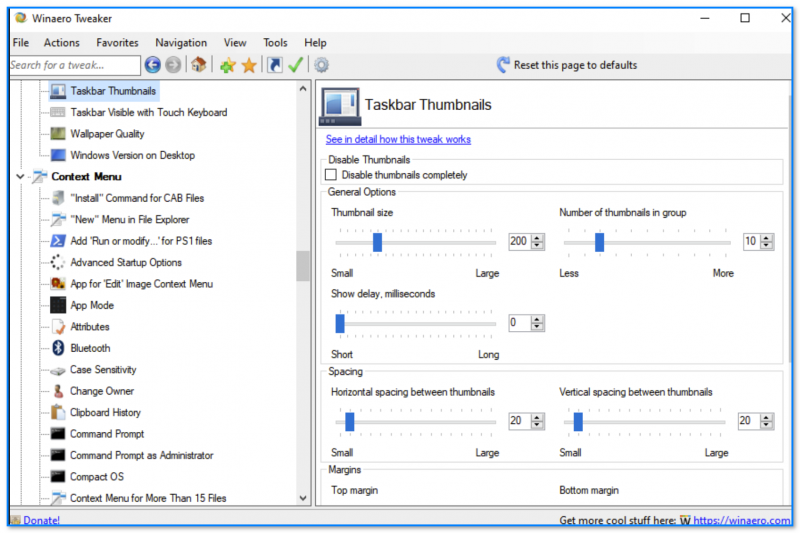
Пример работы с Winaero Tweaker
*
За сим откланяюсь, дополнения по теме — приветствуются в комментариях ниже.
Удачи!
👋
-
Windows Support Forums
-
Personalization
You should upgrade or use an alternative browser.
How to hide Network and Sound icons on Windows 11?
-
Thread starter
Thread starterMrBill
-
Start date
Start date
- Local time
- 11:09 AM
- Posts
- 6
- OS
- Windows 11
-
-
#1
Thanks, Bill
My Computer
-
- OS
- Windows 11
- Computer type
- PC/Desktop
- Manufacturer/Model
- Dell XPS-8960
- Local time
- 11:09 AM
- Posts
- 3,202
- OS
- Windows 11 Pro
-
-
#2
shell:::{05d7b0f4-2121-4eff-bf6b-ed3f69b894d9}
My Computer
-
- OS
- Windows 11 Pro
- Local time
- 11:09 AM
- Posts
- 6
- OS
- Windows 11
-
-
#3
My Computer
-
- OS
- Windows 11
- Computer type
- PC/Desktop
- Manufacturer/Model
- Dell XPS-8960
- Local time
- 11:09 AM
- Posts
- 3,202
- OS
- Windows 11 Pro
-
-
#4
My Computer
-
- OS
- Windows 11 Pro
- Local time
- 3:09 PM
- Posts
- 2
- OS
- Windows 11 Pro
-
-
#5
You can open the run box and type the following to open the classic notification icon settings window:shell:::{05d7b0f4-2121-4eff-bf6b-ed3f69b894d9}
Hey there. Did you test this before posting it?
It’s not useful at all… The options are greyed out and none of the available «settings» that you can change in that window do actually work, not even after a restart. It feels more like a dummy/unsupported menu that was left behind and not removed, but it doesn’t actually work.
The struggle to remove the Network/Audio combo icons still remains…
My Computer
-
- OS
- Windows 11 Pro
- Computer type
- PC/Desktop
- Manufacturer/Model
- ASUS
- CPU
- AMD Ryzen 7 5800X3D
- Motherboard
- ASUS ROG STRIX B550-E
- Memory
- 32GB Corsair Vengeance RGB @3600mhz
- Graphics Card(s)
- EVGA GEFORCE RTX 3080Ti FTW3 ULTRA
- Monitor(s) Displays
- ASUS VG27AQ 165hz
- Screen Resolution
- 2560×1440
- Hard Drives
- Western Digital SN750 500GB NVMe
Western Digital SN750 2TB NVMe
- PSU
- Seasonic Vertex 1000W
- Case
- NZXT H9 Flow (Black)
- Cooling
- NZXT Kraken Elite 360mm
- Keyboard
- HyperX Alloy Origins Core
- Mouse
- HyperX Dart RGB Wireless
- Internet Speed
- Symmetrical Gigabit
- Browser
- Chrome
- Local time
- 11:09 AM
- Posts
- 3,202
- OS
- Windows 11 Pro
-
-
#6
My Computer
-
- OS
- Windows 11 Pro
- Local time
- 11:09 AM
- Posts
- 2,350
- OS
- Windows 7
-
-
#7
Of course I tested it on my machine… nearly 2 months ago when I posted it. And on my machine the options are not greyed out. Don’t know what to tell you.
Doesn’t work for me. What’s your exact build number?
My Computer
-
- OS
- Windows 7
Similar threads
-
Windows Support Forums
-
Personalization