
Все способы:
- Как снять защиту от записи
- Способ 1: Удаление наследования прав
- Способ 2: Выдача разрешения на изменение
- Вопросы и ответы: 6
Порой «десятка» может преподнести неприятный сюрприз: попытка манипуляций с той или иной папкой (копирование, перемещение, переименование) приводит к появлению сообщения с ошибкой «Снимите защиту от записи». Проблема часто проявляется у юзеров, которые пользуются FTP или подобными протоколами для передачи файлов. Решение в данном случае простое, и сегодня мы хотим вас с ним познакомить.
Как снять защиту от записи
Причина неполадки кроется в особенностях работы файловой системы NTFS: те или иные объекты наследуют разрешения на чтение/запись от родительского, чаще всего корневого каталога. Соответственно, при переносе на другую машину унаследованные разрешения сохраняются. Обычно это не создаёт проблем, но если оригинальная директория создана администраторским аккаунтом без разрешений на доступ пользовательским учёткам, после копирования папки на другую машину может произойти проявление рассматриваемой ошибки. Устранить ее можно двумя способами: удалением наследования прав или установкой разрешения на модифицирование содержимого каталога для текущего пользователя.
Способ 1: Удаление наследования прав
Самый простой метод устранения рассматриваемой проблемы – удаление прав на модификацию содержимого каталога, унаследованных от оригинального объекта.
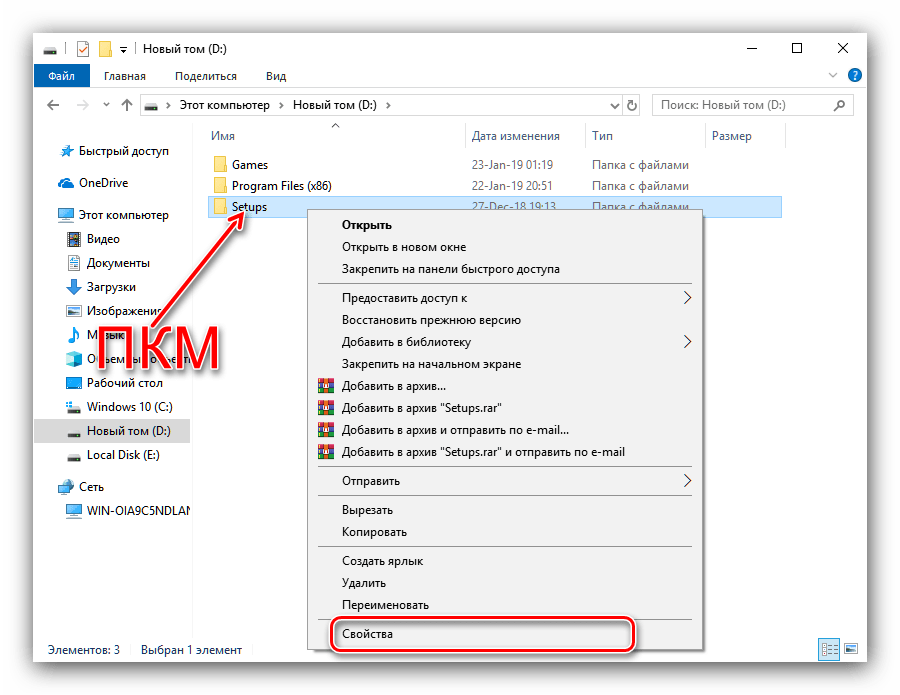
- Выделите нужную директорию и кликните правой кнопкой мыши. Используйте пункт меню «Свойства» для доступа к нужным нам опциям.
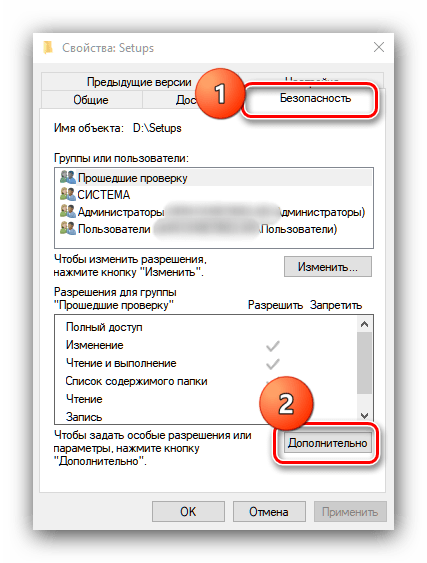
- Перейдите к закладке «Безопасность» и воспользуйтесь кнопкой «Дополнительно».
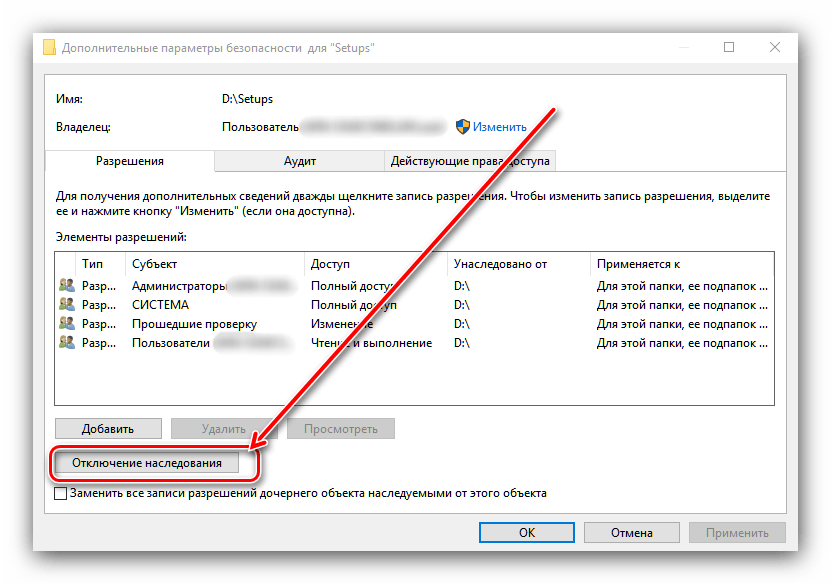
- Не обращайте внимания на блок с разрешениями – нам нужна кнопка «Отключение наследования», расположенная ниже, нажмите на неё.
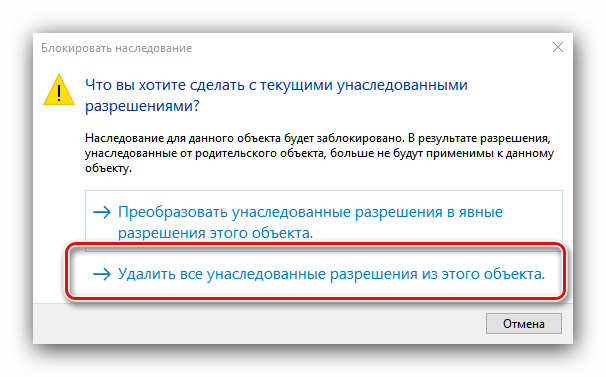
- В окне предупреждения используйте пункт «Удалить все унаследованные разрешения из этого объекта».
- Закройте открытые окна свойств и попробуйте переименовать папку или изменить её содержимое – сообщение о защите от записи должно пропасть.
Способ 2: Выдача разрешения на изменение
Описанный выше метод не всегда эффективен – кроме удаления наследования, может потребоваться также выдать соответствующие разрешения имеющимся пользователям.
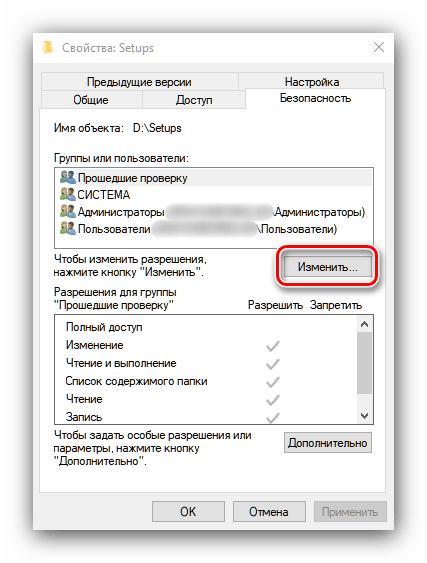
- Откройте свойства папки и перейдите к закладке «Безопасность». На этот раз обратите внимание на блок «Группы и пользователи» – ниже него расположена кнопка «Изменить», воспользуйтесь ею.
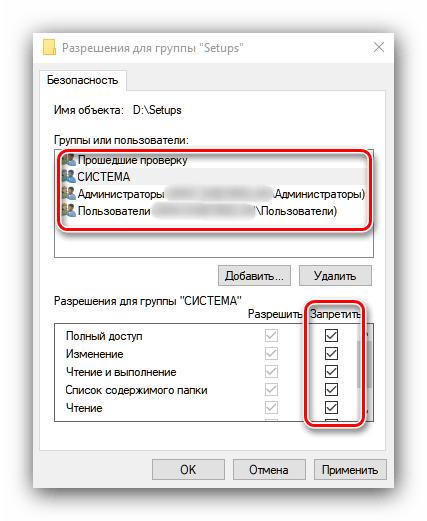
- Выделите в списке нужную учётную запись, затем обратитесь к блоку «Разрешения для…». Если в колонке «Запретить» отмечены один или несколько пунктов, отметки потребуется снять.
- Нажмите «Применить» и «ОК», после чего закрывайте окна «Свойств».
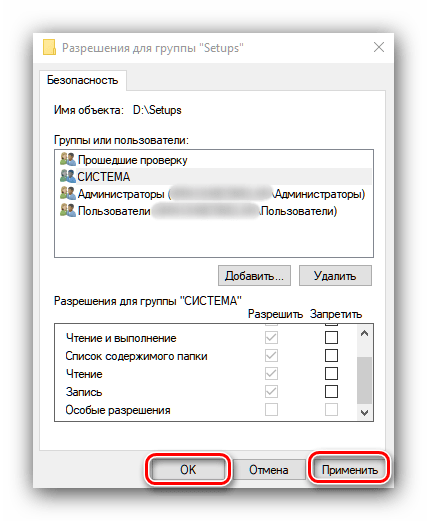
Эта операция выдаст нужные полномочия выбранному аккаунту, что устранит причину появления ошибки «Снимите защиту от записи».
Мы рассмотрели доступные методы борьбы с ошибкой «Снимите защиту от записи» в операционной системе Windows 10.
Наша группа в TelegramПолезные советы и помощь
Трансферное обучение с предобученными моделями в Keras с Python
AI_Generated 06.05.2025
Суть трансферного обучения проста: взять модель, которая уже научилась решать одну задачу, и адаптировать её для решения другой, похожей задачи. Мозг человека работает по схожему принципу. Изучив. . .
Циклические зависимости в C#: методы управления и устранения
stackOverflow 06.05.2025
Если вы хоть раз работали над не самым тривиальным проектом на C#, то наверняка сталкивались с той ситуацией, когда компилятор вдруг начинает сыпать странными ошибками о невозможности разрешить. . .
Как перейти от Waterfall к Agile
EggHead 06.05.2025
Каскадная модель разработки Waterfall — классический пример того, как благие намерения превращаются в организационный кошмар. Изначально созданная для упорядочивания хаоса и внесения предсказуемости. . .
Оптимизация SQL запросов — Продвинутые техники
Codd 06.05.2025
Интересно наблюдать эволюцию подходов к оптимизации. Двадцать лет назад всё сводилось к нескольким простым правилам: «Избегайте SELECT *», «Используйте индексы», «Не джойните слишком много таблиц». . . .
Создание микросервисов с gRPC и Protobuf в C++
bytestream 06.05.2025
Монолитные приложения, которые ещё недавно считались стандартом индустрии, уступают место микросервисной архитектуре — подходу, при котором система разбивается на небольшие автономные сервисы, каждый. . .
Многопоточность и параллелизм в Python: потоки, процессы и гринлеты
py-thonny 06.05.2025
Параллелизм и конкурентность — две стороны многопоточной медали, которые постоянно путают даже бывалые разработчики.
Конкурентность (concurrency) — это когда ваша программа умеет жонглировать. . .
Распределенное обучение с TensorFlow и Python
AI_Generated 05.05.2025
В машинном обучении размер имеет значение. С ростом сложности моделей и объема данных одиночный процессор или даже мощная видеокарта уже не справляются с задачей обучения за разумное время. Когда. . .
CRUD API на C# и GraphQL
stackOverflow 05.05.2025
В бэкенд-разработке постоянно возникают новые технологии, призванные решить актуальные проблемы и упростить жизнь программистам. Одной из таких технологий стал GraphQL — язык запросов для API,. . .
Распознавание голоса и речи на C#
UnmanagedCoder 05.05.2025
Интеграция голосового управления в приложения на C# стала намного доступнее благодаря развитию специализированных библиотек и API. При этом многие разработчики до сих пор считают голосовое управление. . .
Реализация своих итераторов в C++
NullReferenced 05.05.2025
Итераторы в C++ — это абстракция, которая связывает весь экосистему Стандартной Библиотеки Шаблонов (STL) в единое целое, позволяя алгоритмам работать с разнородными структурами данных без знания их. . .
Skip to content
In Windows 10, when a folder or file is encrypted using Encrypting File System (EFS), the File Explorer app shows a pad lock overlay icon for such a file or folder. If you are interested in removing that icon, in this article, we will see how it can be done.
In Windows 7, the pad lock overlay icon was for an entirely different function. The Lock icon in Windows 7 indicated that the file or folder was shared with nobody but your user account, and that your account alone had the permission to access it (besides the SYSTEM and admin accounts). This icon was shown only when some item that was shared previously with other users was made private by right clicking and choosing Share with nobody.
However, in Windows 8 and above, the pad lock overlay icon was removed because people couldn’t understand how to get rid of it. So I was surprised really when I saw another pad lock icon on some of my files in Windows 10! Then I realized how compressed files and folders also had a similar looking icon and realized that this lock icon was appearing only for encrypted files and folders, as mentioned at the beginning of the article.
To remove the Lock icon on files and folders in Windows 10, you need to do the following.
- Download the ZIP archive which contains the empty icon. It will be used instead of the lock icon.
Download empty icon
In the archive, you will also find ready-to-use Registry files so you can avoid manual Registry editing and save your time.
- Extract and put the blank.ico file to any folder you want. For example, let’s use the following path:
C:\Windows\blank.ico
- Open Registry Editor.
- Go to the following path:
HKEY_LOCAL_MACHINE\SOFTWARE\Microsoft\Windows\CurrentVersion\Explorer
Tip: See how to jump to the desired Registry key with one click.
- Create a new subkey named Shell Icons.
- Under the Shell Icons subkey, create a new string value and name it 178. Set its value data to the full path of the «blank.ico» file. In my case I have to set it to
C:\Windows\blank.ico

- Sign out from your Windows session or restart the Explorer shell.
You are done. Before:
After:
To undo this change, you need to delete the mentioned «178» value. That’s it.
Support us
Winaero greatly relies on your support. You can help the site keep bringing you interesting and useful content and software by using these options:
If you like this article, please share it using the buttons below. It won’t take a lot from you, but it will help us grow. Thanks for your support!
|
как снять шифрование с файлов win10? |
|||||
|
|||||
|
|||||
|
|||||
|
|||||
|
|||||
|
|||||
|
|||||
|
|||||
|
|||||
|
|||||
|
|||||
|
В связи с введением в действие Постановления Правительства Российской Федерации от 14.11.2023 № 1905 т.н. «о запрете популяризации VPN» с 1 марта 2024 года — любое обсуждение способов обхода блокировок и VPN на портале запрещено!
Whether you’re a student working on an important research paper, a photographer editing your latest masterpiece, or a professional navigating through countless documents, encountering locked files can be frustrating. I we will explore ways to unlock files on Windows 10, providing you with the tools and knowledge to regain access to your valuable data.
Understanding File Locking in Windows 10

Before diving into the solutions, it’s essential to understand the basics of file locking in Windows 10. File locking occurs when a file is in use by a program or process, preventing other programs from accessing or modifying it. This can happen unintentionally due to software glitches, or intentionally to protect files from unauthorized access or accidental changes.
File locking is a crucial aspect of file management in Windows 10, ensuring data integrity and preventing conflicts when multiple applications attempt to access the same file simultaneously. When a file is locked, it allows other programs to read its content but restricts them from making any modifications or deletions. This mechanism plays a vital role in maintaining the stability and security of files within the operating system.
The Basics of File Locking
File locking is a mechanism that Windows 10 uses to ensure data integrity and prevent conflicts when multiple applications try to access the same file simultaneously. When a file is locked, other programs can still read its content but cannot modify or delete it. Understanding how file locking works is crucial to unlocking files successfully.
Furthermore, file locking helps in preventing data corruption and loss by controlling access to files during critical operations such as saving or editing. It acts as a safeguard against potential data breaches and ensures that files are accessed and modified in a controlled and secure manner.
Reasons for Locked Files
Files can become locked for various reasons. It could be due to an application crash, an ongoing synchronization process, or a program error. Sometimes, the culprit is an antivirus software scanning the file, or Windows itself might lock system files for security purposes. Identifying the cause of the lock is the first step towards unlocking the file.
Understanding the reasons behind file locking is essential for troubleshooting issues related to inaccessible files. By recognizing the factors that lead to file locks, users can take proactive measures to prevent such situations and ensure smooth file operations within the Windows 10 environment. It is crucial to address locked files promptly to maintain system efficiency and prevent any disruptions in workflow.
Essential Tools for Unlocking Files
To effectively unlock files on Windows 10, you have two main options: built-in Windows tools and third-party software solutions. Let’s explore both to determine which approach suits your needs.
When it comes to dealing with locked files on Windows 10, having the right tools at your disposal can make all the difference. Whether you’re trying to delete a stubborn file or modify one that’s in use, understanding the available options can save you time and frustration.
Built-in Windows Tools
Windows 10 provides several built-in tools that can help in unlocking files. The Resource Monitor, accessible through the Task Manager, allows you to identify which processes are using a specific file. This can be particularly useful when you need to track down the source of a lock to release it effectively. Additionally, the command-line utility, Handle, provides detailed information about locked files and the processes locking them, giving you insights into what actions are preventing you from accessing or modifying the file.
Furthermore, Windows 10 offers a feature called “Previous Versions,” which allows you to restore previous versions of files or folders. This can be handy if you accidentally lock a file and need to revert to an earlier state to regain access.
Third-Party Software Solutions
If the built-in tools fail to unlock your file or you require advanced functionalities, third-party software solutions might be the answer. There are various file unlocking tools available, such as Unlocker and LockHunter, which provide a user-friendly interface and additional features to tackle stubborn locks. These tools often offer more flexibility and options for dealing with locked files, giving you a wider range of strategies to try when unlocking a file.
Moreover, some third-party software solutions come with integration options for Windows Explorer, making it easier to unlock files directly from the file explorer interface. This can streamline the process of managing locked files and provide a more seamless experience when dealing with file locks across your system.
Step-by-Step Guide to Unlocking Files
Now that you are equipped with the necessary knowledge and tools, let’s go through a step-by-step process to unlock files on Windows 10.
Identifying the Locked File
The first step is to identify the locked file. Use the Resource Monitor or third-party file unlocking software to determine which process is holding the lock. Take note of the file’s location and the name of the locking process.
Using Windows Tools to Unlock Files
If a built-in Windows tool is suitable for your situation, access the Task Manager and navigate to the Resource Monitor. Locate the locked file and the corresponding process, then terminate the process using the End Task option. This should release the lock on the file, allowing you to access it freely.
Using Third-Party Software to Unlock Files
If the file lock persists or you need advanced features, install and launch a third-party file unlocking tool. Use the tool to select the locked file and choose the option to unlock or terminate the process holding the lock. Follow the tool’s instructions to successfully unlock the file.
Troubleshooting Common Issues

Whilst unlocking files on Windows 10 is generally straightforward, you may encounter some common issues during the process. Let’s address a couple of these issues and provide troubleshooting tips.
Dealing with Persistent File Locks
In some cases, files might remain locked even after terminating the process. This usually happens when the process that locked the file was not properly terminated. To resolve this issue, restart your computer, and the locked file should become accessible again.
Resolving Access Denied Errors
If you encounter an “Access Denied” error when attempting to unlock a file, it could be due to insufficient permissions. To resolve this, log in as an administrator and adjust the file’s permissions accordingly. Right-click on the file, select “Properties,” navigate to the “Security” tab, and modify the permissions to allow full control for your user account.
Maintaining File Security While Unlocking
Unlocking files on Windows 10 should be approached with caution to ensure data security and prevent unintended consequences. It’s crucial to understand file permissions and practice safe unlocking practices.
Understanding File Permissions
File permissions determine who can access, modify, or delete a file. It’s important to be mindful of the permissions assigned to files, especially when unlocking them. Regularly review and manage file permissions to maintain a secure and organized file system.
Ensuring Safe Unlocking Practices
When unlocking files, avoid terminating processes that you are not familiar with. Make sure to verify the legitimacy of the locking process before taking any action. Additionally, always keep your operating system and security programs up to date to protect against potential threats.
Key Takeaways
- Windows 10 uses file locking to prevent conflicts and unauthorized access.
- Locked files can be identified using built-in tools or third-party software.
- Unlock files by terminating the locking process or using specialized unlocking software.
- Persistent file locks can be resolved by restarting the computer.
- Maintain file security by understanding permissions and practicing safe unlocking techniques.
FAQs
1. How can I determine which process is locking a file in Windows 10?
You can use the Resource Monitor or third-party file unlocking software to identify the process locking a file in Windows 10. These tools provide detailed information about locked files and the corresponding locking processes.
2. Why do files become locked in Windows 10?
Files can become locked due to various reasons, such as an application crash, ongoing synchronization process, or program error. Antivirus software scanning or Windows security measures can also cause file locks.
3. What should I do if a file remains locked even after terminating the locking process?
If a file remains locked after terminating the process, restart your computer. This should release the lock on the file and allow you to access it again.
4. How can I avoid unintended consequences when unlocking files?
To avoid unintended consequences, verify the legitimacy of the locking process before terminating it. Only terminate processes that you are familiar with and ensure that your operating system and security programs are up to date.
5. Is it necessary to regularly review and manage file permissions?
Yes, regularly reviewing and managing file permissions is essential for maintaining a secure and organized file system. It helps prevent unauthorized access and ensures that files are accessible to the appropriate users.