
Одно из самых заметных «нововведений» в Windows 11 — закругленные углы окон программ, диалоговых окон и других элементов. Не всем пользователям это новшество пришлось по душе.
При необходимости вы можете отключить закругленные углы, но, к сожалению, действительно хорошего способа для этого нет. Все возможности отключения скругленных углов окон в Windows 11 — в инструкции ниже. Также вас могут заинтересовать другие статьи на тему изменения оформления Windows 11.
Утилита Win11DisableRoundedCorners
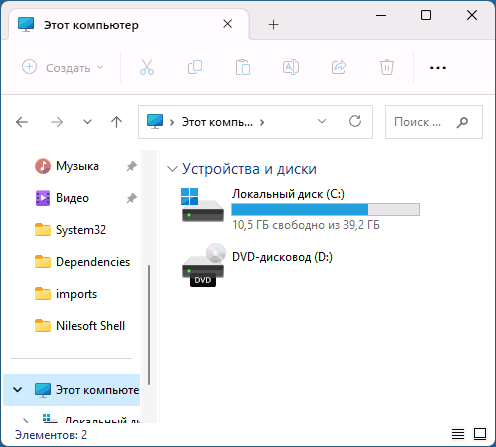
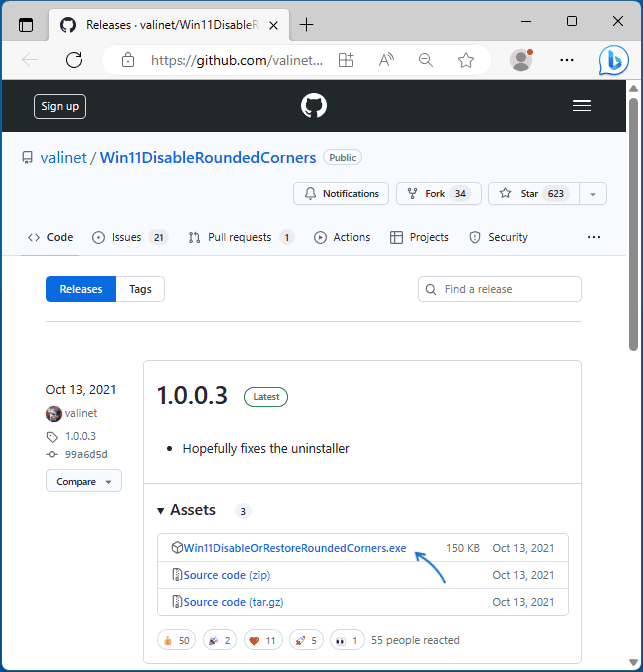
Один из самых простых способов отключить закругленные углы в Windows 11 — использовать бесплатную утилиту Win11DisableRoundedCorners (она же Win11DisableOrRestoreRoundeCorners).
Эта утилита модифицирует системный файл uDWM.dll и возвращает прежние прямые углы для окон, перед использованием рекомендую создать точку восстановления системы (и не могу гарантировать, что использование инструмента не приведет к проблемам).
Для отключения закругленных углов в программе, выполните следующие шаги:
- Скачайте программу со страницы разработчика в GitHub.

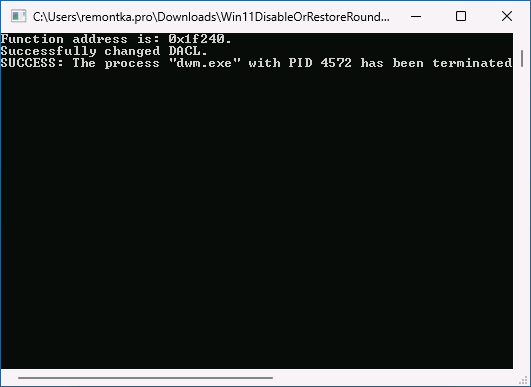
- Запустите программу (может потребоваться подтвердить запуск, так как утилита не имеет цифровой подписи) и дождитесь завершения её работы.

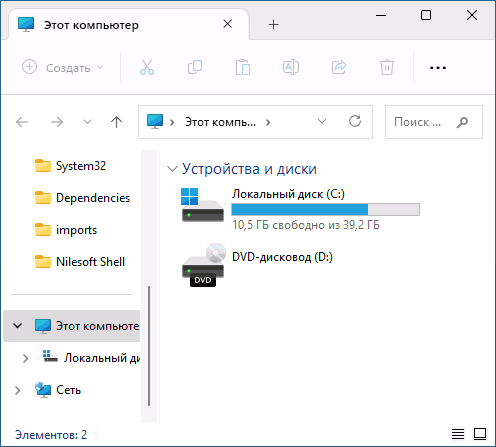
- В результате вы увидите стандартные углы окон Windows 11.

Учитывайте следующие нюансы:
- Углы отдельных элементов, например, новых контекстных меню, продолжат быть скругленными (но вы можете включить классические контекстные меню в Windows 11).
- При восстановлении системных файлов с помощью команды sfc /scannow будет восстановлен и измененный файл, отвечающий за новый вид углов окон.
Повторный запуск Win11DisableOrRestoreRoundeCorners при отключенных закругленных углах снова включит их — всё вернётся в исходное состояние.
ExplorerPatcher
ExplorerPatcher — ещё одна бесплатная программа с открытым исходным кодом, позволяющая настраивать внешний вид различных элементов Windows 11. Среди прочего в ней доступно и отключение закругленных углов окон.
Как и в предыдущем случае — нет гарантий, что при использовании ExplorerPatcher всё пойдёт гладко, а потому настоятельно рекомендую создать точку восстановления системы.
Также учитывайте, что сразу после запуска утилита изменит внешний вид панели задач и некоторых других элементов таким образом, что они станут более похожими на те, к которым вы привыкли в Windows 10 и, если вы захотите вернуть «всё как было», потребуется вручную отключить соответствующие настройки в программе или удалить её через панель управления.
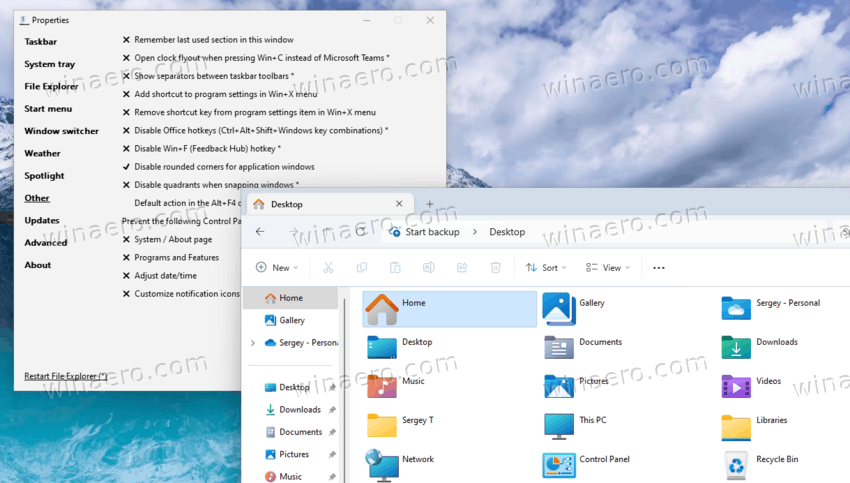
Для отключения закругленных углов в ExplorerPatcher выполните следующие шаги:
- Скачайте последнюю версию ExplorerPatcher с этой страницы.
- Запустите программу и дождитесь, когда она будет установлена (внешний вид панели задач изменится).
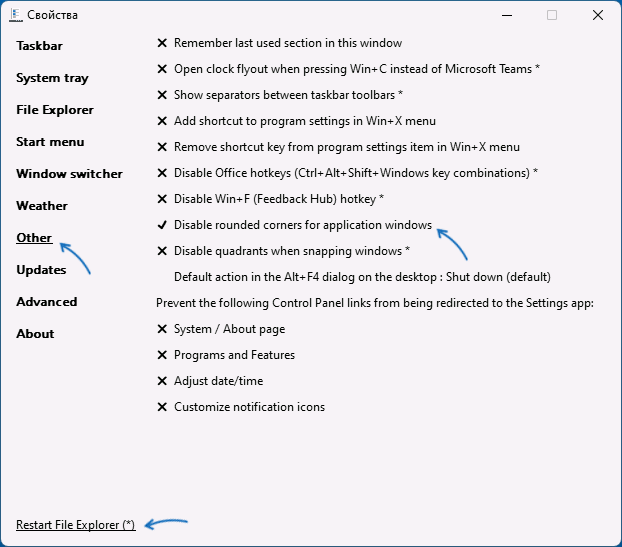
- Нажмите правой кнопкой мыши по пустому месту панели задач и выберите пункт «Свойства».
- Перейдите в раздел «Other», отметьте пункт «Disable rounded corners for application windows», а затем нажмите «Restart File Explorer» для перезапуска проводника. В результате углы окон станут прямыми, а не закругленными.

Примечание: при удалении ExplorerPatcher через Панель управления — Программы и компоненты может показаться, что процесс «завис», однако обычно это не так, достаточно набраться терпения и все, сделанные программой изменения будут отменены, а сама она — удалена.
Отключение закругленных углов без программ
Как было отмечено выше, «хороших» способов отключения закругленных углов в Windows 11 нет. Средства системы в текущих версиях ОС не позволяют этого сделать. Однако, одна возможность всё-таки присутствует — если отключить функции аппаратного ускорения графики в Windows, углы станут обычными — прямыми. Это можно сделать одним из следующих способов:
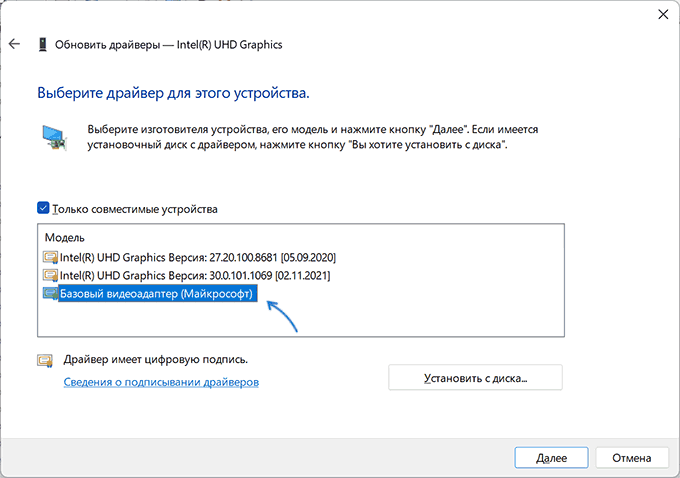
- Изменить драйвер видеокарты, к которой подключен монитор на «Базовый видеоадаптер (Майкрософт)». Для этого в диспетчере устройств нажмите правой кнопкой мыши по видеокарте, выберите пункт «Обновить драйвер» — «Найти драйверы на этом компьютере» — «Выбрать драйвер из списка доступных драйверов на компьютере», выберите «Базовый видеоадаптер (Майкрософт)» и нажмите «Далее».

- Второй вариант (в некоторых случаях может привести к тому, что пропадет изображение) — в диспетчере устройств нажать по видеокарте правой кнопкой мыши и выбрать пункт «Отключить устройство».
В обоих случаях мы получим «квадратные» углы окон, но при этом все функции ускорения графики будут отключены, а список доступных разрешений экрана будет ограничен — работать с компьютером будет не слишком удобно, а играть и вовсе не получится.
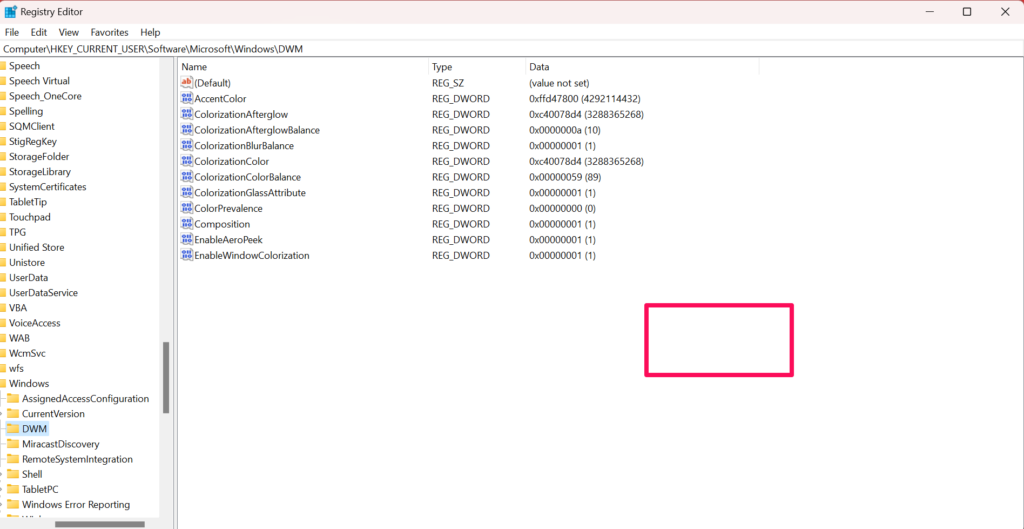
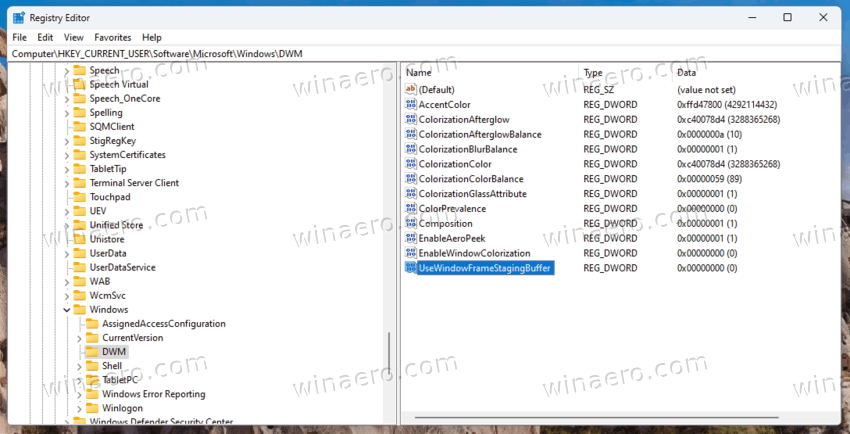
В Интернете вы можете встретить описание ещё одной возможности: создание параметра DWORD с именем UseWindowFrameStagingBuffer и значением 0 в разделе реестра
HKEY_CURRENT_USER\Software\Microsoft\Windows\DWM
однако в моем тесте (также проверено добавление в HKLM) это не сработало.
Возможно, вы знаете другие способы отключения закругленных углов? Буду благодарен, если вы сможете поделиться ими в комментариях к статье.
After adopting sharp edges for windows and dialog boxes in Windows 8, Microsoft kept the UI design in Windows 10. However, with its new Windows 11 OS, the Redmond giant shifted to the rounded corners for windows and dialog boxes to match its latest Fluent Design language for the latest Windows iteration.
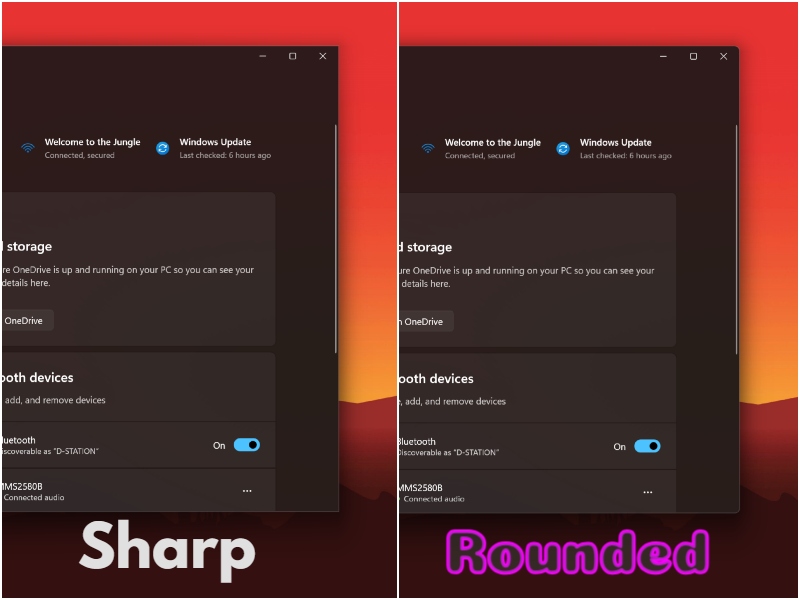
Although the rounded corners in Windows 11 are pretty subtle, they do not appeal to some users who still prefer the sharp corners in the Windows UI over the former. Here’s a comparison of the sharp corners and rounded corners in Windows 11.
So, if you are one of the many users who do not like the new rounded corners in Windows 11 and want to disable them on your PC or laptop, this article should help you out. In this in-depth guide, we have discussed every possible way to disable the rounded corners in the Windows 11 UI on your PC or laptop. Check out the following sections for all the details!
Remove or Disable Rounded Corners in Windows 11
Now, when it comes to removing the rounded corners in Windows 11 on a PC or laptop, things can get a bit complex. This is mainly because Microsoft does not want its users to tinker with the pre-set design language on the newest Windows iteration on their PCs and laptops, and that is why there are limited ways to disable the rounded corners in Windows 11.
Firstly, it is important to note that although there are only a couple of ways to remove the rounded corners in the Windows 11 system itself, they are hidden away. Moreover, it is also worth mentioning that users can use third-party applications to disable the rounded corners in Windows 11 on their PCs or laptops.
So, to help you remove the rounded corners in Windows 11 on your PC or laptop, we have compiled all the possible methods along with step-by-step guides for easy execution. Check them out right below!
1. Using Registry Editor
One of the most efficient ways to remove or disable the rounded corners in Windows 11 on your PC or laptop is via the Registry Editor. For those unaware, the Registry Editor in Windows 11 allows users to make root-level changes and modifications to the system on their PCs or laptops. However, it is worth noting that accessing the Registry Editor requires administrative rights for the Windows 11 device.
More importantly, making incorrect changes in the Windows Registry Editor may lead to serious operational issues in the system. So, if you opt for this method to remove the rounded corners on your Windows 11 PC or laptop, it is recommended to proceed with caution.
With that said, you can follow the steps right below to use the Registry Editor to remove the rounded corners in Windows 11 on your PC or laptop:
1. Use Windows + R to open the Run tool on your PC or laptop.
2. Type in regedit in the provided text box and press Enter.

3. Click Yes on the following User Account Control prompt.
4. Now, type in or copy-paste the following path onto the above URL bar in the Windows Registry Editor windows and press Enter:
HKEY_CURRENT_USER > Software > Microsoft > Windows > DWM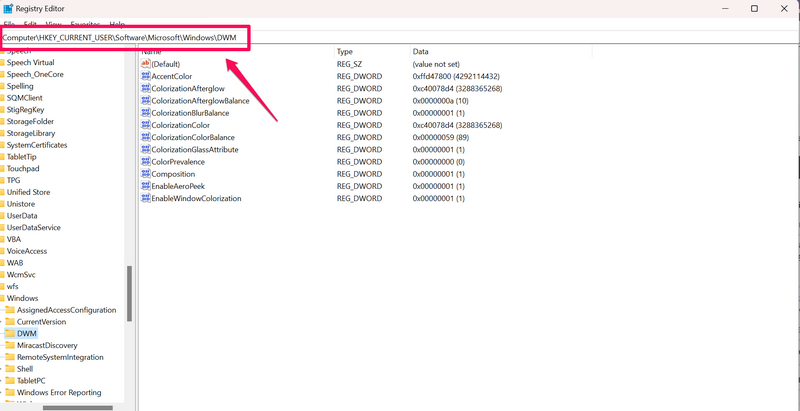
5. Next, right-click on a blank area on the right pane to open the context menu.
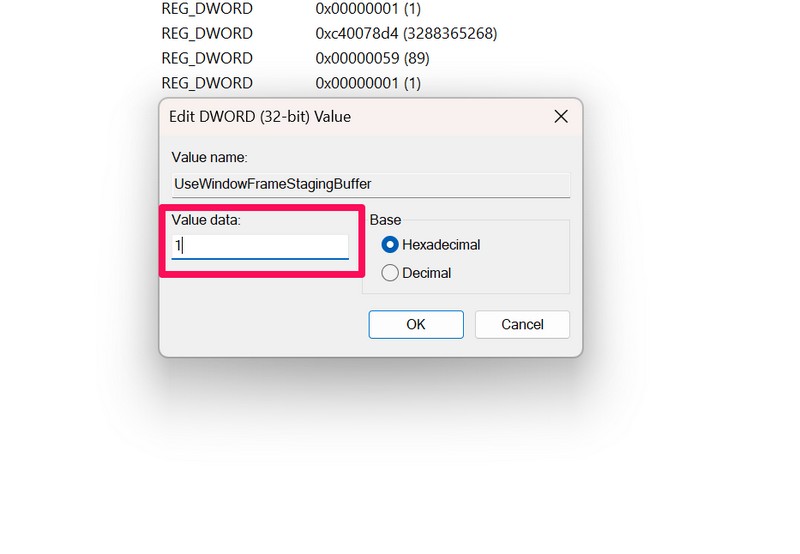
6. Under the sub-menu for the New option, click the DWORD (32-bit) Value option. This will create a new 32-bit Value under Desktop Window Manager (DWM), which is responsible for rendering graphical user interfaces using hardware acceleration in Windows 11.
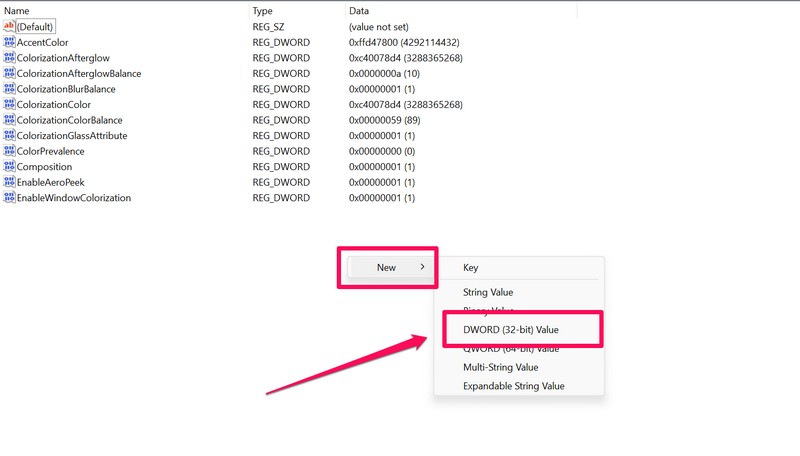
7. Rename the new Value to UseWindowFrameStagingBuffer.
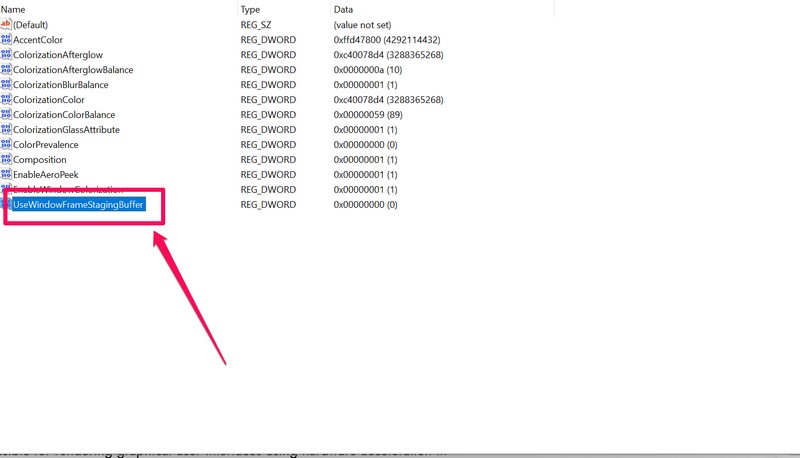
8. Once the Value is set up, double-click it to open the properties.
9. Under the Value data section in the following window, type in 0 and then click the OK button to save the change.
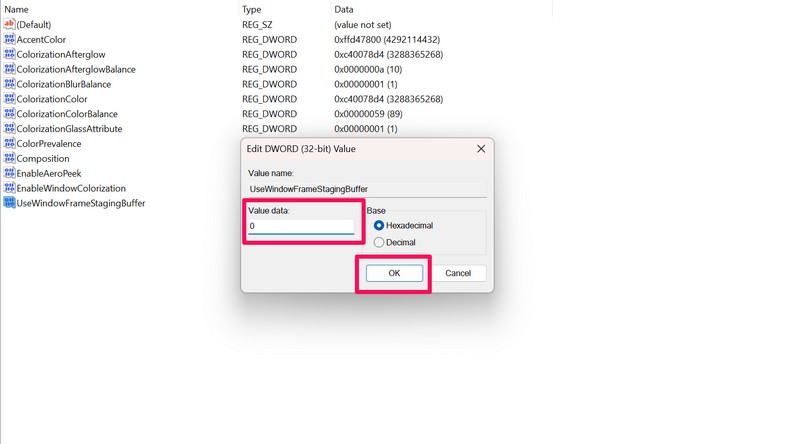
10. Restart your Windows 11 PC or laptop.
Following the restart of your Windows 11 PC or laptop, you will find all the windows and dialog box UI with sharp corners instead of rounded corners.
However, if you want to revert the change and enable the rounded corners in Windows 11 on your PC or laptop, you can simply follow the above steps to set the Value data for the UseWindowFrameStagingBuffer value as 1. Don’t forget to restart your device for the change to take effect.
2. Using Device Manager
Another way of disabling or removing the rounded corners without using third-party software in Windows 11 is via Device Manager. Although this way is much easier than using the Registry Editor in Windows 11, it is a bit impractical.
It essentially involves disabling the primary graphics driver on a Windows 11 PC or laptop to remove the rounded corners from the Windows 11 UI. You can follow the steps right below to disable the graphics driver on your Windows 11 device to remove the rounded corners:
1. Use Windows + X to open the Quick Links menu on your PC or laptop.
2. Open the Device Manager.

3. Expand the Display Adapters section with the tiny arrow beside it.

4. Now, right-click on your primary graphics driver and select the Disable device option on the context menu.
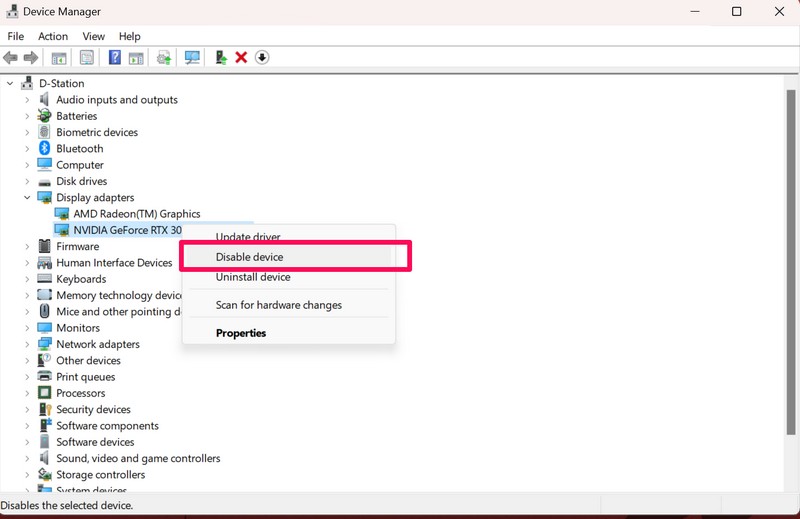
5. Once you disable the graphics driver on your PC or laptop, you will see the changes immediately, including the sharp corners for windows and dialog boxes.
However, it is very important to mention that disabling the primary graphics driver on your Windows 11 PC or laptop will result in inferior display performance and lower screen resolution. It can also make your entire Windows 11 experience more sluggish than ever.
Hence, we think that this trade-off is not worth the sharp corners in the Windows 11 UI. So, if you want to revert the change after making it on your Windows 11 PC or laptop, you can follow the above steps to simply re-enable the graphics driver on your device.
3. Use a Third-Party Program
Now, other than using in-system ways to disable or remove rounded corners in Windows 11, you can also use a few third-party apps to do so on your PC or laptop. Although there is a popular third-party tool called ExplorerPatch that allows users to do more than just disable rounded corners in Windows 11, we have provided a much simpler tool that only gets the said job done.
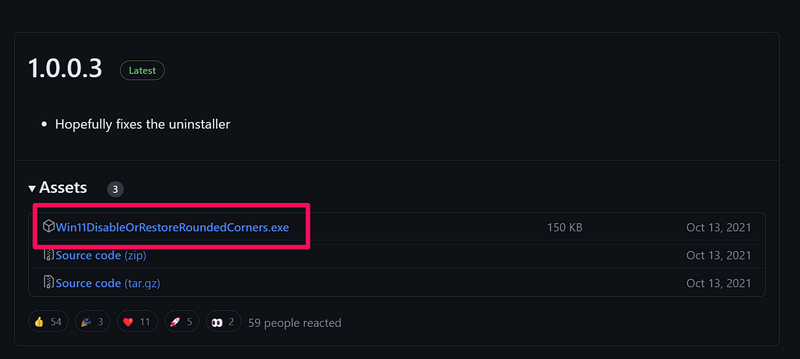
There is an open-source tool called Win11DisableOrRestoreRoundedCorners (quite a mouthful!) on GitHub that you can use to disable or enable rounded corners on your Windows 11 PC or laptop. You can follow the steps right below to use the said tool to remove rounded corners in Windows 11 on your device:
1. Go to GitHub and download the Win11DisableOrRestoreRoundedCorners tool using a web browser. Make sure to download the .exe file from the list.
2. Once the said tool is downloaded, locate it on your PC or laptop and double-click it to run.
3. Click Yes on the following User Account Control prompt.
4. At this point, you will see a Powershell or a Command Prompt window open up on your PC or laptop. Your display might also flicker once or twice after running the tool.
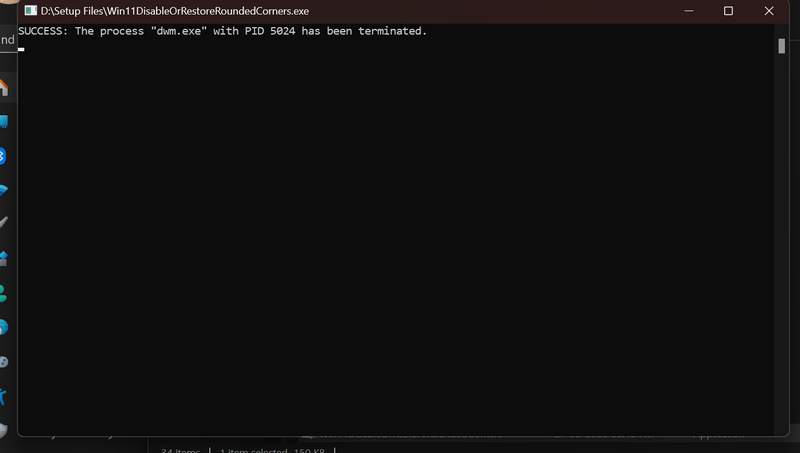
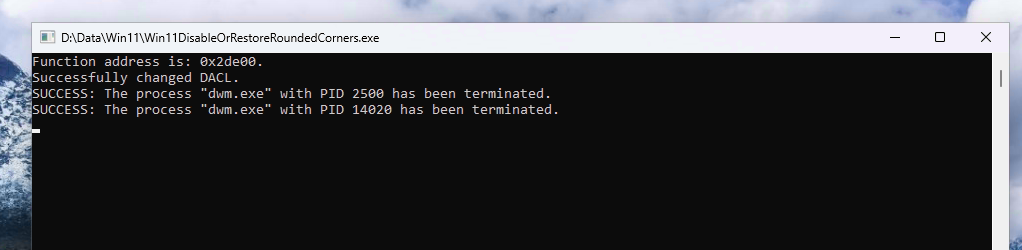
5. After the process is complete, you will see a command in a Powershell or Command Prompt window as shown in the screenshot below.
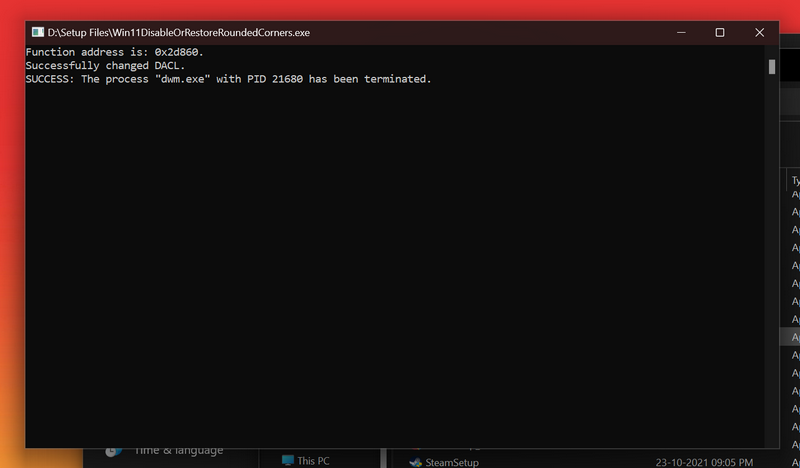
6. Following the completion of the process, you will find the app windows for some of the system apps appearing with sharp corners instead of rounded ones on your PC or laptop. For instance, the windows for File Explorer and the Settings app appear with sharp corners.
However, it is worth mentioning that you might find rounded corners for some modern apps even with the said tool enabled on your PC or laptop. Microsoft Edge, which gained the rounded corners with a Windows update earlier this year, will appear the same even with the rounded corners disabled.
Now, if you later want to revert the change and go back to the rounded corners for all the applications on your Windows 11 PC or laptop, all you have to do is locate the Win11DisableOrRestoreRoundedCorners tool and run it on your device.
The process will be the same, and after it is completed, you will get similar a command in a Powershell or Command Prompt window as shown right below.
So yeah, this is how you can use this third-party, open-source tool to remove the rounded corners in Windows 11 on your PC or laptop.
FAQs
Can I disable the rounded corners in Windows 11?
Although there is no easy way to remove or disable the rounded corners in Windows 11 on a PC or laptop, you can use some in-system settings and third-party tools to do the same. So yes, in a way, you can disable the rounded corners in Windows 11.
How to enable rounded corners in Windows 11?
The new rounded corners in the Windows UI are a part of Windows 11’s Fluent Design language on PCs and laptops. Hence, rounded corners for app windows and dialog boxes are enabled by default in Windows 11.
What is the rounded corner radius in Windows 11?
According to Microsoft, Windows 11 shows three levels of rounding, depending on the UI component on the screen. The top-level UI elements such as app windows and dialog boxes are rounded using an 8px corner radius.
Wrapping Up
So, there you have it! This was our take on how to disable the rounded corners in Windows 11 on your PC or laptop. Although we think that using a third-party tool to remove the rounded corners is the best option on a Windows 11 PC or laptop, you can still use the in-system settings to disable them on your device.
We hope this article helps you get rid of the new Windows 11 rounded corners instantly on your PC or laptop. If it did, don’t forget to let us know in the comments below!
В этой публикации, друзья, рассмотрим, как убрать скругление углов окон в Windows 11. Окна Windows 11 имеют больше функциональности, чем в предыдущих версиях операционной системы. И что примечательно, имеют дизайн-фишку в виде скругления углов под стать общему стилю оформления Windows 11. Но не всегда окна Windows 11 скруглены, есть исключения. Что это за исключения, и как при необходимости отключить скругление окон, сделав их углы прямыми, как в Windows 10?
Скругление углов окон в Windows 11 применяется для современных приложений и большинства классических программ, если они не развёрнуты на весь экран и не используются в макетах привязки. Некоторые классические программы Win32 могут иметь свой уникальный дизайн или прочие особенности, и их углы окон могут быть оформлены иначе, чем в системном стиле Windows 11. Скругление углов окон не применяется в Windows 11, установленной на виртуальные машины, а также в виртуальных средах типа удалённого рабочего стола Windows 365 и Application Guard Windows Defender.
Друзья, возможно, вам не нравится скругление углов окон Windows 11, либо же, например, вы активно работаете со скриншотами активных окон, и они получаются эстетически непривлекательными из-за пустот в углах. Как отключить скругление углов? В настройках Windows 11 сделать это невозможно.
Можно лишь разными неофициальными способами. Но, увы, большая часть из них сомнительны. Так, на просторах Интернета можно встретить решения типа отключения аппаратного ускорения графики, что повлечёт за собой массу проблем. Предлагаются разные утилиты, которые либо не работают, либо в целом применяют стиль оформления Windows 10 с её панелью задач. Также можно встретить способ с ручной подменой определённых системных файлов, он мало того, что сомнительный, так ещё и хлопотный.
Мы нашли лишь одно простое и относительно безопасное решение, как убрать скругление углов в Windows 11. Это бесплатная утилита Win11DisableRoundedCorners с GitHub. Перед её использованием желательно создать точку восстановления на всякий случай. Запускаем утилиту. Если не запускается, запускаем от имени администратора.
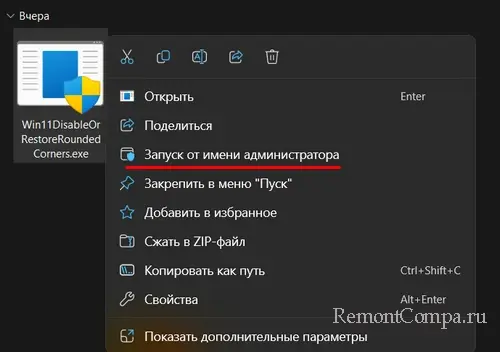
Если появляется экран «Это приложение может нанести вред устройству», жмём «Подробнее», затем – «Запустить в любом случае». После запуска утилиты углы окон Windows 11 преобразятся в прямые.
Вернуть скруглённые углы можно повторным запуском утилиты.
Утилита Win11DisableRoundedCorners убирает скругление углов только для окон Windows 11. Не убирает скругление для системных панелей, меню, контекстных меню, вкладок и меню внутри приложений и программ. Если вы выполните восстановление целостности системных файлов, это нейтрализует работу утилиты, и углы окон снова станут скруглёнными. В таком случае утилиту нужно запустить повторно.
Друзья, стабильность и работоспособность утилит с GitHub такого плана не гарантирована. В будущем Windows 11 может получить обновления, нивелирующие её работу. Если утилита перестанет работать, смотрите на GitHub её обновления.
Если скругление углов окон в Windows 11 вас абсолютно не беспокоит, но вы хотите делать скриншоты окон с аккуратными углами, можете для снимков использовать макеты привязки. Перетащите окно в нужную ячейку макета, оттяните по ширине для нужного размера.
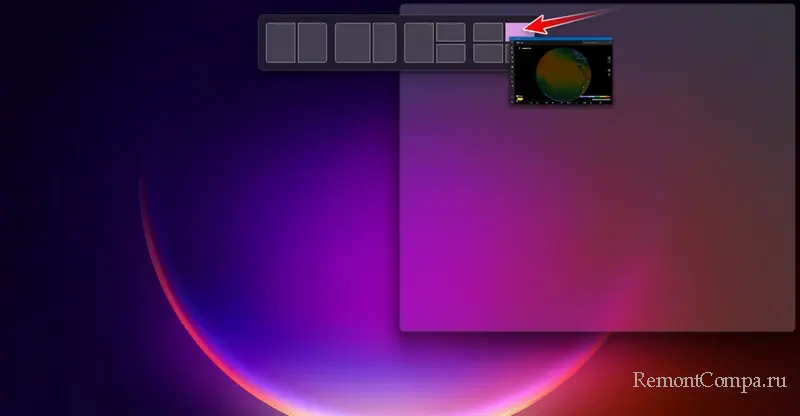
И получите окно без скругления углов.
Some users would like to disable rounded corners of open windows on Windows 11, as the prefer the sharp shapes of its predecessor. They do better with screenshot taking apps, align better on the screen, and make it easier to place windows side-by-side. Finally, you may simply like the classic square corners more than the modern ones.
With release of Windows 11, Microsoft heavily reworked its user interface. There are plenty of things changed. Fonts, colors, icons are all new. The OS includes the expanded set of colorful emojis of the fluent design style.
Windows 11 welcomes the user with a modern taskbar with centered app buttons, Windows Spotlight applied to the Desktop, and much more.
One of the visual changes is the new style of window frames. Running apps have rounded corners, which sets Windows 11 apart from the look Microsoft introduced back in Windows 8. While they look modern and fresh, some people aren’t happy with the new style.
Rounded corners on the screen take up space and can be unpleasant for users with small monitors or when using multiple windows. Also, it is hard to capture a single window with rounded corners, as they leave a few pixels with your wallpaper around them. Even third-party tools don’t always help.
Finally, some Windows 11 apps and dialog boxes still have square corners. If often deal with such components and apps, their appearance may annoy you with a visual inconsistency.
The now-famous developer Valentin Radu has created a tiny and easy-to-use app, Win11DisableRoundedCorners. The app is open source and is available on GitHub. Its core is a smart algorithm that downloads debug symbols from Microsoft for the uDWM.dll file. By using the downloaded data (the uDWM.pdb file), the app finds the appropriate place in DLL and patches it, reverting the code to the Windows 10 style. This dynamic mechanism allows it to support all Windows 11 versions, including the most recent Insider Preview builds! Here’s how to use it.
To disable rounded corners in Windows 11, do the following:
- Download Win11DisableRoundedCorners from its home page on GitHub.
- Extract the app from the ZIP archive to any folder of your choice.
- Double-click the Win11DisableRoundedCorners.exe file to launch it. The app will download the symbols, patch DWM and restart it.

- Voila, you now have sharp square corners everywhere on Windows 11.
That’s it! To undo the change, it is fine enough to launch Win11DisableRoundedCorners.exe one more time. It will restore the patched system file, restart DWM, thereby restoring the rounder windows.
Alternatively, you can use another app, ExplorerPatcher, from the same developer. You may be already familiar with it. The app allows fine grain tuning of many options for the Windows UI, e.g. to bring back the classic taskbar and Start menu.
Here’s how to use ExplorerPatcher to disable rounded corners on Windows 11.
Remove rounded corners using ExplorerPatcher
- Download ExplorerPatcher from its website.
- Run the downloaded
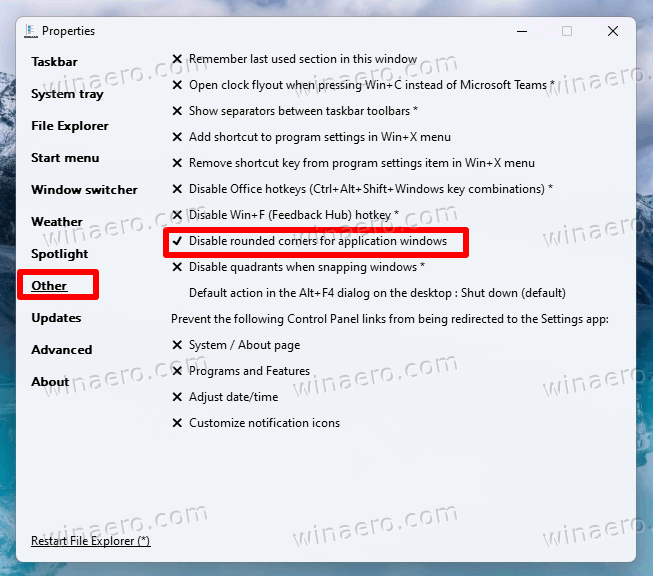
ep_setup.exefile; it will install and launch the app. - Once the screen flashes, right-click the taskbar and select Properties, a new item added by ExplorerPatcher.
- In the Properties dialog, click on Other on the left.
- On the right side, click the Disable rounded corners for application windows option.

- Confirm the UAC prompt, and you now have sharp square window corners!

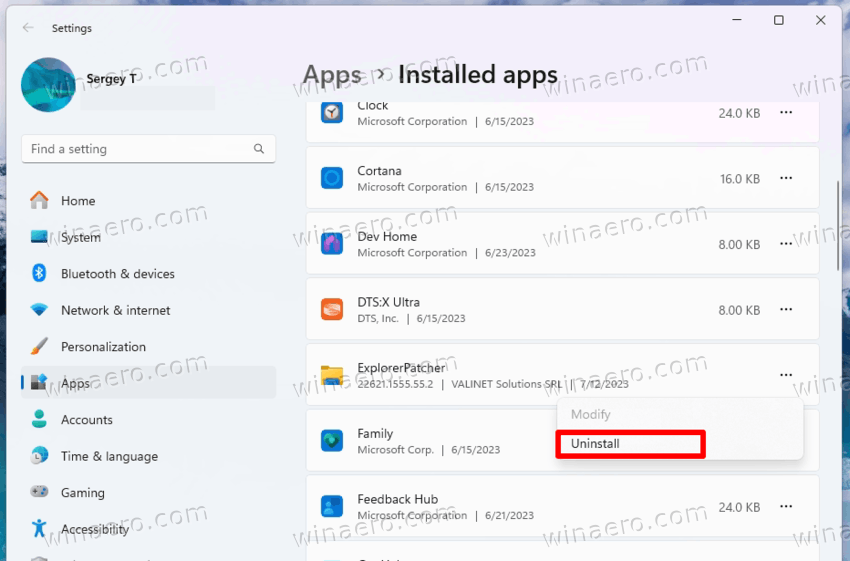
Note: You can uninstall ExplorerPatcher like any other app if you decide to get rid of it. Open Settings (Win + I), navigate to App > Installed apps, and select Uninstall from the menu for the ExplorerPatcher entry.
Finally, last but not least, one more method needs to be mentioned. This is a registry tweak that turns off the rounder corners of the window. However, this no longer applies to Windows 11 22H2 and above. It only works with original Windows 11 release, Build 22000.
💡You can quickly find what build and version of the OS you have installed by pressing Win + R, typing winver in Run, and pressing Enter. The About Windows dialog will provide you with all necessary information.
Registry tweak to disable rounded corners on Windows 11
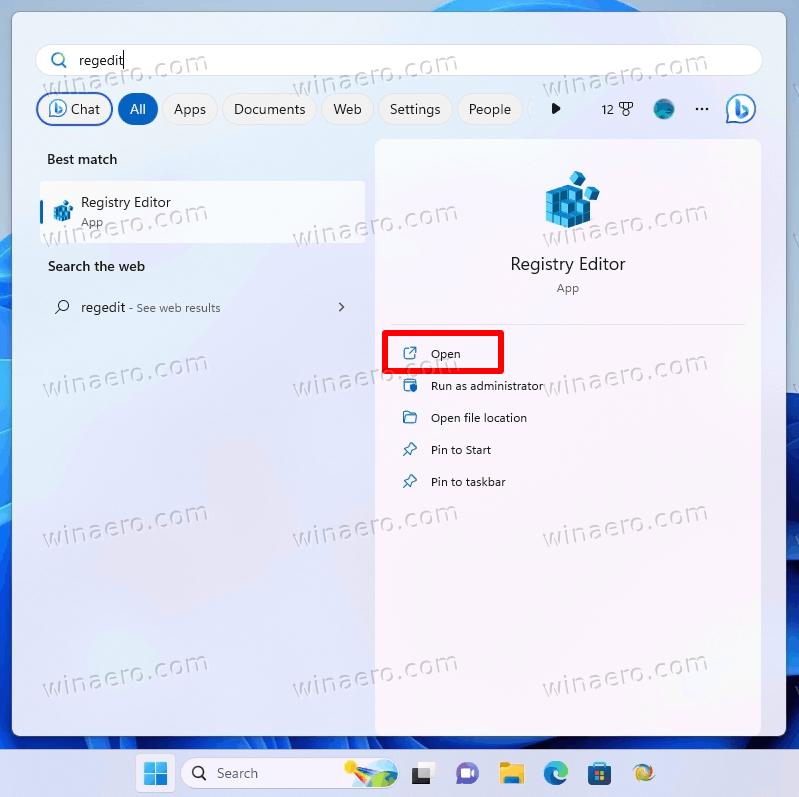
- Launch the Registry Editor with the
regedit.execommand. Type it in the taskbar search box, and select the app from the search results.
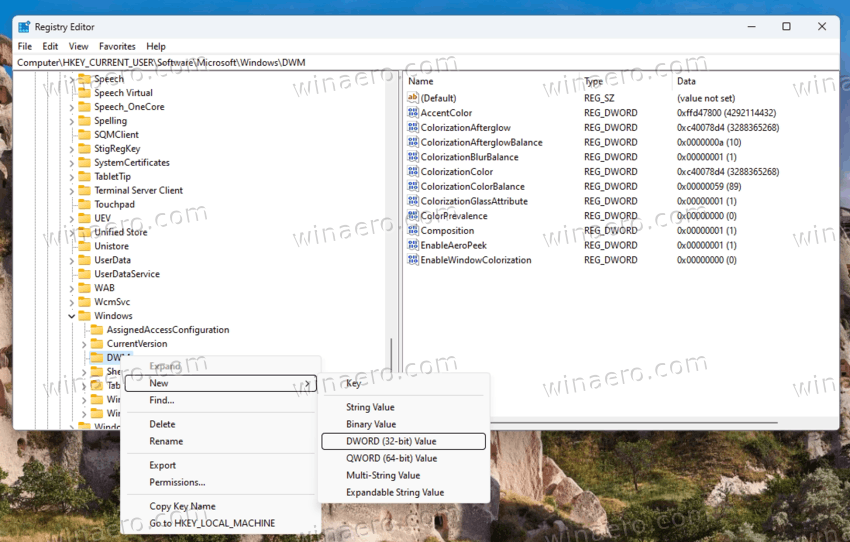
- In the Registry Editor, go to the following branch on the left: HKEY_CURRENT_USER\Software\Microsoft\Windows\DWM.
- Now, right-click the
DWMkey in the left pane, and select New > Dword (32-bit) value from the menu.
- Name the new value UseWindowFrameStagingBuffer. It will be set to zero by default, so don’t change it.

- Restart Windows 11, and you are done.
That’s it. To undo the change later, remove the UseWindowFrameStagingBuffer you created earlier, and restart the OS to apply the modification.
The reviewed methods give you some choice for customizing the OS look. They are great for those who prefer a different appearance other than Microsoft provides. If you decide to turn off rounded corners in Windows 11, you now know what to do.
However, the tools and tweaks aren’t official, and neither supported or recommended by Microsoft. Keep in mind that they may eventually stop working, or break the things with forthcoming OS updates. If you aren’t sure if the tools support your Windows version, contact the developer, try them in a virtual machine, and/or create a backup of your important data.
Support us
Winaero greatly relies on your support. You can help the site keep bringing you interesting and useful content and software by using these options:
If you like this article, please share it using the buttons below. It won’t take a lot from you, but it will help us grow. Thanks for your support!
With Windows 11, Microsoft introduced a fresh and modern interface that embraces rounded corners across various elements of the system. This design choice marks a deviation from the sharp, squared edges that were characteristic of Windows 10 and prior versions. While many appreciate these visual features for their aesthetic appeal and softer look, some of us find them less practical and prefer the classic style, prompting the quest for ways to disable these rounded corners.

We understand that you might be among those who value consistency in the user experience, and the transition to Windows 11’s rounded corners might not align with your preference. It’s important to note that Windows 11 does not offer a native option to revert to the squared edges. However, the tech community has provided solutions to address this. Third-party utilities have been developed to disable rounded corners, effectively allowing users to achieve a more traditional look similar to that of Windows 10.
These utilities work by making modifications to the Desktop Window Manager (DWM), which controls the window animations and frames. By patching the necessary system files, the rounded corners can be disabled. It’s crucial for us to follow the specific instructions provided by these tools to avoid any system instability. Precompiled binaries for these utilities are often available for download, ensuring that even those of us who aren’t technically adept can perform the change with relative ease.
Contents
- 1 Understanding the Windows 11 UI
- 1.1 Fluent Design and Rounded Corners
- 1.2 Differences Between Windows 10 and Windows 11
- 1.3 The Role of DWM in Handling UI Elements
- 2 Methods to Disable Rounded Corners
- 2.1 Using System Settings and Registry Editor
- 2.2 Third-Party Tools and Patches
- 2.3 Manual Actions to Modify System Files
- 3 Backup and Restore Considerations
- 3.1 Creating System Restore Points
- 3.2 Backup of Original System State
- 3.3 Troubleshooting Potential Issues
- 4 Enhanced Performance and Customization
- 4.1 Optimizing Graphics and Display Settings
- 4.2 Reverting to Classic UI Elements
Understanding the Windows 11 UI

In our exploration of Windows 11, we’ll spotlight its modern design features, how it differs from Windows 10, and the technical processes behind its user interface elements.
Fluent Design and Rounded Corners
Windows 11 introduces a refreshed Fluent Design system, embracing a clean and simplified look with rounded corners throughout the UI. This represents a notable shift from the sharp edges prevalent in Windows 10, as these subtle curves lend a more modern and approachable feel to the applications and system windows.
Differences Between Windows 10 and Windows 11
Beyond aesthetic adjustments like rounded corners, Windows 11 diverges from Windows 10 through a reimagined taskbar, centered Start menu, and an overall emphasis on simplicity and ease of use. These changes are more than skin deep, as the underlying user experience principles have been reconceived to prioritize consistency and a seamless user experience.
The Role of DWM in Handling UI Elements
| DWM Functionality | Impact on UI | File Involved |
| Manages visual effects | Controls window animations and transparency | uDWM.dll |
| Organizes window order | Determines which windows appear on top | |
| Renders the user interface | Shapes how elements like rounded corners are displayed |
The Desktop Window Manager (DWM) plays a pivotal role in wielding the fresh UI elements of Windows 11. It is responsible for the compositing and rendering of visual effects on the desktop and is central to the visual fidelity of the user experience. The DWM relies on uDWM.dll, a system file, to manage complex UI features, ensuring an immersive and responsive environment. Our detailed knowledge on this framework allows us to grasp how integral DWM is to the Windows 11 experience, especially when considering UI customizations like disabling rounded corners.
Methods to Disable Rounded Corners
Windows 11 introduced rounded corners for a modern look, but not everyone might prefer this design choice. Below, we discuss various methods we can employ to revert to the sharper-cornered aesthetics.
Using System Settings and Registry Editor
To disable rounded corners without third-party software, we can delve into the Registry Editor for a more “hands-on” approach. After backing up the registry for safety, we navigate to HKEY_CURRENT_USER\Software\Microsoft\Windows\DWM and create or modify values that control UI elements. Microsoft doesn’t offer a direct toggle in system settings, so registry tweaks are our go-to method within the system’s tools.
Third-Party Tools and Patches
Third-party tools offer a more user-friendly way to disable rounded corners. We can find such utilities on platforms like GitHub, where developers share custom patches. One such tool is Win11DisableRoundedCorners; it simplifies the process down to running an executable that modifies the Desktop Window Manager.
Manual Actions to Modify System Files
If we prefer not to use software created by others, we may consider manual modifications to system files, an advanced method that carries risk of system instability if not done correctly. By directly modifying system files like uDWM.dll, we achieve the desired effect, though we must ensure backups are in place to prevent system issues.
- Backup is essential before making registry changes.
- Using GitHub tools simplifies the disabling process.
- Manual file modification should be done with caution.
| Settings/Registry | Third-Party Tools | Manual File Modification |
| Directly using Windows’ built-in tools. | Easier to use and often safer than manual adjustments. | Only recommended for advanced users familiar with system files. |
Backup and Restore Considerations
When altering system files such as the DWM.exe, which affects UI elements like rounded corners in Windows 11, it is crucial to consider backup and restore options. If issues arise, we’ll want the ability to revert our system to a prior state.
Creating System Restore Points
Before making changes to the look of our desktop, we should create a System Restore Point. This acts as a safety net, allowing us to return our system to its previous state if required.
- Open System Properties and click on the System Protection tab.
- Select our system drive and click Create.
Backup of Original System State
To ensure we can restore our system if the disablement of rounded corners leads to problems, we must keep a backup of the original system files affected, specifically the DWM.exe process and related DLLs.
- Locate the DWM.exe file, typically found in the Windows\System32 folder.
- Copy the file and its related DLLs to a separate backup folder.
Troubleshooting Potential Issues
If we encounter issues after disabling rounded corners, troubleshooting will be our next step. Here are ways to address common problems:
- Restart the DWM.exe process via Task Manager to refresh the desktop manager.
- Use the backup files to restore original system state if stability issues persist.
It is essential to note that altering system files can lead to unexpected behavior. Therefore, performing these backup and restore actions is a critical step in our process.
Enhanced Performance and Customization
We understand the importance of fine-tuning our systems to match our performance expectations and aesthetic preferences. Adjusting graphics and display settings can lead to improved system responsiveness, while customizing UI elements aligns with our personal taste.
Optimizing Graphics and Display Settings
Disabling Hardware Graphics Acceleration
In optimizing our system’s video performance, we sometimes need to disable hardware graphics acceleration. This can help systems without powerful graphics cards to run more efficiently, as it reduces the load on the GPU. To do this, we can adjust display settings directly within the operating system.
| Action | Graphics Card | Display Adapters |
| Disable/Enable | Check compatibility | Update Drivers |
Graphics and display adapters are critical in handling the visual features of our operating system. Ensuring that drivers are up to date can also contribute significantly to the system’s overall performance.
Reverting to Classic UI Elements
If we favor efficiency over modern aesthetics, reverting to classic UI elements, such as sharp corners instead of rounded ones, can help. This reversion to the classic taskbar and other elements not only reduces the visual complexity but may also slightly improve system performance.
Restoring Classic Taskbar and Sharp Corners
We can use third-party tools to modify the UI to our liking. For instance, toggling sharp corners can be achieved with specific executables that patch the Desktop Window Manager. While this is a matter of personal preference, it does streamline the user experience to match that of previous versions, which some of us might find more intuitive and navigate more quickly.