
Taking on a virus on one’s system can begin a dreadful experience for a computer user. From gritting your teeth at the occasional BSOD and feeling awful irritation at the very minimal effectiveness gotten from your system, you sure will have a lot on your plate.
The security notification icon is a setting brought forward by Windows to solve many security issues. It offers real-time internal protection, helps to automatically download updates, scans for malware and security hazards, and much more. The process works just like any normal antivirus software.
Nonetheless, some had difficulty finding the icon, and others didn’t even want the icon on their taskbar. This article explains removing or adding the security notification icon to the toolbar, especially as a Wins 11 user.
Quick Fixes for Tray Pop-Up Issue
1. Show or Hide from System Panel
Step 1: Move your cursor and find your way to the Settings process.
Step 2: On the left corner, scroll over and press down on “Personalization.” After this, move your cursor over to the right corner of the screen and find the “Taskbar” at the bottom of the screen.
Step 3: Now, move ahead and find the “Taskbar corner overflow” or the “other system tray icons” option and select it.
Step 4: Under it, scroll over and switch “On” or “Off” to the notification icon. Doing this either reveals or hides the icon respectively.
And you are good to go. Check if the issue is rectified now. If it still isn’t, do check out the next option.
2. Adjust Preferences in Settings
Step 1: You should find and access the “Settings” program.
Step 2: On the left corner, scroll over and press down on “Apps.” After this, move your cursor over the right corner of the screen and find “Startup” at the bottom of the screen.
Step 3: To remove or add the security icon, navigate to the Turn “On” or “Off” option and choose the one you want.
Step 4: Restart the PC
3. Enable or Disable This Tray Item
Step 1: Navigate to the Local Group Policy Editor option
Step 2: Scroll over and discover the policy location at a corner on the set-up
Step 3: Navigate your way from the “Computer Configuration” to the “Admin Templates.” Then, find your way to the “Wins Components” and then the “Wins Security” option till you find “Systray.”
Step 4: Under this, find and press down on the Hide option for the security Systray.
Step 5: You can either enable or disable the windows security notification icon by either choosing “not configured” or “Disable,” respectively. After each option, you are to scroll over to the bottom of the screen and click down on “OK.”
And voila, you are done!
4. Delete Extra Antivirus Programs
Your security icon not showing up might be because you have some AV(antivirus) installed more than one time. So it helps to uninstall such software. As some antiviruses already have a designated way of removing them, you can easily go ahead to the program’s software and gather more information on how to remove them effectively.
Be rest assured that your system won’t be left without protection because Windows already has its internal security option installed.
5. Restart Without Third-Party Apps
A Clean restart is for you to infer if a background program is intruding on your PC or to maybe you need to boost your system load. Follow the steps below for a clean restart:
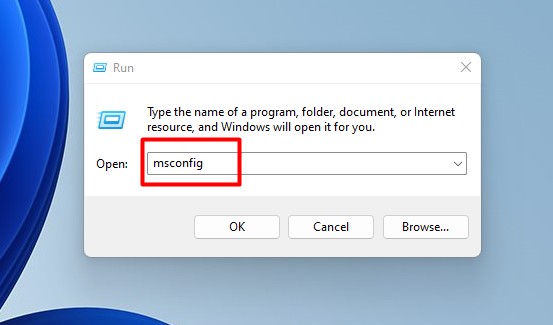
Step 1: To open the Run Menu option, press the windows key and the R option together on your keyboard.
Step 2: In the command box, press the “msconfig” command and press down on OK to access the System Configuration.
Step 3: Check through the Services tab and then tick the box for “Hide All Microsoft Services.”
Step 4: Press down on “Disable All“
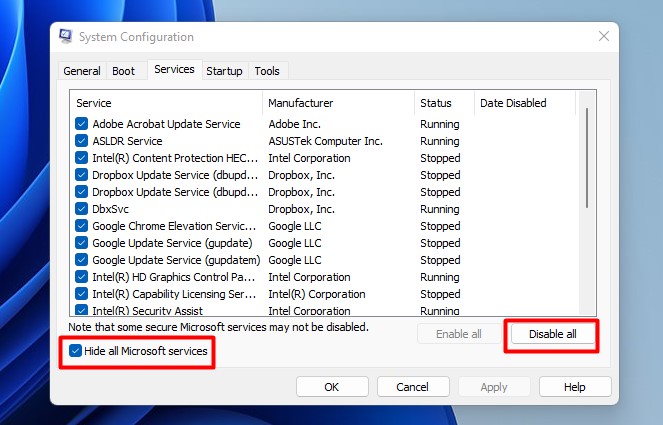
Step 5: You should then scroll over to “Apply“, select, and navigate to “On” to complete the procedure.
Step 6: Start up your system again now.
P.s: Please note that this process deactivates all 3rd party programs from your system’s Startup. Now, if you want to have some apps placed on your Startup after the issue is solved, you can go ahead and enable them. However, if the issue comes back after doing this, then the problem is with that particular software.
6. Use CMD for Troubleshooting
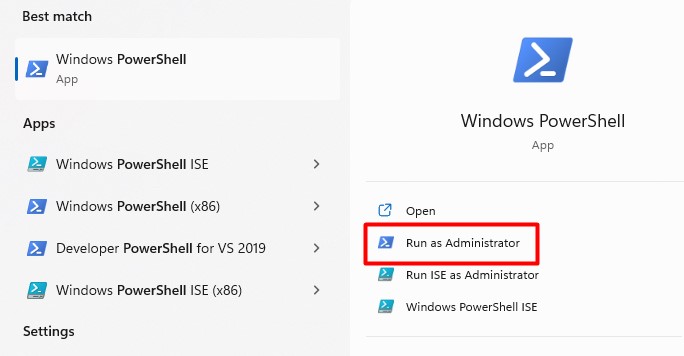
Step 1: You should find your way to the “Start” option.
Step 2: Then open and load the Command prompt by admin or the Power Shell by admin
Step 3: Now, try to copy and paste the command below in the required box:
Step 4: DISM.exe /Online /Cleanup-image /Restorehealth
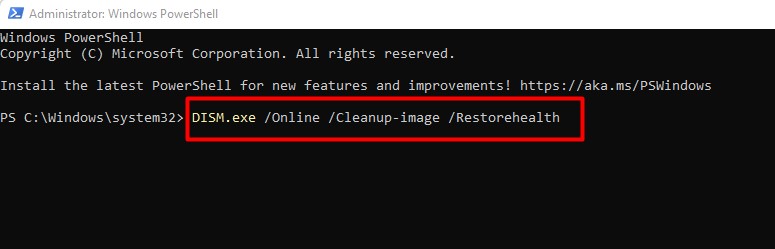
Step 5: You should press in on “Enter” now.
P.s: Do note that the process might take a while to load and end. Nonetheless, do wait patiently, and after you’ve seen a message indicating successful completion, you can now go ahead and paste the other command states below.
Step 1: Paste in the “sfc /scannow” command
Step 2: Strike your Enter key on your keyboard.
Step 1: Take your time and wait till a message comes up. It should indicate that a complete verification is already done.
Why This Symbol Might Keep Appearing
There is no primary reason for the Windows Security Notification Icon Startup showing up or not showing up. You might have mistakenly disabled or enabled it. Or maybe it isn’t set up on your PC by default. So, it helps to just go to your settings and manage it as you want it.
Final Thoughts
Getting antivirus software is vital for any PC in this era where it’s pretty easy to take most viruses. And Windows has taken it into its hands to give internal real-time protection too.
However, some with more powerful AVs might consider the Wins version bothersome, hence, the reason for this article. So, if you plan to add or remove the security notification icon, this article offers all the guides you need.
Answers to Common Questions
What Does The “Windows Security Notification Icon Startup” Issue Cause?
It offers real-time protection. But it might be deemed unnecessary if you already have a better antivirus guiding your PC.
How Does One Add Or Remove The “Windows Security Notification Icon Startup” Issue?
He is hiding or showing the windows security notification icon for current users, adding or removing the icon, and following some other means. The article above has explicitly explained these processes.
Can I disable the Windows security notification icon in Startup?
Yes, you can. Among the many remedies in the article, Solution 2 explains how to do this.
Is The Windows security notification needed at Startup?
Having the security notification icon at Startup is a good option, but it’s not essential. You can very well do without it. And if you do have it at your Startup, be sure that some malware is not camouflaging it.
What is the Windows Security Notification icon?
As rightly explained in the article, the Windows security notification is an internal antivirus system designed by Windows to help you safeguard your system.
Если вы хотите отключить отображение иконки Защитника Microsoft в системном трее панели задач Windows 11 или Windows 10, это достаточно просто.
Начиная с Windows 10, значок «Защитника Windows» по умолчанию отображался на панели задач в области в системном трее или в углу переполнения панели задач. Значок Защитника Windows показывает состояние защиты ПК, с его помощью, вы можете открыть интерфейс приложения «Безопасность Windows», с помощью которого, вы можете выполнить сканирование, проверить наличие и удалить обнаруженные угрозы.
Иконка отображаемая на панели задач Windows 11 находится по следующему пути:
C:\Windows\System32\SecurityHealthSystray.exe
Защитник хорошее дополнение для безопасности вашего устройства, но если вы отключили антивирусную программу «Защитник Windows», вы можете захотеть избавится от иконки приложения защитника в системном трее на панели задач. Вот как это сделать:
Отключить отображение иконки Защитника Windows на панели задач в Windows 11 \ 10
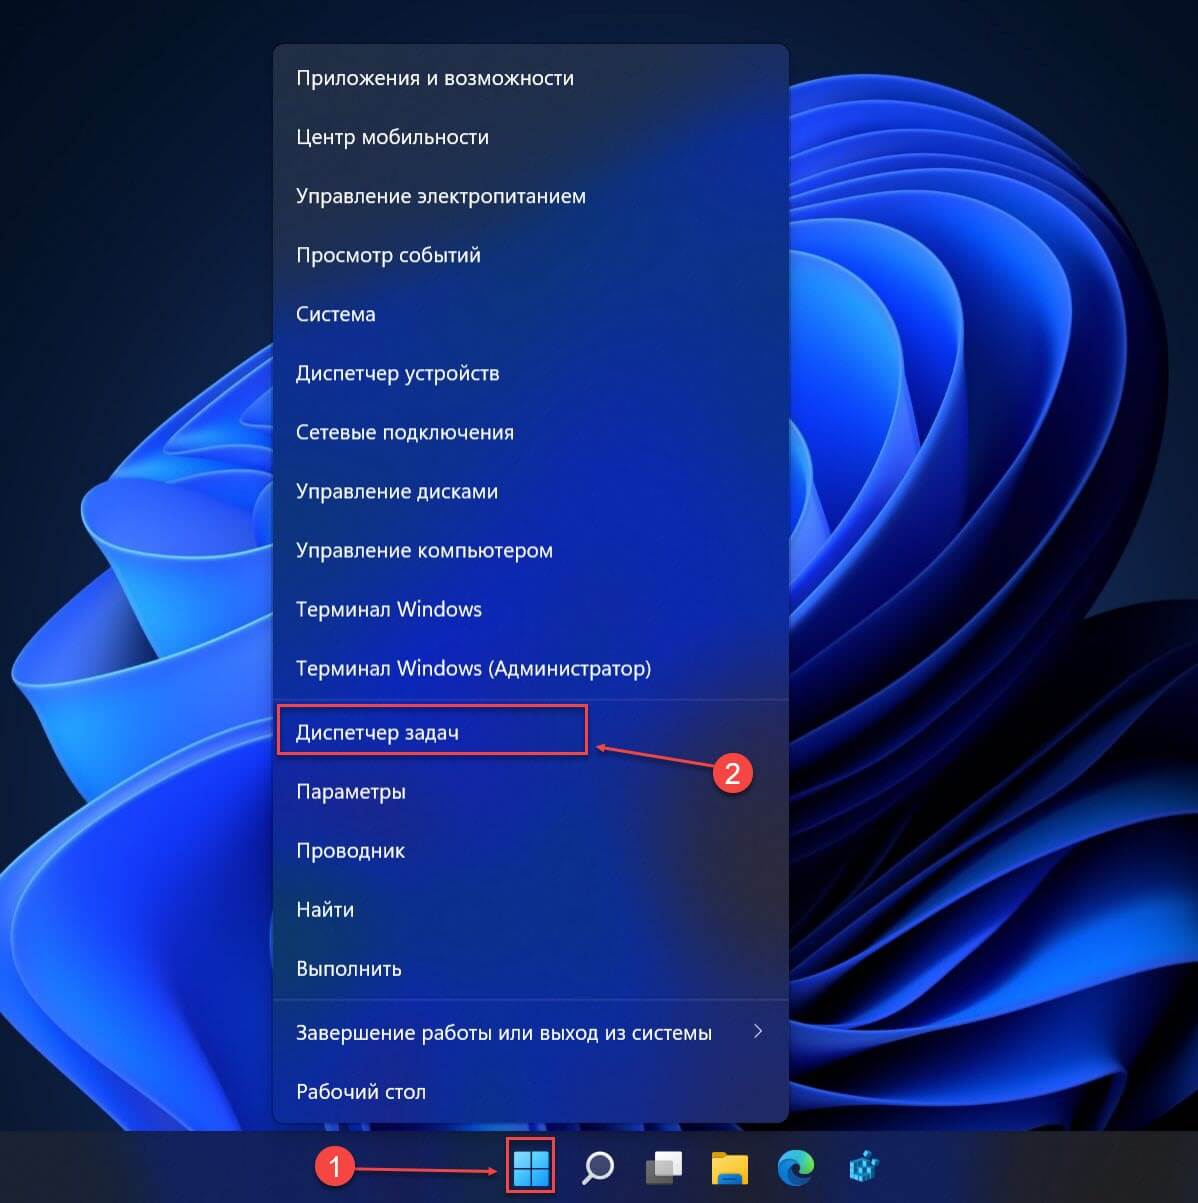
Шаг 1: С помощью меню Win X или любым удобным вам способом откройте «Диспетчер задач».
Шаг 2: В открывшемся окне, при необходимости нажмите кнопку «Подробнее».
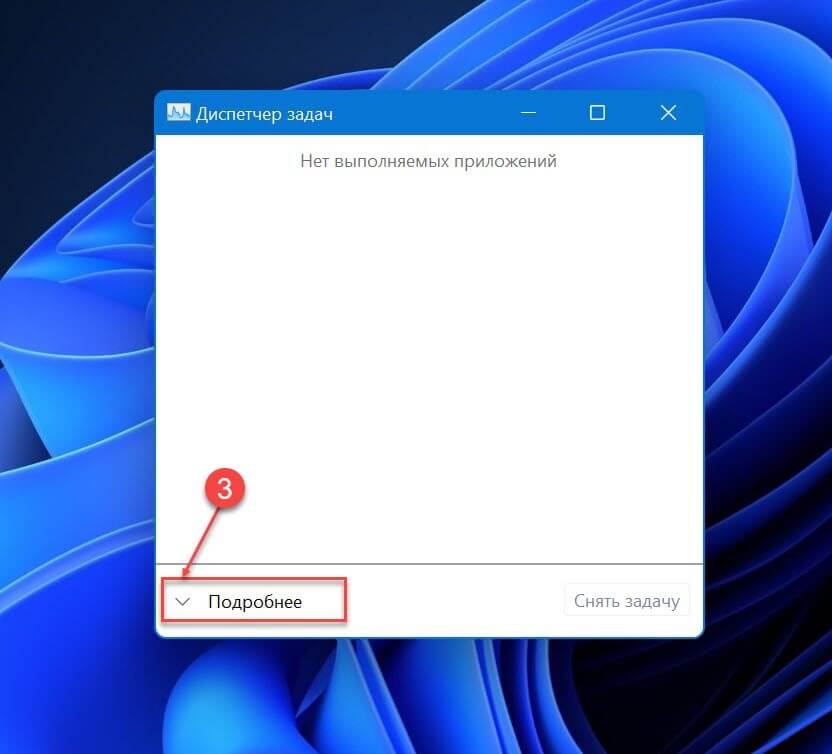
Шаг 3: В «Диспетчер задач» перейдите на вкладку «Автозагрузка».
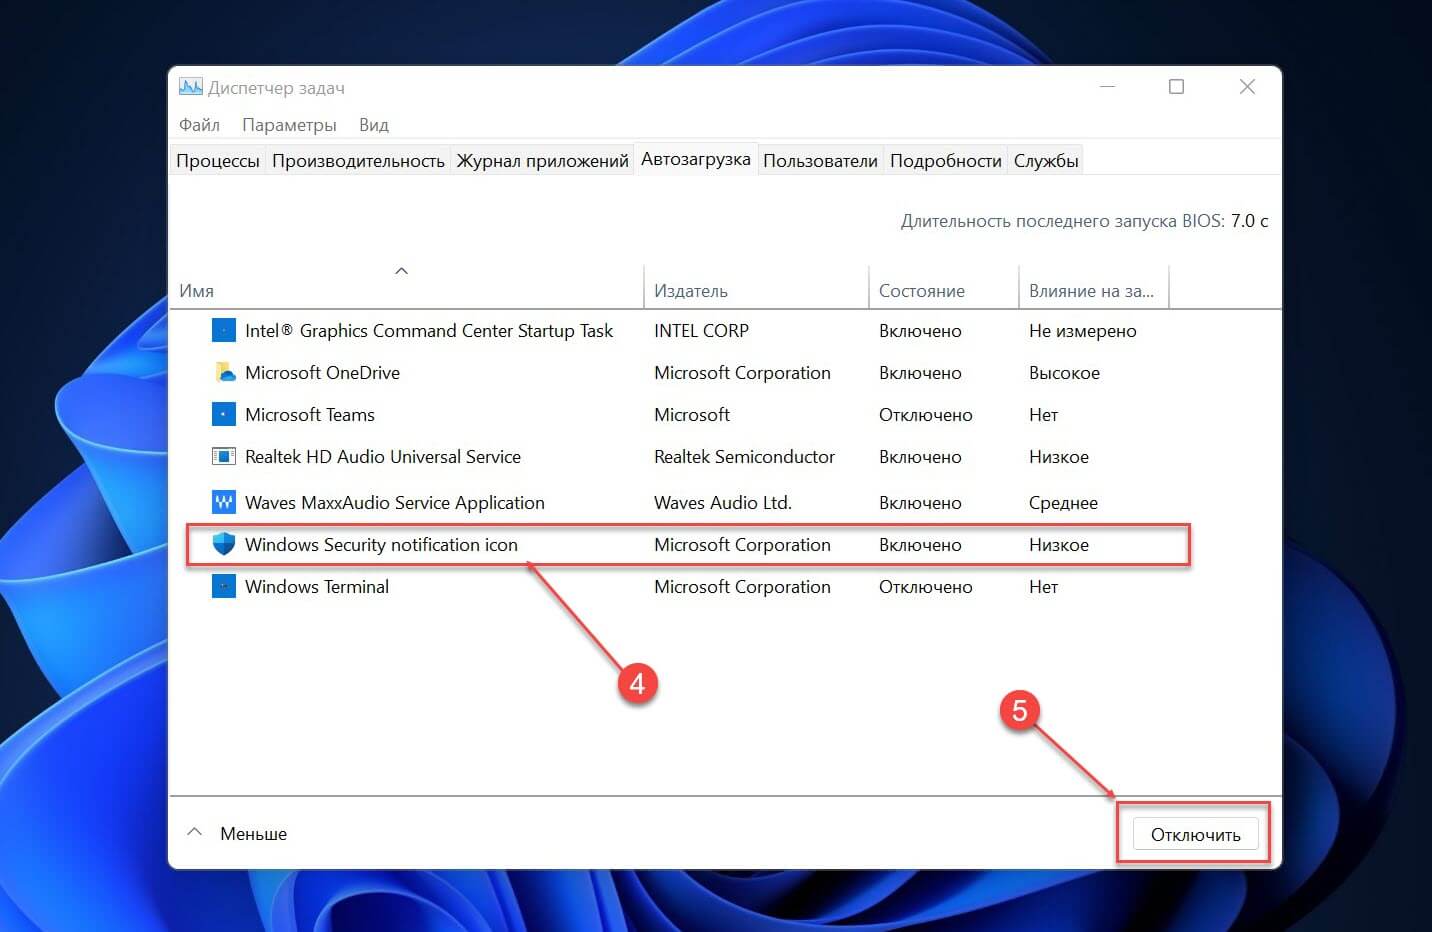
Шаг 4: Выберите приложений найдите запись «Windows Security notification icon» или «SecurityHealthSystray» (в зависимости от версии Windows), кликнув по ней и нажмите кнопку «Отключить». Также вы можете кликнуть на записи правой кнопкой мыши и выбрать в контекстном меню опцию «Отключить».
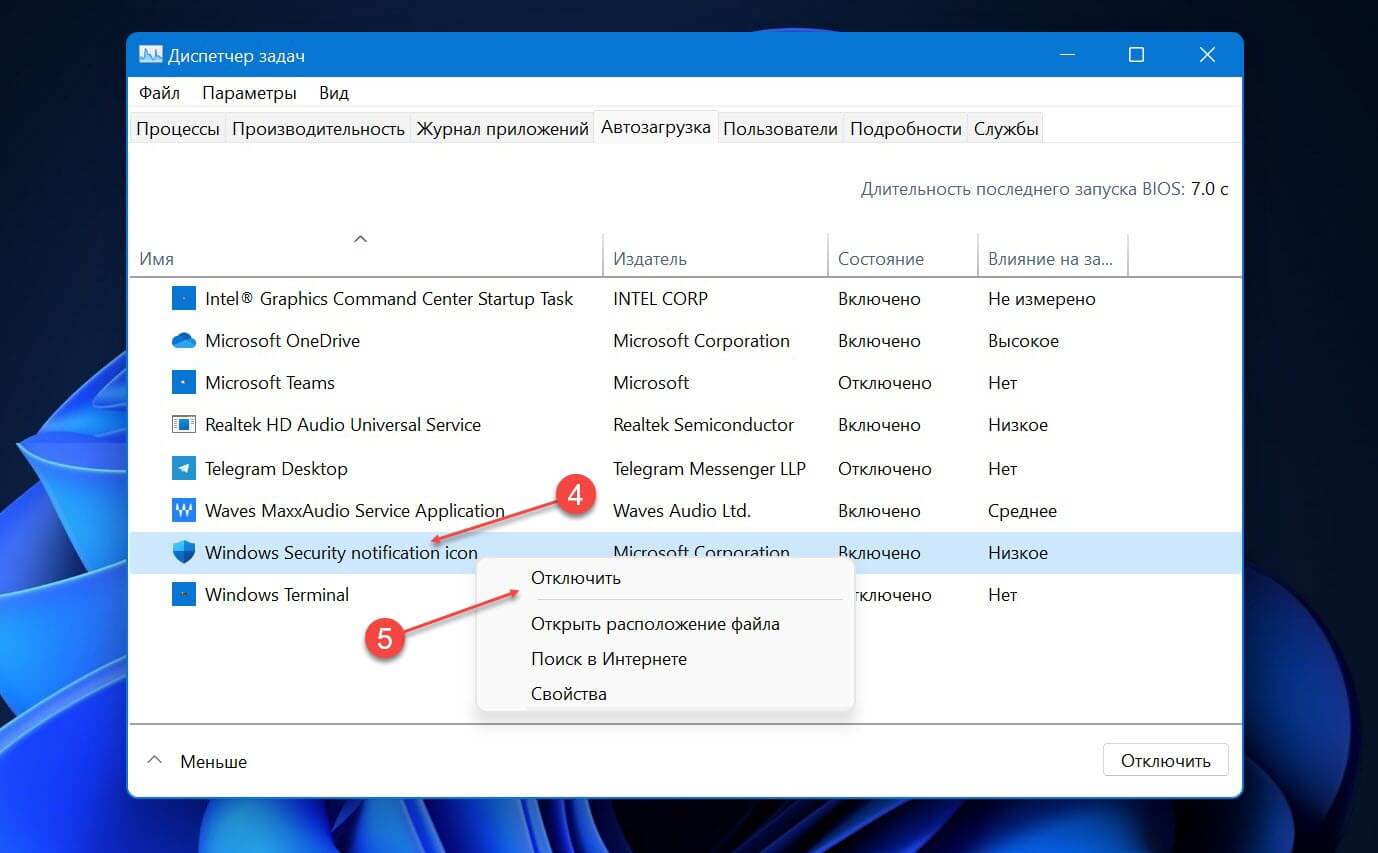
Шаг 5: Перезагрузите компьютер, чтобы изменения вступили в силу. После перезагрузки, или выхода из системы и входа вы избавитесь от значка Центра безопасности Защитника Windows на панели задач.
Если вы когда-нибудь снова увидите иконку Защитника Windows на панели задач в области переполнения, пожалуйста, следуйте данной инструкции снова.
Как скрыть значок Защитника Microsoft с помощью групповой политики
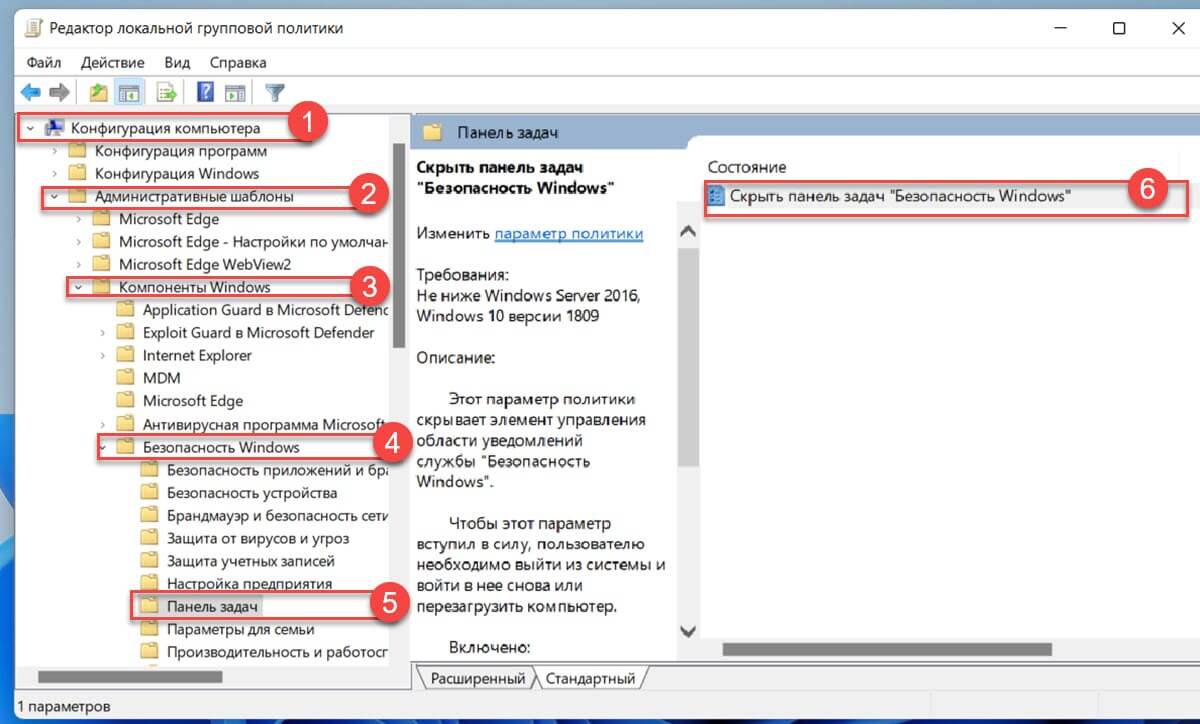
Начиная с Windows 10 версии 1809 существует специальный параметр групповой политики, который позволяет скрывать значок «Защитника Windows» на панели задач. Если вы используете версию Windows 11\10 Pro, Enterprise или Education, вы можете использовать приложение «Редактор групповых политик», чтобы настроить параметр с помощью графического интерфейса редактора следующим образом.
Шаг 1: Откройте Редактор групповых политик (см. как)
Шаг 2: В Редакторе перейдите по следующему пути:
Конфигурация компьютера → Административные шаблоны → Компоненты Windows → Безопасность Windows → Панель задач.
Шаг 5: Здесь найдите параметр политики «Скрыть панель задач «Безопасность Windows», как показано ниже и откройте его для редактирования.
Шаг 5: Измените параметр выбрав вариант «Включено» и нажмите кнопку «Применить» и «ОК».
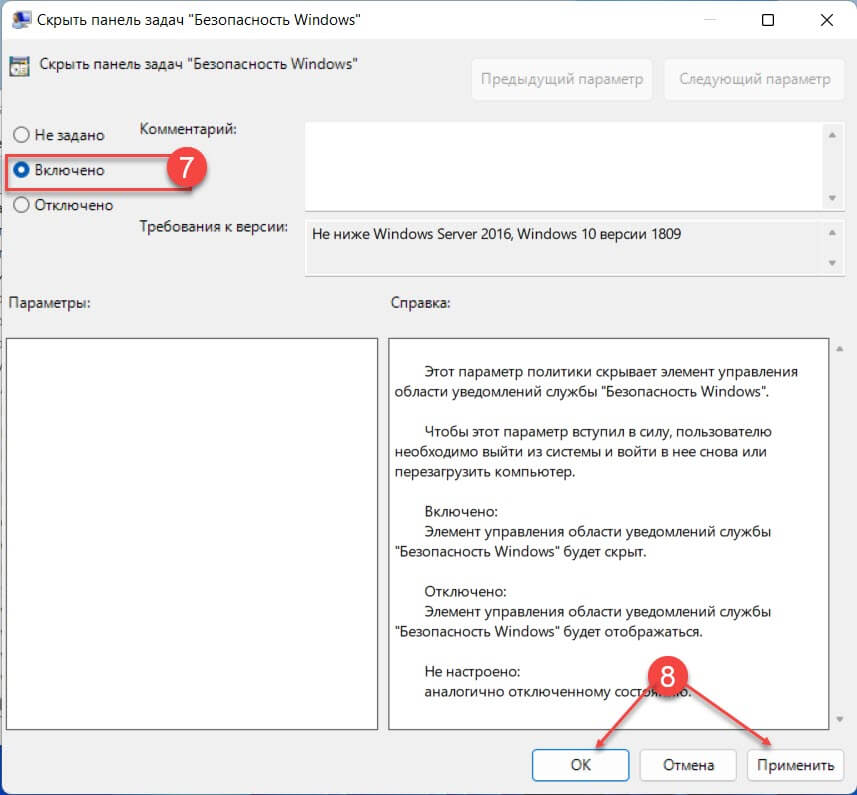
Шаг 6: Перезагрузите компьютер.
После перезагрузки, значок «Безопасность Windows» не будет отображаться на панели задач.
Если вы используете Windows 11\10 Home или другую версию, которая не включает редактор локальных групповых политик, вы можете применить твик реестра.
Скрыть значок защитника с помощью редактор реестра
Шаг 1: Откройте редактор реестра.
Шаг 2: Перейдите к следующему разделу:
HKEY_LOCAL_MACHINE\SOFTWARE\Policies\Microsoft\Windows Defender\Systray
Если такого раздела нет, просто создайте его.
Шаг 3: Здесь создайте новый параметр DWORD (32 бита) с именем «HideSystray».
Примечание: Даже если вы используете 64-битную Windows , вам все равно нужно использовать параметр DWORD (32 бита).
Шаг 4: Установите значение для параметра с именем «HideSystray»: «1», это позволит отключить отображение значка «Безопасности Windows» на панели задач.
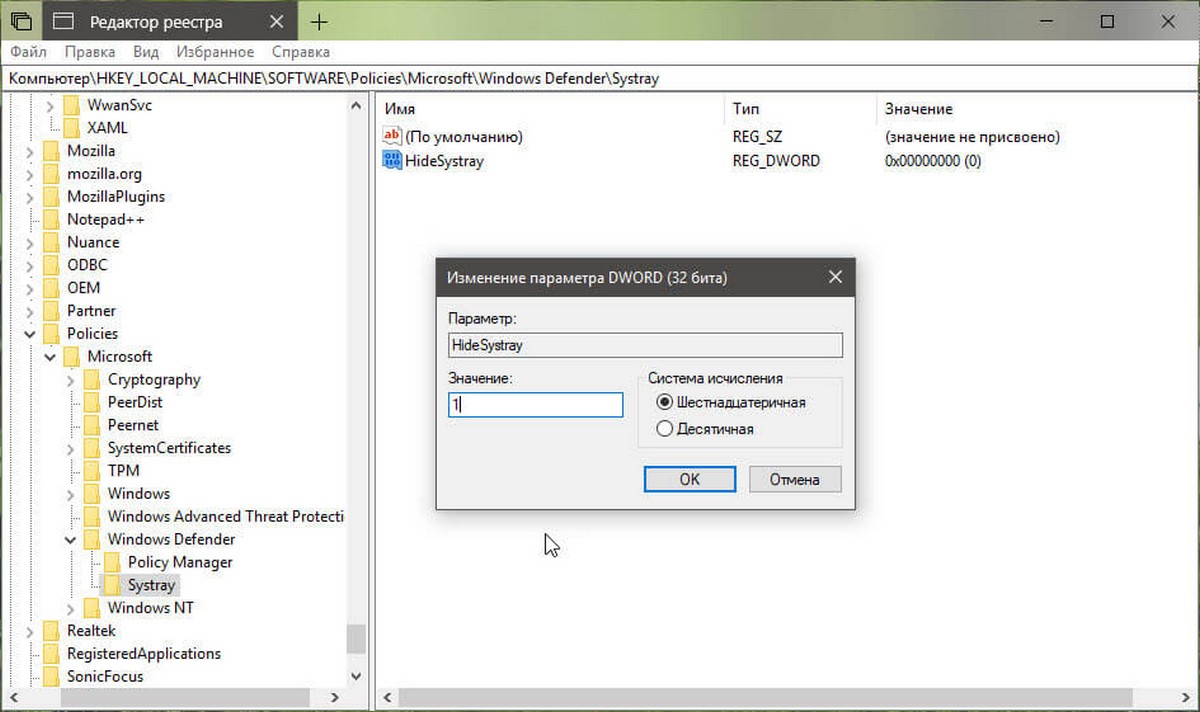
Шаг 5: Чтобы изменения, вступили в силу, необходимо перезагрузить Windows 11\10.
Позже вы можете удалить параметр «HideSystray», чтобы вернуть значок в системный трей.
Все! Если вам известны другие способы, Как отключить иконку Защитника Windows, пожалуйста поделитесь в комментариях ниже.
Вас может заинтересовать: Как в Windows 11 отключить антивирусную программу «Защитник Windows»
Как Отключить Защитник Windows в Windows 10
Windows 11 comes with preinstalled security suite called Windows Security also known as Windows Defender. With this security suite you get free of cost security protection on your device. Windows Security can protect your system in real-time from different kind of security threats. By default, you will find Windows Security notification icon present on the taskbar. That small icon keeps you updated with Windows Security dashboard or happenings. In this article, we will see how you can enable or disable Windows Security notification icon in Windows 11.
So as I said, Windows Security notification icon is present there by default. In case if you have any special requirement of hiding or removing this icon, you can try out below methods. There are different methods available to manage the icon. You can try them as per your convenience.
Page Contents
Method 1: Using Settings app
Note: This method works in Windows 11 build 22572 or later.
- Press + X keys and select Settings.
- Go to Personalization > Taskbar.
- Under Other system tray icons, turn On or Off Windows Security notification icon to enable or disable the icon from taskbar, respectively.
Method 2: Using registry
- Run
regeditcommand to open Registry Editor. - Go to
HKEY_LOCAL_MACHINE\SOFTWARE\Policies\Microsoft\Windows Defender Security Center\Systray. - Under Systray, set HideSystray registry DWORD (REG_DWORD) to 1 to disable or hide Windows Security notification icon. To show the icon, simply delete this DWORD.
- Close Registry Editor and restart your system to make changes effective.
Method 3: Using Group Policy
- Open Group Policy snap-in using
gpedit.mscorgpmc.msccommand. - Go to Computer Configuration > Administrative Templates > Windows Components > Windows Security > Systray.
- Locate the policy setting named Hide Windows Security Systray. Double click on this policy setting to modify it.
- Set the policy configuration to Enabled or Disabled in order to show or hide Windows Security notification icon on taskbar, respectively.
- Close Group Policy snap-in and update Group Policy engine by running
gpupdate /forcecommand.
That’s it!
Related: Show/hide Windows Security notification icon in Windows 10.
RELATED ARTICLES
По умолчанию в операционной системе Windows 10 функционирует «Защитник», фирменная антивирусная утилита от Microsoft. Разработчики предполагали, что Защитник Windows 10 станет незаменимым приложением, способным полностью обезопасить пользователей от потенциальных угроз, но все пошло не по плану.
Несомненно, Defender блокирует некоторые угрозы, но зачастую их список настолько мал, что проще установить сторонний бесплатный антивирусник. Кроме того, на слабых компьютерах процесс Antimalware Service Executable, отвечающий за защиту системы, часто «забивает» процессор на 50 и более процентов, что сильно сказывается на производительности компьютера. Сюда же входит и повышенная нагрузка на жесткий диск. Именно такие проблемы чаще всего наводят пользователей на отключение Защитника Windows 10.
Деактивировать Защитник не так уж и просто, так как доступная опция отключения защиты позволяет выключить программу только на время – после перезагрузки системы она снова будет активна. Однако нет ничего невозможного: есть два эффективных способа, которые позволяют полностью отключить встроенную защиту.
Рассмотрим способы временной и полной деактивации.
Способ 1: Через настройки безопасности Windows
Обратите внимание, что данный способ деактивирует Защитник лишь на время. Как только компьютер будет перезагружен, Defender автоматически включится, и для его отключения снова потребуется открыть настройки системы.
Выключаем Защитник Windows 10:
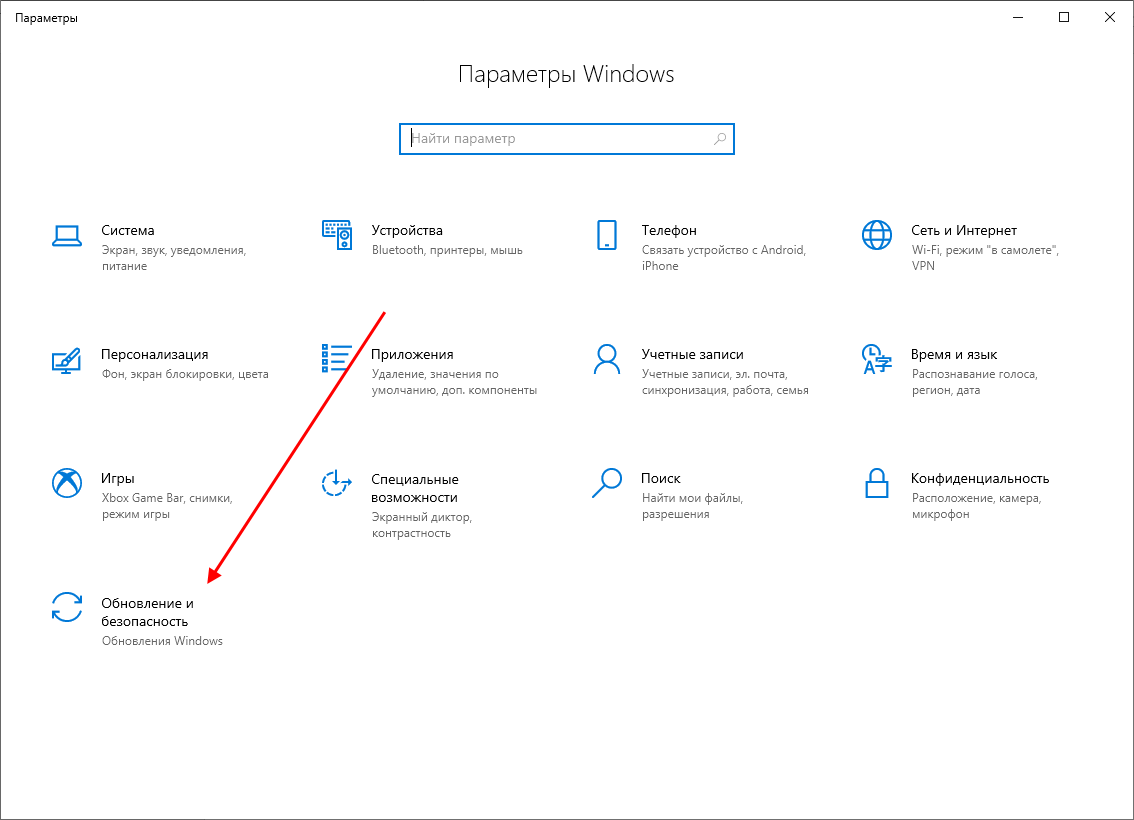
- Первым делом нам потребуется перейти в настройки системы – для этого кликаем правой кнопкой мыши по меню «Пуск» и выбираем «Параметры». Также попасть в данный раздел можно с использованием комбинации клавиш «WIN+I», где WIN – клавиша, расположенная в нижнем левом углу клавиатуры с логотипом Windows.
- Переходим в раздел «Обновление и безопасность».

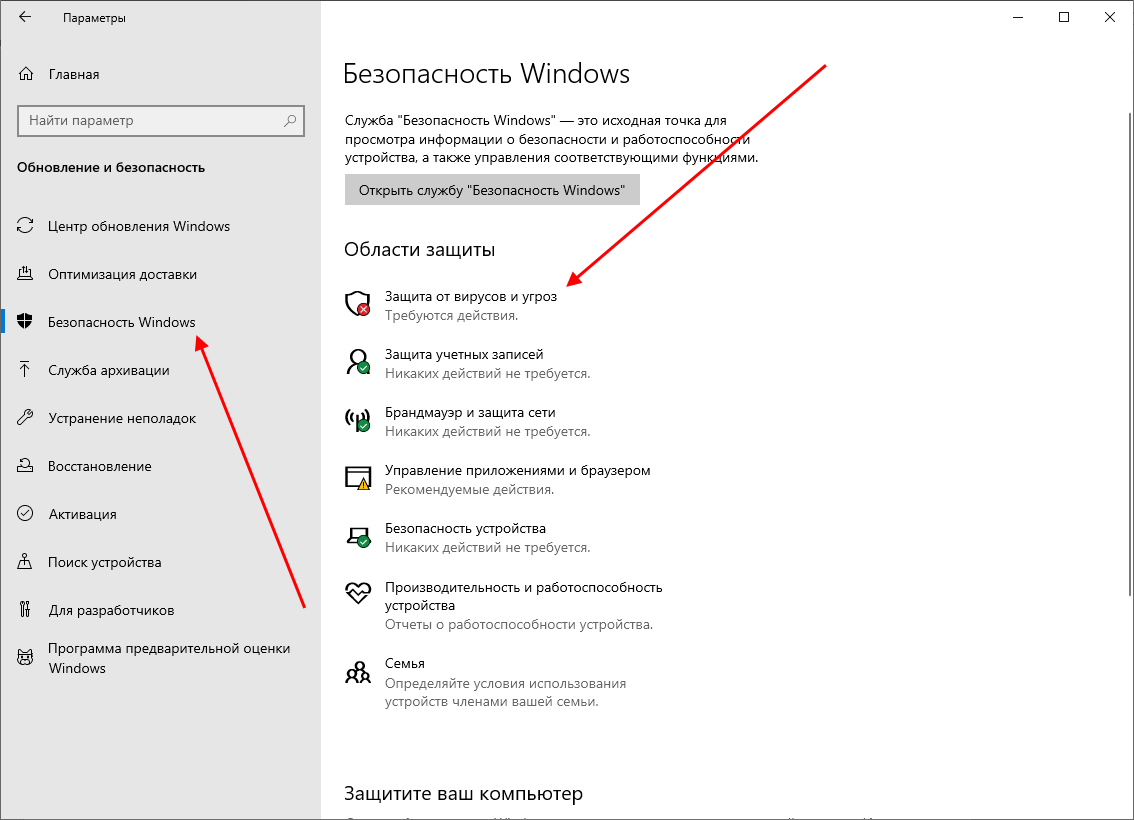
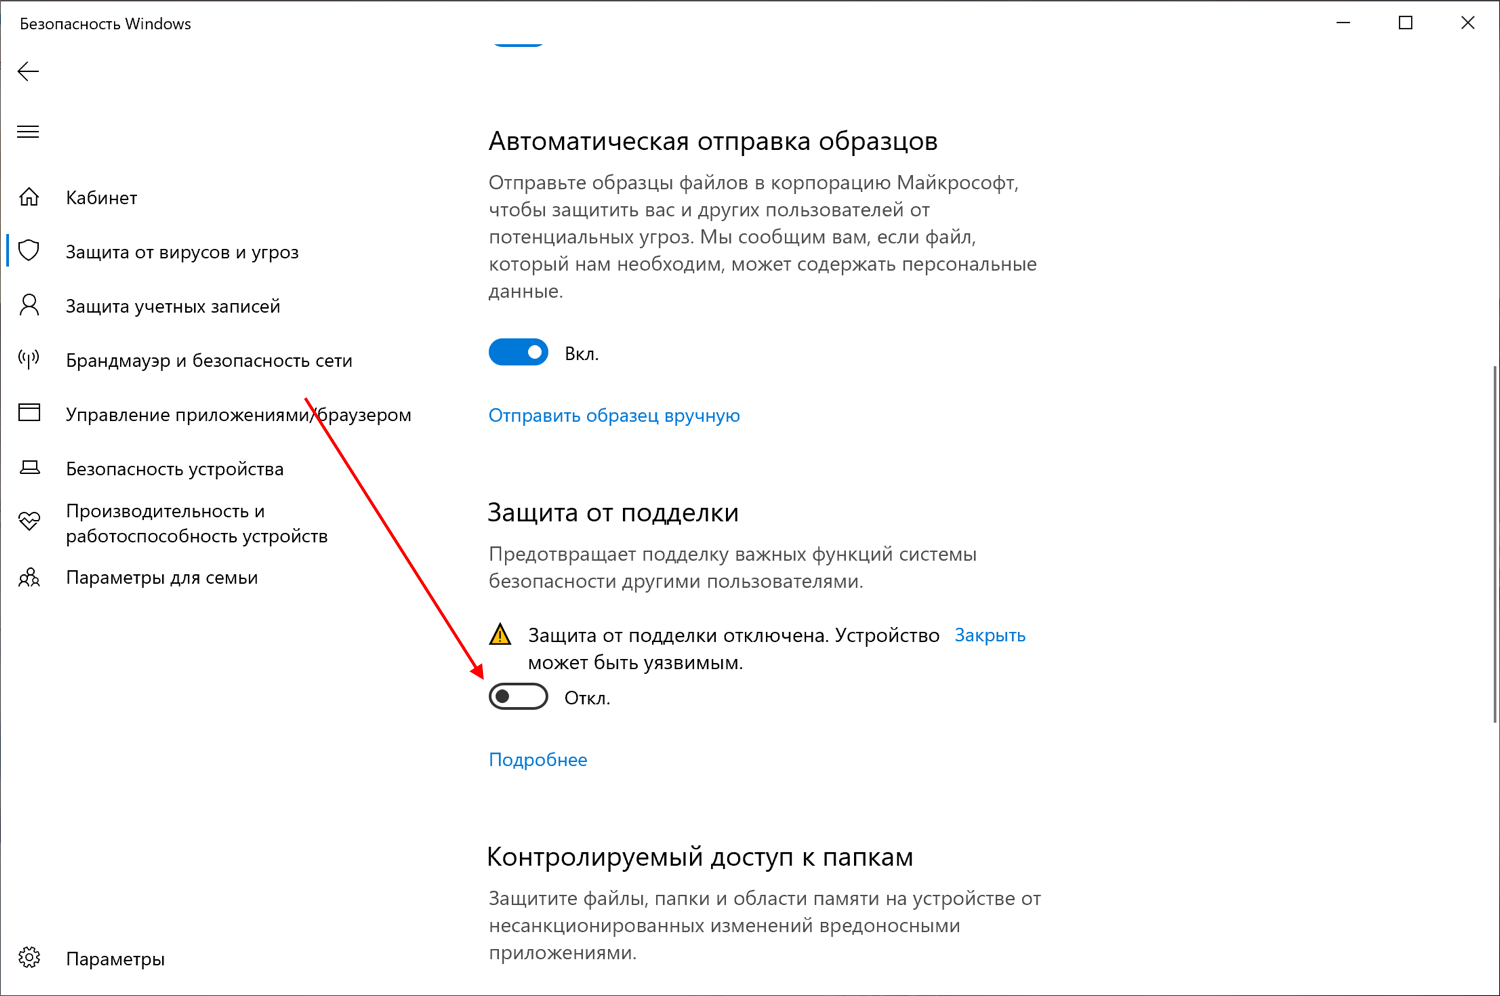
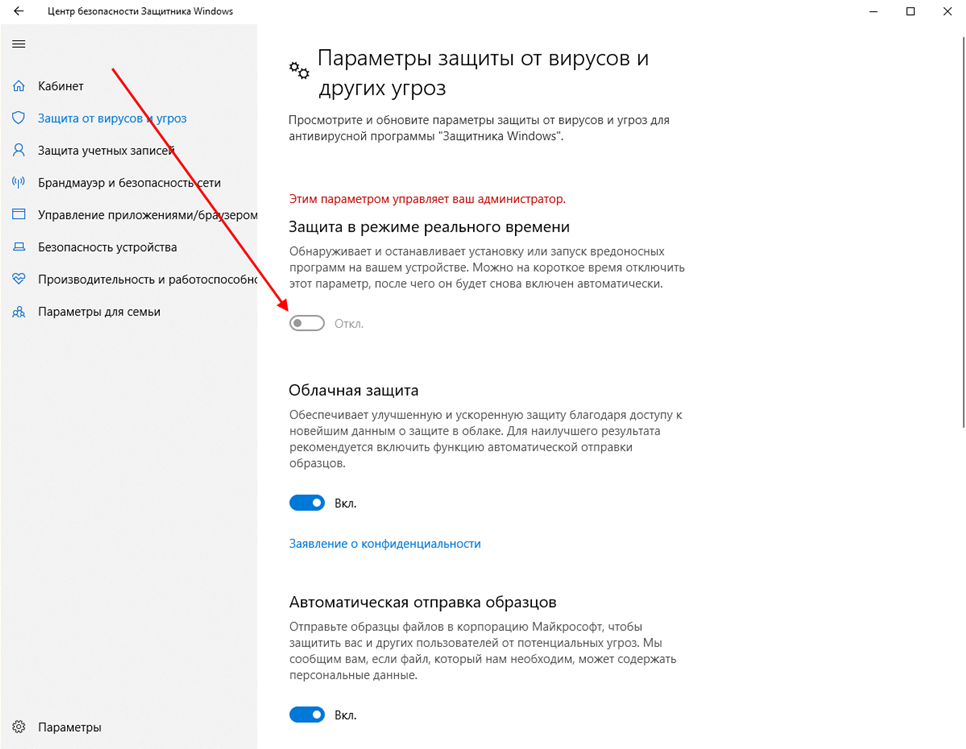
- Следующим шагом открываем подраздел «Безопасность Windows» и выбираем «Защита от вирусов и угроз». Обратите внимание, что в моем случае иконка горит красным цветом – в вашей системе она будет зеленой, так как защита системы активна.
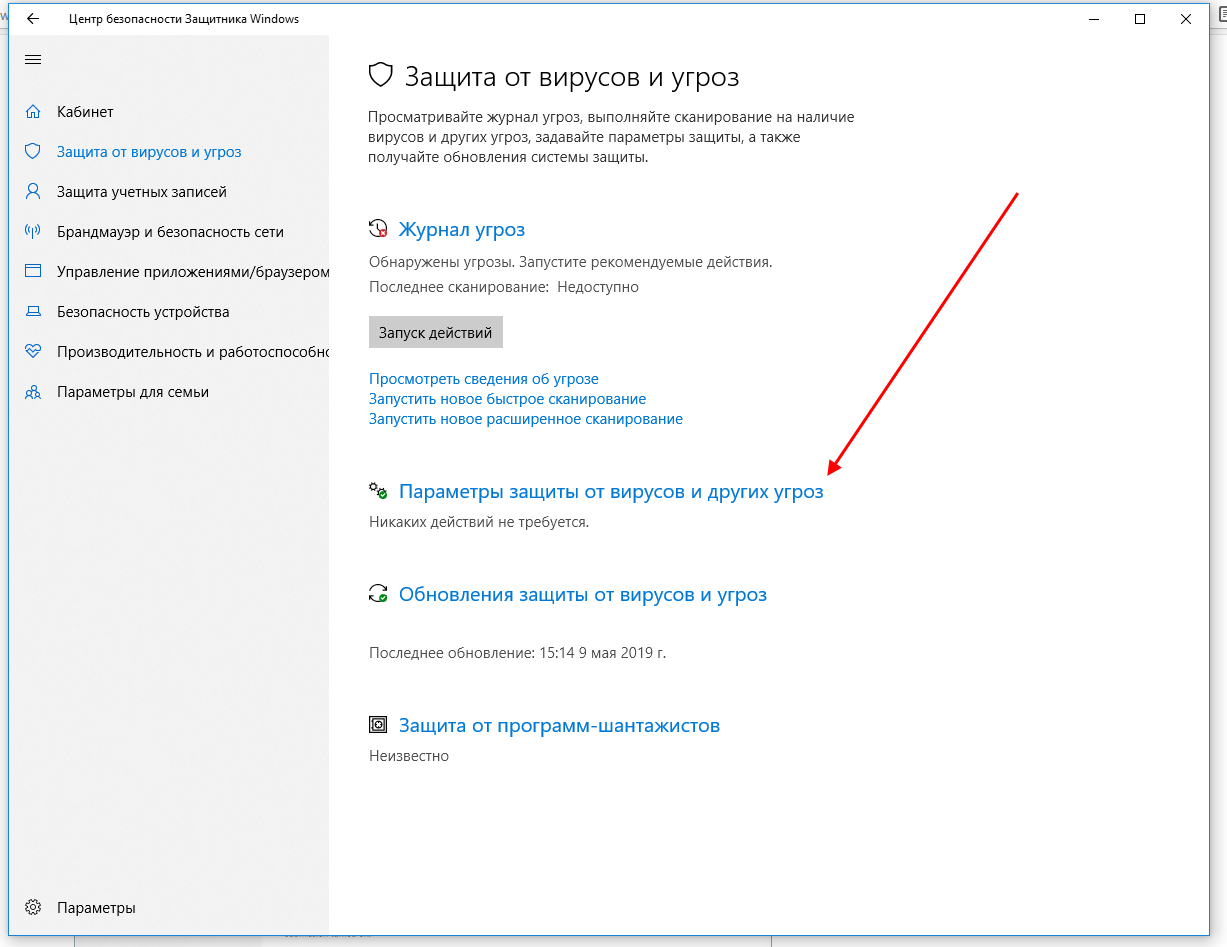
- В правой части кликаем по кнопке «Параметры защиты от вирусов и других угроз».
- В версии 1903 операционной системы Windows 10 появилась функция «Защита от подделки», которая блокирует изменения настроек безопасности. Для того чтобы вручную отключить «Защитник», для начала нужно выключить данную опцию.
- Остается в блоке «Защита в режиме реального времени» установить ползунок в режим «Откл.».
Готово! Теперь Защитник Windows 10 полностью отключен до перезагрузки компьютера. Таким образом, вы можете установить программу или открыть сайт, который был заблокирован системой ранее. Будьте бдительны – посещение небезопасных сайтов и установка подозрительного ПО может навредить вашей системе.
Комьюнити теперь в Телеграм
Подпишитесь и будьте в курсе последних IT-новостей
Подписаться
Способ 2: Через групповые политики
Данный способ подойдет исключительно для версий Windows 10 Pro и Enterprise – с его помощью можно навсегда отключить встроенный антивирус. Для прочих версий системы воспользуйтесь редактором реестра, о котором мы поговорим в следующем разделе.
Отключаем Windows Defender:
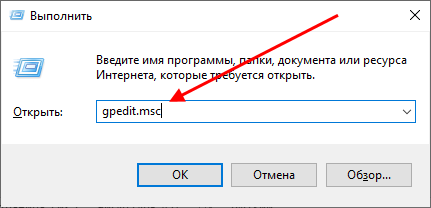
- Воспользуемся комбинацией клавиш «WIN+R», чтобы открыть окно «Выполнить» – в него вводим запрос gpedit.msc и жмем «Enter».
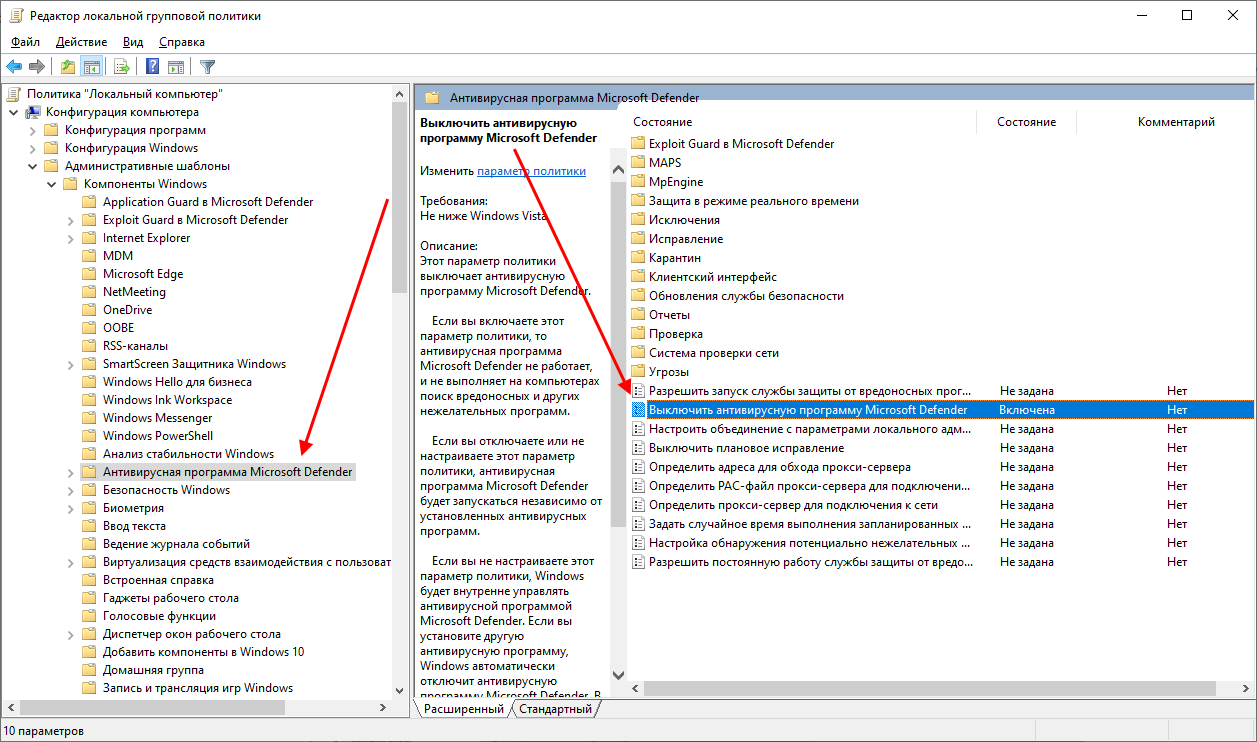
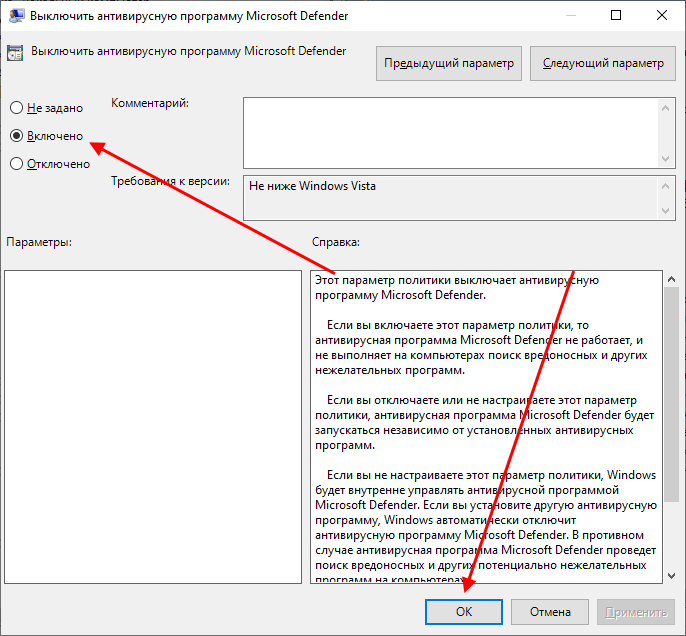
- Далее раскрываем пункт «Конфигурация компьютера» и переходим в подраздел «Административные шаблоны» – там выбираем «Компоненты Windows» и открываем «Антивирусная программа Microsoft Defender». В отобразившемся разделе кликаем двойным щелчком мыши по пункту «Выключить антивирусную программу Microsoft Defender».
- Отмечаем пункт «Включено», чтобы активировать параметр деактивации антивируса, и жмем «ОК».
- Последним действием переходим в подраздел «Защита в режиме реального времени» и отключаем параметры, указанные на картинке. Просто заходим в каждый из них и отмечаем пункт «Отключено».

После выполнения вышеупомянутых действий перезагружаем компьютер и убеждаемся, что встроенная система защиты была полностью отключена. Если она до сих пор работает, то перепроверьте правильность выполнения действий либо воспользуйтесь следующим способом.
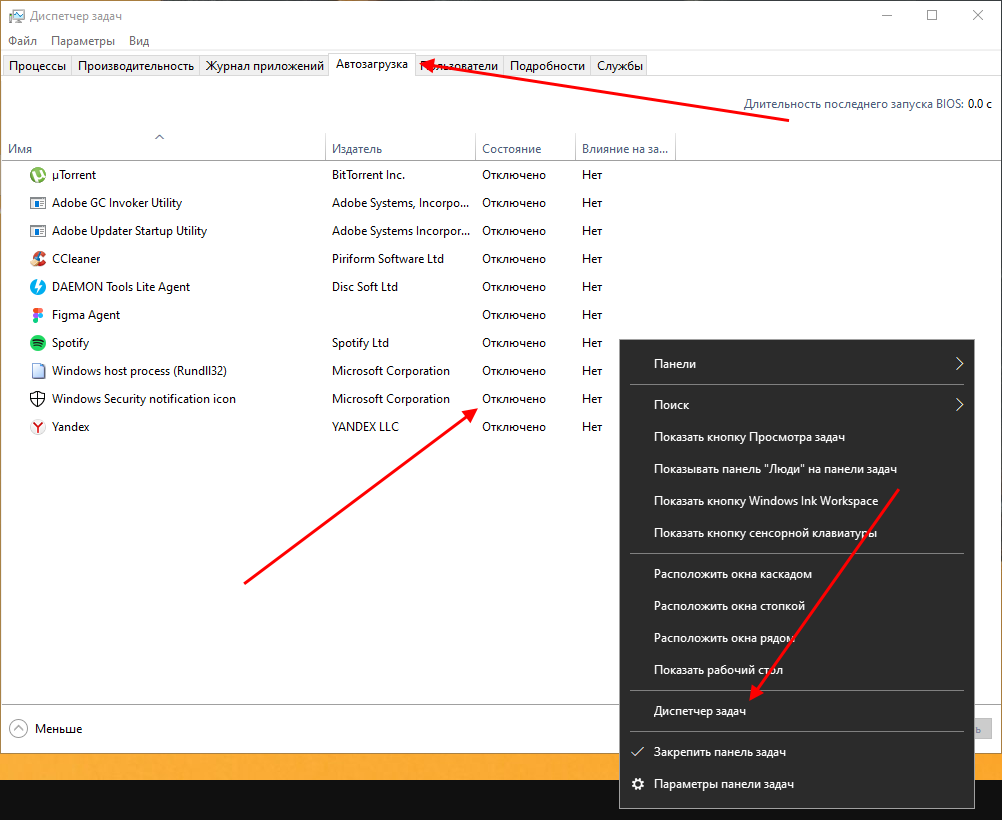
Также обратите внимание на то, что после деактивации программы ее иконка все равно будет отображаться в области уведомлений на панели задач. Чтобы ее отключить, необходимо перейти в «Диспетчер задач» через правый клик кнопки по панели задач и переключить параметр «Windows Security notification icon» в состояние «Отключено».
В любой момент вы сможете восстановить работу встроенного антивируса – достаточно зайти в редактор групповых политик и вернуть параметрам стандартное значение.
Способ 3: Через реестр
Если вы никогда не работали в редакторе реестра, то не рекомендую отходить от нижеуказанной инструкции.
Деактивируем Защитник Windows:
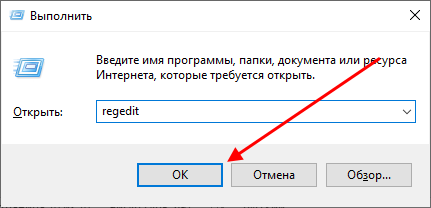
- Открываем окно «Выполнить» с помощью комбинации клавиш «WIN+R» и вводим запрос regedit.
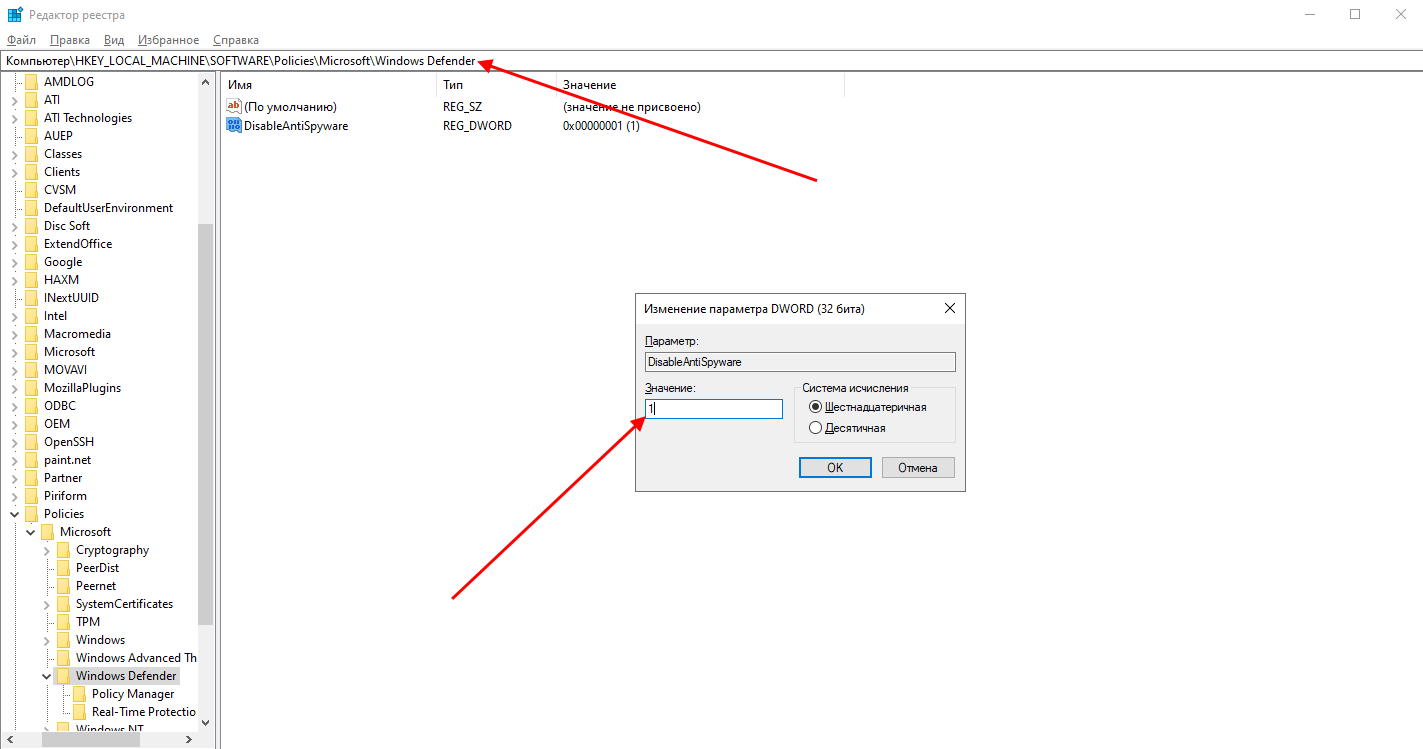
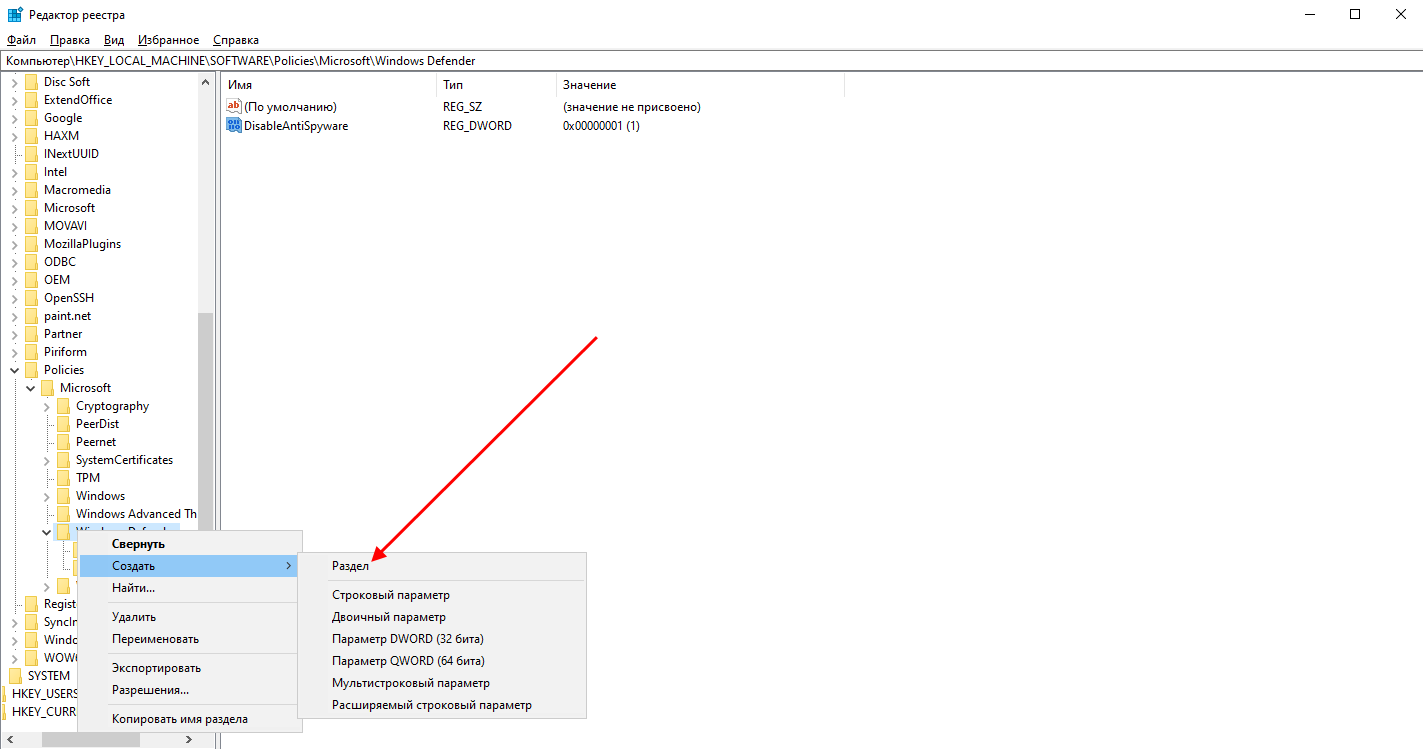
- Разрешаем приложению вносить изменения и попадаем в его главное меню. В верхнюю строку вставляем следующий путь: HKEY_LOCAL_MACHINE\SOFTWARE\Policies\Microsoft\Windows Defender. Создаем здесь новый параметр DWORD (32 бита) со значением 1. Задаем ему название DisableAntiSpyware и жмем «ОК».
- Затем в левой части кликаем правой кнопкой мыши по папке «Windows Defender» и создаем новый раздел с названием Real-Time Protection.
- Следующим шагом создадим 4 параметра DWORD (32 бита): DisableBehaviorMonitoring, DisableOnAccessProtection, DisableScanOnRealtimeEnable, DisableIOAVProtection. Всем параметрам выставляем значение 1.
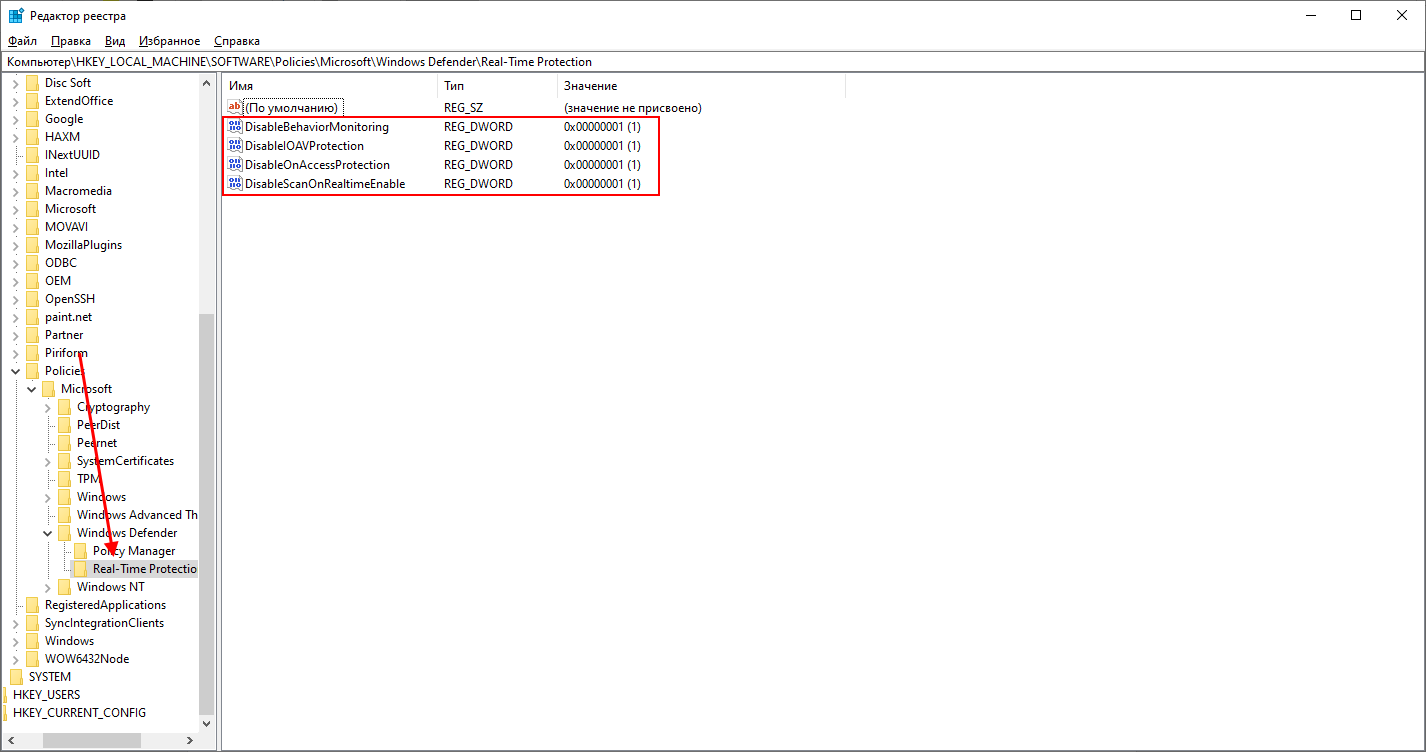
Перезагружаем компьютер и проверяем работоспособность Защитника – он должен быть выключен.
Если вы захотите вернуть Windows Defender к жизни, то полностью удалите раздел Real-Time Protection, а также параметр DisableAntiSpyware в папке «Windows Defender». После этого потребуется перезагрузить операционную систему.
Как видите, отключить встроенный активирус в ОС Windows 10 несложно. Рекомендуем не оставлять свой компьютер без надежного защитника: если вы любитель «походить» по небезопасным ресурсам, то вам непременно потребуется антивирусная программа, которая защитит систему от угроз.
Надеюсь, что у вас не возникло никаких проблем при выполнении вышеуказанных действий. Спасибо за внимание!

This tutorial will show you how to add or remove the Windows Security notification icon on the taskbar for your account or all users in Windows 11.
Windows Security is built-in to Windows 11 and includes an antivirus program called Microsoft Defender Antivirus. Your device will be actively protected from the moment you start Windows 11. Windows Security continually scans for malware (malicious software), viruses, and security threats. In addition to this real-time protection, updates are downloaded automatically to help keep your device safe and protect it from threats.
Windows Security is your home to view and manage the security and health of your device.
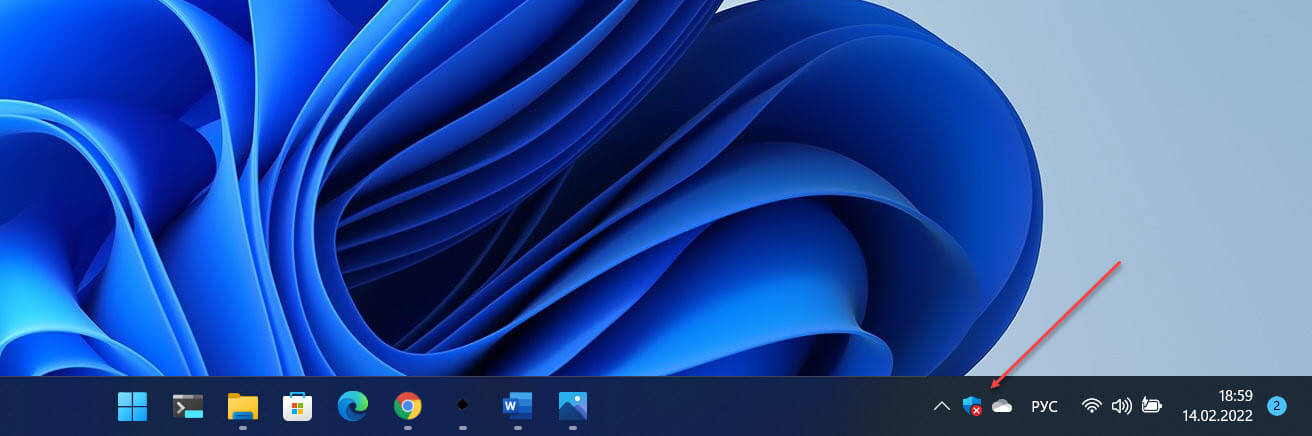
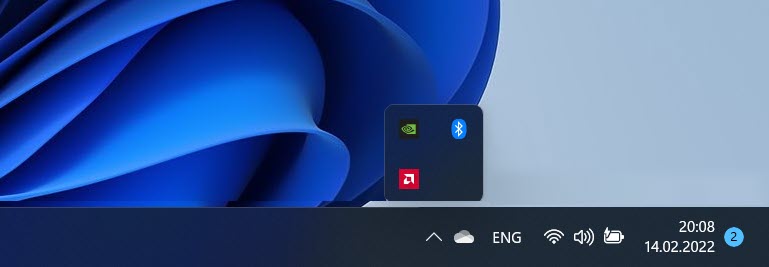
The Windows Security notification icon shows on the taskbar system tray by default.
Contents
- Option One: Hide or Show Windows Security Notification Icon for Current User in Settings
- Option Two: Add or Remove Windows Security Notification Icon for Current User in Startup Apps
- Option Three: Enable or Disable Windows Security Notification Icon for All Users in Local Group Policy Editor
- Option Four: Enable or Disable Windows Security Notification Icon for All Users using REG file
EXAMPLE: Windows Security notification icon on taskbar system tray


Option One
Hide or Show Windows Security Notification Icon for Current User in Settings
1 Open Settings (WIn+I).
2 Click/tap on Personalization on the left side, and click/tap on Taskbar on the right side. (see screenshot below)

3 Click/tap on Taskbar corner overflow or Other system tray icons (build 22572) on the right side to expand it open. (see screenshot below step 4)
4 Turn On (show — default) or Off (hide) Windows Security notification icon for what you want. (see screenshot below)

5 You can now close Settings if you like.
Option Two
Add or Remove Windows Security Notification Icon for Current User in Startup Apps
1 Open Settings (WIn+I).
2 Click/tap on Apps on the left side, and click/tap on Startup on the right side. (see screenshot below)

3 Turn On (add — default) or Off (remove) Windows Security notification icon for what you want. (see screenshot below)
On = Allows Option One to work.
Off = Removes the Windows Security notification icon, and overrides Option One.

4 Close Settings.
5 Either sign out and sign in or restart the computer to apply.
Option Three
Enable or Disable Windows Security Notification Icon for All Users in Local Group Policy Editor
You must be signed in as an administrator to use this option.
The Local Group Policy Editor is only available in the Windows 11 Pro, Enterprise, and Education editions.
All editions can use Option Four to configure the same policy.
1 Open the Local Group Policy Editor (gpedit.msc).
2 Navigate to the policy location below in the left pane of the Local Group Policy Editor. (see screenshot below)
Computer Configuration > Administrative Templates > Windows Components > Windows Security > Systray

3 In the right pane of Systray in the Local Group Policy Editor, double click/tap on the Hide Windows Security Systray policy to edit it. (see screenshot above)
4 Do step 5 (enable) or step 6 (disable) below for what you want.
5 Enable Windows Security Notification Icon for All Users
This is the default setting to allow using Option One and Option Two.
A) Select (dot) Not Configured, click/tap on OK, and go to step 7. (see screenshot below)

6 Disable Windows Security Notification Icon for All Users
This will override Option One and Option Two.
A) Select (dot) Enabled, click/tap on OK, and go to step 7. (see screenshot below)
7 Close the Local Group Policy Editor.
8 Restart the computer to apply.
Option Four
Enable or Disable Windows Security Notification Icon for All Users using REG file
You must be signed in as an administrator to use this option.
1 Do step 2 (enable) or step 3 (disable) below for what you want.
2 Enable Windows Security Notification Icon for All Users
This is the default setting to allow using Option One and Option Two.
A) Click/tap on the Download button below to download the file below, and go to step 4 below.
Enable_Windows_Security_notification_icon_for_all_users.reg
(Contents of REG file for reference)
Code:
Windows Registry Editor Version 5.00

[HKEY_LOCAL_MACHINE\SOFTWARE\Policies\Microsoft\Windows Defender Security Center\Systray]
"HideSystray"=-

[HKEY_LOCAL_MACHINE\SOFTWARE\Microsoft\Windows\CurrentVersion\Explorer\StartupApproved\Run]
"SecurityHealth"=hex:06,00,00,00,00,00,00,00,00,00,00,00

[HKEY_LOCAL_MACHINE\SOFTWARE\Microsoft\Windows\CurrentVersion\Run]
"SecurityHealth"=hex(2):25,00,77,00,69,00,6e,00,64,00,69,00,72,00,25,00,5c,00,\
  73,00,79,00,73,00,74,00,65,00,6d,00,33,00,32,00,5c,00,53,00,65,00,63,00,75,\
  00,72,00,69,00,74,00,79,00,48,00,65,00,61,00,6c,00,74,00,68,00,53,00,79,00,\
  73,00,74,00,72,00,61,00,79,00,2e,00,65,00,78,00,65,00,00,00
3 Disable Windows Security Notification Icon for All Users
This will override Option One and Option Two.
A) Click/tap on the Download button below to download the file below, and go to step 4 below.
Disable_Windows_Security_notification_icon_for_all_users.reg
(Contents of REG file for reference)
Code:
Windows Registry Editor Version 5.00

[HKEY_LOCAL_MACHINE\SOFTWARE\Policies\Microsoft\Windows Defender Security Center\Systray]
"HideSystray"=dword:00000001
4 Save the REG file to your desktop.
5 Double click/tap on the downloaded REG file to merge it.
6 When prompted, click/tap on Run, Yes (UAC), Yes, and OK to approve the merge.
7 Restart the computer to apply.
8 You can now delete the downloaded REG file if you like.
That’s it,
Shawn Brink
Related Tutorials
- Hide or Show System Tray Icons in Taskbar Corner Overflow Menu in Windows 11
- Add Windows Security to Desktop Context Menu in Windows 11
- Enable or Disable Startup Apps in Windows 11
- Open Windows Security in Windows 11
- Enable or Disable All Windows Security Notifications in Windows 11