
-
Home
-
News
- How to Enable/Disable Encrypting File System on Windows 11/10?
By Daisy | Follow |
Last Updated
This tutorial is about how to enable and disable the Encrypting File System (EFS) feature on Windows 11. Here are 5 ways for you and you can choose one of them based on your needs. Now, you can continue to read this post from MiniTool.
Encrypting File System
What is Encrypting File System? Encrypting File System is a feature on Windows, which allows you to easily encrypt and decrypt files on Windows NTFS drives. After you encrypt your files with this tool, other people cannot access them unless they know your password.
This feature allows you to encrypt specific folders instead of entire hard drive partitions. Besides, if you move a file to an EFS-encrypted folder, it will be automatically encrypted.
How to Enable/Disable Encrypting File System
How to enable or disable Encrypting File System on Windows 11/10? There are 5 ways for you.
Way 1: Via Command Prompt
Step 1: Type cmd in the Search box and choose Run as administrator.
Step 2: To enable the EFS feature, type the following command and press Enter:
fsutil behavior set disableencryption 0
Step 3: To disable the feature, type the following command and press Enter:
fsutil behavior set disableencryption 1
Way 2: Via Services
Step 1: Press the Windows + R keys to open the Run dialog box. Type services.msc and press Enter.
Step 2: Find and right-click the Encrypting File System (EFS) option to choose Start.
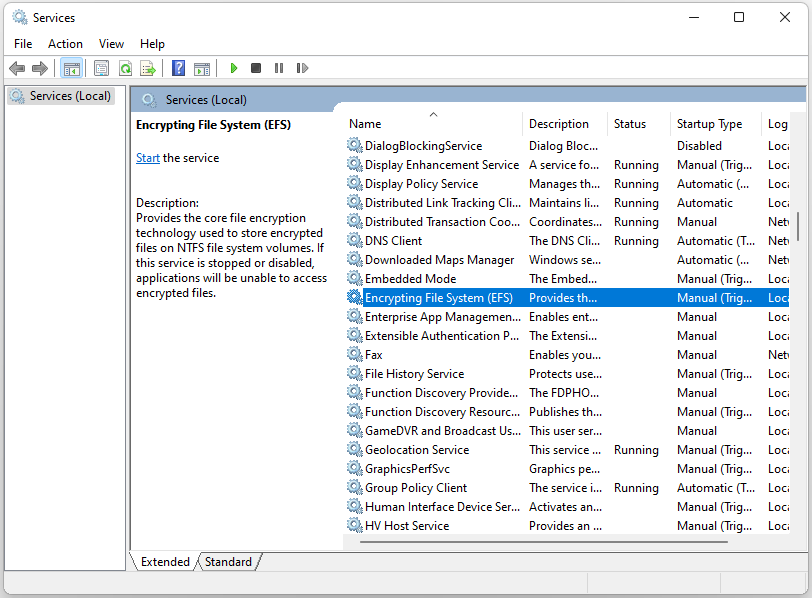
Step 3: Then, double-click it to open its properties. Click the Startup type drop-down menu to select Automatic. Click Apply and then click OK to save these changes.
To disable Encrypting File System, open Services again and select the Disabled option on the Startup type drop-down menu. Click Apply and OK to apply these changes.
Way 3: Via Registry Editor
Step 1: Press the Windows + R keys to open the Run dialog box. Type Regedit and click OK to open Registry Editor.
Step 2: Navigate to Computer > HKEY_LOCAL_MACHINE > SYSTEM > CurrentControlSet > Policies.

Step 3: Right-click on any space on the right-hand side and select New > DWORD (32-bit) Value.
Step 4: Name the DWORD value as NtfsDisableEncryption and press Enter.
To enable EFS, double-click the NtfsDisableEncryption value, set its Value data to 0, and click OK.
To disable EFS, double-click the NtfsDisableEncryption value, set its Value data to 1, and click OK.
Way 4: Via Local Group Policy Editor
Step 1: Press the Windows + R keys to open the Run dialog box. Type gpedit.msc and press Enter to open Local Group Policy Editor.
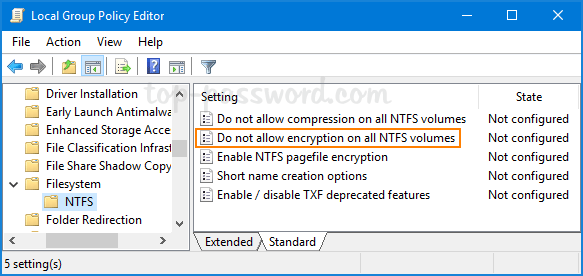
Step 2: Navigate to Computer Configuration > Administrative Templates > System > Filesystem > NTFS.
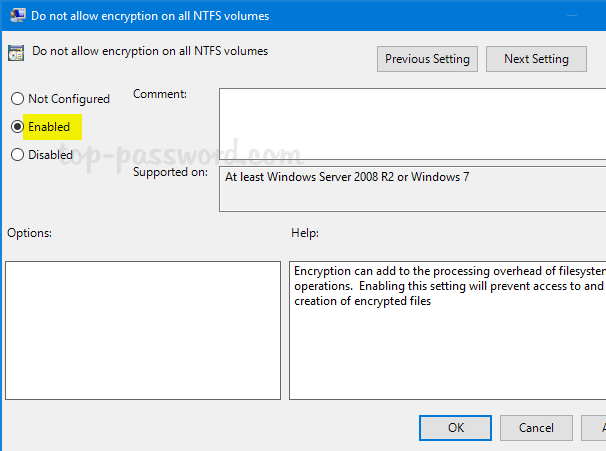
Step 3: On the right-hand side pane, double-click the Do not allow encryption on all NTFS volumes option.
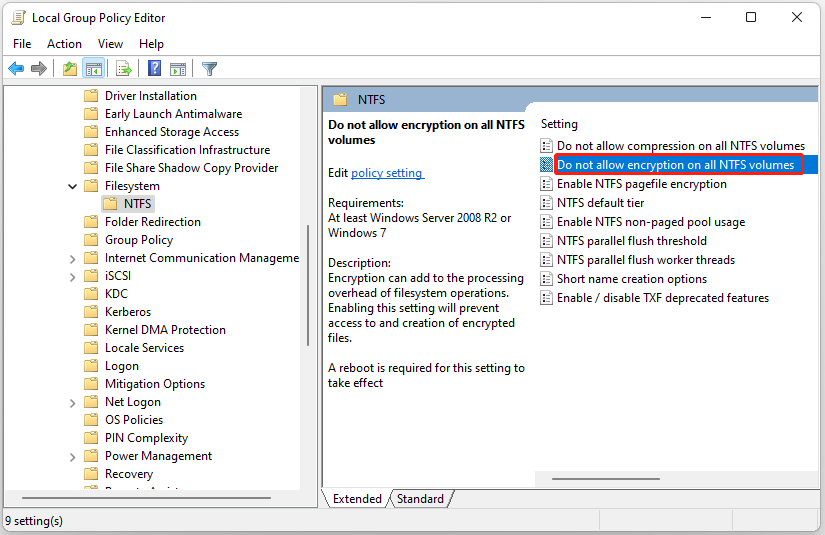
Step 4: To enable it, select Not Configured or Disabled. To disable it, select the Enable option.
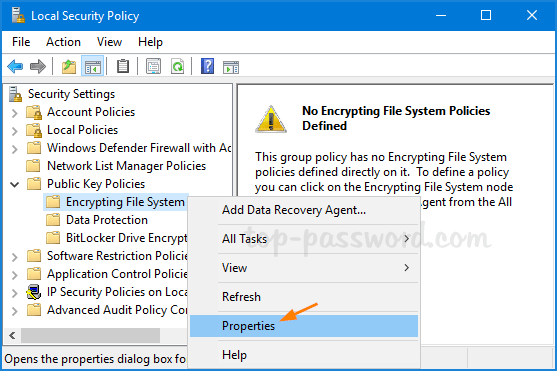
Way 5: Via Local Security Policy
Step 1: Press the Windows + R keys to open the Run dialog box. Type secpol.msc and press Enter to open Local Security Policy.
Step 2: Navigate to Security Settings > Public Key Policies.
Step 3: Find and right-click Encrypting File System and select Properties.
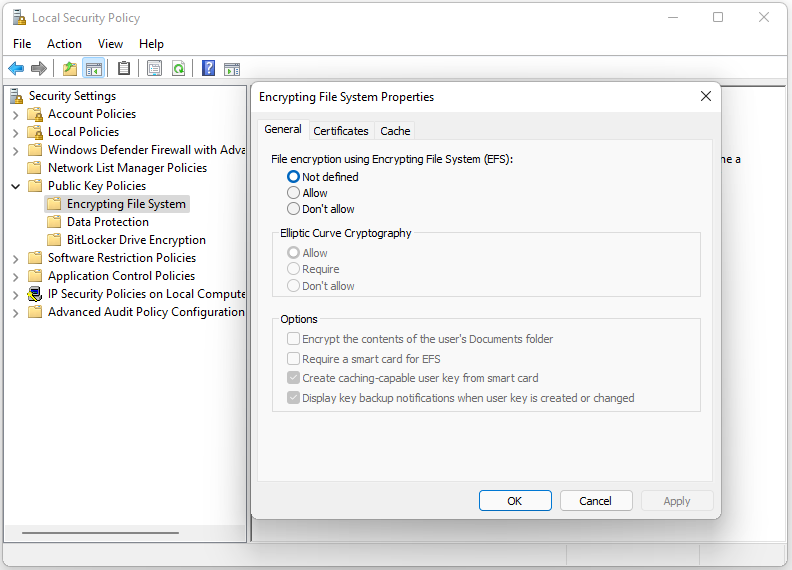
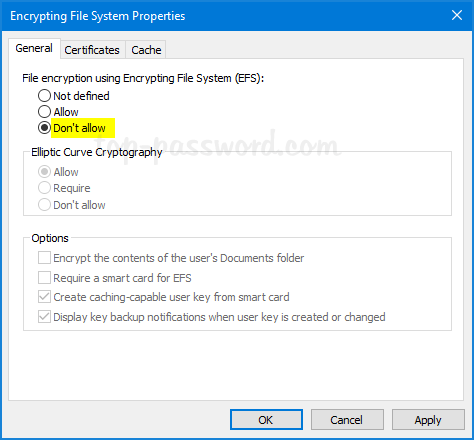
Step 4: Go to the General tab and select Allow under the File encryption using Encrypting File System (EFS) part. Click Apply and OK.
To disable the EFS tool, select Not defined or Don’t allow.
Tips:
Tip: To provide better protection for your data, it’s recommended to back up them regularly. To do that, you can try the PC backup software – MiniTool ShdowMaker. It allows you to add password protection to a specific backup. Three data encryption levels are provided for your choice: None, Normal, and AES128. Download it to see more details!
MiniTool ShadowMaker TrialClick to Download100%Clean & Safe
Final Words
How to enable or disable Encrypting File System on Windows 11? This post provides 5 ways and you can choose one of them based on your needs. I hope that this post can be useful to you.
About The Author
Position: Columnist
Having been an editor at MiniTool since graduating college as an English major, Daisy specializes in writing about data backups, disk cloning, and file syncing as well as general computer knowledge and issues. In her free time, Daisy enjoys running and going with friends to the amusement park.
|
как снять шифрование с файлов win10? |
|||||
|
|||||
|
|||||
|
|||||
|
|||||
|
|||||
|
|||||
|
|||||
|
|||||
|
|||||
|
|||||
|
|||||
|
В связи с введением в действие Постановления Правительства Российской Федерации от 14.11.2023 № 1905 т.н. «о запрете популяризации VPN» с 1 марта 2024 года — любое обсуждение способов обхода блокировок и VPN на портале запрещено!
Table of Contents:
Though Windows has strong in-built security, it’s very difficult to protect a computer from a physical, in-person attack. One solution, however, is Windows 10 file encryption, also known as the encrypting file system (EFS).
Windows 10 EFS allows for easy encryption and decryption of files on your account’s NTSF drives using tried and tested algorithms. Jargon aside, this means that anybody who tries to access your files and doesn’t have the encryption key (password) only sees strings of letters and numbers.
Unfortunately, some people find that the encrypt contents to secure data option is grayed out. In this tutorial, we’ll show you how to enable EFS on your PC to remedy this, as well as how to remove the EFS encryption option if you need to. We’ll show you two methods to enable or disable EFS NTSF – the group policy editor and a registry file. Let’s get started:
How to Enable or Remove EFS NTFS File Encryption in the Windows 10 Local Group Policy Editor
If you have Windows 10 Pro, Enterprise, or Education, the easiest way to enable EFS is through the local group policy editor. This way, you get a nice, understandable UI and full transparency about the changes you’re making. If you have Windows 10 Home, check the registry section below. Otherwise, follow along here:
- Open the Local Group Policy editor
Press Start and type “Edit group policy”. Click the top result.

- Navigate to the EFS NTFS section and open the Windows 10 encryption policy
In the sidebar of the Local Group Policy Editor, find the “Filesystem” folder and click “NTFS”. In your main pane, you should see a setting called “Do not allow encryption on all NTFS volumes”. Double-click it.

- Enable or remove EFS NTSF encryption
In the policy, choose “Not Configured”, “Enabled”, to “Disabled”. Here’s what each option does:
Option Function Enabled Remove EFS encryption as an option on all NTFS drives Disabled Enable EFS NTFS encryption as an option on all drives Not Configured Follow the system default settings Press OK once you’ve made your selection and Restart your PC to apply the changes.


How to Enable or Disable NTFS File Encryption using a REG file
If you don’t have Windows 10 Pro, don’t worry – you can still enable the EFS service. However, it will require you to make some changes to your registry. Make sure you back up your registry before continuing just to be safe.
We’ll walk you through the process manually for full transparency, but you can also check the section below for a .REG file if you’re in a hurry. Let’s get started:
- Open Regedit
Press “Windows + R” to open the Run dialog and type “regedit”. Click the “OK” button to open the Registry Editor.

- Navigate to the Policies key and create a new DWORD
In your Registry Editor search bar, paste the following:
Computer\HKEY_LOCAL_MACHINE\SYSTEM\CurrentControlSet\Policies
In the main pane, right-click any empty space and choose “New > DWORD (32-bit) Value”. Name the DWORD
NtfsDisableEncryption, taking care to copy the capitalization exactly.
- Change the value data to enable or disable Windows file encryption
Modify the value data to turn NTFS EFS encryption on or off, setting it one 1 to remove the EFS option and 0 to enable it. Press “OK” when you’re done.


How to Enable or Disable Windows File Encryption via .REG Download
To make the registry editing process simpler and safer, we have created a .REG file. You can simply double-click this to disable or enable EFS for your system. You can download the .zip file here.
After the download has finished, perform the following steps:
- Unzip the file
Right-click the .zip file and select “Extract All…” from the fly-out menu.

- Browse to the extraction location and click “Extract”
- Double-click the disable or enable NTFS registry key
- Press “Yes” to the warning dialog
- Click “OK” and restart your PC
lf you’d like to switch back to your original setting at any point simply double-click the other registry key and repeat the process. We recommend you keep both .reg files in a safe location incase you ever want to change the setting again.


That wraps up this Windows 10 file encryption tutorial. You can follow our guide to using NTFS encryption to check if “encrypt contents to secure data” is grayed out still and learn more. You may also want to check our BitLocker encryption guide and decide which method is best for you.
Last Updated on February 14, 2022 7:44 pm CET
Ryan Maskellhttps://ryanmaskell.co.uk
Ryan has had a passion for gaming and technology since early childhood. Fusing the skills from his Creative Writing and Publishing degree with profound technical knowledge, he enjoys covering news about Microsoft. As an avid writer, he is also working on his debut novel.
Шифрование диска BitLocker – особая технология защиты данных в операционной системе Microsoft Windows. БитЛокер обеспечивает информационную безопасность через шифрование томов, что позволяет снизить риск похищения и раскрытия персональных данных. Шифрование дисков BitLocker может иметь негативные последствия, поэтому при необходимости его можно отключить.
В этом гайде подробно разберем шифрование BitLocker в Windows 10 и 11. Читайте дальше, чтобы узнать, как отключить БитЛокер и разблокировать диск.
Шифрование BitLocker недоступно в домашней версии Windows 10.
Что такое BitLocker для Windows 10/11
Кратко опишем, зачем нужен BitLocker в системах Windows:
- Защищает данные через полное шифрование.
- Используется для устранения несанкционированного доступа к информации на потерянных или украденных устройствах.
Не смотря на очевидные достоинства, шифрование BitLocker замедляет SSD и жесткие диски.
Как узнать, включен ли BitLocker
Ниже представлена инструкция для проверки шифрования через BitLocker Windows:
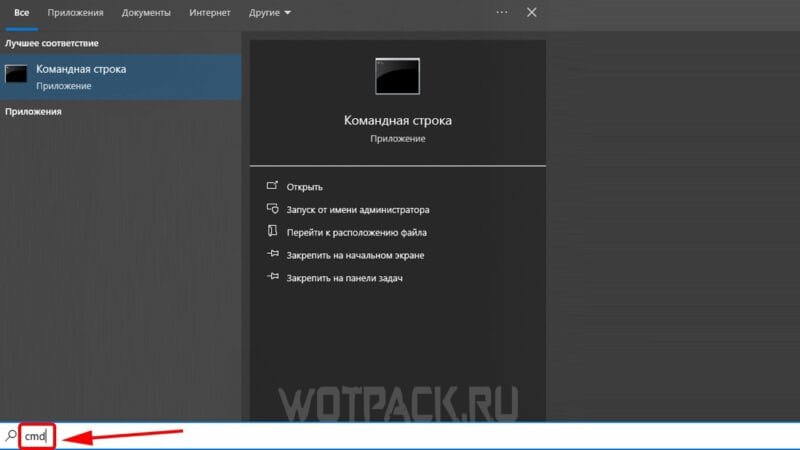
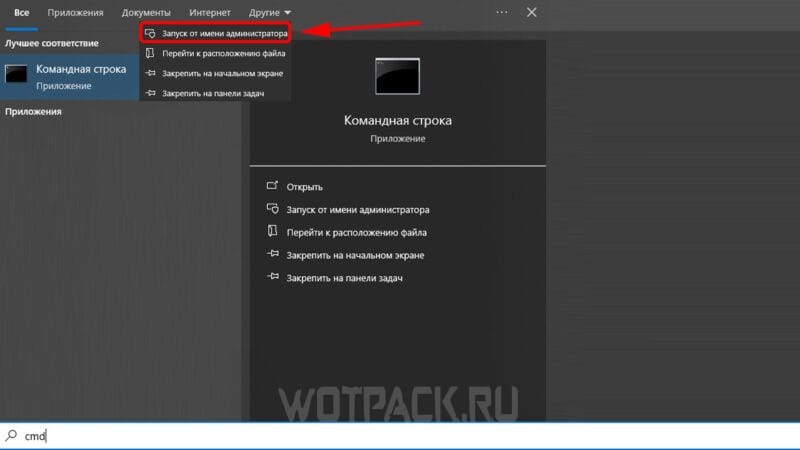
- Введите в строку поиска «cmd».

- Откройте приложение «Командная строка» от имени администратора с помощью правой кнопки мыши.
- Введите в консоль команду «Manage-bde –status» и дождитесь загрузки данных.
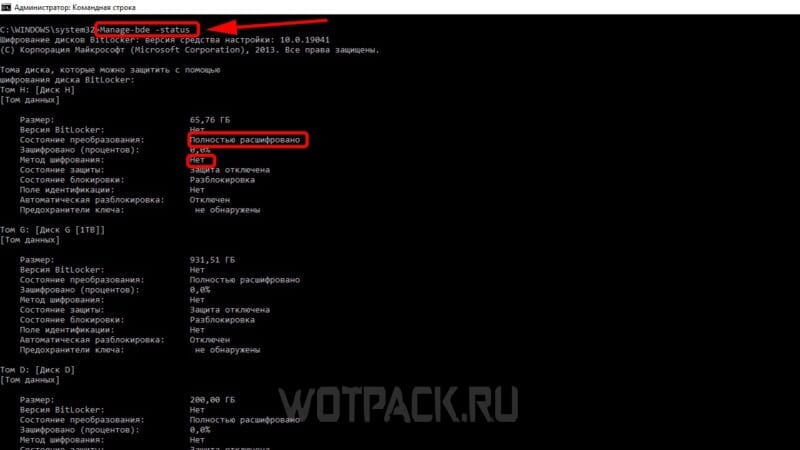
Если в пункте «Состояние преобразования» [Conversion Status] есть запись «Полностью расшифровано», а в графе «Метод шифрования» [Encryption Method] написано «Нет», то BitLocker отключен.
Нужно ли отключать шифрование диска BitLocker
Бесплатное шифрование диска BitLocker по умолчанию встроено в системы Windows 10/11, поэтому разберем, необходима ли активация этой защиты:
- Если случится так, что ПК будет украден или утерян, то злоумышленники не смогут завладеть данными, что хранятся на дисках.
- Когда пользователь включает компьютер и заходит в свою учетную запись, все данные расшифровываются, поэтому файлы будут защиты до принудительной блокировки ПК.
- Шифрование дисков может замедлить работу системы.
- Если ключ восстановления BitLocker [BitLocker Recovery Key] будет утерян, то зашифрованные данные не получится восстановить, а диск придется форматировать.
Таким образом БитЛокер рекомендуется использовать в том случае, когда есть риск потерять конфиденциальные данные или очень ценную информацию, а если компьютер используется только для видеоигр и воспроизведения медиафайлов, то активировать шифрование не обязательно.
Как отключить шифрование диска BitLocker
В следующих пунктах покажем, как выключить БитЛокер в Windows 10 и 11.
Отключить БитЛокер можно через консоль с помощью команды «Manage-bde -off диск» – где вместо слова «диск» необходимо вписать букву нужного тома.
На Windows 10
Следующие действия помогут отключить BitLocker в Windows 10:
- Войдите в систему с правами администратора.
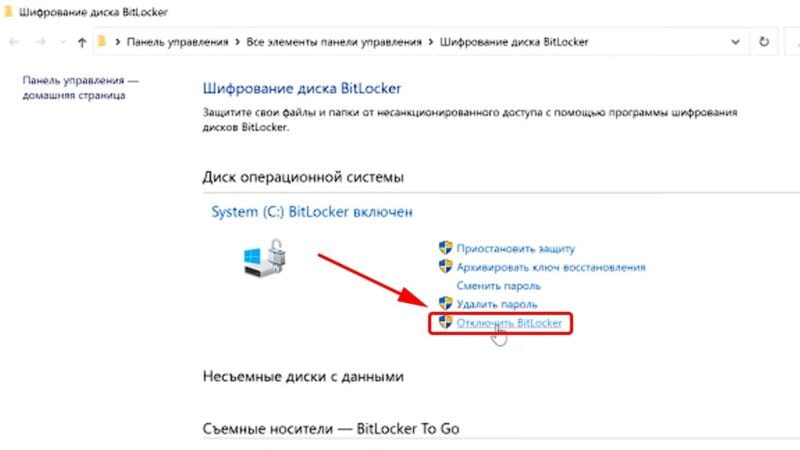
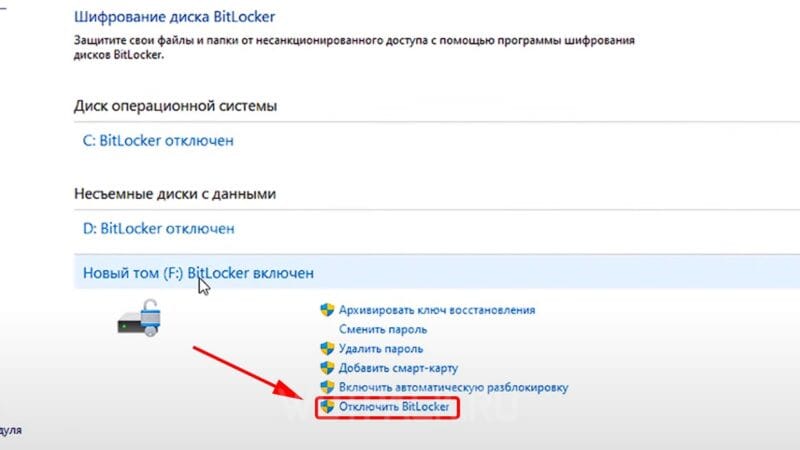
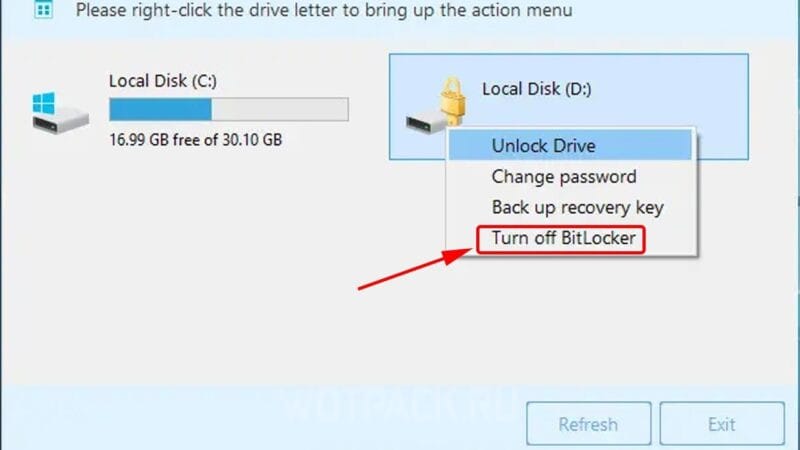
- Откройте панель управления, нажмите на раздел «Система и безопасность», после чего выберете пункт «Шифрование устройства» или «Шифрование диска BitLocker».
- Около иконки с нужным томом нажмите «Отключить BitLocker».
На Windows 11
Кратко поясним, как отключить BitLocker в Windows 11:
- Запустите Windows с правами администратора.
- Откройте через параметры системы раздел «Конфиденциальность и безопасность» и выберете пункт «Шифрование устройства» или «Шифрование диска BitLocker».
- Около нужного диска нажмите кнопку «Отключить BitLocker».
Как разблокировать диск с BitLocker
Системные диски с защитой БитЛокер можно разблокировать – расскажем об этом в следующих пунктах.
Существует два основных способа для разблокировки диска с защитой БитЛокер – с помощью пароля и через ключ восстановления.
На Windows 10
Перечислим действия, которые позволят разблокировать диск с БитЛокер в Windows 10:
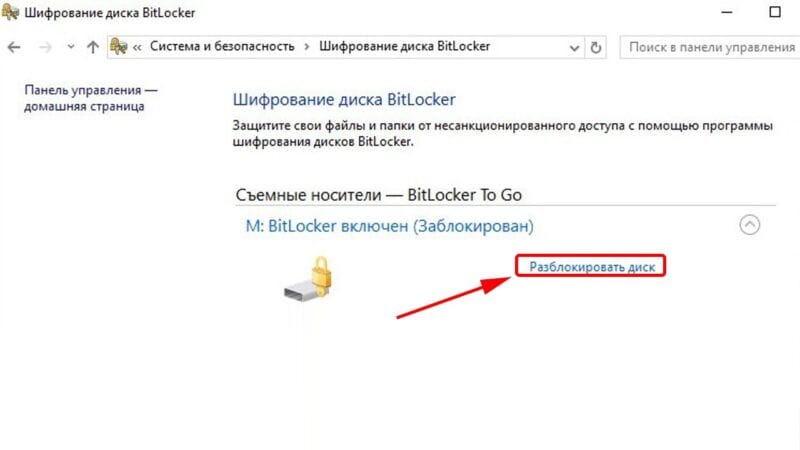
- Откройте панель управления компьютера, после чего перейдите в раздел «Система и безопасность» и нажмите на пункт «Шифрование диска BitLocker».
- В списке выберите зашифрованный том и нажмите «Разблокировать диск».
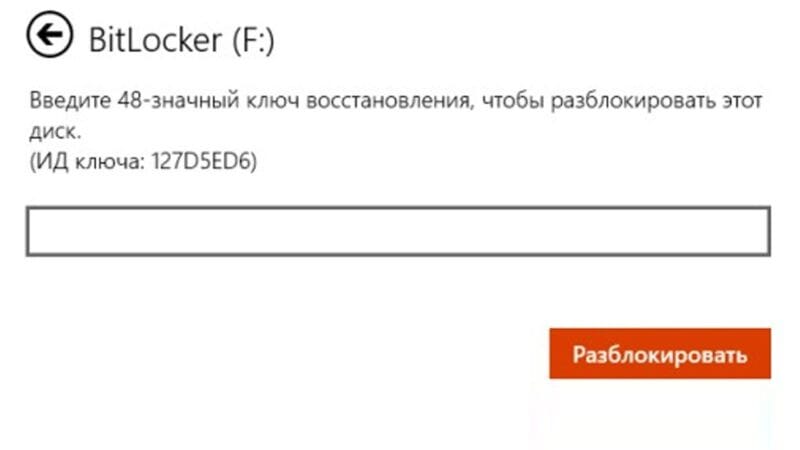
- Введите правильный пароль или подключите идентификационную карту, а если это невозможно, то используйте ключ восстановления через подраздел «Дополнительные параметры».
На Windows 11
Перечислим действия, которые позволят разблокировать диск с БитЛокер в Windows 11:
- Откройте параметры компьютера, перейдите в раздел «Конфиденциальность и безопасность», выберете пункт «Шифрование».
- Выберите нужный зашифрованный том и нажмите «Разблокировать диск».
- Введите требуемый пароль или ключ восстановления БитЛокер.
Как разблокировать диск без ключа
Бывают ситуации, когда ключ восстановления утерян и стоит вопрос, как разблокировать BitLocker. БитЛокер – это продукт Microsoft для обеспечения безопасности данных, поэтому сотрудники компании и служба поддержки не смогут предоставить новый индивидуальный ключ восстановления. Таким образом разблокировать диск без ключа невозможно.
Как включить шифрование диска BitLocker
Далее приведем инструкции, которые позволят активировать шифрование БитЛокер в Windows.
Обязательно сохраните ключ восстановления БитЛокер в удобном месте (распечатанный лист, текстовый файл или на электронной почте).
На Windows 10
Способ включить BitLocker в Windows 10:
- Войдите в систему под учетной записью администратора.
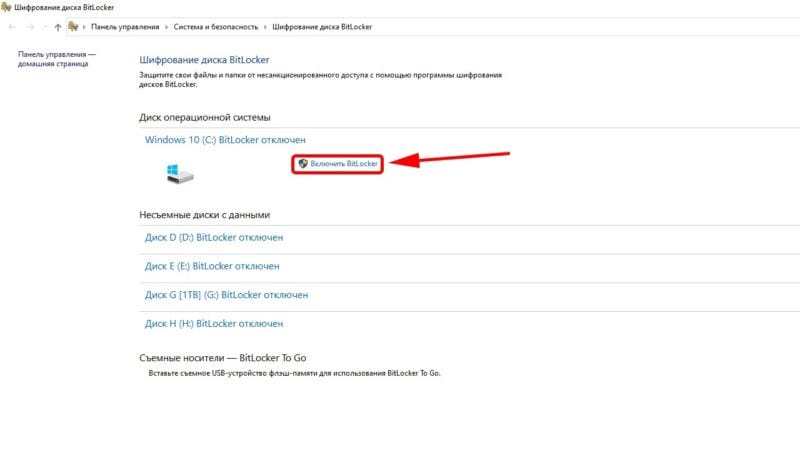
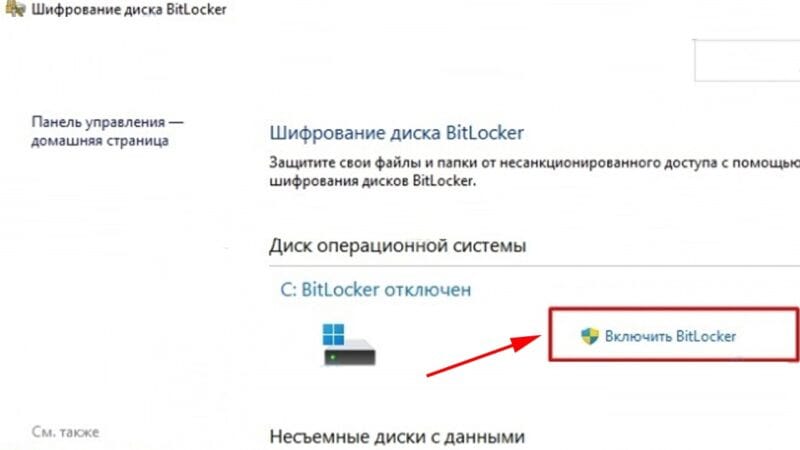
- Вбейте в строку поиска «BitLocker», чтобы открыть «Шифрование диска BitLocker», или откройте этот раздел через панель управления в пункте «Система и безопасность».
- Выберите из списка нужный диск операционной системы, после чего нажмите на кнопку «Включить BitLocker».
На Windows 11
Способ включить BitLocker в Windows 11:
- Запустите Windows с профиля администратора.
- Откройте через «Пуск» меню «Параметры».
- Выберите раздел «Конфиденциальность и безопасность».
- Откройте пункт «Шифрование устройства», а если он отсутствует, то – «Шифрование диска BitLocker».
- Для нужного диска выберете «Включить BitLocker».
Надеемся, что подготовленный материал помог узнать, что такое БитЛокер Windows, а также отключить его. Дополнительные вопросы можно оставить в комментариях.
December 7, 2018 updated by
Leave a reply »
EFS (Encrypting File System) is a feature built into the NTFS file system in Windows that lets you encrypt folders or files on the fly. Though it’s free, many users would like to use third-party alternatives like TrueCrypt, Lock My Folders. In this tutorial we’ll show you 3 ways to disable EFS in Windows 10 / 8 / 7.
Method 1: Disable EFS via Local Group Policy Editor
- Open the Local Group Policy Editor and navigate to:
Computer Configuration\Administrative Templates\System\Filesystem\NTFS.In the right pane, double-click on the “Do not allow encryption on all NTFS volumes” policy to edit it.

- Select Enabled and click OK.

- Reboot your computer for the policy to take effect. The option “encrypt contents to secure data” should be greyed out and you’re unable to encrypt or decrypt folders/files with EFS.
You can also use Registry Editor to enable the “Do not allow encryption on all NTFS volumes” policy. Just navigate to the registry key: HKEY_LOCAL_MACHINE\SYSTEM\CurrentControlSet\Policies, create a 32-bit DWORD NtfsDisableEncryption and set its value to 1.
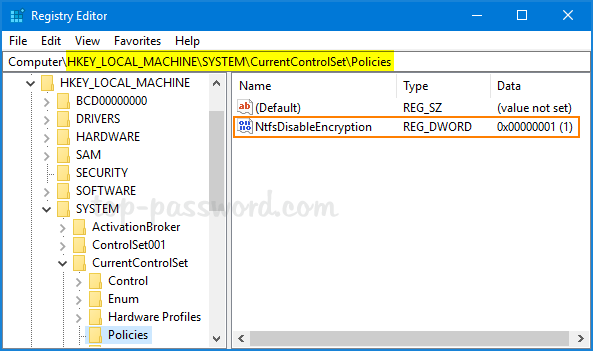
If you want to enable EFS encryption again, just set NtfsDisableEncryption to 0 and reboot your computer.
Method 2: Disable EFS via Command Prompt
Open the elevated Command Prompt, and run the following command to disable EFS:
fsutil behavior set disableencryption 1

If you ever want to turn on EFS again, execute this command:
fsutil behavior set disableencryption 0
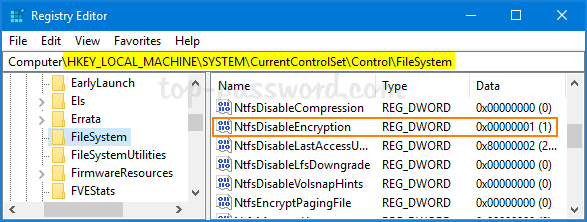
This task could also be done using a registry tweak. Just open Registry Editor and navigate to: HKEY_LOCAL_MACHINE\SYSTEM\CurrentControlSet\Control\FileSystem. Look for the 32-bit DWORD NtfsDisableEncryption and modify its value to 1.
Method 3: Disable EFS via Local Security Policy
- Use the Windows key + R to open the Run command. Type secpol.msc and hit Enter to open the Local Security Policy.
- Navigate to: Security Settings -> Public Key Policies -> Encrypting File System. Right-click on “Encrypting File System” and select Properties.

- Under the General tab, choose to not allow “File encryption Using Encrypting File System (EFS)”. Click OK and reboot your system.

- When you try to encrypt a folder/file, you’ll get the error message “This machine is disabled for file encryption“.
Revert the above change and you can get EFS encryption back to work.
- Previous Post: Auto Lock Windows 10 PC for All Users After Inactivity
- Next Post: EFS: Add Encrypt / Decrypt to Right-Click Context Menu in Windows 10