
Внизу меню Пуск в Windows 11 отображается раздел «Рекомендуем», где появляются значки недавно добавленных и часто используемых приложений, а также ссылки на последние открытые документы.
Если вы хотите убрать содержимое раздела «Рекомендуем», сделать это сравнительно легко и далее в инструкции будет показано, как именно. К сожалению, если использовать средства системы, сам раздел, даже пустой, продолжит показываться. Но при необходимости можно использовать сторонние утилиты, что также будет продемонстрировано в статье.
Очистка содержимого раздела «Рекомендуем» в Windows 11
Для того, чтобы убрать отдельные или все программы и документы из раздела «Рекомендуем» в меню Пуск Windows 11, используйте следующие шаги:
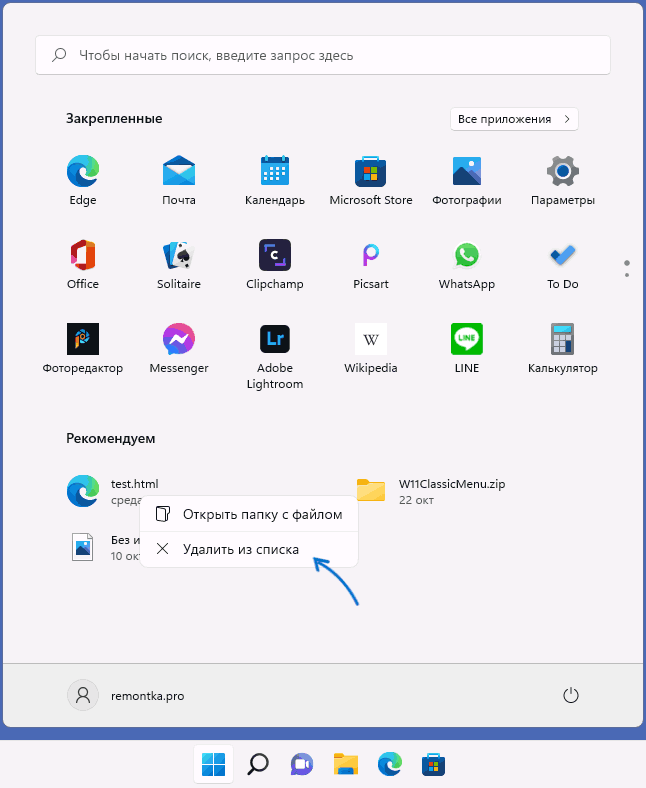
- Если вам требуется удалить только отдельные элементы в разделе «Рекомендуем», просто нажмите по таким элементам правой кнопкой мыши и выберите пункт «Удалить из списка» в контекстном меню.

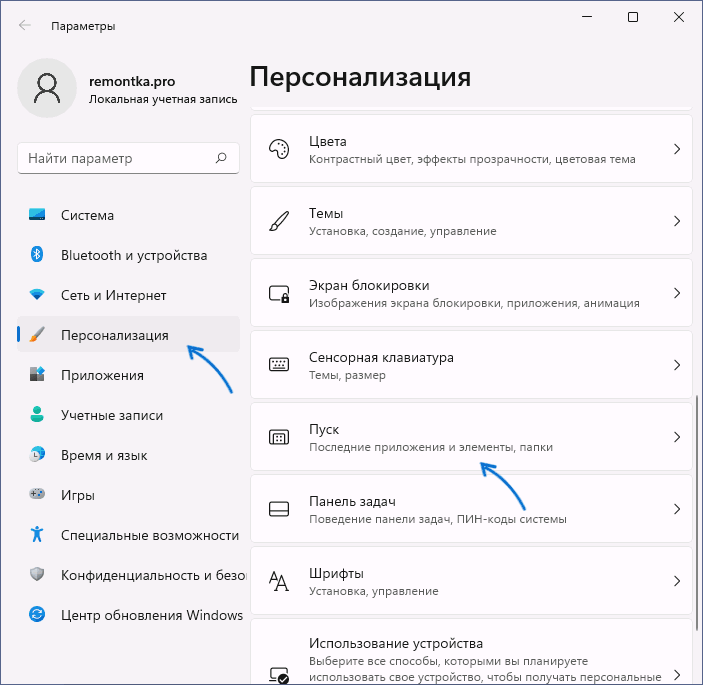
- При необходимости сделать так, чтобы в списке «Рекомендуем» всегда был пустым, зайдите в Параметры — Персонализация и откройте раздел «Пуск».

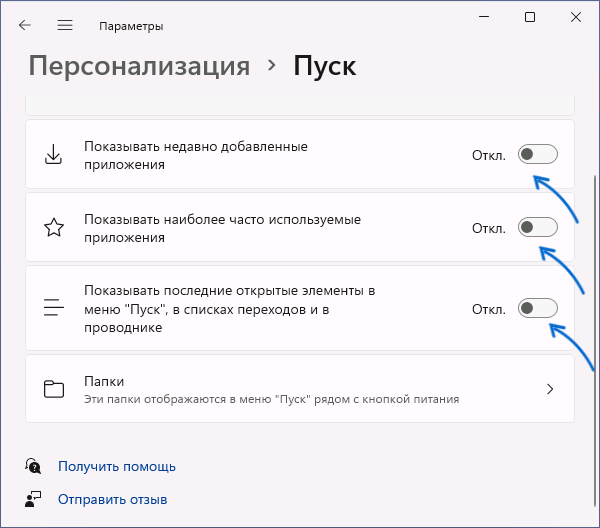
- Отключите пункты «Показывать недавно добавленные приложения», «Показывать наиболее частые приложения», «Показывать последние открытые элементы в меню Пуск, в списках переходов и в проводнике».

- Сразу после этого раздел «Рекомендуем» станет пустым и что-то новое в нём не появится.


Однако, сам раздел продолжит отображаться и всё так же будет занимать почти половину меню «Пуск» Windows 11.
Отключение раздела с рекомендациями в реестре
Следующий вариант, позволяющий убрать соответствующий раздел в меню Пуск — создание файла реестра со следующим кодом:
Windows Registry Editor Version 5.00

[HKEY_LOCAL_MACHINE\SOFTWARE\Microsoft\PolicyManager\current\device\Start]
"HideRecommendedSection"=dword:00000001

[HKEY_LOCAL_MACHINE\SOFTWARE\Microsoft\PolicyManager\current\device\Education]
"IsEducationEnvironment"=dword:00000001

[HKEY_LOCAL_MACHINE\SOFTWARE\Policies\Microsoft\Windows\Explorer]
"HideRecommendedSection"=dword:00000001
Создав указанный файл, «запустите» его, согласитесь с добавлением данных в реестр и перезагрузите компьютер — раздел «Рекомендуем» должен исчезнуть из меню Пуск.
Как полностью убрать раздел Рекомендуем в меню Пуск Windows 11 с помощью ExplorerPatcher
Средства системы позволяют убрать содержимое, но не раздел «Рекомендуем» в меню Пуск как таковой. Если же требуется полностью избавиться от раздела, можно использовать стороннее приложение ExplorerPatcher (обновление: в последних версиях Windows 11 лучше не использовать, может работать неправильно):
- Скачайте последнюю версию ExplorerPatcher с официальной страницы https://github.com/valinet/ExplorerPatcher/releases/latest и запустите приложение.
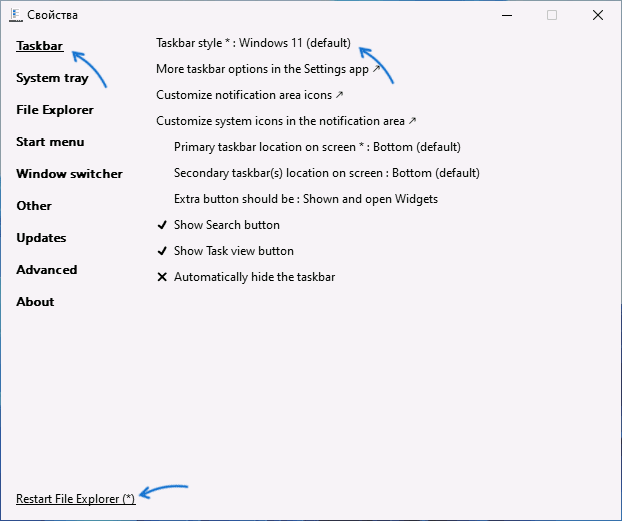
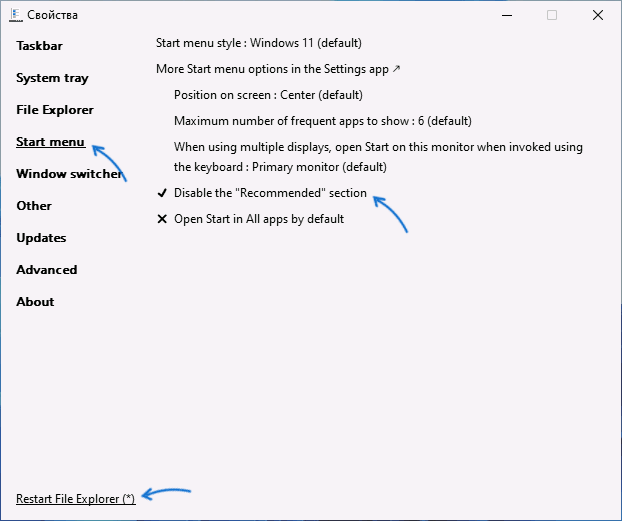
- Внешний вид панели задач изменится, но вы можете вернуть обычный: нажмите правой кнопкой мыши по пустому месту панели задач и выберите пункт «Свойства», в разделе «Taskbar» в пункте «Taskbar Style» выберите «Windows 11» и нажмите «Restart File Explorer» для перезапуска проводника.

- Перейдите в раздел «Start Menu» и включите опцию «Disable the Recommended section», перезапустите проводник.
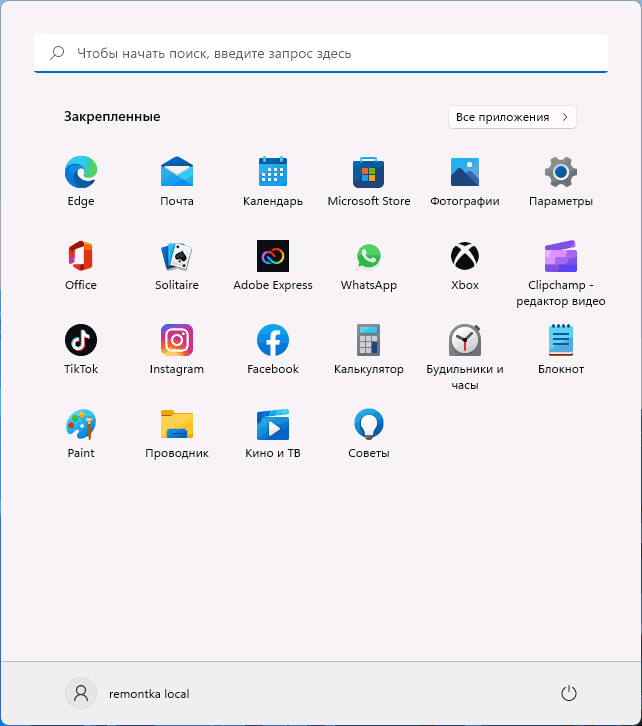
В результате раздел «Рекомендуем» полностью исчезнет из меню Пуск Windows 11, как показано на изображении ниже.
При желании вы можете сделать так, чтобы меню Пуск всегда открывалось в разделе «Все приложения», где рассматриваемый раздел отсутствует.
Каждый раз при открытии меню «Пуск» в Windows 11, помимо закреплённых приложений, в нижней части отображается раздел «Рекомендуем». Он включает в себя список файлов, папок и новых установок, которые недавно открывались или использовались, и активирован по умолчанию. Если вам не нравятся эти автоматические рекомендации, то их можно легко отключить. Тем не менее сразу обращаю ваше внимание: непосредственно сам раздел из меню «Пуск» никуда не исчезнет, оставив просто пустое место и занимая ту же половину окна.
- В тему: Всё о Windows 11 — секреты, инструкции, лайфхаки и полезные статьи
Как скрыть последние файлы и папки в меню «Пуск» Windows 11

- Запустите приложение «Параметры».
- Перейдите по следующему пути:
«Персонализация» → «Пуск» → «Показывать последние открытые элементы в меню „Пуск”, в списках переходов и в проводнике». - Нажмите на переключатель, чтобы отключить функцию.
-
Home
-
News
- How to Remove Recommended on Windows 11? Here Are 5 Ways!
How to Remove Recommended on Windows 11? Here Are 5 Ways!
By Daisy | Follow |
Last Updated
Some users report that when they try to remove Recommended section from the Start menu on Windows 11, it is not working. How to remove Recommended Windows 11? How to turn off Recommended Windows 11? This post from MiniTool introduces how to do that.
The Recommended section is a feature on Windows 11 that can display recently used or opened files, apps, and folders. However, some users report that anyone who opens the Start menu can see their latest used items. Now, we will introduce how to remove Recommended on Windows 11.
Tips:
If you want to provide better protection for your files and folders or get a better privacy experience, you can back up your files/folders to other places such as external drives, NAS, etc. To do that, you can try the free backup software – MiniTool ShadowMaker. This tool also supports encrypting your backup image.
MiniTool ShadowMaker TrialClick to Download100%Clean & Safe
Method 1: Via Settings
How to make Windows 11 remove Recommended? The first method for you is via Settings.
1. Press the Windows + I keys together to open the Settings application.
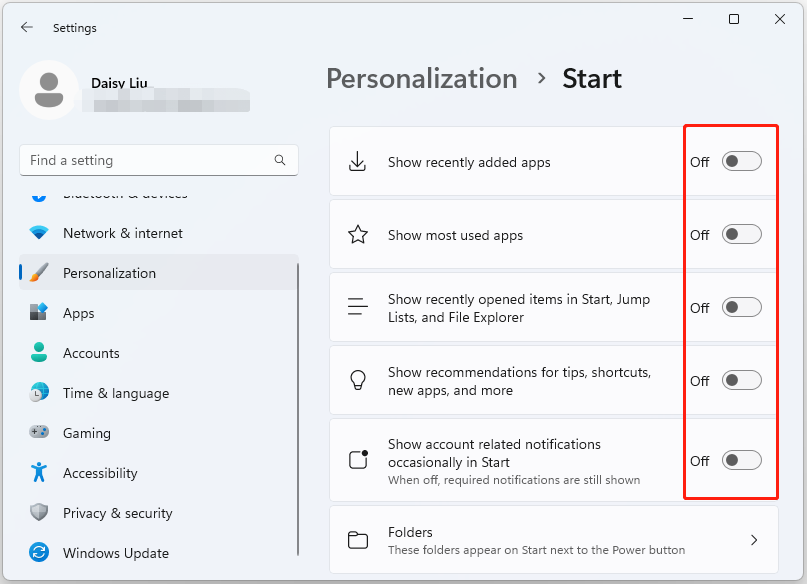
2. Go to Personalization > Start.
3. Turn off the following items:
- Show recently added apps
- Show most used apps
- Show recently opened items in Start, Jump Lists, and File Explorer
- Show recommendations for tips, shortcuts, new apps, and more
- Show account related notifications occasionally in Start
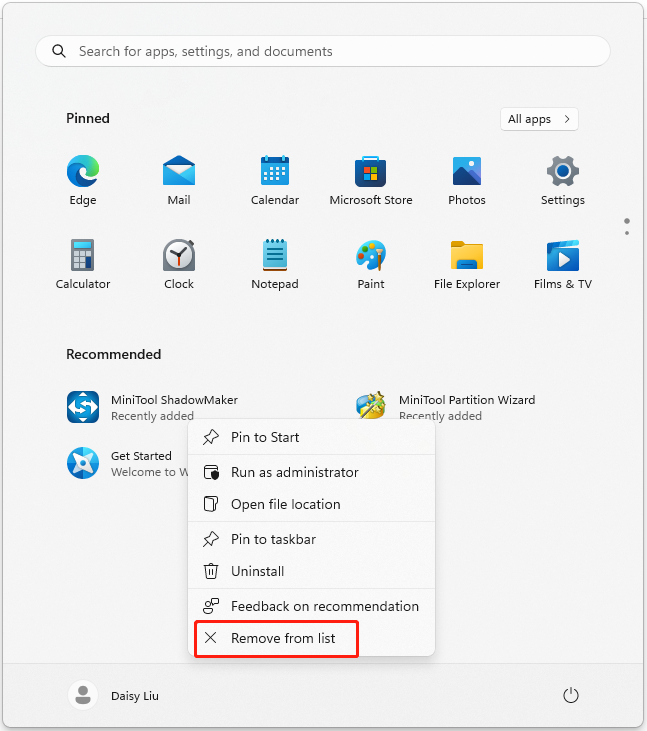
How to remove Recommended from Windows 11? You can also remove it via the Start menu.
Open Start. Under the Recommended section, right-click the item to select the Remove from list option. After you complete the steps, the item will no longer be available in the list. However, the file will still be available from the location.
Tips:
If you have many items, you will notice a More button in the top-right corner. You can also right-click items to remove them one by one.
Method 3: Via Windows PowerShell
How to remove Recommended Windows 11? Try to use Windows PowerShell to do that. This method is only working in Windows 11 Education/SE versions. It is not possible to disable it in Windows 11 Home/Pro editions.
1. Type Windows PowerShell in the Search box and choose Run as administrator.
2. Execute the following command and press the Enter key.
New-ItemProperty -Path “HKLM:\SOFTWARE\Policies\Microsoft\Windows\Explorer” -Name “HideRecommendedSection” -PropertyType DWord -Value 1 -Force
Method 4: Via Group Policy
Note:
This method is only working in Windows 11 Education/SE versions. It is not available in Windows 11 Home/Pro editions.
1. Press the Windows + R keys to open the Run dialog box. Type gpedit.msc and press OK to open the Group Policy Editor window.
2. Go to the following location:
Computer Configuration > Administrative Templates > Start Menu and Taskbar
3. Double-click the Remove Recommended section from Start Menu setting.
4. Select the Enabled option in that window. Click Apply > OK.
Method 5: Via Registry Editor
Note:
This method is only working in Windows 11 Education/SE versions. You can’t turn off it in Windows 11 Home/Pro editions.
1. Press the Windows + R keys to open the Run dialog box. Type regedit.msc and press OK to open Registry Editor.
2. Go to the following path:
HKEY_LOCAL_MACHINE\SOFTWARE\Policies\Microsoft\Windows\Explorer
3. Find the HideRecommendedSection value and double-click it to set its value to 1.
Final Words
How to remove Recommended from Windows 11? How to make Windows 11 remove Recommended from the Start menu? You can find answers in the above content. I hope that this post can be useful to you.
About The Author
Position: Columnist
Having been an editor at MiniTool since graduating college as an English major, Daisy specializes in writing about data backups, disk cloning, and file syncing as well as general computer knowledge and issues. In her free time, Daisy enjoys running and going with friends to the amusement park.
Windows 11 Start menu includes a Recommended section (just below the Pinned apps) showing new apps, recently added files, most used items, etc. If you find it useful, you can keep it that way. Those who don’t find it that helpful can completely remove or hide the Recommended section from Windows 11 Start menu using Group Policy, Registry or ExplorerPatcher.

We have already seen how to hide Recently added apps in Start Menu of Windows 11. Now let’s see how to completely remove or hide the entire Recommended section.
To remove the Recommended section from the Start menu in Windows 11, you can use the following options:
- Group Policy Editor
- Registry Editor
- ExplorerPatcher.
Let’s check these options.
1] Group Policy Editor

The Group Policy Editor feature of Windows 11 also comes with a remove Recommended section from the Start menu setting, but here’s a little catch. This setting is supported on Windows 11 SE edition (designed for low-end devices for education purposes) and not Pro, Enterprise, and other editions of Windows 11. We might get the same or similar setting for other editions in the future. The steps to access this policy setting are as follows:
- Open the Group Policy Editor window
- Expand the Computer Configuration, then Administrative Templates, and select Start Menu and Taskbar
- Double-click on the Remove Recommended section from Start Menu setting. This will open a new window
- Select the Enabled option in that window
- Press the Apply button and then the OK button.
Later, if you want to show the Recommended section in the Start menu, you can follow these steps and select the Not Configured option for the same Group Policy setting. Use Apply button and OK button to save the setting.
Read: Disable Recommended section in Explorer Home in Windows 11
2] Registry Editor
A corresponding Registry entry can be found for the same Group Policy Editor setting. But again, it is not for Pro and other editions of Windows 11. That particular Registry entry is present under the following path:
HKEY_LOCAL_MACHINE\SOFTWARE\Policies\Microsoft\Windows\Explorer
There will be a HideRecommendedSection DWORD value that is used for the Recommended section of the Start menu. If the DWORD value is set to 1, the Recommended section is disabled in the Start menu. If you do not see it, you may need to create it.
If there is no such DWORD value or the DWORD value is present and it is set to 0, then Recommended section will be there on the Start menu.
3] ExplorerPatcher

ExplorerPatcher is an open-source tool that lets you choose between Windows 11/10 taskbar, Alt+Tab switcher style, add Windows 10 Task View button on the taskbar, disable Windows 11 new context menu in File Explorer, and more. The option to disable Recommended section from Windows 11 Start menu is also available to use. Here are the steps:
- Download the EXE file of ExplorerPatcher and execute it
- After that, it will automatically apply the pre-set settings and you will see the changes on the taskbar, right-click menu, etc., based on those settings
- Now you need to open the Properties window of this tool. For this, right-click on the taskbar, and click on the Properties option
- Access the Start menu section available on its Properties window
- Click on Disable the “Recommended” section option.
Now open the Start menu and you will see that the Recommended section has vanished.
You can follow the above steps and use the same option to bring back the Recommended section in Windows 11 Start menu.
This is one of the easiest ways to do this. The only thing you need to take care of is this tool automatically applies some settings that you may not like. So, in that case, you need to use its Properties window and undo the changes using different menus.
If you don’t want this tool, uninstall it from the Settings app or Control Panel.
Related: How to customize Windows 11 Start Menu
I hope it is helpful.
How do I remove suggestions from my Start menu?
If you want to remove app suggestions from the Start menu in Windows 10, then you can right-click on a suggested app and use the Turn off all suggestions option. You can also turn off Occasionally show suggestions in Start option in the Settings app for it. On the other hand, if you want to turn off recommended content (that includes recently added apps, opened items, etc.) in the Start menu of Windows 11, then access the Start page available in the Personalization category in the Settings app.
How do I get the Classic Start menu in Windows 11?
There is a Registry setting to switch back to the classic Start menu in Windows 11, but it doesn’t work with newer versions of Windows 11. But, you can use some third-party Start menu alternative software like Start Menu X, Open Shell, etc., that comes with a classic Start menu feature, different layouts, and other interesting options.
Read next: How to show more Pinned Tiles on Windows 11 Start Menu.

This tutorial will show you how to remove the Recommended section from the Start Menu for specific users or all users in Windows 11.
The Start menu in Windows 11 is comprised of three sections: Pinned, All apps, and Recommended.
The Recommended section on the Start menu shows a list of your recently added apps, recently opened items, and websites.
You can make Windows 11 think it’s an Education edition to make this work.
Starting with Windows 11 build 22635.5025 (Beta 23H2) and build 26120.3380 (Beta/Dev 24H2), Microsoft is trying out a new change where we will recommend a snap group in the Recommended section of the Start menu based on two apps that are most likely to be snapped together.
You must be signed in as an administrator to remove the Recommended section from the Start Menu.
Contents
- Option One: Remove Recommended Section from Start Menu for All or Specific Users in Local Group Policy Editor
- Option Two: Remove Recommended Section from Start Menu for All Users using REG file
EXAMPLE: Add and Remove Recommended section on the Start Menu

Option One
Remove Recommended Section from Start Menu for All or Specific Users in Local Group Policy Editor
1 Open the all users, specific users or groups, or all users except administrators Local Group Policy Editor for how you want this policy applied.
2 Navigate to the policy location below you want in the left pane of the Local Group Policy Editor. (see screenshot below)
(All users)
Computer Configuration > Administrative Templates > Start Menu and Taskbar
OR
(Specific user or group)
User Configuration > Administrative Templates > Start Menu and Taskbar

3 In the right pane of Start Menu and Taskbar in the Local Group Policy Editor, double click/tap on the Remove Recommended section from Start Menu policy to edit it. (see screenshot above)
4 Do step 5 (add) or step 6 (remove) below for what you want.
5 Add Recommended Section to Start Menu
This is the default setting.
A) Select (dot) Not Configured. (see screenshot below)
B) Click/tap on OK, and go to step 7.

6 Remove Recommended Section from Start Menu
A) Select (dot) Enabled. (see screenshot below)
B) Click/tap on OK, and go to step 7.
7 Close the Local Group Policy Editor.
8 Either restart explorer process, sign out and sign in, or restart the computer to apply.
Option Two
Remove Recommended Section from Start Menu for All Users using REG file
1 Do step 2 (add) or step 3 (remove) below for what you would like to do.
2 Add Recommended Section to Start Menu for All Users
This is the default setting
A) Click/tap on the Download button below to download the file below, and go to step 4 below.
Add_Recommended_section_to_Start_Menu_for_all_users.reg
(Contents of REG file for reference)
Code:
Windows Registry Editor Version 5.00

[HKEY_CURRENT_USER\Software\Policies\Microsoft\Windows\Explorer]
"HideRecommendedSection"=-

[HKEY_LOCAL_MACHINE\SOFTWARE\Policies\Microsoft\Windows\Explorer]
"HideRecommendedSection"=-
3 Remove Recommended Section from Start Menu for All Users
A) Click/tap on the Download button below to download the file below, and go to step 4 below.
Remove_Recommended_section_from_Start_Menu_for_all_users.reg
(Contents of REG file for reference)
Code:
Windows Registry Editor Version 5.00

[HKEY_CURRENT_USER\Software\Policies\Microsoft\Windows\Explorer]
"HideRecommendedSection"=-

[HKEY_LOCAL_MACHINE\SOFTWARE\Policies\Microsoft\Windows\Explorer]
"HideRecommendedSection"=dword:00000001
4 Save the REG file to your desktop.
5 Double click/tap on the downloaded REG file to merge it.
6 When prompted, click/tap on Run, Yes (UAC), Yes, and OK to approve the merge.
7 Either restart explorer process, sign out and sign in, or restart the computer to apply.
8 You can now delete the downloaded REG file if you like.
That’s it,
Shawn Brink
Related Tutorials
- Clear Start Menu Recommended Section in Windows 11
- Add or Remove Recommended Websites on Start Menu in Windows 11
- Change Start Layout to Show More Pins or More Recommendations in Windows 11
- Enable or Disable Recommended Tips, Shortcuts, New Apps, and more on Start Menu in Windows 11
-
Add_Recommended_section_to_Start_Menu_for_all_users.reg
Add_Recommended_section_to_Start_Menu_for_all_users.reg
800 bytes
· Views: 2,181
-
Remove_Recommended_section_from_Start_Menu_for_all_users.reg
Remove_Recommended_section_from_Start_Menu_for_all_users.reg
830 bytes
· Views: 5,543