
You can disable blur on the sign-in screen in Windows 11 if you don’t like this effect. Windows 11 inherited it from its predecessor, which has the same look and feel since 2019.
Microsoft is using the blur effect for the sign-in screen to make you focus on your password and other credentials. To prevent distraction, the login screen image background appears with acrylic blur. This style also follows the Fluent Design paradigm Microsoft is actively using these days.

If you prefer to have a clear looking login screen background image, there are a couple of methods to disable blur. You can enable a special Group Policy option, which also has a corresponding Registry tweak. Also, you can turn off transparency effects on Windows 11. This will also remove blur from the sign-in screen for your user account. Let’s review these methods.

To disable the blur effect on the sign-in screen in Windows 11, do the following.
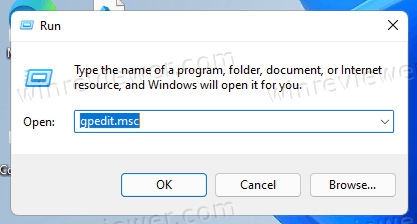
- Press Win + R and type
regeditinto the Run box to open the Registry editor. - Navigate to the following branch:
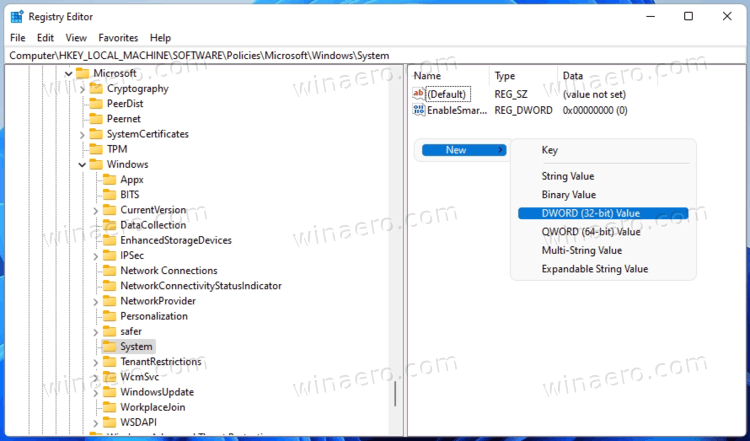
HKEY_LOCAL_MACHINE\SOFTWARE\Policies\Microsoft\Windows\System. If this key isn’t present on your device, then create it manually. - On the right, create a new 32-bit DWORD value named
DisableAcrylicBackgroundOnLogon.
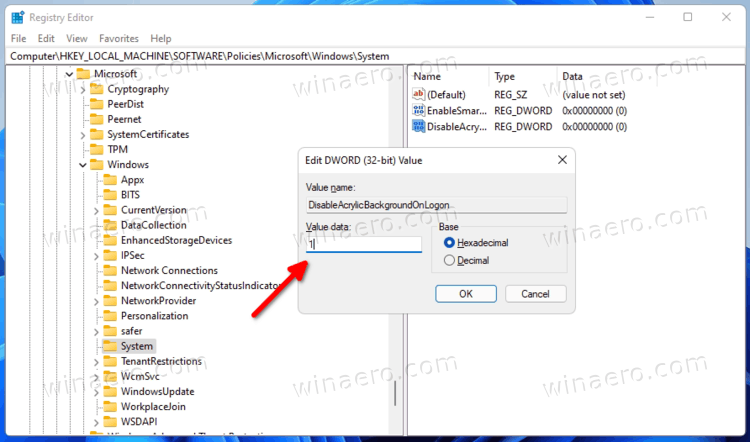
- Set its value data to 1 to disable the blur effect.

You are done. Now you can sign out from Windows 11 and see the change in action. The sign-in screen image background won’t be blurred any longer.
The reviewed method is suitable for all editions and versions of Windows 11.
Download Registry Files
To save you some time, I’ve prepared ready-to-use REG files. Using them, you can enable or disable blur with a couple of clicks.
- Download the following ZIP archive.
- Extract its contents to any folder of your choice, e.g. right to the Desktop.
- Double-click the file
Disable Blur Effect On Sign-in Screen Background.regand confirm the UAC prompt to disable blur. - At any moment later, you can undo the change using the included
Enable Blur Effect On Sign-in Screen Background.regfile.
That was easy.
However, if you are running an advanced edition of Windows 11, such as Pro, Education, or Enterprise, you can use the Local Group Policy Editor app. It is a useful tool to change many options of the OS. You can use it to disable the acrylic blur effect on the login screen in Windows 11.
Disable Acrylic Blur on Login Screen in Group Policy
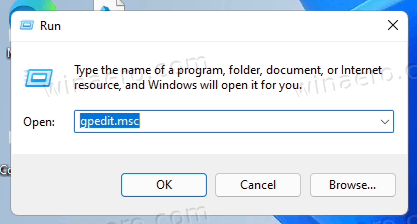
- Press the Win + R shortcut keys to open the Run dialog and type
gpedit.msc.
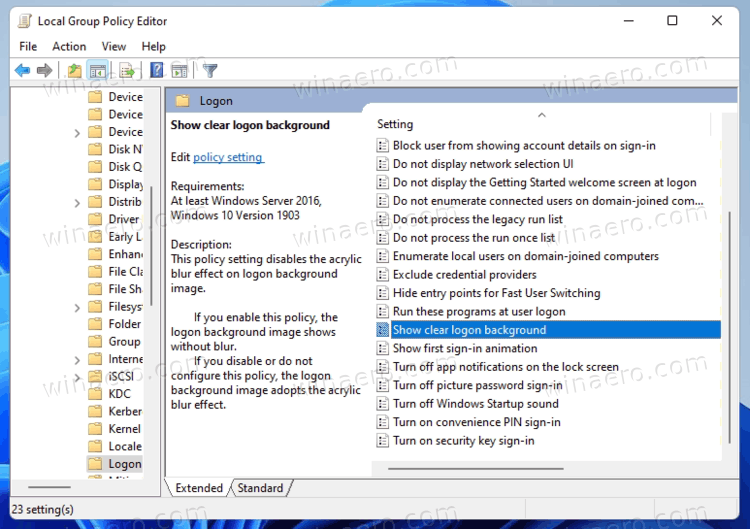
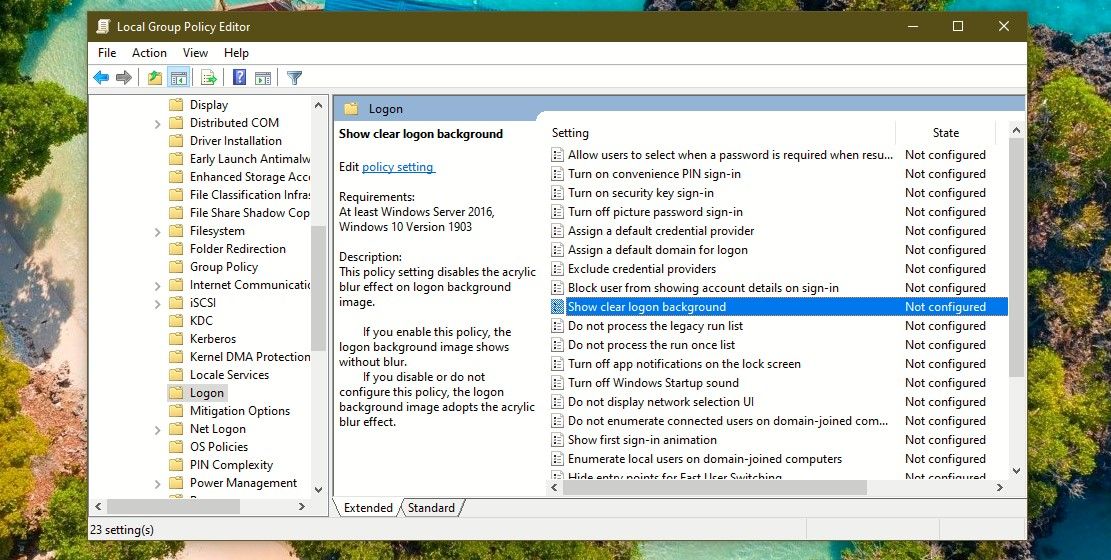
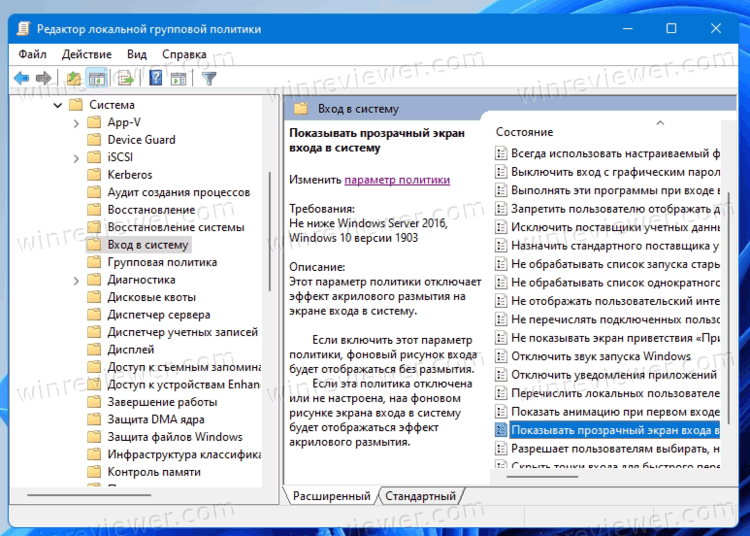
- On the left, navigate to Computer Configuration\Administrative Templates\System\Logon.
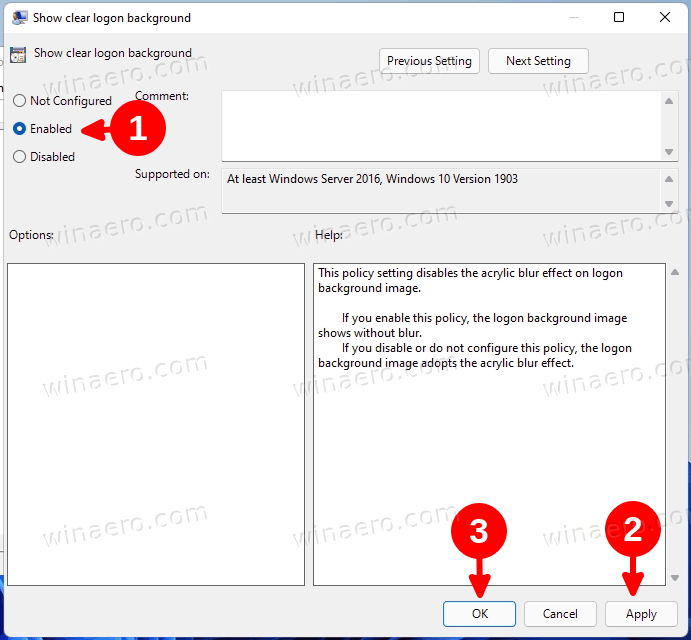
- On the right, double-click the Show clear logon background policy option.

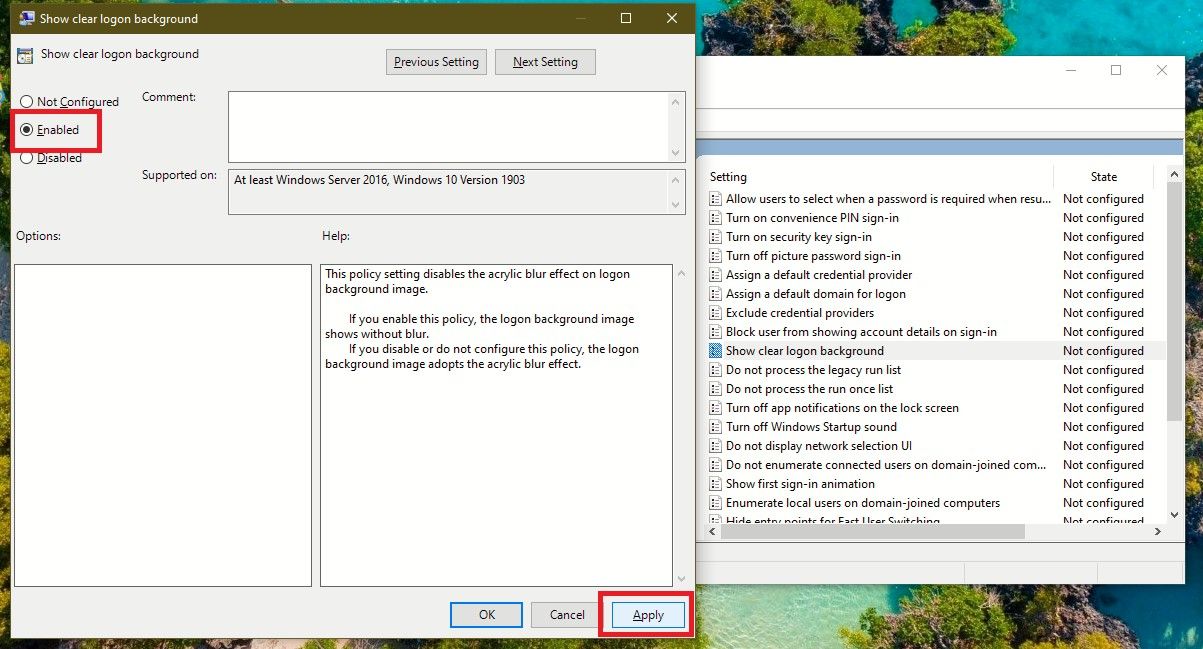
- Set it to Enabled in the next dialog window.

- Click Apply and OK.
You are done. The blur effect is now disabled.
Finally, as above mentioned, simply disabling transparency effect for your user account will also remove the blurry style of the login screen. In Windows 11, it is part of the transparency effects.
Disable blur for the Windows 11 login screen background with transparency
- Open the Settings app by pressing the Win + I hotkey.
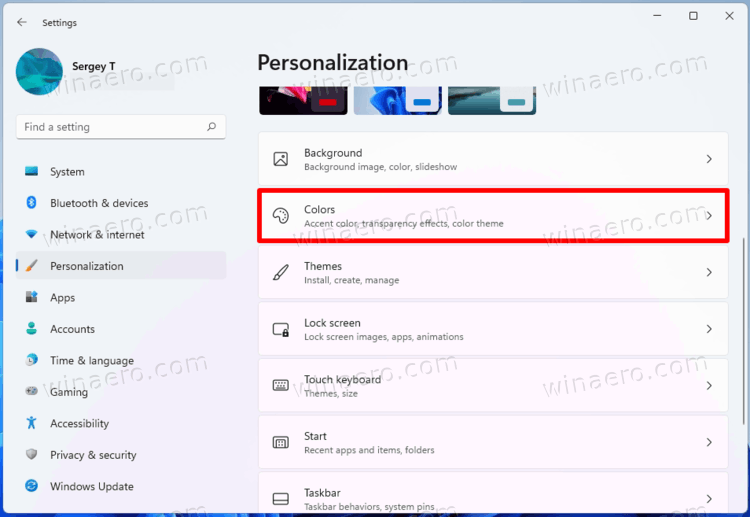
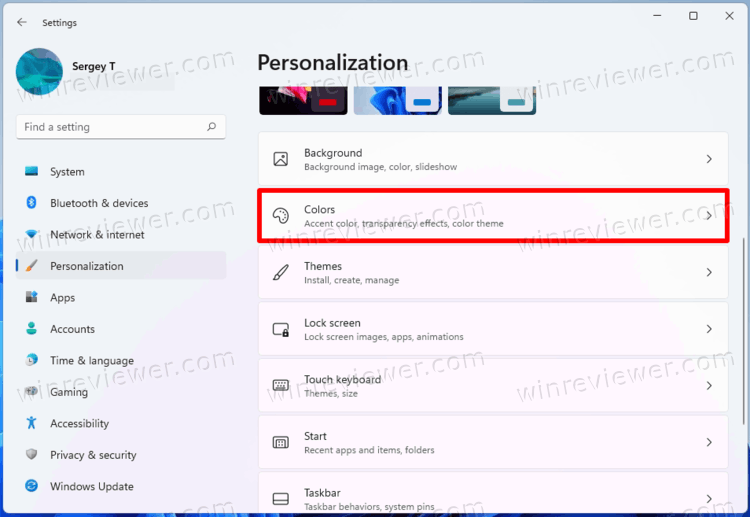
- Click on Personalization section on the left side.
- On the right, click on the Colors button.

- Turn off the Transparency effects toggle option.


This will immediately extra visual effects in Windows 11, along with the acrylic blur for the login screen.
The obvious downside of this method is that your Start menu and taskbar will look less fancy. They, along with Quick Settings and Notification Center flyouts will appear of the opaque color. Also, it changes how context menu and Settings look on the screen. If you are fine with this change, then you can stick with the transparency option. Otherwise, go with the Group Policy tweak.
That’s it.
Support us
Winaero greatly relies on your support. You can help the site keep bringing you interesting and useful content and software by using these options:
If you like this article, please share it using the buttons below. It won’t take a lot from you, but it will help us grow. Thanks for your support!
As a Windows user, you’d probably be signing in to your PC a few times every day. It’s the beginning of working, connecting, enjoying, or achieving whatever you want in your computing lifestyle.
And if the fuzzy sign-in screen doesn’t seem like a good start, there are ways you can clear the blur and enjoy the view. Let’s explore how.
Don’t Like Signing In With a Blurry Image? Unblur it and Enjoy the View
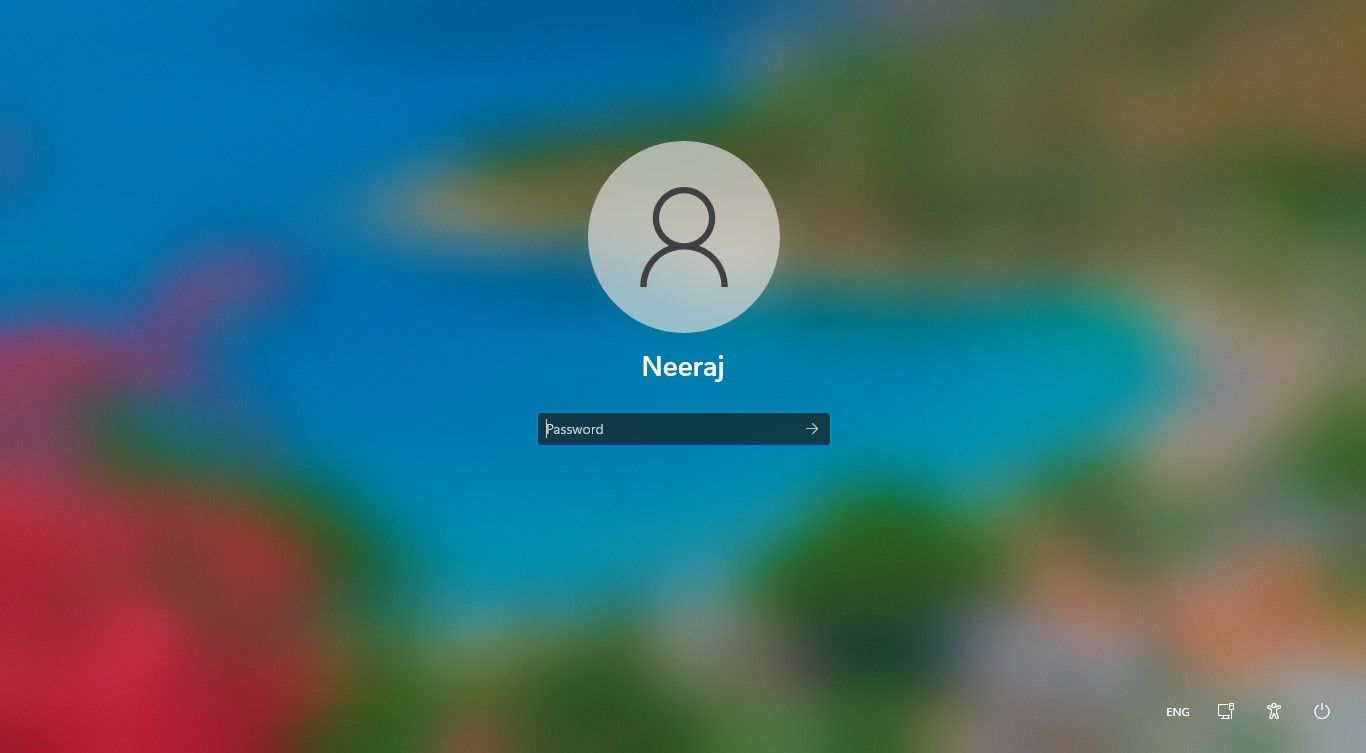
When you sign in to your Windows PC, the background of the sign-in screen is blurred and has a translucent effect. This is the Acrylic Blur Effect, a part of Microsoft’s Fluent Design that is enabled by default.
However, if you prefer not to sign in to a blurry image and want a clear view of the background image, you can easily disable the acrylic blur.
Moreover, you can enjoy some breathtaking images that are enabled by Windows Spotlight or even choose a picture that you like to appear on your sign-in screen.
But first, let’s explore the three ways how you can turn off the blur effect on the Windows sign-in screen.
How to Disable the Acrylic Blur Effect Through Settings on Windows 10 and 11
It’s easy to unblur the sign-in screen via Settings. To do that on Windows 10 and 11:
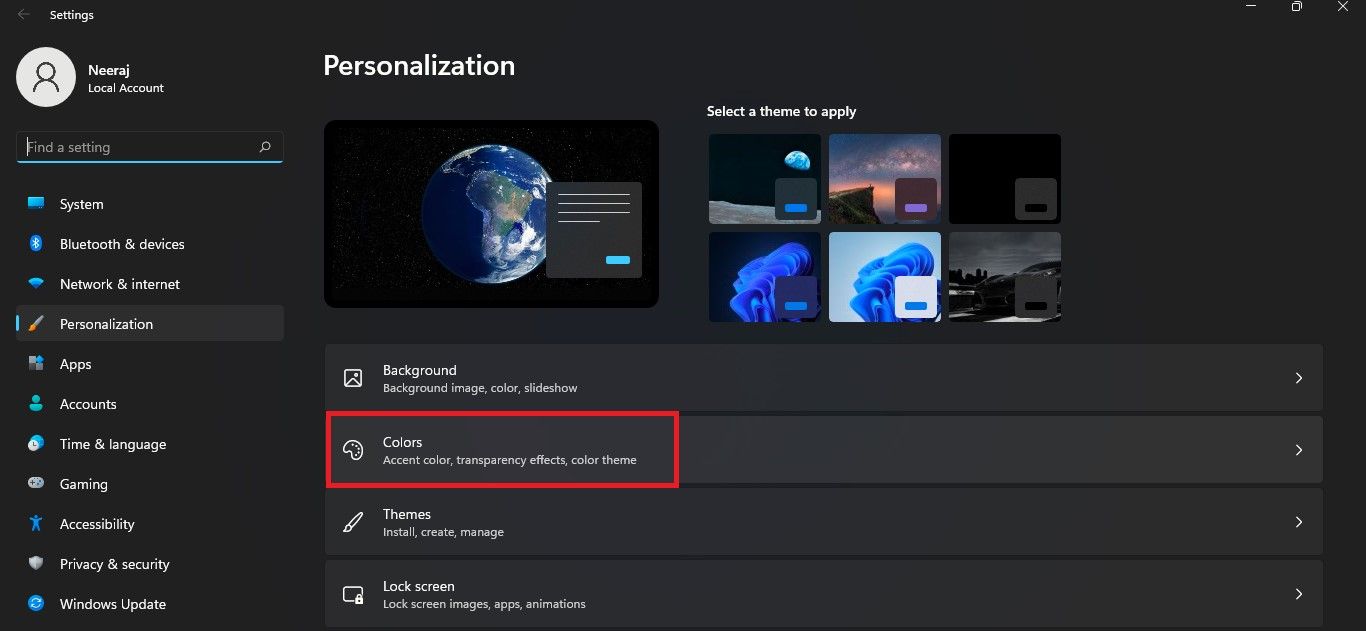
- Press Win + I keys to open Settings and then click Personalization.
- In Windows 11’s Settings, Personalization is on the left pane. Alternatively, you can right-click on the desktop and select Personalize.
-
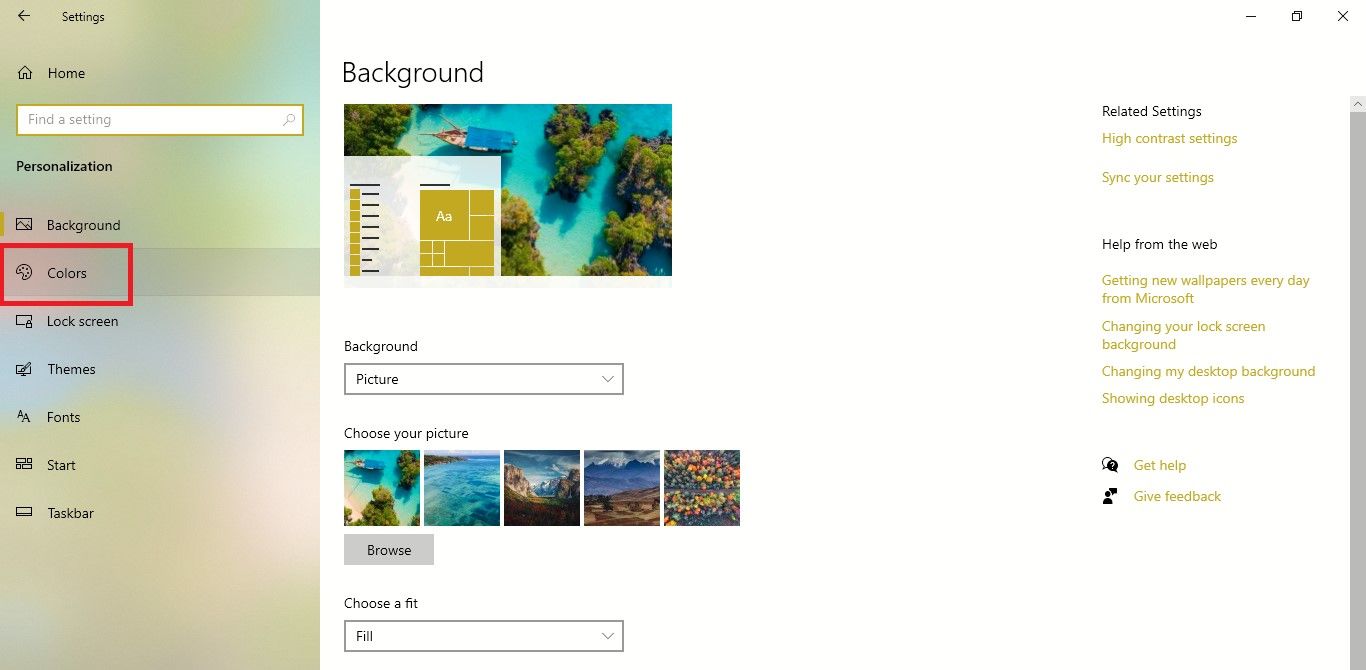
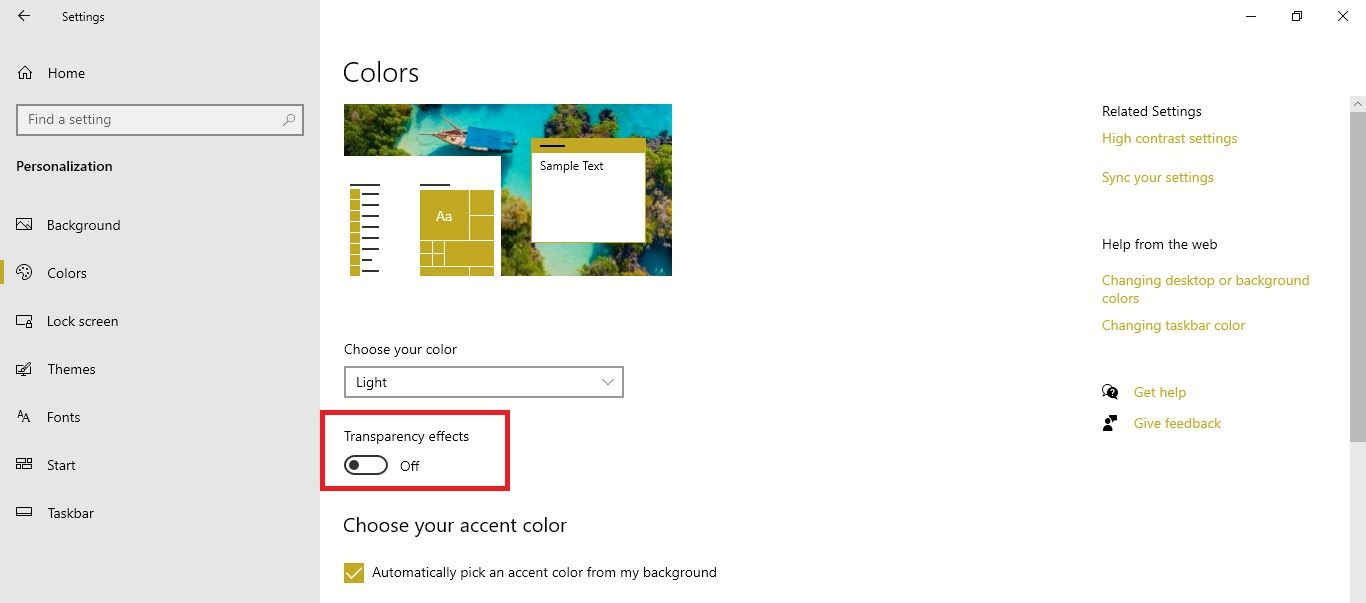
The Personalization screen will open. On Windows 10, click on Colors in the left pane.

-
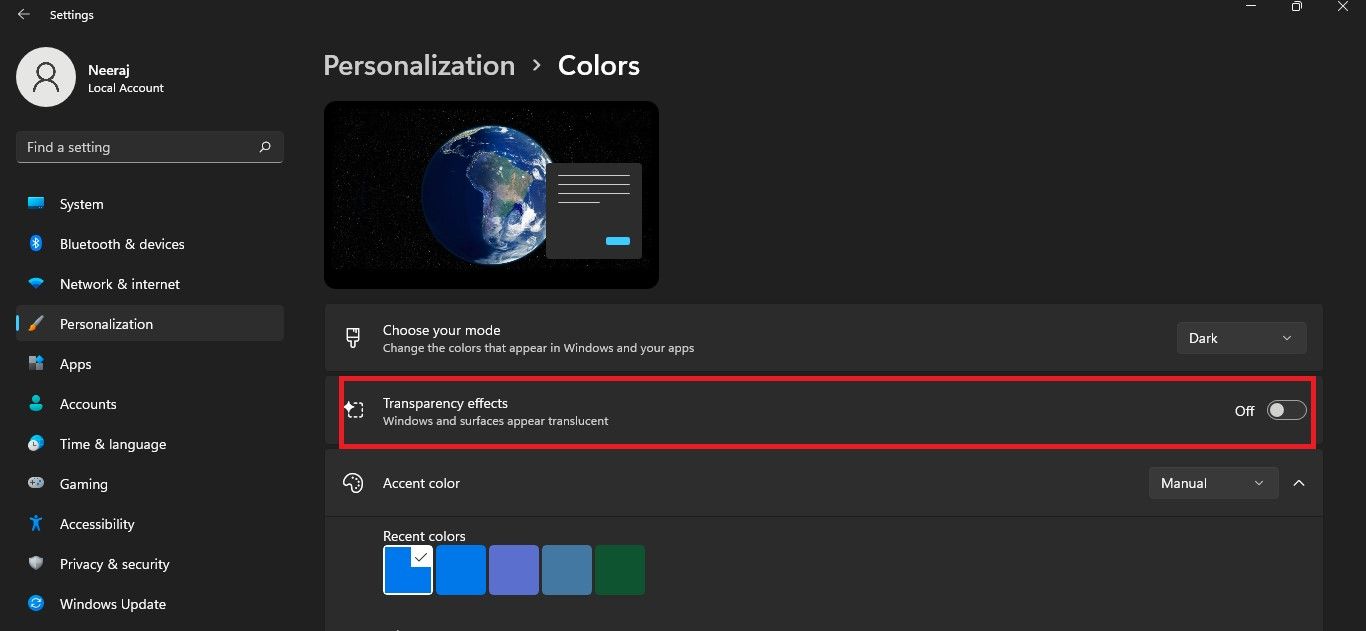
On Windows 11, the Colors tab is on in the right pane.

-
On Windows 10, on the Colors screen in the right pane, Transparency effects will be on by default. Simply toggle off the Transparency effects.

-
On Windows 11, Transparency effects is in the right pane. Toggle it off.
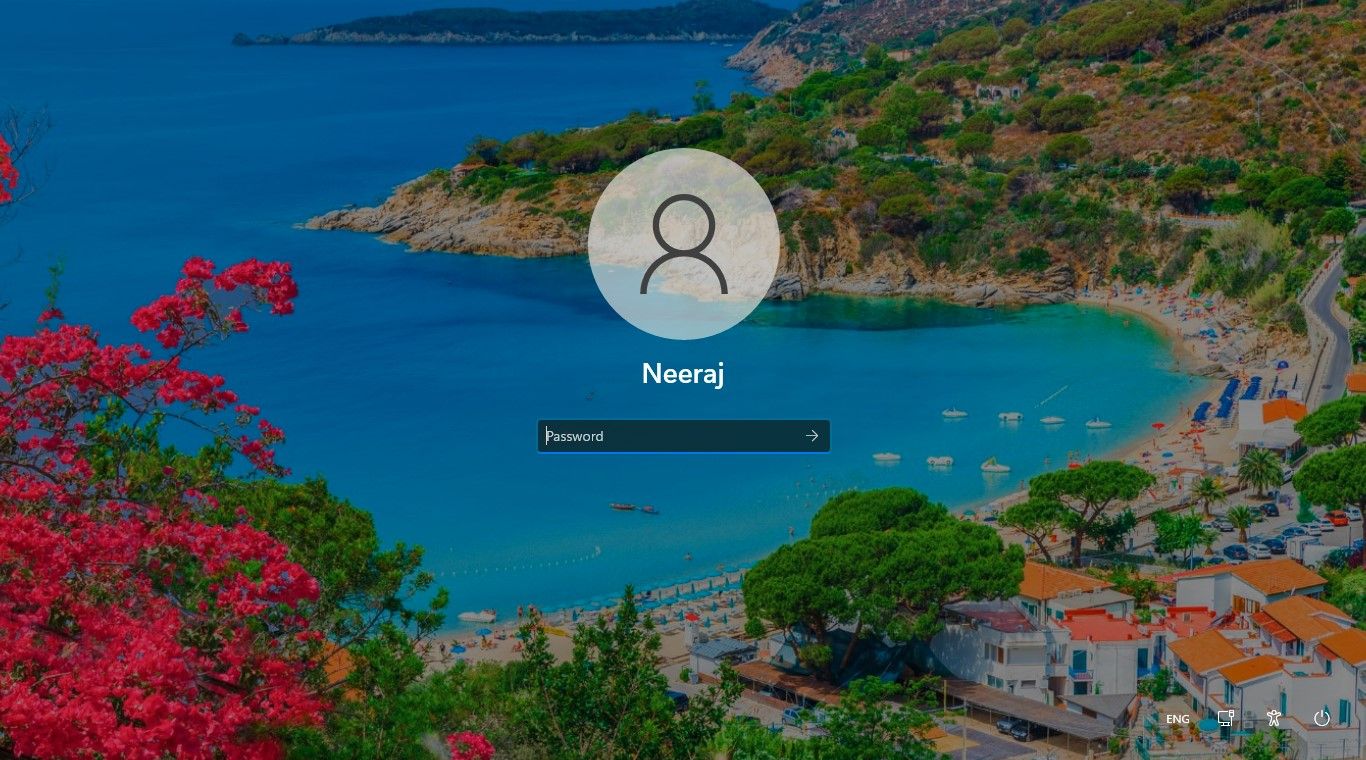
That’s it. Now, whenever you restart or sign in to your PC, you will see the background image without the blur effect.
To check it without restarting your computer, press the Win + L keys together. The Lock screen will appear. Then click on the Lock screen, and the sign-in screen will show up. If everything worked out, your view won’t get blurred out when you sign in.
There are a few other ways to turn off Transparency effects. However, if you unblur the sign-in screen by turning the Transparency effects off, it would also disable the effects on other areas of Windows UI, like the taskbar, Start menu, and Action center.
Transparency effects add an enhanced visual appeal to the Windows UI and make overlapping screen elements blend seamlessly with each other and the background. If you would like this translucent effect on the Start menu, taskbar, and other elements, you should try the other two ways mentioned below to unblur the sign-in screen.
How to Disable the Acrylic Blur Effect Using the Local Group Policy Editor
You can use this method if you have the Windows 10 Pro and Enterprise editions, as the Windows Home edition does not have the Local Group Policy Editor. However, there’s a workaround to get the Local Group Policy Editor on a Windows Home edition PC.
So let’s see how to unblur the sign-in screen using the Local Group Policy Editor:
-
Press Win + R to open the Run box. Type gpedit.msc and hit Enter.

- The Group Policy Editor will open. Now navigate to the following path in the left pane: Computer Configuration\Administrative Templates\System\Logon.
- Under Computer Configuration, click the down arrow next to Administrative Templates to expand it.
- In Administrative Templates, expand the System folder and click on Logon.
-
Then in the right pane, scroll down to the following policy: Show clear logon background. If it’s set to Not configured, you’ll need to change it.

-
Double-click the policy to open it and select Enabled. Then click the Apply button and then click OK.


This should disable the acrylic blur effect and show a clear background on the sign-in screen—while ensuring that other areas of the Windows UI still show transparency effects.
And here are a few ways to fix the Local Group Policy Editor if it fails to respond.
How to Unblur the Sign-In Screen via the Registry Editor
Tweaking the Registry is another way you can unblur the sign-in-screen, and you can do this on a Windows Home edition PC too.
However, you should be cautious while editing the registry and it’s better if you enable automatic registry backups. If something goes wrong, you can restore Windows to normal with a good backup.
- Press Win + R to open the Run box. Type regdit and hit Enter.
- Click Yes on the UAC prompt. The Registry Editor will open up.
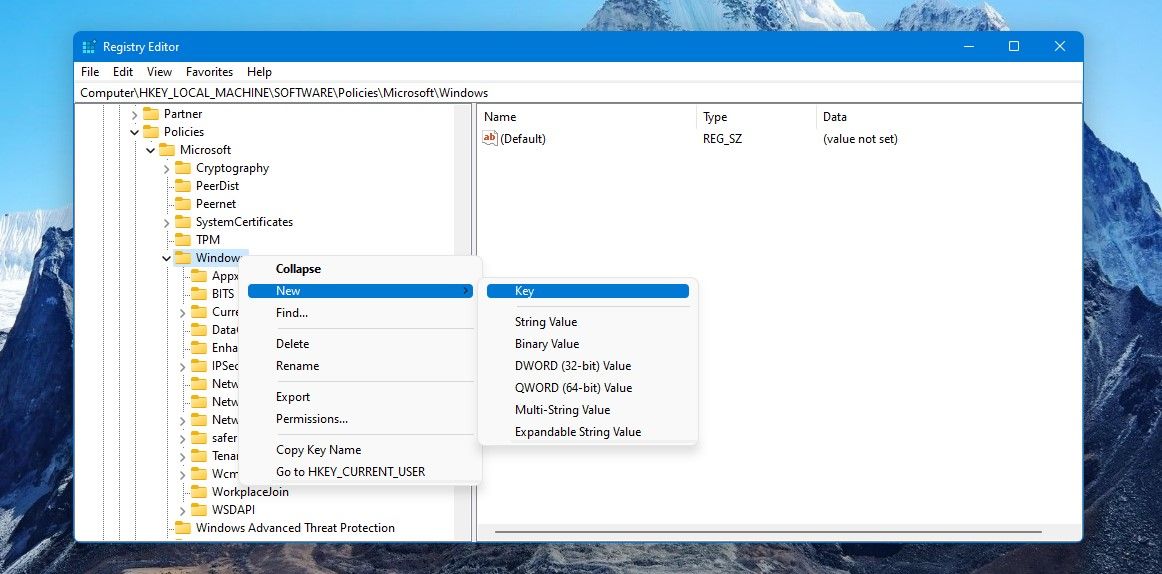
- In the Registry Editor, navigate to the following path: HKEY_LOCAL_MACHINE > SOFTWARE > Policies > Microsoft > Windows. Or just copy and paste this path into the Registry Editor and hit Enter.
-
In the Windows folder, look for the System key in the left pane. If you can’t find it, you will need to create it by right-clicking the Windows key, selecting New > Key and name the key System.

-
Select the System key in the left pane. In the right pane, right-click on a space, and from the menu, select New > DWORD (32-bit) Value.

-
Then give it this exact name with each word beginning with a capital letter: DisableAcrylicBackgroundOnLogon.

-
Double-click on DisableAcrylicBackgroundOnLogon to edit it. You will see that the default value of Value data will be 0. Change the Value data to 1 and click OK to apply the changes.

--Value.jpg)
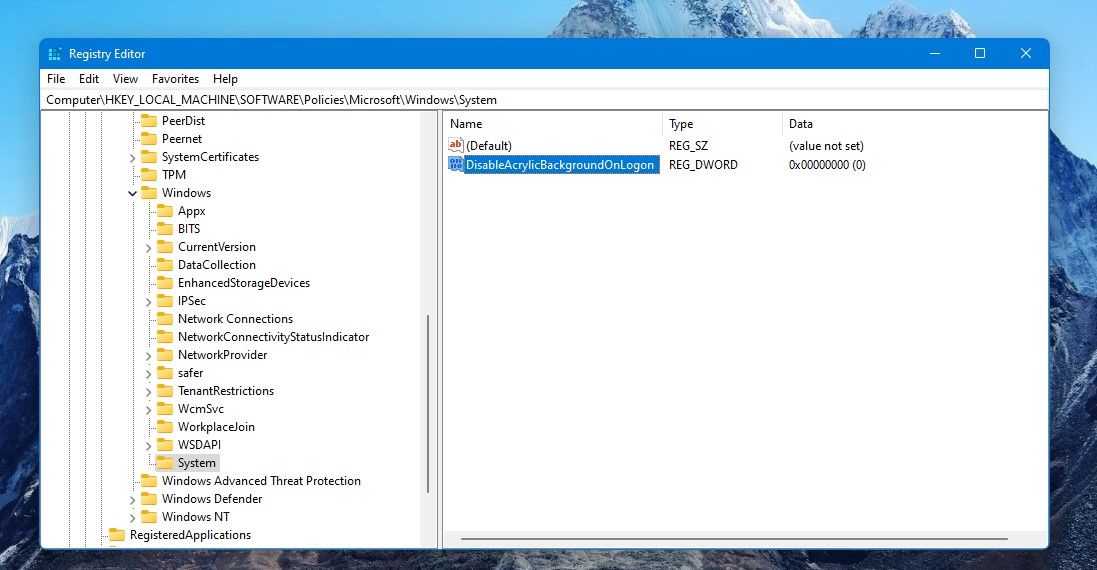
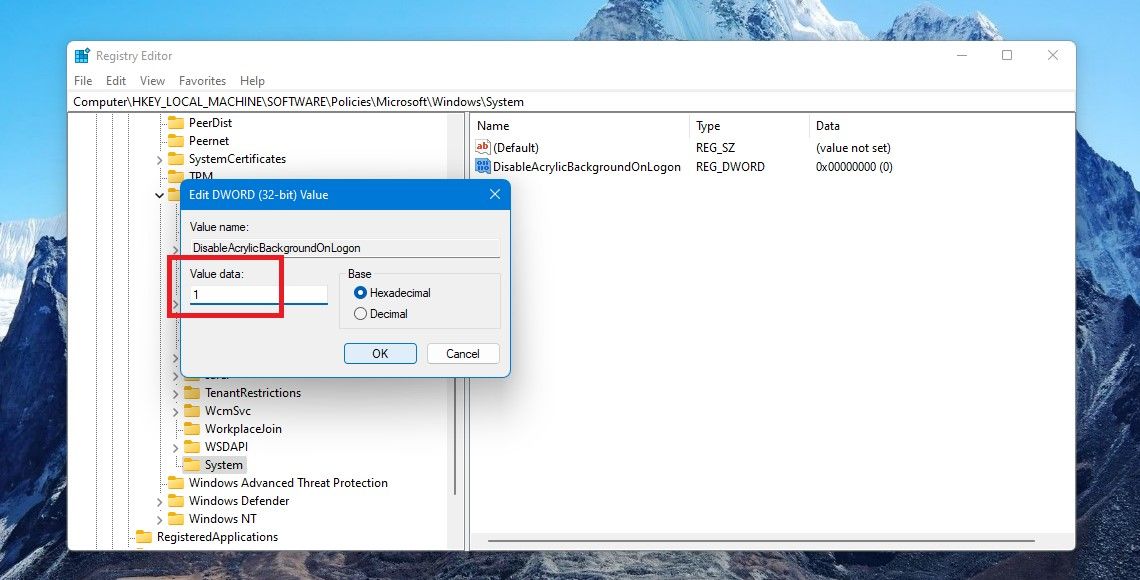
Value data 0 means that the Acrylic Blur Effect is on. Changing Value data to 1 will disable the blur effect on the sign-in screen.
You will see the clear image when you sign in again or just press Win + L keys to see it.
How to Display Your Favorite Picture on the Sign-In Screen
You can even choose which picture you want to display on your sign-in screen. For that first, you need to set up the picture on the Lock screen. Here’s how:
Right-click on your desktop and select Personalize from the menu. In Personalization settings, choose Lock screen.
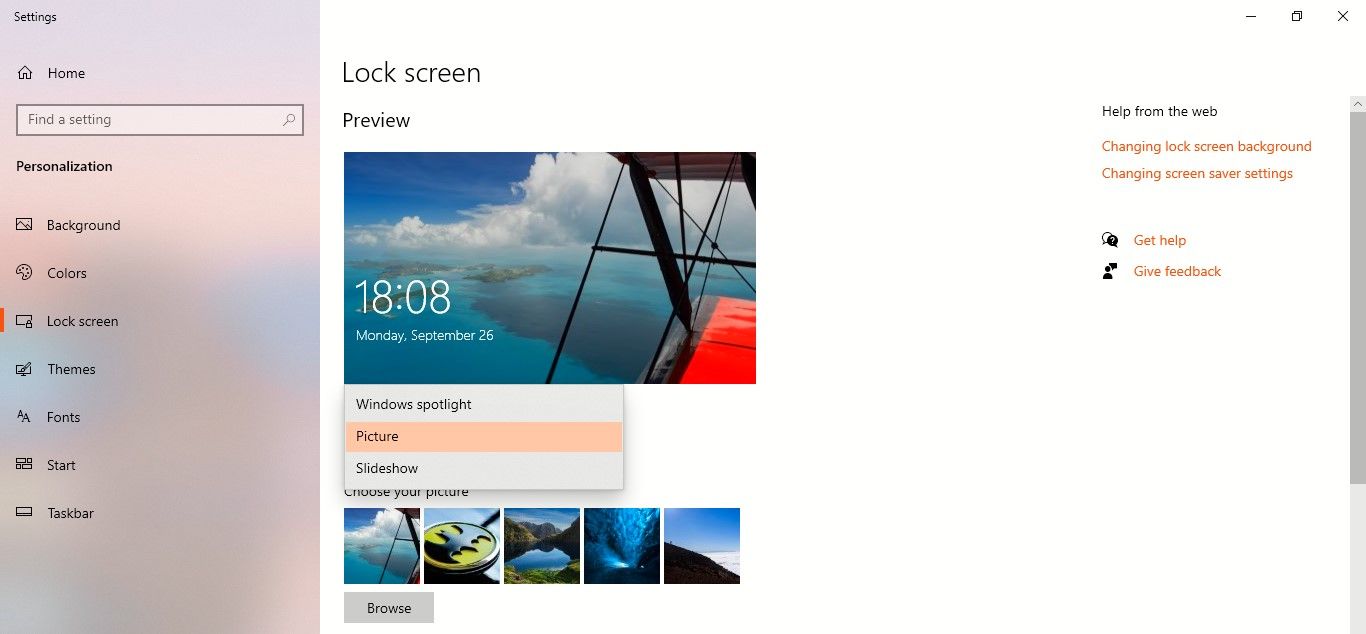
On Windows 10, under the Background tab, you will get three options: Windows spotlight, Picture, and Slideshow.
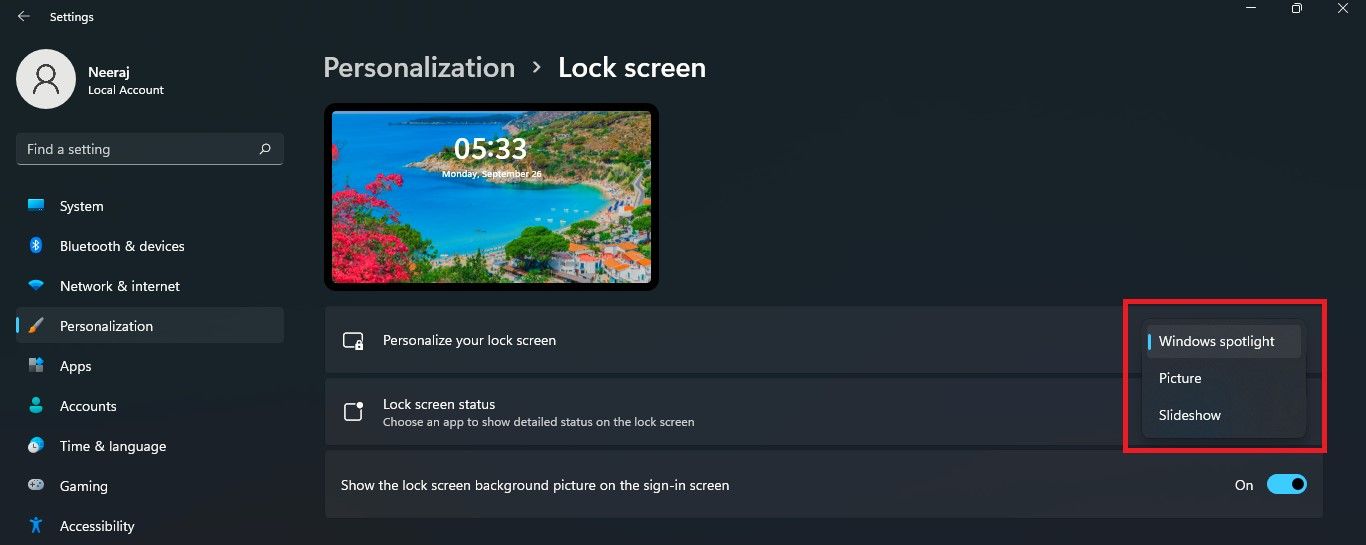
On Windows 11, the three options will be under Personalize your lock screen.
Choose Windows spotlight for beautiful images that display automatically. Windows Spotlight updates daily with images from around the globe and it also shows tips and tricks for getting the most out of Windows. You can also save Windows Spotlight images that you like by looking them up on your PC.
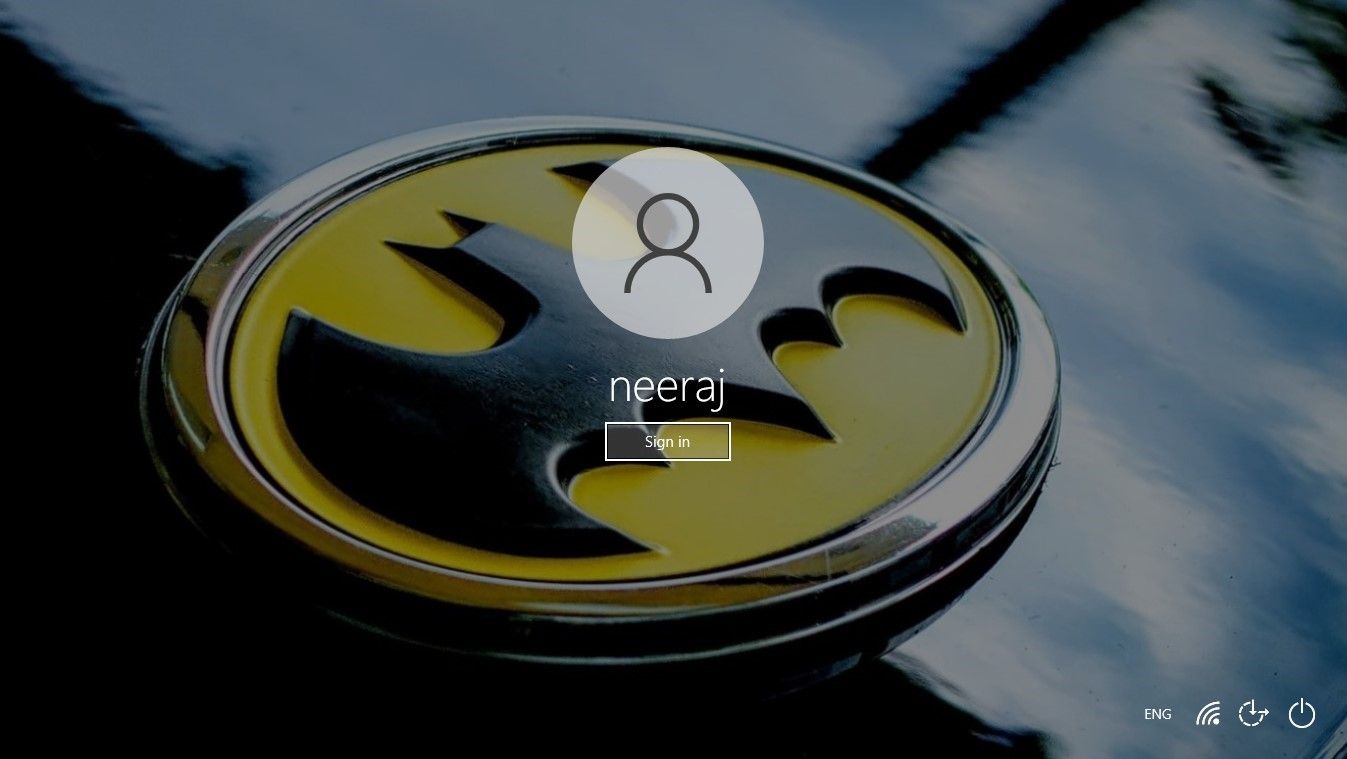
Choose the Picture option to set your favorite picture on the sign-in screen—like a family pic, favorite band, or superhero movie symbol. Click Browse to upload an image from your PC and click on Choose picture.
If you want pictures from your favorite album displayed randomly, select Slideshow. To add the album, select Add a folder and select Choose this folder. For better results, open Advanced slideshow settings to set your preferences.
And most importantly, scroll down the Lock screen page and ensure that the Show lock screen background picture on the sign-in screen option is turned on. Now the lock screen images will show up on the sign-in screen.
Enjoy a Spectacular Welcome to Windows
Bring the visual vibes of breathtaking sceneries, awesome landscapes, and your favorite images to your sign-in screen—and enjoy a spectacular welcome every time you sign in to Windows.

This tutorial will show you how to enable or disable the acrylic blur effect on the sign-in screen background image for all users in Windows 10 and Windows 11.
The lock screen is the screen you see at startup and when you lock (Win+L) the PC. You will need to dismiss the lock screen to to see the sign-in screen and sign in to Windows.
By default, the sign-in screen background image has an acrylic blur effect as part of Windows 11 transparency effects.
If you would prefer to have a clear sign-in screen background image without affecting other transparency effects for users, you can enable the Show clear logon background group policy.
The acrylic blur effect on the sign-in screen background image requires transparency effects to be turned on.
You must be signed in as an administrator to enable or disable the acrylic blur effect on the sign-in screen background image.
Contents
- Option One: Enable or Disable Acrylic Blur Effect on Sign-in Screen Background in Local Group Policy Editor
- Option Two: Enable or Disable Acrylic Blur Effect on Sign-in Screen Background using REG file
EXAMPLE: Acrylic blur effect on the sign-in screen background image


Option One
Enable or Disable Acrylic Blur Effect on Sign-in Screen Background in Local Group Policy Editor
The Local Group Policy Editor is only available in the Windows 11 Pro, Enterprise, and Education editions.
All editions can use Option Two.
1 Open the Local Group Policy Editor (gpedit.msc).
2 Navigate to the policy location below in the left pane of the Local Group Policy Editor. (see screenshot below)
Computer Configuration > Administrative Templates > System > Logon

3 In the right pane of Logon in the Local Group Policy Editor, double click/tap on the Show clear logon background policy to edit it. (see screenshot above)
4 Do step 5 (enable) or step 6 (disable) below for what you would like to do.
5 To Enable Acrylic Blur Effect on Sign-in Screen Background
This is the default setting.
A) Select (dot) Not Configured, click/tap on OK, and go to step 7 below. (see screenshot below)

6 To Disable Acrylic Blur Effect on Sign-in Screen Background
A) Select (dot) Enabled, click/tap on OK, and go to step 7 below. (see screenshot below)
7 You can now close the Local Group Policy Editor if you like.
Option Two
Enable or Disable Acrylic Blur Effect on Sign-in Screen Background using REG file
1 Do step 2 (enable) or step 3 (disable) below for what you would like to do.
2 To Enable Acrylic Blur Effect on Sign-in Screen Background
This is the default setting.
A) Click/tap on the Download button below to download the file below, and go to step 4 below.
Enable_acrylic_blur_effect_on_Sign-in_sceen_background.reg
(Contents of REG file for reference)
Code:
Windows Registry Editor Version 5.00

[HKEY_LOCAL_MACHINE\SOFTWARE\Policies\Microsoft\Windows\System]
"DisableAcrylicBackgroundOnLogon"=-
3 To Disable Acrylic Blur Effect on Sign-in Screen Background
A) Click/tap on the Download button below to download the file below, and go to step 4 below.
Disable_acrylic_blur_effect_on_Sign-in_sceen_background_for_all_users.reg
(Contents of REG file for reference)
Code:
Windows Registry Editor Version 5.00

[HKEY_LOCAL_MACHINE\SOFTWARE\Policies\Microsoft\Windows\System]
"DisableAcrylicBackgroundOnLogon"=dword:00000001
4 Save the .reg file to your desktop.
5 Double click/tap on the downloaded .reg file to merge it.
6 When prompted, click/tap on Run, Yes (UAC), Yes, and OK to approve the merge.
7 You could now delete the downloaded .reg file if you like.
That’s it,
Shawn Brink
-
Disable_acrylic_blur_effect_on_Sign-in_sceen_background_for_all_users.reg
Disable_acrylic_blur_effect_on_Sign-in_sceen_background_for_all_users.reg
702 bytes
· Views: 956
-
Enable_acrylic_blur_effect_on_Sign-in_sceen_background.reg
Enable_acrylic_blur_effect_on_Sign-in_sceen_background.reg
676 bytes
· Views: 721
Одна из новых особенностей Windows 10 — размытый фон при вводе пароля на экране блокировки (входа в систему). И, как оказалось, многим пользователям этот эффект пришелся не по душе, более того, размытие тормозит на некоторых компьютерах.
В этой инструкции несколько способов отключить размытие фона при входе в Windows 10 последней версии: в параметрах, с помощью редактора локальной групповой политики и в редакторе реестра.
Как отключить размытие фона при входе в Windows 10 с помощью редактора локальной групповой политики или редактора реестра
Отключение размытия фонового изображения на экране блокировки возможно с помощью изменения соответствующей политики Windows 10.
Если на вашем компьютере установлена Профессиональная или Корпоративная редакция системы — используйте первый из описываемых способов, если Домашняя, то второй.
Отключение размытия в редакторе локальной групповой политики
Для того, чтобы отключить размытие фона при входе в редакторе локальной групповой политики, выполните следующее:
- Нажмите клавиши Win+R, введите gpedit.msc и нажмите Enter.
- В открывшемся редакторе локальной групповой политики перейдите к разделу Конфигурация компьютера — Административные шаблоны — Система — Вход в систему.

- В правой части окна редактора найдите пункт «Показывать чистый экран входа в систему» или «Показывать прозрачный экран входа в систему», дважды нажмите по нему, установите значение «Включено».

- Примените сделанные настройки и закройте редактор локальной групповой политики.


Обычно сделанные настройки применяются без перезагрузки компьютера, убедиться в этом можно, нажав клавиши Win+L для блокировки системы (ваши программы не закроются).
Как отключить размытие фона при входе в редакторе реестра
В случае Домашней редакции Windows 10 то же самое можно выполнить и с помощью редактора реестра:
- Нажмите клавиши Win+R на клавиатуре, введите regedit и нажмите Enter.
- В открывшемся редакторе реестра перейдите к разделу
HKEY_LOCAL_MACHINE\SOFTWARE\Policies\Microsoft\Windows\System
- В правой панели редактора реестра нажмите правой кнопкой мыши и создайте параметр DWORD 32 бита (даже в Windows 10 x64) и задайте имя DisableAcrylicBackgroundOnLogon для него.
- Дважды нажмите по созданному параметру и установите значение 1 для него. Итоговый результат должен получиться как на скриншоте ниже.

- Примените сделанные настройки и закройте редактор реестра.

Опять же, сделанные настройки должны начать действовать без перезагрузки компьютера.
Простое отключение размытие фона экрана блокировки
Самый простой метод отключить размытие фоновой фотографии на экране блокировки при входе в Windows 10 — использовать следующие шаги:
- Зайдите в Пуск — Параметры (или нажмите клавиши Win+I).
- Перейдите к разделу Персонализация — Цвета.
- Отключите пункт «Эффекты прозрачности». Если он уже отключен (с предыдущей версии ОС), а размытие происходит, то сначала включите его, а затем снова отключите.


Отключение эффектов прозрачности отключит не только полупрозрачную панель задач и прозрачность некоторых окон Windows 10, но и размытие фона при входе в систему.
Основной минус метода — он не подходит в тех ситуациях, когда эффекты прозрачности нужны, а размытие фона не требуется. В описываемой ситуации существуют и методы отключить вторую «функцию» отдельно.
Вы можете отключить размытие на экране входа в Windows 11, если вам не нравится этот эффект фонового изображения. Windows 11 унаследовала его от своей предшественницы, которая выглядит так же с 2019 года.
Microsoft использует эффект размытия для экрана входа, чтобы вы могли сосредоточиться на своем пароле и других учетных данных. Чтобы не отвлекаться, фон изображения экрана входа в систему имеет акриловое размытие. Этот стиль также следует парадигме Fluent Design, которую Microsoft активно использует в наши дни.

Если вы предпочитаете иметь четкое фоновое изображение для экрана входа в систему, есть несколько способов отключить размытие. Вы можете включить специальный параметр групповой политики, который также имеет соответствующую настройку реестра.

Кроме того, вы можете отключить эффекты прозрачности в Windows 11. Это также удалит размытие экрана входа для вашей учетную записи в системе. Давайте рассмотрим эти методы.
Чтобы отключить эффект размытия на экране входа в Windows 11, сделайте следующее.
- Нажмите Win + R и введите regedit в поле «Выполнить», чтобы открыть редактор реестра.
- Перейдите в следующую ветку: HKEY_LOCAL_MACHINE \ SOFTWARE \ Policies \ Microsoft \ Windows \ System. Если этого ключа нет на вашем устройстве, создайте его вручную.
- Справа создайте новое 32-битное значение DWORD с именем DisableAcrylicBackgroundOnLogon.
- Установите для него значение 1, чтобы отключить эффект размытия.


Готово. Теперь вы можете выйти из Windows 11 и увидеть изменения в действии. Фон изображения экрана входа больше не будет размытым.
Рассмотренный способ подходит для всех редакций и версий Windows 11.
Скачать файлы реестра
Чтобы сэкономить вам время, я подготовил готовые файлы REG. С их помощью вы можете включить или отключить размытие в пару кликов.
- Скачайте ZIP-архив по ссылке.
- Распакуйте его содержимое в любую папку по вашему выбору, например прямо на рабочий стол.
- Дважды щелкните файл
Disable Blur Effect On Sign-in Screen Background.regи подтвердите запрос UAC, чтобы отключить размытие. - В любой момент позже вы можете отменить изменение с помощью прилагаемого файла
Enable Blur Effect On Sign-in Screen Background.reg.
Это очень просто.
Однако, если вы используете расширенный выпуск Windows 11, такой как Pro, Education или Enterprise, вы можете использовать приложение «Редактор локальной групповой политики». Это — полезный инструмент для изменения многих параметров ОС. Вы можете использовать его, чтобы отключить эффект акрилового размытия на экране входа в Windows 11.
Отключить акриловое размытие на экране входа в систему в групповой политике
- Нажмите сочетания клавиш Win + R, чтобы открыть диалоговое окно «Выполнить», и введите
gpedit.msc.
- Слева перейдите в раздел Конфигурация компьютера \ Административные шаблоны \ Система \ Вход в систему.

- Справа дважды щелкните параметр Показывать прозрачный экран входа в систему.
- В следующем диалоговом окне установите для него значение «Включено».
- Нажмите Применить и ОК.

Готово. Эффект размытия отключен.
Наконец, как упоминалось выше, отключение эффекта прозрачности для вашей учетной записи также уберёт размытие фона для экрана входа в систему. В Windows 11 он является частью эффектов прозрачности.
Отключить размытый фон экрана входа с прозрачностью
- Откройте приложение «Параметры», нажав горячую клавишу Win + I.
- Щелкните раздел Персонализация слева.
- Справа нажмите кнопку Цвета.
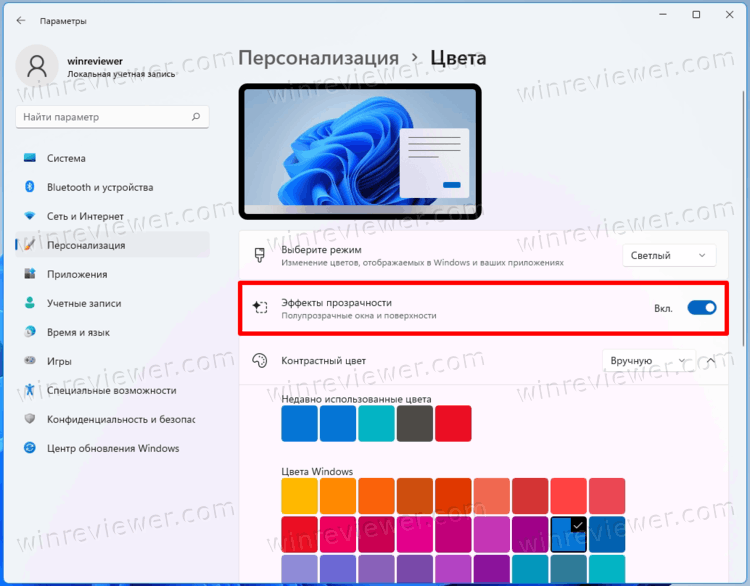
Это действие тут же отключит дополнительные визуальные эффекты в Windows 11, а также акриловое размытие фона экрана входа в систему.
Очевидным недостатком этого решения является то, что ваше меню «Пуск» и панель задач будут выглядеть менее привлекательно. Они вместе с всплывающими окнами «Быстрые настройки» и «Центр уведомлений» будут иметь непрозрачный фон. Кроме того, изменится внешний вид контекстного меню и приложения Параметры. Если вас устраивает это изменение, вы можете пользоваться Windows 11 без прозрачности. В противном случае используйте настройку групповой политики.
Вот и все.
Источник: Winaero
💡Узнавайте о новых статьях быстрее. Подпишитесь на наши каналы в Telegram и Twitter.
Судя по тому, что вы читаете этот текст, вы дочитали эту статью до конца. Если она вам понравилась, поделитесь, пожалуйста, с помощью кнопок ниже. Спасибо за вашу поддержку!