
on this page, you’ll find handy solutions to restore deleted files on Windows 10 and stop Windows 10 from deleting files without asking.
| Workable Solutions | Step-by-step Troubleshooting |
|---|---|
| Fix 1. Stop Windows Defender | Open Windows Defender > click Virus & Threat protection > click Exclusions…Full steps |
| Fix 2. Turn off Storage Sense | Go to Settings > System > Storage > toggle Storage Sense to «Off»…Full steps |
| Fix 3. Uninstall faulty updates | Open Control Panel > click Programs and Features > click View Installed Updates…Full steps |
Q: Windows Defender Keeps Deleting Files
«Hi, I’m having an issue with my computer automatically deleting files without asking me for confirmation. I use some programs with .exe extension. But Windows defender reads those as a virus and deletes them while I still want them! How do I stop Windows defender from deleting files I want to keep?«
Are you having the same issue that Windows defender keeps deleting files, such as downloaded videos, documents, or .exe programs? Or is your Windows 10 automatically deleting downloaded files and data without asking for confirmation? Although it sounds senseless, it is true. Windows 10 may keep deleting programs and documents after restart because of the defender or the new storage sense feature in Windows 10. But, you don’t have to worry since you can quickly recover deleted files from Windows 10 using a professional EaseUS data recovery tool. After that, you can use the helpful methods demonstrated below to stop Windows from deleting files automatically.
- Notice:
- If you’ve got important files deleted by Windows 10, which you can restore from nowhere, go to Part 1 and recover those lost files first. And then, you can follow Part 2 with provided methods to stop Windows 10 from deleting your files without asking your permission or giving any notification.
Part 1. Restore Files Deleted by Windows 10
If your essential files got removed or deleted by Windows 10 and you can’t get them back anyhow, don’t worry. One of the best file recovery software — EaseUS Data Recovery Wizard can simply recover your lost files within three steps. It allows you to restore deleted files from Recycle Bin, HDD, SSD, USB flash drive, external hard drive, digital camera, and more.
Now, download and install this software on your PC and follow the next steps to restore the removed files deleted by Windows 10.
Step 1. Run EaseUS Data Recovery Wizard. Choose the drive where you lost files and start scanning by clicking «Search for Lost Data». This software allows you to recover lost data from all devices, including HDD, SSD, USB drive, SD card, pen drive, camera, etc.

Step 2. Browse the full scan results. You can choose the file type you need by clicking on the file type filter. EaseUS data recovery software supports 1000+ file types like photos, videos, documents, emails, audio files, and many more.

Step 3. Select the files you want to preview. Click «Recover» and set a storage location or Cloud drive to save the recovered data.

Part 2. Fix Windows 10 Automatically Delete Files Error
After removing all your lost files from the Windows system, you can now follow the solutions to fix Windows 10 from the problem of the deleting file.
Method 1. Stop Windows Defender from Deleting Files Automatically
1. Open «Windows Defender» > Click on «Virus & threat protection».
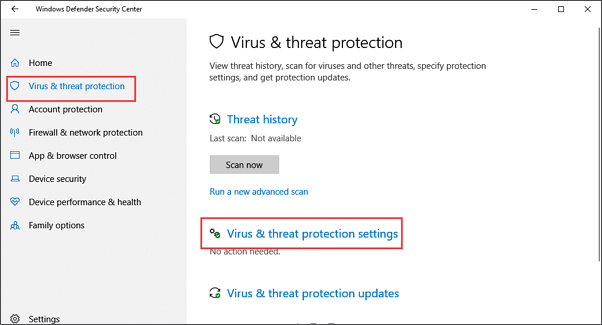
2. Scroll down and click «Virus & threat protection» settings.
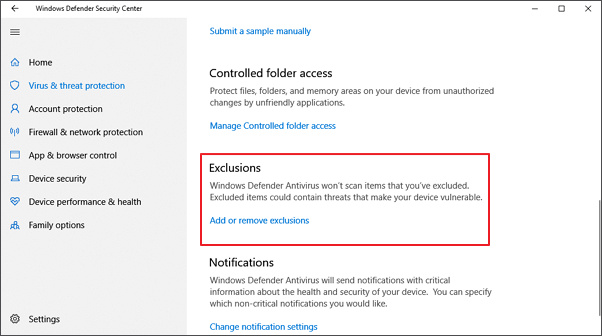
3. Scroll down to «Exclusions» and click «Add or remove exclusions».
4. Click + plus icon to add an exclusion and select File, Folder, File Type, or Process, then specify the exact files, folders, or even file types that you don’t want to get them deleted or removed by Windows Defender.
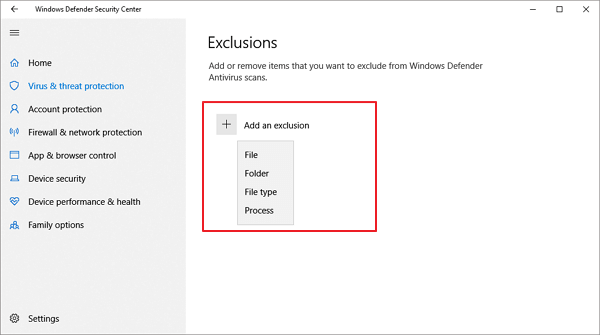
5. Save all changes. If you don’t want Windows Defender to remove the .dll files, click «File Types» and type in the .dll and .exe file extension, click «Add». After this, those files that you’ve set to be excluded won’t be removed or deleted again.
Method 2. Turn off Storage Sense to Stop Windows 10 Deleting Files Automatically
Storage Sense in Windows 10 is a new feature. When you enable it, Windows will automatically delete unused files when the computer is low on disk space. For instance, it can automatically delete files older than 30 or 60 days from the Recycle Bin or delete temporary files to free up some space. It also can delete older files in the Downloads folder.
But If you don’t want the Storage Sense to delete files by itself, you can change its default settings to prevent Windows 10 from automatically deleting files when you want to keep them
Step 1. Open the «Settings» app. Click the «System» > «Storage». You can flip the Storage Sense switch to «Off».
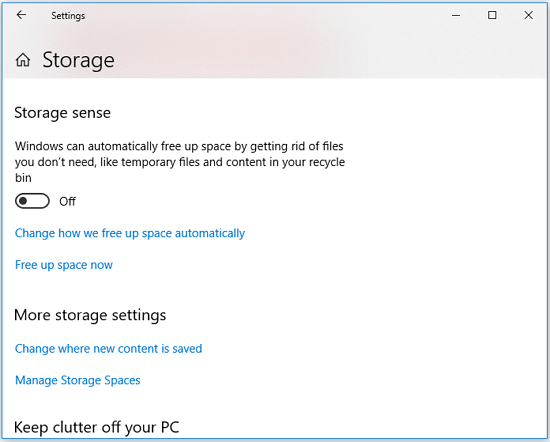
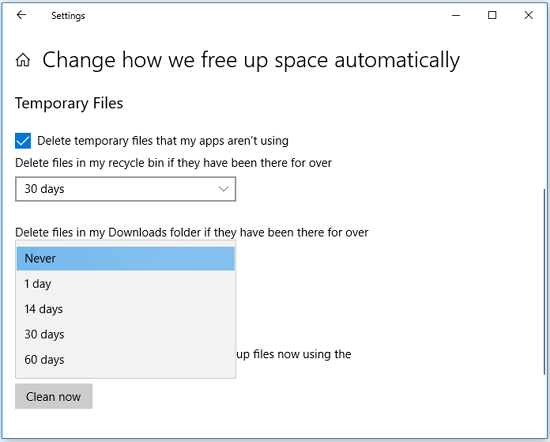
Step 2. If you don’t want to disable this feature totally, you can re-configure Storage Sense by clicking «Change how we free up space automatically».
Step 3. Click the box under «Delete files in my recycle bin if they have been there for over» and select «Never». Also, click the box under «Delete files in my Downloads folder if they have been there for over» and choose «Never».
Method 3. Uninstall Faulty Updates that Delete Files on Windows 10
As we all know that sometimes the newly installed Windows system would remove or delete files on the computer without asking you for permission. It seems that if you’ve installed an incompatible or faulty Windows 10 update, it will remove or delete your files on PC. So the most straightforward way is to uninstall the faulty updates that remove files on your Windows 10 computer.
Here are the detailed steps about how to uninstall faulty updates:
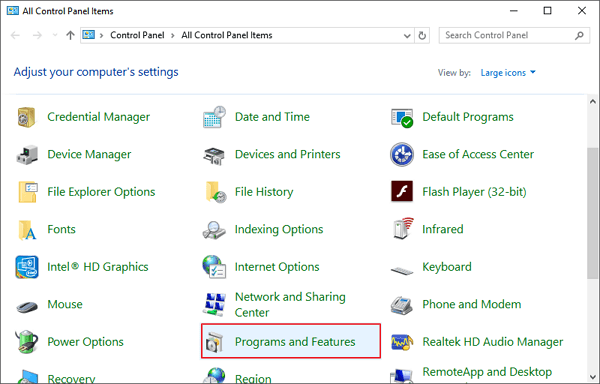
Step 1. Press Windows + X keys and select «Control Panel».
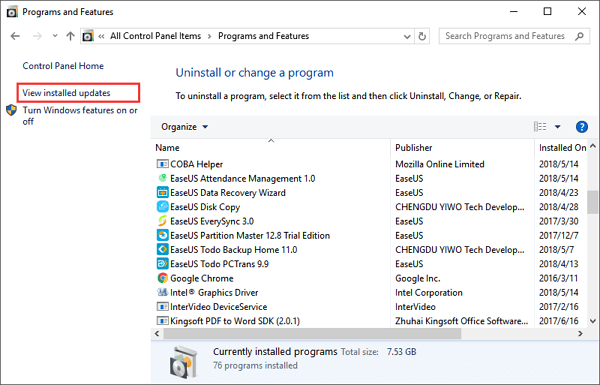
Step 2. Click «Programs and Features» and select «View Installed Updates».
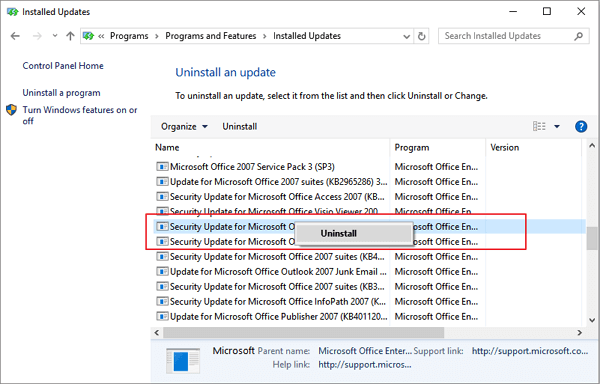
Step 3. Click the «Installed On» column header to sort the updates by dates.
Step 4. Locate and right-click on the large-sized, significant updates you’ve recently downloaded, and select «Uninstall».
Step 5. When the uninstall process completes, reboot your PC.
PS: If you want to install the latest Windows 10 update, you can refer to Microsoft Windows 10 update official website to download Windows 10 ISO and install it on your PC.
Windows 10 packs multiple safety and security features to help you save your data from deleting due to accidental clicks and presses. That’s why the moment you hit the Delete button on the keyboard after selecting a file/folder, you will view a pop-up to confirm the deletion. Well, how to disable this confirmation dialogue?
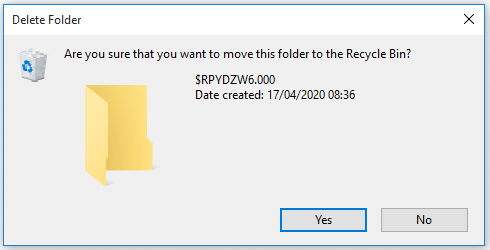
The pop-up always asks, ‘Are you sure you want to move this file/folder/shortcut to the Recycle Bin?’ with two options — Yes and No. Windows operates this way to help users avoid deleting important files by mistake. Savvy users know better and are only frustrated by this behavior. If you’re part of that group, then you’ll be happy to know that Windows offers a way to switch off those confirmational messages, thankfully.
On the other hand, some Windows users want this feature back in Windows 10, which has been disabled by default.
Let’s begin.
1. Enable or Disable Delete Confirmation Dialogue From Settings
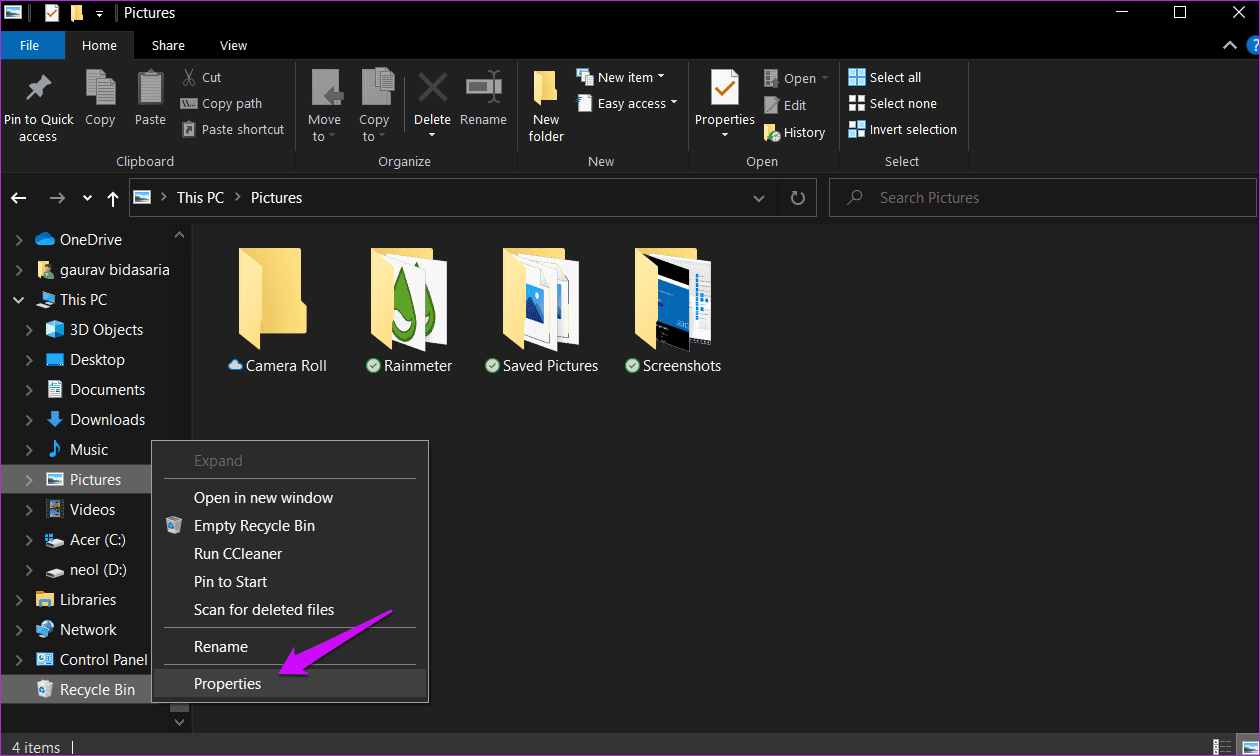
Step 1: Locate the Recycle Bin on your desktop and right-click on it to select Properties. You will also find Recycle Bin inside File Explorer (Windows key+E shortcut).
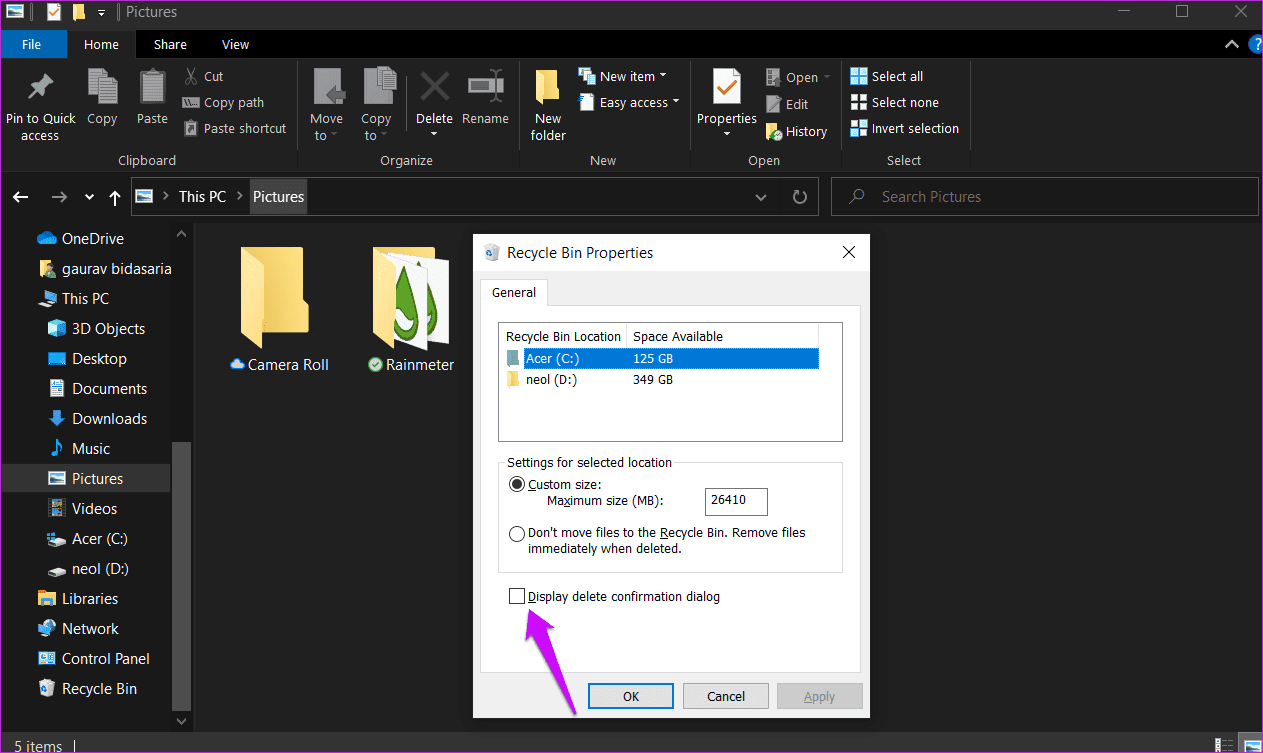
Step 2: You can easily enable or disable it by checking/unchecking the ‘Display delete confirmation dialogue’ option. Click on Apply and OK to save changes.
Did you notice there was another option to completely skip the Recycle Bin while deleting a file? Checking that will remove the file immediately, so use it only if you must.
2. Enable or Disable Delete Confirmation Dialogue Using Registry Editor
The Registry Editor is available on all Windows versions, including the Home Edition. Editing the Registry Editor is tricky, and that’s why you should take a backup before proceeding with this solution.
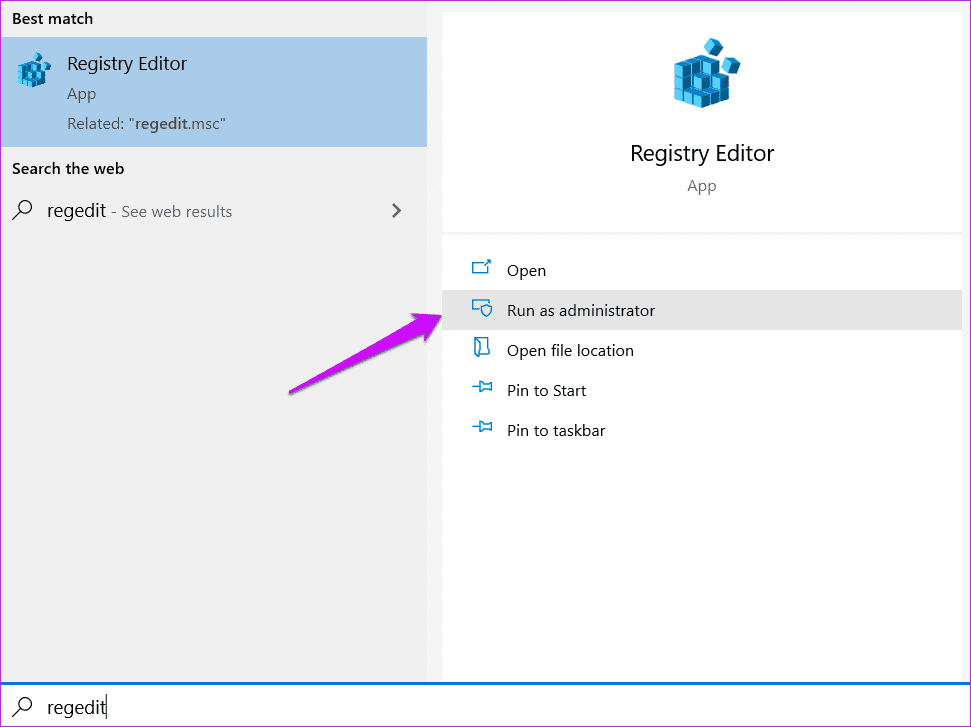
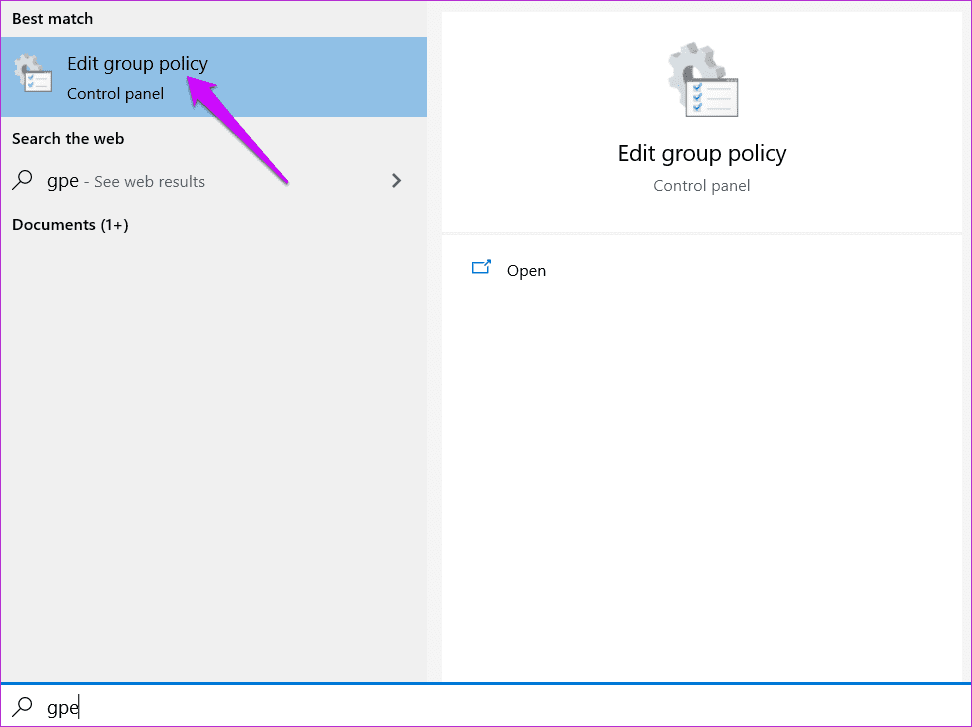
Step 1: Open the Start menu and search for Registry Editor. Click on Run as administrator to open with proper rights.
Step 2: Navigate to the folder structure below.
HKEY_CURRENT_USER\Software\Microsoft\Windows\CurrentVersion\Policies\Explorer
Note: If a folder is missing, you can right-click on the main folder to create a new sub-folder. For example, if the Explorer folder is missing, right-click on Policies and select New > Key and name it so. Folders are called Keys, and files inside them are called Values in the Registry Editor. We call them folders and files to make it easier for our readers to understand and follow the steps.
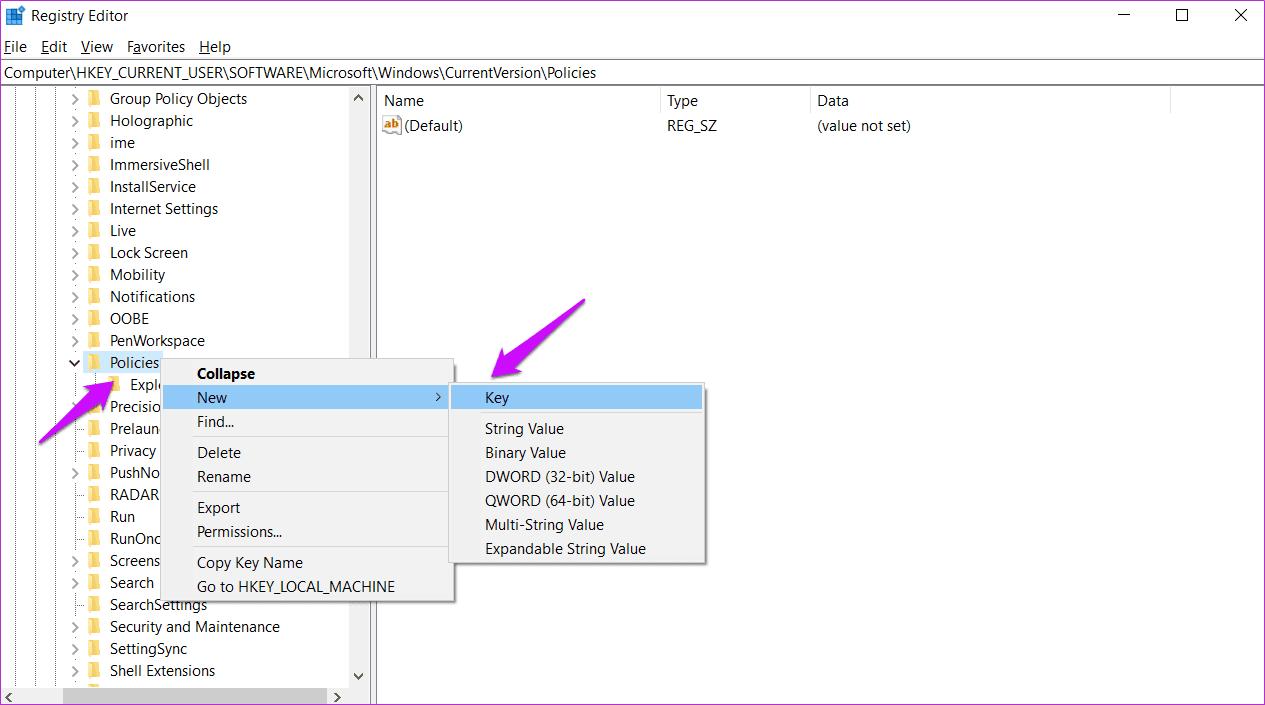
Step 3: Open the ‘ConfirmFileDelete’ file in the right window-pane. If it is missing or you just created the necessary folders, right-click anywhere on the right side to select New > DWORD (32-bit) Value name it accordingly.

Step 4: Double-click on the ConfirmFileDelete file to open it and set the value as 1. Save changes. Check if you still get the delete confirmation dialogue when you hit the Del button on the keyboard.

3. Enable or Disable Delete Confirmation Dialogue in Group Policy Editor
Unlike the Registry Editor, the Group Policy Editor or GPE is available only on Windows Pro and Enterprise editions. You may follow this method if the one shared above is not working or working in a company with an enterprise server installation. The latter will allow you, the system administrator, to enforce these settings on all or a group of computers connected to the server. If in doubt, talk to your superior.
Step 1: Search for and open the Group Policy Editor in the Start menu and open it. You will be asked for admin rights. Please allow it.
Step 2: Drill down to the folder structure below.
User Configuration\Administrative Templates\Windows Components\File Explorer
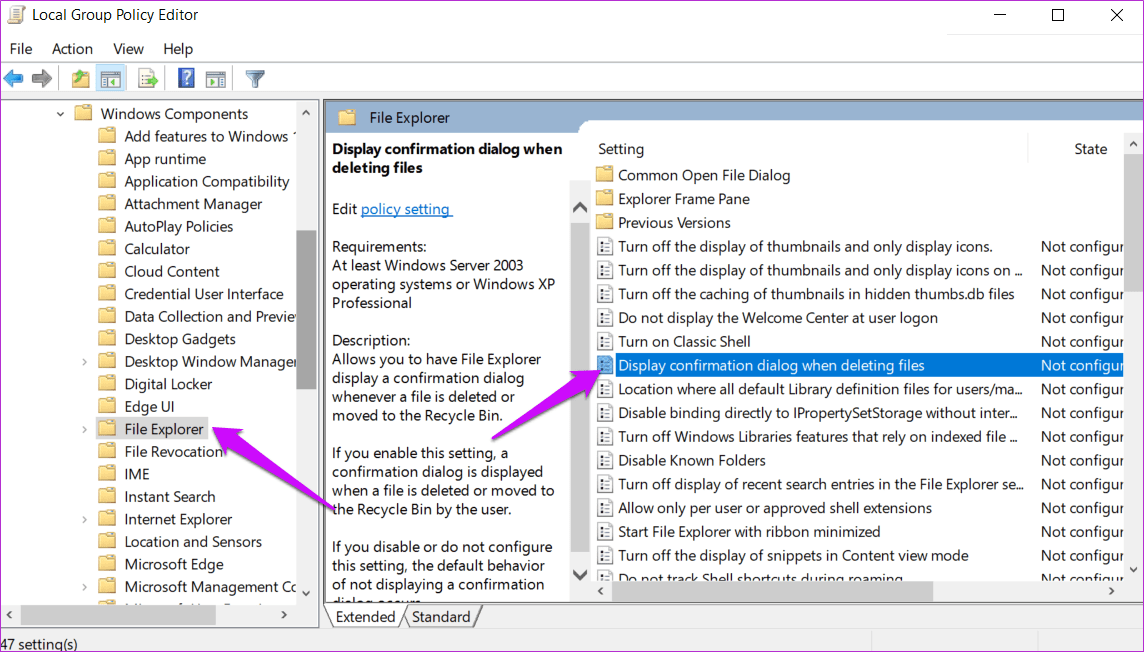
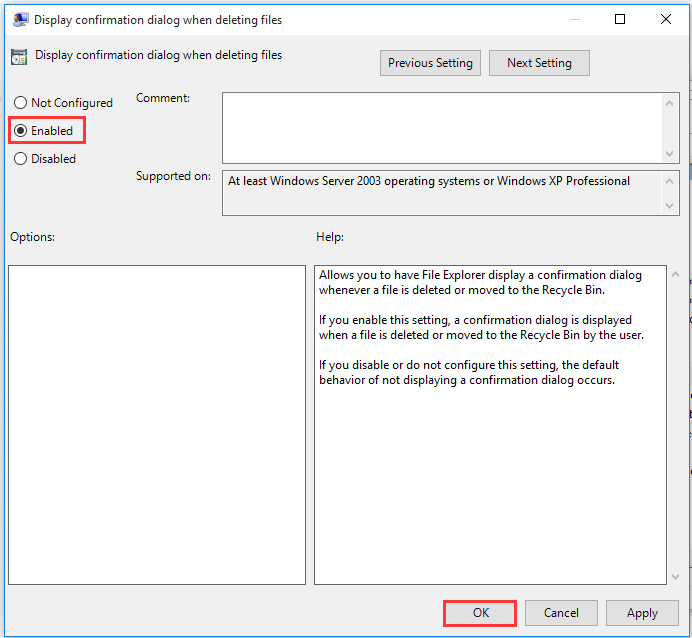
Find the ‘Display confirmation dialog when deleting files’ entry in the right window-pane and double-click on the same to open it.
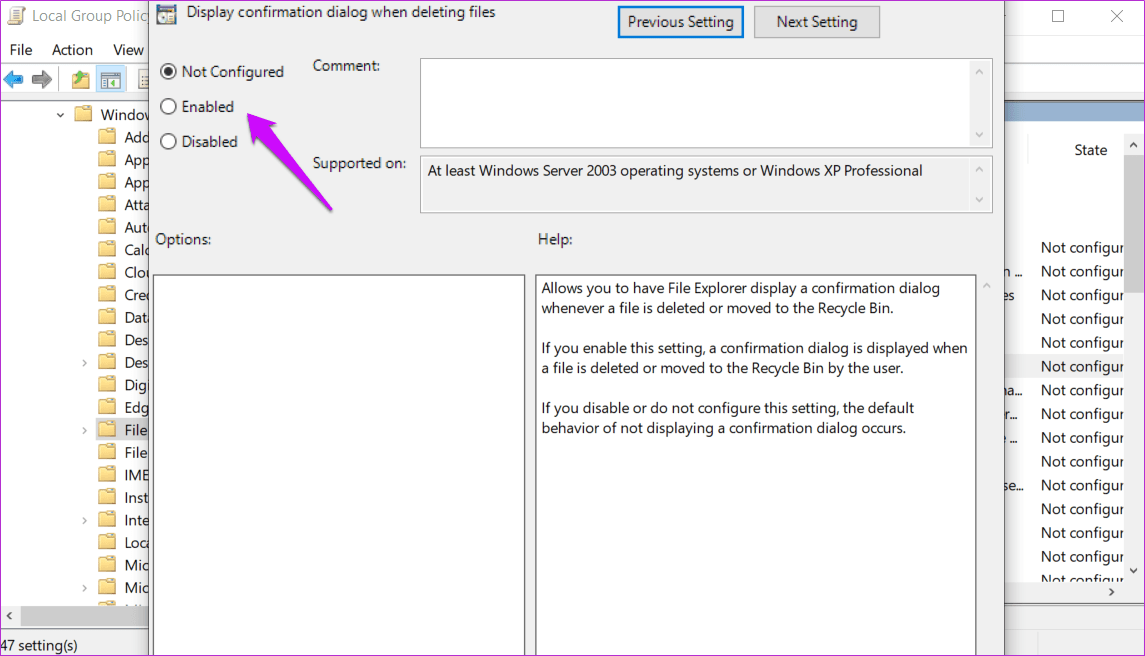
Step 3: Select the Enabled radio option in the pop-up that follows to enable delete confirmation dialogue and Disabled to disable it. Don’t forget to click on Apply to save changes before closing the pop-up.
Deleting on Windows
Now that you know why Windows gives you the confirmation pop-up, you can deal with it the way you want. In case you want to skip the confirmation message, keep the Shift key pressed, and then delete the files directly from your computer. Thankfully, even if you delete something accidentally, it can still be recovered easily from the bin or those deleted directly. There are file recovery apps like Recuva available on the web that help with the process. However, these apps work better on HDDs as SSDs work differently. So, always keep that in mind when deleting files directly or from the Recycle Bin.
Next up: Did you know Microsoft comes with a built-in file recovery tool? Click on the link below to learn everything you need to know about it.
Was this helpful?
Thanks for your feedback!
The article above may contain affiliate links which help support Guiding Tech. The content remains unbiased and authentic and will never affect our editorial integrity.
A lot of users want to have a confirmation prompt when deleting a file. At this time, you need to enable the Windows 10 confirm delete feature. How to disable/enable Windows 10 delete confirmation? This post of MiniTool will walk you through a step-by-step guide and help you recover deleted data.
About Window 10 Confirm Delete
If you are using Windows 8 or the latest Windows 10 operating system, you may have found that you won’t be prompted with a confirmation message when deleting a file. This is because the Windows 10 confirm delete feature is disabled by default.
If you haven’t enabled this option, then the file or folder will be moved to the Recycle Bin directly when you press the Delete key. Sometimes, the selected files could be permanently deleted without moving them to the Recycle Bin if the files are too large or you select the checkbox for Don’t move to the Recycle Bin.
To avoid deleting files by mistake, a lot of Windows 10 users want to enable Windows 10 delete confirmation. After enabling this feature, then confirmation dialogue will pop up with the message “Are you sure that you want to move this file/folder/shortcut to the Recycle Bin?”
How to Disable/Enable Windows 10 Confirm Delete
There are 3 simple methods to disable/enable the confirm deletion dialogue box on Windows 10. You can set it by using the Recycle Bin as well as Registry Editor and Group Policy Editor.
Method 1. Use the Recycle Bin Properties Option
The first and simplest method to enable the confirm delete Windows 10 feature is to use the Recycle Bin properties option. To do so, follow the step-by-step guide below:
Step 1. Right-click the Recycle Bin shortcut on your desktop and select Properties from the pop-up menu.
Step 2. In the Properties window, tick the checkbox for the Display delete confirmation dialogue and click on Apply button to make the change take effect.
Tip: If you want to delete a file or folder as fast as possible, you can disable this feature by unselecting the Display delete confirmation dialogue checkbox.
After that, the Windows 10 confirm delete dialogue box will appear on the screen when deleting a file.
Method 2. Use the Registry Editor
In addition, you can use the Registry Editor to enable the delete confirmation Windows 10 feature. Here is a complete guide for you.
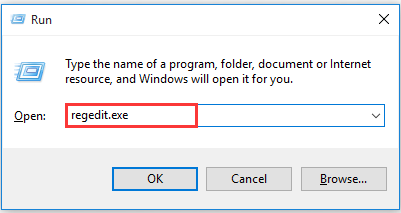
Step 1. Press Win + R keys to open the Run dialogue box, and then type regedit.exe in the box and hit Enter key. Click on the Yes button to open the Registry Editor if you are prompted.
Step 2. In the Registry Editor window, go to the following path via the left-hand navigation bar. The destination path may be slightly different depending on your Windows 10 version.
HKEY_CURRENT_USERSoftwareMicrosoftWindowsCurrentVersionPolicies or
HKEY_CURRENT_USERSoftwareMicrosoftWindowsCurrentVersionPoliciesExplorer
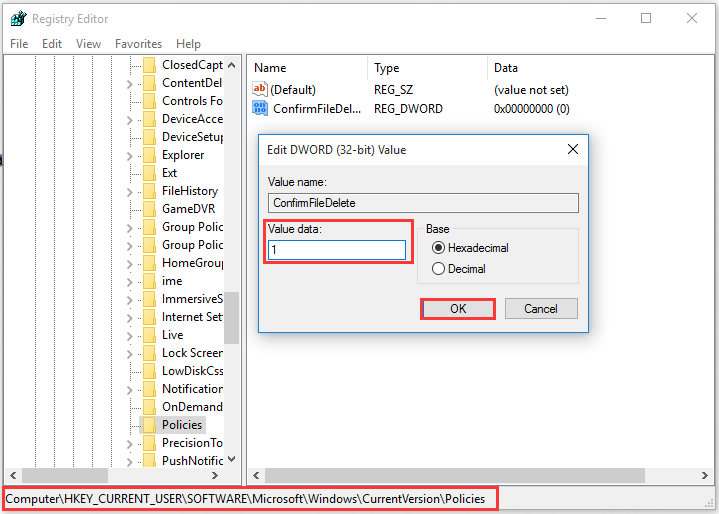
Step 3. Once you arrive at the destination path, right-click the blank area on the right side and select New > DWORD (32-bit) Value from the pop-up menu.
Step 4. Name the new key to ConfirmFileDelete, and then double click the key and set its Value data to 1, and click on OK to save the change.
Tip: You can disable the confirm deletion feature by setting its Value data to 0.
Step 5. Exit the Registry Editor window and restart your computer to make it take effect
Method 3. Use the Local Group Policy Editor
This method is suitable for a system administrator who want to enable the Windows 10 confirm delete feature for all users in the enterprise. If you are using a Windows 10 Pro or Enterprise operating system, then you can use the Group Policy Editor. Here’s how:
Step 1. Open the Run dialogue box again, and then type gpedit.msc in it and hit Enter.
Step 2. In the Local Group Policy Editor window, go to the following path via the left-hand navigation bar.
User ConfigurationAdministrative TemplatesWindows ComponentsFile Explorer
Step 3. On the right side, scroll down the list of entry keys until you find the Display confirmation dialogue when deleting files entry and double click it.
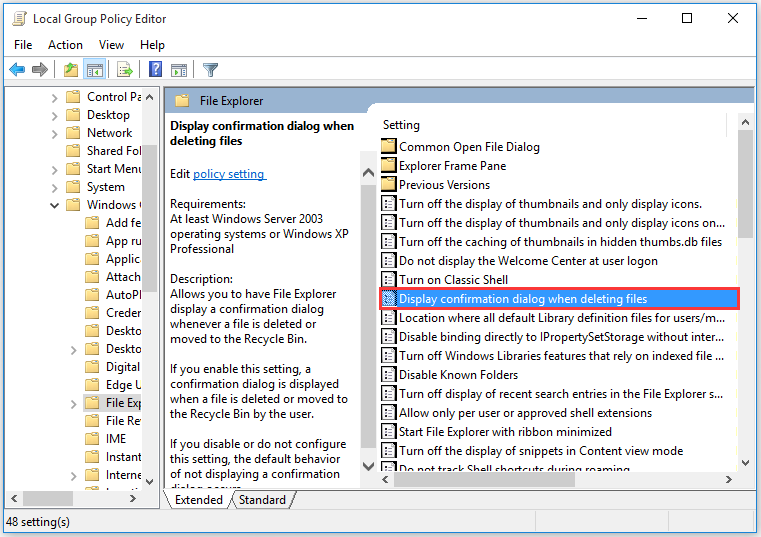
Step 4. In the pop-up window, select the Enabled option and click on OK button to turn on the confirm deletion feature. If you want to turn off this feature, then select the Disabled option. After that, exit the editor and restart your computer to take it into effect.
How to enable Windows 10 confirm delete? Three methods have been illustrated to you. You can select one based on your demands. Here comes a new question. What would happen if I disable the confirm deletion? Let’s keep reading the following part.
What Would Happen If I Disable Windows 10 Delete Confirmation
After the confirm delete Windows 10 feature is disabled, you can directly press the Delete key to remove the files without any confirmation dialogue. For those who want to delete files as fast as possible, disabling this feature is an ideal choice.
Sometimes, however, you may get into trouble because of this choice. Usually, the selected files or folders will be moved into the Recycle Bin. Then you can open the Recycle Bin again and restore them from it. But there are some exceptions that cause you to lose data.
Here we summarize 2 main cases that you may encounter after disabling the Windows 10 delete confirmation.
Case 1. You delete the files or folders in the local disk.
If you delete the files or folders with small size, you can open the Recycle Bin and restore them. However, if the deleted files are larger than the maximum size of your Recycle Bin, the selected item will be deleted permanently without being put into Recycle Bin for temporary storage.
Tip: If the Windows 10 confirm delete feature is enabled, you may receive the message “The file is too large for the Recycle Bin. Do you want to permanently delete it?”
Case 2. You delete the files or folder from a removable storage device.
If you delete files from an external storage device, then the files or folders will be directly deleted without being moving into the Recycle Bin no matter how large the files are. Here is a true example from answers.microsoft.com who reported the files are gone over from an external drive.
Separate from Recycle Bin: When I am connected to an external drive (my Android phone, connected via USB in “File Transfer” mode), I can view, copy and delete files (e.g. photos) on that drive. However, when I delete files on my phone, I don’t get any confirmation dialogue! This is a case where I definitely want confirmation because there is no Recycle Bin — the files are gone forever. Any thoughts? I am running Windows 10 Home. What should I do to restore my files? Please help!
In order to avoid data loss, we recommend you enable the delete confirmation Windows 10 feature. However, there are still a great many people using the default settings. What can I do if the files are deleted accidentally? Let’s keep reading.
How to Recover Lost Data After the Windows 10 Delete Confirmation Is Disabled
How to recover deleted data on Windows 10? Here you can choose a method based on your own situation. If the deleted files are located on the local disk, please refer to case 1. If you accidentally delete the files of an external drive, you can read case 2.
Case 1. Recover Lost Data from Local Disk
For the small files or folders, it is very simple to restore. You can open your Recycle Bin, and then right-click the files that want to recover and select Restore from the context menu. However, the large files won’t be moved into the Recycle Bin.
At this time, you need a professional tool to recover deleted files. Here MiniTool Partition Wizard is highly recommended. It is a multifunctional partition manager that can help you convert MBR to GPT, convert FAT to NTFS, format hard drive, perform disk benchmark, migrate OS to SSD/HD, extend partition, etc.
Tip: MiniTool Partition Wizard Free Edition doesn’t support data recovery. You need to install a Pro Ultimate edition or a more advanced edition to recover lost data.
Now, press the button below to download this program and install it on your Windows 10 PC.
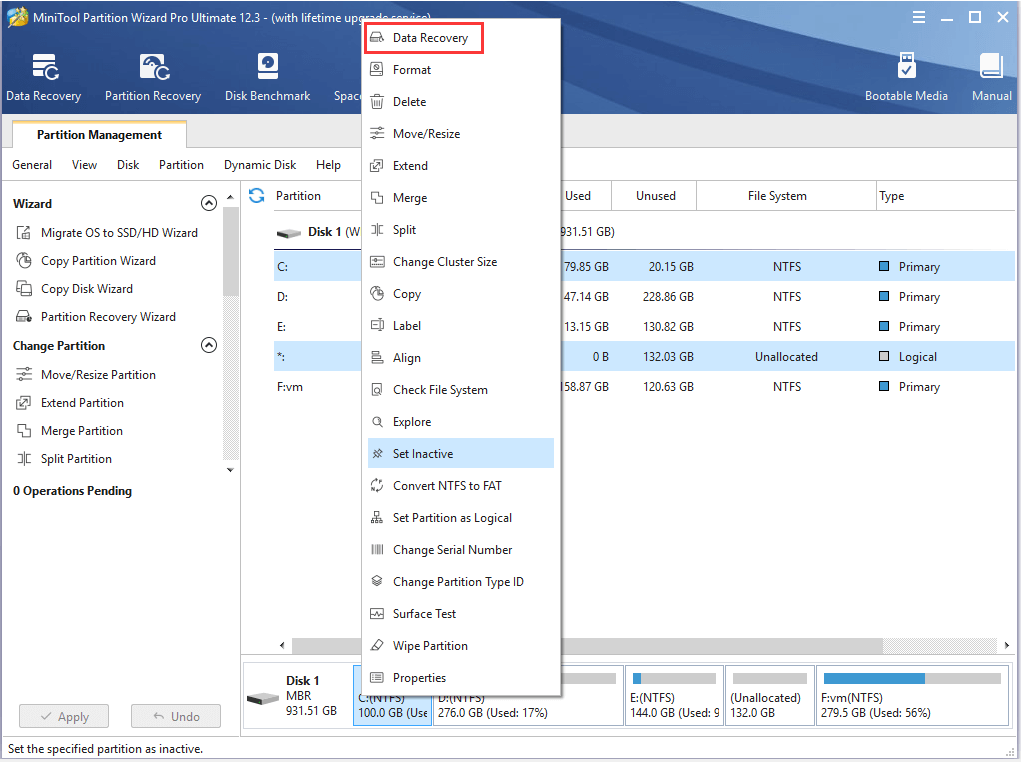
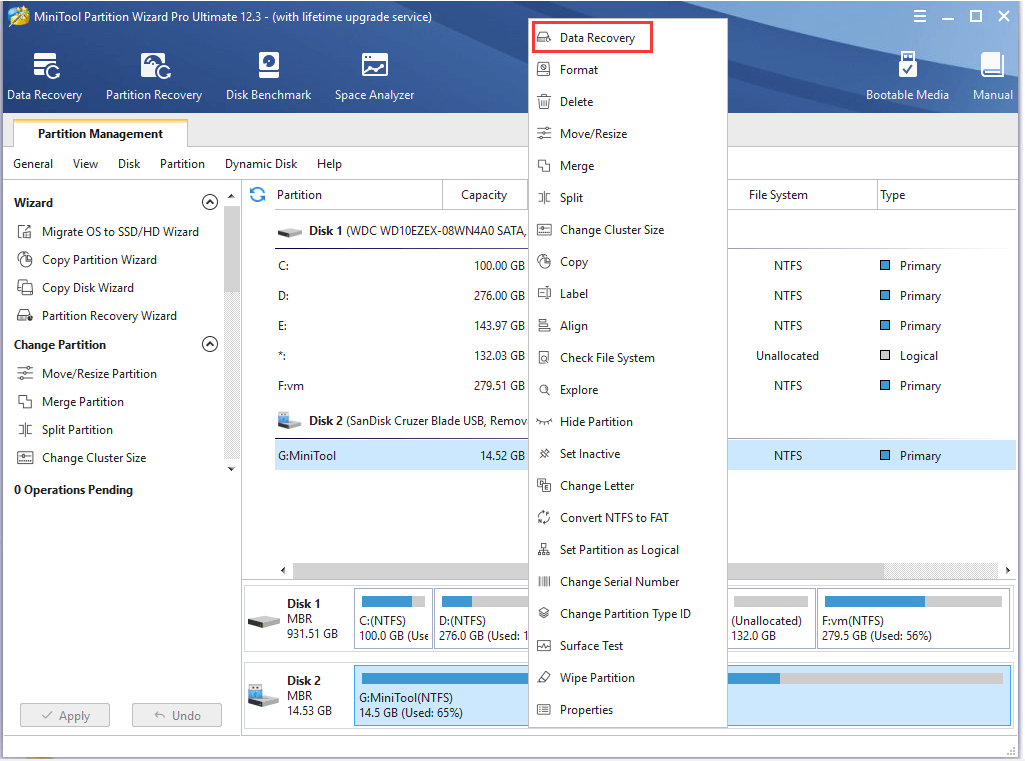
Step 1. Launch the program to enter its main interface, and then right click the drive that you delete the files and select Data Recovery.
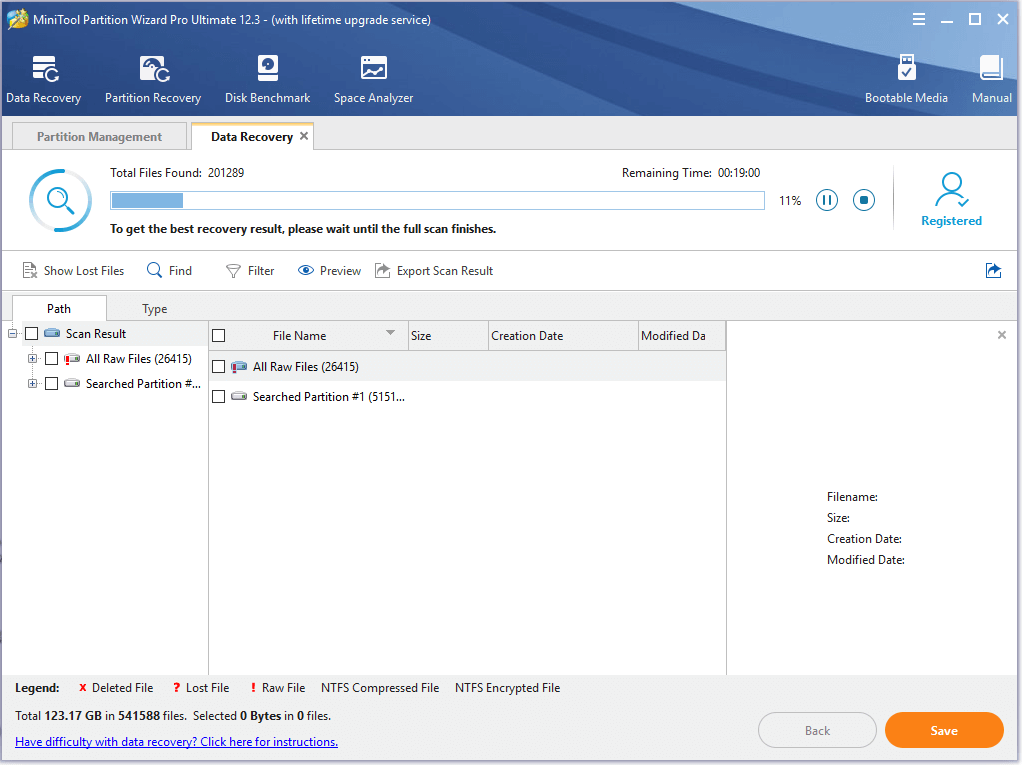
Step 2. Then you need to wait for this scan to complete. After the scan completes, tick the checkboxes next to the needed files and click on the Save button.
Tip: Also, if you have found your needed file, you can click on the Pause or Stop button to pause this process and click on the Save button to restore the file. You can utilize the Show Lost Files feature to find needed files quickly.
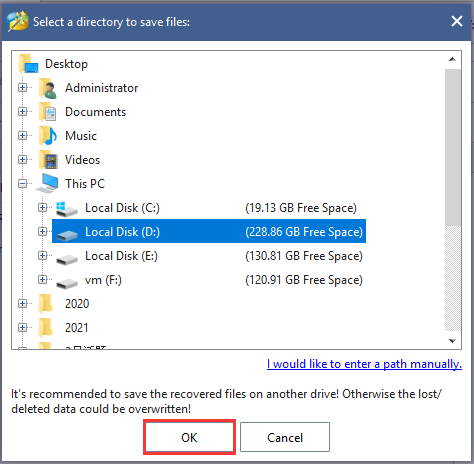
Step 3. Select a directory to save the needed files and click on OK. Here we recommend you save the recovered files to another drive. Otherwise, the recovered data could be overwritten.
Case 2. Recover Lost Data from a Removable Storage Device
MiniTool Partition Wizard can not only recover lost data on the local disk but on an external drive. If you accidentally delete the files from a removable storage device, you can utilize the Data Recovery feature as well. Here is a quick guide for you.
Step 1. Connect your external storage device to the Windows PC.
Step 2. Launch this software to enter its main interface, and then right-click the external drive from the disk map and select Data Recovery. Here we take a USB flash drive for example.
Step 3. Then you can refer to Step 2 to Step 3 in the above case to save the lost files to another location.
After updating my system to Windows 10, I found the files are deleted quickly without any confirmation message. I want to avoid accidental deletions. Fortunately, this post helped me enable the Windows 10 confirm delete feature. Perhaps you are looking for such an article. Click to Tweet
Bottom Line
How to enable Windows 10 delete confirmation? How to recover the accidentally deleted data? Now, I believe that you have already known the answers to this post. If you have any better ideas on this topic, write them in the comment area. Also, you can send us an email via [email protected] if you have any suggestions about the MiniTool software.
Windows 10 Confirm Delete FAQ
How to turn off the single click delete?
- Press Win + E keys to open the File Explorer.
- Navigate to the View tab and select the Options > Change folder and search options from the top menu.
- In the pop-up window, select the Double click to open an item option under the Click items as follows
How to disable Recycle Bin auto-deletion on Windows 10?
To do so, follow the steps below to stop Windows from automatically emptying your Recycle Bin
- Press Win + I keys to open the Settings app, and then navigate to the System
- Select Storage from the left menu.
- To >disable Recycle Bin auto-deletion, toggle of the switch for Storage Sense can automatically free up space by getting rid of files you don’t need, like temporary files and content in your Recycle.
How to show the Recycle Bin on Windows 10?
- Press Win + I keys to open the Settings app, and then navigate to the Personalization
- Select Themes from the left menu, scroll down the right sidebar, and click on the Desktop icon settings
- Tick the checkbox for the Recycle Bin and click on Apply to execute the change.
Одна из частых претензий пользователей к Windows 11 и Windows 10 — автоматическое удаление файлов, как правило — скачанных из Интернета и часто каких-либо уведомлений пользователя.
В этой инструкции подробно о том, что делать, если Windows удаляет файлы, как восстановить удаленные файлы и дополнительная полезная информация в контексте рассматриваемой темы.
Почему Windows удаляет файлы
В Windows 11 и 10 по умолчанию включены сразу несколько функций защиты от вирусов и вредоносных программ. Основные — защита от вирусов и угроз в Microsoft Defender и фильтр SmartScreen для защиты на основе репутации в браузере Microsoft Edge.
Если с точки зрения этих средств защиты скачанный файл представляет собой угрозу, он может быть помещен в карантин или удален с компьютера, при этом:
- Это может произойти сразу после загрузки, без каких-либо действий с вашей стороны. Если файл скачивался браузером, уведомление об удалении и обнаружении вирусов вы можете увидеть в самом браузере, если какими-либо другими методами, уведомлений может и не появиться.
- Удаление файлов или помещение их в карантин может быть выполнено в момент установки какого-либо ПО или распаковки архива, если сам установщик или архив не были «заподозрены», а уже в их содержимом обнаружились угрозы: причем удаляться они могут не из места установки (распаковки) а из промежуточной временной папки, создаваемой в процессе.
Обосновано ли удаление
Прежде чем предпринимать действия для восстановления удаленного файла, учитывайте: сохраняя файлы, которые Windows считает небезопасными, вы берёте весь риск на себя:
- Да, действительно, иногда блокировка и удаление бывают не вполне обоснованными: Windows 11 и Windows 10 может заблокировать вполне безобидные утилиты для просмотра паролей или удаленного доступа к компьютеру, а также средства для обхода лицензий игр и другого ПО, которые ничего кроме того, что указано не делают.
- Однако, столь же часто происходит и автоматическое помещение в карантин программ, которые действительно представляют угрозу.
Если вы не уверены, рекомендую выполнить проверку файла на VirusTotal.com или в других сервисах онлайн-проверки на вирусы: единичные обнаружения обычно говорят либо о ложном срабатывании, либо о том, что программа может быть небезопасной при определенных сценариях использования (как упомянутые средства удаленного доступа или просмотра паролей). Десятки срабатываний, в свою очередь, должны заставить задуматься, стоит ли запускать это ПО на своем компьютере.
Как восстановить удаленные Windows файлы и что сделать, чтобы она их не удаляла
Повторюсь: восстанавливая удаленные Windows 11 или Windows 10 файлы и запуская их на компьютере, вы берёте возможные риски на себя.
Восстановление файлов, которые удалила Windows
Удаленные из-за обнаруженных угроз файлы должны отображаться в журнале Безопасности Windows. Чтобы посмотреть, какие файлы удалил Microsoft Defender и восстановить их, используйте следующие шаги:
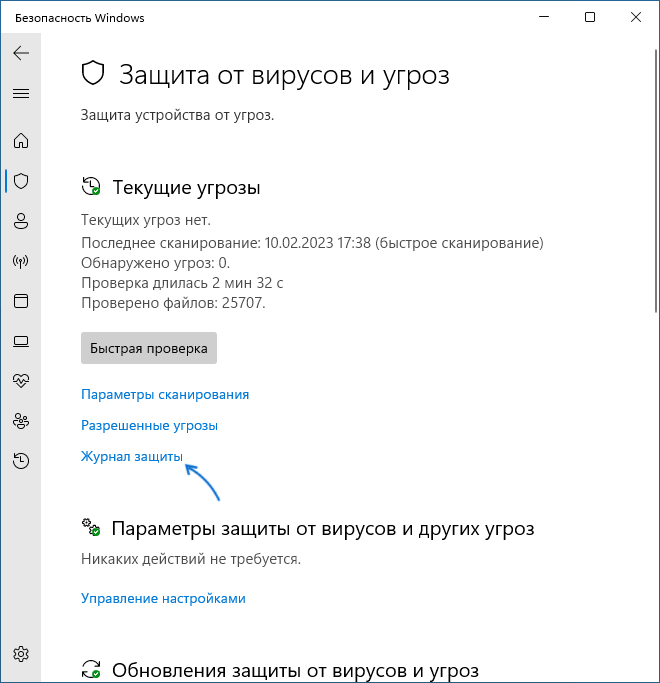
- Откройте окно «Безопасность Windows», используя значок в области уведомлений.
- Откройте раздел «Защита от вирусов и угроз».
- Перейдите в «Журнал защиты».

- Там вы можете увидеть пункты, такие как «Угроза заблокирована» или «Угроза помещена в карантин». Раскройте такой пункт и посмотрите, идет ли речь о файле, который был удален.
- Если это тот файл, который нужен, нажмите по кнопке «Действия» и выберите один из пунктов — «Восстановить» (будет доступен для угроз, помещенных в карантин).
- Или «Разрешить» (этот пункт отображается для заблокированных и удаленных приложений, обычно удаление происходит ещё в момент скачивания файла).


Для выполнения указанных действий потребуются права администратора на компьютере, чтобы подтвердить действия.
- В случае, если вы восстановили файл из карантина — он появится в том же расположении, откуда был удален. Учитывайте, что возможна ситуация, когда файл был удален ещё в процессе установки, распаковки или скачивания и представляет собой не нужный исполняемый файл, а промежуточный временный, в этом случае потребуется повторить процесс.
- Если файл был удален при скачивании и заблокирован, то после разрешения вы сможете снова его скачать и в этот раз он будет сохранен, при условии, что его не заблокируют функции защиты в браузере (обычно настраиваются в Настройки — Безопасность в самом браузере, а для Microsoft Edge можно также отключить SmartScreen в Безопасность Windows — Управление приложениями и браузером — Защита на основе репутации).
- Если файл был удален в процессе установки игры или программы в результате чего она не удалась, вероятнее всего вам придётся добавить все используемые в процессе установки папки в исключения Microsoft Defender как описано в следующем разделе, а затем заново запустить установку.

Добавление папок или файлов в исключения защиты от вирусов и угроз
Если ваша задача состоит в том, чтобы автоматическое удаление файлов игр и программ не происходило, вы можете добавить папки, где такое ПО может находиться, в исключения Microsoft Defender. Чаще всего требуется добавить следующие расположения в исключения:
- Папку «Загрузки» — C:\Windows\Users (Пользователи)\Имя_пользователя\Downloads (Загрузки) или другую папку, куда вы скачиваете программы из Интернета.
- Папку C:/Users (Пользователи)/Имя_пользователя/AppData/Local/Temp — она обычно используется как промежуточная папка при распаковке архивов и при установке «репаков» игр и файлы могут удаляться уже из неё, до попадания в целевую папку.
- Папку, в которую производится установка скачанных из Интернета игр и программ.
Для добавления исключений можно использовать следующие шаги:
- Откройте окно «Безопасность Windows» и перейдите в «Защита от вирусов и угроз».
- В разделе «Параметры защиты от вирусов и угроз» откройте пункт «Управление настройками».
- Пролистайте вниз до пункта «Исключения» и нажмите «Добавление или удаление исключений».

- Нажмите кнопку «Добавить исключение» и добавьте нужные папки или отдельные файлы в исключения защитника Windows.


Более подробно о способах добавления исключений: Как добавить исключения в Microsoft Defender Windows 11, Как добавить исключения в Microsoft Defender Windows 10.
В завершение, ещё несколько нюансов, которые могут быть полезными:
- Может оказаться, что файл был удален не Windows, а сторонним антивирусом на компьютере. При наличии таковых, изучите журналы антивируса и доступные действия.
- В крайнем случае, чего я не рекомендую, вы можете отключить встроенный антивирус Windows, об этом в инструкциях Как отключить Microsoft Defender Windows 11, Как отключить Защитник Windows 10.
- Файлы из пользовательских папок также будут удаляться, если вы зайдете в Windows с временным профилем пользователя.