
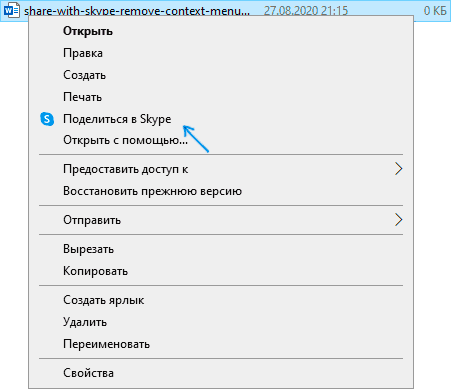
В контекстном меню файлов Windows 10 вы можете заметить новый пункт — «Поделиться в Skype» и далеко не любому пользователю нравится, когда меню по правому клику мышью заполнено ненужными элементами. Этот пункт, как в прочем и многие другие, можно удалить.
В этой простой инструкции подробно о том, как убрать пункт «Поделиться в Skype» из контекстного меню файлов Windows 10 вручную, с помощью редактора реестра, не удаляя при этом само приложение Skype. Кстати, в контексте темы может оказаться интересным: Как редактировать контекстные меню Windows 10 в бесплатной программе Easy Context Menu (но удаление «Поделиться в Skype» там в настоящий момент не предусмотрено).
- Как убрать контекстного меню «Поделиться в Skype» в редакторе реестра
- Видео инструкция
Убираем пункт контекстного меню файлов «Поделиться в Skype» с помощью редактора реестра
Для того, чтобы удалить ненужный пункт меню «Поделиться в Skype» достаточно будет выполнить следующие простые шаги:
- Запустите редактор реестра, для этого можно нажать клавиши Win+R на клавиатуре, ввести regedit в окно «Выполнить» и нажать Enter.
- В редакторе реестра перейдите в раздел (можно просто вставить путь в адресную строку вверху)
HKEY_LOCAL_MACHINE\SOFTWARE\Classes\PackagedCom\Package
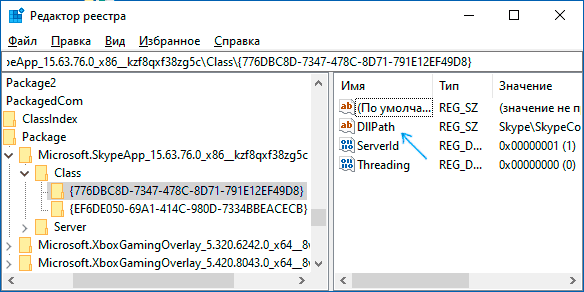
- В этом разделе найдите подраздел, имя которого начинается с Microsoft.SkypeApp и внутри этого раздела перейдите в «папку»
Class\{776DBC8D-7347-478C-8D71-791E12EF49D8}
- Обратите внимание на параметр с именем DllPath и значением Skype\SkypeContext.dll в правой панели редактора реестра. Дважды нажмите по параметру и удалите его значение, затем нажмите «Ок».
- Еще один метод — создать раздел реестра
HKEY_LOCAL_MACHINE\SOFTWARE\Microsoft\Windows\CurrentVersion\Shell Extensions\Blocked
и добавить в него строковую переменную с именем {776DBC8D-7347-478C-8D71-791E12EF49D8}
Как правило, после выполнения этих действий перезагрузка компьютера не требуется: нажмите правой кнопкой мыши по любому файлу, и вы увидите, что пункт «Поделиться в Skype» больше не отображается.
Видео инструкция
Возможно, вам будет интересна и еще одна статья с различными методами и дополнительными бесплатными утилитами, позволяющими убрать ненужное из контекстных меню файлов и папок: Как убрать пункты из контекстного меню Windows 10.
0
1
Linux Mint 18.3 Cinnamon.
После недавнего обновления скайпа в меню выбора приложений «Открыть с помощью» добавился пункт «Поделиться в Skype». И хрен бы с ним, но этот пункт почему-то стал пунктом по дефолту для всех файлов неизвестного типа.
Т.е. теперь при двойном клике на любой файл, для которого раньше не было определено приложение (например образ диска, какой-нить дамп или даже своп-файл (LOL!)), теперь открывается эта отрыжка мелкософта. Раньше же при таком действии открывалось системное окно с предложением выбрать приложение для открытия файла.
Собственно суть вопроса — как вернуть это дефолтное поведение взад?
Удалить скайп не предлагать — приходится этим тормозным говном иногда пользоваться.
On Windows 10, the context menu has a particular option that allows you to share File Explorer files via Skype. All you need to do is right-click on the item you want to share and select Share with Skype. If you rarely use this option, you can quickly remove it from the context menu. Keep on reading this guide to learn how you can do that.
Contents
- 1 Steps to Disable “Share with Skype”
- 1.1 Rename the ShareWithSkype Key
- 1.2 Restrict the Option
- 1.3 Delete the Entry
- 1.4 Use the Command Prompt
- 1.5 Add Share with Skype to the Blocked Key
- 1.6 Install Easy Context Menu
- 1.7 Uninstall Skype
- 1.8 Conclusion
Keep in mind that some of the Registry paths listed below may not be available on your computer. These differences stem from your OS version, Skype app version, as well as the other programs you installed on your machine.
Rename the ShareWithSkype Key
- Type regedit in the Windows Search bar and launch the Registry Editor.
- Navigate to the following key: HKEY_CLASSES_ROOT\PackagedCom\ClassIndex\{776DBC8D-7347-478C-8D71-791E12EF49D8}.
- Then right-click on {776DBC8D-7347-478C-8D71-791E12EF49D8} and select Rename.

- Now, change the key name to -{776DBC8D-7347-478C-8D71-791E12EF49D8}. Apply the changes and close the Registry Editor.

By simply adding the minus sign in front of the key name, you should be able to remove the “Share with Skype ” option from File Explorer’s context menu.
⇒ Important Note: Skype will restore the key to default settings every time you install a new app version. In other words, you’ll need to repeat these steps after every Skype update.
Restrict the Option
Additionally, if you want to remove “Share with Skype” from the desktop app, follow the steps below.
- Relaunch the Registry Editor.
- Then navigate to the following key:
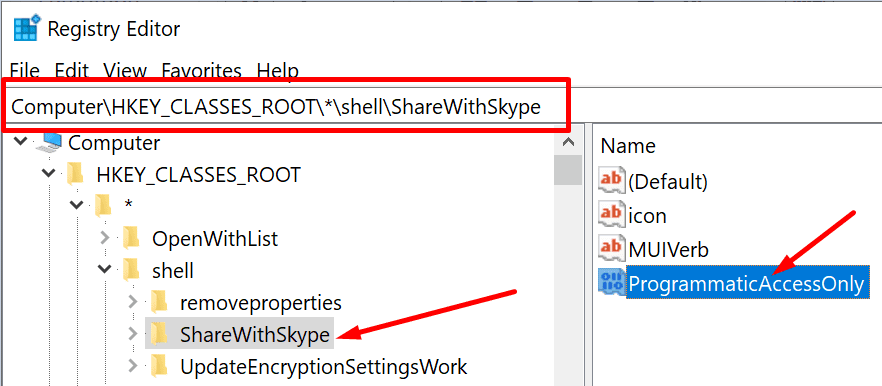
HKEY_CLASSES_ROOT\*\shell\ShareWithSkype. - Right-click in the right pane, create a new DWORD key and name it ProgrammaticAccessOnly. Leave the value data box empty.
Delete the Entry
Other users fixed this issue after deleting the ShareWithSkype key from the Registry.
- Launch the Registry Editor and navigate to HKEY_CLASSES_ROOT\*\shell\ShareWithSkype.
- Then right-click on the ShareWithSkype key and delete it.
This method should survive Skype updates and reinstalls.
⇒ Note: Some users may need to follow a different path to locate this option. Navigate to HKEY_LOCAL_MACHINE\SOFTWARE\Classes\PackagedCom\Package\Microsoft.SkypeApp_15.61.87.0_x86__kzf8qxf38zg5c\Class\{776DBC8D-7347-478C-8D71-791E12EF49D8}. Delete the DLL path.
Use the Command Prompt
Alternatively, if you’re running Windows 10 version 2004 and newer, you can also use Command Prompt to disable Share with Skype.
- Launch Command Prompt with admin rights and enter this command: REG ADD “HKLM\SOFTWARE\Microsoft\Windows\CurrentVersion\Shell Extensions\Blocked” /v {776DBC8D-7347-478C-8D71-791E12EF49D8} /d Skype
- Hit Enter and restart File Explorer.
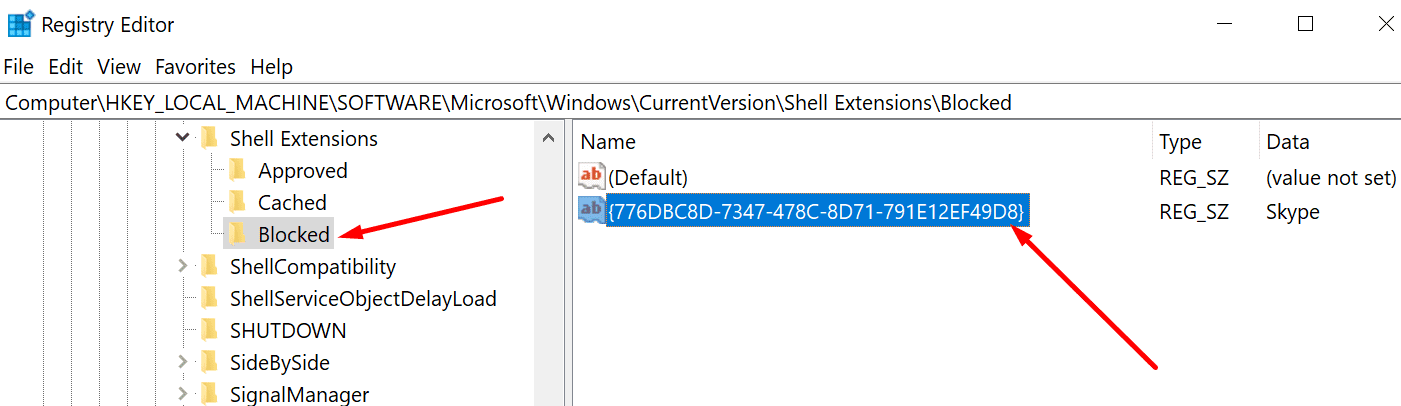
- Launch the Registry Editor and navigate to HKEY_LOCAL_MACHINE\SOFTWARE\Microsoft\Windows\CurrentVersion\Shell Extensions\Blocked.
- Then right-click in the right pane and select New → String value.
- Name the new REG_SZ {776DBC8D-7347-478C-8D71-791E12EF49D8}.
- Double-click on the key and add Skype in the Value box.

- Restart File Explorer. If the option is still visible in the context menu, restart your computer.
Adding this option to the list of blocked actions should permanently solve the problem.
Easy Context Menu is a light program that allows you to customize your Windows 10 context menu. You can add and remove different options, including Share With Skype.
- First, you need to download Easy Context Menu from Sordum.
- Then launch the program and press Ctrl + X to open the Context Menu Cleaner.
- Select the ShareWithSkype line and delete it.
Uninstall Skype
If you don’t really use Skype and you rely on other instant messaging and video meeting tools, you can simply uninstall the app. Launch the Control Panel, select Uninstall a program, click on Skype, and then hit the Uninstall button.
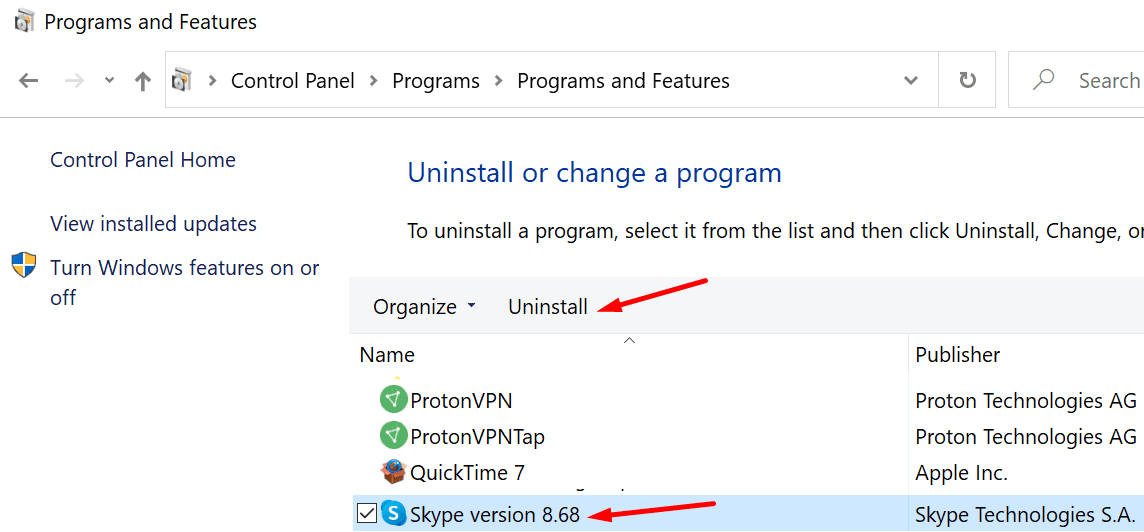
Once the Skype app removed, the Share With Skype option will also disappear from the context menu.
Conclusion
If you don’t use Skype too often, the quickest way to remove the Share with Skype context menu option is to uninstall the app. But if you want to keep the app and only remove the option from the menu, you’ll need to tweak your Registry.
We’re really curious to learn which of the solutions above worked for you. Do let us know in the comments below.
Чем асинхронная логика (схемотехника) лучше тактируемой, как я думаю, что помимо энергоэффективности — ещё и безопасность.
Hrethgir 14.05.2025
Помимо огромного плюса в энергоэффективности, асинхронная логика — тотальный контроль над каждым совершённым тактом, а значит — безусловная безопасность, где безконтрольно не совершится ни одного. . .
Многопоточные приложения на C++
bytestream 14.05.2025
C++ всегда был языком, тесно работающим с железом, и потому особеннно эффективным для многопоточного программирования. Стандарт C++11 произвёл революцию, добавив в язык нативную поддержку потоков,. . .
Stack, Queue и Hashtable в C#
UnmanagedCoder 14.05.2025
Каждый опытный разработчик наверняка сталкивался с ситуацией, когда невинный на первый взгляд List<T> превращался в узкое горлышко всего приложения. Причина проста: универсальность – это прекрасно,. . .
Как использовать OAuth2 со Spring Security в Java
Javaican 14.05.2025
Протокол OAuth2 часто путают с механизмами аутентификации, хотя по сути это протокол авторизации. Представьте, что вместо передачи ключей от всего дома вашему другу, который пришёл полить цветы, вы. . .
Анализ текста на Python с NLTK и Spacy
AI_Generated 14.05.2025
NLTK, старожил в мире обработки естественного языка на Python, содержит богатейшую коллекцию алгоритмов и готовых моделей. Эта библиотека отлично подходит для образовательных целей и. . .
Реализация DI в PHP
Jason-Webb 13.05.2025
Когда я начинал писать свой первый крупный PHP-проект, моя архитектура напоминала запутаный клубок спагетти. Классы создавали другие классы внутри себя, зависимости жостко прописывались в коде, а о. . .
Обработка изображений в реальном времени на C# с OpenCV
stackOverflow 13.05.2025
Объединение библиотеки компьютерного зрения OpenCV с современным языком программирования C# создаёт симбиоз, который открывает доступ к впечатляющему набору возможностей. Ключевое преимущество этого. . .
POCO, ACE, Loki и другие продвинутые C++ библиотеки
NullReferenced 13.05.2025
В C++ разработки существует такое обилие библиотек, что порой кажется, будто ты заблудился в дремучем лесу. И среди этого многообразия POCO (Portable Components) – как маяк для тех, кто ищет. . .
Паттерны проектирования GoF на C#
UnmanagedCoder 13.05.2025
Вы наверняка сталкивались с ситуациями, когда код разрастается до неприличных размеров, а его поддержка становится настоящим испытанием. Именно в такие моменты на помощь приходят паттерны Gang of. . .
Создаем CLI приложение на Python с Prompt Toolkit
py-thonny 13.05.2025
Современные командные интерфейсы давно перестали быть черно-белыми текстовыми программами, которые многие помнят по старым операционным системам. CLI сегодня – это мощные, интуитивные и даже. . .

This tutorial will show you how to add or remove the Share context menu from files for your account or all users in Windows 11.
When you right click on one or more selected files, click/tap on Show more options, and click/tap on Share, you will then be able to share the file(s) using nearby sharing or an app of your choice.
This remove Share from the old Shift+Right Click context menu, after you click/tap on Show more options.
This will also remove Share from the command bar (toolbar) at the top of the new Show more options context menu.
This will not remove Share from within the new Show more options context menu though.
Contents
- Option One: Add or Remove «Share» Context Menu for Current User
- Option Two: Add or Remove «Share» Context Menu for All Users
EXAMPLE: Share on toolbar of new context menu, and Share on Shift+Right Click context menu
Option One
Add or Remove «Share» Context Menu for Current User
1 Do step 2 (add) or step 3 (remove) below for what you would like to do.
2 Add «Share» Context Menu for Current User
This is the default setting.
A) Click/tap on the Download button below to download the file below, and go to step 4 below.
Add_Share_context_menu_for_current_user.reg
(Contents of REG file for reference)
Code:
Windows Registry Editor Version 5.00

[HKEY_CURRENT_USER\Software\Microsoft\Windows\CurrentVersion\Shell Extensions\Blocked]
"{e2bf9676-5f8f-435c-97eb-11607a5bedf7}"=-
3 Remove «Share» Context Menu for Current User
A) Click/tap on the Download button below to download the file below, and go to step 4 below.
Remove_Share_context_menu_for_current_user.reg
(Contents of REG file for reference)
Code:
Windows Registry Editor Version 5.00

[HKEY_CURRENT_USER\Software\Microsoft\Windows\CurrentVersion\Shell Extensions\Blocked]
"{e2bf9676-5f8f-435c-97eb-11607a5bedf7}"="Share"
4 Save the .reg file to your desktop.
5 Double click/tap on the downloaded .reg file to merge it.
6 When prompted, click/tap on Run, Yes (UAC), Yes, and OK to approve the merge.
7 Either restart explorer process, sign out and sign in, or restart the computer to apply.
8 You can now delete the downloaded .reg file if you like.
Option Two
Add or Remove «Share» Context Menu for All Users
You must be signed in as an administrator to use this option.
1 Do step 2 (add) or step 3 (remove) below for what you would like to do.
2. Add «Share» Context Menu for All Users
This is the default setting.
A) Click/tap on the Download button below to download the file below, and go to step 4 below.
Add_Share_context_menu_for_all_users.reg
(Contents of REG file for reference)
Code:
Windows Registry Editor Version 5.00

[HKEY_CLASSES_ROOT\AllFilesystemObjects\shellex\ContextMenuHandlers\ModernSharing]
@="{e2bf9676-5f8f-435c-97eb-11607a5bedf7}"

[HKEY_CURRENT_USER\Software\Microsoft\Windows\CurrentVersion\Shell Extensions\Blocked]
"{e2bf9676-5f8f-435c-97eb-11607a5bedf7}"=-

[HKEY_LOCAL_MACHINE\SOFTWARE\Microsoft\Windows\CurrentVersion\Shell Extensions\Blocked]
"{e2bf9676-5f8f-435c-97eb-11607a5bedf7}"=-
3. Remove «Share» Context Menu for All Users
This will override Option One.
A) Click/tap on the Download button below to download the file below, and go to step 4 below.
Remove_Share_context_menu_for_all_users.reg
(Contents of REG file for reference)
Code:
Windows Registry Editor Version 5.00

[HKEY_LOCAL_MACHINE\SOFTWARE\Microsoft\Windows\CurrentVersion\Shell Extensions\Blocked]
"{e2bf9676-5f8f-435c-97eb-11607a5bedf7}"="Share"
4 Save the .reg file to your desktop.
5 Double click/tap on the downloaded .reg file to merge it.
6 When prompted, click/tap on Run, Yes (UAC), Yes, and OK to approve the merge.
7 Either restart explorer process, sign out and sign in, or restart the computer to apply.
8 You can now delete the downloaded .reg file if you like.
That’s it,
Shawn Brink
Related Tutorials
- Turn On or Off Nearby Sharing in Windows 11
- Share Files with Nearby Devices in Windows 11
- Share File with App in Windows 11
- Share File with Email Contact in Windows 11
- Change Device Friendly Name for Nearby Sharing in Windows 11
- Add or Remove Sharing tab in Drive and Folder Properties in Windows 11
- Add or Remove «Give access to» context menu in Windows 11
-
Add_Share_context_menu_for_all_users.reg
Add_Share_context_menu_for_all_users.reg
1.2 KB
· Views: 746
-
Add_Share_context_menu_for_current_user.reg
Add_Share_context_menu_for_current_user.reg
720 bytes
· Views: 933
-
Remove_Share_context_menu_for_all_users.reg
Remove_Share_context_menu_for_all_users.reg
722 bytes
· Views: 1,629
-
Remove_Share_context_menu_for_current_user.reg
Remove_Share_context_menu_for_current_user.reg
728 bytes
· Views: 2,157