
Applies ToExcel для Microsoft 365 Word для Microsoft 365 Outlook для Microsoft 365 PowerPoint для Microsoft 365 Access для Microsoft 365 Классический клиент Project Online Publisher для Microsoft 365 Visio, план 2 Excel 2024 Outlook 2024 PowerPoint 2024 Access 2024 Project профессиональный 2024 Project стандартный 2024 Excel 2021 Word 2021 Outlook 2021 PowerPoint 2021 Access 2021 Project профессиональный 2021 Project стандартный 2021 Publisher 2021 Visio профессиональный 2021 Visio стандартный 2021 Excel 2019 Word 2019 Outlook 2019 PowerPoint 2019 Access 2019 Project профессиональный 2019 Project стандартный 2019 Publisher 2019 Visio профессиональный 2019 Visio стандартный 2019 Excel 2016 Word 2016 Outlook 2016 PowerPoint 2016 Access 2016 OneNote 2016 Project профессиональный 2016 Project стандартный 2016 Publisher 2016 Visio профессиональный 2016 Visio стандартный 2016 Конструктор панели мониторинга PerformancePoint InfoPath 2013
Чтобы приложение Office, которое используется ежедневно, запускалось автоматически, добавьте ярлык в папку автозагрузки Windows.
Windows 10 или 8
-
Откройте диалоговое окно «Запуск Windows» (клавиша Windows + R).
-
Скопируйте следующий путь в диалоговое окно Запуск и нажмите клавишу ВВОД.
%AppData%\Microsoft\Windows\Start Menu\Programs\Startup
-
Откройте начальный экран, щелкните правой кнопкой мыши нужное приложение Office и выберите пункт Открыть расположение файла. Он может находиться в подменю Дополнительно .
Совет: Если программа отсутствует в списке, щелкните начальный экран правой кнопкой мыши и выберите пункт Все приложения.
-
Скопируйте ярлык программы (CTRL+C), а затем вставьте его (CTRL+V) в папку Startup, открытую на шаге 2.
Приложение автоматически запустится при следующем запуске компьютера. Если потребуется удалить программу из автозагрузки, удалите ярлык из папки «Автозагрузка» (этапы 1 и 2).
Windows 7
-
Нажмите кнопку Пуск > Все программы > Microsoft Office.
-
Щелкните правой кнопкой мыши значок программы, которую требуется запускать автоматически, и выберите команду Копировать (или нажмите клавиши CTRL+C).
-
В списке Все программы щелкните правой кнопкой мыши папку Автозагрузка и выберите команду Проводник.
-
Нажмите Упорядочить > Вставить (или нажмите клавиши CTRL+V), чтобы вставить ярлык приложения в папку «Автозагрузка».
Нужна дополнительная помощь?
Нужны дополнительные параметры?
Изучите преимущества подписки, просмотрите учебные курсы, узнайте, как защитить свое устройство и т. д.
В последний версиях Windows 11 приложение Outlook (New) устанавливается автоматически, а недавно Майкрософт объявила, что в конце января — начале февраля 2025 года оно будет автоматически устанавливаться и на устройства с Windows 10 в составе обновлений.
В случае, если вам не требуется новое приложение Outlook, вы хотите удалить его или отключить его автоматическую установку, в этой инструкции подробно о том, как это сделать, а при необходимости — вернуть старое приложение «Почта».
Удаление установленного приложения Outlook (New)
Если приложение Outlook (New) уже было установлено в Windows 11/10, вы можете удалить его одним из следующих способов:
- Запустить Терминал Windows или Windows PowerShell от имени администратора (используйте меню Win+X, оно же открывается при нажатии правой кнопкой мыши по кнопке «Пуск»), ввести команду
Remove-AppxProvisionedPackage -AllUsers -Online -PackageName (Get-AppxPackage Microsoft.OutlookForWindows).PackageFullName
и нажать Enter.

- Если команда из 1-го способа сообщит об ошибке, используйте следующий вариант:
Get-AppxPackage *Microsoft.OutlookForWindows* | Remove-AppxPackage -AllUsers
- Нажать правой кнопкой мыши по приложению в меню «Пуск» и выбрать пункт «Удалить», после чего подтвердить удаление приложения. То же самое можно сделать в Параметры — Приложения — Установленные приложения.

Во всех случаях приложение будет удалено, причём при использовании первых двух способов — для всех пользователей системы.
Первый способ предназначен для удаления предустановленного или установленного в ходе обновления Windows приложения Outlook (New), второй — для приложений, установленных пользователем вручную или автоматически после запуска устаревшего приложения «Почта», третий сработает в обоих вариантах.
Запрет автоматической установки нового приложения Outlook
Самый простой способ отключить автоматическую установку Outlook (New) в Windows 10, а также предложение его установки в классической программе Outlook и миграцию для подписчиков Office 365 — создать REG-файл со следующим кодом:
Windows Registry Editor Version 5.00


[HKEY_CURRENT_USER\Software\Microsoft\Office\16.0\Outlook\Options\General]
"HideNewOutlookToggle"=dword:00000001

[HKEY_LOCAL_MACHINE\SOFTWARE\Microsoft\WindowsUpdate\Orchestrator\UScheduler_Oobe\OutlookUpdate]
"BlockedOobeUpdaters"="[\"MS_Outlook\"]"

[HKEY_CURRENT_USER\Software\Policies\Microsoft\Office\16.0\Outlook\Preferences]
"NewOutlookMigrationUserSetting"=dword:00000000
Сохранить его, и «запустить», согласившись на добавление данных в реестр, после чего перезагрузить компьютер.
Для Windows 11 код будет слегка отличаться:
Windows Registry Editor Version 5.00


[HKEY_CURRENT_USER\Software\Microsoft\Office\16.0\Outlook\Options\General]
"HideNewOutlookToggle"=dword:00000001

[-HKEY_LOCAL_MACHINE\SOFTWARE\Microsoft\WindowsUpdate\Orchestrator\UScheduler_Oobe\OutlookUpdate]

[HKEY_CURRENT_USER\Software\Policies\Microsoft\Office\16.0\Outlook\Preferences]
"NewOutlookMigrationUserSetting"=dword:00000000
То же самое можно сделать вручную в редакторе реестра:
- Нажмите клавиши Win+R на клавиатуре, введите regedit и нажмите Enter.
- Перейдите к разделу реестра
HKEY_LOCAL_MACHINE\SOFTWARE\Microsoft\WindowsUpdate\Orchestrator\UScheduler_Oobe
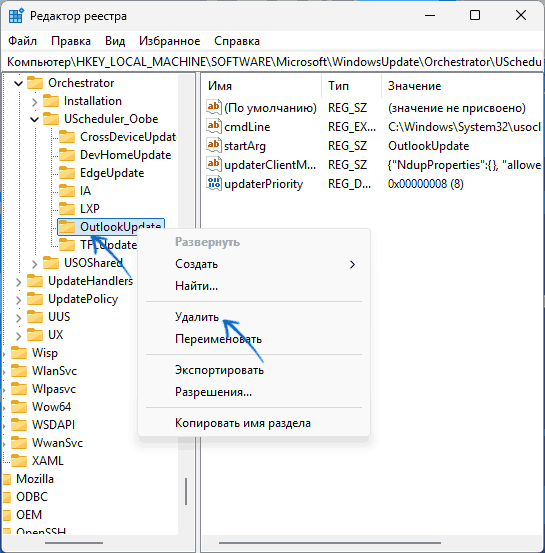
- В Windows 11 в указанном разделе удалите подраздел с именем OutlookUpdate, нажав по нему правой кнопкой мыши и выбрав пункт «Удалить».

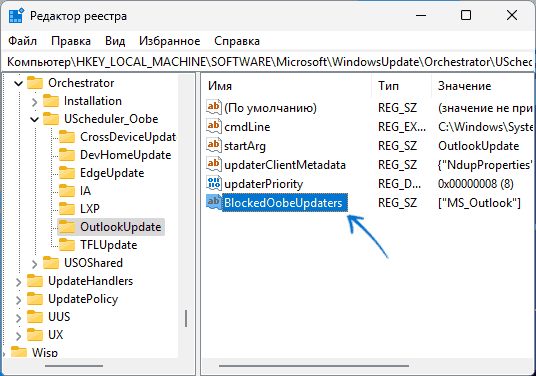
- В Windows 10 выберите раздел OutlookUpdate, нажмите правой кнопкой мыши в пустом месте правой панели редактора реестра, создайте новый строковый параметр с именем BlockedOobeUpdaters, дважды нажмите по созданному параметру и установите значение
["MS_Outlook"]
для него.

- Создав параметр DWORD с именем NewOutlookMigrationUserSetting и значением 0 в разделе реестра
HKEY_CURRENT_USER\Software\Policies\Microsoft\office\16.0\outlook\preferences
вы отключите переход на новую версию Outlook в Office 365
- Параметр DWORD с именем HideNewOutlookToggle и значением 1 в разделе реестра
HKEY_CURRENT_USER\Software\Microsoft\Office\16.0\Outlook\Options\General
уберёт переключатель с предложением попробовать новый Outlook в классическом приложении Outlook.
После внесения изменений рекомендую перезагрузить компьютер. Документ Майкрософт по этой теме доступен на официальном сайте.
Дополнительная информация
Описанные выше действия предотвратят автоматическую установку приложения Outlook (New) Windows 11/10 при обновлениях. Однако, если вы удаляли это приложение с целью использования классического встроенного приложения «Почта», то после его запуска установка Outlook (New) будет инициирована вновь, несмотря на проделанные изменения, поскольку «Почта» более не поддерживается и считается Майкрософт устаревшим приложением.
Решение здесь лишь одно — отказаться от использования «Почты» и перейти на альтернативы, такие как Thunderbird (бесплатно), Outlook (классическое приложение в составе Office) и другие. Вы также можете удалить приложение «Почта» (при этом также будет удалено приложение «Календарь») с помощью команды PowerShell:
Get-AppxPackage *microsoft.windowscommunicationsapps* | Remove-AppxPackage -AllUsers
Для предотвращения его случайного запуска другими пользователями с последующей установкой нового приложения Outlook.

How to Disable Microsoft Outlook on Startup
Image Credit:
DragonImages/iStock/Getty Images
Microsoft Outlook allows you to combine your email, contacts and calenders in one application. Outlook is part of the Microsoft Office software suite, and by default is set to launch each time your computer is turned on. If you do not use Outlook, or would like to prevent it from starting when your computer is booted, you can disable it from automatically loading from the System Configuration window.
Step 1
Click on the Windows «Start» button, then type «msconfig» into the search box.
Step 2
Click «msconfig» from the search results displayed at the top of the menu to launch the System Configuration utility.
Step 3
Click the tab labeled «Startup» in the System Configuration utility window, then scroll down and locate the «Microsoft Outlook» entry.
Step 4
Remove the check mark next to the «Microsoft Outlook» entry, then click «OK.»
Step 5
Click «Restart» to immediately restart your computer, or click «Exit without restart» to restart your computer at another time. The settings will take effect when the computer is restarted.
In this post, we will discuss three methods to disable Outlook in Windows 11/10. Microsoft Outlook is a popular email management software that is used by many people. However, there may be times when you need to disable or delete it.
If you’re having problems with Outlook and want to stop using it, Microsoft provides a way to disable or delete the program from your PC. Let’s check them out.
Windows 11 is the newest operating system from Microsoft and it is loaded with many great features. One of these features is the Outlook email client. However, if you’re not interested in using this email client, then you can disable or delete it completely.
You can also just disable Outlook without deleting it, which means that it can still be used if necessary. To disable or delete Outlook in Windows 11, follow the below suggestions:
- Disable Outlook from the Startup List
- Set a new default email client
- Disable Outlook for Office 365
Now let’s take a closer look at them:
1. Disable Outlook from the Startup List
Using this method, Microsoft Outlook remains on your computer system, but you no longer have to interact with it. The steps for doing so are listed below:
- Press the Windows + I keyboard shortcut to launch the File Explorer.
- In the File Explorer window, go to the address bar and type the following:
%AppData%\Microsoft\Windows\Start Menu\Programs\Startup
- Now press Enter to jump to the relevant page.
- If you see the Outlook shortcut there, delete it.
- Now press Ctrl+Shift+Esc to open the Task Manager.
- Once it opens, go to the Startup tab.
- If you see Outlook there, select it and disable it
2. Set a new default email client
Microsoft Outlook also offers the option to switch to another email program in place of it if you would prefer not to be constantly suggested. To do this, follow these steps.
Windows 11:
To set a new default email client on Windows 11, use the following steps:
- Press the Windows + I keys to access the Windows Settings.
- On the left side, click Apps.
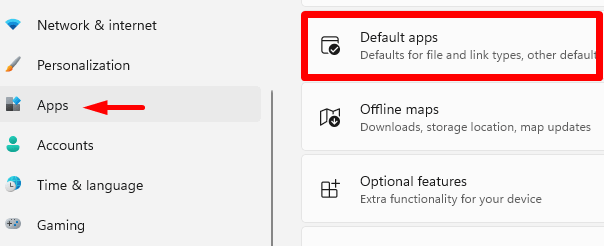
- Choose Default apps in the right panel.
- Select Mail from the list.
- As soon as you select Mail, Outlook will appear as your default email client.
- Click on Outlook and choose another application for your email.
Once you complete the steps above, Outlook no longer serves as your default email client.
Windows 10:
To set a new default email client on Windows 10, use the following steps:
- Open Settings, and press the Windows key + I together.
- From there, click the Apps category.
- On the left pane, select Default apps.
- In the Email section, Outlook should be the default email client.
- From the dropdown list, select the program you want to replace Outlook with.
3. Disable Outlook for Office 365
Here are the steps you will need if you use Outlook for Office 365 instead of the regular Outlook application:
- Right-click on the Start menu.
- Then select the Apps and Features option from the menu list.
- From the list, select Microsoft Office Desktop Apps.
- Then click on the three dots and select the Uninstall option.
- Click on the Uninstall button again to confirm this.
Related Post:
- Add, Remove, or Change holidays on your calendar in Outlook
- How to Fix Microsoft Outlook Error 0x80040115
Last Updated on June 19, 2022 by
All of you observe while restarting or starting your personal computer or laptop you must start your Microsoft Outlook separately.
It’s not a technical glitch, it’s a pattern. You like to make Outlook start automatically with a computer/laptop.
Here in this write-up, you must set up/change a few backhand settings which start outlook on startup.
It’s beneficial, Outlook is unable to update those email messages which hit your inbox until you open the application, it will take a few movements to update.
How to add Outlook to startup Windows [Step by Step Process]
Windows consist of a startup folder, which allows those programs to AutoStart once your system start. Windows 10 consists of a few programs like (Audio, antivirus, notes, and Spotify), these programs start with your windows.
You can add the Microsoft Office Outlook application to the Startup folder to auto-start your Outlook when turning on your computer.
Finding your startup folder in a different setup like Window 7/8/8.1/10 is different, there is one thing common “RUN“.
Follow the steps:
- Close your Outlook if running and refresh your system.
- Go to the search bar of your window, and type Outlook you find the Outlook icon, which directly opens your Outlook, Click the right mouse button, and click open file location.
- In the Apps Folder, search Outlook using ‘Ctrl + F’, type Outlook, and copy the program shortcut using ‘Ctrl + C’.
- Hit ‘Windows key + R‘ key, it’s a Run Command and opens the run dialog box.
- Type shell:startup and click on OK to open the Startup folder on your computer.

- Simply Hit Ctrl + V to paste that outlook application into the startup folder.
You can also use the drag and drop option to copy the Outlook application into the startup folder, you have to open both the folders (startup and application) simultaneously.
Drag the Outlook icon from the application folder without releasing the mouse button and drop that icon into the startup folder.
All set, when you start your computer, Outlook runs automatically.
Bonus Tip
Copy the following path to the Run dialog, and then press Enter %AppData%\Microsoft\Windows\Start Menu \Programs\Startup
This process directly takes you to the startup folder.
How To Disable Outlook from Opening on Startup?
Turn off outlook on startup, required selecting outlook application from startup folder:
- Hit the ‘Window + R‘ key, type shell:startup, and click on OK.
- Startup Folder appears you will find the Outlook application in the folder.
- Select that application, click the mouse right button, and click delete.

After this, you will no longer find Outlook starting Automatically with your computer. I always recommend all outlook users enable this step.
Open Outlook Calendar on Startup
Outlook is one of the most popular email programs around, but if you don’t use it often, you may have missed a few tips for making it work more efficiently.
One of those tips is to set up the program to automatically open at startup. When you open Outlook, it will launch into your default calendar.
But you can set the program to open to your default calendar (or calendar of choice) every time you start the program.
Outlook Calendar, Todo list, and Email all are part of the Microsoft Outlook application, once you add the outlook application icon to the startup setup of your computer, it will automatically allow you to Open Outlook Calendar on Startup.
Final Words
In summary, this article will explain the steps on how to start the Outlook application automatically when you start your computer system, which will help you get fresh emails updated in your Outlook application instantly.
As far as Outlook Web or Outlook Progressive Web App (PWA) is concerned, any updating regarding fresh email will be updated until you open the website or PWA.
Frequently Asked Questions (FAQ)
It depends on the user, Outlook has features of running outlook in the background even if you close the Outlook application.
Related Articles
- How To Setup/Run Rules in Outlook 365 Webmail? [Use rules to manage your email]
- Why are my emails going to outbox and not sent?
- How To Send Multiple Emails to One Person in Outlook?