
-
Home
-
News
- How to Delete a Virtual Drive Windows 10 – 3 Ways
By Tina |
Last Updated
When you don’t want to use a virtual drive, you may want to remove it Windows 10. But do you know how to delete a virtual drive? This post shows you 3 ways. In addition, you can visit MiniTool to know more about disk tips and solutions.
If you have a lot of files to save, you may need an external hard drive to save them. However, in Windows 10, there is a function that enables you to create a virtual disk. The virtual disk has various functions, such as saving files. If you don’t know how to create a virtual disk, click here to know more.
However, if you don’t need the virtual drive again, you may wonder there is a way to remove virtual drive Windows 10. The answer is positive. In this post, we will show you how to delete a virtual drive in 3 different ways. So, just keep on your reading.
3 Ways to Delete Virtual Drive Windows 10
In this section, we will show you how to delete a virtual drive.
Way 1. Delete Virtual Drive via This PC
First of all, we will show you how to delete a virtual drive via This PC.
Now, here is the tutorial.
Step 1: Open File Explorer, go to This PC, select the virtual drive and choose Properties from the context menu.

Step 2: In the pop-up window, go to the Hardware tab, select the virtual disk on your computer, and choose Properties to continue.
Step 3: In the pop-up window, go to the Driver tab, and then choose Uninstall Device to continue.
Tip: If you found that the Uninstall Device button is grayed out, navigate to the following solution.
When all steps are finished, reboot your computer and the virtual drive would have been removed.
Way 2. Delete Virtual Drive via Disk Management
The second way to delete virtual drive Windows 10 is to remove it in Disk Management. Now, here is the tutorial.
Step 1: Open File Explorer, right-click This PC and choose Manage to continue.
Step 2: In the Disk Management window, select the virtual disk and choose Delete volume… to continue.

Step 3: Then you will receive a warning message which tells you all data on the virtual disk will be deleted. So back up them first. Then confirm it.
Step 4: Then it will become unallocated space. Right-click the unallocated space and choose Detach VHD.

Step 5: Then confirm the changes.
When all steps are finished, you have successfully removed the virtual drive Windows 10.
Way 3. Delete Virtual Volume via Diskpart
The third solution to delete virtual volume Windows 10 is through the diskpart. Now, here is the tutorial.
Step 1: Type the Command Prompt in the search box of Windows and choose the best-matched one. Right-click it to choose Run as administrator to continue.
Step 2: In the pop-up window, type the following commands and hit Enter after each command.
diskpart
select vdisk file=“f:\virtual disk.vhd” <h represents the drive which has the virtual disk file, the virtual disk represents the title of the virtual disk.>
detach vdisk

When all steps are finished, you can successfully remove virtual disk Windows 10.
Besides the methods we mentioned in the above part, you can also delete virtual volume via the third-party software, such as MiniTool Partition Wizard. Then you can click here to know how to delete virtual disk Windows 10.
Final Words
To sum up, this post has introduced 3 ways to delete virtual disk Windows 10. If you want to do so, try these solutions.
About The Author
Position: Columnist
Tina is a technology enthusiast and joined MiniTool in 2018. As an editor of MiniTool, she is keeping on sharing computer tips and providing reliable solutions, especially specializing in Windows and files backup and restore. Besides, she is expanding her knowledge and skills in data recovery, disk space optimizations, etc. On her spare time, Tina likes to watch movies, go shopping or chat with friends and enjoy her life.
Download Windows Speedup Tool to fix errors and make PC run faster
The Windows operating system includes a feature that allows you to backup your data files and the System Image regularly. While this is a very useful feature, you may at times find that it is consuming a lot of disk space. If you are constrained for disk space, you can free up disk space by deleting previous System Images and Data File backups in Windows 11/10 via Backup and Restore > Manage Spaces. Let us see how you can do this.
Open Control Panel and navigate to Backup and Restore (Windows 7) applet. Click on Manage space.

The following Manage Windows Backup disk space setting will open. Here you can click on the View backups button.
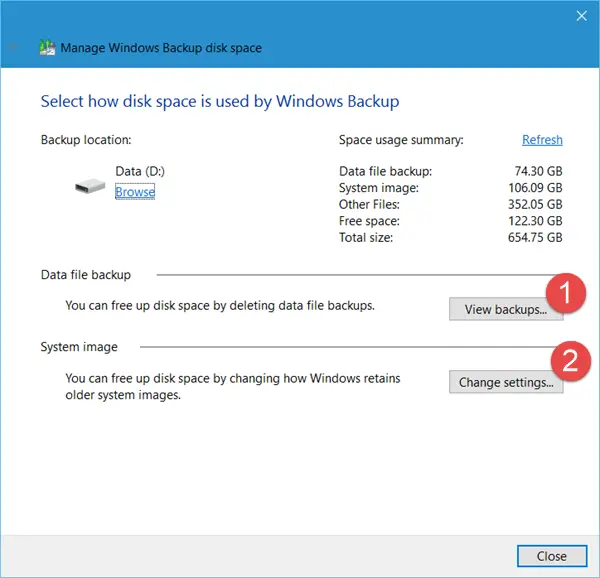
This will allow you to view all your Data File backups, and delete the backups you do not need.

Next under System image, you may click on the Change settings button.
Now when here, you will see the following options:
- Let Windows manage the space used for backup history
- Keep only the latest system image and minimize space used by backup.
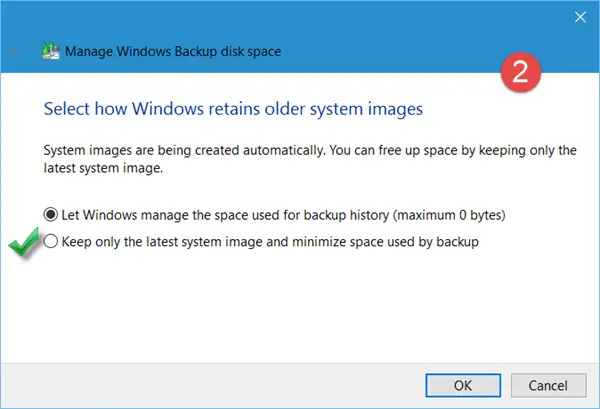
The 1st option is the default one. Select the former or 2nd option. This will delete your earlier system images and keep only the latest System Image, thereby resulting in saving of disk space. Now henceforth, only one, and that is the latest System Image will be saved.
Hope you find this small tip useful.
What is the difference between a backup and system image?
A system image is the exact copy of your hard drive. It contains everything stored on the hard drive. If we talk about the system image of the C drive, it contains all your programs and files stored on it. The benefit of a system image is that you can recover everything on the hard drive easily if your hard drive crashes. On the other hand, a backup contains your files and folders. You can create a backup on any storage device by using the copy-and-paste method, whereas, to create a system image, you need dedicated software.
Is it OK to delete backup files?
It depends on you whether you want to delete backup files or not. If you do not need the backup files anymore, you can delete them in order to free up unwanted space so you can create another backup on the same device.
Now read: How to delete System Restore Points and Previous versions of files in Windows 11/10.
Anand Khanse is the Admin of TheWindowsClub.com, a 10-year Microsoft MVP (2006-16) & a Windows Insider MVP (2016-2022). Please read the entire post & the comments first, create a System Restore Point before making any changes to your system & be careful about any 3rd-party offers while installing freeware.
Reader Interactions
Readers help support Windows Report. We may get a commission if you buy through our links.
Read our disclosure page to find out how can you help Windows Report sustain the editorial team. Read more
Virtual drives are virtualized hard drives that operate much the same as additional external hard disk drives with their partitions. Although they can be useful for virtual machines, some users remove virtual drives in Windows 10 when no longer needed.
The process of deleting a virtual drive is different from creating it. And to free up storage space if the virtual drive is not required, deleting it is the best way to proceed. So, let’s find out all about it.
What is a virtual drive?
A Virtual Drive is similar to a regular one and can be created on a connected storage drive. It usually has two extensions, .vhdx and .vhd, with distinct features and individual sets of pros and cons.
To any program or application on the PC, the virtual drive appears as a real/physical device and is used as such. Here are some of the key features of a virtual drive:
- Easy to create: Virtual drives are easy to create and can be built on an existing storage drive, all in a matter of minutes.
- Can be quickly moved: A major benefit of virtual drives is the enhanced portability, meaning they can be moved quickly and easily from one system to another.
- Used by Virtual Machines: Virtual Drives are mostly employed by Virtual Machines to store the OS, programs, and data. So, once done with the latter, you can remove the virtual drive in Windows 10.
- Slower than regular drives: One of the aspects users often complain about is the slow speed of drives that were created virtually. And there’s ain’t much you can do because that’s how the way it works.
How can I remove the virtual drive on Windows 10?
Tip
Many recommend removing the Virtual Drive via the Uninstall Device option in the Drivers tab in its Properties. But, the method wouldn’t work. As soon you restart the computer, the virtual drive will reappear, given that Windows automatically installs the missing driver.
1. Using Disk Management
- Press Windows + X to open the Power User menu, and select Disk Management from the list.
- In Disk Management, locate the Virtual Drive, right-click on it, and choose Detach VHD.

- Click OK in the confirmation prompt to remove the Virtual Disk in Windows 10.


This is the simplest method to remove the virtual drive in Windows 10, and it shouldn’t take more than a few seconds. But, if you prefer the command line over GUI, we have a solution for that as well.
2. With Diskpart
- Press Windows + R to open Run, type cmd, and hit Ctrl + Shift + Enter.

- Click Yes in the UAC prompt.
- Paste the following command and hit Enter:
diskpart
- Next, execute this command while replacing Path of the VHD file with the actual one on your PC:
select vdisk file=”Path of the VHD file”
- Finally, run this command to delete Virtual Drive in Windows 10:
detach vdisk


The Virtual Drive has now been removed from Windows 10. Also, you could head over to the file path and delete the .vhd or .vhdx file to free up storage space in case there’s no data on the Virtual Drive.
Besides, if there’s critical data on the virtual drive, we recommend you use a reliable backup tool to store it and only then remove the drive.
- Microsoft updates Copilot app with guided tour for new users
- Microsoft wants Windows 10 users to upgrade to Windows 11 or Copilot + PCs
- Deleting ‘inetpub’ folder lets hackers permanently stop Windows updates, Microsoft warns
- The latest KB5055612 for Windows 10 22H2 brings huge stability to the OS
How to delete a virtual hard disk on VirtualBox?
- Launch VirtualBox, right-click on the Virtual Machine, and select Settings.
- Now go to the Storage tab.

- Right-click on the virtual drive and select Remove Attachment from the context menu.

- Once done, click OK to save the changes.


If you were wondering how to remove the virtual CD drive, it could be done via the VirtualMachine settings in no time.
These are all the ways you can remove a Virtual Drive in Windows 10 and even on VirtualBox. And while we are on the subject, check our curated list of the best Virtual Machines in Windows.
If you have any queries or want to share additional information on the subject, comment below.
Matthew Adams
Windows Hardware Expert
Matthew is a freelancer who has produced a variety of articles on various topics related to technology. His main focus is the Windows OS and all the things surrounding it.
He is passionate about the tech world, always staying up-to-date with the latest and greatest. With an analytical view, he likes problem-solving, focusing on errors and their causes.
In his free time, he likes to read and write about history and tries to always develop new skills.
Всем привет! Сегодня мы поговорим про то, как же нам удалить виртуальный диск в Windows 10, 11, 7 или 8. И тут сразу нужно уточнить несколько нюансов. Дело в том, что виртуальных приводов может быть несколько видов:
- Виртуальный жесткий диск – отображается так же, как и любой жесткий носитель в виде дополнительного раздела.
- Виртуальный DVD привод – данное устройство, отображается в том случае, если вы смонтировали ISO или любой другой образ.
ПРИМЕЧАНИЕ! Если у вас на жестком диске есть несколько разделов «C:\», «D:\», «E:\» и т.д. И вы хотите убрать лишние, сделав объединение – читаем эту инструкцию.
В статье я расскажу про «извлечение», отключение или удаления данного виртуального диска. Чтобы не бродить по всей статье в поисках нужного способа, советую ознакомиться с оглавлением и выбрать тот вариант, который вам нужен.
Содержание
- У меня виртуальный дисковод (привод)
- Способ 1: Через проводник
- Способ 2: Сторонние программы
- У меня виртуальный жесткий диск
- Способ 1: Через проводник
- Способ 2: Управление дисками
- Способ 3: Командная строка
- Задать вопрос автору статьи
У меня виртуальный дисковод (привод)
В этой главе мы посмотрим, как удалить DVD дисковод в Windows 10. Но я говорю именно про виртуальный привод, если вам нужно убрать физическое устройство, то у вас есть два варианта. Первый – отключить его физически. Второй – зайти в «Диспетчер устройств», найти там привод, кликнуть ПКМ и выбрать «Отключить устройство».
Читаем – как смонтировать виртуальный привод.
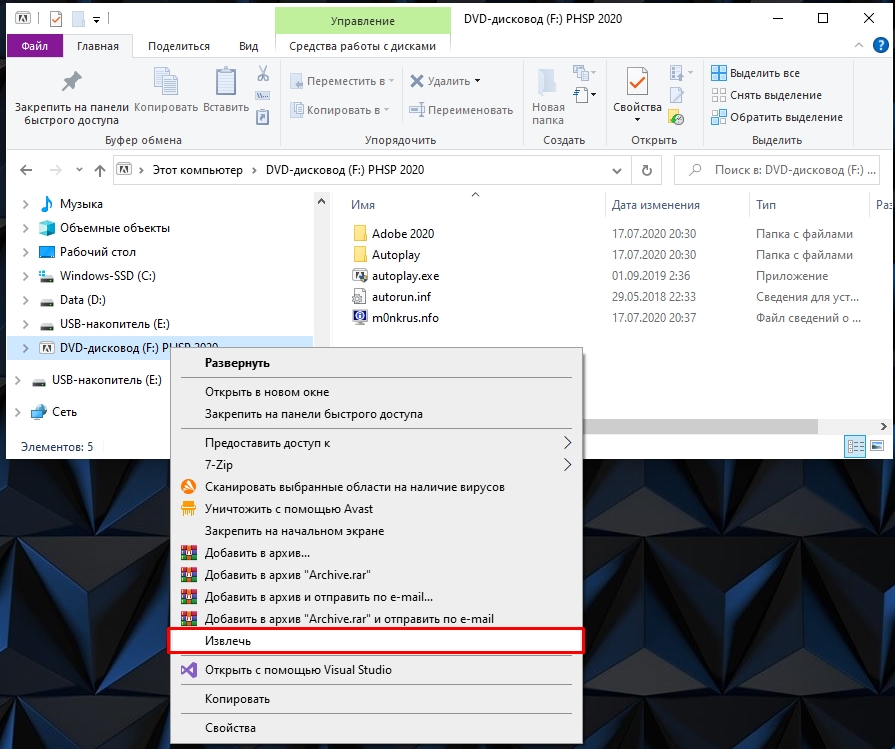
Способ 1: Через проводник
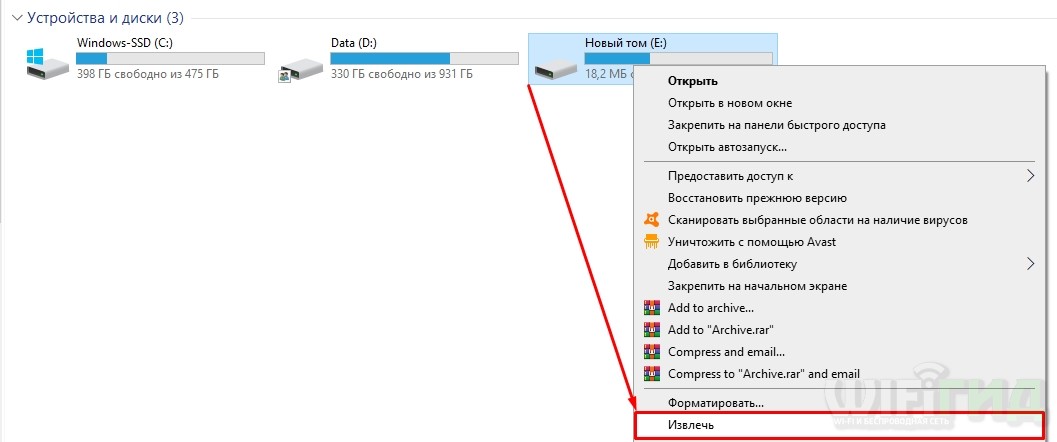
Если для создания виртуального привода вы использовали стандартную функцию Виндовс, то отключается он очень просто – кликните по нему правой кнопкой мыши и из меню выберите команду «Извлечь».
Способ 2: Сторонние программы
Если для создания дисковода вы использовали какие-то сторонние приложения, тогда для извлечения и удаления виртуального устройства, у нас есть несколько методов. Первый – вы можете просто закрыть программу. Нужно найти её в «Трее» в правом нижнем углу экрана, кликнуть ПКМ и выбрать команду «Выйти» (или «Закрыть»). Второй способ – это в самой программе найти образ или привод, кликнуть по нему ПКМ – далее выбираем «Демонтировать» или «Извлечь».
У меня виртуальный жесткий диск
Удалить виртуальный диск можно несколькими способами. Давайте ознакомимся со всеми.
Читаем – как создать виртуальный диск.
Способ 1: Через проводник
Обычно при создании подобного носителя он свободно отображается в виде диска в проводнике. Чтобы зайти в «Проводник» откройте «Компьютер».
Теперь вам останется просто кликнуть правой кнопкой мыши по виртуальному диску. Далее из выпадающего контекстного меню кликаем по команде «Извлечь».
Способ 2: Управление дисками
- Чтобы попасть во встроенную утилиту «Управление дисками» – одновременно зажмите две клавиши:
+ R
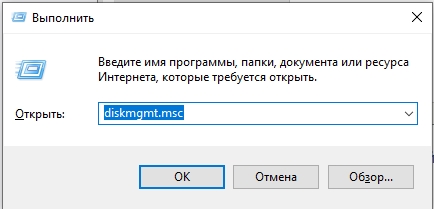
- Далее вводим запрос:
diskmgmt.msc
- В списке в самом низу, где отображается графическое представление дисков – кликните правой кнопкой по нужному разделу и выберите команду отсоединения.
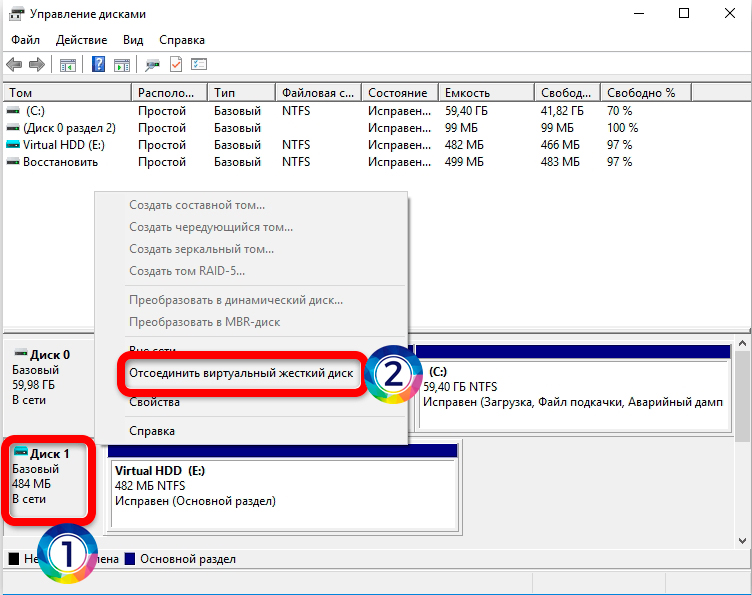
- В конце нужно подтвердить действие, нажав «ОК».
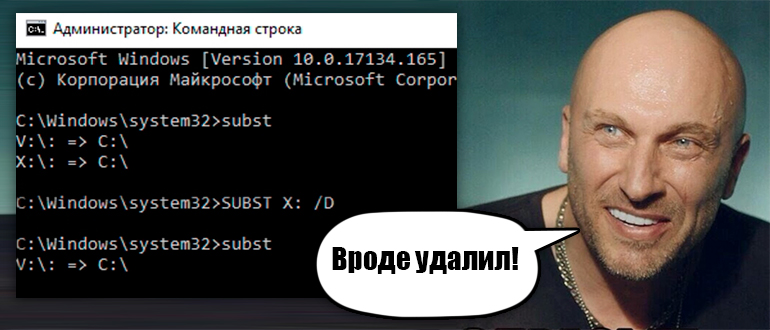
Способ 3: Командная строка
Запускаем консоль с правами администратора. Теперь вводим команду:
subst
Далее вы увидите список всех виртуальных носителей. Например:
V:\: => C:\
V – это буква виртуального диска. C – физический раздел, на котором виртуальный носитель и располагается. Чтобы удалить «устройство» используем команду:
subst v: /D (Вместо D введите букву вашего диска)