
Как удалить папку «Недавние места» с рабочего стола
Как-то я столкнулась с такой проблемой. Уж не знаю, каким образом, но папка «Недавние места» вдруг очутилась на рабочем столе. Самое интересное, что ее невозможно было удалить ни одним стандартным способом! При выделении ее и нажатии кнопки Del не происходило ровным счетом ничего. При вызове на папке контекстного меню (по щелчку правой кнопки мыши) обнаруживалось, что там вообще нет такого варианта «Удалить», как это обычно бывает! А при попытке перетащить данную папку в корзину, в корзине оказывался только ярлык на «Недавние места», а злосчастная папка оставалась на месте. То же самое происходило и при попытке перетащить папку в любое другое место.
Если у вас произошло тоже самое, не отчаивайтесь. Выход из этого положения есть и совсем не сложный.
Открываем Мой компьютер (или просто Компьютер, как пишется в Windows 7). Заходим на диск C. Открываем папку Пользователи (или Users) – Default (если не находите папку Default в папке Пользователи, смотрите как отобразить скрытые файлы/папки) – AppData – Roaming – Microsoft – Windows. Здесь удаляем папку Recent.
Перезагружаем компьютер.
Ура! Папка «Недавние места» исчезла с рабочего стола!
Снова заходим в Мой Компьютер и следуем по уже известному пути: Пользователи – Default – AppData – Roaming – Microsoft – Windows. Создаем здесь папку Recent (если она отсутствует).
Вот и все! Всем удачи!
Оцените статью. Вам не сложно, а автору приятно
Информация была полезной? Поделитесь ссылкой в соцсетях! Спасибо!
Статьи по теме:
-
Несколько пользователей удаленного рабочего стола RDP в Windows 10 одновременно
-
Несколько пользователей удаленного рабочего стола Windows 7 одновременно
-
Как настроить удаленный рабочий стол Windows. Подключение к удаленному рабочему столу
-
Расширение файла. Как показать расширения файлов в Windows 10
-
Как изменить имя компьютера в Windows 10
Новости по теме:
Вернуться к статьям
Recent Files is one of the most useful features on Windows 11 as it automatically lists the last 20 files you have accessed in the Quick Access directory. The operating system thus, provides you with swift access to your recent files. The downside of this feature is that anyone can see these files. This could result in the unintended disclosure of confidential or personal information. In this guide, we will teach you how to hide or unhide recent files and folders on Windows 11 to use this feature as per your convenience.

Table of Contents
If you share your computer with family or friends, they can view which files you have accessed via Quick Access Recent Files section. Likewise, the Recommended Section of the Start Menu in Windows 11 lists recent files and applications in a similar fashion. Read the methods to hide or unhide recent files & folders on Windows 11 below.
Method 1: Remove Files From Start Menu Recommended Section
The addition of Recommended section is something that has divided Windows users about its use. If you want to hide recent files and folders on Windows 11, in particular, then follow these steps:
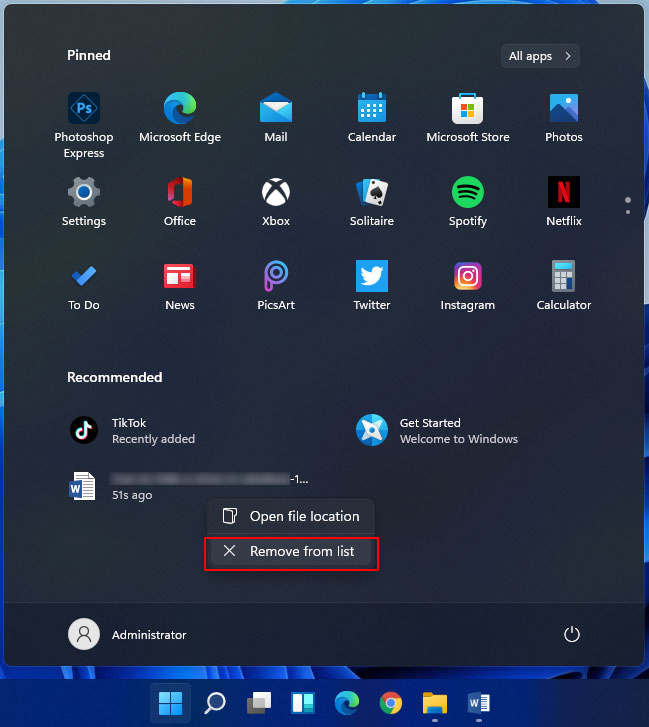
1. Click on Start.
2. Right-click on the app or file you want to remove from Recommended section.
3. Select Remove from list option, as depicted below.
Also Read: Fix Start Menu Not Working in Windows 10
Method 2A: Hide Files in Quick Access
Turning off Quick Access which lists the recent files in File Explorer is quite simple. Follow these steps to do so:
1. Press Windows + E keys simultaneously to open File Explorer.
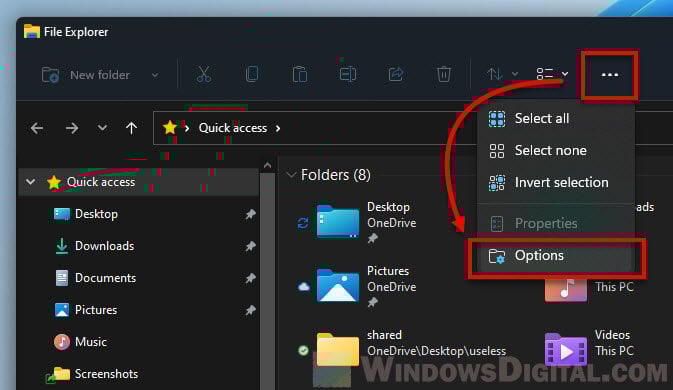
2. Then, click on the three-dotted icon from the menu bar at the top of the screen.

3. Here, select Options from the given list.
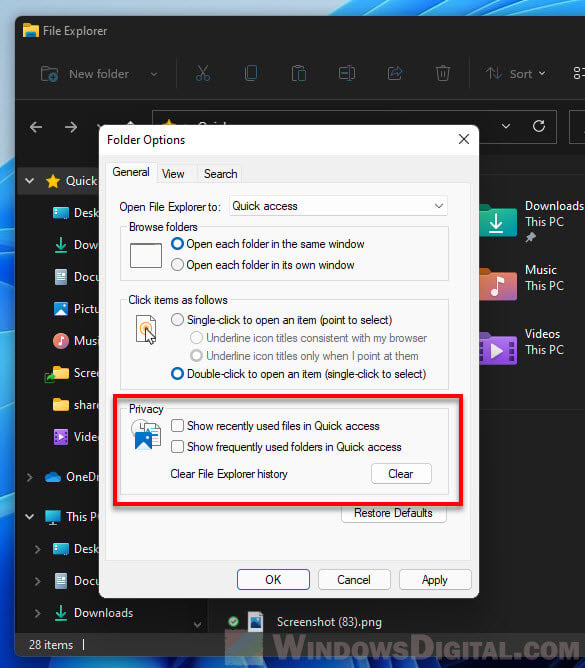
4. Uncheck the given options in the General tab under the Privacy section.
- Show Recently used files in Quick access
- Show frequently used files in Quick access
Note: In addition, click on Clear to clear File Explorer history.
5. Click on Apply > OK to save these changes.

Method 2B: Unhide Files in Quick Access
If you want to unhide recent files & folders on Windows 11 then,
1. Implement Steps 1-3 from Method 2A.
2. Check the given options under Privacy section and click on Apply > OK to save the changes.
- Show Recently used files in Quick access
- Show frequently used files in Quick access

Method 3A: Hide Recently Used Items From Personalization Settings
Here’s another method to hide recent files & folders on Windows 11 through Settings app:
1. Press Windows + I keys together to open Windows Settings.
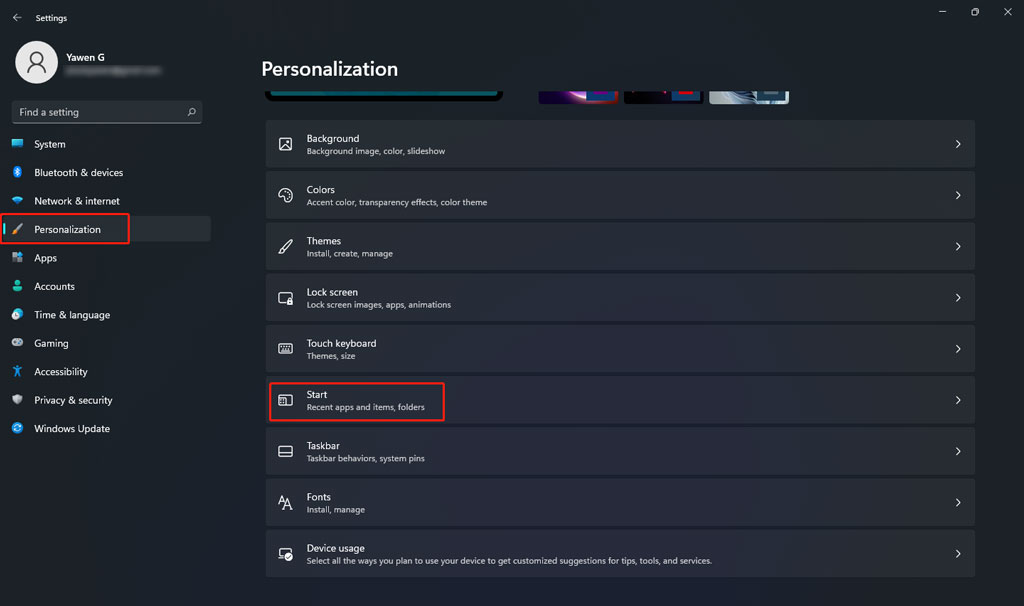
2. Click on Personalization from the left pane.
3. Here, scroll down the list and click on Start.

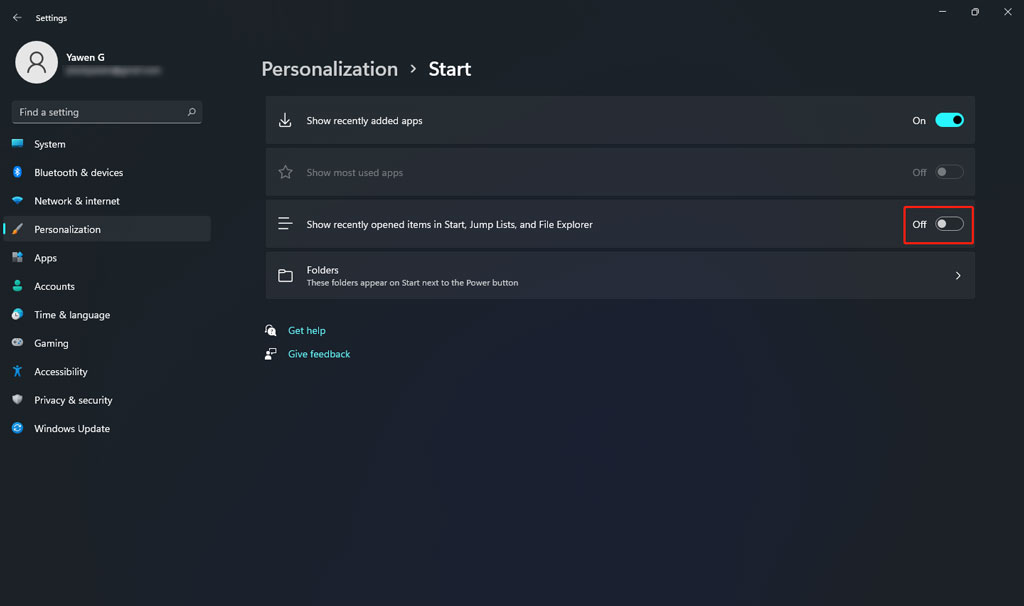
4. Now, toggle off the following options. marked
- Show recently added apps
- Show most-used apps
- Show recently opened items in Start, Jump lists, and File Explorer.

Method 3B: Unhide Recently Used Items From Personalization Settings
Now, to unhide recent files & folders on Windows 11,
1. Follow Steps 1-3 of Method 3A.
2. Toggle on the given options and exit:
- Show recently added apps
- Show most-used apps
- Show recently opened items in Start, Jump lists, and File Explorer.
Recommended: How to Debloat Windows 11
We hope you found this article interesting and learnt how to hide recent files & folders on Windows 11. You can send your suggestions and queries in the comment section down below. Let us know which topic you want us to explore next.
-
Home
-
News
- How to Hide Recent Files and Folders in Windows 11’s Start Menu?
By Stella | Follow |
Last Updated
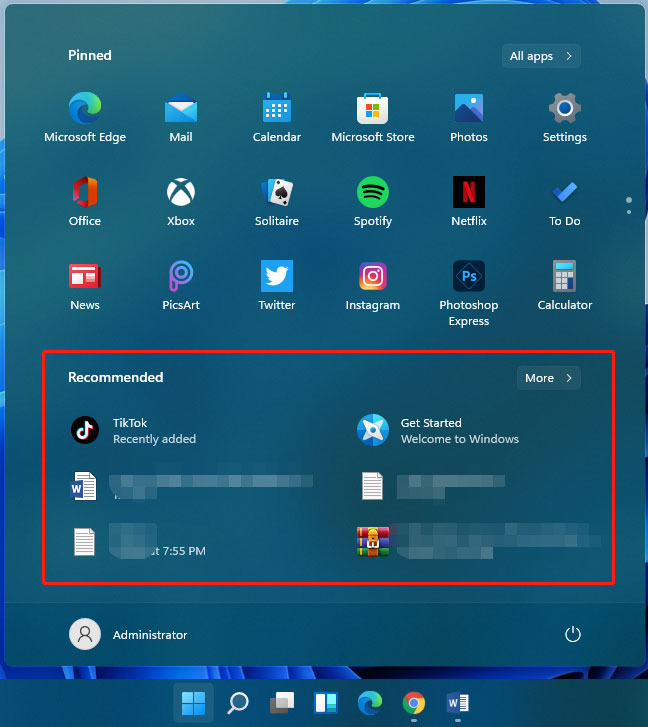
The recently-opened files and folders will be shown up in Windows 11’s Start menu under the Recommended section. That is, when you click the Start menu, you will directly see them. Perhaps, you don’t want them to be displayed. If so, you can read this MiniTool post to see how to hide or remove recent files and folders in Windows 11’s Start menu.
The first Windows 11 Insider preview build 22000.51 has been released for a while. Many Windows Insiders have upgraded their system to Windows 11 to test and use the new features and improvements in it.
One big change in Windows 11 is the Start menu. Microsoft not only centralizes the Start menu but also simplifies the contents in it. You can’t directly see the apps’ list in the Start menu. But you can see the files and folders that you have opened recently under the Recommended section. This offers you quick access to those files and folders if you want to use them again. This is a useful change. But not all users like it. Perhaps, you don’t want others to see what you have opened recently. Fortunately, you can remove or hide recent files and folders in Windows 11’s Start menu if you’d like to do that.
In this post, we will show you a simple guide on how to hide or remove recent files and folders in Windows 11’s Start menu.
How to Hide Recent Files and Folders in Windows 11’s Start Menu?
1. Click Start and you can see the Settings icon in the Start menu. Click it to open it. You can also right-click Start and select Settings to open the Settings app.
2. In Settings, select Personalization from the left menu. There is an alternative way to open Personalization: you can right-click the desktop and select Personalise to open it.
3. Find Start under Personalization and click it to open it.
4. Find the Show recently opened items in Start, Jump lists, and File Explorer option and turn off the button next to it.
5. Close Settings.
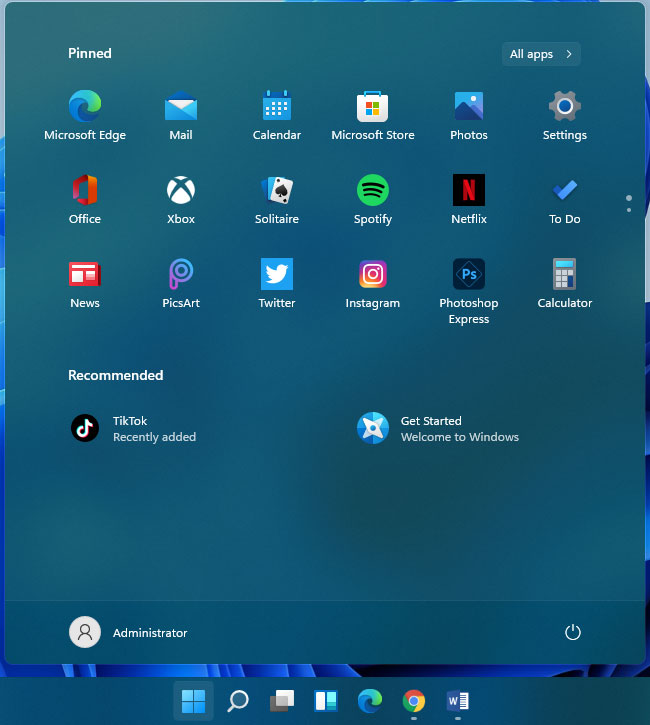
After these steps, you can click Start and see the list of recent files and folders under the Recommended section is gone. You see it is simple to turn off recent files and folders in Windows 11.
How to Unhide Recent Files and Folders in Windows 11’s Start Menu?
If you want to revert the change to unhide recent files and folders in Windows 11’s Start menu, you can repeat the above steps from 1 to 3, but turn on the button next to Show recently opened items in Start, Jump lists, and File Explorer in step 4.
How to Remove Files and Folders from the Recommended Section in Windows 11?
You can also only remove some specific files and folders from the Recommended section in the Start menu. It is very easy to do this:
- Clcik Start to open the Start menu.
- Right-click the file you want to remove from the Recommended section and select Remove from list.
With just these two steps, the selected item will be removed from the Recommened section in the Start menu.
Tip: Recent Files and Folders in Windows 10
Windows 10 also shows you the files and folders you have recently opened. But you can’t see them after clicking Start. But when you click the app from the app list in Start, you can see the files that are opened using that app. On the other hand, you can also see your recent files and folders after you open File Explorer.
You are also allowed to hide recent files and folders in Windows 10. Here is a guide: Methods to Clear Recent Files & Disable Recent Items in Windows 10.
Bottom Line
How to hide recent files and folders in Windows 11’s Start menu? After reading this post, you should know the answer. Should you encounter other issues when using Windows 11, you can let us know in the comments.
About The Author
Position: Columnist
Stella has been working in MiniTool Software as an English Editor for more than 8 years. Her articles mainly cover the fields of data recovery including storage media data recovery, phone data recovery, and photo recovery, videos download, partition management, and video & audio format conversions.
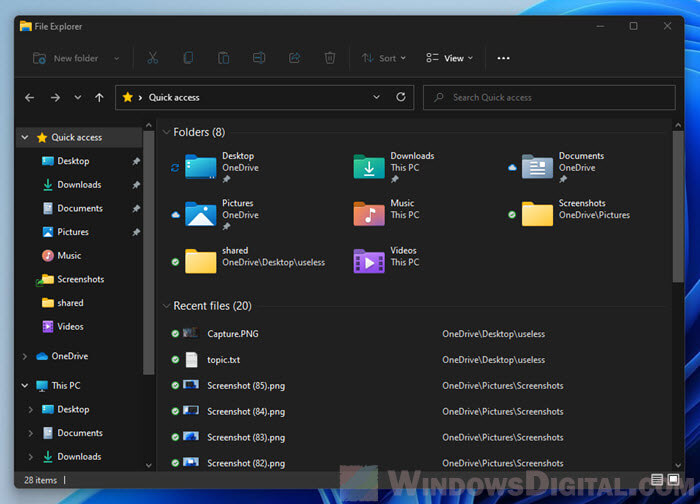
Don’t want anyone else to be able to see your recently used files or frequently used folders? This is a common problem for many users who share their computers with other people such as their family members. When you open File Explorer in Windows 11, Windows will show a directory called Quick Access where 20 of your most recently used files and some frequently opened folders are listed.
However, there is actually a way to remove recent files and frequent folders from showing in the Quick Access in File Explorer. This short tutorial will show you how to disable the recent files and frequent folders feature in Windows 11, and how to clear the recent files if you want to retain the feature.
How to disable recent files and frequent folders
In Windows 11, by default, 20 of the most recently used files and a few frequently used folders will be listed in the Quick Access area when you launch File Explorer. To disable or hide the recent files and/or frequently used folders feature, follow the steps below.
- Open File Explorer.
- Next, click on the triple dotted icon from the top menu bar, and select Options.

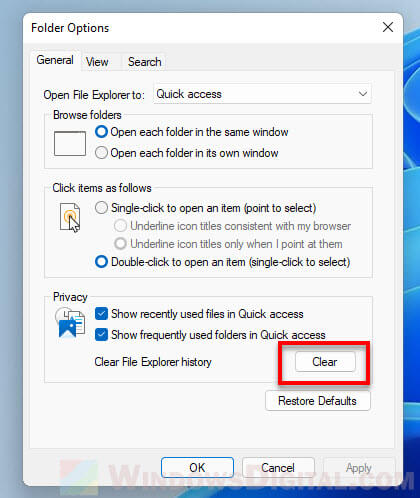
- In the Folder Options window, under Privacy, uncheck both or only one of the following checkboxes (based on your preference).
- Show recently used files in Quick access.
- Show frequently used folders in Quick access.
- Click Apply, then OK.

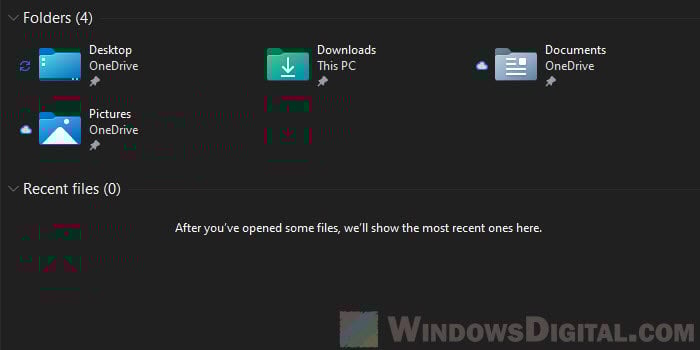
By unchecking the said options, Windows will no longer show recent files and frequent folders in the Quick Access area in File Explorer. After the changes are applied, the Quick Access area will show only the default folders such as Desktop, Downloads, Documents and Pictures.
To revert the changes back to their defaults, repeat step 1 and 2 to open the folder options window. Then, re-enable the checkboxes under Privacy to allow Windows to show recent files and frequent folders again in File Explorer.
Alternatively, to restore the all folder options back to their defaults, click on the “Restore Defaults” button instead.
How to clear recent files in Windows 11
If you would like to only clear the recent files list but retain the feature to show recent files, here’s how to do it.
Follow step 1 to 2 in the instruction above. Then, in the folder options window, under Privacy, click on the Clear button to clear file explorer history. Doing so will clear all logged recent files and frequent folders from the file explorer history.
The recent files will then show (0) with a message that reads “After you’ve opened some files, we’ll show the most recent ones here“. The list will now start afresh and will show the latest items as soon as you open one.
Another place that stores Recent Files history in Windows 11
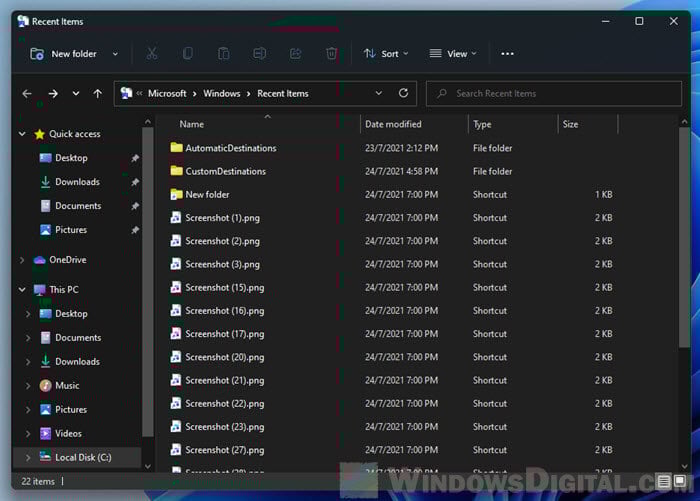
The instruction above to disable showing recent files will only stop Windows from showing recent files in the Quick Access area. It doesn’t stop it from logging recent files elsewhere. One other place that stores recent files history in Windows 11 is the directory below.
C:\Users\yourusername\AppData\Roaming\Microsoft\Windows\Recent
However, the Clear button in the Folder Options does clear the recent files list in both the Quick Access and the Recent folder.
You can also access to this Recent folder by enter the following onto File Explorer address bar, Start menu search bar, or the Run window.
%AppData%\Microsoft\Windows\Recent\
This folder will list all the recently used files and folders as shortcuts in Windows 11. You can manually delete them by highlighting them and pressing the Delete key (or Shift + Delete to permanently delete them).