
In this guide, we’ll show you how to make the names or text under your desktop icons disappear in Windows 11 or Windows 10. Desktop icons are an efficient way to get to your most frequently used programs and files quickly. But sometimes, you might not want their names shown, perhaps due to privacy issues or because you simply want a cleaner look on your desktop.
Removing the text from the desktop icons does not affect how your icons look. The icon will remain what it is but with a blank name. Follow the instructions below to remove the name of an icon.
See also: How to Undo Desktop Icon Changes in Windows 11
Removing desktop icon name using invisible Unicode character
The problem with removing the name of a desktop icon is that it won’t work if you just delete the name because the system requires at least one character as the name of an icon. To get around this issue, you can use an invisible Unicode character as the icon’s name to effectively “hide” its name. Follow the steps below to do so.
- Right-click on the icon whose name you want to hide and choose “Rename”.
- Hold down the “Alt” key.
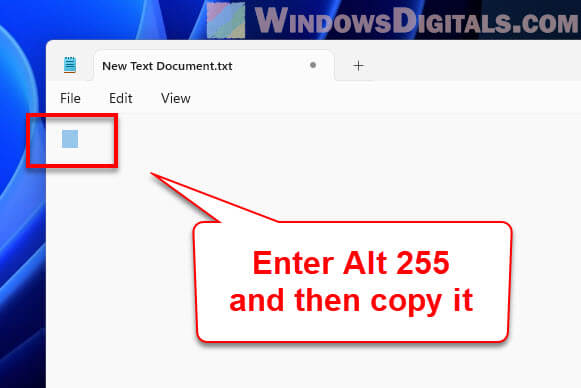
- While holding “Alt”, type “0160” on the numeric keypad.
- Let go of “Alt”, and you’ll see the name turn into an invisible character.
- Hit “Enter” to keep the change.
Now, the icon’s name is gone, thanks to that invisible character.
Pro tip: How to Make a Picture an Icon in Windows 11
Removing text from multiple desktop icons
But what if you have several icons you want to rename? The method above might cause conflicts because you can’t have multiple icons with the same invisible name. You can get around this by using different invisible Unicode characters like so:
- Right-click the next icon and pick “Rename”.
- Hold down “Alt”.
- With “Alt” held, type “255” or “0173” on the numeric keypad.
- Let go of “Alt” to see another kind of invisible character appear.
- Press “Enter” to save this new change.
Keep alternating between “Alt 255” and “Alt 0173” for each new icon. This way, all your icons can be nameless but still different from each other.
If you want to remove the name of a bunch of icons, a good method is to use more than one of the same invisible character for each icon. This trick prevents icons from conflicting with each other due to having the same invisible name.
For instance, if you use “Alt 0160” for the first icon, use it twice for the second icon, thrice for the third, and so on. This keeps every icon unique, even though their names are invisible.
Useful tip: Save and Restore Positions of Desktop Icons in Windows 11/10
Copying invisible characters from a text editor
If using ALT codes directly on icons is not possible for you, try this instead:
- Open a text editor, like Notepad.
- Hold down “Alt”.
- While holding “Alt”, type “0160”, “255”, or “0173” on the numeric keypad.
- Let go of “Alt” to see the invisible character in Notepad.
- Copy this invisible character.
- Right-click the icon you want to rename and choose “Rename”.
- Paste the invisible character as the new name and hit “Enter” to save.
This method is useful if you have troubles trying to type the ALT codes when renaming a file.
Related guide: How to Change Desktop Icon Spacing in Windows 11
Using a third-party tool
A third-party tool called Iconoid can also hide icon text by blending it with the background.
- Download and set up Iconoid from its official site.
- Start Iconoid and go to the “Colors” section.
- Choose a desktop-matching color under “Text Color”.
- For “Icon Background”, pick “Transparent” or another matching color. If you match both text and icon colors, the text will look like it’s vanished.
- Click “Apply”, then “Hide” to minimize Iconoid.
With Iconoid, your icon text will seem to disappear. It is another great way to keep your desktop tidy without manual renaming.
One more thing
Hiding your desktop icon names is a smart idea to make your computer look the way you want and to add a bit of privacy. It can sometimes make it harder for other people who look at your computer’s screen to quickly see what’s on your desktop. However, don’t rely on this alone for your privacy.
If you’re going this route to declutter your desktop, know that while it looks good, it might make finding your stuff a bit more difficult. With the text gone, you’ll need to remember each icon by its picture alone. So, if your desktop is very crowded with tens, or for some users, hundreds of icons, you might end up playing a guessing game trying to find the right one. Try to keep only the most important icons on your desktop to avoid confusion.
Внимание! После перезагрузки могут пропасть иконки ярлыков. Чтобы вернуть иконки, верните имена и снова перезагрузите ПК.
Скрытие имен ярлыков рабочего стола
Программа заменяет имена ярлыков в папке на пробелы, чтобы скрыть названия. Произведенные замены сохраняет в папку с ярлыками в файл names.db.
В любой момент можно откатить переименования. Сам файл names.db можно сделать скрытым через средства Windows.
Рабочий стол до:

Рабочий стол после:

Инструкция
Ярлыки рабочего стола пользователя тянутся из двух папок:
- C:\Users%username%\Desktop — файлы текущего пользователя
- C:\Users\Public\Desktop — общие для всех пользователей файлы. Для правки файлов тут требуется запуск от имени администратора.
Заменить имена ярлыков, скорее всего, вам потребуется в обеих папках.
Программа работает через консоль:
name-hide.exe hide— скрыть именаname-hide.exe show— показать имена
Можно указать параметр -path и путь до папки с ярлыками. По умолчанию используется папка откуда запущена программа.
Скрываем имена

Показываем имена

Download Article
Clean up your desktop using these built-in features
Download Article
- Windows
- macOS
|
This wikiHow will teach you how to hide icon names on Windows and Mac desktops by renaming them. On Windows, inserting a space in the renaming field will cause the original file name to appear, so you’ll need to use alt code instead. This is easier to do with macOS since all you need to do is enter some code in Terminal if you don’t want to download a third-party app that will hide your icons with one-click.
Hiding Icon Names on Windows
To hide an icon name on Windows, right click on the icon and select rename. Then, type Alt+255 or Alt+0160 to create an invisible character. After that, click outside the text box to apply the invisible text.
-

This action will prompt a menu to drop down.
-
It’s near the bottom of the menu and will bring your cursor inside the icon’s name with the original text highlighted.
Advertisement
-
It’s the 10-digit keypad to the right of your normal keyboard. Using the 0-9 keys at the top most likely will not work.
- If you need to rename a second icon, Alt + 255 will not work because it’s already in use. In this case, add another Alt + 255 to add two invisible characters. For a third icon, enter the Alt + 255 alt code three times. For each additional icon, add an Alt + 255 alt code character.
-
When you’re done, apply the name change by clicking on the desktop.
-
A window will pop-up saying you’ll need administrator permission to rename the file, so click Continue to change the file name to the hidden characters.
- The Alt + 255 alt code is a hidden character that makes your desktop icons appear to not have a name.[1]
- The Alt + 255 alt code is a hidden character that makes your desktop icons appear to not have a name.[1]
Advertisement
-
You can press Shift + Cmd + U to open the Utilities folder in Finder, or you can click Go > Utilities > Terminal from the menu bar at the top of your screen.
- There are third-party apps like HiddenMe and Desktop Icons Hider that you can pay for in the App Store that will perform this action for you if you’re not comfortable using Terminal.
-
The code will enter and move to another line.
-
This will restart Finder so the previous code will take effect.
- When you close out of Terminal, you should see that your icons are hidden. To unhide your icons from Terminal, enter
"defaults write com.apple.finder CreateDesktop true", press Return, and enter"killall Finder".[2]
- When you close out of Terminal, you should see that your icons are hidden. To unhide your icons from Terminal, enter
Advertisement
Ask a Question
200 characters left
Include your email address to get a message when this question is answered.
Submit
Advertisement
Thanks for submitting a tip for review!
References
About This Article
Article SummaryX
1. Right-click a desktop icon.
2. Click Rename.
3. Hold the Alt key and press 2 + 5 + 5 on the numeric keypad.
4. Click outside of the text box.
5. Click Continue (if prompted).
Did this summary help you?
Thanks to all authors for creating a page that has been read 123,867 times.
Is this article up to date?
Если вы видите это сообщение, значит, произошла проблема с загрузкой файлов в стилей (CSS) нашего сайта. Попробуйте сбросить кэш браузера (Ctrl+F5).
Если это не поможет, а вы находитесь в регионе, где возможны ограничения интернет-трафика с российских серверов — воспользуйтесь VPN.
|
Кликните правой кнопкой мыша по иконке, выберите пункт меню «Свойства», затем зайдите во вкладку «Общие» и там «сотрите» (точнее забейте невидимыми символами, например кодом 255) название для данной иконки. Код 255 (любое их количество в названии ярлыка) можно ввести следующим образом: нажмите и удерживайте левую клавишу ALT на клавиатуре, затем на цифровой панели (если включен NUMLock) наберите код 255, отпустите левую клавишу ALT. Повторите эти действия столько раз, сколько невидимых символов вы хотите присвоить тому или иному ярлыку. автор вопроса выбрал этот ответ лучшим хельг 6 лет назад здравствуйте,нажимае Знаете ответ? |
Windows позволяет легко создать ярлыки файлов и папок несколькими способами: с помощью меню «Отправить» и пункта «Рабочий стол (создать ярлык)», путём перетаскивания элемента с удержанием клавиши Alt либо правой кнопкой мыши. При этом к имени папки или файла добавляется текст « — Ярлык», который многие пользователи затем удаляют вручную.
Вы можете отключить добавление этого текста к ярлыкам, используя редактор реестра. В этой инструкции подробно о том, как убрать автоматическую подпись «Ярлык» при их создании в Windows 11 и 10, способы должны работать и для других версий ОС.
Отключение дополнительного текста в имени ярлыков в реестре

Для того, чтобы надпись «Ярлык» не добавлялась потребуется внести изменения в реестр Windows. Сначала о том, как это сделать вручную:
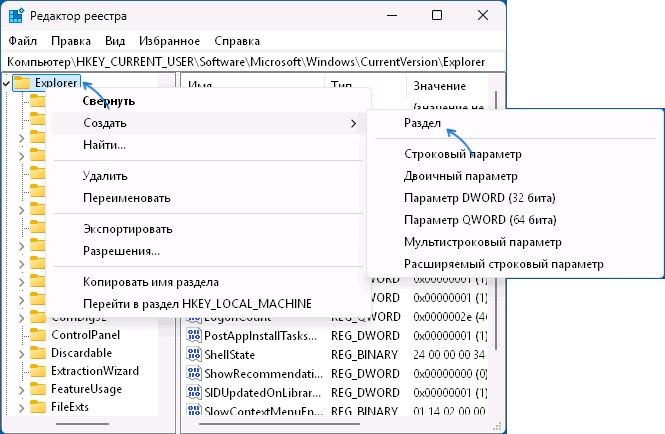
- Нажмите клавиши Win+R на клавиатуре, либо нажмите правой кнопкой мыши по кнопке «Пуск» и выберите пункт «Выполнить», введите regedit и нажмите Enter.
- Откроется редактор реестра. Перейдите к разделу
HKEY_CURRENT_USER\SOFTWARE\Microsoft\Windows\CurrentVersion\Explorer\
- Если в этом разделе присутствует подраздел с именем NamingTemplates, выберите его, иначе нажмите правой кнопкой мыши по разделу Explorer, выберите пункт контекстного меню «Создать» — «Раздел», задайте имя NamingTemplates и выберите этот раздел.

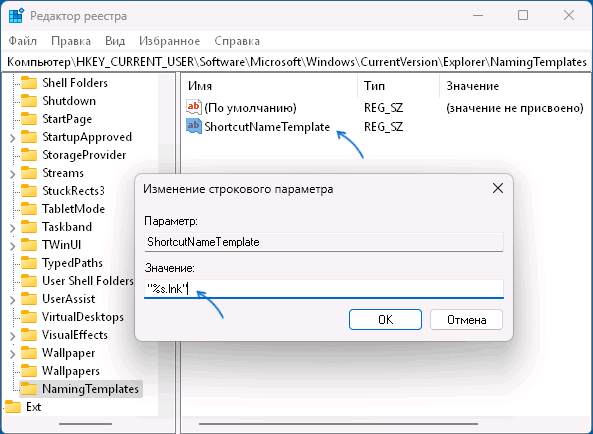
- Нажмите правой кнопкой мыши в правой панели редактора реестра и создайте новый строковый параметр с именем ShortcutNameTemplate
- Дважды нажмите по созданному параметру и укажите его значение (вместе с кавычками):
"%s.lnk"

- Нажмите «Ок» и закройте редактора реестра.
На этом всё готово — теперь при создании ярлыка его имя будет таким же как у изначального элемента, а расширение .lnk для ярлыков Windows не отображается. Выдавать ярлык будет лишь стрелка в левом нижнем углу (но и её можно убрать).
Вместо ручного редактирования реестра вы можете запустить командную строку от имени администратора и ввести команду:
reg add HKCU\SOFTWARE\Microsoft\Windows\CurrentVersion\Explorer\NamingTemplates /v ShortcutNameTemplate /t REG_SZ /d "\"%s.lnk\""
Ещё одна возможность — создать REG-файл со следующим кодом, после чего добавить его в реестр путем обычного «запуска»:
Windows Registry Editor Version 5.00

[HKEY_CURRENT_USER\Software\Microsoft\Windows\CurrentVersion\Explorer\NamingTemplates]
"ShortcutNameTemplate"="\"%s.lnk\""
Дополнительная информация
Вы можете не просто убрать текст «Ярлык» при создании ярлыка, но и изменить его на свой собственный: всё, что потребуется, добавить его в значение ShortcutNameTemplate, где элемент %s заменяется на имя изначального элемента, расширение .lnk является обязательным для ярлыка, а остальной текст может быть введёт по вашему усмотрению, например:
"%s by Remontka Pro.lnk"
при создании ярлыка будет заменяться на
Имя_файла by Remontka Pro
со скрытым расширением .lnk для ярлыка.
При необходимости отменить изменения и вернуть подпись «Ярлык», достаточно удалить параметр ShortcutNameTemplate из раздела реестра
HKEY_CURRENT_USER\SOFTWARE\Microsoft\Windows\CurrentVersion\Explorer\
В некоторых сторонних программах для настройки Windows также присутствует опция для отключения подписей к ярлыкам, однако для этой задачи их использование будет излишним — всё быстро решается встроенными средствами системы.