
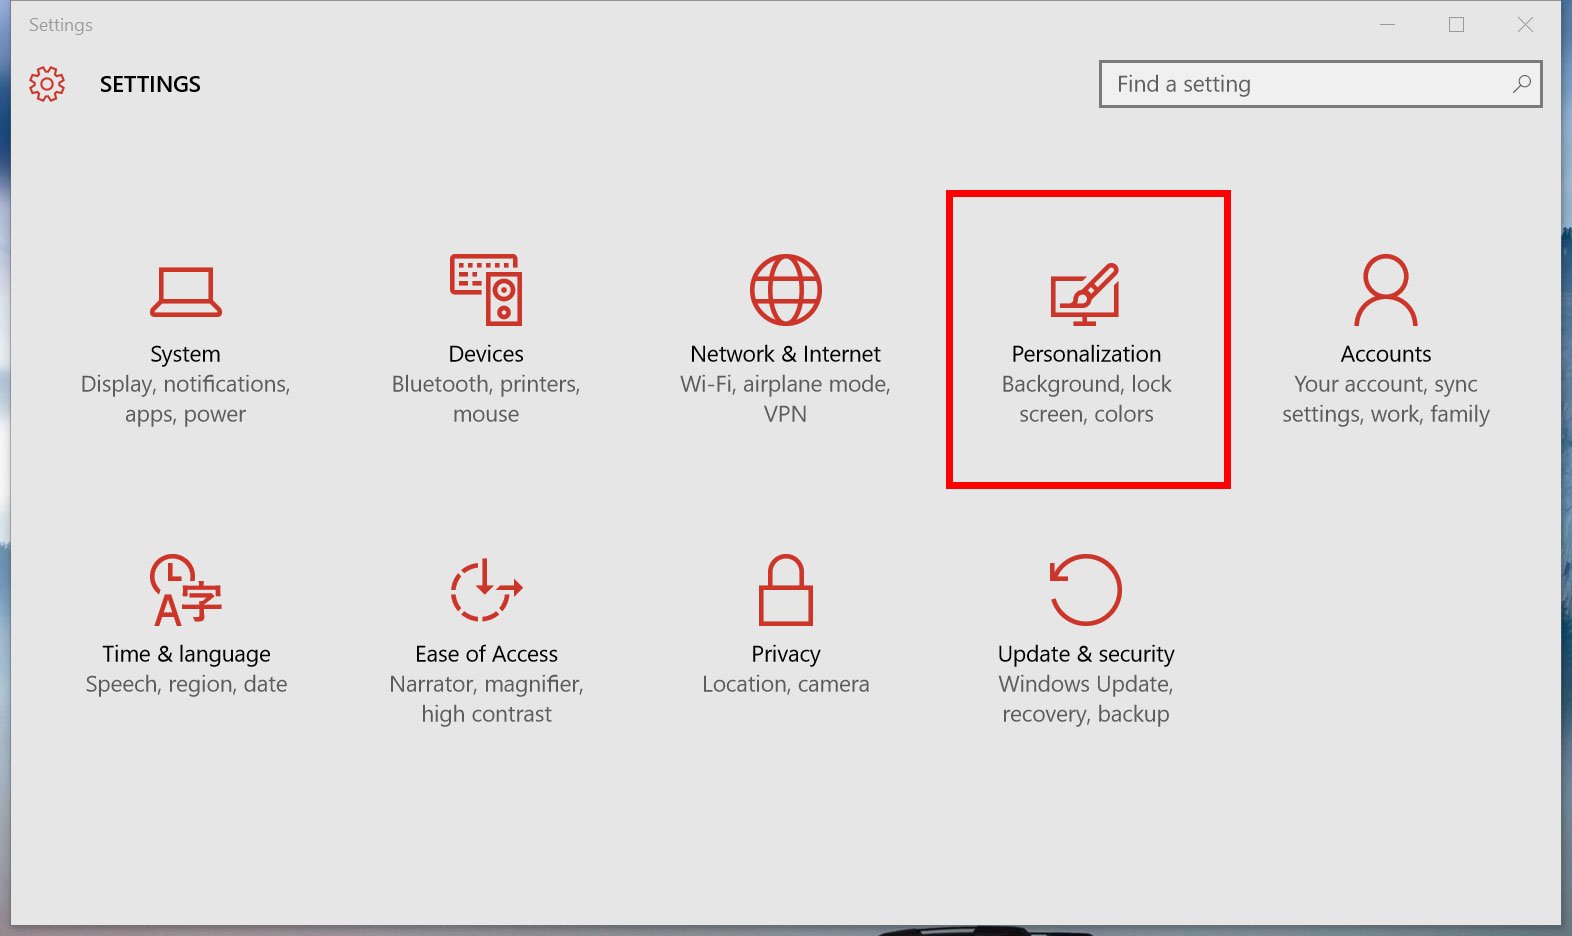
One of the new features on Windows 10 Insider preview build 10547 is the ability to remove the Windows background picture on the sign-in screen. Removing the picture is as easy as flipping a switch in the settings. If you need guidance, we’ll show you how to do it.
1. Go to Settings (keyboard shortcut: Windows + I) > Personalization > Lock screen
2. Scroll down and turn off the option, «Show Windows background picture on the sign-in screen.»
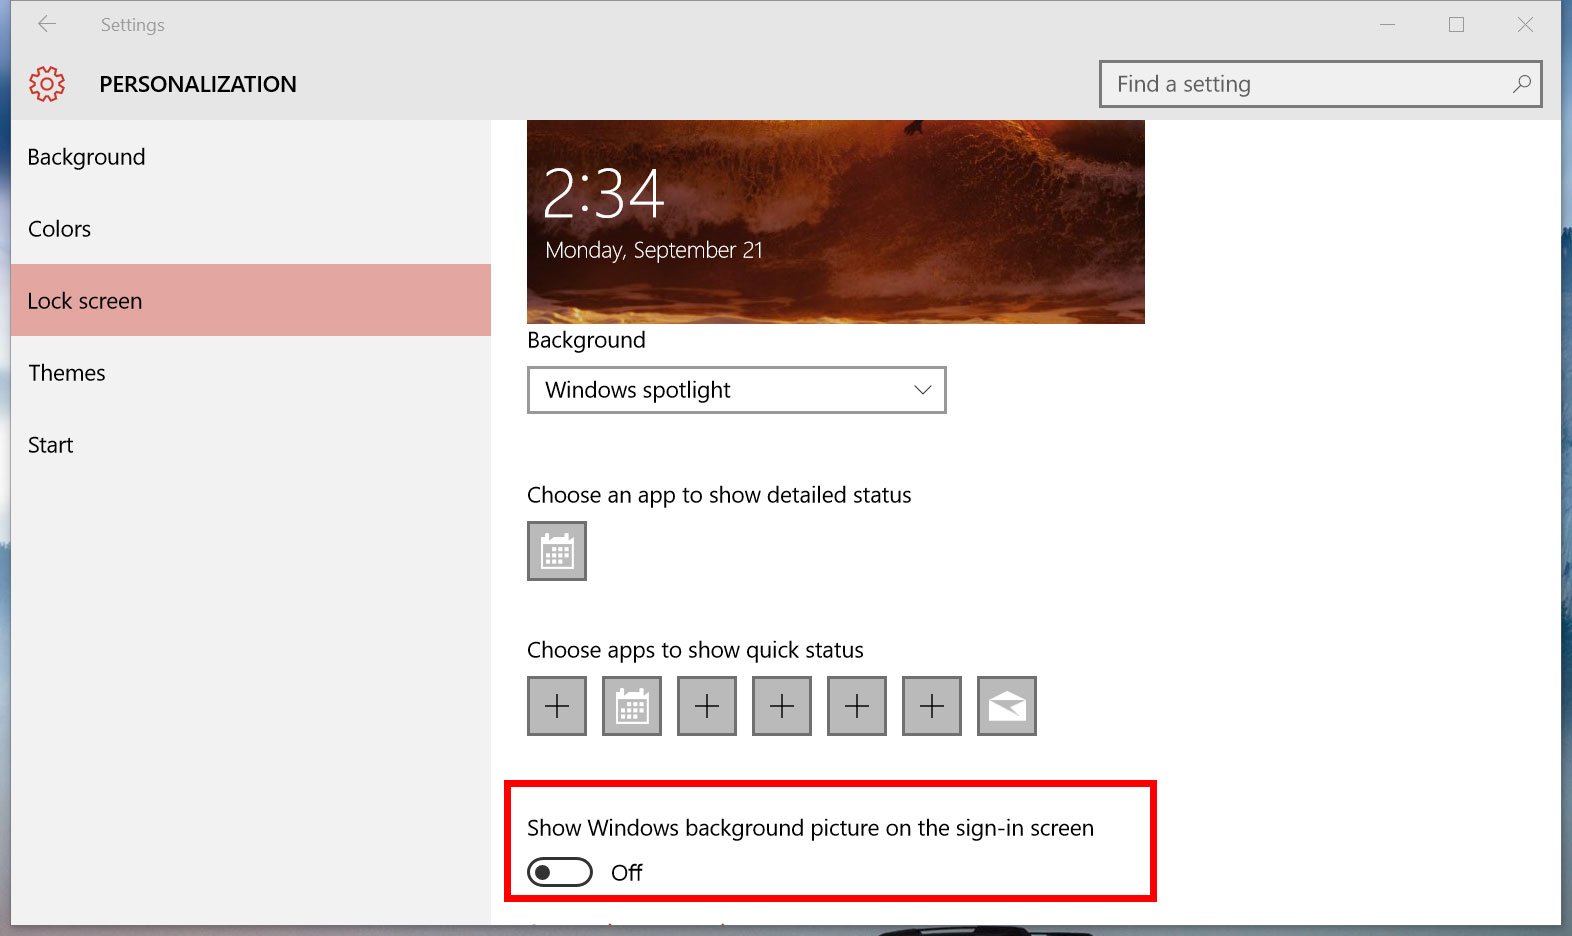
That’s it! No, really… that’s all you need to do. Instead of the default black and blue Windows 10 wallpaper on the sign-in screen, you’ll see the solid color matching your theme. What would be even more awesome is if we have a built-in option to replace the image instead of just removing it. Hopefully, Microsoft will add that option in a future update.
Need more visuals? You can see this setting in our hands-on video for Windows 10 Insider preview build 10547.
Are you removing the Windows 10 wallpaper on the sign-in screen? Let us know in the comments!
All the latest news, reviews, and guides for Windows and Xbox diehards.
Download Article
Easy to follow instructions for removing your user account picture in Windows 10
Download Article
When you select a Windows 10 user account photo, it’ll appear on the login screen, the Start menu, and various other places in Windows. If you don’t want to have a profile photo at all, you’ll need to replace it with something else, such as the default profile icon (an outline of a person). Once you replace the photo, you can delete your old profile photos. This wikiHow will teach you how to reset your Windows 10 user account photo to the default profile icon and delete your old profile photos.
Quick Steps
- Click on your username in the Windows menu.
- Select Change account settings.
- Click Browse for one under the «Create your picture» heading.
- Select a default picture from «C:\ProgramData\Microsoft\User Account Pictures».
- Save your profile.
- Go to «%appdata%\Microsoft\Windows\AccountPictures» in File Explorer.
- Delete your old user account picture.
-

It’s usually at the bottom-left corner of the screen.
-
It should look like your current user photo, and it’s near the top-left corner of the Start menu.[1]
Advertisement
-
-
It’s under the «Create your picture» header. You’ll see the «Open» dialog window.
-

\ProgramData\Microsoft\User Account Pictures. This is where you’ll find the default user icons. Here’s a quick way to do this:
- Highlight this text with your mouse: C:\ProgramData\Microsoft\User Account Pictures.[2]
- Press Ctrl+C to copy it to your clipboard.
- In the address bar at the top of the Open window, click your mouse at the end of the current path. This highlights the information that’s already in that box.
- Press Ctrl+V to paste the copied location.
- Press ↵ Enter.
- Highlight this text with your mouse: C:\ProgramData\Microsoft\User Account Pictures.[2]
-

Any of the files with the name «user» should be fine. This replaces your user profile photo with the default.
- Your old photo will still appear in your account settings. If you want to delete it from the computer completely, continue with this method.
-

Now you’ll use the File Explorer to delete your old photo from the computer.
-

You’ll do this just as you did when you navigated to the User Account Pictures folder in the Open window.
-

Now you’ll see all of your user account photos.
-
To select multiple photos, hold Ctrl as you click.
-
The selected photos are now removed from your account.
- If you log into Windows with your Microsoft account, you may still see your old profile photo in some locations (such as when you sign into other Windows 10 computers). See the «Removing a Profile Photo from a Microsoft Account» method to learn how to remove it.


Advertisement
-
You’ll find this app near the bottom of the Start menu.
- If your Windows 10 login is connected to your Microsoft account and you don’t want your old profile photo to appear anywhere, use this method to remove it from your Microsoft account. [3]
- If your Windows 10 login is connected to your Microsoft account and you don’t want your old profile photo to appear anywhere, use this method to remove it from your Microsoft account. [3]
-
It’s the icon that looks like the outline of a person.[4]
-

It’s below your current user photo.
-
If you’re not already signed in to your account, you’ll be prompted to do so now. Use the same login and password you use to sign into Windows.
-

It’s at the top-left corner of the page. A larger version of your photo will appear.
-
It’s near the bottom-right corner of the page. A confirmation message will appear at the bottom.[5]
-

The photo is no longer associated with your account.[6]


Advertisement
Add New Question
-
Question
I deleted the picture, but it’s still there. What should I do?
Review Steps 7 — 8 to ensure that you’ve also deleted it from the account folder.
-
Question
I have deleted the picture, but still it shows me. Can you tell me about account folder?
Ashkan Sahba
Community Answer
If you’re unsure of the folder name, you can also just browse to the location. Here, you’ll find all the account pictures you’ve ever added to your account using the Settings app. Select any images you no longer want and then press the Delete key to relegate them to the Recycle Bin.
Ask a Question
200 characters left
Include your email address to get a message when this question is answered.
Submit
Advertisement
Video
Thanks for submitting a tip for review!
References
About This Article
Article SummaryX
1. Open the Start menu.
2. Click your profile photo.
3. Click Change account settings.
4. Click Browse for one.
5. Navigate to C:\ProgramData\Microsoft\User Account Pictures.
6. Select user.png and click Choose picture.
For more tips, including how to permanently delete your account picture from your computer, read on!
Did this summary help you?
Thanks to all authors for creating a page that has been read 440,077 times.
Reader Success Stories
-
Andrew Mathenge
Feb 15, 2019
«Excellent instructions, including how to delete an ugly photo that I has added by accident. Just couldn’t find…» more
Is this article up to date?
Download Windows Speedup Tool to fix errors and make PC run faster
Windows 11/10 Lock Screen background images are stored in a system folder which is protected by the Windows operating system. Windows 11/10 offers no direct way to delete a Lock Screen image from the background history list. If you want to remove the old Images from the Lock Screen Background History in Windows Settings, then this post shows how to delete Lock Screen picture history easily.
Delete old Lock Screen images in Windows 11/10
All Lock Screen background images you apply via Settings reside under a system folder at the following location –
C:\ProgramData\Microsoft\Windows\SystemData\<User_Account_Security_Identifier>\ReadOnly
Here User_Account_Security_Identifier is the number for your User Account. You will have to enable the Show Hidden Files option by opening File Explorer Options > ‘View’ tab and check the box against “Show hidden files, folders, and drives” option.
Also, you will notice that once you have access to the ProgramData folder, you cannot readily open the SystemData folder since it is protected by Windows. If you try to, you’ll get the following prompt:
You don’t currently have permission to access this folder.
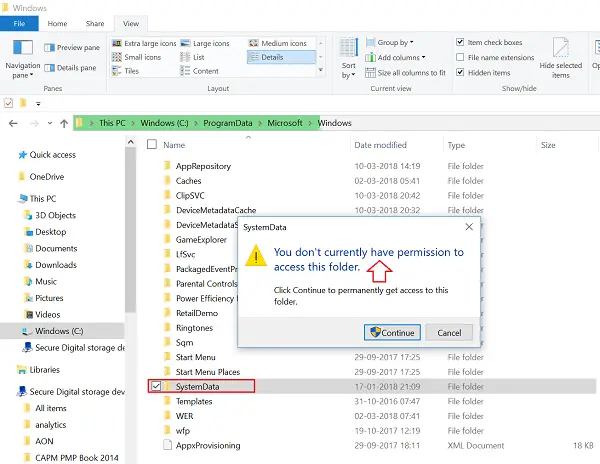
So it is essential that you first take Ownership of the folder manually. When done, you will be granted access to the ‘SystemData’ folder.
Open the folder, and you will see some folders listed instantly.
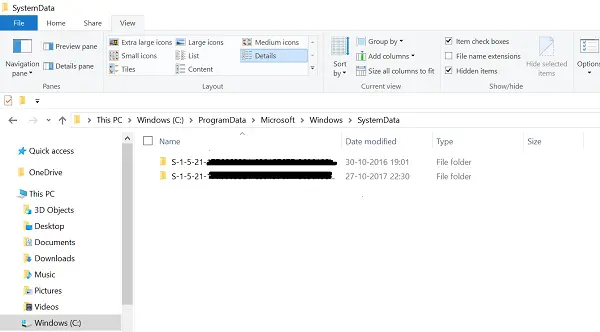
Find the folder that contains your use account SID (Security Identifier) number in its name and open that folder.
[To find your SID number, open CMD and run the following command – whoami /user].
This will open another folder with the name ‘ReadOnly’. Open it, and you’ll see a few other folders.

The number of these folders may vary on different computers. However, each of these folders will contain the Lock Screen background images in original resolution with the name “LockScreen.jpg” alongside other information.
Open the folder containing the Lock Screen image which you want to delete permanently, and then empty that folder.
The Lock Screen image will disappear from the Lock Screen background history list in the Settings app.
How do I remove old Lock Screen images in Windows?
All Lock Screen background images you apply via Settings reside under a system folder at the following location –
C:\ProgramData\Microsoft\Windows\SystemData\<User_Account_Security_Identifier>\ReadOnly
Open this folder and delete the ones you don’t want as explained above.
Deleted Picture still showing in Lock Screen
If the deleted Lock Screen images are still showing in Lock Screen, do the following:
Open an elevated PowerShell window and execute the following command:
C:\ProgramData\Microsoft\Windows\SystemData\S-1-5-18\ReadOnly\LockScreen_Z
del .\LockScreen___1366_0768_notdimmed.jpg
del .\LockScreen___1920_1200_notdimmed.jpg
del .\LockScreen___2560_1600_notdimmed.jpg
del .\LockScreen___3440_1440_notdimmed.jpg
This should help!
A post-graduate in Biotechnology, Hemant switched gears to writing about Microsoft technologies and has been a contributor to TheWindowsClub since then. When he is not working, you can usually find him out traveling to different places or indulging himself in binge-watching.
-
Home
-
News
- How to Delete Desktop Background Images in Windows 10
By Alisa |
Last Updated
Check the guides for how to delete desktop background images in Windows 10, how to clear recently used desktop background pictures, how to delete lock screen image in Windows 10, etc. For Windows users, you can find many useful free tools from MiniTool Software, e.g. MiniTool Power Data Recovery, MiniTool Partition Manager, etc.
You can freely set the desktop background image in Windows 10. You can use the default Windows 10 background images, download HD or 4K wallpapers from image sites, or use your own image as the Windows 10 desktop wallpaper.
Every image you used as the background is stored in computer. If you want to delete the desktop background or clear recently used desktop background images in Windows 10, you can check the step-by-step guide below.
How to Delete Desktop Background Images in Windows 10
How to Delete System Background Images
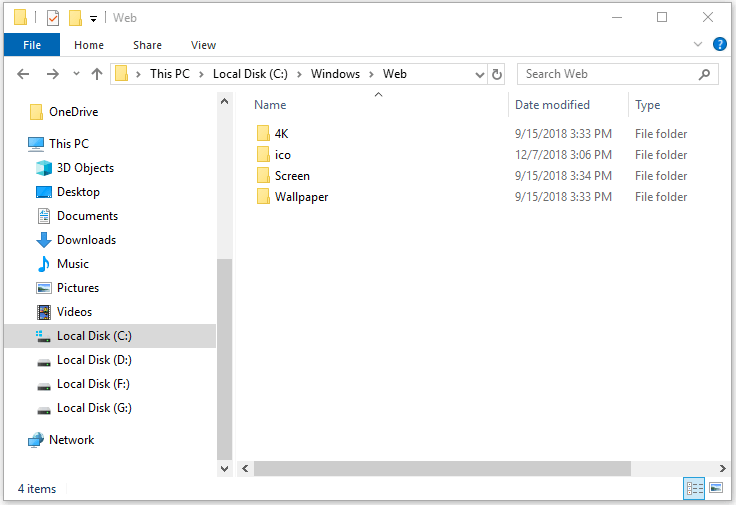
- Double-click This PC to open File Explorer.
- Click as the following directory: C:\Windows\Web. This is Window 10 wallpaper location.
- Open Wallpaper folder, and you can check the Windows 10 system background images in those folders.
- Open one folder and right-click one image to select Delete. This will delete the desktop background images from your Windows 10 computer.
How to Delete Uploaded Desktop Background Images
If you can find the image location, you can locate it and right-click it and select Delete to delete the picture. If you can find the location of the picture, you can follow the steps below to find and delete it.
- Right-click the blank area of desktop and select Personalize.
- Click Themes from the left column, and you can see the image name under Background.
- Search the image name in File Explorer. Find the target image and delete it.
How to Clear Recently Used Desktop Background Images in Windows 10
If you want to remove recently used desktop background images and clear the Windows 10 background history, you can follow the steps below.
- Press Windows + R, type regedit, and press Enter to open Registry Editor in Windows 10.
- Click as follows: HKEY_CURRENT_USER\Software\Microsoft\Windows\CurrentVersion\Explorer\Wallpapers.
- After you click Wallpapers key, you can find a few values in the right window named BackgroundHistoryPath followed by numbers.
- You can right-click one value and click Delete to delete the desktop background image in Windows 10. You can delete the history background images in batch. After you delete the backgrounds, Windows will rebuild these values with its default wallpapers.
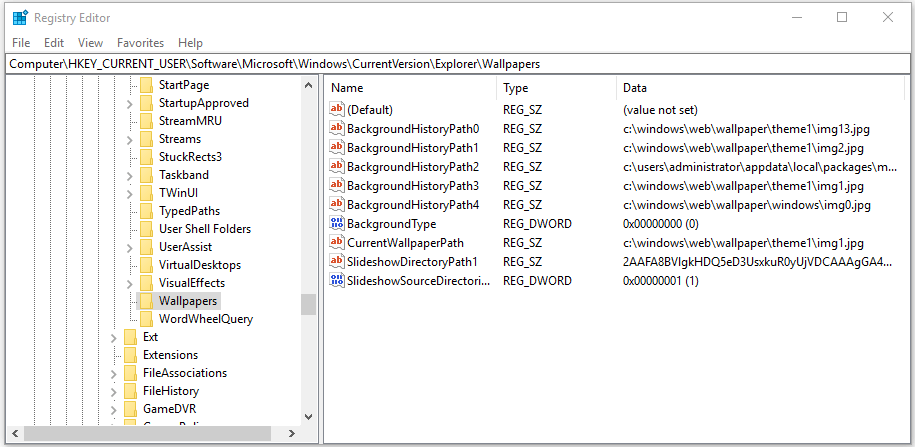
Tip: You should be careful to edit the registry. Before you edit the Windows Registry, it’s advised you back up registry first in case something goes wrong and causes computer crash. Learn: backup and restore registry.
How to Delete Lock Screen Image in Windows 10
You can go to C:\Windows\Web\Screen folder, right-click the lock screen image and select Delete to delete lock screen image in Windows 10.
To change the lock screen image in Windows 10:
- Right-click the blank area on the desktop and click Personalize.
- Click Lock screen in the left panel.
- Click Picture under Background. You can change the lock screen image in this window.
Bottom Line
If you want to delete desktop background images/wallpapers or lock screen images, clear recently used desktop background images in Windows 10, you can follow the above guide.
About The Author
Position: Columnist
Alisa is a professional English editor with 4-year experience. She loves writing and focuses on sharing detailed solutions and thoughts for computer problems, data recovery & backup, digital gadgets, tech news, etc. Through her articles, users can always easily get related problems solved and find what they want. In spare time, she likes basketball, badminton, tennis, cycling, running, and singing. She is very funny and energetic in life, and always brings friends lots of laughs.

Бывает что изображение экрана входа в Windows 10 требуется убрать, наше небольшое руководство поможет быстро убрать картинку и оставить только цвет системы.
По умолчанию операционная система Windows 10 отображает фоновое изображение экрана блокировки на экране входа и оно размыто.

Если вам не нравится отображение рисунка на экране входа в Windows 10, просто уберите, воспользовавшись нашей небольшой инструкцией приведенной ниже.
Как убрать изображение экрана входа в Windows 10
Щелкните правой кнопкой мыши на рабочем столе и откройте в параметры «Персонализации«.

Зайдите в раздел «Экран блокировки» прокрутите страницу чуть ниже и под надписью «Показывать на экране входа фоновый рисунок экрана блокировки» переведите переключатель в неактивное положение.

После чего, экран входа в Windows 10 начнет отображаться без картинки.