
You are here:
Home » Windows 10 » How To Remove Windows Media Player Entries From Context Menu (Without Using Third-Party Tools)
Countless numbers of free audio and video players are available for Windows. Most Windows users have installed at least two or more third-party media players. Users who have set Winamp, foobar2000, or any other audio player as their default media player may want to get rid of Windows Media Player entries from the context menu.
With default Windows installation settings, you can see Play and Add to Windows Media Player List entries in the context menu. Add to Windows Media Player List entry is visible even if you have set a third-party audio player as your default player. So, users who use a media player other than WMP may want to remove these entries.
Sure, one can always use available free utilities to remove entries from the context menu, but one can easily remove WMP entries without using a third-party tool. Just follow the simple steps given below to quickly remove Windows Media Player entries from the right-click menu.
This method works on Windows 10, 8.1, 8, and 7.
Procedure:
Step 1: Open Default Programs. To do this, open the Start menu on Windows 7 and then click on Default Programs. On Windows 10, type Default Programs in Start menu search and then press Enter key to open Default Programs. Windows 8 users can simply type Default Programs in Start screen, and press the Enter key to launch the same.

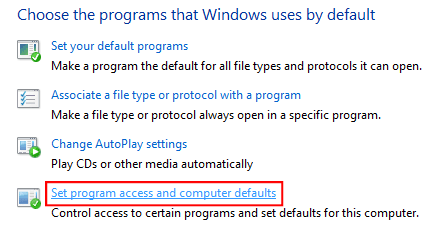
Step 2: Here, click Set program access and computer defaults to open Set Program Access and Computer Defaults window.

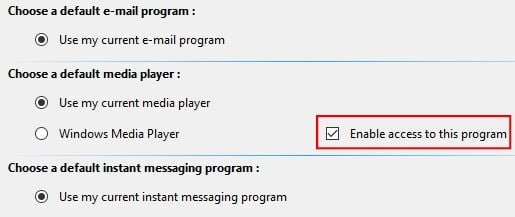
Step 3: Select Custom and then click the down arrow icon to expand the list. Here, under Choose a default media player, disable Enable access to this program next to Windows Media Player.

Step 4: Click the Ok button to exit the window. You are done! You just removed Windows Media Player entries from the context menu.

You might also like to know how to reinstall Windows Media Player, how to download and install Windows Media Player skins, and how to change Windows Media Player background picture guides.
Windows has no inbuilt mechanism to control options that get listed in the context (right-click) menu. If that’s not enough, they decided software publishers could add options to the menu, with the result that most users end up with a cluttered context menu.
Some publishers however do give users an option, either during installation or in their settings, to control their entries. Surprisingly, Microsoft products rarely include such an option. Such is the case with Windows Media Player (WMP).
WMP has a come a long way since its XP days, and to be fair, it’s a decent program if what you need is simply to play music. However, there are a myriad of better alternatives out there such as VLC, the nifty foobar or my personal favorite Jaangle that people prefer to it.
For that reason, the WMP related context menu entries usually go unused.
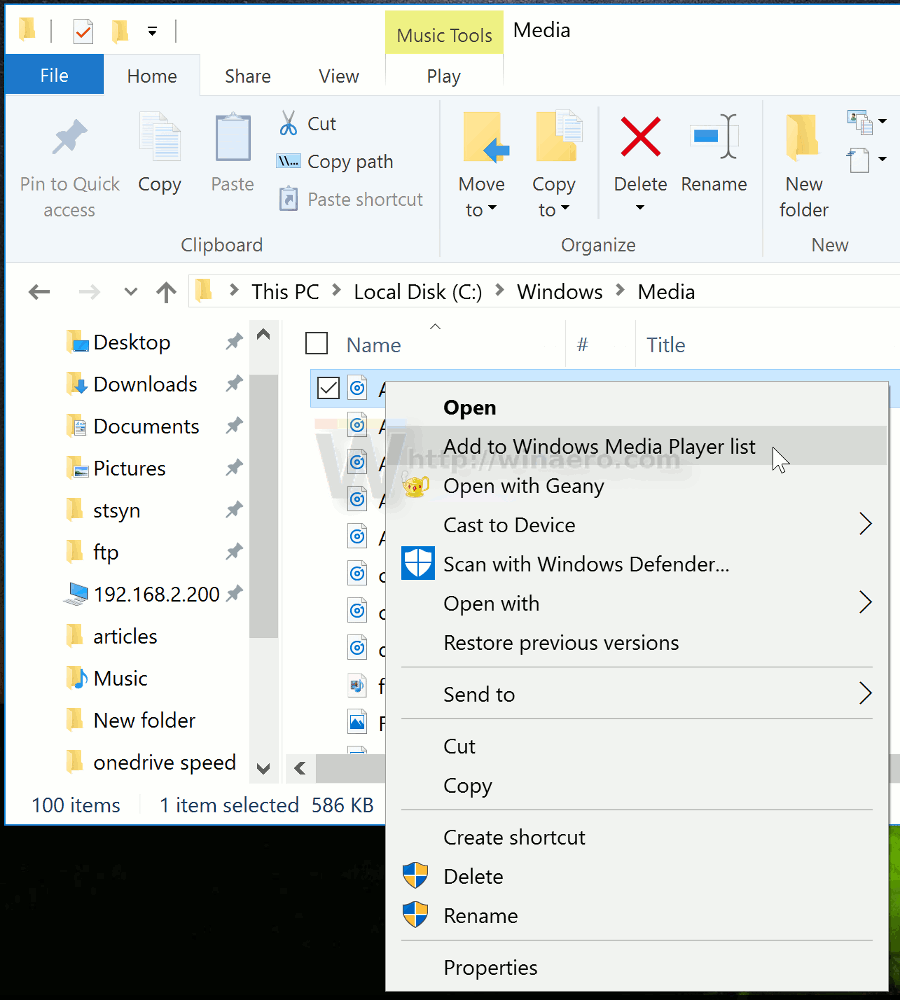
Windows Media Player Entries
Windows Media Player installs the above 3 entries in Windows’ explorer right-click menu. They include:
- Add to Windows Media Player list
- Play with Windows Media Player
- Shop for music online
These entries usually only appear when you right-click folders containing media files like music, video and images.
For most third party programs, ShellMenuView from Nirsoft (Nir Sorfer) usually removes this kind of entries with little hassle.
However, it seems that it can’t disable WMP entries as per my tests. To do that I had to scour the web for some solutions, and luckily I got the following three fixes. If you don’t want to tinker around with the registry, use either of the first two methods below.
1. Using Control Panel’s Default Programs
This method simply removes Windows Media Player as the default media player and as a result removes the associated entries. Here’s how to do that:
- Open the old Control Panel. You can find it easily by searching for it in the start menu.
- Switch the view to Large Icons or Small Icons if it’s in the Category view.
- Scroll down and open Default Programs.
- In the default programs window, open the option Set Program access and computer defaults.

- That will open a small window with one of three radio buttons selected: Microsoft Windows, Non-Microsoft and Custom. If you’re using a different media player, chances are the Custom option is already selected. If not so, select it and then enlarge the settings using the drop arrow on the far right.
- Scroll down and go to Choose default media player. If you’re already using a different media player, then Use my current media player is selected by default. If not, do so. However, below it you’ll notice beside Windows Media Player there’s the option Enable access to this program. Remove that check mark.

7. Click Ok and you’re done
This will only “disable access” to WMP from Windows Explorer (File Manager) but you will still be able to use the program by launching it from elsewhere e.g the Start Menu.
2. By Turning off Windows Media Player
This method renders WMP inaccessible through “uninstallation” but not in the traditional sense. You won’t be able to use the program but you can “turn it on” later if you need to use it. Here’s how to go about it:
- Open the old Control Panel. You can find it easily by searching for it in the start menu.
- Switch the view to Large Icons or Small Icons if it’s in the Category view.
- Scroll down and open Programs and Features.
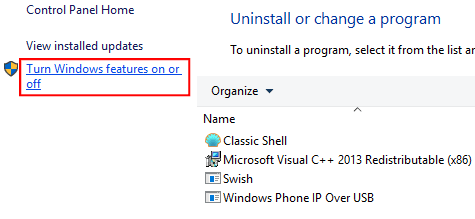
- In the Programs and Features window, go to the left panel and open the option Turn Windows features on or off.

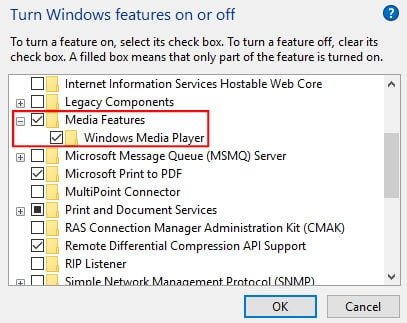
- That will open a small window titled Windows Features. Navigate through the categories listed and find Media Features. Expand that category by clicking on the little plus sign and remove the checkmark from Windows Media Player.

- You’ll get a warning prompt. Click Yes to accept.
- Windows may take some time to apply those settings, after which you’ll have to Restart your computer for the changes to be applied.
After restarting the computer WMP entries should be gone and the program should be inaccessible. If you had defaults set to WMP, like to open mp3s and other media files, they’ll will automatically default to another media player that’s installed; if not you’ll have to do that manually.
Option 3: Remove Manually using the Registry
This is the last method, and it’s the least user-friendly of the three. If you don’t know what the Registry is, it’s probably a good idea to stick with the first two methods.
Also, before editing anything in the registry, you may want to consider backing it up or simply create a system restore point. There’s no undo button here, so if you make an unwanted change there’s no way to revert unless if you remember exactly what you edited.
If you’ve some trouble going through the steps, please refer to the video below. It’s what I made for Windows 7 but the procedure is exactly the same for Windows 8 and 10.
- First, make sure you’re logged in as an Administrator.
- Open the Run window. You can do this by going to the Start Menu and on the bottom click on the button Run… or using the Windows Button + R keyboard shortcut.
- Enter regedit in the run box and click Ok. The registry editor should launch.
- On its left there’s what is referred to as Classes which houses the different kinds of settings and on the right is the preview window where the settings are previewed and edited. The keys we need to edit are under the HKEY_CLASSES_ROOT class.
- Navigate carefully to the following folders:
- HKEY_CLASSES_ROOT\SystemFileAssociations\Directory.Audio
- HKEY_CLASSES_ROOT\SystemFileAssociations\Directory.Image
- HKEY_CLASSES_ROOT\SystemFileAssociations\Directory.Video
- Directory.Audio holds the settings for folders with audio files, Directory.Image for images and Directory.Video files. Expand each of those folders and their respective sub-folders and on the right pane you’ll notice the data.
- Now chances are that there are keys from other programs and those should be left alone with. Window Media Player keys that we’re interested in are as follows:
- HKEY_CLASSES_ROOT\SystemFileAssociations\Directory.Audio\shell\Enqueue
- HKEY_CLASSES_ROOT\SystemFileAssociations\Directory.Audio\shell\Play
- HKEY_CLASSES_ROOT\SystemFileAssociations\Directory.Audio\shellex\ContextMenuHandlers\WMPShopMusic
- These are the only keys that you need to delete. You can confirm their data in the right pane which contains the following options:
- To delete, just right-click on each of the folders above and select delete. Before deleting you can back up the keys by right-clicking each of the folders and choosing Export. The exported file is a *.reg file that can be edited on a text editor like notepad and is restored by simply double-clicking it.
- Reboot your computer once you’re done.
Windows Media Player (WMP) is the default audio and video player app in all Windows versions. Even in Windows 10, where it is not associatiated with media files any more because of UWP Groove Music and Video apps, WMP is still available. It has a couple of context menu entries which are useless if you do not use the app. Here is how to remove them.
The commands «Play with Windows Media Player» and «Add to Windows Media Player list» are always visible in the context menu of File Explorer. If you never use WMP, here is how to get rid of them.
To remove Windows Media Player context menu, do the following.
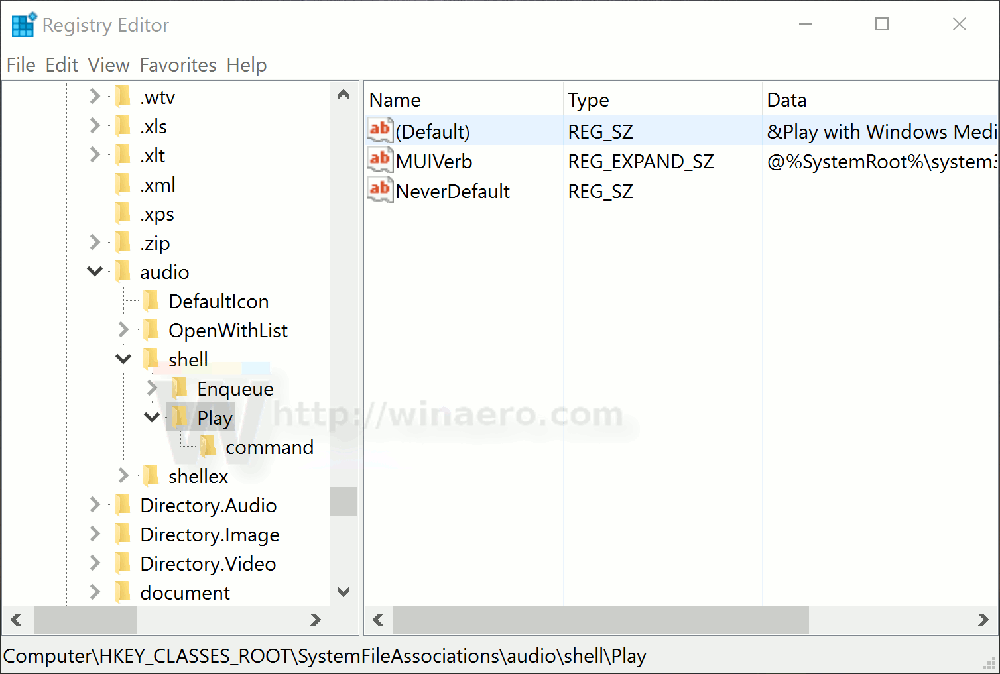
- Open Registry Editor (see how).
- Navigate to the following Registry key:
HKEY_CLASSES_ROOT\SystemFileAssociations\audio\shell\Play
Tip: You can access the desired Registry key with one click.

- On the right, create a new string value named «ProgrammaticAccessOnly». Leave its value data empty.
- Repeat the same under the following keys:
HKEY_CLASSES_ROOT\Stack.Audio\shell\Play

HKEY_CLASSES_ROOT\Stack.Video\shell\Play

HKEY_CLASSES_ROOT\Stack.Image\shell\Play

HKEY_CLASSES_ROOT\SystemFileAssociations\Directory.VIDEO\shell\Play

HKEY_CLASSES_ROOT\SystemFileAssociations\audio\shell\Play

HKEY_CLASSES_ROOT\SystemFileAssociations\Directory.Audio\shell\Play

HKEY_CLASSES_ROOT\SystemFileAssociations\Directory.Image\shell\Play

HKEY_CLASSES_ROOT\MediaCenter.WTVFile\shell\Enqueue

HKEY_CLASSES_ROOT\Stack.Audio\shell\Enqueue

HKEY_CLASSES_ROOT\Stack.Image\shell\Enqueue

HKEY_CLASSES_ROOT\Stack.Video\shell\Enqueue

HKEY_CLASSES_ROOT\SystemFileAssociations\audio\shell\Enqueue

HKEY_CLASSES_ROOT\SystemFileAssociations\Directory.Audio\shell\Enqueue

HKEY_CLASSES_ROOT\SystemFileAssociations\Directory.VIDEO\shell\Enqueue

HKEY_CLASSES_ROOT\SystemFileAssociations\Directory.Image\shell\Enqueue

HKEY_CLASSES_ROOT\WMP.DVR-MSFile\shell\Enqueue

HKEY_CLASSES_ROOT\WMP.WTVFile\shell\Enqueue

HKEY_CLASSES_ROOT\WMP11.AssocFile.3G2\shell\Enqueue

HKEY_CLASSES_ROOT\WMP11.AssocFile.3GP\shell\Enqueue

HKEY_CLASSES_ROOT\WMP11.AssocFile.ADTS\shell\Enqueue

HKEY_CLASSES_ROOT\WMP11.AssocFile.AIFF\shell\Enqueue

HKEY_CLASSES_ROOT\WMP11.AssocFile.ASF\shell\Enqueue

HKEY_CLASSES_ROOT\WMP11.AssocFile.ASX\shell\Enqueue

HKEY_CLASSES_ROOT\WMP11.AssocFile.AU\shell\Enqueue

HKEY_CLASSES_ROOT\WMP11.AssocFile.AVI\shell\Enqueue

HKEY_CLASSES_ROOT\WMP11.AssocFile.FLAC\shell\Enqueue

HKEY_CLASSES_ROOT\WMP11.AssocFile.M2TS\shell\Enqueue

HKEY_CLASSES_ROOT\WMP11.AssocFile.m3u\shell\Enqueue

HKEY_CLASSES_ROOT\WMP11.AssocFile.M4A\shell\Enqueue

HKEY_CLASSES_ROOT\WMP11.AssocFile.MIDI\shell\Enqueue

HKEY_CLASSES_ROOT\WMP11.AssocFile.MK3D\shell\Enqueue

HKEY_CLASSES_ROOT\WMP11.AssocFile.MKA\shell\Enqueue

HKEY_CLASSES_ROOT\WMP11.AssocFile.MKV\shell\Enqueue

HKEY_CLASSES_ROOT\WMP11.AssocFile.MOV\shell\Enqueue

HKEY_CLASSES_ROOT\WMP11.AssocFile.MP3\shell\Enqueue

HKEY_CLASSES_ROOT\WMP11.AssocFile.MP4\shell\Enqueue

HKEY_CLASSES_ROOT\WMP11.AssocFile.MPEG\shell\Enqueue

HKEY_CLASSES_ROOT\WMP11.AssocFile.TTS\shell\Enqueue

HKEY_CLASSES_ROOT\WMP11.AssocFile.WAV\shell\Enqueue

HKEY_CLASSES_ROOT\WMP11.AssocFile.WAX\shell\Enqueue

HKEY_CLASSES_ROOT\WMP11.AssocFile.WMA\shell\Enqueue

HKEY_CLASSES_ROOT\WMP11.AssocFile.WMV\shell\Enqueue

HKEY_CLASSES_ROOT\WMP11.AssocFile.WPL\shell\Enqueue

HKEY_CLASSES_ROOT\WMP11.AssocFile.WVX\shell\Enqueue
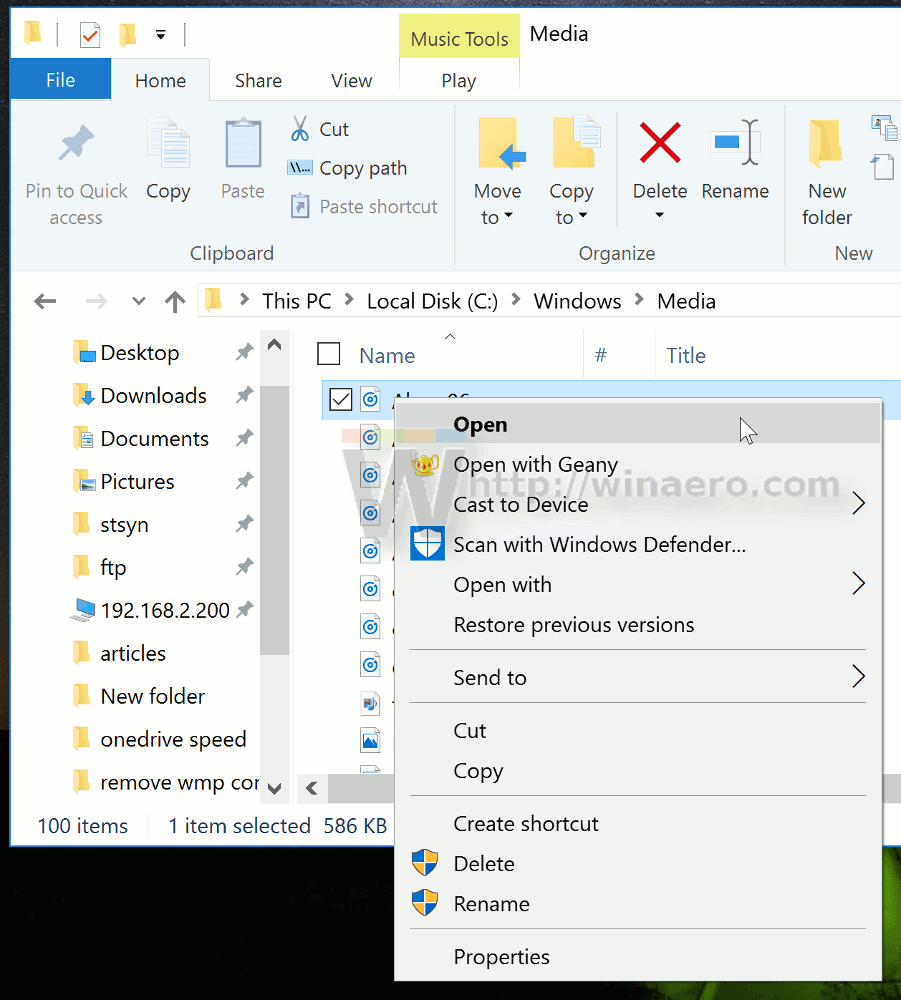
This will remove both Windows Media Player entries from the context menu of the File Explorer app.
Before:
After:
This trick works in all modern Windows versions like Windows 10, Windows 8.1 and Windows 7.
To restore the context menu commands, just remove the ProgrammaticAccessOnly value that you created.
To save your time, you can use the following ready-to-use Registry files.
Download Registry Files
The undo tweak is also included in the ZIP archive.
Also, you use Winaero Tweaker to get rid of the Windows Media Player context menu entries.
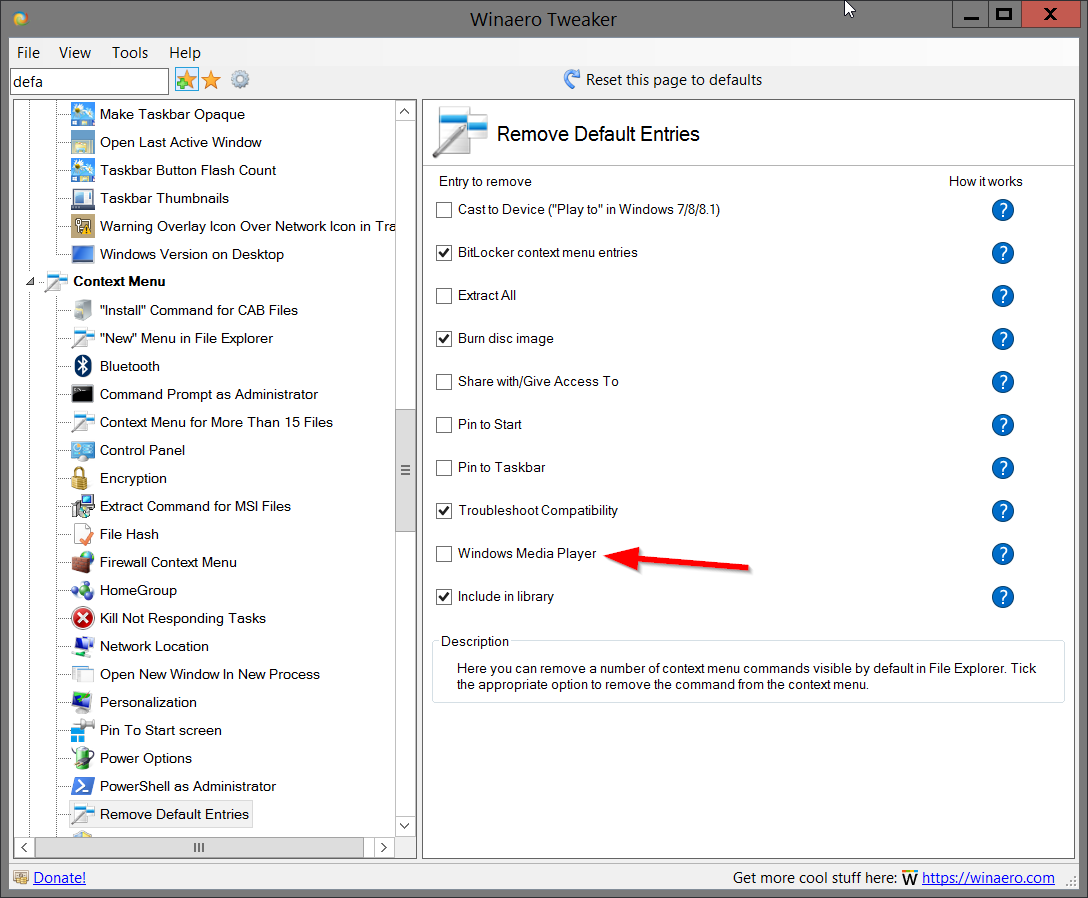
You can download it here:
Download Winaero Tweaker
That’s it.
Support us
Winaero greatly relies on your support. You can help the site keep bringing you interesting and useful content and software by using these options:
If you like this article, please share it using the buttons below. It won’t take a lot from you, but it will help us grow. Thanks for your support!
Many people do not use Windows Media Player, and yet we all seem to be stuck with the ubiquitous WMP context menu entries in Windows, cluttering the right click menu.
Worse yet somewhere along the line Microsoft has inserted a strange “shop for music online” context menu entry in what seems to be a fit of iTunes-envy. All the more reason to remove WMP’s presence from the context menu.
This post will show you how to remove the Windows Media Player context menu entries in Windows 7. WMP itself will not be removed or uninstalled, and will still be accessible on demand.

Step 1: go to Start Menu in the lower left corner, then ‘Control Panel’, then ‘default programs’
If you cannot see ‘default programs’ then in the upper right corner, find and toggle ‘View by Category’/Large icons (see image to the right). You should then see a display similar to the screenshot below.

Step 2: next, click ‘Set program access and computer defaults’

Step 3: next, make sure ‘custom’ is selected and click the down arrow to the right.

Step 4: scroll down to the ‘Choose a default media player’ section; uncheck the ‘enable access to this program’ opposite the ‘Windows Media Player’ entry (see screenshot below). Click Ok

That’s it. The context menu entry should now be free of all traces of WMP.