Вариант 1: В одной папке
Если надо убрать группы в одной папке, достаточно воспользоваться контекстным меню, открыв его внутри каталога. Запустите ту папку, группы в которой нужно убрать, и щелкните по свободной области правой кнопкой мыши. Наведите курсор на пункт «Группировка» и из дополнительного меню выберите значение «Нет».
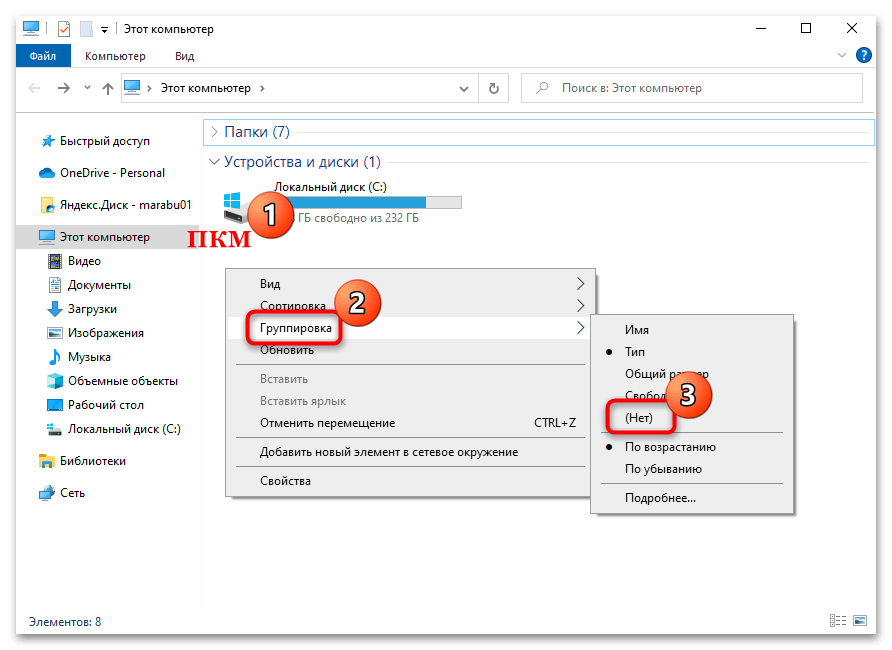
После этого в конкретной папке, где была произведена настройка, группировка файлов и подпапок будет отключена.
Вариант 2: Для всех папок
Если требуется настроить вид данных во всех папках, то вышеописанную инструкцию надо применить к каталогам на компьютере. В этом случае потребуется перейти в дополнительные параметры папок:
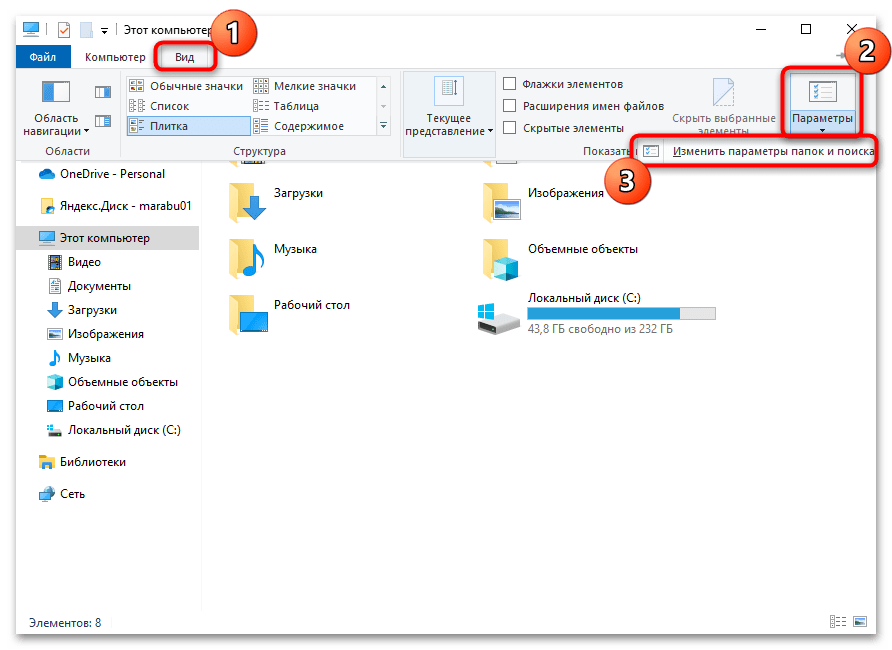
- Произведите настройку отображения данных в любой папке так же, как описано выше. Затем перейдите на вкладку «Вид» у «Проводника». Нажмите на кнопку «Параметры» и выберите «Изменить параметры папок и поиска».
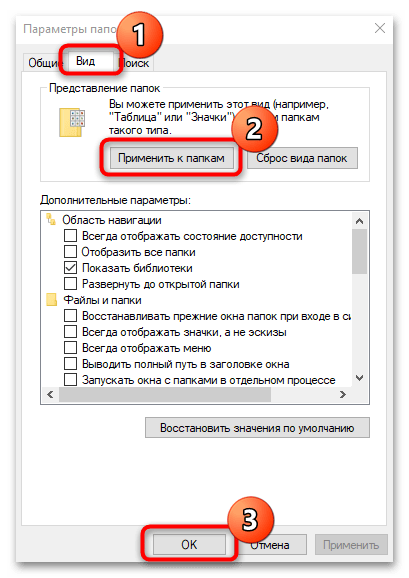
- В новом окне откройте раздел «Вид». Должна быть активна кнопка «Применить к папкам» — нажмите на нее и подтвердите действие кнопкой «ОК».
- Подтвердите действие в появившемся окне.

Настройка применится ко всем папкам, которые есть в «Проводнике». Если нужно, то в отдельных каталогах можно вновь активировать группировку по разным критериям, при этом другие папки затронуты не будут.
Читайте также: Открываем «Параметры Проводника» в Windows 10
Наша группа в TelegramПолезные советы и помощь
Table of contents
- What Is the Purpose of “Group By” in Windows 11 File Explorer
- How to Disable File Grouping in Windows 10 File Explorer?
- How to Disable File Grouping in Windows 11 File Explorer?
- How to Disable File Grouping for All Folders in Windows 10/11
- How to disable file grouping for all files and folders in Windows 10:
- How to disable file grouping for all folders in Windows 11
- How to Enable Local or Universal File Grouping
- Disabling the Group by Folder View in Windows 10/11: Explained
- FAQ
With Windows Explorer on Windows 10 and 11, arranging your files and folders according to your preferred order is just a few clicks away.
The operating system’s native file browser lets you do a lot of cool stuff in addition to the routine copy, paste, move, and launch operations.
When viewing a folder full of files or subfolders, you can cycle between multiple icon views (extra large, large, medium, small) or dispense with icons altogether and give prominence to details or file content.
You can decide to sort your files according to one of the default attributes, such as name, type, size, and date modified, or in ascending or descending order.
You can also decide to group similar items, with each set of groupings ordered by name, size, type, etc.
However, if you don’t want it, you can disable the feature. This guide will show you how to disable the “Group by folder” view in Windows 10 and 11.
What Is the Purpose of “Group By” in Windows 11 File Explorer
If you’re using Windows 11, you must have noticed the major improvements in File Explorer. File Explorer now has a new, streamlined context menu, allowing users to quickly access popular commands.
Likewise, a new update announced in April 2022 has added tabs to File Explorer, a feature that works just like in Microsoft Edge. It lets you open multiple tabs for each section of File Explorer or folder. What’s more, you can create new or close open tabs.
The “Group by” feature is still available in Windows 11 and is similar to what’s in Windows 10 File Explorer. This feature allows you to organize your files and folders as you please.
However, the grouping feature isn’t always useful, and users might want to disable it. Keep reading to learn how to turn off “Group by” in File Explorer in Windows 11.
Now, just like in Windows 10 File Explorer, your files or folders can be arranged in ascending or descending order.
To check this, simply open any folder and click “Sort.” You should see which option is activated.
Also read:Windows Tweaks: How to Customize Your Windows 10/11
How to Disable File Grouping in Windows 10 File Explorer?
Turning off file grouping in Windows will undo all grouping arrangements and revert files and folders to their default order. This can be useful in certain situations where linear sorting proves to be a sufficient method of arranging files.
To turn off file grouping in Windows 10:
- On your desktop, click the Windows Explorer icon to launch it or press the
Windows key + E. - Navigate to any folder of your choice whose files you want to degroup.
- Click View at the top left to access the View tab.
- In the View tab in the Current view group, click the Group by dropdown arrow to reveal a list of selectable attributes.
- Select None from the list.
Download Auslogics BoostSpeed
Your one-stop PC maintenance and optimization tool, this program will clean, speed up, repair, and tweak your system to ensure maximum speed and efficiency.
How to Disable File Grouping in Windows 11 File Explorer?
Here’s how to remove the group view in File Explorer in Windows 11:
- Launch File Explorer using the
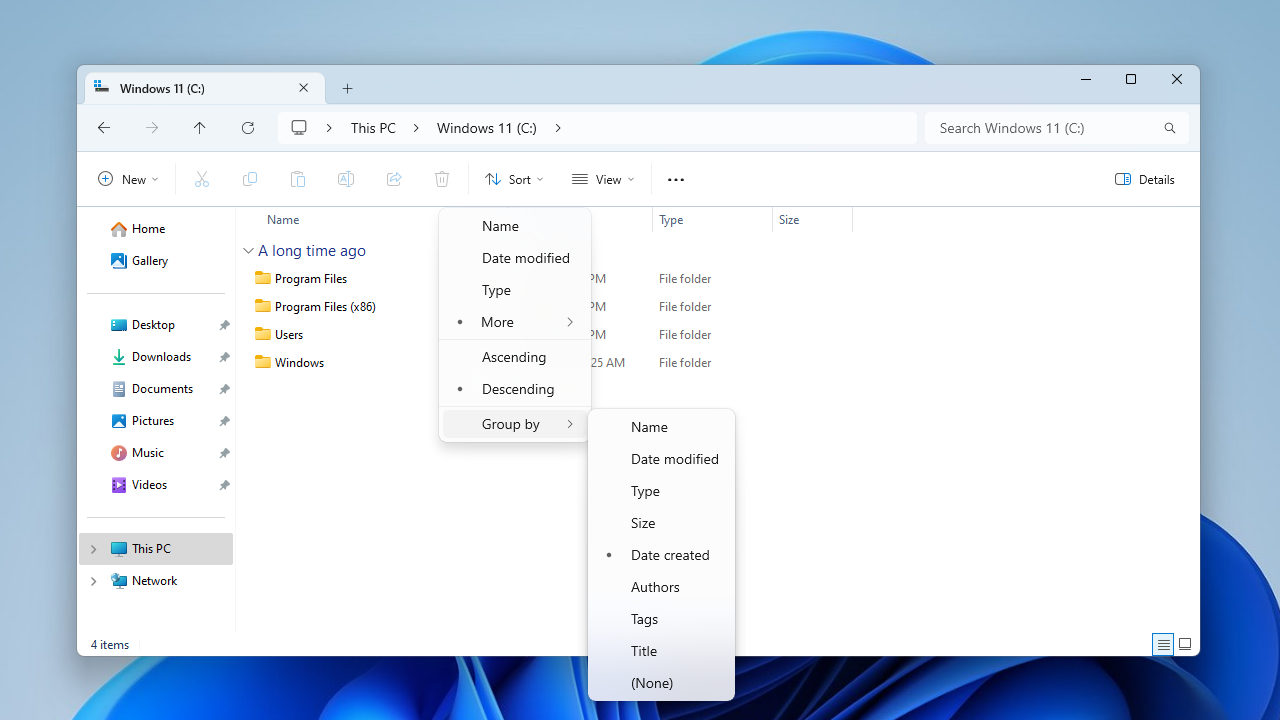
Win + Ekeyboard shortcuts or simply click on the File Explorer icon on your taskbar. - Click the Sort option on the File Explorer command bar.
- Select the Group by option and click on (None) to ungroup all items in the folder.
Alternatively:
- Launch File Explorer and open the folder with file grouping enabled.
- Right-click an empty area in the folder and select Group by > (None).
Note
If you don’t see the (None) option, the folder you’ve opened doesn’t currently have grouped items.
Also read:How to Fix File Explorer Lag in Windows 11
How to Disable File Grouping for All Folders in Windows 10/11
If you would like to make file grouping universally disabled across your system, you can do that too.
Disabling file grouping in all your folders will undo all the “Group by” settings you have applied to any folder anywhere on your computer.
At least one folder structure should already be disabled in order to successfully disable systemwide file grouping. Then, it becomes a matter of applying the settings in that file folder across your entire system.
How to disable file grouping for all files and folders in Windows 10:
- On your desktop, click the Windows Explorer icon to launch it or press the
Windows key + E. - Navigate to any folder of your choice that already has file grouping disabled.
- Click View at the top left to access the View tab.
- In the View tab in the Show/hide group, click on the Options icon.
- In the Folder Options dialog, click View to access the View tab.
- Click the Apply to Folders button to make the in-folder setting systemwide.
- Click OK.
How to disable file grouping for all folders in Windows 11
You can also disable file grouping for all the folders in your Windows 11 machine. The procedure is slightly different from Windows 10 due to the upgrades applied to the new File Explorer.
But don’t worry, it’s quite straightforward:
- Bring up File Explorer by pressing the
Win + Ekeys simultaneously. - Next, navigate to the folder that already has file grouping disabled.
- Click the three dots at the top right on the new command bar and select Options.
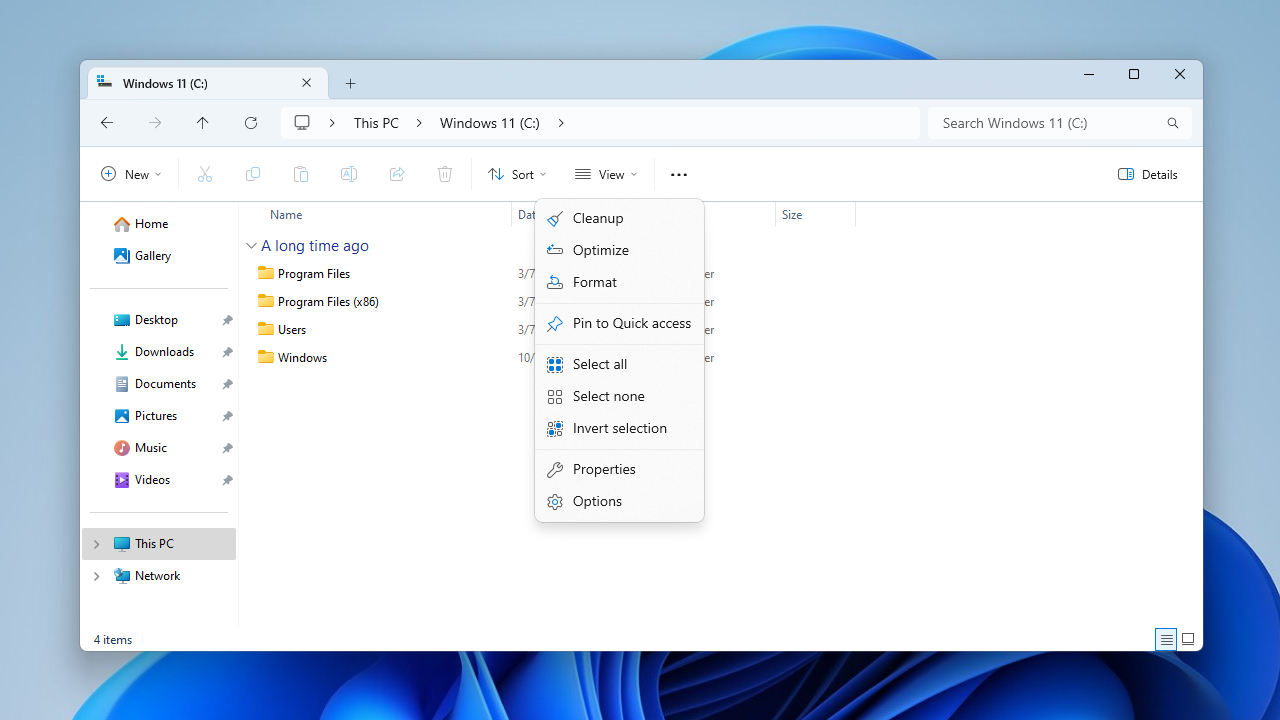
- On the Folder Options screen that pops up, click on Apply to Folders and select Yes.
- Select Apply > OK to effect the changes.
This setting will disable file grouping on all folders in your system.
How to Enable Local or Universal File Grouping
If you wish to enable file grouping again, just follow these steps:
In Windows 10:
- On your desktop, click the Windows Explorer icon to launch it or press the
Windows key + E. - Navigate to any folder of your choice whose files you want to group.
- Click View at the top left to access the View tab.
- In the View tab in the Current view group, click the Group by dropdown arrow to reveal a list of selectable attributes.
- Select your desired attribute from the list (date, type, size, etc.).
In Windows 11:
- Launch File Explorer using the
Win + Eshortcut keys. - Open the folder whose files you want to apply file grouping to.
- Click on Sort > Group by, and then select your preferred attribute from the list (name, date modified, size, type, etc.).
Once you’ve decided that you’d make your preferred file grouping attribute applicable across all files and folders, do the following to apply systemwide file grouping according to your preferences:
In Windows 10:
- On your desktop, click the Windows Explorer icon to launch it or press the
Windows key + E. - Navigate to any folder of your choice that already has file grouping enabled.
- Click View at the top left to access the View tab.
- In the View tab in the Show/hide group, click on the Options icon.
- In the Folder Options dialog, click View to access the View tab.
- Click the Reset Folders button to make the in-folder setting systemwide.
- Click OK.
In Windows 11:
- You can launch File Explorer by clicking on the icon on your taskbar or using the
Win + Ehotkeys. - Select the three dots at the top right and click on Options.
- On the View tab, click on Reset Folders to apply the setting systemwide.
- Click Apply > OK.
Download Auslogics BoostSpeed
Your one-stop PC maintenance and optimization tool, this program will clean, speed up, repair, and tweak your system to ensure maximum speed and efficiency.
Disabling the Group by Folder View in Windows 10/11: Explained
In conclusion, Windows Explorer in both Windows 10 and 11 offers a range of customization options to arrange and organize your files and folders according to your preferences.
The “Group by” feature allows you to group items based on various attributes, such as name, type, size, and date modified.
However, if you find file grouping unsuitable for your needs, you can easily disable it.
Whether you’re using Windows 10 or the upgraded File Explorer in Windows 11, the steps to disable file grouping are straightforward.
By following the instructions provided, you can revert to linear sorting and arrange your files and folders in the default order.
If you wish to re-enable file grouping, the process is equally simple. Just select the desired attribute for grouping, and you can apply it either to individual folders or systemwide.
FAQ
Where is File Explorer located in Windows 10?
In Windows 10, File Explorer is typically located in the taskbar, which is the bar at the bottom of the screen. It is represented by a folder icon labeled “File Explorer.” You can click on this icon to open File Explorer and access your files and folders.
How to remove groups in File Explorer?
To remove groups in File Explorer, right-click on an empty area within the folder, select Group by, and choose (None) to remove the grouping.
How to search by date in File Explorer?
To search by date in File Explorer, use the search bar at the top right of the window. Type “datemodified:” followed by the desired date or a range of dates to search for files modified on specific dates.
How to stop Quick Access from adding folders in Windows 11?
In Windows 11 File Explorer, click on the three dots at the top right and access Options. Under the General tab, change the Open File Explorer to setting to This PC to prevent Quick Access from automatically adding folders.