
Режим гибернации в Windows 11 и предыдущих версиях системы, в отличие от режима сна, требующего сохранения электропитания, сохраняет данные из оперативной памяти на диск в файл hiberfil.sys, полностью выключается и, при последующем включении, загружает эти данные снова.
В этой инструкции подробно о том, как отключить гибернацию Windows 11, включить её или добавить пункт «Гибернация» в меню завершения работы, где он может не отображаться. А также дополнительная информация, которая может быть полезной в контексте рассматриваемой темы.
Как отключить гибернацию Windows 11
Наиболее частый вопрос, касающийся гибернации — как отключить её. Причины разные, среди самых распространённых:
- Освободить место на диске от файла hiberfil.sys, имеющего достаточно большой размер (зависит от объёма оперативной памяти).
- Отключить функции гибернации и быстрого запуска в случае, если они работают неправильно — возможно на старом оборудовании, при отсутствии подходящих драйверов управления электропитанием.
Чтобы отключить гибернацию в Windows 11 достаточно выполнить следующие простые шаги:
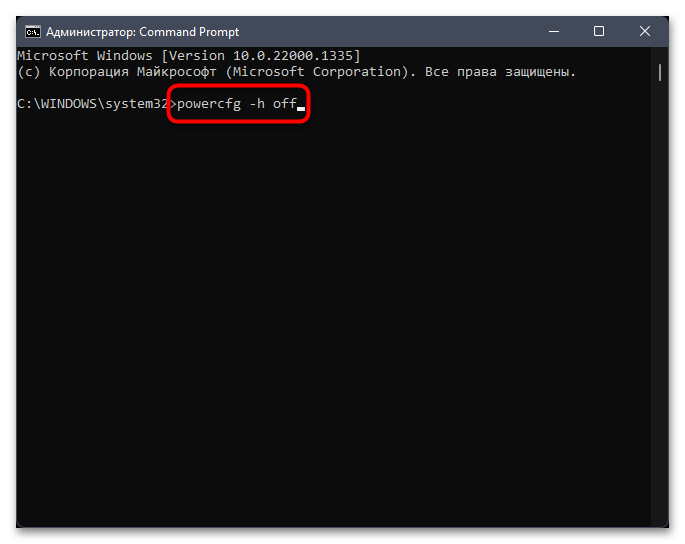
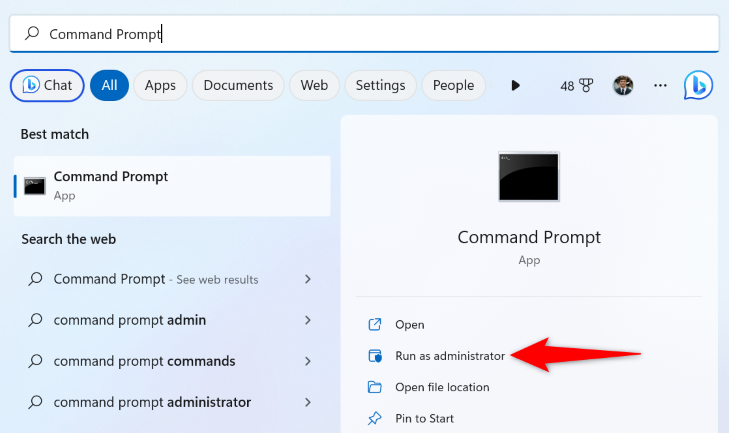
- Запустите командную строку от имени Администратора или, нажав правой кнопкой мыши по кнопке «Пуск» откройте Терминал Windows от имени администратора.
- Введите команду
powercfg -h off
и нажмите Enter.

- Каких-либо сообщений об успешном выполнении команды не появится, но гибернация будет отключена.

Сразу после выполнения команды или после первой перезагрузки компьютера или ноутбука файл hiberfil.sys исчезнет с диска (если нет — можно удалить в проводнике), а функция гибернации станет недоступной.
Дополнительная возможность отключения гибернации Windows 11 — использование редактора реестра:
- Нажмите правой кнопкой мыши по кнопке пуск, выберите пункт «Выполнить», введите regedit и нажмите Enter.
- Перейдите к разделу реестра
HKEY_LOCAL_MACHINE\System\CurrentControlSet\Control\Power
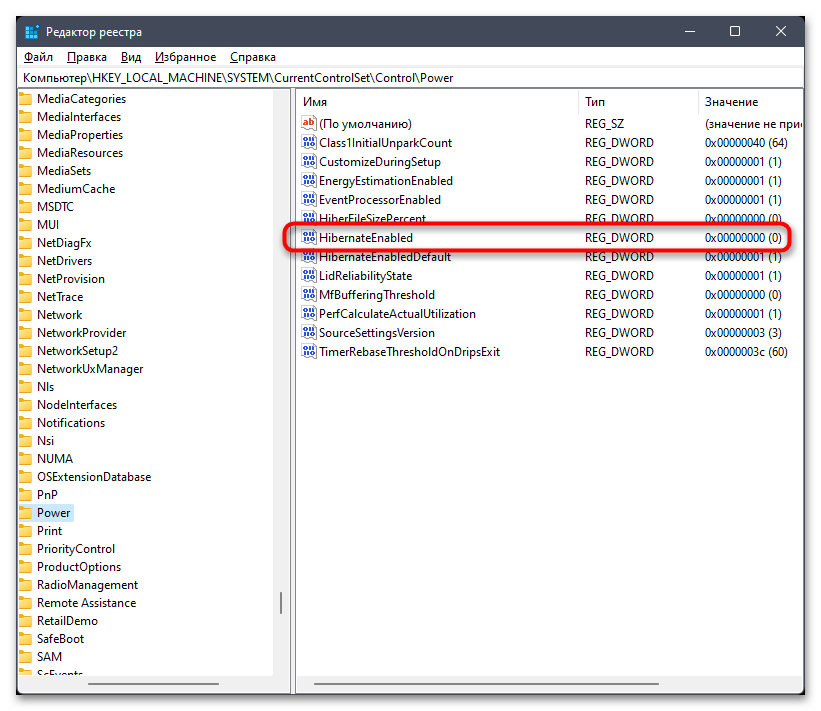
- Дважды нажмите по параметру HibernateEnabled в правой панели редактора реестра и задайте значение 0 для него.
Включение гибернации
Для того, чтобы включить гибернацию в Windows 11, действия будут обратными описанным выше:
- Запустите командную строку или Терминал Windows от имени администратора.
- Введите команду
powercfg -h on
и нажмите Enter.
- Сообщений о результате не появится, но гибернация будет включена.

Внимание: на некоторых системах или при отсутствии драйверов чипсета включение гибернации может быть недоступным.
Второй метод — изменить значение параметра HibernateEnabled на 1 в разделе реестра
HKEY_LOCAL_MACHINE\System\CurrentControlSet\Control\Power
Как добавить пункт «Гибернация» в меню завершения работы Windows 11
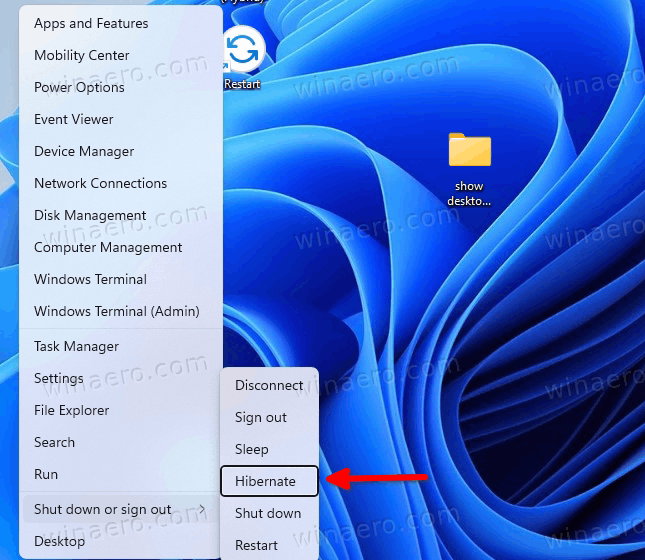
В меню, открывающемся при нажатии на кнопку «Питания» в меню «Пуск» Windows 11 может отсутствовать пункт «Гибернация» — только завершение работы, спящий режим и перезагрузка. Если вы хотите добавить этот пункт в список, потребуется выполнить следующие действия:
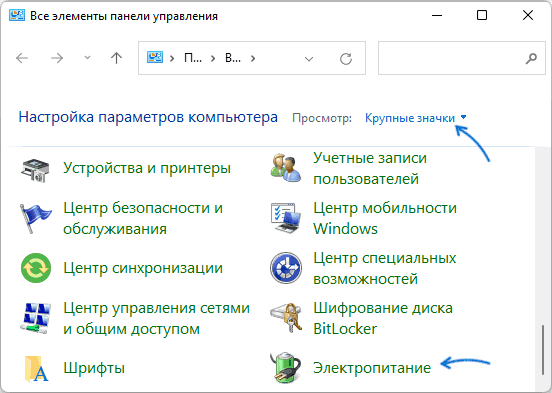
- Включить гибернацию (если она отключена), затем открыть Панель управления.
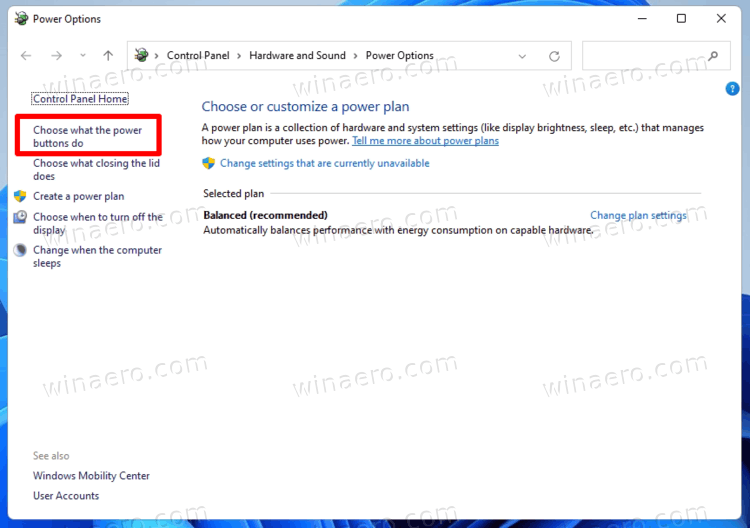
- В Панели управления перейти к пункту «Электропитание».

- В панели слева нажать «Действия кнопок питания».

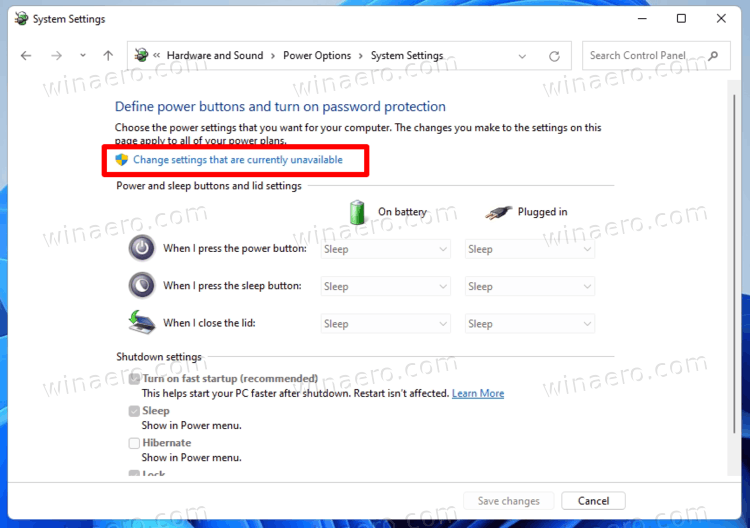
- Нажать «Изменение параметров, которые сейчас недоступны», а затем включить отображение режима гибернации в меню завершения работы и применить настройки.


Готово, теперь пункт «Гибернация» будет отображаться в меню завершения работы Windows 11. Если этот пункт не активен или отсутствует, используйте инструкцию Что делать, если нет пункта Гибернация в меню завершения работы меню Пуск.
Уменьшение размера файла гибернации hiberfil.sys
Если ваша задача — освободить место на диске, существует возможность не отключать гибернацию, а уменьшить размер файла гибернации (при этом функция быстрый запуск будет работать, но пункт Гибернация не будет отображаться в меню Пуск):
- Запустите Терминал Windows или командную строку от имени администратора.
- Введите команду
powercfg -h -type reduced
и нажмите Enter.

- В результате выполнения вы увидите новый размер файла гибернации, который будет использоваться в Windows 11.
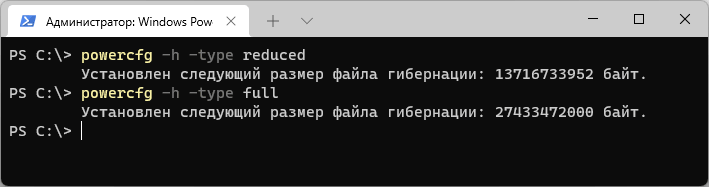
Если в дальнейшем вам потребуется вновь включить полный размер, тем же способом используйте команду
powercfg -h -type full
Важная информация
Если при отображении скрытых файлов и папок на своем системном разделе жесткого диска вы обнаружили файл гибернации, важно понимать, что просто так удалить его не получится. Даже если вы каким-то образом обойдете системные ограничения, данный объект будет создан автоматически в следующем сеансе, поскольку используется для сохранения текущего состояния операционной системы. Единственный верный шаг, который поможет избавиться от данного файла, — отключение самой функции гибернации в Windows 11.
При этом необходимо учитывать, что вам нужно именно отключить данный режим, а не просто запретить автоматический переход в него. Поскольку если режим все равно остается активным, файл будет создаваться и занимать пространство на диске. Теперь, когда вы получили основные сведения по теме, можно перейти к выполнению задачи при помощи двух доступных методов.
Способ 1: «Командная строка»
Самый простой и быстрый метод полного отключения гибернации в Windows 11, после чего и будет удален упомянутый файл, заключается в использовании команды управления питанием в консоли. Вам не понадобится искать дополнительную информацию, все будет представлено в следующей инструкции.
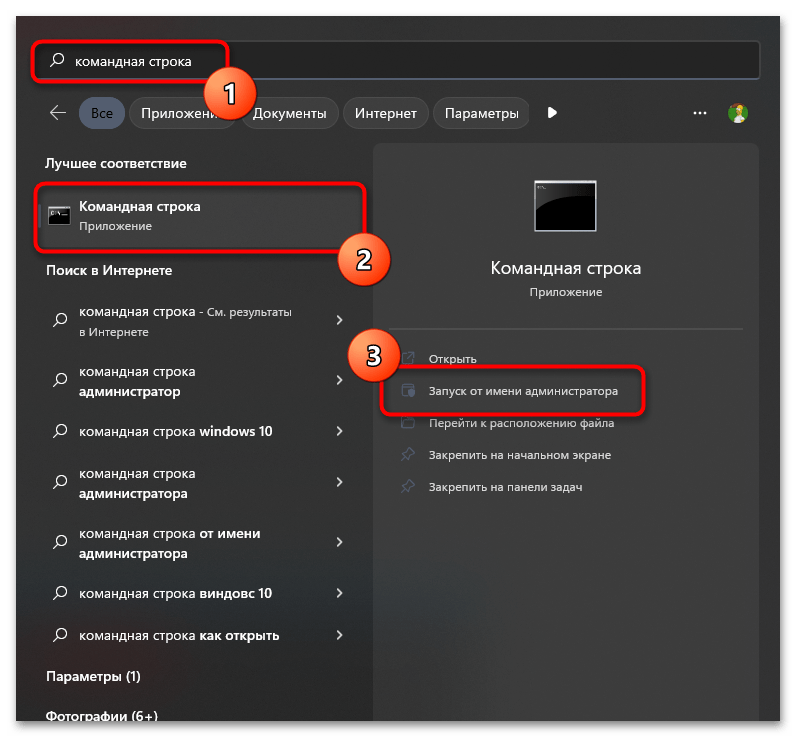
- Откройте меню «Пуск», отыщите «Командую строку» и запустите ее от имени администратора. Вы можете использовать вместо этого любой другой вариант открытия консоли с повышенными правами, о чем рассказано в статье по ссылке ниже.
Подробнее: Запуск «Командной строки» от имени администратора в Windows 11
- Следующий шаг — ввод команды управления электропитанием. Она подразумевает изменение конфигурации с отключением гибернации. Команда имеет вид
powercfg -h off. Вам достаточно скопировать ее, вставить в консоль и нажать Enter для применения. - Сразу же отобразится следующее поле ввода, что означает успешное выполнение команды. Сейчас мы рекомендуем отправить компьютер на перезагрузку, а после этого снова открыть системный раздел жесткого диска и проверить, был ли удален файл гибернации.

Способ 2: «Редактор реестра»
Внести изменения в план электропитания операционной системы можно и путем редактирования реестра. Конкретно в этом случае, когда речь идет об отключении гибернации, пользователю понадобится отыскать необходимый параметр и всего лишь изменить его значение, после чего режим сохранения сеанса будет отключен в Windows 11.
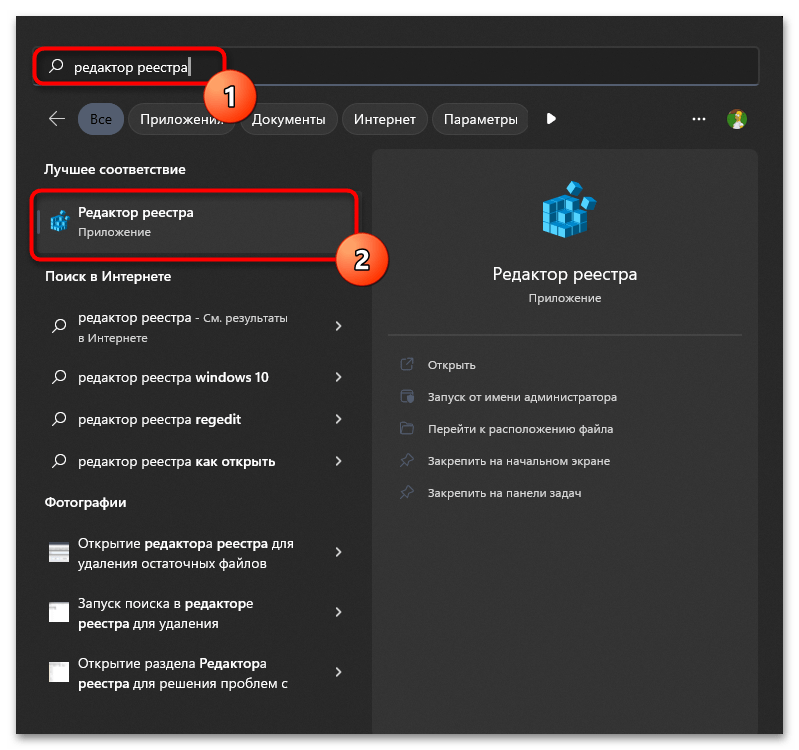
- Откройте меню «Пуск», через поиск отыщите «Редактор реестра» и запустите данное приложение.
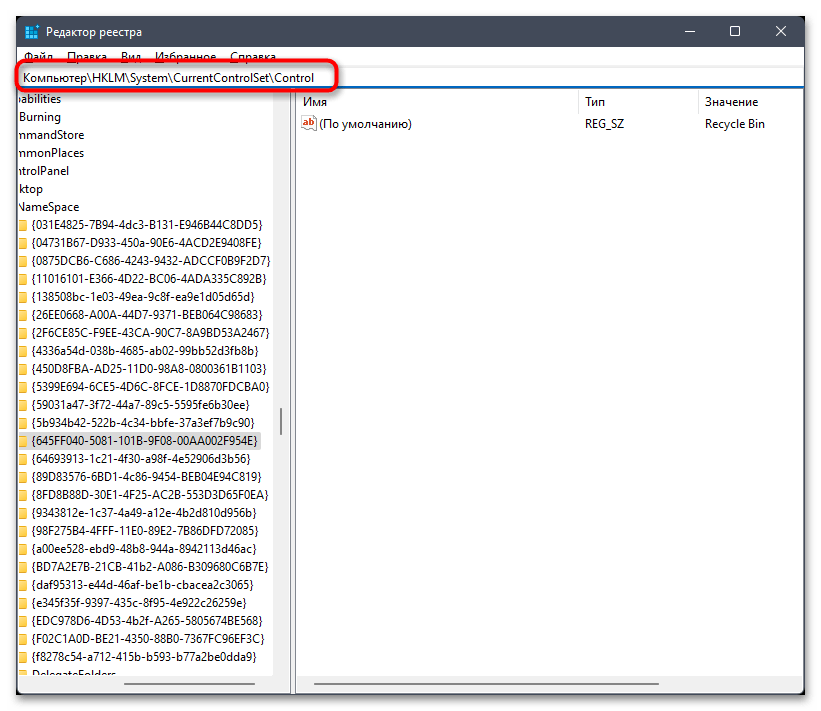
- В нем перейдите по пути
Компьютер\HKLM\System\CurrentControlSet\Control. Вы можете просто удалить текущее содержимое адресной строки и вставить данный путь. - В корне каталога отыщите другую директорию с названием «Power» и выделите ее левой кнопкой мыши.
- Теперь на панели справа предстоит отыскать параметр с названием «HibernateEnabled». Щелкните по нему дважды ЛКМ, чтобы открыть для редактирования.
- Установите значение как «0» и сохраните изменения.

После редактирования реестра не спешите просматривать изменения, поскольку сначала понадобится перезагрузить компьютер. Это обязательное условие, чтобы новые настройки вступили в силу. В новом сеансе Windows 11 приступайте к просмотру содержимого системного раздела, чтобы убедиться в отсутствии файла гибернации. Если вдруг возникнут вопросы по поводу отображения скрытых файлов и папок, обратитесь за инструкциями к статье по следующей ссылке.
Подробнее: Отображение скрытых файлов и папок в ОС Windows 11
Вместе с этим отметим, что включение гибернации осуществляется теми же методами, которые были описаны выше, если вы снова захотите в будущем использовать этот режим. Понадобится только вводить немного другие значения, чтобы перевести функцию в активное состояние. Об этом читайте по ссылке далее.
Подробнее: Включение гибернации в Windows 11
Наша группа в TelegramПолезные советы и помощь
Quick Links
-
What Is the Hibernation File in Windows 11?
-
Disable Hibernation and Delete Windows 11’s Hibernation File
-
How to Re-Enable Hibernation in Windows 11
-
Frequently Asked Questions
Summary
To turn off hibernation and delete the hiberfil.sys file on Windows 11, open an elevated Command Prompt window and run the «powercfg -h off» command. You can re-enable it later with «powercfg.exe /hibernate on».
If you don’t use hibernation on your Windows 11 PC, it’s a good idea to disable the feature to reclaim the storage space used by the hibernation file (hiberfil.sys). It may even fix issues with certain drivers. Here’s how to do that.
What Is the Hibernation File in Windows 11?
The hibernation file is named hiberfil.sys and Windows uses it to store your PC’s current state. When you hibernate your PC, Windows offloads your open apps and documents onto this file. Later, when you turn on your PC, your system loads your activity from hiberfil.sys, letting you resume your tasks rather than open your apps and documents from scratch.
Hibernation helps you save time, but in case you don’t use it, turn the feature off to delete its file that uses several GBs of your disk space. You can then use this space to store your other apps and files.
Disabling hibernation also helps fix issues with certain drivers that don’t work well with this mode.
Disable Hibernation and Delete Windows 11’s Hibernation File
To turn off hibernation and delete the hiberfil.sys file, just like in Windows 10, all you have to do is run a command from Command Prompt.
Do that by first opening the «Start» menu, finding «Command Prompt», and selecting «Run as Administrator.»
In the «User Account Control» prompt, choose «Yes.»
Then, in Command Prompt, type the following command and press Enter. In this command, the
-h
parameter refers to hibernation, and
off
tells the command to turn off the feature.
powercfg -h off
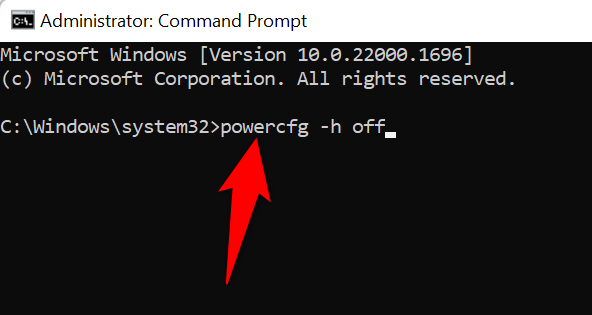
Command Prompt won’t display a success message, but know that your feature is disabled and the relevant file is deleted.
How to Re-Enable Hibernation in Windows 11
In the future, to re-enable hibernation on your PC, run the following command from an elevated Command Prompt window:
powercfg.exe /hibernate on
From now on, you’ll be able to use hibernate again, and the hiberfil.sys file will again be present on your hard drive.
Frequently Asked Questions
What’s the Difference Between Sleep and Hibernate?
Windows’ Sleep mode puts your open apps and documents onto your RAM, whereas Hibernate saves those items onto your hard drive. When in sleep mode, your PC still uses some power, but hibernate lets your PC turn off completely.
Sleep mode is ideal if you’re leaving your PC unattended for a short period of time. Hibernation is good for when you won’t use your PC for an extended period of time.
Does Hibernate Save More Energy Than Sleep?
Yes, Hibernate saves more energy than Sleep because hibernation allows your PC to turn off completely. Your PC can’t fully turn off in Sleep mode because the mode puts your open apps and documents on your RAM, which gets cleared if you turn off your machine.
Is It Better to Shut Down, Sleep, Or Hibernate My Laptop?
If you’re stepping away from your PC for the short term, put your PC in Sleep mode, and it’ll wake up faster than the other methods. If you won’t be using your machine for an extended period of time, use Hibernate, as it’ll save all your open apps and documents onto your hard drive. Shut down your PC if you experience issues when you boot back your PC from hibernation.
If you’re looking for other ways to optimize your PC, learn how to choose when Windows 11 turns your screen off or how to free up space on your disk in Windows 11.
Let’s review in detail how to enable or disable hibernation in Windows 11, remove the hiberfil.sys file, reduce the hiberfil.sys file size, and add Hibernation to the Start menu. This post pretends to be your ultimate guide on Hibernation in Windows 11.
Hibernation is a sort of advanced shutdown mode that allows you to power off your computer without losing any data or closing apps. When you put a PC into hibernation, Windows saves your current session into a dedicated hyberfil.sys file on the system drive. Once a PC is back on, the saved session restores and continues where you left off.
By default, Windows 11 (this also applies to Windows 10) uses Fast Startup that combines log-off and hibernation. When enabled, it makes Windows boot very fast. The operating system uses a hybrid shutdown which writes the memory occupied by the OS kernel and loaded drivers to the C:\hiberfil.sys file.
If you prefer standard hibernation to Fast Startup, this article will show you how to turn on hibernation in Windows 11.
There are two ways to enable hibernation in Windows 11. You can do that from the Command Prompt, or in the Registry Editor.
Enable hibernation in Windows 11 using Command Prompt
- Open Windows Terminal as Administrator in Windows 11. You can also use PowerShell or the classic Command Prompt.

- Enter the following command:
powercfg -h on. Press Enter.
- This will enable the Hibernation option instantly.
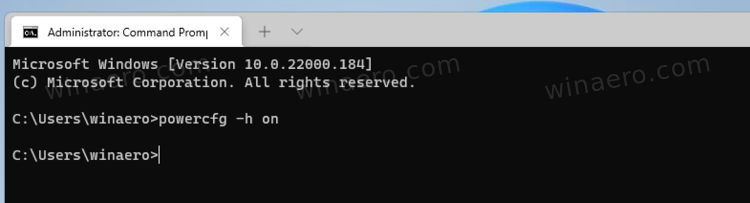
Note: The opposite command is powercfg -h off. It will disable the hibernation feature.
Enable hibernation using Registry Editor
Finally, as with virtually any other Windows setting, you can enable hibernation by tweaking Windows Registry.
- Press Win + R and enter the
regeditcommand. - Open the
HKEY_LOCAL_MACHINE\SYSTEM\CurrentControlSet\Control\Powerkey.
- In the right pane, find the
HibernateEnabledDefaultvalueand double-click it. - Change its value data from
0to1. - Click OK to save changes.

That is how to turn on hibernation in Windows 11. After enabling it, you need to add the Hibernate command to the Start menu. Here’s how.
Add Hibernate Command to the Start menu in Windows 11
- Press Win + R and type the following Control Panel command:
powercfg.cpl. Press Enter. - Alternatively, open Control Panel in Windows 11 and go to the Power Options section.
- Click the Choose what the power button does link in the left panel. Note that you need administrative privileges to change the following settings.

- Click Change settings that are currently unavailable.
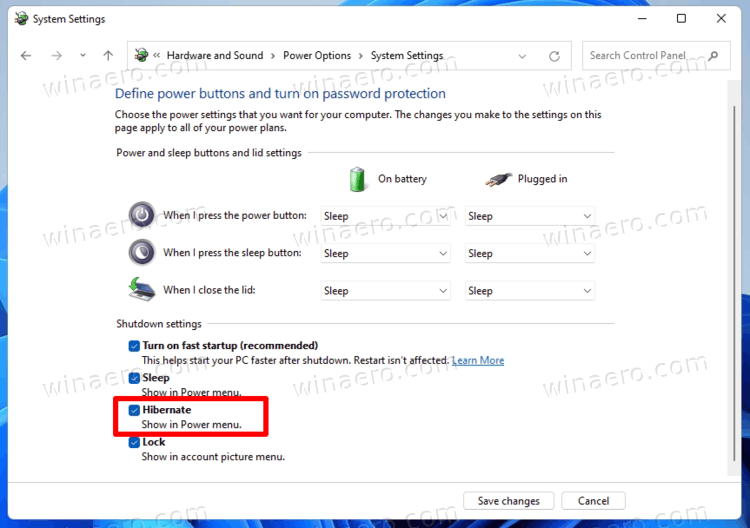
- Place a check mark next to the Hibernate option.
- Click Save Changes to add the Hibernate command to the Start menu in Windows 11.

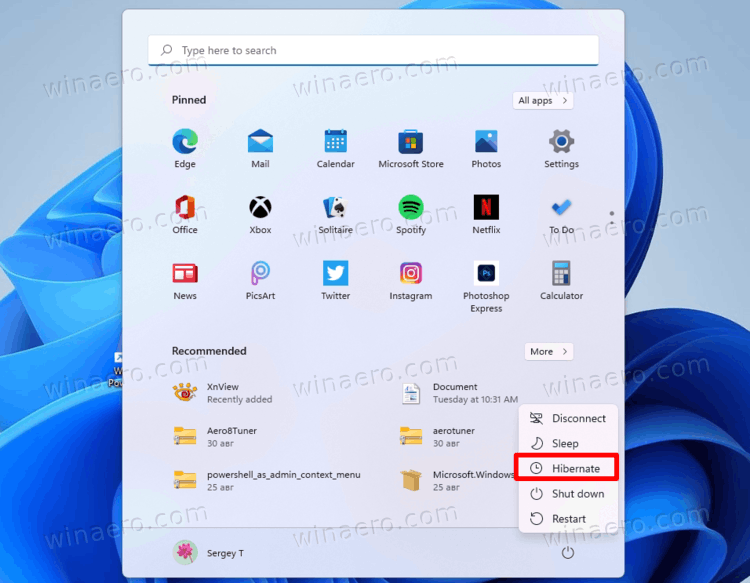
Now you can also choose hibernation in Windows 11 power menu.
Note: You might not find the Hibernate option in the Control Panel right after clean-installing Windows 11. Make sure you have installed the chipset and all other drivers.
That is how you turn on hibernation option in Windows 11 using the classic Control Panel.
Manage Hibernation File Hiberfil.sys in Windows 11
Depending on the size of the RAM installed in your computer, the hiberfil.sys file might reach several GBs in size. It can be a very big file. Here’s how to delete it, reduce its size, or keep it as small as required for the Fast Startup feature. First of all, you may want to learn what is the current size of the file.
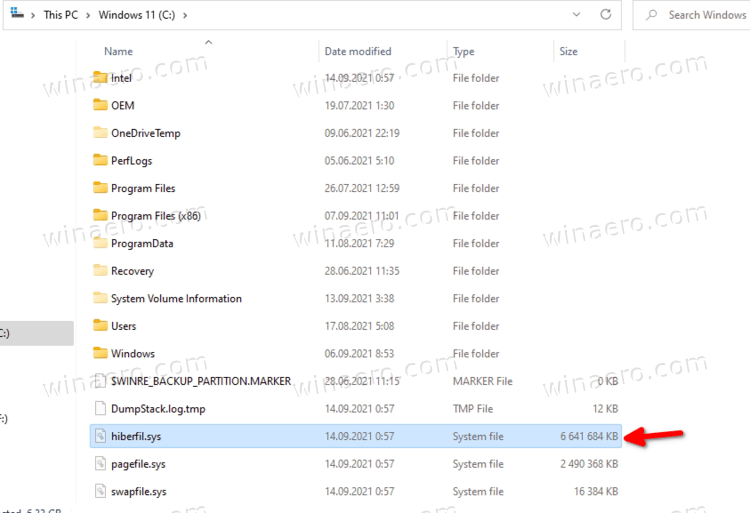
Find the hiberfil.sys file size
- Open File Explorer (Win + E).
- Make it show hidden files and specially protected system files. Means the Hide protected operating system files option in Folder options must be unchecked.
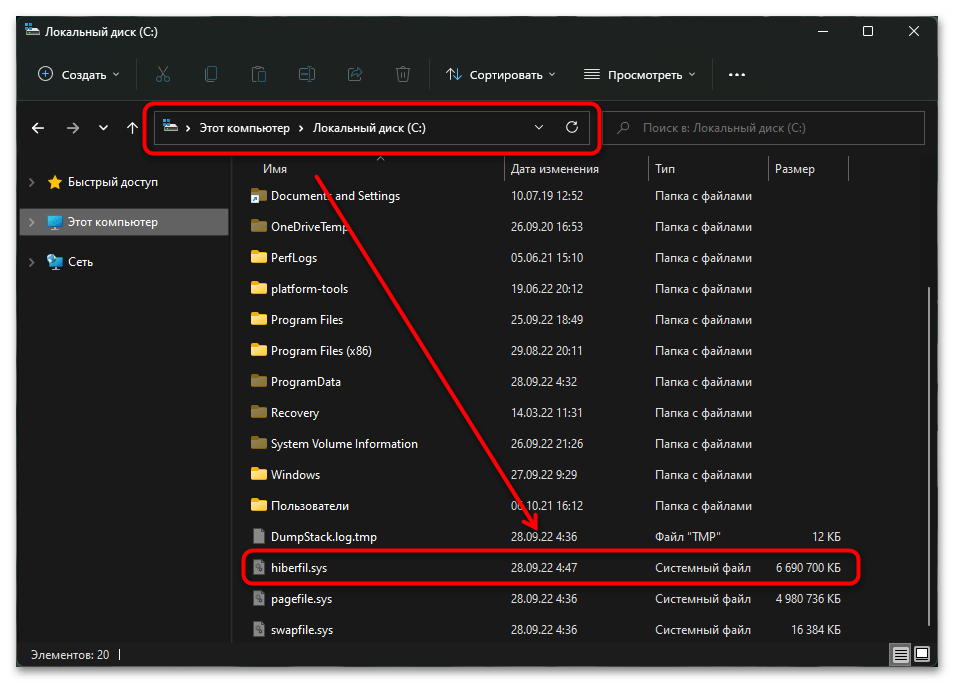
- Navigate to the root of the system drive, which is
C:in most cases. - Windows 11 now shows the hiberfil.sys file and its actual size.

Say you want to get rid of the hiberfil.sys file. It is easy to do, but keep in mind that the Hibernation feature does’t work without that file, as well as Fast Startup. So the only way to remove the file is to disable Hibernation. If it is fine, then continue.
Delete the hiberfil.sys Hibernation file in Windows 11
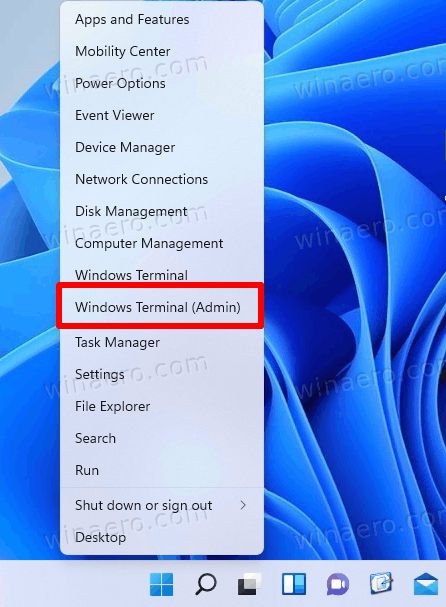
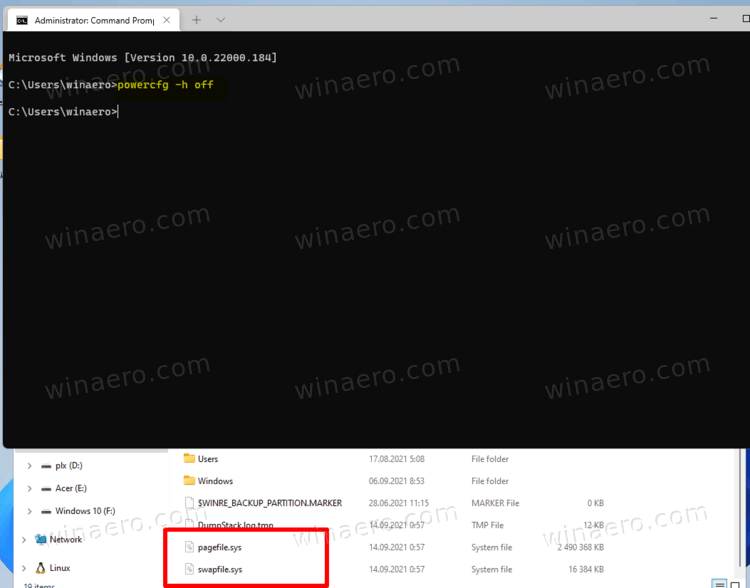
- Open Windows Terminal as Administrator; right-click the Start button and select Windows Terminal (Admin) from the menu.
- Type
powercfg -h offin either PowerShell or Command Prompt profile. Press Enter. - The hiberfil.sys hibernation file is now deleted.

This will disable hibernation, will remove the hiberfil.sys file, and also disable the Fast Startup feature. You can restore everything back with a single command reviewed in the beginning of this tutorial, powercfg -h on.
Disable Hibernation but keep Fast Startup
Usually, users want to disable hibernation to save disk space on the partition where Windows 11 is installed. The hiberfil.sys file is really huge. Luckily, there is an additional option you can use to save disk space without completely turning off hibernation.
To disable Hibernation but keep Fast Startup in Windows 11, do the following.
- Open Windows Terminal as Administrator, e.g. press Win + X and the click on Windows Terminal (Admin).
- Type the command
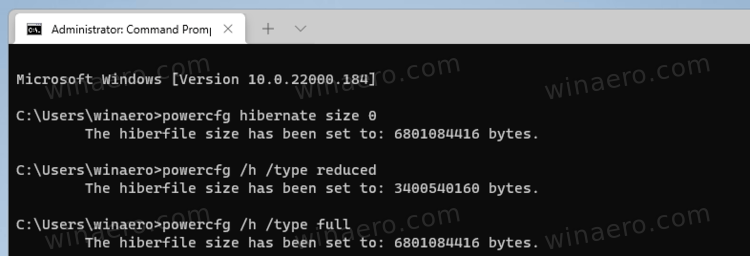
powercfg hibernate size 0and hit the Enter key. This will decompress the hiberfil.sys file if it was compressed. See the next chapter for more details on this. - Finally, run the command
powercfg /h /type reduced. Now you have a smaller hibernation file, enough for having Fast Startup working.

The command will shrink the hibernation file size for storing only the OS kernel and drivers for Fast Startup. The hiberfil.sys will take only 20% of the installed RAM. However, you won’t be able to use the Hibernate command in this reduced mode. It will disappear from the Start menu and the Power menu in Win + X.
Restore the default hibernation configuration
If some day, you decide to restore the default hibernation settings on Windows 11, the following command will do it for you: powercfg /h /type full. Again, run it in an elevated Windows Terminal.
Note that after you run it, the size of the hiberfil.sys file will be restored. The operating system will enable the hibernation file to store the full contents of memory.
Reduce the hibernation file size
Modern devices can handle huge RAM capacities. This directly leads to a large hiberfil.sys stored on your system partition. To solve this issue, Microsoft added the ability to compress the hibernation file. This means that the C:\hiberfil.sys file does not take as much disk space as your RAM capacity. It can take significantly less disk space, even 50% of your installed RAM capacity. This is a fantastic improvement Microsoft has made in Windows 7 and later, but it’s turned off by default even in Windows 11.
To reduce the hibernation file size in Windows 11, do the following.
- Open a new elevated Windows Terminal. For that, right-click the Start button, and select Windows Terminal (Admin).
- Switch to the PowerShell or Command Prompt profile if it does open to something else for you.
- Type the following command:
powercfg hibernate size NN. SubstituteNNwith the desired hiberfil.sys size in percentage of the total memory. For example,powercfg hibernate size 60for 60% of RAM.
- You can now close the Windows Terminal console.
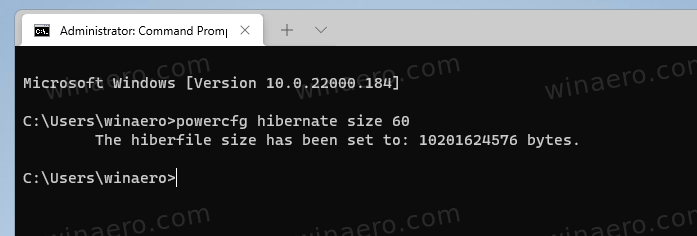
In the example above, we set the hibernation file to 60% RAM. If you have 8 GB of RAM, 60% of it is 4.8 GB <— this is the size of your hiberfil.sys file. You will save 3.2 GB of disk space.
The percentage of the total memory for the powercfg command cannot be smaller than 50.
To undo the compression, execute the command powercfg hibernate size 0, with which you are already familiar.
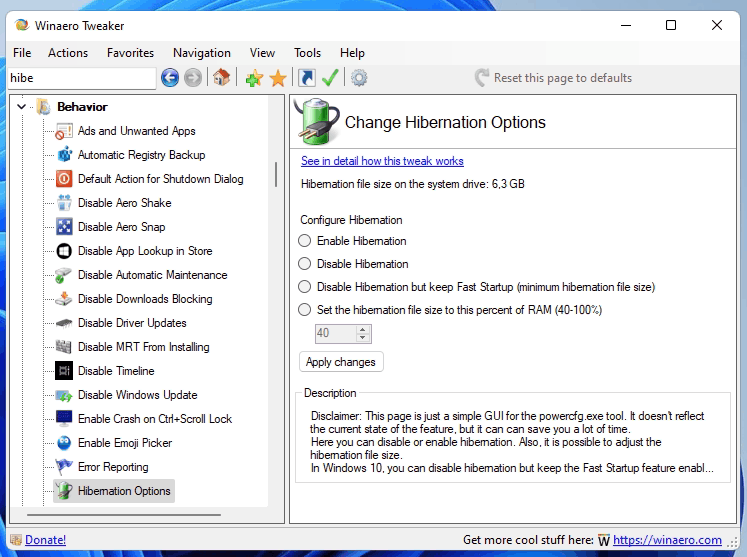
Using Winaero Tweaker
To automate the above tasks, you can use Winaero Tweaker. Select Behavior\Hibernation options on the left, and then change the option on the right according to your preferences.
That’s it.
Support us
Winaero greatly relies on your support. You can help the site keep bringing you interesting and useful content and software by using these options:
If you like this article, please share it using the buttons below. It won’t take a lot from you, but it will help us grow. Thanks for your support!
If you are not using it, you can disable hibernation mode on your Windows 11/10 computer and delete Hiberfil.sys file to recover a good amount of storage space.
What is Hibernation Mode?
The Hibernate Mode in Windows computers is designed to save battery life by shutting down almost all programs, while still being able to spring back to life at the press of a button (Power button).
When Hibernate Mode is enabled on a Windows computer, it offloads all open apps and documents to a file named as hiberfil.sys, it closes all power consuming activities and goes into a state of deep sleep mode.
When you press the Power button (even much later on), the computer instantly loads back your activity from hiberfil.sys file, which allows you to resume working from the same point that you had stopped, without the need to re-launch Apps and re-open the files.
Advertisement
Is it Safe to Disable Hibernation & Delete Hiberfil.sys?
While Hibernation helps in saving battery life and time, it can be safely disabled, without having any adverse impact on the performance of your computer.
In-fact, you may find the need to disable hibernation mode, if you come across the issue of the computer remaining active in background or not going into Hibernation mode due to certain drivers not working well in hibernation mode.
Also, disabling hibernation mode allows you to recover storage space by deleting the storage space occupied by hiberfil.sys on your computer.
Where is Hiberfil.sys Located on Windows 11/10 computer?
The default location of Hiberfil.sys file in Windows 11/10 is at root folder of the local drive (C:) on your computer.

Being a system file, Windows operating system keeps hiberfil.sys hidden, in order to prevent the possibility of this file being deleted by the user.
However, you can take a look at the amount of storage space occupied by hiberfil.sys, by enabling the option to Show Hidden System Files on your computer.
What is the Difference Between Hibernate and Sleep Mode?
When a computer goes into Hibernate mode, it offloads all open apps and documents to hiberfil.sys file, which is located on the Local Hard Disk of the computer.
This allows the computer to save maximum battery life by ceasing all its power consuming activities and remaining truly switched off, without any power requirements.
In the case of sleep mode, Windows moves open apps and documents to the computer’s Random Access Memory (RAM) and remains active in background using a small amount of power.
This makes sleep mode ideal for taking short breaks from the computer, while Hibernation mode is more suited for taking extended breaks from the computer.
1. Disable Hibernation Using PowerShell
If you are not using Hibernation mode, you can switch OFF Hibernation mode on your device by using PowerShell or Command Prompt.
Advertisement
1. Open Windows PowerShell as Admin > type powercfg -h off and press the enter key on the keyboard of your computer.

2. Once the Command is executed, Hibernate Mode will be disabled and “hiberfil.sys” file should be removed from the hard disk, when you restart the computer.
2. Disable Hibernation Using Advanced Power Settings
Another way to disable Hibernation on a Windows computer is by going to Advanced Power Settings
1. Right-click on the Start button and click on Run. In the Run Command window, type Powercfg.cpl and click on OK.
2. From the Power Options screen, go to Change Plan Settings > Change Advanced Power Settings.
3. On Advanced Power Settings screen, expand the Sleep entry > expand Hibernate After entry and set both On Battery and Plugged in to Never.

This will ensure that your computer never goes into Hiberantion mode, while using battery and also when it is plugged-in to a direct power source.
3. Disable Hibernattion By Using Registry
Another way to enable or disable Hibernatation mode on a Windows 10/11 is by using Registry Editor.
1. Right-click on the Start button and click on Run. In the Run Command Window, type regedit and click on OK.
2. On Registry Editor screen, navigate to HKEY_LOCAL_MACHINE\System\CurrentControlSet\Control\ Power and double-click on HibernateEnabled DWORD in the right-pane.

3. On the next screen, you can disable Hibernate Mode by changing Value Data to 0.
4. Click on OK to close the registry editor and save the changes on your computer.
How to Manually Delete Hiberfil and Recover Storage Space
You can check whether or not hiberfil.sys file has been removed from the computer and manually remove this file from your computer by following the steps below.
1. Open the File Explorer on your computer.
2. On File Explorer window, click on This PC in the left-pane and double-click on your Local Drive (C:) in the right pane.

3. If you are using Windows 10, click on the File Tab and select Change Folders and Search options in the menu that appears.

If you are using Windows 11, click on 3-dots icon in the top-menu and select Options.

4. On Folder Options screen, switch to View tab > select Show hidden files, folders, drives option and uncheck Hide protected operating system files (Recommended) option.
5. Click on Apply and OK to save the changes
6. After this, go to This PC > Local drive (C:) > right-click on hiberfil.sys and select the Delete option in the menu that appears.
Note: Do not delete Pagefile.sys, without knowing the implications of deleting this system file on your computer. In this regard, you can refer to this guide: How to Delete, Resize & Restore Pagefile.sys in Windows 11/10.