
Как и в предыдущей версии системы, в Windows 11 значок «Мой компьютер» или, точнее — «Этот компьютер» по умолчанию после чистой установки отсутствует на рабочем столе, однако при желании его можно вернуть.
В этой простой инструкции подробно о том, как включить значок компьютера на рабочем столе Windows 11, а при необходимости — и другие системные значки, а также видео, где все необходимые шаги показаны наглядно.
Включение значка «Этот компьютер» или «Мой компьютер» в Windows 11
Для того, чтобы включить значок компьютера на рабочий стол, выполните следующие простые шаги:
- Нажмите правой кнопкой мыши в любом пустом месте рабочего стола и выберите пункт «Персонализация». Либо зайдите в Пуск — Параметры — Персонализация.
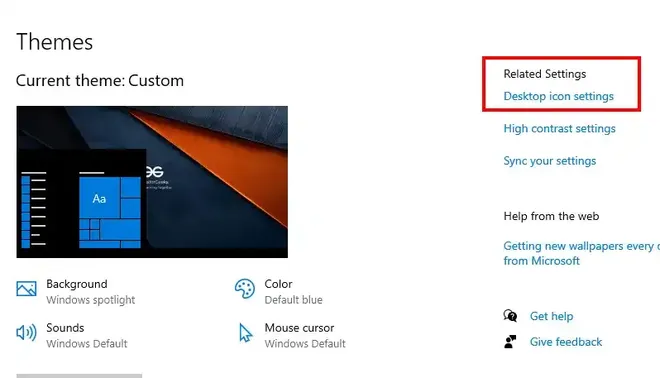
- Откройте пункт «Темы».
- В разделе «Сопутствующие параметры» откройте пункт «Параметры значков рабочего стола». Внимание: если пункт недоступен, далее в инструкции приведено решение.

- В разделе «Значки рабочего стола» включите пункт «Компьютер», а при необходимости — и другие пункты.

- Примените настройки, значок «Этот компьютер» появится на рабочем столе.
В случае, если Windows 11 не активирована, то перейти к настройкам значков рабочего стола через «Параметры» не получится, однако если вы нажмёте клавиши Win+R на клавиатуре (Win — клавиша с эмблемой Windows), введёте desk.cpl ,5 (перед запятой пробел) и нажмёте Enter, нужное окно откроется, и вы сможете вернуть нужную иконку.
И два дополнительных нюанса, которые может быть полезным знать:
- Некоторым пользователям не нравится название «Этот компьютер». Вы можете нажать по значку компьютера правой кнопкой мыши и переименовать его в «Мой компьютер».
- Среди советов на других сайтах можно встретить предложение просто создать ярлык компьютера на рабочем столе. Тут важно отметить, что у ярлыка не будет таких возможностей, как у системного значка: например, открытие свойств компьютера или переход в консоль «Управление компьютером» через контекстное меню по правому клику мышью.
Как включить значок Мой компьютер Windows 11 на рабочий стол с помощью редактора реестра
Возможно добавление значка компьютера на рабочий стол с помощью редактора реестра. Возможно ручное изменение параметров, но я рекомендую создать файл .reg и добавить его в реестр. Содержимое reg-файла:
Windows Registry Editor Version 5.00

[HKEY_CURRENT_USER\Software\Microsoft\Windows\CurrentVersion\Explorer\HideDesktopIcons\NewStartPanel]
"{20D04FE0-3AEA-1069-A2D8-08002B30309D}"=dword:00000000

[HKEY_CURRENT_USER\Software\Microsoft\Windows\CurrentVersion\Explorer\HideDesktopIcons\ClassicStartMenu]
"{20D04FE0-3AEA-1069-A2D8-08002B30309D}"=dword:00000000
Для добавления в реестр, просто дважды нажмите по файлу и подтвердите внесения изменений. Чтобы изменения вступили в силу и Мой компьютер появился на рабочем столе, перезапустите проводник или выйдите из учетной записи и снова зайдите.
Надеюсь, всё сработало именно так, как требовалось. Другие полезные инструкции по Windows 11 для начинающих, и не только вы всегда можете найти в соответствующем разделе этого сайта.
1. Make use of the Desktop Context Menu
• To begin, go to the desktop and right-click on a blank area.
• Next, go to View and uncheck the box beside Show desktop icons.
(external link removed by moderator)
2. Make use of the Local Group Policy Editor
• To launch the Run command dialogue box, press Win + R.
• To open the Local Group Policy Editor, type gpedit.msc and press Enter.
• Select User Configuration > Administrative Templates > Desktop.
• On the right-hand side pane, double-click the «Hide and disable all items» on the desktop option.
• Select Enabled in the following box, then click Apply and OK.
(external link removed by moderator)
3. Make use of the Registry Editor
• To launch the Run command dialogue box, press Win + R.
• To launch the Registry Editor, type regedit and click Enter.
• Goto HKEY CURRENT USER > Software > Microsoft > Windows > CurrentVersion > Policies > Explorer
• Then, in the right-hand side pane, right-click a blank space and choose New > DWORD (32-bit) Value.
• Enter NoDesktop as the value for the DWORD.
• Set the NoDesktop Value Data to 1 by double-clicking it.
• To save these changes, click OK and then restart your computer.
If you search for the “My Computer” (or This PC) icon on the Windows 11 or existing Windows 10 desktop, you will probably not find it unless someone manually added it. It is one of the favorite and helpful icons for all Windows users.
Follow the steps below to show This PC icon on the Windows 11/10 desktop. The same steps apply to Windows 8.1/7 if you still use these old Operating Systems.
If you want quick and easy access to your computer’s files and folders, you can show My Computer on desktop in Windows 11. Here’s how:
In Windows 11, the “My Computer” icon has been replaced with a new name, “This PC.” This change was made to provide a more user-friendly experience and align with the modern design of the operating system. Users can still access their files and drives by clicking on the “This PC” icon on the desktop or in the File Explorer.
How to Show This PC on Desktop – Windows 11/10
I’m demonstrating these steps from Windows 11, but these steps are identical on Windows 10 as well (except for slight changes in icons and appearance)
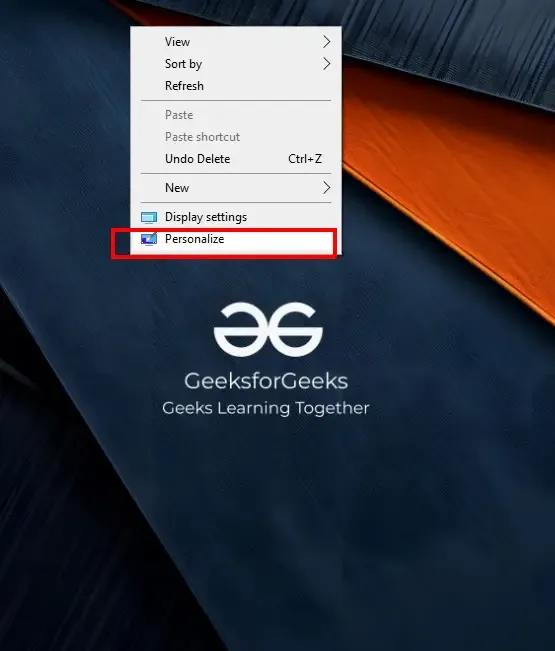
1) Right-click on the empty space on the desktop. Click on ‘Personalize’.

2) In Windows 11/10, it will take you to the settings app.
Click ‘Themes’ in the Personalization settings and ‘Go to desktop icon settings’ shown below.
In Windows 8.1, you will get the classic control panel to customize the icon set.
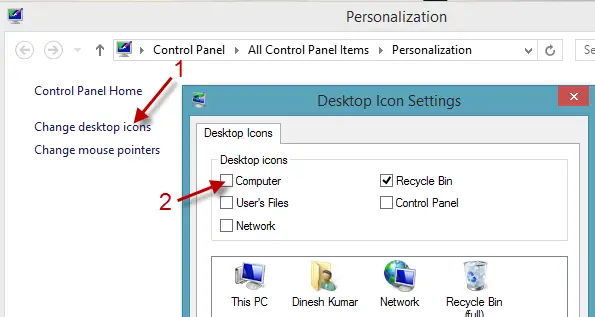
Tick the ‘Computer’ to show it on the desktop. Luckily, the ‘Recycle Bin’ is already ticked; if you can’t see the Recycle Bin or it is missing from the Windows 10/11 desktop, this is the first place you have to check and enable it.
3) The ‘This PC’ or ‘My Computer’ icon would appear on the desktop.
If you no longer want the “My Computer/This PC” icon to appear on your desktop, you can repeat these steps and uncheck the box next to “My Computer” to remove it.
Here is a short video of this method:
Add to Task Bar – This PC Windows 11
As you know, the start menu returned to Windows 10. The My Computer icon is not included in the start menu. You can follow the method below to pin the (This PC) icon to the start menu and list.
Also, the start menu was revamped in Windows 11, which looks great compared to earlier Microsoft Operating Systems.
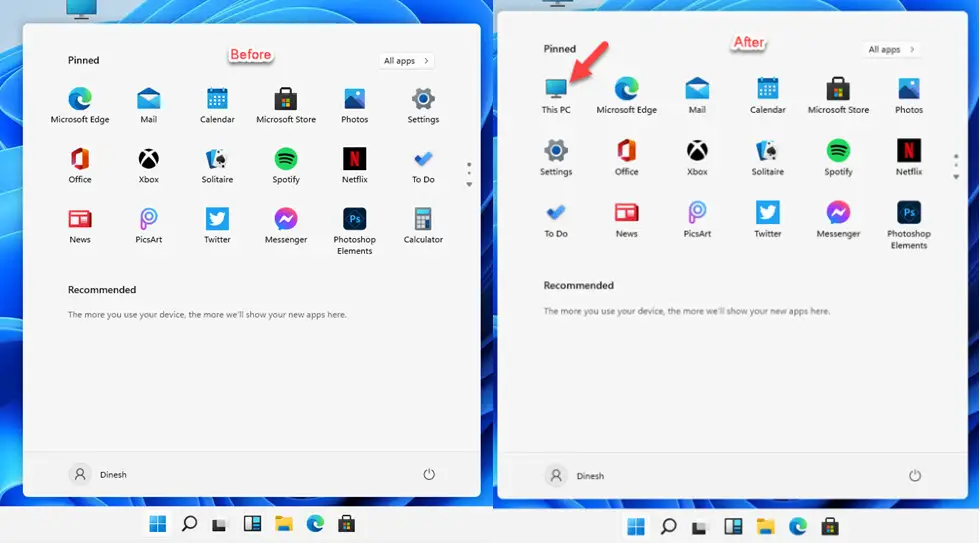
4) Right-Click on the ‘This PC’ icon after you have enabled it to display on the desktop. Select Pin to Start in Windows 11.
You have an additional option to add ‘Pin to Start list’ in Windows 10.
So, this is what happens when you select ‘Start’ and ‘Start List’ in Windows 10.
If you want to hide all icons from the desktop in Windows 10/11, here is the way.
Right Click on the empty space on the desktop, select View, and remove ‘Show desktop icons’ to hide all icons from the desktop. You can enable it to show all icons on the desktop again.
Can I Rename ‘This PC’ to ‘My Computer?
Yes, you can rename This PC to My Computer in Windows 11 or 10.
Simply click on the icon and press F2 (the standard rename keyboard shortcut), or select the rename option from right-click menu.
Change the name to ‘My Computer’, so you will not miss the familiar name.
Where can I find the This PC icon settings in Windows 11/10?
You can find the This PC icon settings by right-clicking on the desktop, selecting “Personalize,” then “Themes,” and finally, “Desktop icon settings.”
Set File Explorer to open My Computer Windows 11 by Default
To set File Explorer to open to This PC by default, open File Explorer, go to the View tab, select Options, and under the General tab, choose “This PC” from the drop-down menu next to “Open File Explorer.
We hope this guide helps on how to add This PC to desktop and customize the Recycle Bin icons/Taskbar.
The ‘This PC’ icon, previously known as ‘My Computer’, enables users to get quick access through all the computer’s drives, folders or any other connected devices. While Windows OS offers an easy method of navigating through the ‘This PC’ icon on a Windows 10 or 11 desktop and can be incredibly useful. This guide will help you add the ‘This PC’ icon on both Windows 10 and Windows 11, ensuring you can easily navigate your files and drives.
Table of Content
- Add the ‘This PC’ Icon to the Desktop in Windows 10 and 11 — Easy Methods
- Method 1: Windows Setting
- Method 2: Create Desktop Shortcut
- Method 3: Windows File Explorer
- Advanced Method 4: Use Control Panel
Add the ‘This PC’ Icon to the Desktop in Windows 10 and 11 — Easy Methods
Whether you’re using Windows 10 or Windows 11, these steps will help you display the ‘This PC’ icon on your desktop.
Method 1: Windows Setting
If you want to add the ‘This PC’ icon to your desktop in Windows 10 and 11, you can easily do so through Settings. Here’s how:
For Windows 11:
Step 1: Open Windows Settings
Press the Start button, select Settings from there, or press the shortcut keys Win + I to open settings.
Step 2: Navigate to Personalization
On the left-hand side in the Windows Settings, Click on «Personalization«
Step 3: Select Themes
Click on the «Themes» tab on the Right sidebar.
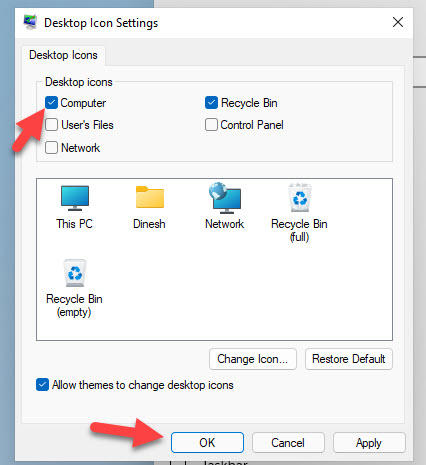
Step 4: Click on Desktop Icon Settings
Scroll down and click on «Desktop icon settings» and checkmark on “computer” or “This PC” and finally apply and OK.
Following this four simple steps, you can easily add This PC to your Windows 11 desktop.
For Windows 10:
Step 1: Open Windows Settings
Go to Windows Desktop, make a Right-click anywhere and select Personalize from the context menu.
Step 2: Go to Themes and Desktop Icon Settings
Navigate to Themes on the left panel and select Desktop Icon Settings (avilable on the right-hand side panel)
The above-mentioned two easy steps can help you to get ‘This PC’ icon on your Windows 10 desktop.
Method 2: Create Desktop Shortcut
If you prefer having the ‘This PC’ icon directly on your desktop for easy access, you can do so by creating a desktop shortcut. Here’s how:
Note: This method is suitable for both Windows 10 and Windows 11.
Step 1: Navigate to the Windows Desktop
Right-click on an empty space on your desktop (works for both Windows 10 and 11)
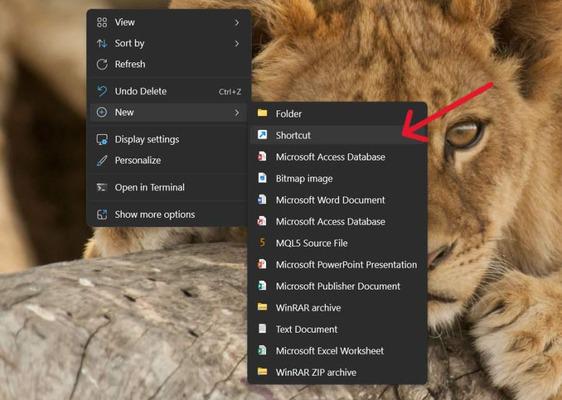
Step 2: Select New and Hover to Shortcut
Hover over «New» in the context menu. Choose ‘Shortcut‘
Step 3: Enter the Location of ‘This PC’
In the «Create Shortcut» window, enter the location of ‘This PC’:
%windir%\explorer.exe shell:MyComputerFolder
Step 4: Click «Next» and provide a name for the shortcut, such as «This PC and click «Finish» to create the shortcut.
Method 3: Windows File Explorer
If you prefer having quick access to your files and drives directly from your desktop, you can easily add the ‘This PC’ icon using File Explorer. Here’s how:
Note: This method is suitable for both Windows 10 and Windows 11.
Step 1: Access to Windows File Explorer
Open File Explorer you can use the shortcut Win + E or use Windows Keyboard Shortcut Win + X and then select File Explorer and click to open it.
Step 2: Navigate to ‘This PC’
Then, Select ‘This PC’ from the right sidebar and drag and drop to Desktop to create a copy of it.
By using this short and simpel two step method, you can easily add and get ‘This PC’ to your Windows Desktop.
Advanced Method 4: Use Control Panel
If you prefer using the Control Panel to customize your desktop icons in Windows 11, you can easily show the ‘This PC’ icon. Here’s how:
Step 1: Access to Control Panel
Go to the Start Menu and type Control Panel and hit the enter button.
Step 2: Navigate to Appearance & Personalization
Select “Control Panel” then click on “Appearance and Personalization” and click on “File Explorer Options.”
Step 3: Open File Explorer Options
Select “open file explorer to this pc” from the menu in the ‘general” tab then select ‘this PC’ and click apply.
Once the changes are being applied, you can press the “Windows + E” and the “This PC” window will open up on your screen.
Conclusion
Adding the ‘This PC’ icon on a Windows 11 desktop is a simple process that can greatly enhance your user experience by providing quick and easy access to your files and drives. By following these steps, you can personalize your desktop to enhance your workflow, and ensure that you are able to access This PC effectively.