
Applies ToWindows 11 Windows 10
Сенсорная клавиатура предоставляет экранную клавиатуру в Windows. Это полезно на планшетном устройстве с Windows, если к устройству с Windows не подключена клавиатура.
Поведение сенсорной клавиатуры зависит от версии Windows. Выберите версию Windows, а затем выберите нужный режим сенсорной клавиатуры:
Внешний вид сенсорной клавиатуры можно контролировать с помощью значка сенсорной клавиатуры в области панели задач. Значок сенсорной клавиатуры в области области панели задач имеет следующие параметры:
-
Никогда — этот параметр окончательно скрывает значок сенсорной клавиатуры в области значков панели задач. Выберите этот параметр, чтобы предотвратить появление сенсорной клавиатуры.
-
Всегда — всегда отображается значок сенсорной клавиатуры в области панели задач. Чтобы отобразить сенсорную клавиатуру, щелкните значок сенсорной клавиатуры в области панели задач.
-
Если клавиатура не подключена . Значок сенсорной клавиатуры в области панели задач отображается только в том случае, если клавиатура не подключена. Чтобы отобразить сенсорную клавиатуру, если клавиатура не подключена, щелкните значок сенсорной клавиатуры в области панели задач.
Примечание: При использовании всех этих параметров подключенная клавиатура может быть проводной или беспроводной или bluetooth-клавиатурой.
Чтобы скрыть значок сенсорной клавиатуры в области панели задач и отключить сенсорную клавиатуру, выполните следующие действия:
-
Если сенсорная клавиатура видна, закройте ее, выбрав в окне сенсорной клавиатуры.
-
Совет: Для сенсорных экранов нажмите и удерживайте панель задач, а затем выберите Параметры панели задач.
-
В окне Персонализация > панели задач в разделе Значки панели задач выберите Никогда в раскрывающемся меню рядом с элементом Сенсорная клавиатура.
-
Значок сенсорной клавиатуры удаляется из области панели задач, даже если клавиатура не подключена. После удаления значка сенсорной клавиатуры сенсорная клавиатура никогда не должна отображаться.
Чтобы всегда отображать значок сенсорной клавиатуры в области значков панели задач, выполните следующие действия:
-
Совет: Для сенсорных экранов нажмите и удерживайте панель задач, а затем выберите Параметры панели задач.
-
В окне Персонализация > панели задач в разделе Значки панели задач выберите Всегда в раскрывающемся меню рядом с элементом Сенсорная клавиатура.
-
Значок сенсорной клавиатуры постоянно добавляется в область панели задач, даже если клавиатура подключена.
-
Чтобы отобразить сенсорную клавиатуру, щелкните значок сенсорной клавиатуры в области панели задач.
Чтобы отобразить значок сенсорной клавиатуры в области значков панели задач, только если клавиатура не подключена, выполните следующие действия:
-
Совет: Для сенсорных экранов нажмите и удерживайте панель задач, а затем выберите Параметры панели задач.
-
В окне Персонализация > панели задач в разделе Значки панели задач выберите Если клавиатура не подключена в раскрывающемся меню рядом с элементом Сенсорная клавиатура.
-
Значок сенсорной клавиатуры добавляется в область области области задач, только если клавиатура не подключена.
-
Чтобы отобразить сенсорную клавиатуру, если клавиатура не подключена, щелкните значок сенсорной клавиатуры в области панели задач.
Отправка отзыва с помощью Центра отзывов
Если сенсорная клавиатура запускается без необходимости в определенном приложении или ситуации или если есть предложения по улучшению сенсорной клавиатуры, оставьте отзыв Майкрософт в Центре отзывов. Дополнительные сведения см. в разделе Отправка отзывов в Корпорацию Майкрософт с помощью приложения «Центр отзывов».
Нужна дополнительная помощь?
Нужны дополнительные параметры?
Изучите преимущества подписки, просмотрите учебные курсы, узнайте, как защитить свое устройство и т. д.
Many users use their laptop computers with an external keyboard as if they are using a desktop computer. Since built-in hardware such as keyboard are hardwired into the laptop, you cannot disconnect the built-in keyboard from your laptop. If you want to disable your laptop’s keyboard permanently in Windows 11 and use only external keyboard, this guide will show you how to do so.
Disable Laptop Keyboard in Windows 11
Listed below are several methods on how to disable laptop’s keyboard permanently in Windows 11. If one doesn’t work, try the other.
Uninstall keyboard driver and stop Windows from reinstalling it
The first thing that comes to mind when we want to disable a hardware is to uninstall the driver of the hardware. However, Windows will automatically re-install the driver for the keyboard on every restart if it finds that a driver is missing for the device.
The workaround to this issue is to stop Windows from automatically installing or updating the driver for your laptop keyboard. You can do so via the Group Policy Editor.
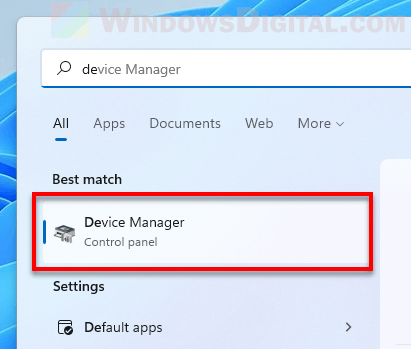
First, we will need the hardware ID of your laptop’s keyboard. To get the ID, go to Start, search for and open Device Manager.
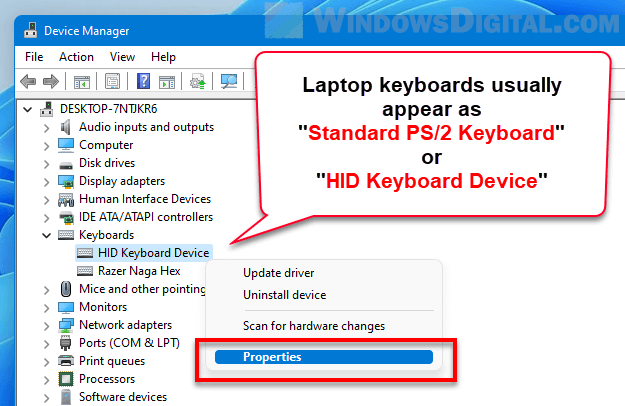
In Device Manager, click on Keyboards to expand the keyboard category which will show all your keyboards currently connected to your laptop PC.
Right-click on your laptop’s keyboard, which usually appears as Standard PS/2 Keyboard or HID Keyboard Device. Then, select Properties.
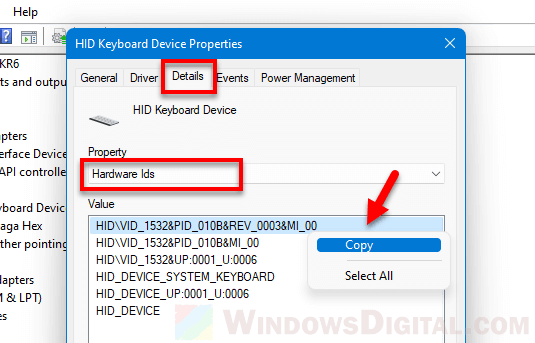
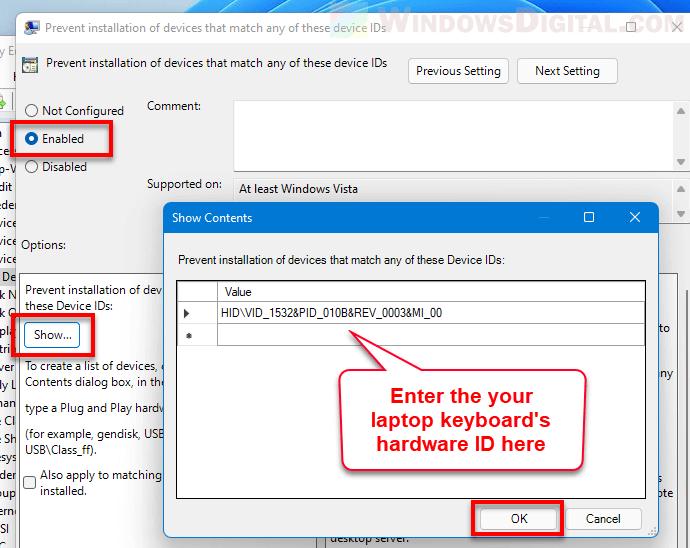
In the Properties window, go to Details tab. Click on the drop-down menu under Property and select Hardware Ids. Right-click on the first value and select Copy. You will need this ID later.
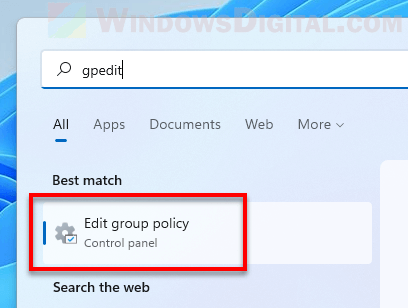
Now, back to Windows desktop, click on Start. Type gpedit and open “Edit group policy“.
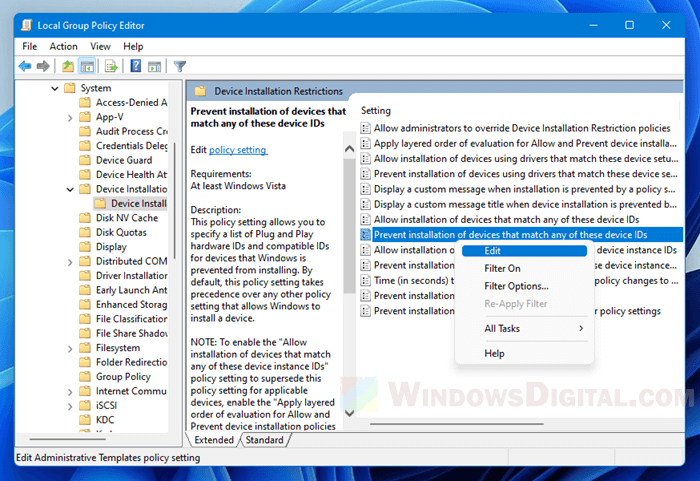
In the Local Group Policy Editor window, navigate to Computer Configuration > Administrative Templates > System > Device Installation > Device Installation Restrictions.
Right-click a policy called “Prevent installation of devices that match any of these device IDs” (not the one with “instance IDs”), and select Edit.
In the policy window, select Enabled, then click on Show in the Options column. Then, paste the Hardware ID (you’ve copied earlier from Device Manager) to the Value field. Click OK to save the changes.
Now, back to device manager, right-click on your laptop keyboard and select Uninstall device to uninstall the keyboard driver.
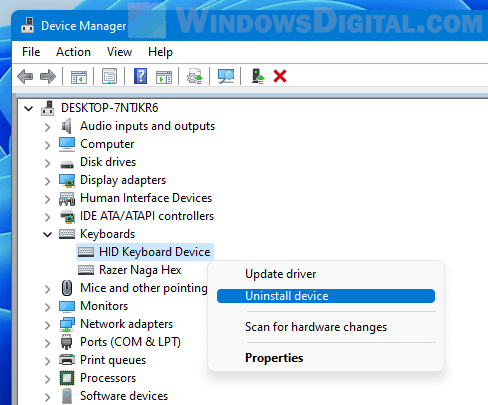
Since you have configured the policy to tell Windows to not re-install any driver for this specific keyboard, on the next restart, your laptop keyboard driver will remain uninstalled.
Force install a wrong driver for the keyboard to break it
Another method to disable laptop keyboard in Windows 11 is by force installing a wrong or incompatible driver for the laptop keyboard. A driver is a set of files that tells the hardware how to work with Windows. If a wrong driver is installed, the keyboard will not know how to communicate with the operating system and thus stop functioning. To do so, follow the steps below.
Note that if the same keyboard driver also controls other hardware such as your laptop’s touchpad, the touchpad will also stop working after installing a wrong driver for the laptop’s keyboard.
First, go to Start, search for and open Device Manager.
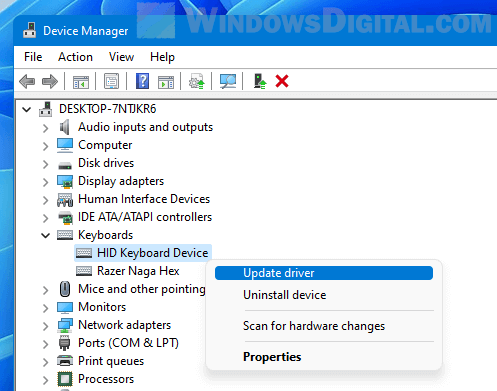
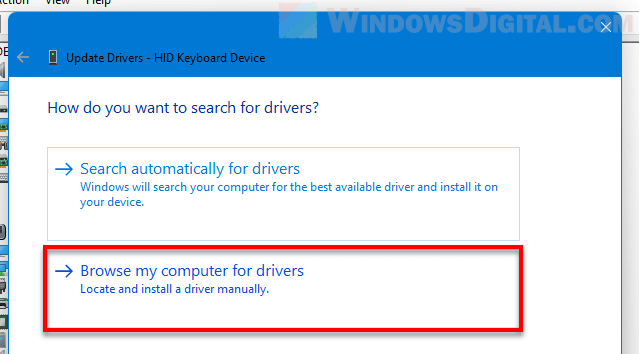
In Device Manager, click on Keyboards to expand it. Next, right-click on your laptop keyboard (usually appears as Standard PS/2 Keyboard or HID Keyboard Device) and select Update driver.
Select Browse my computer for drivers (locate and install a driver manually).
Select “Let me pick from a list of available drivers on my computer“.
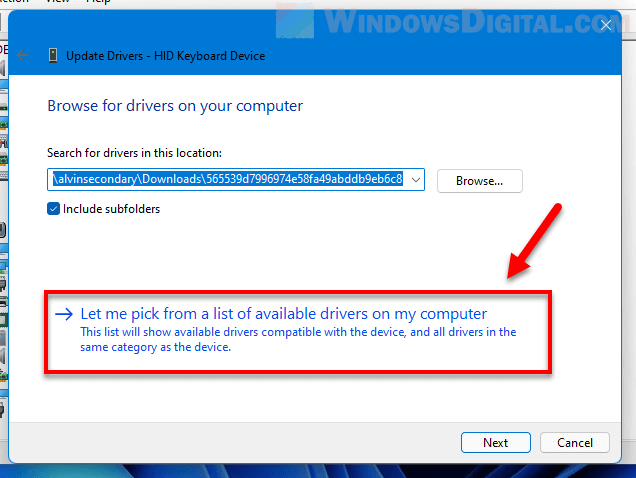
On the next screen, uncheck the checkbox that says “Show compatible hardware“. This will allow Windows to show you a list of all other keyboard drivers even if they are not compatible with your keyboard.
Next, select a manufacturer that is different than your laptop keyboard, and then select a model. Choose Next to continue.
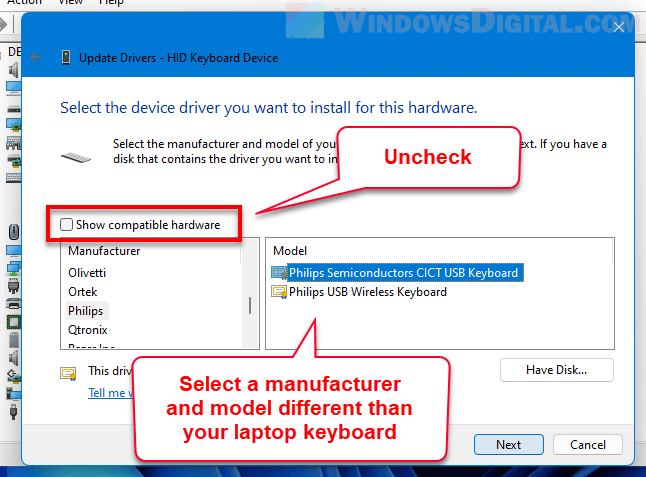
When Windows prompts you for confirmation, click Yes to proceed installing the selected driver.
Once the driver is installed, click Close and restart your computer. Your laptop keyboard should stop functioning on the next restart. If the keyboard is still functioning, repeat the steps above and try a different driver from another manufacturer and model.
Should you want to undo the changes, you can do so by simply allowing Windows to automatically update your laptop’s keyboard driver.
To do so, in Device Manager, right-click on the keyboard again, select Update driver, and then select Search automatically for drivers. Windows will then automatically search for and install the correct and latest driver for the keyboard.
Disable the service that controls PS/2 ports
If none of the above methods work to disable your laptop’s keyboard permanently, you can try to disable the service that controls data communication between the PS/2 ports and your laptop. Once you disable the service, since there won’t be any data communication between the ports and your laptop, the PS/2 keyboard will stop working. In most laptops, the built-in keyboard is the only hardware that uses the PS/2 port.
To disable the service that controls PS/2 ports in Windows 11, follow the steps below.
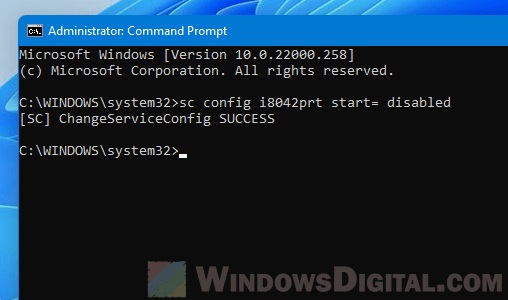
Go to Start and search for Command Prompt or CMD. Right-click on Command Prompt and select “Run as administrator“. Administrative privilege is required to execute the following command.
In the command prompt, enter the following command.
sc config i8042prt start= disabled
Once executed, restart your computer and your laptop keyboard should stop functioning.
Though extremely rare, there may be other hardware that also uses the PS/2 port. Should something stops working right after you’ve disabled the PS/2 port, or if you simply want to undo the changes and re-enable your laptop’s keyboard, you can re-enable the service using the command below.
sc config i8042prt start= auto
Use Device Manager to disable or permanently uninstall your Windows 11 keyboard
Updated on October 3, 2023
What to Know
- Open Device Manager, expand Keyboards, right-click your keyboard name, and select Uninstall device.
- Restarting your Windows 11 laptop will enable your keyboard again.
- To disable keyboard permanently: Start > search for Device installation settings. Choose No > Save Changes
This article explains the two main methods for disabling a keyboard on a laptop running Windows 11. The first method can be used to temporarily disable a Windows 11 laptop’s keyboard, while the second process explains how to make this change permanent.
How Do I Temporarily Disable My Laptop Keyboard?
If you just want to disable your Windows 11 laptop’s keyboard for the current session, follow the steps below. This will turn off all the functionality of the keyboard, but you can restart your computer to enable it again.
Make sure you have a mouse connected to your laptop so you can navigate the operating system after the keyboard is disabled. If your device has a touch screen, you should be fine with touch controls and gestures.
-
Open the Start menu on your Windows 11 laptop.
-
Type Device Manager.
You don’t need to select the search bar before typing. The Start menu will immediately detect anything you type once it’s open.
-
Select Device Manager.
-
Next to Keyboards, select the arrow icon to expand the list of connected keyboards and related devices.
-
Right-click your keyboard’s name and select Uninstall device.
The name of your Windows 11 laptop’s keyboard will likely vary depending on your device model and manufacturer.
-
Your laptop’s keyboard and its trackpad, if it has one, will now stop working. To enable your keyboard, restart your laptop.
How Do You Lock the Keyboard on a Laptop Permanently?
The above method for disabling a keyboard is effective, but as soon as your laptop is restarted, it will automatically reinstall and activate the keyboard again. Fortunately, you can turn off this automatic reinstall preference fairly quickly in Windows 11.
Following the steps below can prevent newer device drivers from being installed when needed and can also prevent other accessories and hardware from working properly. This should only be done as a last resort.
-
Open the Start menu.
Before continuing with these steps, please know it’s safer to follow the steps described above. You can simply use Windows 11’s sleep mode to keep your computer on and your keyboard disabled.
-
Type Device installation settings.
-
Select Change device installation settings.
-
Select No.
-
Select Save Changes.
To undo this change, repeat the above steps and select Yes instead of No.
A Warning About the Incorrect Driver Method
There is another method for permanently disabling or locking a laptop’s keyboard, which involves deliberately installing the incorrect driver for it. While this process can disable your laptop’s keyboard, it can also cause some major issues such as the Blue Screen of Death (BSOD) that can break your entire device. This method is strongly discouraged and shouldn’t be attempted.
Quick Laptop Keyboard Fixes and Tips
In addition to the two above methods for disabling a laptop keyboard in Windows 11, there are some other things you may want to consider.
- Do you need to disable your keyboard? Unless your keyboard’s keys are glitching and causing major annoyances, there’s very little need to disable your laptop’s keyboard.
- Plug in a USB keyboard. Most USB keyboards should work with your Windows 11 laptop.
- Use a Bluetooth keyboard. Another alternative is to connect a wireless Bluetooth keyboard when your main one is broken.
- Detach your Type Cover. If you’re using a Surface laptop/tablet two-in-one device, you can physically remove the Type Cover keyboard whenever it breaks or glitches.
- Use the Windows 11 on-screen touch keyboard. Windows 11 has a built-in on-screen keyboard that you can use with a mouse or with touch if your device has a touch screen.
Why Can’t I Disable My Laptop Keyboard?
If you’re having trouble disabling your keyboard, there are likely a few main reasons behind your frustration.
- You selected the wrong keyboard. Make sure you’re editing the settings for the correct keyboard in Device Manager.
- Did a Windows 11 restart enable it again? Remember the first method is undone when your laptop restarts. Try putting your laptop to sleep instead.
- Windows may have updated. The Windows Update process also often scans devices for any errors and fixes them. This may have undone your keyboard disable attempts.
FAQ
-
To disable a laptop keyboard in Windows 10, navigate to Device Manager and then select Keyboards. Right-click Standard PS/2 Keyboard and choose Disable device, then select Yes to confirm.
-
To disable a specific key on your keyboard, try a third-party tool such as the free KeyTweak. Download KeyTweak, select the key you want to disable, then go to Keyboard Controls > Disable Key > Apply. Select Restore All Defaults to enable the key again.
-
To turn off keyboard access on a Mac, go to the Apple Menu and select System Preferences > Keyboard, then click the Shortcuts tab. Select Keyboard from the menu on the left, then uncheck Turn keyboard access on or off.
Thanks for letting us know!
Get the Latest Tech News Delivered Every Day
Subscribe
На чтение4 мин
Опубликовано
Обновлено
Windows 11, новая операционная система от Microsoft, поставляется с рядом новых функций и инструментов, что делает ее более современной и удобной для использования. Однако некоторые пользователи могут испытывать проблемы с автоматическим запуском экранной клавиатуры при старте системы, что может быть неудобно и замедлить процесс загрузки. Если вы хотите отключить экранную клавиатуру при запуске Windows 11, в этой статье мы предоставим вам пошаговую инструкцию.
Шаг первый: откройте меню Пуск и перейдите в «Настройки» с помощью значка шестеренки в левом нижнем углу экрана.
Шаг второй: в открытой панели настроек найдите раздел «Экранная клавиатура» и выберите его. Далее нажмите на кнопку «Включить автозапуск клавиатуры», чтобы снять галочку и отключить этот параметр.
Шаг третий: после выполнения предыдущего шага закройте окно настроек и перезагрузите компьютер. После перезагрузки экранная клавиатура больше не будет автоматически запускаться при старте Windows 11.
Теперь у вас есть пошаговая инструкция, как отключить экранную клавиатуру при запуске Windows 11. Мы надеемся, что эта информация будет полезна и поможет вам настроить операционную систему по вашему усмотрению.
Как отключить экранную клавиатуру в Windows 11: пошаговая инструкция
Шаг 1: Откройте «Настройки».
Шаг 2: В открывшейся панели «Настройки» выберите раздел «Система».
Шаг 3: В списке разделов на левой панели, выберите «Клавиатура».
Шаг 4: В правой панели, найдите раздел «Экранная клавиатура» и переключите его выключатель в положение «Выкл».
Шаг 5: Закройте «Настройки».
После выполнения этих шагов экранная клавиатура будет отключена, и вы сможете использовать только физическую клавиатуру при работе с Windows 11. Если в будущем вам потребуется снова включить экранную клавиатуру, повторите эти шаги и переключите выключатель в положение «Вкл».
Отключение экранной клавиатуры может быть полезным, если у вас есть проблемы с пространством на экране или потребность в более быстрой и эффективной работе с помощью физической клавиатуры. Надеемся, что эта инструкция была полезной для вас.
Перейдите в настройки системы
Чтобы отключить экранную клавиатуру при запуске Windows 11, вам нужно перейти в настройки системы. Это можно сделать следующим образом:
| 1. | Нажмите на кнопку «Пуск» в левом нижнем углу экрана или нажмите клавишу «Windows». |
| 2. | В открывшемся меню найдите и нажмите на значок «Настройки». |
| 3. | В окне настроек выберите раздел «Система». |
| 4. | На левой панели выберите «Клавиатура». |
| 5. | Настройте параметры экранной клавиатуры по вашему усмотрению или просто отключите ее, сняв флажок рядом с «Использовать экранную клавиатуру при запуске». |
После выполнения этих шагов экранная клавиатура при запуске Windows 11 будет отключена, и она больше не будет появляться на вашем экране.
Выберите раздел «Доступность»
Windows 11 предоставляет возможность изменять настройки доступности, включая экранную клавиатуру. Для отключения экранной клавиатуры при запуске операционной системы следуйте следующим инструкциям:
Откройте пункт «Клавиатура ввода»
Чтобы отключить экранную клавиатуру при запуске Windows 11, вам необходимо открыть раздел «Клавиатура ввода».
Для этого выполните следующие шаги:
- Нажмите правой кнопкой мыши на кнопке «Пуск» в левом нижнем углу экрана.
- В открывшемся контекстном меню выберите пункт «Настроить элементы панели задач».
- На открывшейся странице «Параметры» выберите раздел «Клавиатура».
- Прокрутите список параметров вниз и найдите пункт «Клавиатура ввода».
- Кликните на этот пункт, чтобы открыть дополнительные параметры клавиатуры.
Теперь вы можете настроить режимы и параметры экранной клавиатуры или отключить ее при запуске операционной системы Windows 11.
Нажмите на «Экранная клавиатура»
1. Чтобы отключить экранную клавиатуру при запуске Windows 11, необходимо выполнить следующие действия:
- Откройте меню «Пуск» путем нажатия на иконку Windows в левом нижнем углу экрана.
- Выберите пункт «Настройки» в меню «Пуск».
- В открывшемся окне «Настройки» найдите и нажмите на раздел «Устройства».
- На странице «Устройства» выберите вкладку «Печать, сканирование и клавиатура».
- В разделе «Клавиатура» найдите опцию «Экранная клавиатура» и нажмите на нее.
2. После нажатия на «Экранная клавиатура» откроется окно, где вы сможете отключить опцию «Запускать клавиатуру при входе».
3. Чтобы применить изменения, закройте окно «Настройки». При следующем запуске Windows 11 экранная клавиатура уже не будет запускаться автоматически.
Отключите переключатель «Включить экранную клавиатуру при запуске»
Чтобы отключить экранную клавиатуру при запуске Windows 11, выполните следующие шаги:
- Нажмите на кнопку «Пуск» в левом нижнем углу экрана или нажмите клавишу «Windows» на клавиатуре.
- Выберите в меню «Настройки».
- Откройте раздел «Доступность».
- На панели слева выберите «Экранная клавиатура».
- Настройте переключатель «Включить экранную клавиатуру при запуске» в положение «Выкл».
После выполнения этих шагов экранная клавиатура больше не будет запускаться при старте Windows 11.
Сохраните изменения и закройте настройки
После того как вы завершили настройку отключения экранной клавиатуры при запуске Windows 11, не забудьте сохранить все изменения. Для этого следует нажать на кнопку «Применить» или «ОК» в окне настроек.
После сохранения изменений, можно закрыть окно настроек и перезагрузить компьютер, чтобы убедиться, что экранная клавиатура больше не появляется при запуске операционной системы.
Теперь вы можете наслаждаться более удобным и безопасным запуском Windows 11 без ненужной экранной клавиатуры.