
Все способы:
- Способ 1: Использование настройки в «Параметрах»
- Способ 2: Редактирование реестра
- Способ 3: Настройка параметров запуска игры
- Способ 4: Драйвер мыши
- Вопросы и ответы: 0
Способ 1: Использование настройки в «Параметрах»
Ускорение мыши – одна из функций работы указателя, активная в Windows 11 по умолчанию. Она мешает нормальному управлению в разных играх и специальных программах, поэтому часто требуется ее отключить. Самый удобный вариант – обратиться к приложению «Параметры», через которое и можно перейти к необходимой настройке.
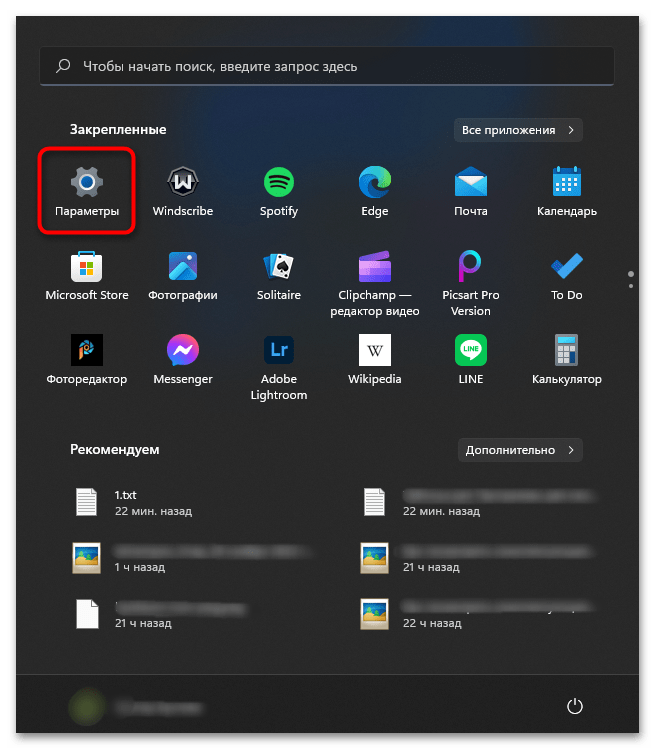
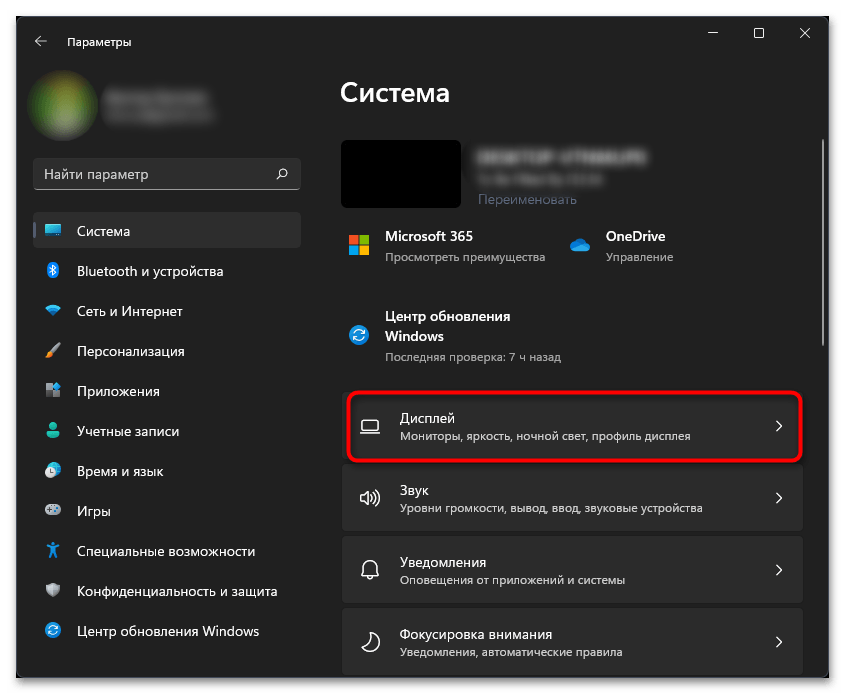
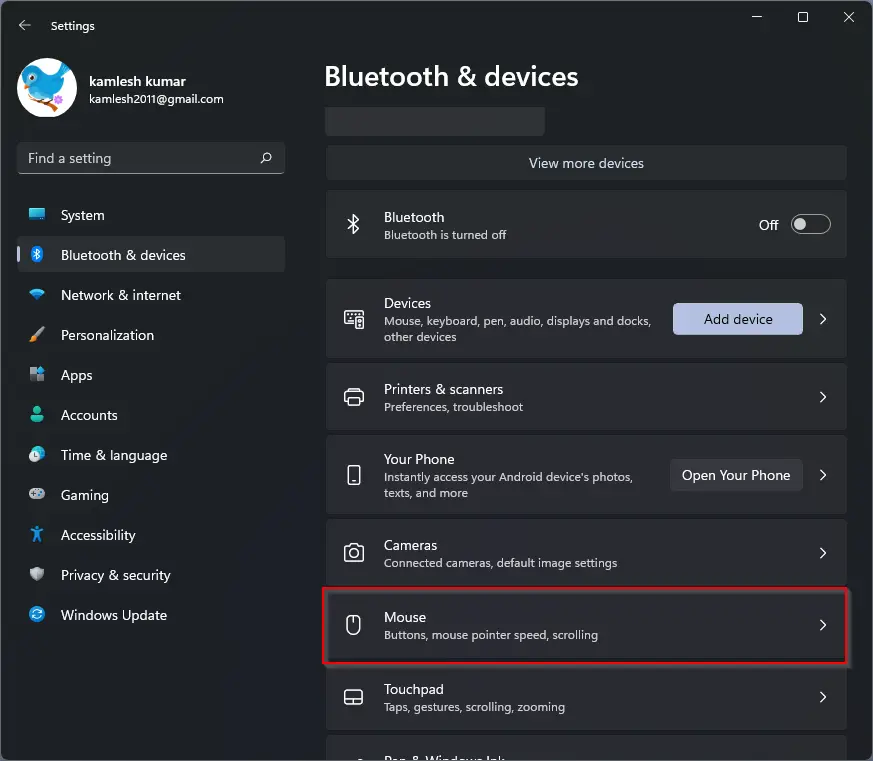
- В меню «Пуск» нажмите по закрепленному значку с названием «Параметры».
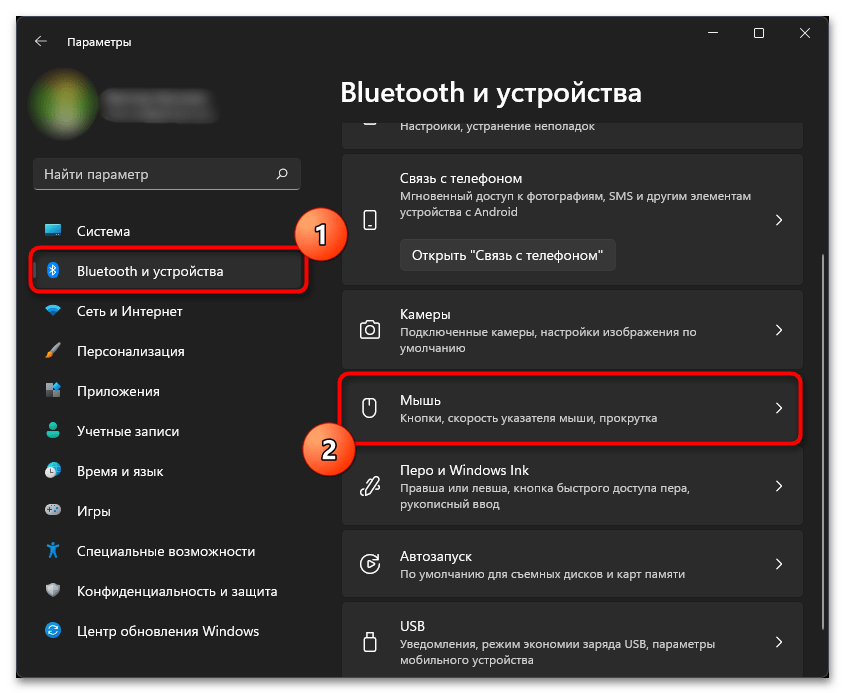
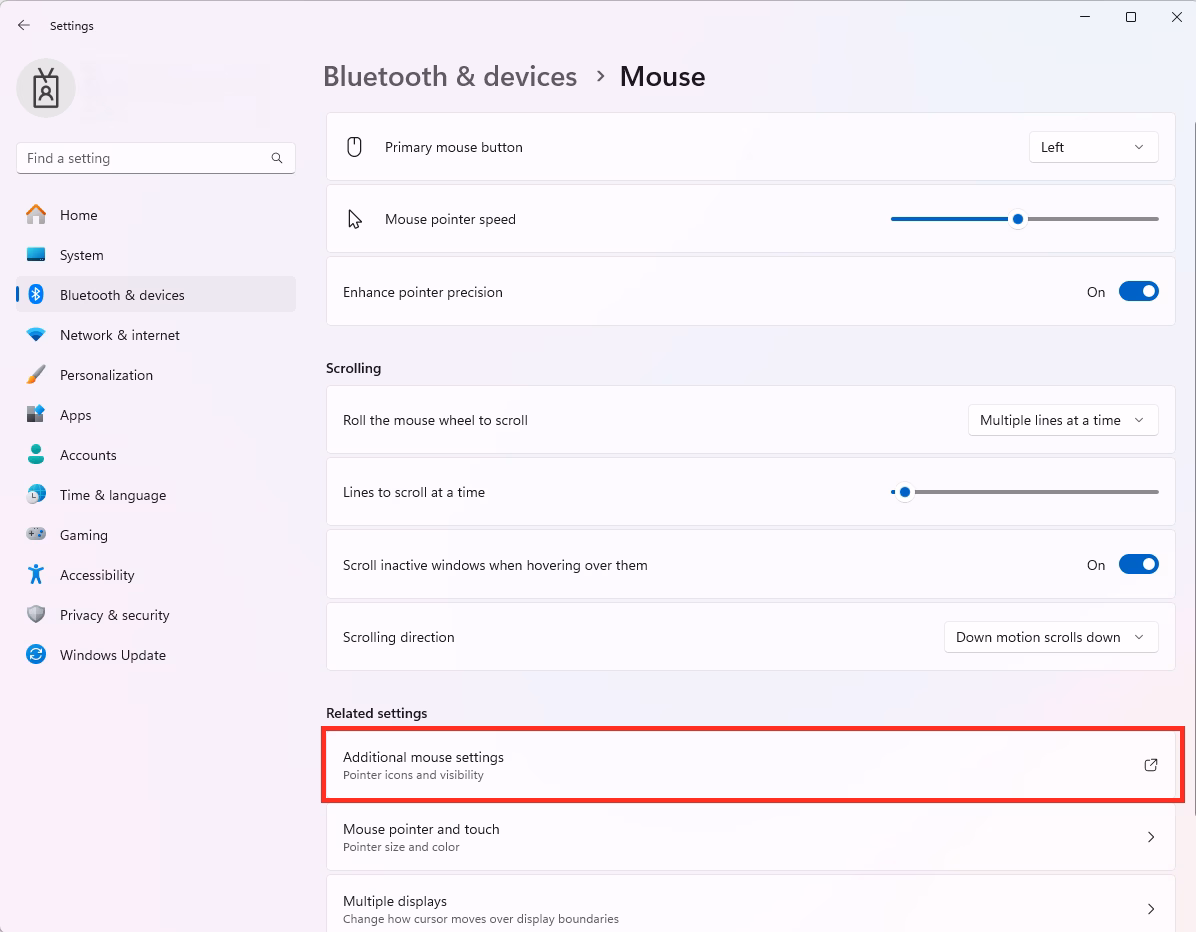
- На панели слева выберите раздел «Bluetooth и устройства», затем нажмите по категории «Мышь».
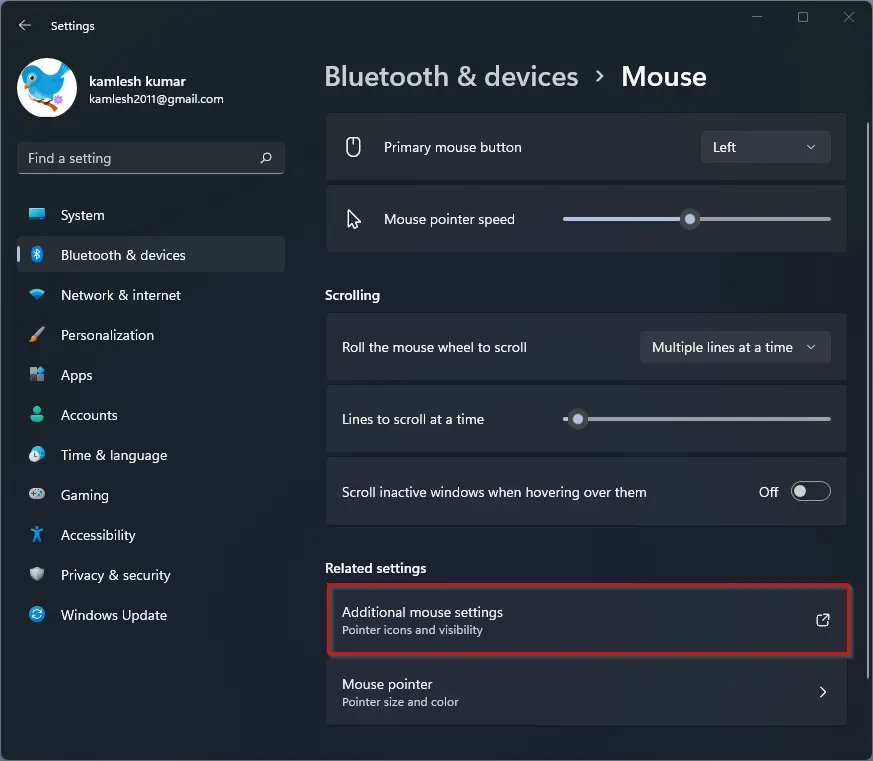
- Прокрутите до блока «Сопутствующие параметры» и щелкните по названию «Дополнительные параметры мыши».
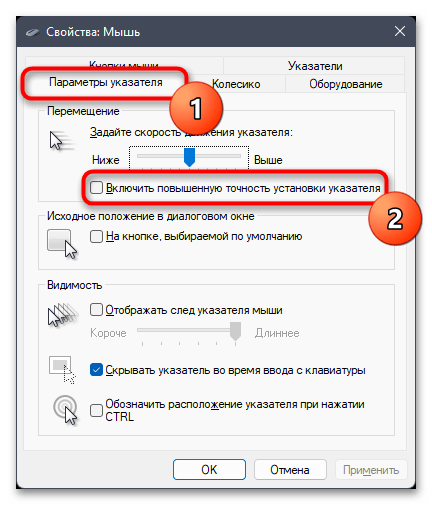
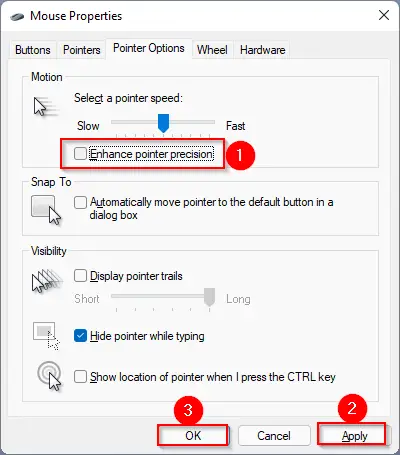
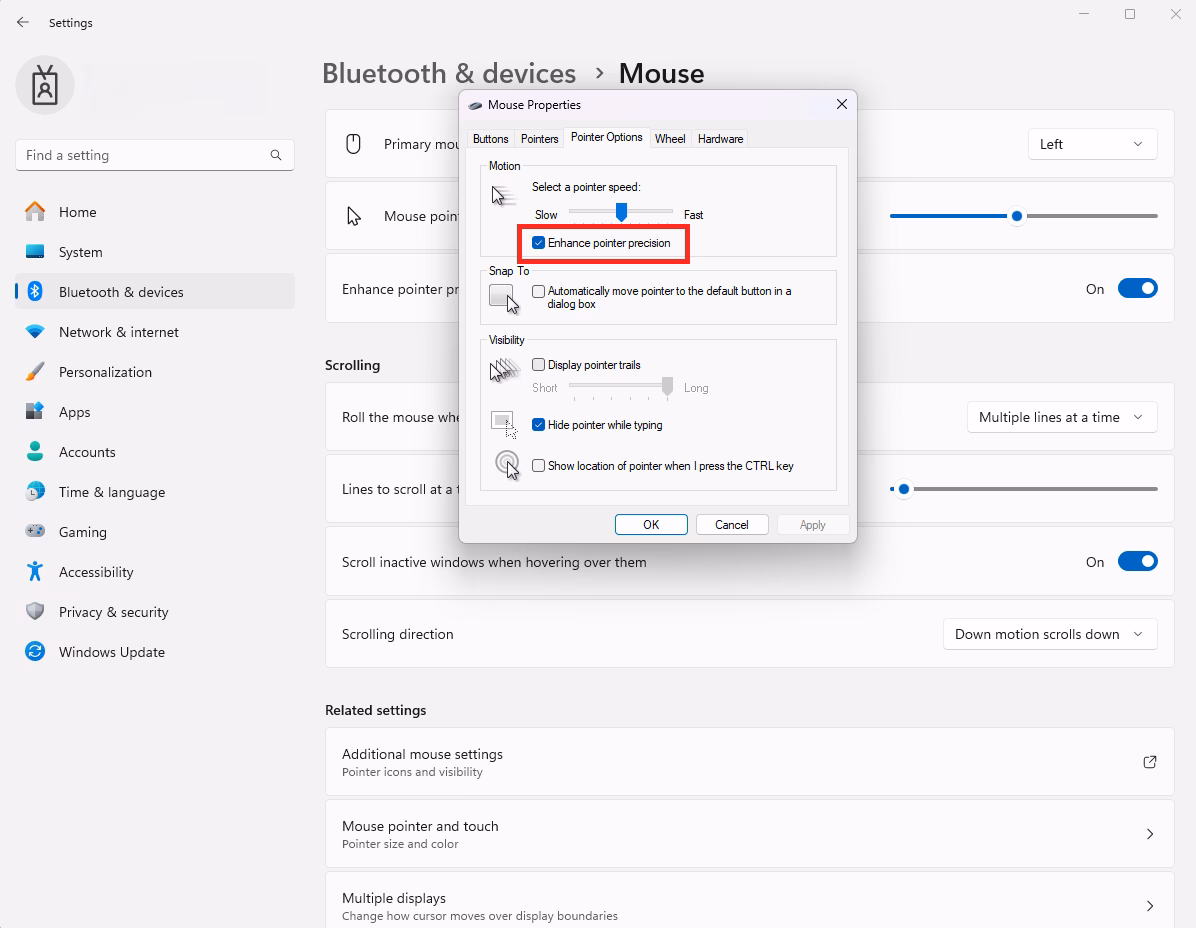
- На экране отобразится окно со свойствами мышки, в котором выберите вкладку «Параметры указателя» и снимите галочку с пункта «Включить повышенную точность установки указателя».
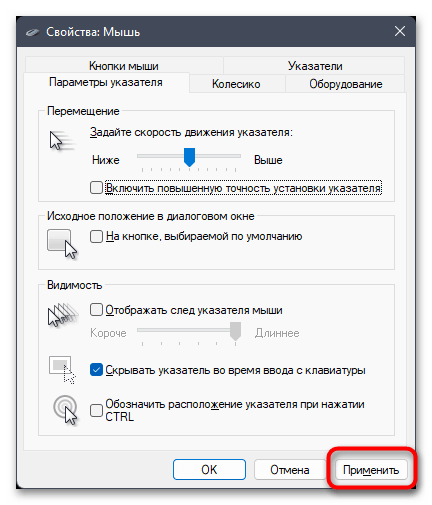
- Перед выходом обязательно примените изменения, иначе они могут быть сброшены сейчас или при следующей перезагрузке компьютера.

Способ 2: Редактирование реестра
Метод с редактированием реестра считается значительно сложнее предыдущего, подразумевает ручное изменение параметров с довольно большим количеством данных, поэтому понадобится быть внимательным, чтобы не ошибиться. Стоит заметить, что этот вариант – единственный, который поможет в тех случаях, когда ускорение мыши со временем включается автоматически и приходится постоянно обращаться к вышеописанной настройке.
Значения по умолчанию, которые будут изменены далее, лучше самостоятельно скопировать и сохранить в текстовом документе, чтобы в случае чего без проблем восстановить их и вернуть прежнее поведение указателя.
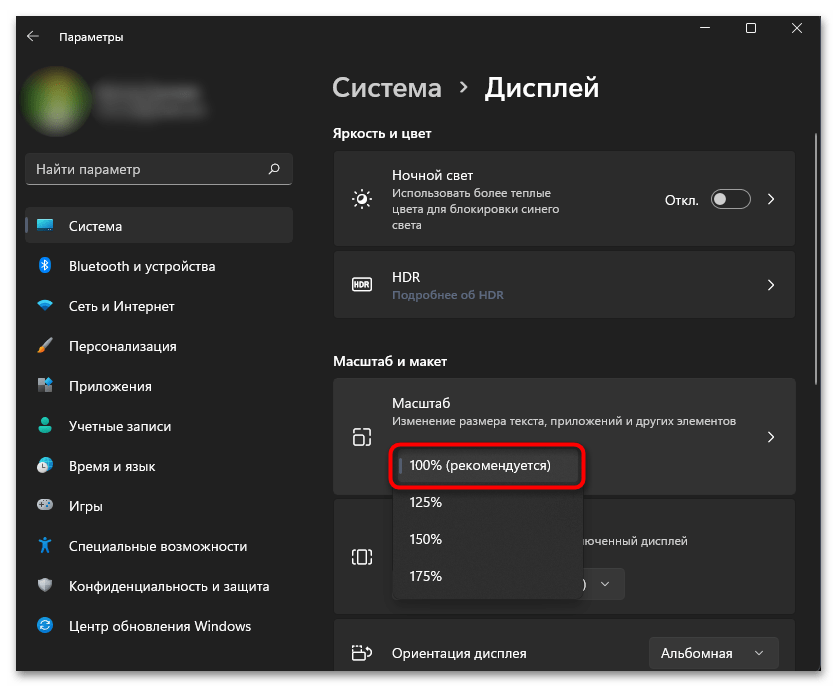
- Для начала через «Параметры» в первом разделе выберите категорию «Дисплей».
- Установите масштаб дисплея на 100%, поскольку именно для такой характеристики и будут производиться дальнейшие настройки.
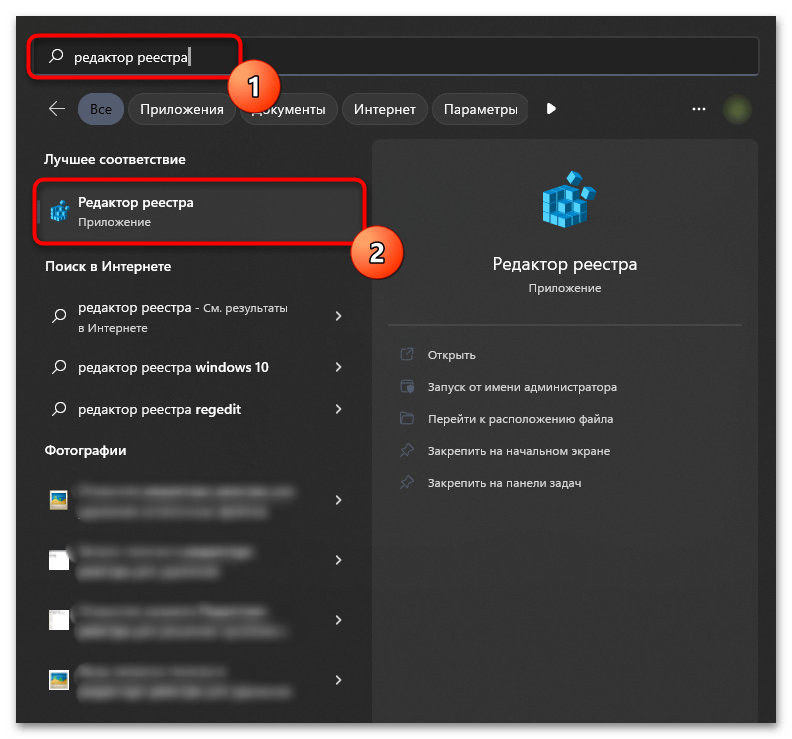
- Откройте меню «Пуск» и через поиск отыщите классическое приложение «Редактор реестра».
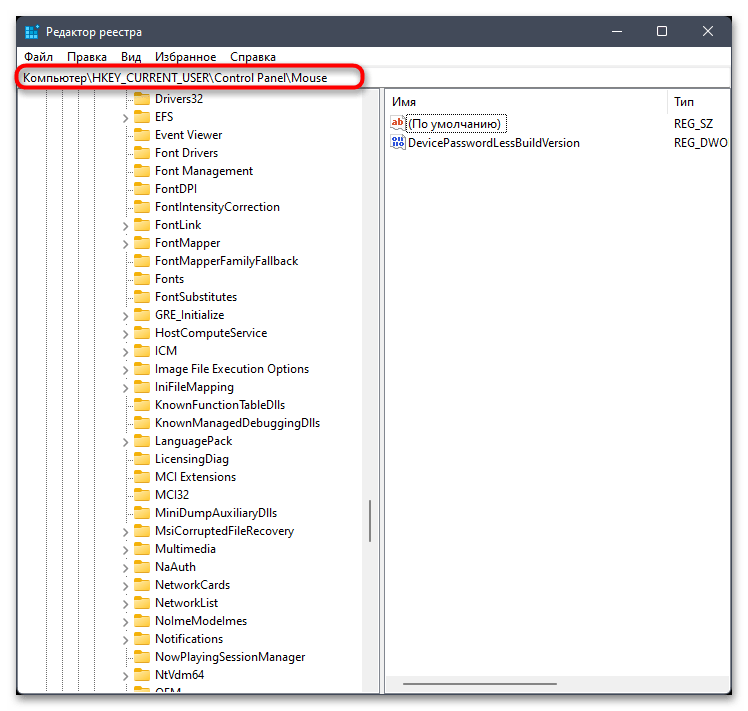
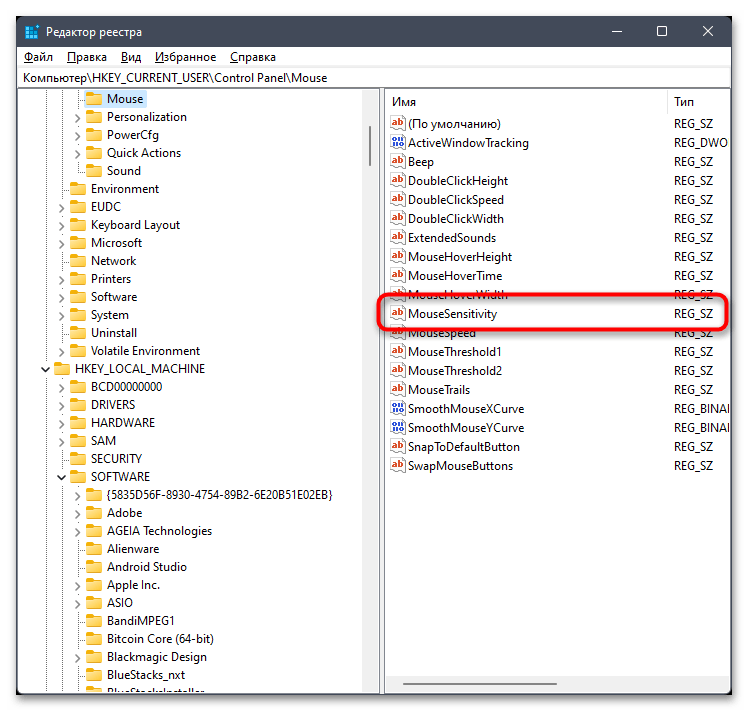
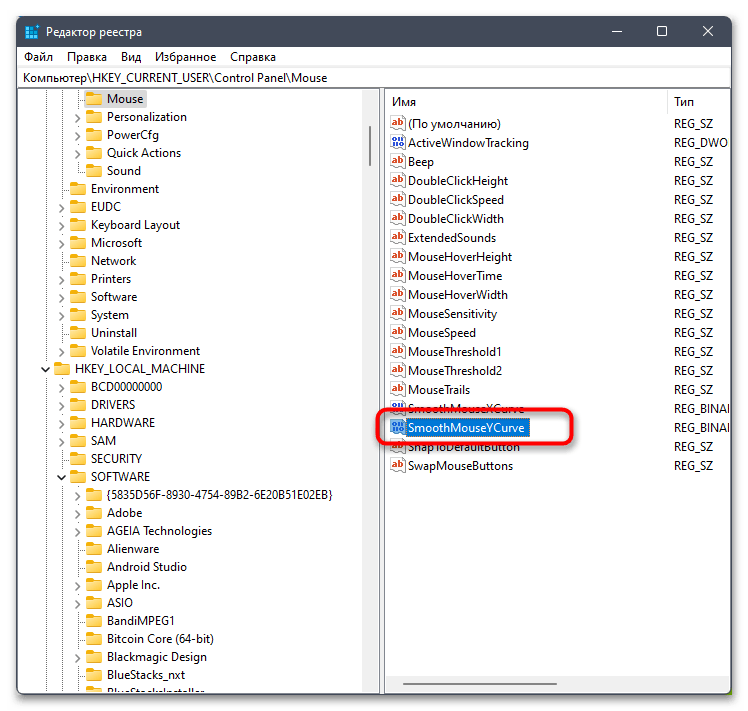
- В новом окне перейдите по пути
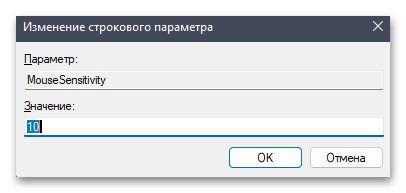
HKEY_CURRENT_USER\Control Panel\Mouse. - Найдите параметр с названием «MouseSensitivity» и дважды щелкните по нему левой кнопкой мыши.
- Измените значение на «10», чтобы скорость перемещения указателя стала стандартной. Это понадобится для корректного изменения следующих параметров.
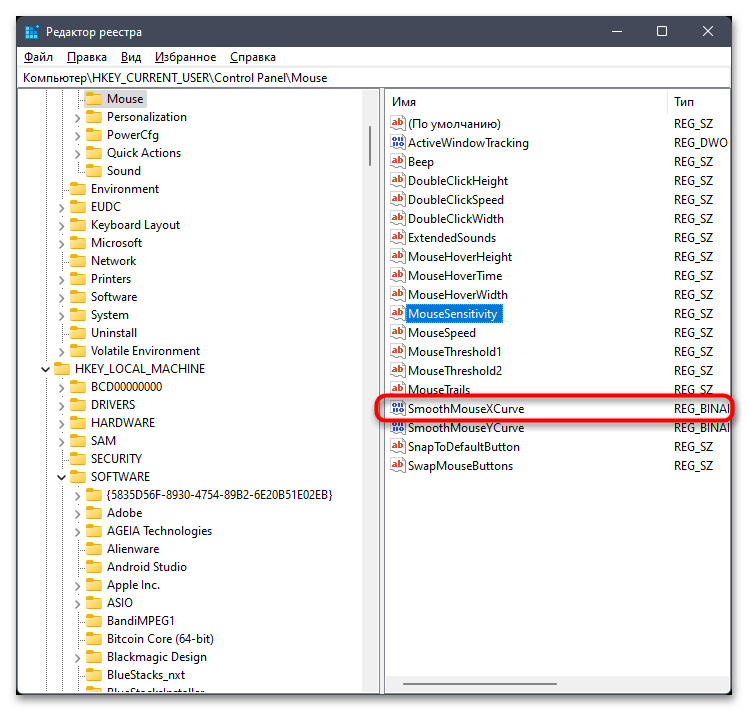
- Далее в этой же директории отыщите «SmoothMouseXCurve» и снова дважды щелкните по параметру ЛКМ.
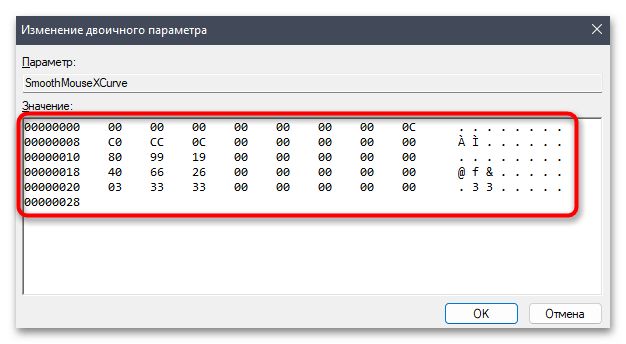
- Сейчас наступает самый сложный этап – редактирование значения. При помощи клавиши на клавиатуре сотрите все содержимое значения и по очереди вводите числа, указанные в следующем коде.
00 00 00 00 00 00 00 00

C0 CC 0C 00 00 00 00 00

80 99 19 00 00 00 00 00

40 66 26 00 00 00 00 00

00 33 33 00 00 00 00 00 - Это было значение в бинарном коде, влияющее на смазывание мыши при ее перемещении по оси X. Далее то же самое понадобится сделать и со значением по оси Y, но сам код будет немного отличаться.
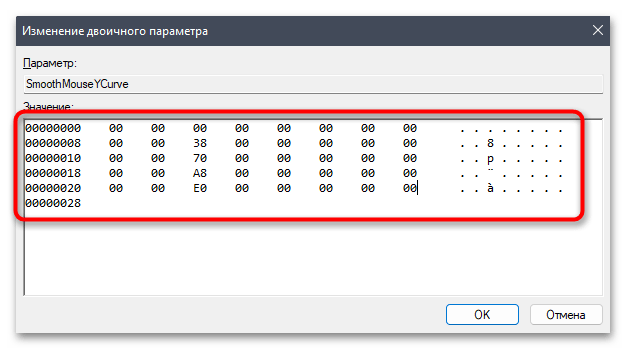
- Поэтому в директории дважды нажмите по параметру «SmoothMouseYCurve», затем измените значение на представленное ниже.
00 00 00 00 00 00 00 00

00 00 38 00 00 00 00 00

00 00 70 00 00 00 00 00

00 00 A8 00 00 00 00 00
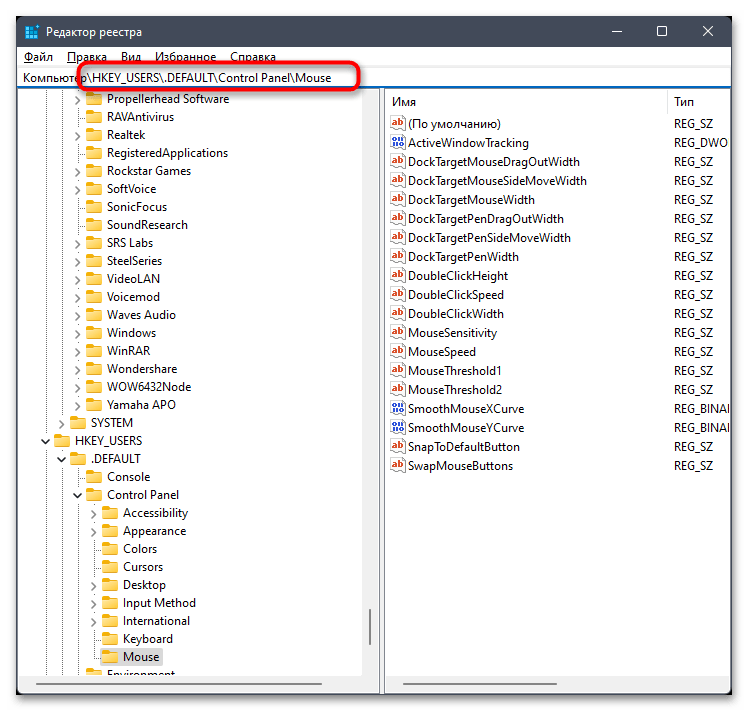
00 00 E0 00 00 00 00 00 - Внимательно проверяйте правильность ввода всех бинарных пар, затем примените изменения и переходите по следующему пути в реестре, который имеет вид
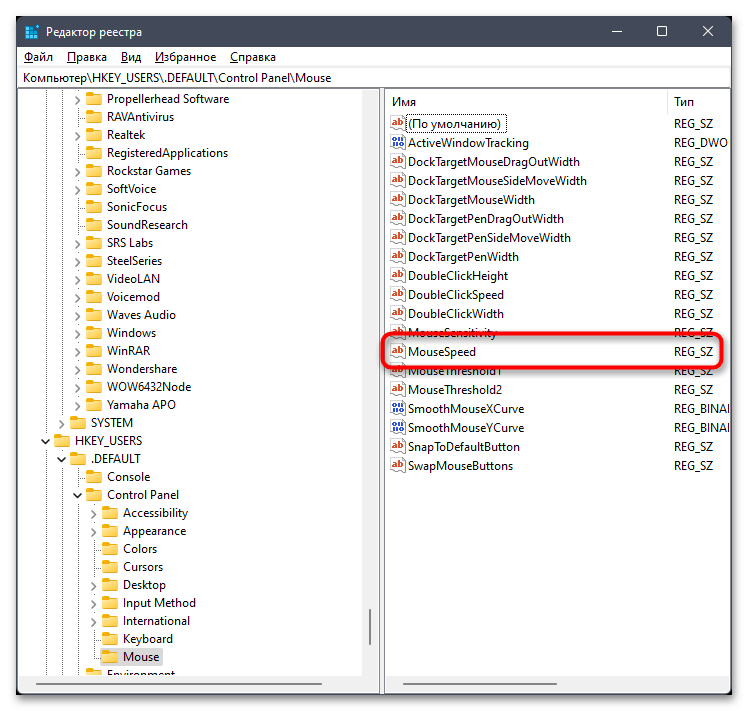
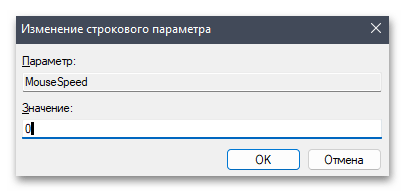
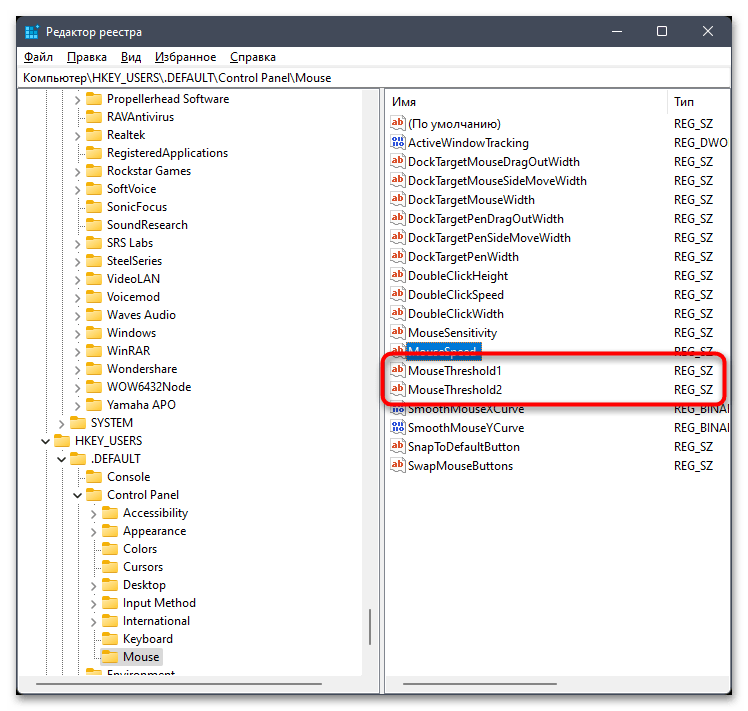
HKEY_USERS\.DEFAULT\Control Panel\Mouse. - В нем отыщите параметр с названием «MouseSpeed» и дважды щелкните по нему ЛКМ.
- Установите значение «0» и нажмите «ОК» для подтверждения изменений.
- Ниже найдите параметры «MouseThreshold1» и «MouseThreshold2», после чего точно так же измените их значения на «0».
- Все изменения вступают в силу только после перезагрузки компьютера. Сделайте это и переходите к проверке перемещения указателя на экране. Если оказалось, что для вашего дисплея такое перемещение курсора не подходит, попробуйте поменять описанные выше бинарные значения в параметрах реестра на те, которые представлены в виде кода ниже.
SmoothMouseXCurve:
00 00 00 00 00 00 00 00

00 a0 00 00 00 00 00 00

00 40 01 00 00 00 00 00

00 80 02 00 00 00 00 00

00 00 05 00 00 00 00 00
SmoothMouseYCurve:
00 00 00 00 00 00 00 00

66 a6 02 00 00 00 00 00

cd 4c 05 00 00 00 00 00

a0 99 0a 00 00 00 00 00

38 33 15 00 00 00 00 00
Способ 3: Настройка параметров запуска игры
Помимо изменения системных настроек, касающихся абсолютно всех аспектов работы с указателем, вы можете отключить ускорение мыши исключительно для конкретной игры, установив для нее параметры запуска, определяющие эти самые настройки. Давайте для начала разберемся с тем, как это осуществляется на примере самого популярного лаунчера – Steam.
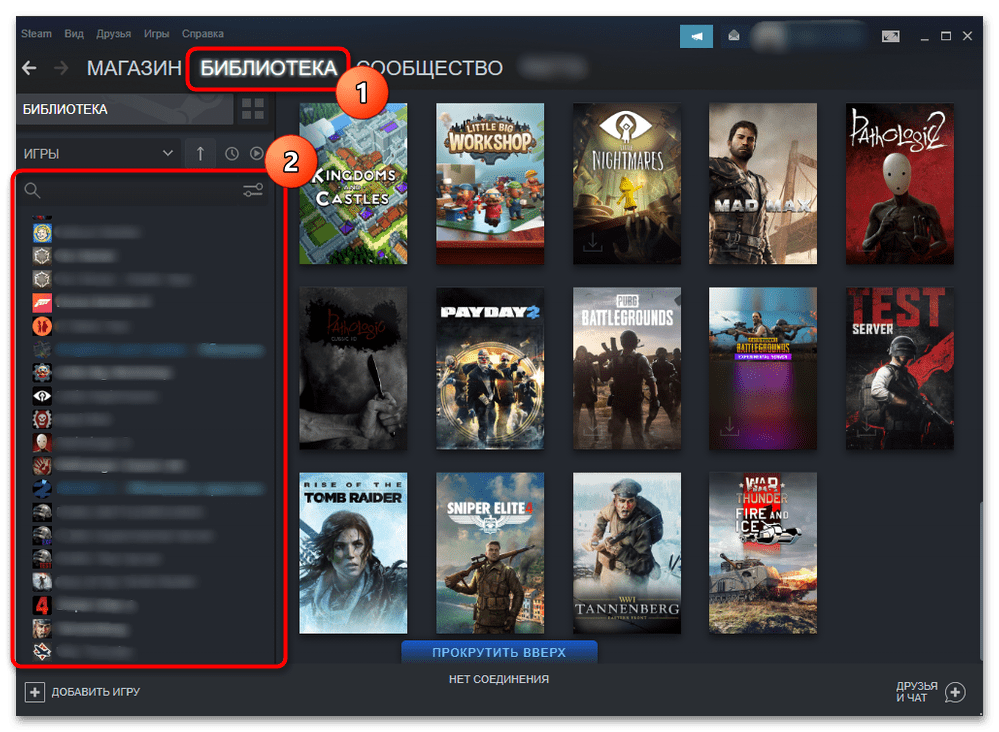
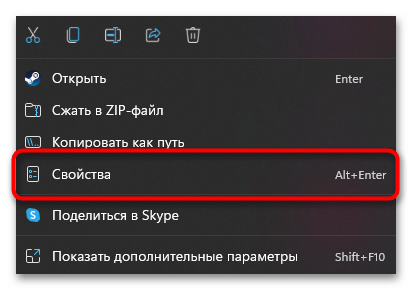
- Откройте приложение, перейдите в «Библиотеку» и выберите игру в списке, для которой хотели бы отключить ускорение указателя.
- Щелкните по ней правой кнопкой мыши и из появившегося контекстного меню выберите пункт «Свойства».
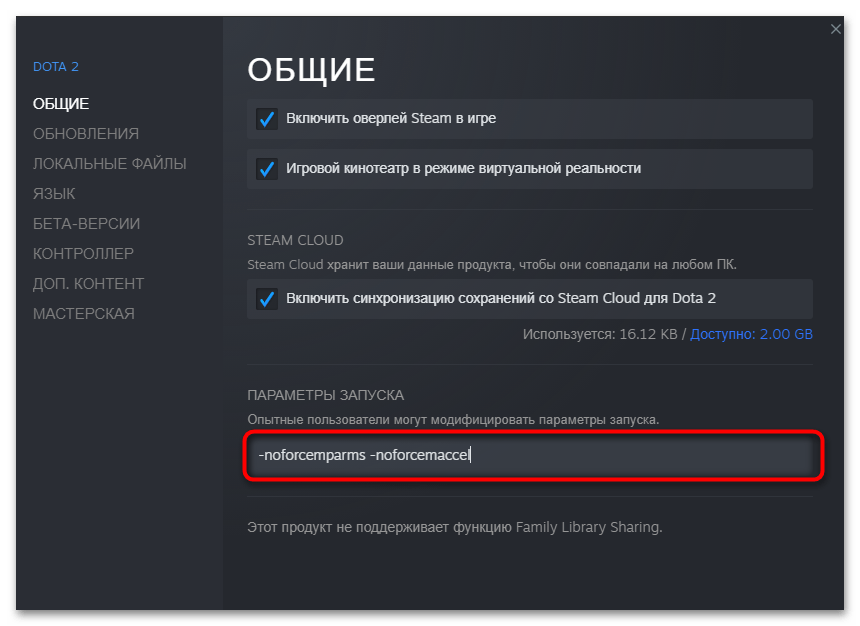
- В поле «Параметры запуска» напишите две команды
-noforcemparms -noforcemaccel, после чего можете закрывать данное окно и переходить к запуску игры с измененными параметрами запуска.

Если вы используете ярлыки или исполняемые файлы игр для их запуска без использования лаунчера или любой другой установленный не поддерживает внесение таких изменений, задать нужные настройки можно прямо в Windows 11. Осуществляется это через изменение ярлыка и тоже применимо для каждого приложения отдельно.
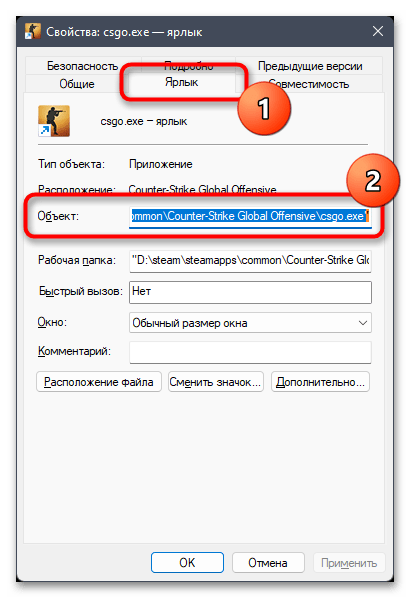
- Найдите файл запуска игры, нажмите по нему правой кнопкой мыши и перейдите в «Свойства».
- Откройте вкладку «Ярлык» и переместите указатель ввода в конец строки «Объект», не удаляя при этом уже имеющееся содержимое.
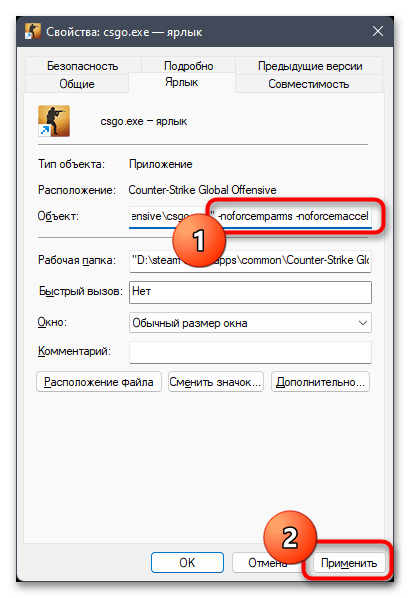
- В конце команды через пробел вставьте
-noforcemparms -noforcemaccelи примените изменения. Теперь можете приступать к запуску игры и проверке, отключилось ли в ней ускорение указателя.
Способ 4: Драйвер мыши
В игровых мышках, которые практически всегда имеют специальное приложение для тонкой настройки, также может происходить управление ускорением мыши. Как правило, по умолчанию этот параметр выключен, но так бывает далеко не всегда. Так что даже если обладатель такой мыши отредактирует настройки Windows, ускорение все равно останется во всех или некоторых приложениях.
Поскольку игровой софт сильно отличается друг от друга интерфейсом, универсальную рекомендацию дать не получится. Однако и найти нужную настройку вам самостоятельно не составит труда. Например, в SteelSeries Engine (или SteelSeries GG > Engine) нужный параметр так и называется.
Аналогичное название функции и в Logitech Gaming Software — достаточно просто сперва зайти в раздел с настройками указателя.
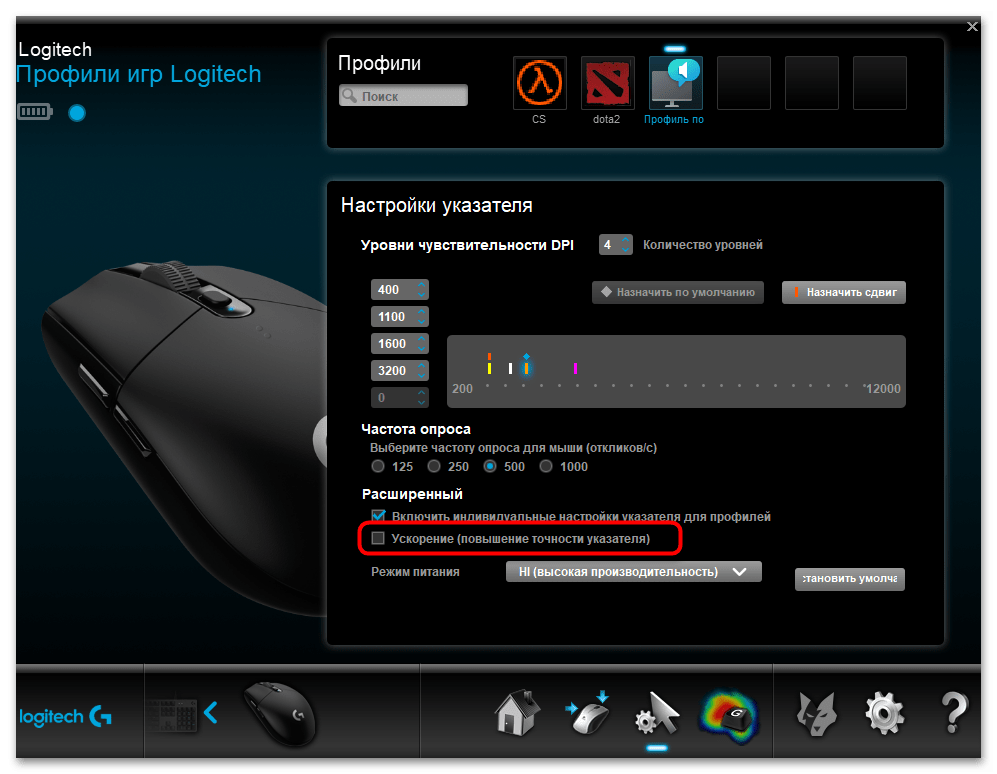
Если в вашем игровом ПО нет такого пункта (как нет и похожего, например «Акселерация», «Скорость указателя», «Acceleration»), значит, отсутствует и возможность регулировки этой возможности. Соответственно, в такой ситуации достаточно отключить ускорение средствами операционной системы.
Наша группа в TelegramПолезные советы и помощь
По умолчанию в Windows включена функция ускорения мыши (повышенная точность установки указателя). Она может быть удобной при использовании компьютера для работы, но по отзывам многих пользователей, специализирующихся на играх, может мешать точности прицеливания или указания в других игровых задачах и функцию лучше отключить.
В этой инструкции о том, как отключить ускорение мыши в Windows 11 и Windows 10 и дополнительная информация на тему, которая может пригодиться.
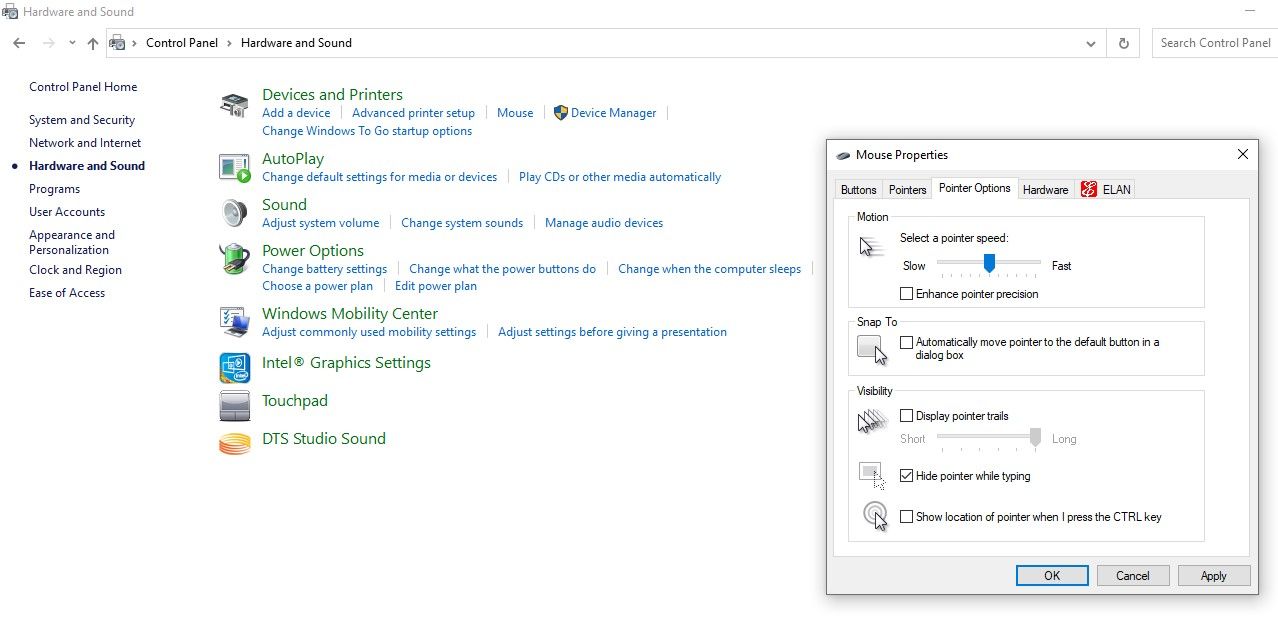
Отключение ускорения мыши в Панели управления
Основной способ отключения ускорения мыши во всех последних версиях Windows — использовать её настройки в панели управления. Шаги будут следующими:
- Нажмите клавиши Win+R на клавиатуре, введите main.cpl и нажмите Enter, либо зайдите в Параметры — Bluetooth и устройства — Мышь — Дополнительные параметры мыши.

- Перейдите на вкладку «Параметры указателя».
- Снимите отметку «Включить повышенную точность установки указателя» и нажмите «Ок».


Готово, ускорения указателя мыши отключено.
Обычно этого способа бывает достаточно, но при желании вы можете выполнить те же действия и альтернативными методами.
В редакторе реестра
Отключение ускорения указателя мыши возможно и в реестре Windows, для этого выполните следующие действия:
- Нажмите клавиши Win+R на клавиатуре, введите regedit и нажмите Enter.
- Перейдите в раздел реестра
HKEY_CURRENT_USER\Control Panel\Mouse
- Измените значения параметров (дважды нажав по соответствующему параметру и указав новое значение) MouseSpeed, MouseThreshold1 и MouseThreshold2 на 0


Это полностью отключит функции ускорения мыши в Windows.
Если в дальнейшем потребуется вернуть значения по умолчанию:
- MouseSpeed — 1
- MouseThreshold1 — 6
- MouseThreshold1 — 10
Суть функции ускорения мыши или повышенной точности установки указателя в том, что в зависимости от того, с какой скоростью вы передвигаете мышь, расстояние, на которое будет перемещаться указатель на экране за каждый пройденный сантиметр поверхности, будет отличаться.
Помимо описанных способов отключения ускорения мыши возможно использование следующих способов:
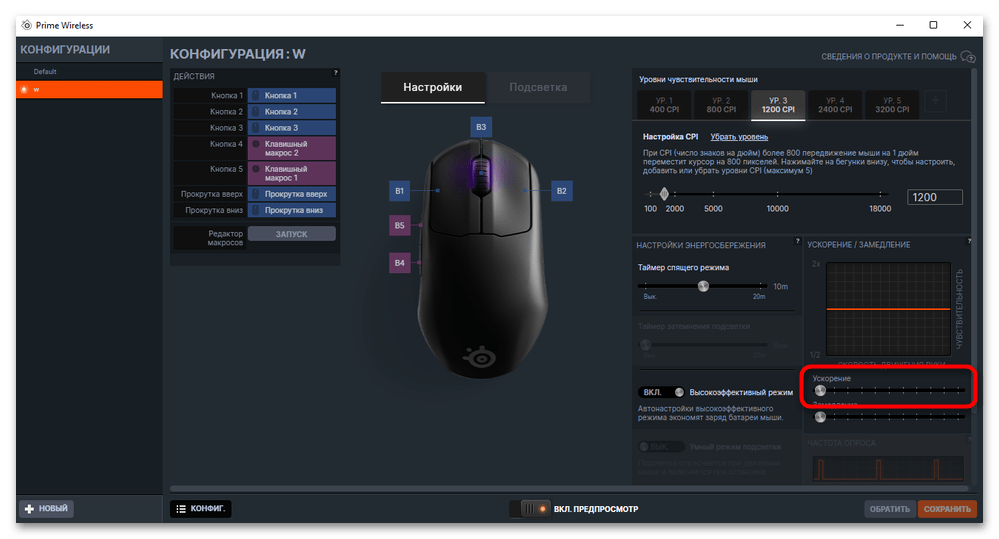
- Включение и отключение ускорения мыши может быть доступным в фирменном ПО мыши, в том числе с возможностью автоматического отключения в играх.
- В интернете можно найти дополнительные возможности отключения ускорения мыши: reg-файлы CPL Mouse Fix и MarkC Mouse Acceleration Fix, драйвер и ПО для управления ускорением мыши Raw Accel и другие. При их использовании рекомендую не удалять соответствующие reg-файлы с компьютера: они могут пригодиться, когда потребуется вернуть настройки по умолчанию.
На близкую тему может быть полезным: Как узнать DPI мыши, Как настроить чувствительность мыши в Windows.
Sign in to your MUO account

The mouse acceleration feature in Windows was added to help gamers have better control over their cursor, but it hasn’t turned out well for some gamers. Often, enabling this feature causes your cursor to drift out of control.
In case you are also losing control over the aim that is affecting your gaming experience, we will explain how to disable the mouse acceleration in Windows.
What Is Mouse Acceleration on Windows?

A mouse acceleration feature accelerates the motion of your pointer. It enables users to move their pointer faster and cover more on-screen distance with merely a faster mouse movement rather than the physical distance the mouse covers.
Because this feature allows you to control the movement of the mouse pointer based on the speed with which you move the mouse, it does not matter how much distance your mouse covers on the mousepad.
As a result, gamers can drag the mouse pointer from one corner of the screen to another without moving the mouse a single inch on the mouse pad.
Why Should You Disable This Feature?
The accuracy of your shot is critical while playing shooting games. When the mouse acceleration feature is turned on, your aim moves much farther, even with slight movements. This could result in you missing a vital shot that could have won you the game.
With this feature disabled, the mouse pointer moves the same distance you move your mouse on the mousepad. Such a natural movement fits well with many gamers, resulting in improved gaming performance.
Therefore, if the mouse acceleration feature disrupts your gaming performance, you should disable it.
How to Disable Mouse Acceleration Feature in Windows 10 and 11
Follow the steps below to disable mouse acceleration in Windows 10 and 11:
- Go to Windows Search and type «Control Panel.»
- Open the Control Panel app.
- Click on Hardware and Sound.
- Click on the Mouse under the Devices and Printers.
- In the Mouse Properties window, navigate to the Pointer Options tab.
- In the Motion section, uncheck the box left to Enhance pointer precision, which controls the mouse acceleration in Windows. Unchecking it will disable the mouse acceleration.
-
Click Apply and hit Ok.

By turning off the feature, you will be able to control the mouse pointer naturally again. In most cases, disabling the feature makes it easier for you to control your aim perfectly, but it may also worsen your gaming performance. If that’s the case, it might be best to turn the feature back on.
When Should You Keep Mouse Acceleration Enabled?
Mouse acceleration isn’t all bad, however. If you encounter the following problems with the feature disabled, be sure to turn it back on again for the best experience.
1. You Start to Have Issues While Controlling the Mouse Cursor

It might be difficult for you to adjust to this change if you have been playing games with this feature turned on for some time. If your gaming performance starts to slide, turn the feature back on.
2. You Don’t Have Enough Space on Your Desk

When you disable mouse acceleration, your mouse will cover the same distance as you move it on the mouse pad. This could lead to you bumping your mouse into other accessories on your desk or causing it to move outside your mouse pad.
Hence, if the space becomes too small for the mouse to move properly, either get an extended mouse pad or revert the change.
3. The Games You Play Demand Quick Movement
You can keep this feature on if the game demands quick navigation. Given how you need to move your mouse less to achieve more, keeping mouse acceleration on lets you take sharp, quick turns with as little effort as possible.
Leverage Mouse Acceleration to Beat Your Opponents
By now, you should be familiar with mouse acceleration and how it can improve or disrupt your gaming performance. Feel free to adjust it to your liking and gain the upper hand over your opponents.
Regardless, keep the feature enabled or disabled and become accustomed to either setting. Turning it on and off repeatedly would make it harder for you to get used to it.
How do I turn off mouse acceleration in Windows 11? So you notice your mouse pointer rushing across the screen faster than you’re moving the mouse? It’s high time to disable or turn off mouse acceleration in Windows 11. There is nothing wrong with your mouse; it is related to mouse acceleration, which is also known as pointer precision. Starting with Windows XP, this feature continues to Windows 11. By default, this feature (mouse acceleration) is enabled on your Windows 11 PC.
Microsoft implemented the feature for those Windows users who work slowly or move their mouse slowly. By implementing this feature, users feel the mouse is in their control as it covers more distance and speed at which the cursor moves across the screen in response to the speed of the physical mouse on a surface.
Those people who play video games might be familiar with this feature and mostly turn off or disable this feature to help stabilize the cursor movements on their screen. Once this feature is disabled, the cursor moves a fixed distance solely based on the physical activity of your mouse.
Turning off mouse acceleration is relatively easy, even if you’re new to Windows 11. You can easily and quickly turn off this feature on your Windows 11 PC using the Settings app. If you are new to Windows 11, you should know that this is not third-party software; it is an inbuilt feature of Windows 11 that was first introduced on Windows 10.
The settings app is quite impressive and lets you perform several tasks in Windows 11, including AutoPlay Settings, rearranging Quick Settings, resettings apps, adding or removing printers, and more.
If the Mouse Acceleration feature of Windows 11 is causing uninvited problems, Microsoft has provided an option to enable or disable this feature. That means, using the Settings app, you can enable or disable the Mouse Acceleration feature on Windows 11, according to your convenience. In this gearupwindows article, we will learn to enable or disable the Mouse Acceleration feature on Windows 11.
How to Enable or Disable Mouse Acceleration in Windows 11?
As said above, with the default configuration of Windows 11, the mouse acceleration feature remains turned on. However, according to your needs, you can enable or disable this feature. If the mouse acceleration feature is giving you uninvited problems, you can turn this functionality off. But, if mouse pointers cover less space than you desire, you can turn on this feature: your PC, your choice, and your needs. No one can stop you. Just proceed with further steps.
Step 1. Open the Settings app by pressing Windows + I keys simultaneously from the keyboard.
If you are new to Windows 11, refer to our complete guide to open the Settings app. According to your convenience, you can remember a method to open the Settings app. The settings app on Windows 11 is quite impressive and lets you perform several tasks on your PC.
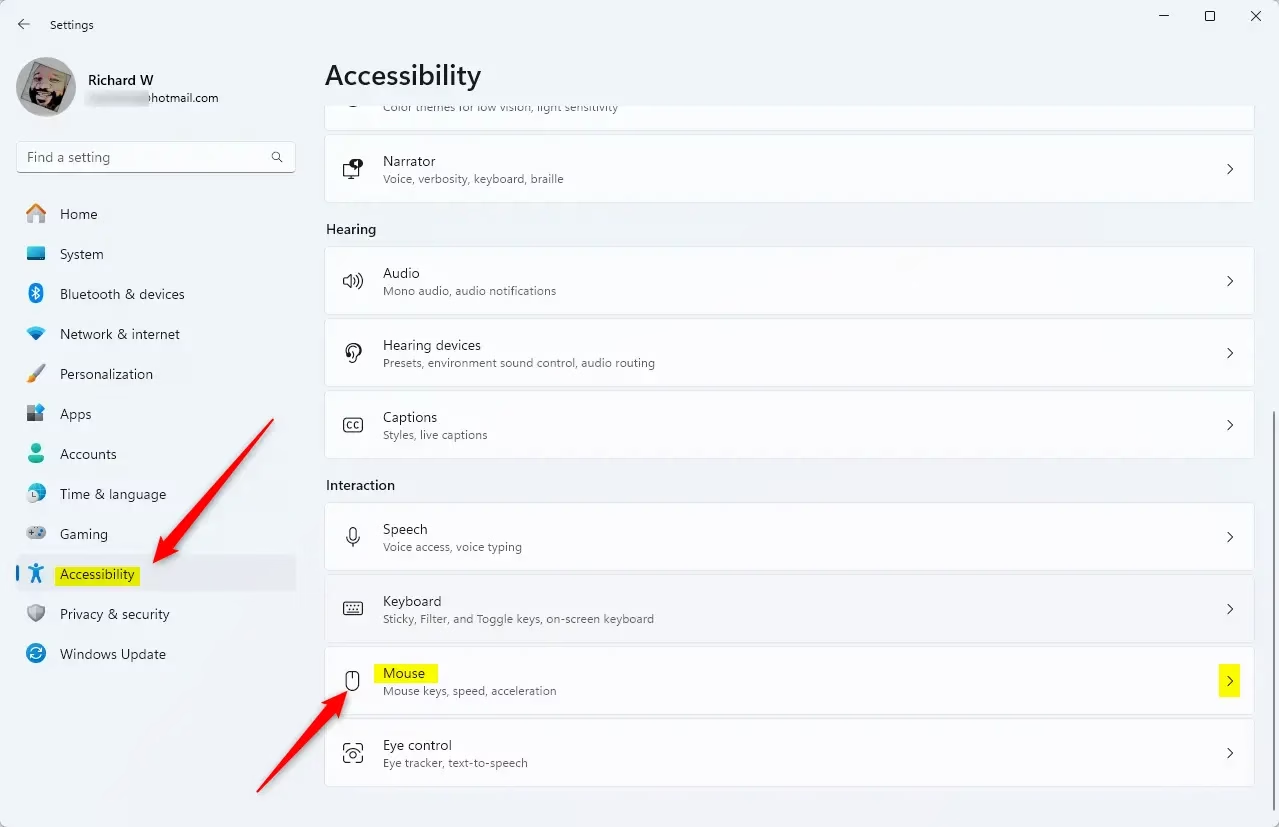
Step 2. Once the Settings app opens, click on the Bluetooth & devices category from the left sidebar.
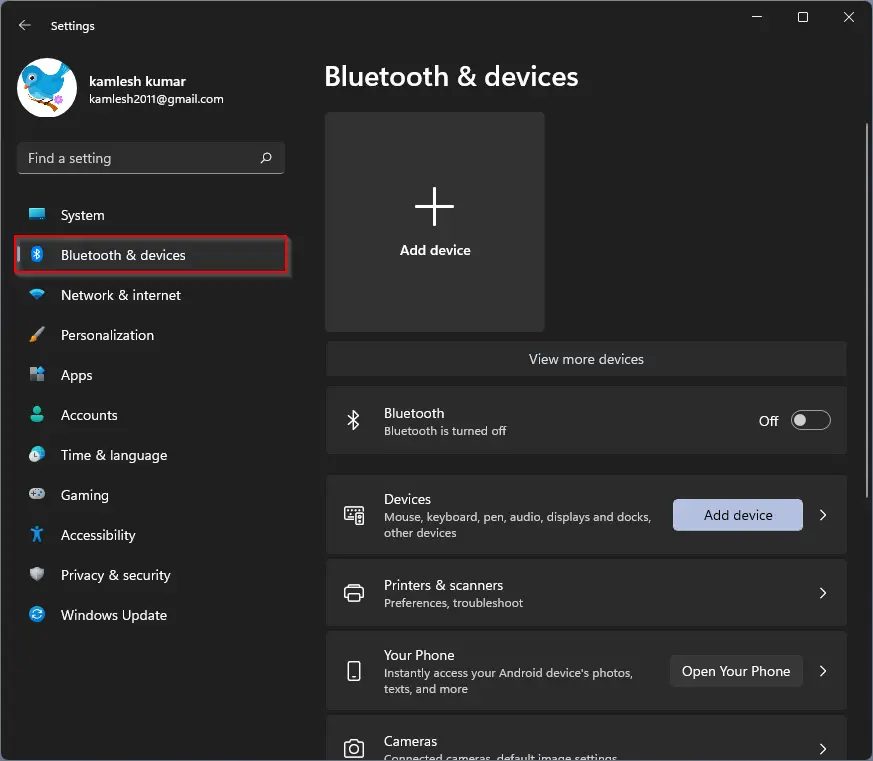
Step 3. Now, on the right-side pane of Bluetooth & devices, click on the Mouse tab.
If you don’t see the Mouse option, you need to scroll down on the right side window. Depending on the screen size of the monitor, you might see fewer options.
Step 4. Under the Related settings section, click on the Additional mouse settings option.
Step 5. Now, the Mouse Properties window will open.
Select the Pointer Options tab, and then uncheck the checkbox labeled with Enhance pointer precision to disable or turn off mouse acceleration.
Step 6. Finally, click on the Apply and then the OK button.
That’s it. Now you have successfully turned off or disabled the mouse acceleration in Windows 11. If you want to reenable this feature on your Windows 11 PC, repeat the above steps, and in step 5, check the checkbox labeled with Enhance pointer precision.
Conclusion
In conclusion, mouse acceleration is a feature that adjusts the cursor speed on Windows 11 based on the physical movement of the mouse. While this feature is helpful for some users, it can cause problems for others, especially gamers. Luckily, Microsoft has provided an option to enable or disable mouse acceleration in Windows 11 using the Settings app. By following a few simple steps, users can turn off or on the mouse acceleration feature on their PC. Whether you want to disable or enable mouse acceleration, it’s a simple process that can make a big difference in how you interact with your computer.
This article provides instructions on how to turn off or disable mouse acceleration in Windows 11.
If you notice that your mouse pointer is moving across the screen faster than you are moving the mouse, this could be due to mouse acceleration, also known as pointer precision. This feature has been present for quite some time, starting with Windows XP.
It was designed to help users feel more in control of the mouse by increasing the distance and speed at which the cursor moves across the screen in response to the speed of the physical mouse on a surface.
Disabling mouse acceleration in Windows 11 is quite simple, even for beginners. This guide will walk you through the necessary steps.
How to turn off mouse acceleration in Windows 11
To disable mouse acceleration in Windows 11, follow these steps.
Windows 11 has a centralized location for the majority of its settings. From system configurations to creating new users and updating Windows, all can be done from the System Settings pane.
To get to System Settings, you can use the Windows key + I shortcut or click on Start ==> Settings, as shown in the image below:

Alternatively, you can use the search box on the taskbar and search for Settings. Then select to open it.
In Windows Settings, select Bluetooth & devices, then choose Mouse on the right pane of your screen, as shown in the image below.
On the Mouse settings pane, under Related settings, click on Additional mouse settings as highlighted below.
On the Mouse Properties screen, select Pointer Options and uncheck the box for “Enhance pointer precision” to turn off mouse acceleration.
Click OK to save your changes and exit. Mouse acceleration is now disabled.
That should do it!
Conclusion:
- Disabling mouse acceleration can provide more control over cursor movement, especially for gamers and precision tasks.
- The process to turn off mouse acceleration in Windows 11 is straightforward and user-friendly.
- Accessing the settings through the System Settings menu simplifies the process for new users.
- Ensuring the unchecked “Enhance pointer precision” option will help maintain consistent cursor performance.
- Following these steps will enhance your overall experience while using your mouse in Windows 11.