
Introduction
Windows 10, like previous versions of Microsoft’s operating system, uses a paging file—commonly referred to as pagefile.sys—to manage memory more efficiently. This system file acts as a virtual memory extension of your computer’s RAM, allowing for smoother multitasking and enabling your system to handle more applications concurrently. However, there may be instances where you want to change the size or the location of this paging file. This article will outline why you might want to do this, the implications of making such changes, and provide a step-by-step guide on how to modify the pagefile.sys settings in Windows 10.
Understanding the Pagefile.sys File
Before delving into the modification process, it’s essential to understand what the pagefile.sys file is and why it is vital for your system’s performance. The paging file is used for various functions:
- Memory Management: It allows Windows to swap data to and from RAM when needed, effectively preventing applications from using up all memory resources.
- System Stability: A well-configured pagefile can improve the stability of your system, particularly under heavy loads when multiple applications are running.
- Crash Dumps: In the event of a system crash (BSOD), Windows writes memory contents to the pagefile for analysis, which can help in troubleshooting.
By default, Windows manages the pagefile automatically. However, users with specific needs—such as gaming, video editing, or running memory-intensive applications—might opt to customize their paging file for improved performance.
When to Change pagefile.sys Settings
While you may not need to change the pagefile settings for everyday computer use, here are some scenarios where adjusting the paging file could be beneficial:
-
Limited RAM: If you are using a system with low memory (e.g., 4 GB or less), increasing the pagefile size can help improve performance when running multiple applications.
-
SSD vs. HDD: On systems with Solid State Drives (SSDs), moving the pagefile to a different drive can help improve read speeds and overall system performance if the primary drive is crowded.
-
Gaming and Resource-Intensive Applications: Gamers or users running large software applications may experience better performance by tweaking the pagefile to allow for more virtual memory.
-
System Stability: Users experiencing crashes or instability might find benefit in having a larger pagefile or configuring it to allow more overhead for memory management.
Steps to Change the pagefile.sys File
Changing the pagefile settings in Windows 10 is a straightforward process but requires administrative privileges. Here’s a comprehensive guide to altering the pagefile configuration.
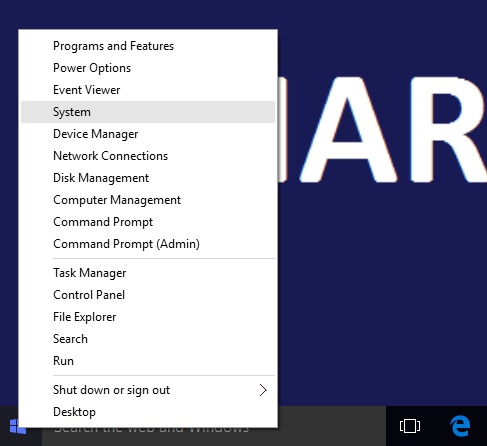
Step 1: Access System Properties
-
Open Control Panel: Click on the Start menu and type «Control Panel» in the search bar. Press Enter to open it.
-
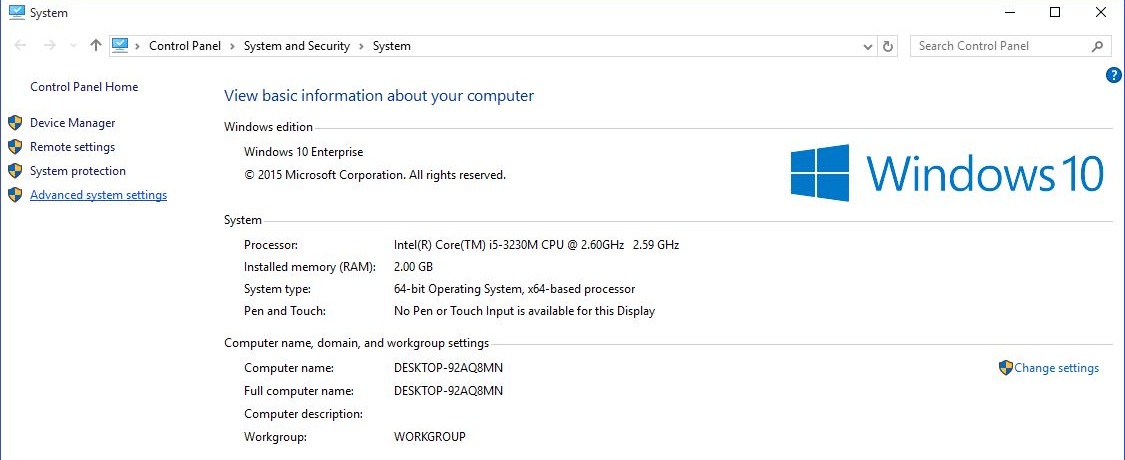
System and Security: Click on «System and Security,» and then click on «System.»
-
Advanced System Settings: In the left panel, click on «Advanced system settings.» This will open the System Properties dialog box.
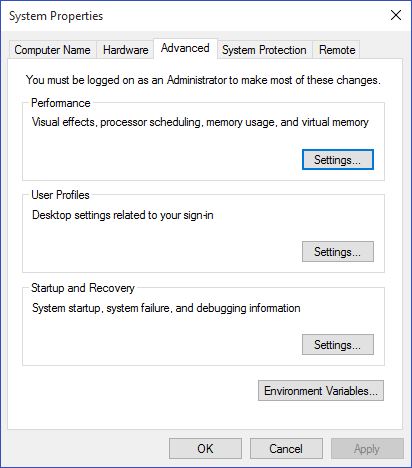
Step 2: Configure Virtual Memory
-
Performance Settings: In the System Properties window, navigate to the «Advanced» tab. Under the «Performance» section, click on «Settings.»
-
Virtual Memory Settings: In the Performance Options dialog box, switch to the «Advanced» tab. Here, you will find the «Virtual memory» section. Click the «Change…» button.
-
Automatic Management: If «Automatically manage paging file size for all drives» is checked, uncheck it to enable manual changes.
Step 3: Customize Pagefile Settings
-
Select Drive: You will see a list of available drives. Select the drive where you want to change the pagefile size. By default, it is usually set on the C: drive.
-
Custom Size: To set a custom size:
- Select “Custom size” and enter the Initial Size (MB) and Maximum Size (MB) for the pagefile.
- A general rule is to set the Initial Size to 1.5 times the size of your RAM and the Maximum Size to 3 times the size of your RAM. However, this can vary based on individual needs and usage.
-
Set the Size: Input your desired values and click on «Set.»
-
Disable Pagefile on Other Drives: If you want to disable the paging file on other drives, select them and choose «No paging file» before clicking on «Set.» It’s advisable to only do this if you have ample RAM and understand the potential risks involved.
Step 4: Save Changes and Restart
-
Apply Settings: Click «OK» in each of the open dialog boxes until you return to the System Properties window.
-
Restart Your Computer: You will need to restart your computer for the changes to take effect. Click “OK” in any remaining open dialogs and restart your system.
Step 5: Verify Configuration
Once your computer has restarted, verify the changes:
-
Open Task Manager: Right-click the taskbar and select “Task Manager,” or press Ctrl + Shift + Esc.
-
Performance Tab: Navigate to the “Performance” tab and select “Memory.” Here, you will see the amount of RAM used and the size of the pagefile.
-
Virtual Memory: You can further check your virtual memory configuration by going back to Control Panel > System and Security > System > Advanced System Settings > Performance Settings > Advanced, and then looking at the «Virtual memory» section.
Important Considerations
While it might be tempting to tinker with the pagefile settings, it’s essential to consider a few factors before making changes:
-
Impact on System Performance: Incorrect settings can lead to slowed performance and system instability. Ensure that you understand the implications before making changes.
-
Data Integrity: The paging file can be used in crash dump files. Removing or relocating it might affect how effectively the system generates meaningful crash reports.
-
SSD Lifespan: If you’re moving the pagefile to an SSD, consider that excessive writing can impact the drive’s lifespan. Monitor usage to avoid unnecessary wear.
-
Backup: Always backup important data before making system-level changes.
Conclusion
Adjusting the pagefile.sys in Windows 10 can significantly impact its performance and stability, especially in systems with limited RAM or during resource-intensive tasks. By understanding the paging file’s function and following the proper steps for modification, users can optimize their computer’s memory management effectively. Always make these changes with care, ensuring that you’ve considered the consequences and have appropriate backups in place. Whether you’re a casual user or a power user, having the right pagefile configuration can enhance your overall Windows experience.
This tutorial was written by Tom’s Hardware Community member viveknayyar007. You can find a list of all their tutorials here.
Pagefile in Windows 10 is a hidden system file with the .SYS extension that is stored on your computer’s system drive (usually C:\). The Pagefile allows the computer to perform smoothly by reducing the workload of the physical memory, or RAM.
Simply put, every time you open more applications than the RAM on your PC can accommodate, the programs already present in the RAM are automatically transferred to the Pagefile. This process is technically called Paging. Because the Pagefile works as a secondary RAM, many times it is also referred to as Virtual Memory.
The minimum and maximum size of the Pagefile can be up to 1.5 times and 4 times of the physical memory that your computer has, respectively. For example, if your computer has 1GB of RAM, the minimum Pagefile size can be 1.5GB, and the maximum size of the file can be 4GB.
By default, Windows 10 automatically manages the Pagefile according to your computer’s configuration and the RAM present in it. However, if you ever face lagging while working on Windows 10, or you start getting the PAGE_FAULT_IN_NONPAGED_AREA or KERNEL_DATA_INPAGE_ERROR Blue Screen of Death (BSOD), managing the size of the Pagefile manually is the first thing you should look for.
Managing the Pagefile size manually in Windows 10 is simple. Here is how:
- Use an administrator account to log on to Windows 10.
- From the desktop screen, right-click the Start button to open its context menu.
- Click System.
- From the left pane of the System window, click Advanced system settings.
- On the System Properties box, ensure that you are on the Advanced tab.
- Click the Settings button from under the Performance section.
- On the Performance Options box, go to the Advanced tab.
- Click the Change button from under the Virtual memory section.
- On the Virtual Memory box, uncheck the Automatically manage paging file size for all drives checkbox.
- From the available list, click to select the drive on which Windows 10 is installed. (C: in most cases.)
- From below the list, click to select the Custom size radio button.
- In the now-enabled fields, type the minimum and maximum size of the Pagefile in megabytes (MB) according to the physical memory present in your computer.
- Click Set and then click OK.
- Restart your computer when you’re done.
Get Tom’s Hardware’s best news and in-depth reviews, straight to your inbox.
The Tom’s Hardware forum community is a powerful source of tech support and discussion on all the topics we cover from 3D printers, single-board computers, SSDs, and GPUs to high-end gaming rigs. Articles written by the Tom’s Hardware Community are either written by the forum staff or one of our moderators.
Файл подкачки, или виртуальная память — это системный файл на жестком диске компьютера, который Windows использует, чтобы компенсировать нехватку оперативной памяти, если приложениям ее не хватает. Что это за файл, как он работает, что о нем нужно знать, как увеличить файл подкачки в Windows 10, или, наоборот — как отключить файл подкачки в Windows 10, читайте в нашей шпаргалке. В конце статьи — короткое видео, в котором все показано.
Файл подкачки в Windows: зачем он нужен и как работает?
Всем известно, что запущенные приложения на компьютере выполняются в оперативной памяти (ОЗУ, RAM). Выражаясь образно, при запуске приложения считываются с жесткого диска и временно «переписываются» в оперативную память. Вся информация в приложениях тоже хранится в оперативной памяти до тех пор, пока вы их не закроете.
Когда количество оперативной памяти заполняется, в дело вступает так называемый «файл подкачки». Это скрытый системный файл на жестком диске, который может выполнять функции ОЗУ. Вместо того, чтобы закрыть приложение, которому не хватает RAM, Windows скидывает его в файл подкачки и при необходимости возвращает обратно.
Какие приложения отправлять в файл подкачки, система решает сама. К примеру, приложение, которое долго находится в свернутом состоянии, может быть помечено системой как неактуальное. При нехватке RAM оно отправится в файл на жестком диске, чтобы немного почистить память.
В современных компьютерах устанавливается достаточно много ОЗУ, поэтому файл подкачки используется редко. Но если вы замечаете, что приложение при открытии немного «подлагивает», а индикатор жесткого диска на ПК мигает, значит, Windows возвратила его в RAM из файла подкачки. Если это происходит часто, стоит задуматься о том, чтобы докупить немного памяти.
Файл подкачки в Windows 10: что такое pagefile.sys и swapfile.sys?
В Windows 10, в отличии от более старых версий Windows, используются два файла подкачки: pagefile.sys и swapfile.sys. Они хранятся в корне диске C:\ и найти их можно, если включить на своем компьютере отображение скрытых и системных файлов.
В файл pagefile.sys при нехватке памяти отправляются обычные приложения, которые вы устанавливаете из разных источников — браузер, графический редактор, мессенджеры и так далее. А в файл swapfile.sys — встроенные приложения Windows 10 и приложения, установленные из Магазина Windows.
Swapfile и Pagefile всегда работают в паре. Объем swapfile.sys не превышает пары десятков мегабайт, а вот pagefile.sys в процессе работы может «раздуваться» до нескольких гигабайт. Из-за этого некоторые ищут способ, как отключить файл подкачки в Windows 10, чтобы освободить место на диске. Но если сделать это, отключится и swapfile.sys — а без него многие встроенные приложения Windows 10 просто перестанут запускаться.
Файл подкачки Windows 10: оптимальный размер
Вообще-то, ваша «виндовс» сама решает, какой объем файла подкачки ей нужен, и стандартного объема хватает в большинстве случаев. Кроме того, на компьютерах с большим количеством RAM он вообще довольно редко используется.
Но можно высчитать, сколько составляет оптимальный объем файла подкачки в Windows 10 и самостоятельно. Расскажем, как сделать это правильно.
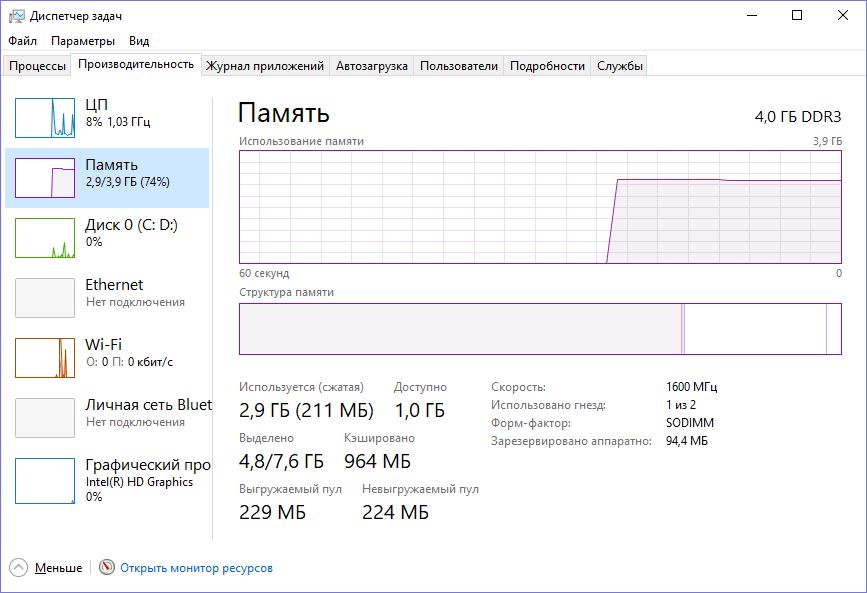
- Откройте все нужные вам приложения. Затем запустите Диспетчер задач (Ctrl+Alt+Delete) и посмотрите на занятый объем RAM на вкладке Производительность.

- Умножьте объем занятой памяти на 2. К примеру, 3 Гбайт из 4 Гбайт занято, значит — 6 Гбайт.
- Вычитаем из полученного значения количество вашей RAM. 6 минус 4 — 2 Гбайт. Это и есть оптимальный размер файла подкачки для вашего ПК. Если у вас получился отрицательный размер, значит вам не надо увеличивать, уменьшать или вообще как-то изменять стандартный объем файла подкачки.
Не рекомендуется поднимать и повышать размер файла подкачки более чем в три раза от актуального объема ОЗУ.
Как увеличить файл подкачки в Windows 10?
Расскажем, как поставить файл подкачки на Windows 10 в оптимальное значение.
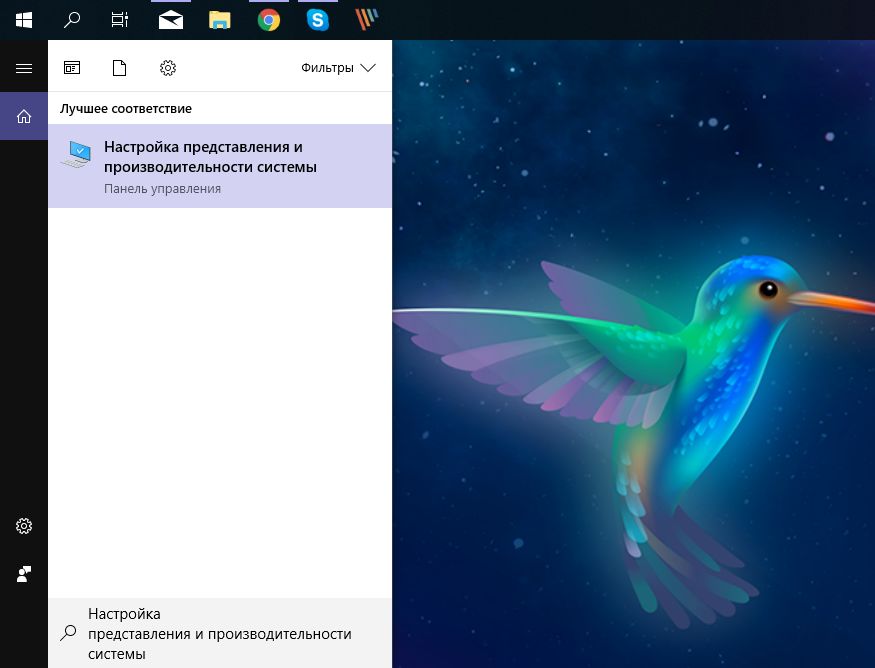
- Откройте меню Пуск, найдите и запустите приложение «Настройка представления и производительности системы«.
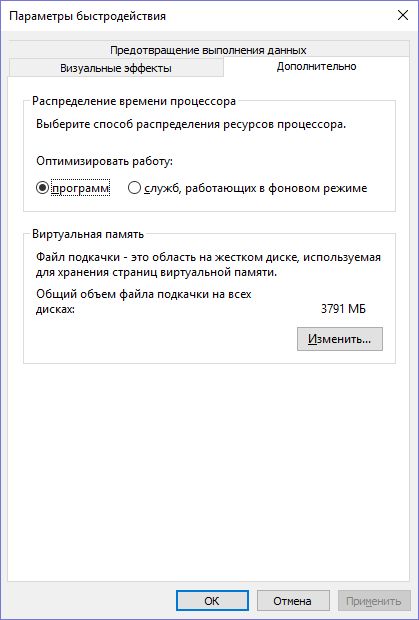
- Перейдите на вкладку Дополнительно и в разделе Виртуальная память щелкните Изменить.
- Снимите отметку возле пункта Автоматически выбирать объем файла подкачки.
- Выделите системный диск из списка, а затем нажмите Указать размер.
- В строке Исходный размер (МБ) укажите минимальный размер файла подкачки — он не должен быть меньше 800 Мбайт, а в строку Максимальный размер (МБ) введите нужный объем, который вы разрешите системе отнять. Значения должны быть указаны в мегабайтах (1 Гбайт = 1 024 Мбайт).
- После ввода новых параметров нажмите Задать, а затем Ок.
Как отключить файл подкачки в Windows 10?
Вообще-то, отключать файл подкачки не рекомендуется. Во-первых, приложения начнут «вылетать» (самопроизвольно перезагружаться), а некоторые вообще не смогут запуститься. Но если у вас много RAM, а место на жестком диске осталось мало, то отключение файла подкачки позволит освободить пару Гбайт. Главное — потом не пожалеть о своем решении. Может быть, вам поможет очистка диска, или нужно почаще очищать кэш браузера?
Нижеприведенные инструкции можно использовать на свой страх и риск!
Отключаем pagefile.sys
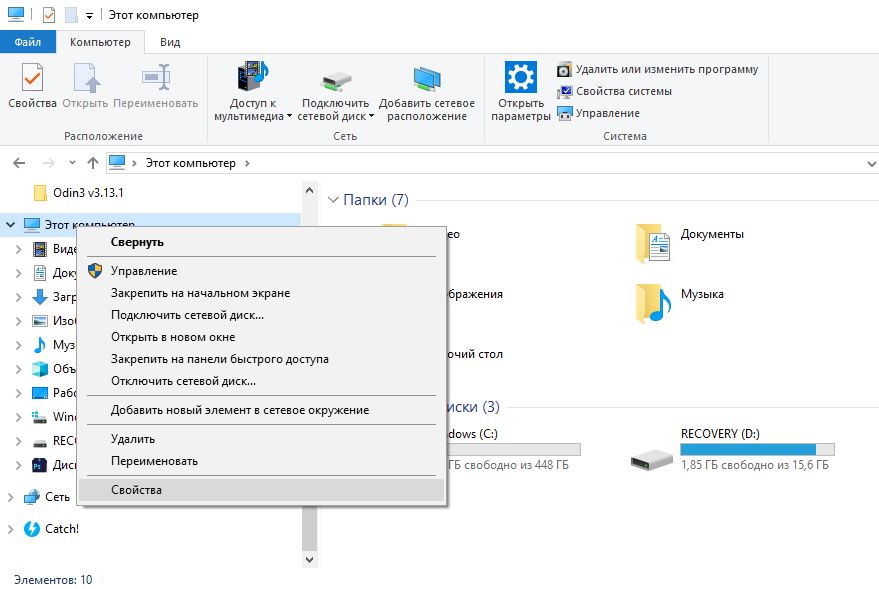
- Откройте Проводник, нажмите правой кнопкой мыши по Этот Компьютер и выберите Свойства.
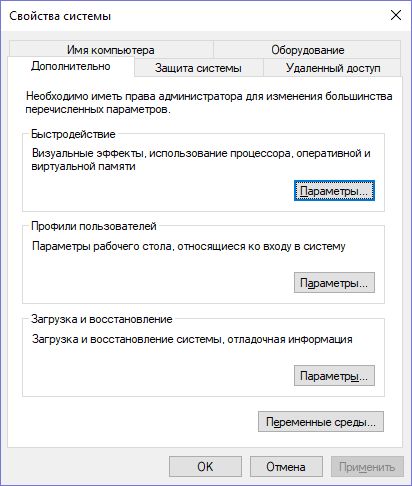
- Нажмите в левом меню Дополнительные параметры системы.
- На вкладке Дополнительно найдите раздел Быстродействие и нажмите Параметры.
- Снова откроется новое окно. На нем откройте вкладку Дополнительно. В области Виртуальная память нажмите Изменить.
- Снимите отметку возле Автоматически выбирать объем файла подкачки. Установите отметку в положение Без файла подкачки и кликните Задать и ОК.

Отключаем swapfile.sys
- Обязательно сделайте точку восстановления системы.
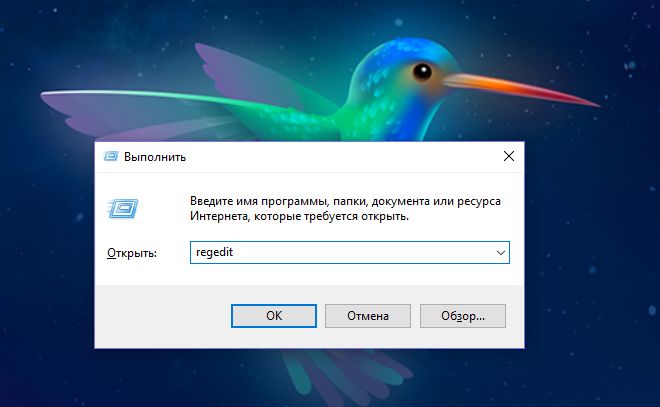
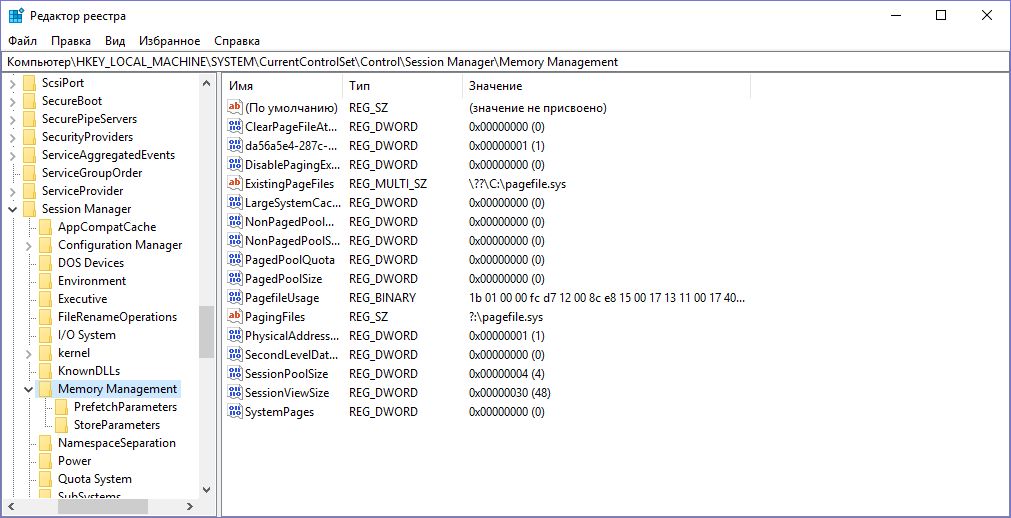
- Нажмите Win + R и введите regedit, чтобы зайти в редактор реестра.
- Скопируйте в адресную строку редактора реестра следующий адрес: Компьютер\HKEY_LOCAL_MACHINE\SYSTEM\CurrentControlSet\Control\Session Manager\Memory Management
- В правой части окна редактора реестра нажмите правую кнопку мыши, выберите Создать – Значение DWORD (32-бита).
- Назовите его SwapfileControl и перезагрузите компьютер.
- После этого swapfile будет отключен. Включить файл подкачки в Windows 10 обратно можно, удалив созданный параметр.
Как переместить файл подкачки?
Есть небольшая хитрость, как настроить файл подкачки на Windows 10. Если в вашем компьютере стоят несколько дисков, можно перенести файл подкачки с системного диска (не раздела!) на другой диск.
- Для этого в уже знакомом приложении Настройка представления и производительности системы > Дополнительно > Виртуальная память нажмите Изменить.
- Снимите отметку возле пункта Автоматически выбирать объем файла подкачки. Затем выделите ваш системный диск и нажмите Без файла подкачки. Нажмите Задать > ОК.
- Выберите в том же списке диск, на котором вы хотите хранить файл подкачки. Нажмите Размер по выбору системы > Задать. Кликните ОК и перезагрузите компьютер, чтобы система применила ваши настройки.
ВАЖНО: не рекомендуется перемещать файл подкачки на накопитель типа SSD, так как это может сократить срок его службы, увеличив число циклов перезаписи.
Вот еще несколько полезных материалов по оптимизации:
- Освобождаем место на диске, переместив файл подкачки
- Сколько оперативной памяти нужно компьютеру?
- Как ускорить Windows: пошаговое руководство
Last Updated :
16 Aug, 2024
Virtual memory, also known as the pagefile, is an essential component in Windows 10 that helps manage your computer’s memory more efficiently. By default, Windows automatically manages the virtual memory settings, but there are situations where you might need to change virtual memory in Windows 10 to optimize performance, especially when running memory-intensive applications.
In this article, we will show you how to adjust pagefile size in Windows 10 and modify virtual memory settings to ensure your system runs smoothly.
-In-Windows-10.png)
How To Change Virtual Memory in Windows 10
Steps to Manage Virtual Memory (Pagefile) in Windows 10
- Step 1: Open the Control Panel on the computer. For that purpose, write Command Prompt in the Start Menu. It will show an option Control Panel. Click on it to proceed.

- Step 2: Here, a new window will open. Then click on the system option to get more options.

- Step 3: Now, again a new window will open. Find some options mentioned on the Left Hand Side of the Screen. There will be an option named as Advanced System Settings. Click on that to get more options.

- Step 4: Now click on the Advanced Tab. Then click on the Settings option under the Performance portion.

- Step 5: Then click on the Advance Tab present there.

- Step 6: Now, under the Advanced Tab, you will find an option called Virtual Memory. There click on Change button.

- Step 7: Here, remove the Consent from the Checkbox. It will help to make suggested changes in that.

- Step 8: Now, after removing the consent from that checkbox, some more options are now available. Click on the option Custom Size.

- Step 9: Now, under the Custom Size, provide the Initial Size & the Maximum Size. All the data should be in MegaByte (MB) format. Then, click on the Set button. This will save the changes.
Note: The Initial Memory will always be 1151 MB. In most cases, the computer requires this amount of memory for Virtual Memory. You will find this same data as Recommended just below this portion. If Recommended size is different from the 1151 MB, then it is advisable to put the same memory as marked in the Recommendation. Simply, enter the Recommended Memory size as the Initial Memory.

- Step 10: After clicking on the Set button, click on the Ok. This will save the changes to the Virtual Memory.

- Step 11: As soon as users click on Ok, a popup window comes up to Restart the device to permanently make changes. Click on the Ok button & the computer will promptly restart. Hence all the changes made there are now permanent.

Hence, we have successfully managed Virtual Memory (Pagefile) in Windows 10.
Note: The Maximum Memory is as per the choice of the users. Users can provide any data there. But a simple formula works here. The Maximum Memory will always be 1.5 of the Initial Memory. Suppose, you have provided the Initial Memory as 10 MB, then the Maximum Memory will be 10*1.5 = 15 MB. Using this formula, you need to provide the Maximum Memory.
Conclusion
Knowing how to change virtual memory in Windows 10 can be incredibly beneficial, particularly if you’re experiencing performance issues or running out of memory. By following the steps outlined in this guide to adjust pagefile size and optimize virtual memory in Windows 10, you can improve your system’s performance and stability. Properly managing your virtual memory ensures that your computer can handle multiple tasks efficiently without slowing down.
To change the pagefile size on Windows 10, first open the virtual memory window. Select the Advanced tab and click the Change button. This opens a virtual memory window where you can set the initial pagefile size in MB and maximum pagefile size in MB. Then click OK. You will need to have administrative rights to make changes. Then follow the steps below. Note: It is always recommended to keep your pagefile size at 1.5x or 2x the total physical memory of your system.
The recommended Pagefile size is 3 times the physical memory, or 4 GB. The default Pagefile size is based on the amount of RAM in your computer. Although Windows 10 automatically manages the size of the Pagefile based on RAM, you can increase it manually to improve your PC’s performance. A big Pagefile will take up a large portion of your hard drive. This may lead to frequent crashes and BSODs.
What is the Best Paging File Size For Windows 10?
First, open the Performance Options dialog. Under the Virtual memory tab, click Change. In the Advanced settings, expand the Virtual memory section and click the Change pagefile size option. You should then multiply the maximum amount of memory by 1.5 and enter the desired size. Finally, click OK to apply the changes. You can now tweak the size of the paging file in Windows 10.
The best pagefile size for Windows 10 depends on the amount of RAM your system has and how much virtual memory it uses. If you have eight gigabytes of RAM, the recommended pagefile size is 1.25 GB. The maximum size is 2.5 GB for 16 GB systems, five GB for 32 GB systems. However, it’s not a bad idea to increase the pagefile size if you’re unsure about the amount of space your computer needs. However, be aware that it may reduce the stability of the computer. Try booting your PC in Safe Mode first, before making any changes.
Windows automatically calculates the virtual memory paging file size according to the amount of installed RAM. However, there is one exception to this rule. You should leave the virtual memory settings on “automatic” and let Windows adjust the size of the virtual memory pool as needed. Then, open the advanced settings menu. Click on the Performance tab and choose the Virtual Memory Options. Select the option that corresponds to your system’s memory.
There are two ways to change the page file size on Windows 10 systems. You can change it on physical drives and change it to use the recommended size. However, if you don’t have enough free space on a drive, you can also disable it. This article will help you change the size of your page file. However, before you make any changes, you should know what the recommended size is. You can find out how much space your page file needs in the next section.
To change the pagefile size, first open the Performance tab in the Performance Settings window. Click on the Change button under the Virtual Memory section. Under the Advanced tab, click on the Virtual Memory section. Click on the Change button in the Virtual Memory section. Select the Pagefile size option and click the Advanced button. The size you want will be displayed in megabytes (MB). You can change the maximum size to 8GB.
How Do I Change the Page Drive in Windows 10?
If you’re wondering how to change the page drive on your Windows PC, keep reading. In Windows 10, you can change the location of the page file. By default, it’s located on the F: drive, but you can change it to any drive or folder if you like. To change the location of the page file, you should first enable it on your computer. You can also disable it if you’d like.
One of the reasons people want to change the page file is to increase the virtual memory. Many people experience issues with BSOD errors and lagging when they increase their page file size. However, changing the page drive can result in system instability. For this reason, it’s important to keep the size of the page file small and use the maximum memory you can. If you want to change the page file size, make sure that your system has enough physical memory to support the extra memory.
Changing the page file size can improve the performance of Windows. However, it’s important to note that disabling the page file can reduce the stability of the computer. If you want to change the size of the page file, open the virtual memory settings and ensure that the option Automatically manage paging file size for all drives and System managed size is checked. Once you’ve changed the page drive size, you should restart your PC and check whether the changes have made a difference. You can also reboot the computer if you encounter problems in starting up Windows.
Is It Safe to Change Paging File Size?
You can change the pagefile size in Windows 10. However, you should know how to make this adjustment properly. It’s crucial that the size of the pagefile is at least 1.5 x the total amount of physical memory in Windows 10. If you don’t know how to do this correctly, here are some simple steps to follow. Open the virtual memory window. Then, select the Pagefile settings. Check the box for Custom size. This option will let you enter a maximum value for the paging file.
First, the pagefile is located on every drive in your computer. You can modify the size and location of the pagefile to improve system performance and speed. On the other hand, disabling the pagefile may decrease the stability of your system. Make sure to change the pagefile size and location only when you’re sure that you can safely undo them afterwards. To make these changes, open the virtual memory settings in your PC. Next, click the box next to Automatically manage the paging file size of all drives.
How Big Should My Pagefile Be 8Gb RAM?
How big should my pagefile be? In theory, it should be at least four gigabytes, or 1.5 times your physical memory. But what is the actual maximum? Generally, it should be at least four gigabytes, but it can be as little as 256 MB. However, some algorithms use different code paths if there’s no page file. Regardless, the right page file size is essential to a computer’s performance.
The size of the pagefile is closely related to the size of your PC’s RAM. A pagefile of 8Gb RAM, for example, will require a pagefile of four GB. Microsoft recommends a pagefile size of 1.5 to three times the size of your system’s RAM. However, you should consider the size of your hard drive before making the change. If you encounter problems booting, try booting in Safe Mode.
Does 64GB RAM Need Virtual Memory?
You can change the size of your pagefile by adjusting the virtual memory size in Windows 10. You can set the paging file to anywhere from 2GB to 1.2GB. You can set this with the Ctrl + Shift + ESC shortcut. Make sure to change the default setting first. If you encounter a strange behavior, you should reset virtual memory. To do this, follow these steps:
The first step is to open the Settings app. Navigate to the Performance tab. From there, select the Advanced tab. Click on Virtual memory. Select Advanced settings. Click the Change button under the Virtual memory section. In the Virtual memory section, select the maximum size for your paging file. After that, press the Enter key to save your changes. Once you have changed the virtual memory size, you can restart your computer.
Change the pagefile size to make your system use more RAM. Changing the pagefile size allows Windows to make the most of the RAM. By default, Windows uses about 50% of its virtual memory for inactive applications and 35% for active programs. You can change this value to suit your needs. Just remember that this setting is not permanent and will eventually reduce your computer’s performance. But if you want to improve your performance, you should change the virtual memory size.
What is the Best Paging File Size?
The paging file is an enormous resource for your PC. Windows uses it to manage virtual memory. You should increase the size of your paging file to at least 1.5GB of the available memory. This will improve the performance of Windows 10 when you’re navigating through the desktop or using multiple applications. If you need to increase the paging file size, there are a few ways to do it.
The maximum page file size on a Windows 10 PC is 16TB, theoretically. But your actual system’s paging file size will be limited by the amount of free space on the disks. Ideally, you should use at least 1.5 GB for each page file to ensure stability. Alternatively, you can use the paging file size calculator to estimate your paging file size.
To increase the paging file size, open the Performance Options dialog. Click the Advanced tab. Go to Virtual memory. Select Change virtual memory. In the Virtual Memory window, click the Virtual Memory tab. Under the Memory section, click the Change virtual memory option. Select the paging file size that you want, multiply the maximum amount of RAM by 1.5, and click OK. Then you can increase it whenever you want. If you’re experiencing Windows 10 lagging, you’ll want to increase the size of the paging file, so make sure you check the page file size regularly.
Learn More Here:
1.) Windows Help Center
2.) Windows – Wikipedia
3.) Windows Blog
4.) Windows Central