
Если при попытке изменить, открыть или удалить папку или файл в Windows вы получаете сообщения о том, что вам отказано в доступе, «Нет доступа к папке», «Запросите разрешение на изменение этой папки» и аналогичные, то вам следует изменить владельца папки или файла, о чем и поговорим.
Есть несколько способов стать владельцем папки или файла, основные среди которых — использование командной строки и дополнительные настройки безопасности ОС. Есть также и сторонние программы, позволяющие изменить владельца папки в два клика, на одного из представителей которых тоже посмотрим. Все описанное ниже подходит для Windows 11, Windows 10 и предыдущих версиях системы.
Использование команды takeown для изменения владельца объекта
Для того, чтобы стать владельцем того или иного элемента с использованием способов ниже, вы должны иметь права администратора на компьютере. Кроме этого, не следует изменять владельца для всего системного диска — это может повлечь нестабильную работу Windows. Если вы хотите стать владельцем папки для того, чтобы удалить ее, а иначе она не удаляется, потребуется также предоставить необходимые права соответствующему пользователю (простого назначения владельца может быть недостаточно).
Изменение владельца папки или файла возможно с помощью командной строки. Имеются две команды, первая из них — takeown. Для ее использования, запустите командную строку от имени Администратора, в Windows 11 и Windows 10 это можно сделать через поиск в панели задач с последующим выбором пункта «Запуск от имени администратора». В командной строке, в зависимости от того, владельцем какого объекта вам нужно стать, введите одну из команд:
- takeown /F «полный путь к файлу» — стать владельцем указанного файла. Чтобы сделать всех администраторов компьютера владельцами, используйте параметр /A после пути к файлу в команде.
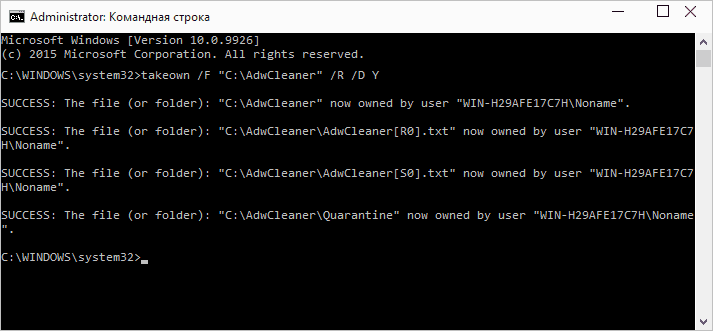
- takeown /F «путь к папке или диску» /R /D Y — стать владельцем папки или диска. Путь к диску указывается в виде D: (без слэша), путь к папке — C:\Folder (также без слэша).
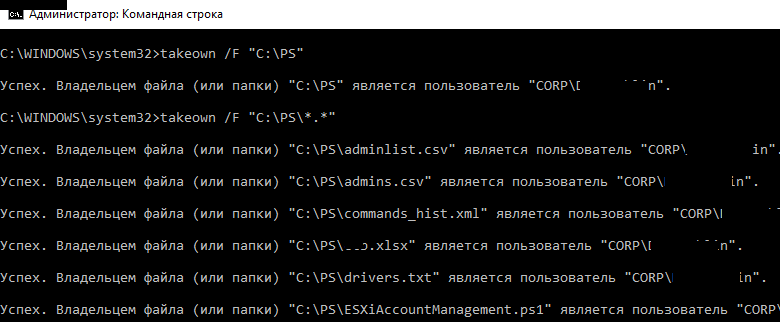
При выполнении данных команд вы получите сообщение о том, что вы успешно стали владельцем конкретного файла или отдельных файлов в указанной вами папке или на диске (см. скриншот).
Как было отмечено ранее, простое изменение владельца объекта, не обязательно означает, что вы сможете удалить, переименовать или иным образом изменить его. Для этого также нужно предоставить необходимые права пользователю, о чём в следующих двух частях инструкции.
Команда icacls
Еще одна команда, которая позволяет получить доступ к папке или файлам (изменить их владельца) и получить необходимые права — icacls, использовать которую следует так же, в командной строке, запущенной от имени администратора.
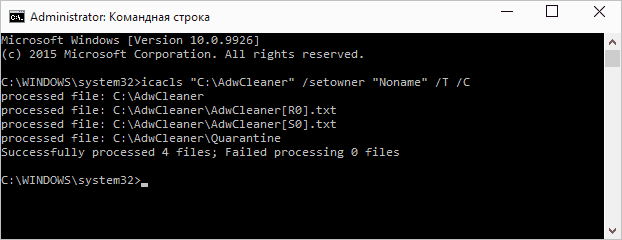
Для установки владельца используйте команду в следующем виде (пример на скриншоте):
icacls "путь к файлу или папке" /setowner "Имя_пользователя" /T /C
Пути указываются аналогично предыдущему способу.
Команды из первой и второй части можно сочетать. Например, следующие две команды сделают вас владельцем папки и предоставят полные права доступа к ней для группы Администраторы:
takeown /F D:\ПУТЬ /R /A
icacls D:\ПУТЬ /T /Inheritance:e /grant Администраторы:F
И общий пример для того, чтобы предоставить полный доступ пользователю к какой-либо папке или файлу с помощью ICACLS:
ICACLS "ПУТЬ_К_ПАПКЕ" /grant:r "имя_пользователя":(OI)(CI)F
Получение доступа с помощью настроек безопасности
Ещё один способ — использовать лишь мышь и интерфейс Windows, не обращаясь к командной строке.
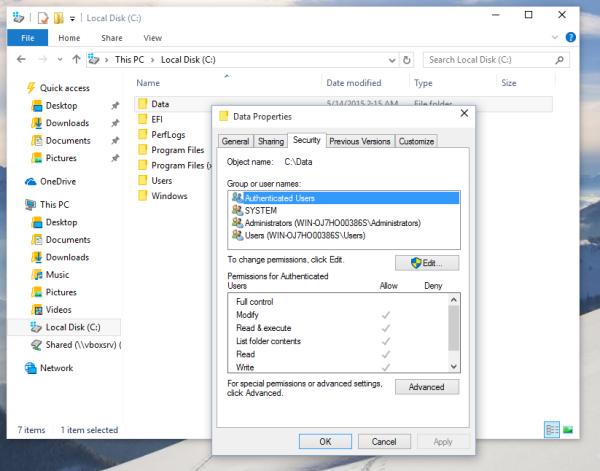
- Кликните правой кнопкой мыши по файлу или папке, доступ к которому нужно получить (стать владельцем), в контекстном меню выберите пункт «Свойства».
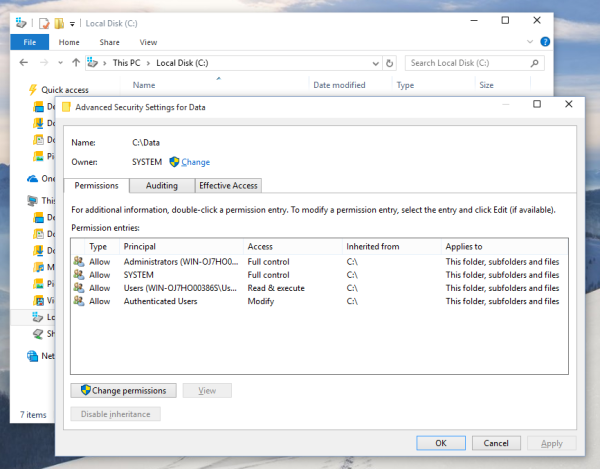
- На вкладке «Безопасность» нажмите кнопку «Дополнительно».
- Напротив пункта «Владелец» нажмите «Изменить».

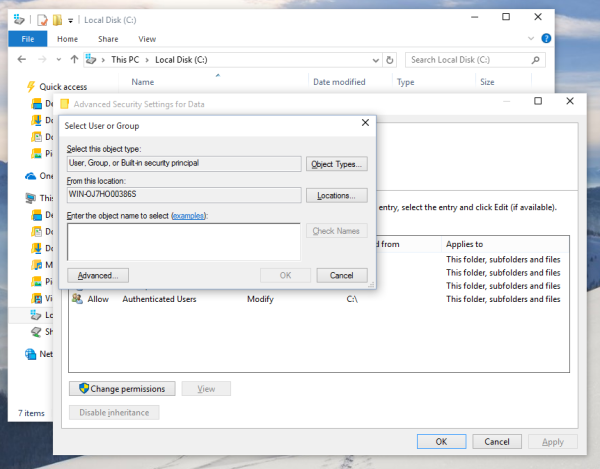
- В открывшемся окне нажмите кнопку «Дополнительно», а в следующем — кнопку «Поиск».

- Выберите в списке пользователя (или группу пользователей), которого нужно сделать владельцем элемента. Нажмите Ок, затем — снова Ок.
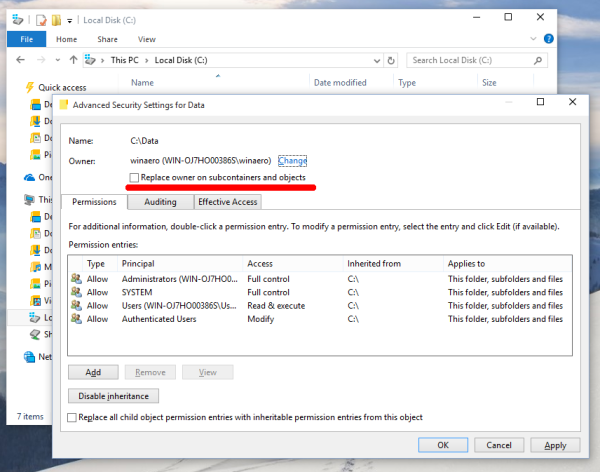
- Если вы изменяете владельца папки или диска, а не отдельного файла, отметьте также пункт «Заменить владельца подконтейнеров и объектов».

- Нажмите Ок.
- Вернитесь на вкладку «Безопасность» в свойствах папки или файла, нажмите кнопку «Изменить» под списком пользователей и групп и предоставьте необходимый уровень доступа нужным пользователям или их группам (которых можно добавить в список аналогично тому как мы делали на 4-м шаге), например — полный доступ.


На этом вы стали владельцем указанного объекта Windows, а также получили права на доступ к нему. Сообщения о том, что нет доступа к папке или файлу вас не должны больше потревожить.
Другие способы стать владельцем папок и файлов
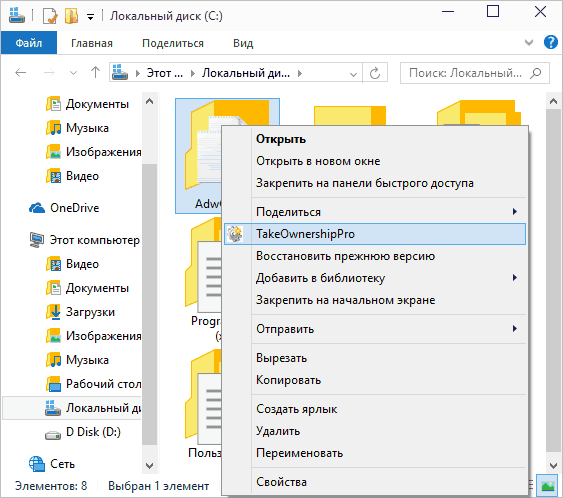
Есть и другие способы решить проблему «отказано в доступе» и быстро стать владельцем, например, с помощью сторонних программ, встраивающих пункт «Стать владельцем» в контекстное меню проводника. Одна из таких программ — TakeOwnershipPro, бесплатная и, насколько я могу судить, без чего-то потенциально нежелательного. Аналогичный пункт в контекстное меню можно добавить и путем редактирования реестра Windows. Есть и другие похожие утилиты, подробнее: Как добавить пункт Стать владельцем в контекстное меню папок и файлов Windows.
Однако, с учетом того, что подобная задача возникает сравнительно редко, я не рекомендую устанавливать стороннее ПО или вносить изменения в систему: на мой взгляд, лучше изменить владельца элемента одним из способов «вручную».
В Windows можно изменить владельца файла или папки через графический интерфейс Проводника Windows (откройте свойства файла -> Безопасность –> Advanced -> Owner –> Change) или с помощью встроенной консольной утилиты takeown.exe. В этой статье мы покажем, как изменить владельца файла в командной строке с помощью команды takeown.
Чтобы изменить владельца файла вы должны быть его владельцем или обладать правами администратора.

Обратите внимание, что с помощью команды takeown вы сможете назначить владельцем только текущего пользователя или локальную группу администраторов. Команда не позволяет указать в качестве владельца каталога или файла произвольного пользователя или группу.
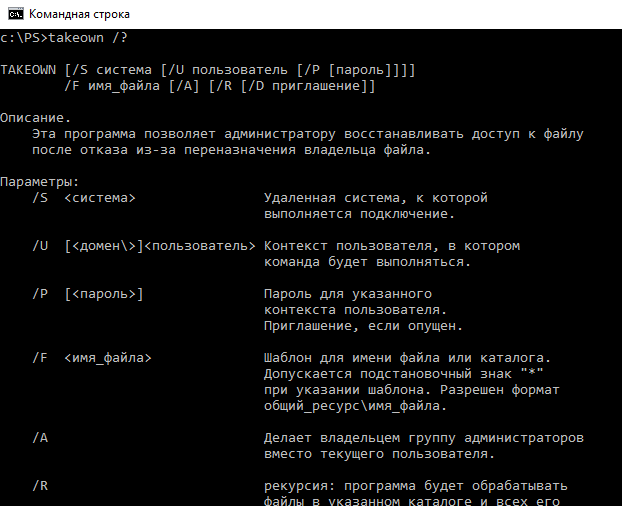
Утилита takeown.exe по умолчанию находится в каталоге C:\Windows\System32, поэтому для ее использования не нужно указывать полный путь к ней. Команда takeown имеет следующий синтаксис:
takeown /F <file_name> [/S <имя удаленного компьютер>] [/U <Domain\DomainUserName>] [/P <Пароль_пользователя>] [/A] [/R [/D приглашение]]
Рассмотрим основные параметры команды takeown:
- /F <имя_файла> — здесь нужно указать полный путь к файлу или каталогу, владельца которого нужно изменить. Можно использовать символ подстановки *.
- /S <ИмяУдаленногоКомпьютера> — вы можете указать IP адрес или имя удаленного компьютера, на котором нужно выполнить команду takeown. По умолчания команда выполняется на текущем компьютере.
- /U <Domain\DomainUserName> и [/P <UserPassword> — используется для указание учетных данных пользователя, под которым нужно выполнить команду takeown.
- /A – назначить владельцем не текущего пользователя (из-под которого запущена команда), а локальную группу администраторов. Если параметр не указан владельцем файла назначается текущий пользователь, под которым выполняется команда takeown.
- /R – указывает, что нужно рекурсивно изменить владельцев всех вложенных файлов и папок в указанном каталоге.
- /D {Y | N} – если у текущего пользователя нет прав доступа на просмотр содержимого каталога (list files), нужно ли изменять владельца данных файлов. Y – изменить владельца, N – пропустить файлы.
Полный синтаксис и помощью по команде можно получить так:
takeown /?
Рассмотрим несколько примеров использования командой takeown.
Назначить себя владельцем каталога C:\PS:
takeown /F "C:\PS"
Чтобы изменить владельца всех файлов в каталоге, используйте команду:
takeown /F "C:\PS\*.*"
Если запущена непривелигированная командная строка, или у текущего пользователя нет прав на каталог, появится ошибка
Ошибка. Текущий вошедший пользователь не имеет привилегий владельца на файл (или папку) «C:\PS».
После того, как вы назначали себя владельцем, вы сможете получить доступ к папке. Если к этой папке получают доступ другие пользователи, нужно проверить и изменить доступ с помощью утилиты icacls или проводника Windows.
Назначить себя владельцем файла testfile.txt на удаленном компьютере msk-sal-15-21.vmblog.ru:
takeown /F "C:\testfile.txt" /S msk-sal-15-21.vmblog.ru
При выполнении данных команд вы получите сообщение о том, что вы успешно стали владельцем конкретного файла или отдельных файлов в указанной вами папке.
Назначить владельцем всех тестовых файлов в каталоге C:\SharedFolder группу администраторы можно так:
takeown /F C:\SharedFolder\*.txt /A
Чтобы назначить группу администратором владельцем всех вложенных файлов и каталогов и пропустить каталоги, к которым у пользователя нет доступа:
takeown /F C:\PS\ /A /R /D Y
Назначить текущего пользователя владельцев всех файлов с расширением *.docx в общей сетевой папке Public на сервер msk-fs1:
takeown /S msk-fs1 /F Public\*.docx
Совет. Не стоит без осознанной необходимости переназначать владельца для корневых системных папок (c:\Windows, c:\Users\, c:\Program Files и т.д.) или для всего системного раздела – вы можете повредить систему.
Sign in to your MUO account
Windows 11 and 10 include some restricted access folders by default. When you try to open such folders, a message pops up that denies you permission to access them. Those restricted access folders are even closed off from admin-level users.
Such folders are usually restricted for good reason, but at any rate, you can still access them. To do so, you’ll need to take ownership of them. Taking ownership of a folder enables you to change the object permissions for it. You can take ownership of folders in Windows 11 and 10 with the alternative methods below.
How to Manually Take Ownership of Folders on Windows
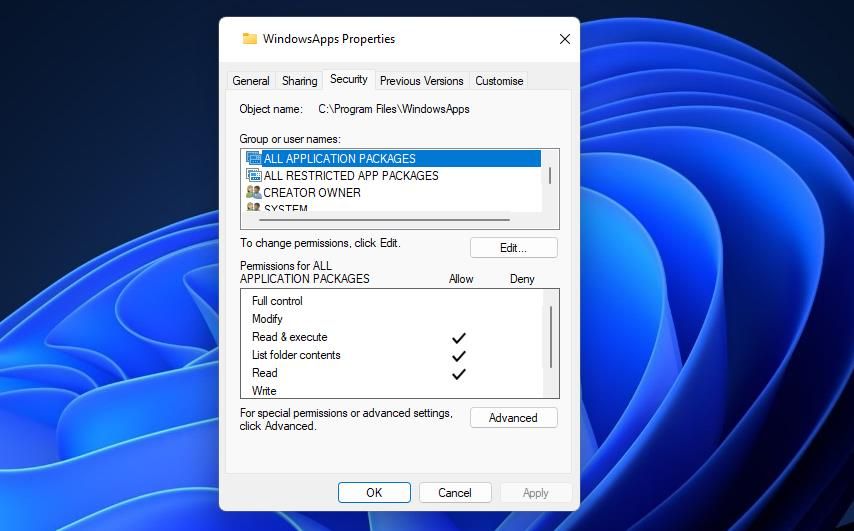
The WindowsApps folder is a good example of a restricted access folder. That folder includes installed Universal Windows Platform apps on your PC. You’ll see the usual access (or permission) denied message when you try to open it.
You can manually take ownership of that folder, and others, to open it by changing its permissions via the Security tab. That tab includes the advanced security settings you’ll need to tweak to take ownership of folders. This is how you can take ownership of the WindowsApps folder within Windows 11.
- Open File Explorer (the Win + E keyboard shortcut launches it).
- Click View and Show to open more Explorer options.
- Select Hidden Items on the menu.
- Bring up the C:\Program Files folder path.
- Right-click WindowsApps to select Properties.
-
Select the Security tab shown in the snapshot directly below.

-
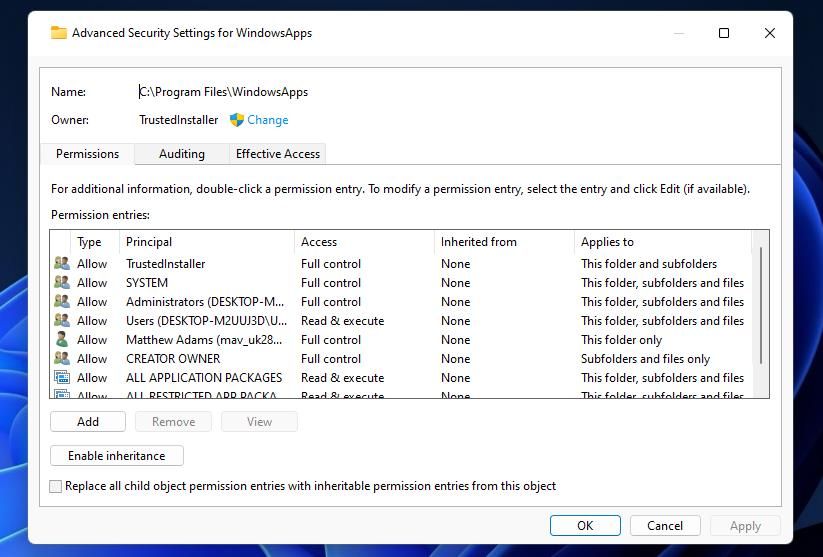
Click Advanced to view the Security Settings for WindowsApps window.

- Then click Change to open a Select User or Group window.
-
Enter Administrator in the object name box. Alternatively, you can enter your target user account there.

- Press the Check Names button, and click the OK option.
- Click the Replace owner on subcontainers and objects checkbox to select it.
- Then select Apply > OK to change the folder permission as configured.
- Click OK on the prompt that confirms you’ve taken ownership of the folder.

Now go ahead and try opening WindowsApps again. That folder will now open for you after taking ownership of it. You can take ownership of other folders much the same.
How to Take Ownership of a Folder With the Command Prompt
The Command Prompt gives us another way to take ownership of folders. It’s a bit simpler and faster to take ownership of a folder by entering a quick command. You can take ownership of WindowsApps in the Command Prompt as follows:
- Click inside the Type here to search box on the Start menu, or you can press the Windows + S keys at the same time.
- Input cmd in your search box and open Command Prompt with elevated rights by selecting Run as administrator.
-
Type in this takeown command:
takeown /F "C:\Program Files\WindowsApps” - Press the Enter keyboard key to take ownership of the folder.

The above command will assign ownership to the currently logged-in user. You can further modify that command by adding extra switches to it. For example, adding an /A and /R switch to it will assign ownership to the admin group and apply ownership to all subfolders included in the primary directory. That command for the WindowsApp folder would look like this:
takeown /F C:\Program Files\WindowsApps /A /R
If you would prefer an even simpler way to take ownership of folders, set up a Take Ownership context menu option. You can add a Take Ownership shortcut to Windows 11’s desktop context menu with the freeware Winaero Tweaker. Then you can simply select that context menu option to take ownership of whatever folder you fancy. These are the steps for adding a Take Ownership option to the Context Menu with Winaero Tweaker:
- First, go to the Winaero Tweaker download page in a web browser.
- Click Download Winaero Tweaker on that webpage to save a ZIP archive for the software.
- Launch File Explorer to open the folder that includes Winaero Tweaker’s ZIP file.
-
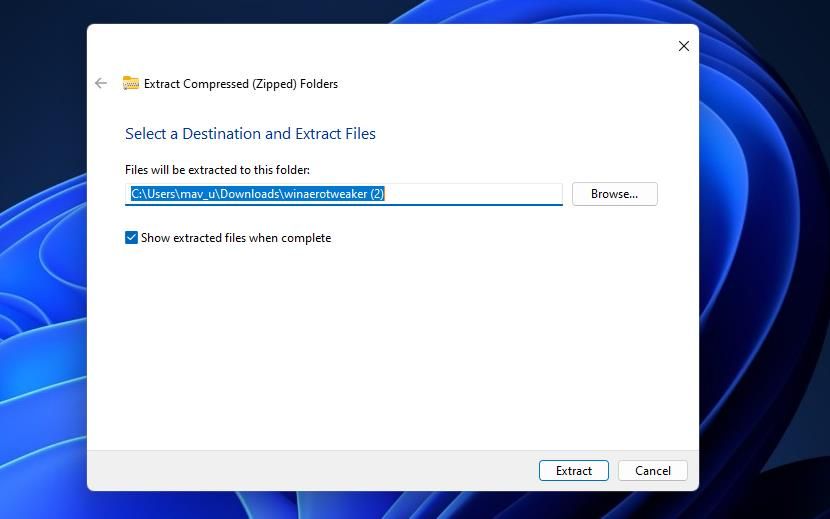
Click the winaerotweaker ZIP archive with your right mouse button and select Extract All.

-
Select Show extracted files and Extract.

- Double-click the setup file for Winaero Tweaker.
- Click Next to reach the agreement options.
- Select the I accept agreement radio button and click Next again.
- If you don’t want to install the software in a default directory, select Browse to choose another one.
- Keep clicking Next until you reach the final Install option.
- Click Install to do that.
- Select Run Winaero Tweaker to start the software after exiting the setup wizard.
- Press Finish to exit the installer and bring up Winaero Tweaker.
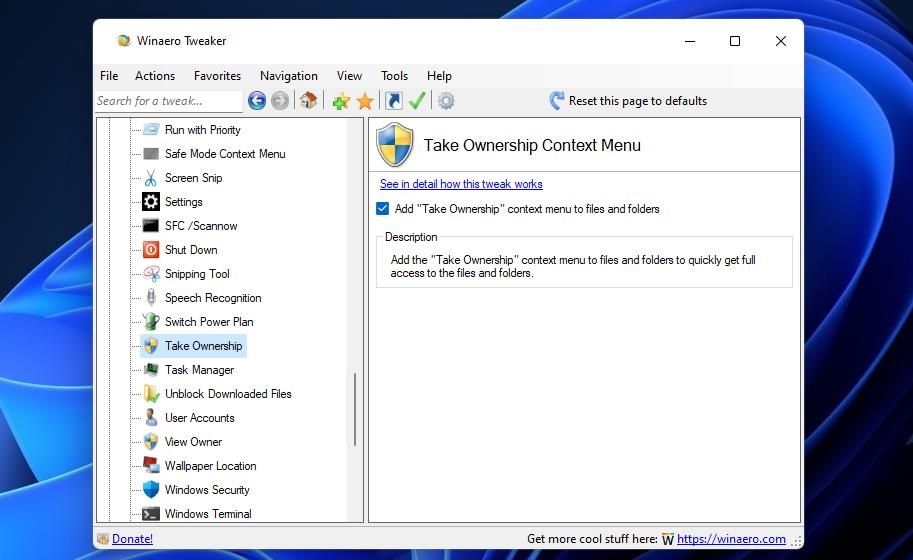
- Double-click Context Menu in Winaero Tweaker to view that category’s options.
-
Select the Take Ownership option.

- Click the Add “Take Ownership” context menu to files and folders checkbox to select it.
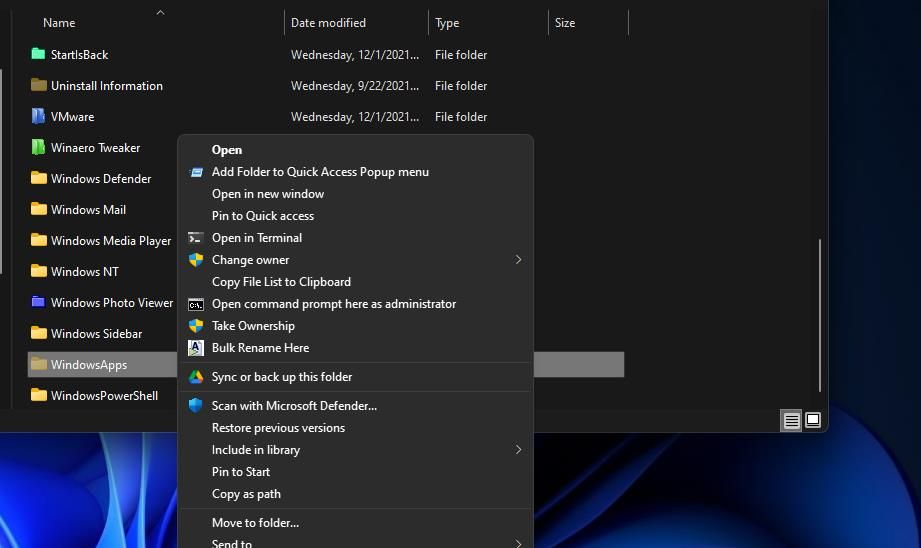
Now you can try out your new Take Ownership context menu shortcut. Open the C:\Program Files folder in File Explorer and make sure Hidden Items is selected as outlined in steps one to four of the first method. Right-click the WindowsApps folder and select Show more options at the bottom of the context menu. Click the new Take Ownership option in the classic menu, and select Yes in UAC prompts.
A cmd.exe window will then pop up. Wait for the Command Prompt to apply your ownership of the selected folder (it will tell you to press any key when done). Thereafter, you can go ahead and open WindowsApps to see what’s inside.
You can also remove the Take Ownership option from the context menu with Winaero Tweaker. To do so, uncheck the Add Take Ownership context menu to files and folders to deselect that option in Winaero Tweaker. Or you can click Reset this page to defaults instead.
Expand Your System Access by Taking Ownership of Folders
When you’ve taken ownership of some folders, you’ll be able to view exactly what’s inside them. In the case of WindowsApps, you’ll be able to open installation subfolders for Windows apps from there. Thus, taking ownership of folders effectively gives you greater access to everything on your PC. However, it’s recommended that you don’t try to delete the contents of such folders unless you’re clear about exactly what you’re erasing.
In Windows, sometimes taking ownership of files or folder becomes mandatory. Especially when you need to deal with objects that are well protected by permissions, taking ownership is the only way. In our past, we’ve shared you the guide to take ownership of registry key in Windows 10.
Now a little bit similar article, which will show you step-by-step process for taking ownership of files and folders in Windows 10. We’ve got the UI method and Command Prompt method, so try them out as per your convenience and take ownership of files or folder you need for.
Page Contents
Take Ownership Of Files Or Folders In Windows 10
Method 1 – Using Security Settings Of File Or Folder
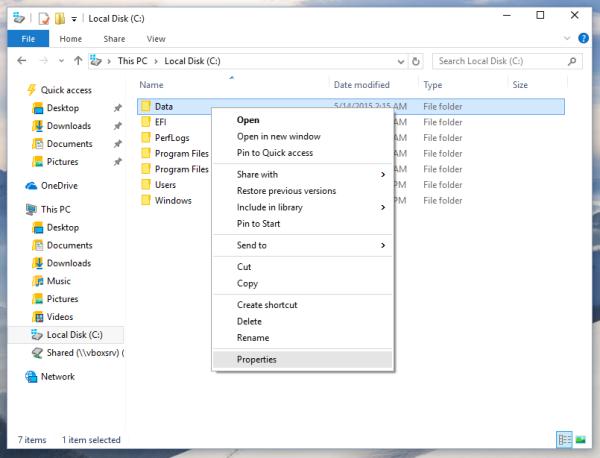
1. Right click on the file or folder whose ownership you want to take and select Properties.
2. On the property sheet, switch to Security tab and click Advanced.
3. Next, under Advanced Security Settings window, click on Change link next to Owner. As you can see in the below screenshot, the current owner name mentioned is SYSTEM. When we will take ownership, it will be showing our user name.
4. Then under Select User or Group window, click on Advanced button.
5. Moving on, in next window, click on Find Now first. Then from Search results, pick up the account you want to which you want to make the owner of content. Double click on that account name.
6. This will show you the account added back in Select User or Group window, so click OK.
7. Now back in Advanced Security Settings window, check Replace owner on subcontainers and objects. Click Apply, followed by OK.
8. In the Windows Security confirmation prompt, click OK. Click Apply, OK in rest of windows we opened so far and close them.
This completes the process of taking ownership. It is illustrated in following video:
Method 2 – Using Command Prompt
The UI method mentioned above is quite lengthy. So sometimes, if you want to quickly take ownership of files and files, prefer to use this method.
1. Open Command Prompt.
2. We’ll now use command to take ownership to currently logged user. So type below mentioned command and press Enter key.
For files, type this command:
takeown /F "<FILE-NAME-WITH-LOCATION>", for example takeown /F "C:\Users\Kapil Arya\Desktop\test.doc".
For folders, type this command:
takeown /F "<FOLDER-NAME-WITH-LOCATION>" /R /D Y, for example takeown /F "C:\Users\Kapil Arya\Desktop\MyFolder" /R /D Y.
3. If you’ve successfully taken ownership, you’ll be notified after command execution. Once done, close Command Prompt.
That’s it!
Read Next: Allow/Prevent Users To Take Ownership Of Files Or Other Objects.
RELATED ARTICLES
Sometimes you need to get full access to some file or folder in Windows 10. It can be a system file or folder, or one which was created by a user account that no longer exists. In most cases, the Windows operating system will prevent you from doing any operation on such files and folders. In this article, we will see how to take ownership and get full access to files and folders in Windows 10.
Take ownership of a file or folder in Windows 10 using File Explorer
To take ownership of a file or folder in Windows 10 without using third party tools
- Open File Explorer, and then locate the file or folder you want to take ownership of.
- Right-click the file or folder, click Properties, and then click the Security tab.


- Click the Advanced button. The «Advanced Security Settings» window will appear. Here you need to change the Owner of the key.
Click the Change link next to the «Owner:» label
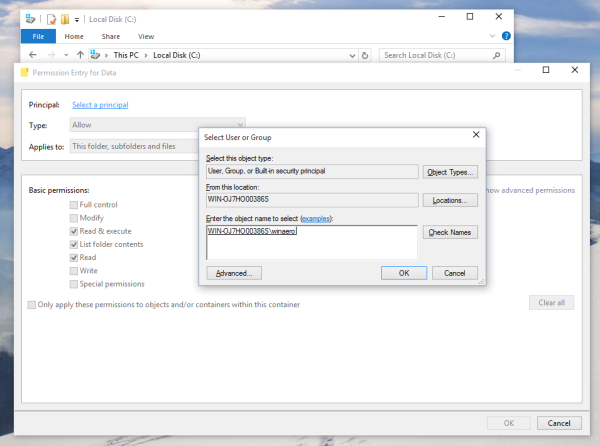
- The Select User or Group window will appear.
Select the user account via the Advanced button or just type your user account in the area which says ‘Enter the object name to select’ and click OK.
- Optionally, to change the owner of all subfolders and files inside the folder, select the check box «Replace owner on subcontainers and objects» in the «Advanced Security Settings» window. Click OK to change the ownership.

- Now you need to provide full access to the file or folder for your account. Right-click the file or folder again, click Properties, and then click the Security tab.
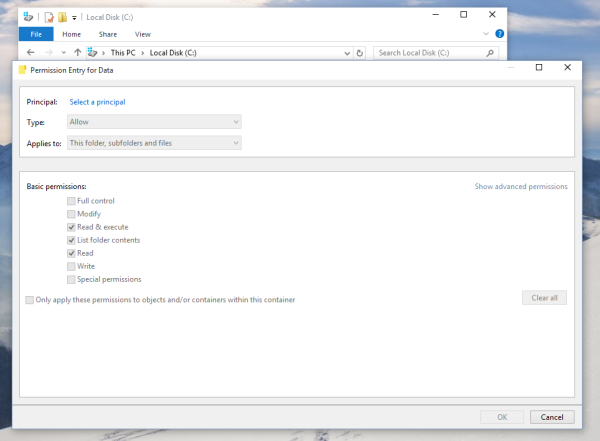
- Click the Add button. The «Permission Entry» window will appear on the screen:

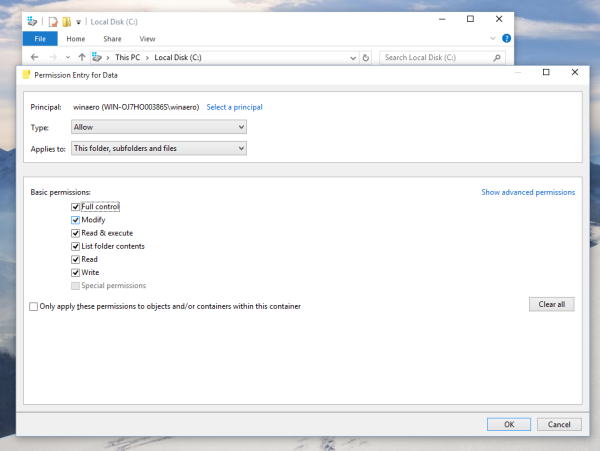
- Click «Select a principal» and select your account:

- Set permissions to «Full control»:

Click OK.
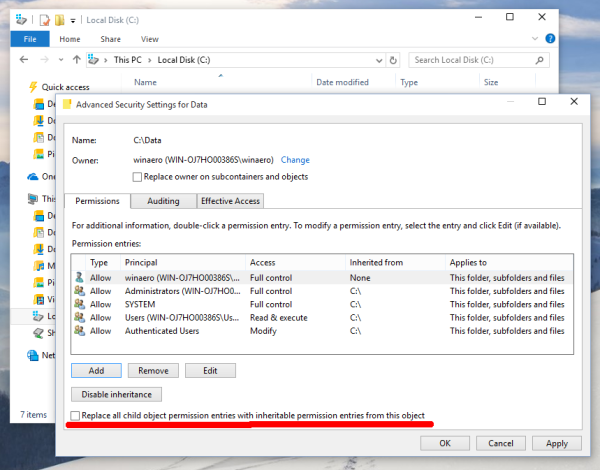
- Optionally, click «Replace all existing inheritable permissions on all descendants with inheritable permissions from this object» in the «Advanced Security Settings» window.

What it means is permissions on this parent object will replace those on its descendant objects. When cleared, permissions on each object, whether parent or its descendant, can be unique. Click OK to get full access to the file or folder.
That’s it. You just changed the ownership and got full access to the file in Windows 10 using the File Explorer app.
See: How to restore the TrustedInstaller ownership in Windows 10
Additionally, you may want to add a Change Owner context menu. It will allow you to save significant amount of time by directly setting ownership to one of the pre-defined system accounts.
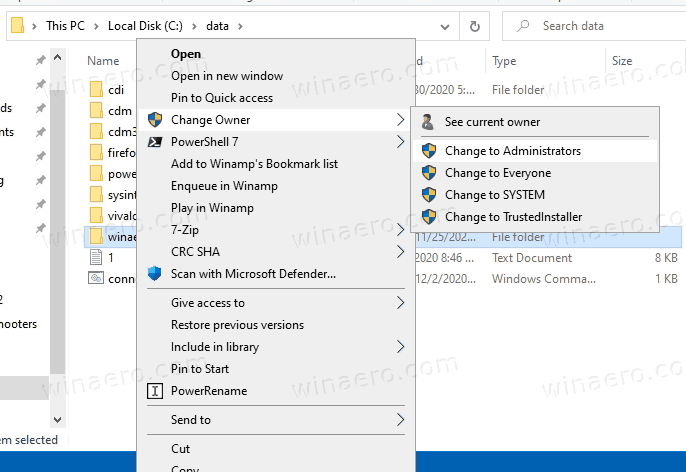
The context menu allows you to quickly change the owner to one of the following system accounts: the Administrators group, Everyone, SYSTEM, and TrustedInstaller. To learn more about the Change owner context menu, please refer to the following post.
How to Add Change Owner Context Menu in Windows 10
There, you will find ready-to-use Registry files, detailed instructions, and clarifications about how every context menu entry works. This will allow you to change the file, folder, or drive owner with one click.
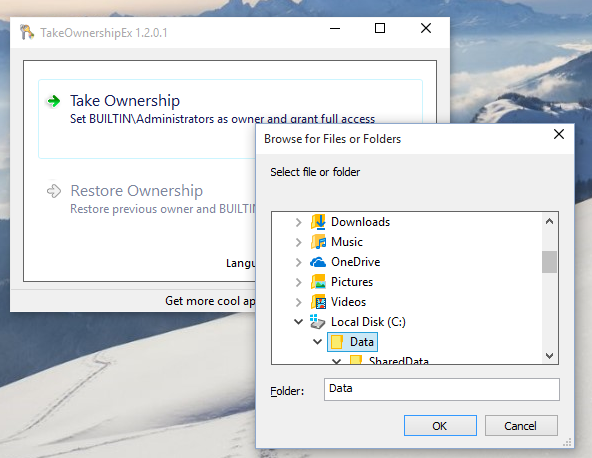
Take ownership of a file or folder in Windows 10 using TakeOwnershipEx
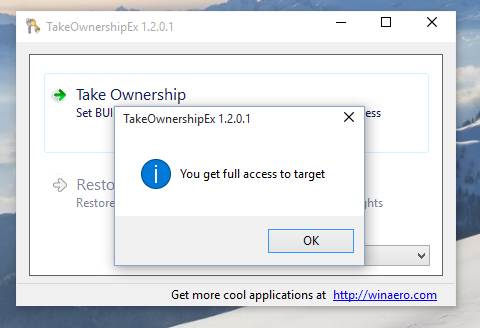
Alternatively, you can save a lot of your time using my freeware, TakeOwnershipEx. It allows you to change file ownership and access rights with one click. Just select the file or a folder and click the «Take Ownership» button:
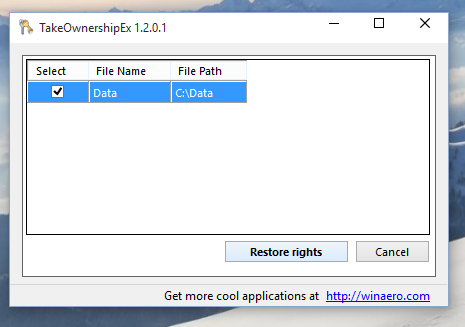
After you get full access to the desired file or folder, you can even restore the default permissions which it had. Click the «Restore ownership» button to restore it:
That’s it. Using the TakeOwnershipEx app, you can save your time, but even if you prefer using the built-in options in File Explorer, it shouldn’t be too hard task for you if you followed the instructions in this article.
Support us
Winaero greatly relies on your support. You can help the site keep bringing you interesting and useful content and software by using these options:
If you like this article, please share it using the buttons below. It won’t take a lot from you, but it will help us grow. Thanks for your support!