
Иногда может потребоваться отследить изменения, выполняемые программами или настройками в реестре Windows. Например, для последующей отмены этих изменений или для того, чтобы узнать, как те или иные параметры (например, настройки оформления, обновлений ОС) записываются в реестр.
В этом обзоре — популярные бесплатные программы, которые позволяют легко просмотреть изменения в реестре Windows 10, 8 или Windows 7 и некоторая дополнительная информация.
Regshot
Regshot — одна из самых популярных бесплатных программ для отслеживания изменений в реестре Windows, доступная на русском языке.
Процесс использования программы состоит из следующих шагов.
- Запустите программу regshot (для русскоязычной версии — исполняемый файл Regshot-x64-ANSI.exe или Regshot-x86-ANSI.exe (для 32-бит версии Windows).
- При необходимости переключите интерфейс на русский язык в правом нижнем углу окна программы.
- Нажмите по кнопке «1-й снимок», а затем — «снимок» (в процессе создания снимка реестра может показаться, что программа зависла, это не так — подождите, процесс может занять несколько минут на некоторых компьютерах).
- Произведите изменения в реестре (измените настройки, установите программу и т.п.). Я для примера включил цветные заголовки окон Windows 10.
- Нажмите кнопку «2-й снимок» и создайте второй снимок реестра.
- Нажмите кнопку «Сравнить» (отчет будет сохранен по пути в поле «Путь для сохранения»).
- После проведения сравнения отчет будет автоматически открыт и в нем можно будет увидеть, какие параметры реестра были изменены.

- При необходимости очистить снимки реестра нажмите кнопку «Очистить».

Примечание: в отчете вы можете увидеть куда больше измененных параметров реестра, чем по факту было изменено вашими действиями или программами, так как Windows сама часто изменяет отдельные параметры реестра во время работы (при обслуживании, проверке на вирусы, проверке обновлений и т.п.).
Программа Regshot доступна для бесплатной загрузки на сайте https://sourceforge.net/projects/regshot/
Registry Live Watch
Бесплатная программа Registry Live Watch работает по несколько иному принципу: не путем сравнения двух образцов реестра Windows, а путем мониторинга изменений в режиме реального времени. Однако программа не отображает самих изменений, а лишь сообщает о том, что такое изменение произошло.
- После запуска программы в верхнем поле укажите, какой раздел реестра нужно отследить (т.е. следить за всем реестром сразу она не может).

- Нажмите «Start Monitor» и сообщения о замеченных изменениях будут сразу отображаться в списке внизу окна программы.
- При необходимости вы можете сохранить журнал изменений (Save Log).


Скачать программу можно с официального сайта разработчика http://leelusoft.altervista.org/registry-live-watch.html
WhatChanged
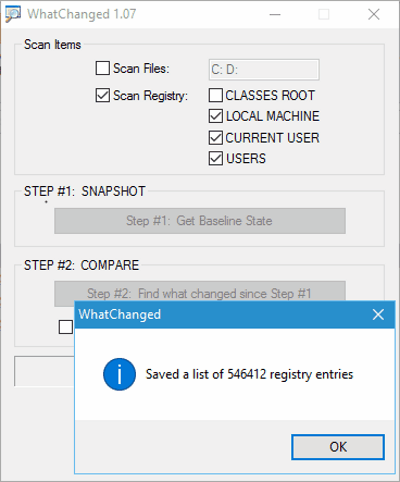
Еще одна программа, позволяющая узнать, что изменилось в реестре Windows 10, 8 или Windows 7 — WhatChanged. Её использование очень похоже на таковое в первой программе этого обзора.
- В разделе Scan Items отметьте «Scan Registry» (программа также умеет отслеживать изменения файлов) и отметьте те разделы реестра, которые нужно отследить.
- Нажмите кнопку «Step 1 — Get Baseline State» (получить первоначальное состояние).
- После изменений в реестре нажмите по кнопке Step 2 для сравнения исходного состояния с изменившимся.
- В папке с программой будет сохранен отчет (файл WhatChanged_Snapshot2_Registry_HKCU.txt) содержащий информацию об изменившихся параметрах реестра.


У программы нет собственного официального сайта, но она легко находится в Интернете и не требует установки на компьютер (на всякий случай перед запуском проверьте программу с помощью virustotal.com, при этом учитывайте, что в оригинальном файле есть одно ложное обнаружение).
Еще один способ сравнить два варианта реестра Windows без программ
В Windows присутствует встроенный инструмент для сравнения содержимого файлов — fc.exe (File Compare), который, в том числе, можно использовать и для сравнения двух вариантов ветвей реестра.
Для этого с помощью редактора реестра Windows экспортируйте необходимую ветвь реестра (правый клик по разделу — экспортировать) до изменений и после изменений с разными именами файлов, например, 1.reg и 2.reg.
Затем используйте в командной строке команду наподобие:
fc c:\1.reg c:\2.reg > c:\log.txt
Где указаны сначала пути к двум файлам реестра, а затем — путь к текстовому файлу результатов сравнения.
К сожалению, способ не подойдет для отслеживания значительных изменений (потому как визуально в отчете не получится ничего разобрать), а лишь для какого-то небольшого раздела реестра с парой параметров, где предполагается изменение и скорее для отслеживания самого факта изменения.
Here is a list of Best Free Software To Compare Registry of your PC. These software come in handy when you want to check what changes have been made to your computer’s Registry after installing/running a software, or over a period of time.
Registry comparison is done by taking 2 snapshots of Registry. The first snapshot is taken as a baseline reference, then the second snapshot is taken after installing/running a software or after a given time. After the snapshots are taken, these software compare the Registry snapshots to find out what files have been deleted, added, or modified in the Registry. Most of these software also let you export the comparison report in TXT or HTML format.
This list includes the use of default Windows tools (Command Line Tool and Registry Editor) and third party software as well. Some folks prefer going with conventional and basic ways, and for that, File Comparison command in CMD is used, which also saves comparison result in TXT format. However, third party software to compare Registry automate the process and save time and effort.
Go through the list to find out more about these software for Registry Comparison, and you will also get to know How to Compare Registry using the mentioned software.
My Favorite Software To Compare Registry:
I like Regshot the most as Registry Comparing software. Its a very basic software, designed just for one job, that is to compare Registry. The process for Registry comparison is pretty straight forward, and it also lets you save results in TXT or HTML format.
You can also checkout the list of best free Registry Monitor Software, Registry Backup Software, Registry Cleaner Software.
Regshot
Regshot is an open source Registry comparison software for Windows. It is a smart and simple utility, designed just to compare Registry. It lets you take 2 snapshots of your computer’s Registry at different instances.
Say, you want to compare Registry status after making some changes to your PC. You can take the 1st shot before making the changes, then take the 2nd shot afterwards. Before you begin comparing the Registry screenshots, you can select whether to save the comparison log as TXT or HTML. It also lets you select an output location to save the comparison log.
You will also find a Clear option, which lets you get rid of 1st shot values stored, so that you can start fresh.
When you check the comparison log, you will find the compared values of Keys Added, Values Added, Values Modified, and Total Changes in the Registry.
What Changed
What Changed, as the name suggests, tells you what changed in your computer’s Registry by comparing Registry snapshots. Not only you can compare Registry files selectively, you can also compare all the drives of your PC. Under Registry, you can select to scan from Classes Root, Local Machine, Current User, or Users.
It lets you take a Baseline snapshot of Registry as a reference point. Now you can take the second snapshot of Registry after some time or after any changes are made to system. The progress of scan is displayed and you can abort the process any time you want.
An option to clear temp files is available, so that you can start fresh with getting a baseline state of Registry.
After the scan is complete for step 2, a report with Registry comparison data is saved in TXT format in the folder where the EXE file of this software is located.
InstallSpy
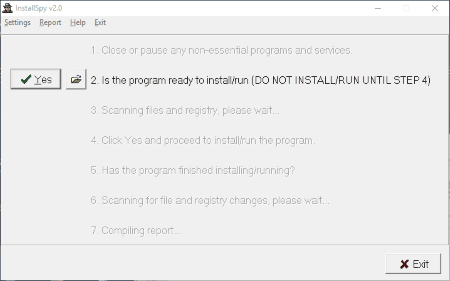
InstallSpy is one of the best software to compare Registry. It mainly focuses on tracking changes made to Registry by installing a software or after running a software. All of this can be carried out in 7 simple steps available on the interface. These steps guide you to perform a set of actions to compare Registry. You have to click Yes after carrying out each step. These steps are:
- Close or pause all non-essential program and services.
- Is the program ready to install/run (DO NOT INSTALL/RUN UNTIL STEP 4).
- Scanning files and registry, please wait.
- Click Yes and proceed to install/run the program.
- Has the program finished installing/running?
- Scanning for file and registry changes, please wait.
- Compiling report.
These steps for Registry comparison are very easy to carry out. After you click Yes for the last time, a detailed report is generated in HTML format. This report displays the deleted, new, and modified Registry files.
CRegistry Comparison
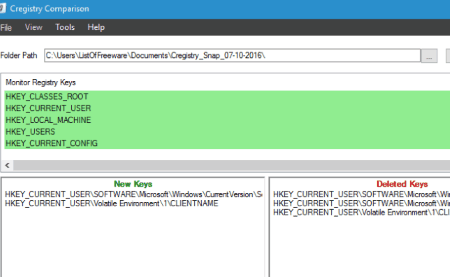
CRegistry Comparison is a simple software to compare Registry. It shows the difference between two Registry snapshots categorized under New Keys and Deleted Keys. It works the same as other Registry comparison software by taking a snapshot of Registry as base reference, then taking another snapshot afterwards.
It lets you scan the whole Registry, or selectively scan Registry from the options: Classes Root, Local Machine, Current User, Current Config and Users.
The comparison result can be saved as TXT file.
TrackWinstall
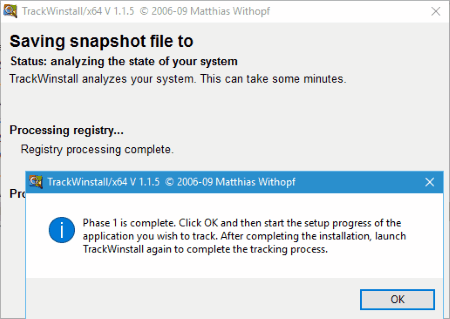
TrackWinstall lets you keep an eye on your PC’s Registry by two methods: One Click Protocol and Two Phase Mode. The first method lets you monitor changes made by installed software on your PC’s Registry; however, the second method lets you perform Registry comparison. It compares your computer’s Registry’s snapshots from two instances, and displays what changes have been made.
Basically you have to run a scan to take Registry snapshot as base reference, then run a software or wait for some time to take the second snapshot. The changed values of Registry are displayed on the interface.
Registry snapshot is saved as SNA file.
InstallWatch Pro
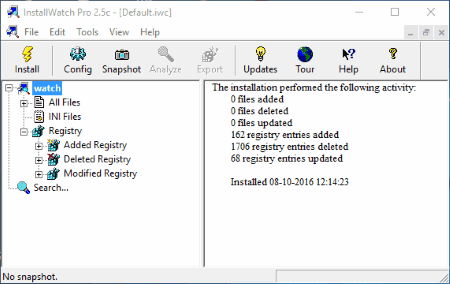
InstallWatch Pro is designed to check the changes made by a software on your computer’s Registry. It lets you compare Registry snapshot of your computer before and after installing a software.
Create a snapshot of your computer’s Registry before you Install a program. The Install option available on the interface lets you do so before you can install a program. After snapshot process is complete, install/run the program, and then take another screenshot for comparison.
After comparison is complete, a list of number of changes made to Registry is displayed. This list includes: Added files, Deleted files, Modified files, Added registry, Deleted registry, and Modified Registry. For detailed information for each category, click on the respective category.
It lets you export Registry snapshot as Original or New; this means, as it was before installation and after installation.
Registrar Registry Manager
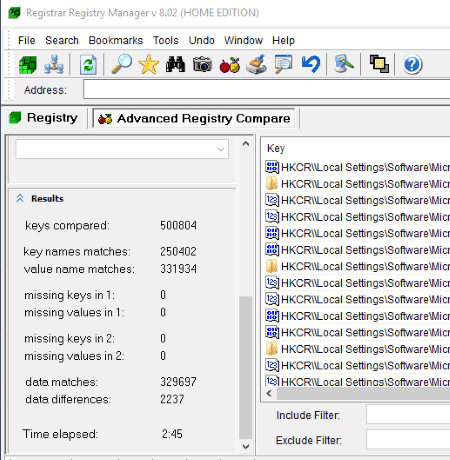
Registrar Registry Manager‘s home version is available for free, which can be used for Registry comparison. It is a Registry manager software, and can be utilized to perform various Registry based activities, such as: editing Registry, monitoring Registry, Registry backup/restore, Registry comparison, etc.
The Advance Compare option lets you compare Registry snapshots before and after installation of a software. It lets you compare the whole Registry, or select from these comparison options: Key names, Values name, Compare data, and Case sensitive data compare.
After the Registry comparison, the result is displayed, which includes: Total key compare, Key name matches, Value name matches, Missing keys, Data matches/Difference, and Time elapsed.
The Pro version of this software lets you export the Registry comparison result.
CMD
Using Window’s inbuilt Command Line Tool (CMD) to compare Registry is a basic way to do it. It takes 2 Registry backup files, then compares them and saves comparison data as a TXT file. To carry out Registry comparison, first you need to save Registry backup data from two instances at a similar location. After saving Registry backup, run the File comparison tool using CMD.
How to generate Registry backup:
- Open Run dialog box by pressing Windows Key + R or by typing Run in the Start menu.
- Now type Regedit in the Run dialog box to open Registry Editor.
- Current Registry backup can be saved easily. Go to File>Export and save Registry backup in .Reg format.
- Repeat the above 3 steps to generate another Registry backup file after making changes to your computer or after a given time period.
After generating Registry backups, you will have to open Command Prompt. Press Windows key + R to open Run dialog box again, then type CMD in it and press Enter. This opens Command Prompt. Now you have to change the active directory in CMD to the directory where the Registry files are stored. Changing directory in Command Prompt is a very basic and easy affair.
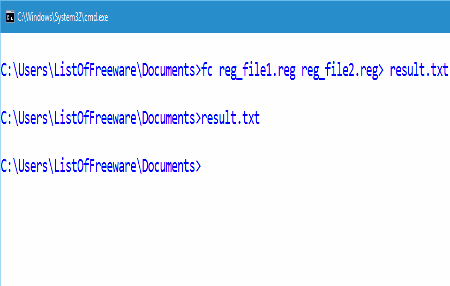
Now type the following command, in order to run the Registry comparison:
fc registryfile1.reg registryfile2.reg > result.txt
Here registryfile1.reg and registryfile2.reg are the Registry backups that I saved on my PC. In place of registry backup names that I entered, you will have to enter the file names of the Registry backups you create. The result of file comparison will be saved in TXT format at the same location where Registry backups are located. You can name the TXT file to whatever you want. Here I have used Result.txt as filename of the comparison file.
Although there are software that automate this long process, some people find it convenient to carry out the process of Registry Comparison through Command Prompt.
| RegistryChangesView v1.30 Copyright (c) 2017 — 2023 Nir Sofer |
See Also
- OfflineRegistryFinder — Scan and search Windows Registry Hives (offline / external drive).
Description
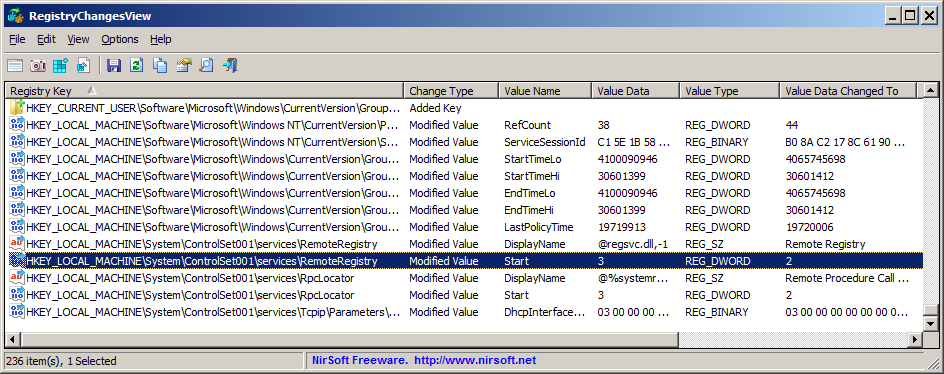
RegistryChangesView is a tool for Windows that allows you to take a snapshot of Windows Registry and later compare it with another Registry snapshots, with the current Registry or with Registry files stored in a shadow copy created by Windows.
When comparing 2 Registry snapshots, you can see the exact changes made in the Registry between the 2 snapshots, and optionally export the Registry changes into a standard .reg file of RegEdit.
System Requirements
This utility works on any version of Windows, starting from Windows XP and up to Windows 11. Both 32-bit and 64-bit systems are supported.
Versions History
- Version 1.30:
- Added option to change the sorting column from the menu (View -> Sort By). Like the column header click sorting, if you click again the same sorting menu item, it’ll switch between ascending and descending order. Also, if you hold down the shift key while choosing the sort menu item, you’ll get a secondary sorting.
- Added ‘Sort By’ toolbar button.
- Version 1.29:
- Fixed bug: RegistryChangesView failed to handle large values (with more than 16,344 bytes) when a value is added or removed.
- Version 1.28:
- Updated to work properly in high DPI mode (Toolbar, status bar, and properties window).
- Version 1.27:
- Fixed bug: When specifying relative path to create a Registry snapshot, the security hive was created under the System32 directory instead of the specified snapshot folder.
- Version 1.26:
- Fixed the /cfg command-line option to load the .cfg file from the current directory if full path is not specified.
- Version 1.25:
- Added option to create a Registry snapshot with the ntuser.dat hive of another user on your system, instead the user that runs the RegistryChangesView tool.
- Version 1.22:
- Added option to choose another font (name and size) to display in the main window.
- Version 1.21:
- Added ‘Case Sensitive’ option to the Quick Filter window.
- Version 1.20:
- Added more command-line options, which allow you to compare Registry snapshots and export the result to .reg file or csv/tab-delimited/xml/html file.
- Version 1.15:
- Added new columns: ‘Data Length’ and ‘Data Length Changed To’.
- Version 1.12:
- Fixed bug: RegistryChangesView failed to handle large values (with more than 16,344 bytes) properly and this problem also caused RegistryChangesView to crash on some systems.
- Version 1.11:
- Added /cfg command-line option to start RegistryChangesView with the specified config file.
- Version 1.10:
- RegistryChangesView now consumes less memory when loading large amount of items.
- Version 1.08:
- Fixed bug: RegistryChangesView generated .reg file incorrectly when the value names had ‘\’ or ‘»‘ characters.
- Fixed bug: In some circumstances, RegistryChangesView omitted the key name of the first .reg file value.
- Version 1.07:
- Fixed bug: RegistryChangesView exported REG_EXPAND_SZ values incorrectly.
- Version 1.06:
- Fixed bug: The browse button on the ‘Create Registry Snapshot’ window didn’t work.
- Version 1.05:
- Added /CreateSnapshot command-line option for creating Registry snapshot from command-line.
- Version 1.01:
- Fixed bug: Under certain conditions, RegistryChangesView skipped half of subkeys or crashed while reading Registry key that had many subkeys.
- Version 1.00 — First release.
Examples for useful things you can do with this tool
- You can create a Registry snapshot before installing a new software and then after the installation is completed, compare this Registry snapshot with the current Registry and see
all Registry changes made by the installer (Be aware that you’ll also see some changes made by Windows or other programs in the same time).
If there are Registry changes that you don’t like, you can generate a .reg file to revert back the changes. - If you make a change in Windows configuration from the GUI of Windows and you want to see how to make this change in the Registry, simply
create a Registry snapshot before making the config change and then after the configuration change, compare this Registry snapshot with the current Registry and optionally
generate a .reg file that makes this configuration change. - If there is unwanted change in the Registry of your system but you don’t have any previous snapshot, you can compare the current Registry with a shadow copy created by Windows and
try to locate the unwanted Registry changes. - You can also use this tool as a simple way to backup the Registry. The snapshot created by RegistryChangesView simply contains Registry hive files with the same name as the original one (ntuser.dat, SYSTEM,
SOFTWARE, and so on…)
Start Using RegistryChangesView
RegistryChangesView doesn’t require any installation process or additional DLL files. In order to start using it, simply run the executable file — RegistryChangesView.exe
After running RegistryChangesView, the main options window is displayed, which allows you to choose 2 Registry snapshots to compare.
For every snapshot , you can choose one of the following data sources: ‘Current Registry’, ‘Saved Registry Snapshot’, and ‘Shadow Copy’.
You can choose any combination you want, as long as ‘Data Source 1’ is not identical to ‘Data Source 2’. For example: you can choose to compare the Registry of 2 different shadow copies,
compare a shadow copy with current Registry, compare a saved Registry snapshot with current Registry, compare a saved Registry snapshot with another saved Registry snapshot, and so on…
If you want to generate a new Registry snapshot, simply choose ‘Saved Registry Snapshot’ in the data source combo-box and then click the ‘Create Registry Snapshot’ button.
In the ‘Create Registry Snapshot’ window choose the folder to save the Registry Snapshot, click the ‘Create Snapshot’ button, and wait a few seconds to create the snapshot.
You can also create a new Registry snapshot from the main window by pressing F8 (File -> Create Registry Snapshot).
After choosing the 2 Registry data sources to compare , you should also set the following options:
- Direction:
This field determines how the 2 Registry snapshots are compared. For example: if the direction you choose is ‘Registry Data Source 1 => Registry Data Source 2’, every Registry key or value that exists on the second snapshot but
doesn’t exist on the first snapshot will be displayed as ‘Added Key’ or ‘Added Value’. But if you choose the opposite direction (‘Registry Data Source 2 => Registry Data Source 1’), every Registry key or value that exists on the second snapshot but
doesn’t exist on the first snapshot will be displayed as ‘Removed Key’ or ‘Removed Value’.
The direction field also affects the way that .reg file is generated (‘Export Selected Items To .Reg File’ and ‘Copy As .Reg File Format’ options).
if the direction you choose is ‘Registry Data Source 1 => Registry Data Source 2’, the generated .reg file will make the changes from snapshot 1 to snapshot 2.
if the direction you choose is ‘Registry Data Source 2 => Registry Data Source 1’, the generated .reg file will make the changes from snapshot 2 to snapshot 1. - Hives to compare:
Allows you to choose which Registry hives to compare.
For example, If you only want to see the Registry changes on HKEY_CURRENT_USER, you should select the ‘HKEY_CURRENT_USER’ and ‘HKEY_CURRENT_USER\Software\Classes’ hives and deselect all others.
After choosing all option, click the ‘Ok’ button. RegistryChangesView will compare the 2 Registry data sources you chose and the result will be displayed on the main window.
Some Important Remarks
- By default, the SAM and SECURITY Registry hives are not selected for comparison and for generating new Registry snapshots.
You can choose these 2 Registry hives if you need to compare them, but you should be aware that there is a security risk:
These Registry hives contain encryption keys and password hashes of your system and if you leave a Registry snapshot with SAM/SECURITY hives that can be accessed by a non-admin user,
hacker that finds these files on your system might be able to use them for penetrating your system. - When you choose ‘Current Registry’ as one of the data sources, RegistryChangesView generates a temporary Registry snapshot on %temp%\TempRegSnapshotX folder (X = numeric value) and deletes it after the Registry comparison process is finished.
- The Registry snapshot created by RegistryChangesView is just a folder that contains the Registry files with their original name.
If you have a copy of Registry hives and you want to use them as a snapshot, simply copy them into a separated folder with their original filename ( Software, System, ntuser.dat, UsrClass.dat ) and choose this folder as a Registry snapshot.
Columns Description
- Registry Key:
Full path of the Registry key. - Change Type:
Type of Registry change:
Added Key, Removed Key, Added Value, Removed Value, Modified Value. - Value Name:
Name of the Registry value (Relevant only when the ‘Change Type’ is ‘Added Value’, ‘Removed Value’, or ‘Modified Value’) - Value Data:
The content of Registry value (Relevant only when the ‘Change Type’ is ‘Added Value’, ‘Removed Value’, or ‘Modified Value’).
If the ‘Change Type’ is ‘Modified Value’ — this columns shows the original value (before the change) and the ‘Value Data Changed To’ column shows the value after the change. - Value Type:
Type of Registry value (REG_SZ, REG_DWORD, REG_BINARY, and so on…).
If the ‘Change Type’ is ‘Modified Value’ — this columns shows the original value type (before the change) and the ‘Value Type Changed To’ column shows the value type after the change. - Value Data Changed To:
The content of Registry value after the change (Relevant only when the ‘Change Type’ is ‘Modified Value’). - Value Type Changed To:
The type of Registry value after the change (Relevant only when the ‘Change Type’ is ‘Modified Value’). - Key Modified Time 1:
The timestamp of the specified Registry key in the first snapshot. - Key Modified Time 2:
The timestamp of the specified Registry key in the second snapshot.
Generating .reg file
RegistryChangesView allows you to generate a .reg file that can be used to import with RegEdit tool of Windows.
There are 2 options to generate .reg file: (Both options work on selected items, you can press Ctrl+A to select all items)
- Export Selected Items To .Reg File (Ctrl+E): Exports into a .reg filename that you choose.
- Copy As .Reg File Format (Ctrl+R): Generates text in .reg file format into the clipboard.
The .reg file is generated according to the ‘Direction’ field in the Options window.
if the Direction is ‘Registry Data Source 1 => Registry Data Source 2’, the generated .reg file will make the changes from snapshot 1 to snapshot 2.
if the Direction is ‘Registry Data Source 2 => Registry Data Source 1’, the generated .reg file will make the changes from snapshot 2 to snapshot 1.
Quick Filter
If you want to see only Registry keys or values that contain specific strings, you can press Ctrl+Q (View -> Quick Filter),
and then in the quick filter text-box type the desired filter string.
Command-Line Options
| /cfg <Filename> |
Start RegistryChangesView with the specified configuration file. For example: RegistryChangesView.exe /cfg «c:\config\rcv.cfg» RegistryChangesView.exe /cfg «%AppData%\RegistryChangesView.cfg» |
| /sreg <Filename> | Save the Registry comparison result into a .reg file. |
| /stext <Filename> | Save the Registry comparison result into a regular text file. |
| /stab <Filename> | Save the Registry comparison result into a tab-delimited text file. |
| /scomma <Filename> | Save the Registry comparison result into a comma-delimited text file (csv). |
| /shtml <Filename> | Save the Registry comparison result into HTML file (Horizontal). |
| /sverhtml <Filename> | Save the Registry comparison result into HTML file (Vertical). |
| /sxml <Filename> | Save the Registry comparison result into XML file. |
| /CreateSnapshot [Folder] |
Creates a Registry snaphot in the specified folder. If the folder doesn’t exist, RegistryChangesView will create it. By default the snapshot will be created according to the last settings, but you can change it by using the commands below ( /CreateSnapshot.SoftwareHive , /CreateSnapshot.SystemHive and so on…) |
|
/CreateSnapshot.SoftwareHive [0 | 1] /CreateSnapshot.SystemHive [0 | 1] /CreateSnapshot.NTUserHive [0 | 1] /CreateSnapshot.UsrClassHive [0 | 1] /CreateSnapshot.DefaultHive [0 | 1] /CreateSnapshot.BCD00000000Hive [0 | 1] /CreateSnapshot.SAMHive [0 | 1] /CreateSnapshot.SecurityHive [0 | 1] |
Specifies which hives to include in the snapshot (1 = include, 0 = execlude)
For example: |
|
/DataSourceType1 [1 | 2 | 3] /DataSourceType2 [1 | 2 | 3] |
Specifies the data source to compare: 1 — Current Registry 2 — Saved Registry Snapshot 3 — Shadow Copy |
|
/RegSnapshotPath1 [Path] /RegSnapshotPath2 [Path] |
Specifies the path of the Registry snapshot when DataSourceType is 2 |
|
/ShadowCopyPath1 [Path] /ShadowCopyPath2 [Path] |
Specifies the path of the Shadow Copy when DataSourceType is3 |
|
/DataSourceDirection [1 | 2] |
Specifies the comparison direction: 1 — Registry Data Source 1 => Registry Data Source 2 2 — Registry Data Source 2 => Registry Data Source 1 |
|
/Compare.SoftwareHive [0 | 1] /Compare.SystemHive [0 | 1] /Compare.NTUserHive [0 | 1] /Compare.UsrClassHive [0 | 1] /Compare.DefaultHive [0 | 1] /Compare.BCD00000000Hive [0 | 1] /Compare.SAMHive [0 | 1] /Compare.SecurityHive [0 | 1] |
Specifies which hives to compare (1 = compare, 0 = don’t compare) |
Examples:
- Compare a saved Registry snapshot with current Registry, and export the result to regcomp1.reg:
RegistryChangesView.exe /DataSourceDirection 1 /DataSourceType1 2 /DataSourceType2 1 /RegSnapshotPath1 «C:\temp\RegSnapshot20190622075426» /sreg «c:\regcomp1.reg» - Compare 2 saved Registry snapshots and export the result to regcomp1.csv:
RegistryChangesView.exe /DataSourceDirection 1 /DataSourceType1 2 /DataSourceType2 2 /RegSnapshotPath1 «C:\temp\RegSnapshot20190622075426» /RegSnapshotPath2 «C:\temp\RegSnapshot20190623022112» /scomma «c:\temp\regcomp1.csv»
Translating RegistryChangesView to other languages
In order to translate RegistryChangesView to other language, follow the instructions below:
- Run RegistryChangesView with /savelangfile parameter:
RegistryChangesView.exe /savelangfile
A file named RegistryChangesView_lng.ini will be created in the folder of RegistryChangesView utility. - Open the created language file in Notepad or in any other text editor.
- Translate all string entries to the desired language.
Optionally, you can also add your name and/or a link to your Web site.
(TranslatorName and TranslatorURL values) If you add this information, it’ll be
used in the ‘About’ window. - After you finish the translation, Run RegistryChangesView, and all translated
strings will be loaded from the language file.
If you want to run RegistryChangesView without the translation, simply rename the language file, or move
it to another folder.
License
This utility is released as freeware.
You are allowed to freely distribute this utility via floppy disk, CD-ROM,
Internet, or in any other way, as long as you don’t charge anything for this and you don’t
sell it or distribute it as a part of commercial product.
If you distribute this utility, you must include all files in
the distribution package, without any modification !
Disclaimer
The software is provided «AS IS» without any warranty, either expressed or implied,
including, but not limited to, the implied warranties of merchantability and fitness
for a particular purpose. The author will not be liable for any special, incidental,
consequential or indirect damages due to loss of data or any other reason.
Feedback
If you have any problem, suggestion, comment, or you found a bug in my utility,
you can send a message to nirsofer@yahoo.com
RegistryChangesView is also available in other languages. In order to change the language of
RegistryChangesView, download the appropriate language zip file, extract the ‘registrychangesview_lng.ini’,
and put it in the same folder that you Installed RegistryChangesView utility.
| Language | Translated By | Date | Version |
|---|---|---|---|
| Arabic | Simo:Thami | 04/09/2018 | RegistryChangesView v1.08 |
| Brazilian Portuguese | João Mac-Cormick | 13/01/2021 | 1.27 |
| Czech | Jiří Cmunt | 14/04/2025 | 1.30 |
| Dutch | Jan Verheijen | 26/09/2023 | 1.30 |
| French | Largo | 16/09/2017 | 1.01 |
| French | Eric FICHOT | 10/08/2022 | 1.29 |
| German | «Latino» | 21/04/2025 | 1.30 |
| Greek | geogeo.gr | 06/05/2018 | 1.07 |
| Hungarian | Timinoun | 03/08/2024 | 1.30 |
| Italian | Andrea Carli e bovirus | 25/09/2023 | 1.30 |
| Japanese | maboroshin | 28/01/2020 | 1.25 |
| Japanese | youzeeen | 12/06/2021 | 1.28 |
| Persian | ZendegiyeSabz | 01/10/2023 | 1.30 |
| Polish | Hightower | 29/09/2023 | 1.30 |
| Russian | traumig (update by Ghaal) | 07/07/2019 | 1.20 |
| Russian | Òàõòàóëîâ Þðèé | 29/02/2024 | 1.30 |
| Simplified Chinese | DickMoore | 13/06/2021 | 1.28 |
| Simplified Chinese | https://www.52pojie.cn | 04/12/2023 | 1.30 |
| Slovak | František Fico | 02/10/2023 | 1.30 |
| Spanish | Ricardo A. Rivas | 14/12/2020 | 1.27 |
| Traditional Chinese | Danfong Hsieh | 25/09/2023 | 1.30 |
| Turkish | HARUN ARI | 25/09/2023 | 1.30 |
| Ukrainian | Lembergman (update by Ghaal) | 07/07/2019 | 1.20 |
Если вам часто приходится иметь дело с REG-файлами или вообще с реестром, наверняка вы уже сталкивались с необходимостью сравнить два ключа реестра на предмет отличий. Поскольку файлы реестра являются текстовыми, проанализировать их можно с помощью любой программы или даже онлайн-сервиса для сравнения текстовых документов. Правда, у такого подхода есть один недостаток – большинство подобных приложений сравнивают файлы построчно, тогда как файлы реестра лучше сравнивать логически.
Поэтому использовать для сравнения файлов реестра лучше узкоспециализированные инструменты, например, бесплатную консольную утилиту Regdiff.
Эта небольшая портативная программка позволяет не только сравнивать, но также объединять кусты, разделы и REG-файлы, автоматически удаляя или добавляя ключи, параметры и значения с использованием специального режима.
Чтобы вам стало все понятно, приведем несколько примеров работы с этим инструментом.
Сравнение двух REG-файлов
У нас есть два экспортированных в REG-файлы ключа HKLM\SOFTWARE, в которых имеются неизвестные пока нам отличия. Давайте узнаем, чем именно отличаются эти оба файла.
Запускаем командную строку или PowerShell и переходим в расположение исполняемого файла утилиты. Туда же лучше скопировать и сравниваемые файлы, чтобы не заморачиваться лишний раз с полными путями.
Формируем и выполняем команду
./regdiff.exe software1.reg software2.reg
Утилита прочитает оба файла и выведет в консоль полный список изменений. Например, из данного скриншота видно, что в файле software2.reg утилита Regdiff обнаружила в общей сложности 28 отличий.
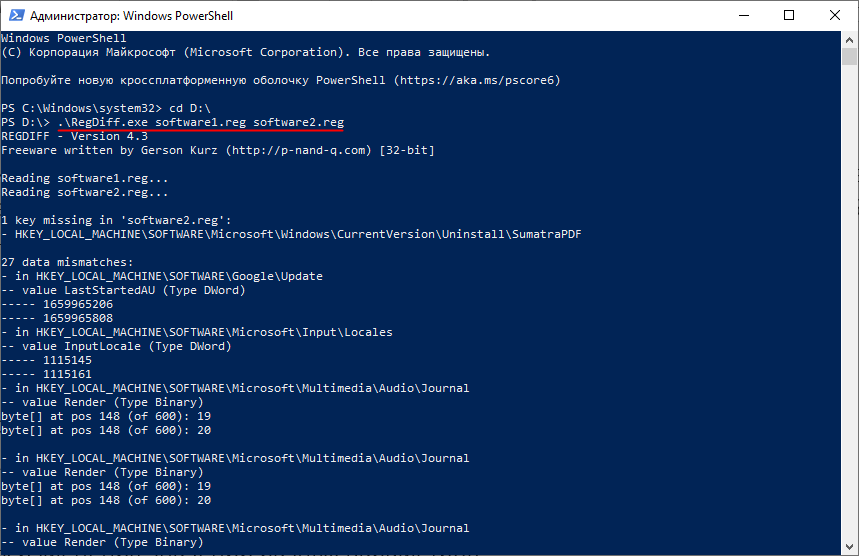
Так, сообщение key missing in ‘software2.reg’: указывает, что во втором файле реестра отсутствует целый ключ. А вот так выглядит сообщение, указывающее на изменение значения параметра:
— in HKEY_LOCAL_MACHINE/SOFTWARE/Google/Uрdate
— value LastStartedAU (Type DWord)
—— 1659965206
—— 1659965808
Говоря простым языком, в указанном ключе реестра было изменено значение DWORD параметра LastStartedAU. В первом файле в качестве значения было задано число 1659965206, а во втором файле значение уже равняется 1659965808.
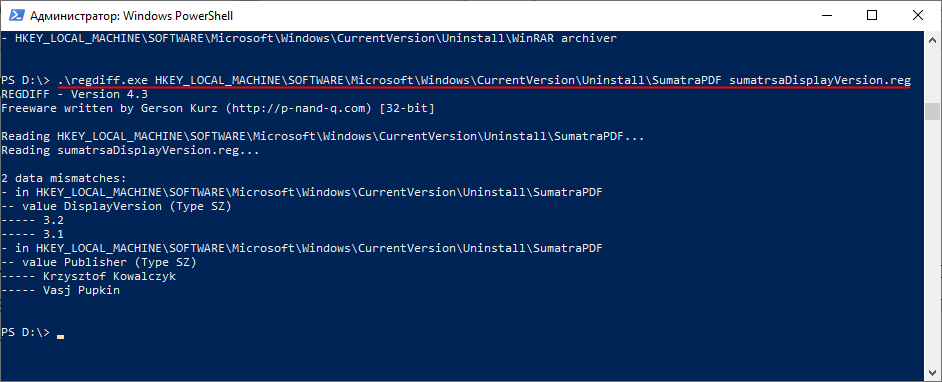
Сравнение раздела и REG-файла
Сравнивать можно не только файлы с файлами, но и ключи с файлами.
Тут всё так же просто, в приведенной выше команде нужно лишь заменить имя первого файла сравниваемым ключом реестра.
./regdiff.exe ключ_реестра REG-файл
Файлы отличия и слияния
Еще одной полезной функцией утилиты является создание файлов различий и слияния.
Допустим, у вас есть два имеющих отличия файла, и вы хотите не просто их сравнить, но и экспортировать найденные отличия в отдельный файл.
Для этого в конец команды сравнения нужно добавить параметр /diff и указать имя создаваемого файла, вот так:
./regdiff.exe 1.reg 2.reg /diff differences.reg
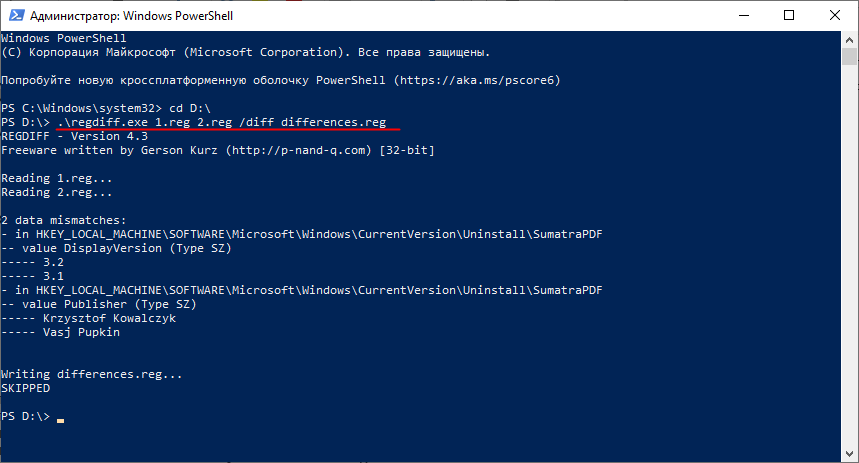
При этом будут действовать следующие правила:
- Если ключ отсутствует в файле 1, но имеется во втором файле, ключ будет добавлен.
- Если ключ отсутствует в файле 2, но имеется в файле 1, он будет удален.
- То же самое касается параметров и их значений.
Аналогичным образом можно создавать файлы слияний, то есть файлы, в которых содержимое обоих REG-файлов будет объединено в один файл.
Для этого в конец команды добавляется параметр /merge плюс имя объединенного файла:
./regdiff.exe 1.reg 2.reg /diff merged.reg
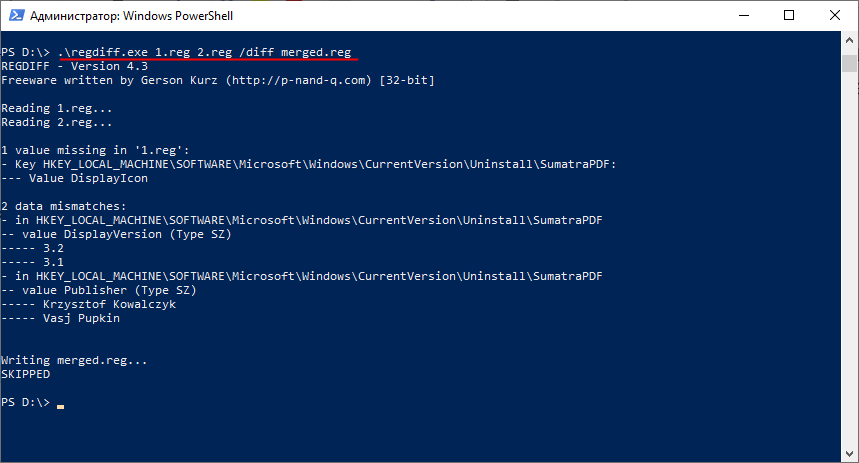
Правила при этом будут действовать следующие:
- Вся информация из файла 2 включается в файл 1.
- Если ключ имеется в файле 1, но отсутствует в файле 2, ключ удаляется.
- То же самое касается параметров с их значениями.
И это еще не все возможности инструмента.
Утилитой Regdiff также поддерживается экспорт файлов реестра, в том числе в формате XML, сортировка их содержимого по алфавиту, удаление из файлов пустых ключей и запись данных из файлов в реестр.
Получить более подробную информацию об инструменте и его возможностях вы можете на сайте разработчика p-nand-q.com.
RegistryToolbox
Windows Registry binary files comparison Tool.

Functionality
On the Left panel we can find 4 main buttons that are
1. Load Registry
What it does it is to open a Windows Registry Hive binary
Files located on C:\Windows\System32\Config
i.e System, Software from a Windows PC or VM

You can find this files from differente sources (IaaS Disk report)
or tools like https://github.com/Azure/azure-diskinspect-service or the new VM Inspector
(https://learn.microsoft.com/en-us/troubleshoot/azure/virtual-machines/vm-inspector-azure-virtual-machines)
When selected it’s going to ask for a File path

You can explore the Registry tree and move to check the values
If selected for example in the previous image you can find the Key Entry call Control if you press B you are going to go to BackupRestore key so it’s going to look in the subkeys
As well you can use the mouse to move in the Registry Tree explorer
As well you can go to an specific registry with the path
Just type the Registry key path that you want to go and Press the Blue arrow button
For example in Regedit on windows a path looks like this
HKEY_LOCAL_MACHINE\SYSTEM\ControlSet001\Control\Terminal Server\WinStations\RDP-Tcp
Registry Toolbox uses paths like this, please see that the HKLM\System it’s not in the path as this File is a System hive so only contains the subcontents so the Paths needs to remove the HLM\System and HLM\Software if this files are loaded
Example of a Valid path
ControlSet001\Control\Terminal Server\WinStations\RDP-Tcp

2. Load 2 Hives
Please Select the second option on the left panel call Load hives
When the 2 files are loaded you are going to see the tool like this

You can customize the name of the registry for example on the left i wrote Working and on the right Not Working.
As well you can see the file path open
Example C:\temp\DemoRegToolbox\SystemBefore
Remember Windows Registries files have no extension on the names

Press to customize the Title color of the panel example in this case was red selected to show Not working
Comparaison
When two registries opened if you click on the Button
COMPARE KEYS

You are going to see that the Registry Toolbox it’s going to show on the registry Tree on Red in bold text the keys that have differences
If you click in SETUP in this example you can see
- On the top you can see the registry tree differences
- If you open the Setup key you can see it contains differences on the key values SystemPartition and Respecialize
Red: Means that the value is different between registries
Light blue: means that the value it is on a registry but not in the other in this example
respecialize Its on the registry on the left but not in the right.

CONGRATULATIONS
You can now find differences on your Windows Registry data.
TIP
If you are comparing a value on the left and you want to see the same value on the right please press
MATCH PATH button this will set the values of the Registry Path equally to the same place

- Export .REG (Experimental)
On the left registry or with one registry loaded click on the Registry tree and then select export, this is going to export the registry to .REG format
- Compare .Reg (it requires VSCODE installed)
It going to ask to open 2 .reg files and will open VS Code in comparaison mode.