
Будем честны, запись загрузочных USB флешек с Microsoft Windows на macOS — боль. Особенно для рядового пользователя, который, вероятно, никогда ранее не видел Терминал и не использовал виртуальные машины.
Без длительного вступления, хочу презентовать программное обеспечение собственной разработки, задачей которого является максимально упростить процесс записи флешек с Windows на macOS.
Стоит заранее отметить, что данное программное обеспечение является полностью бесплатным продуктом с открытым исходным кодом.
- Поддержка UEFI и Legacy загрузочных режимов (даже для Windows 11)
- Поддержка x64 и x32 образов
- Возможность удаления проверок TPM 2.0 и Secure Boot с образов Windows 11
- Оптимизация оригинальных образов Microsoft Windows для загрузки c FAT32 разделов (автоматическое разделение install.wim на части)
- Оптимизация образов Windows 7 и Vista для загрузки в EFI режиме
- Windows 11
- Windows 10
- Windows 8.1
- Windows 8
- Windows 7
- Windows Vista
На любой версии системы, начиная с Mac OS X Snow Leopard 10.6 и вплоть до последней на текущий момент — macOS Sonoma 14.0.
Поддерживаются компьютеры с процессорами Intel и Apple silicon.
Для начала необходимо загрузить образ нужной вам редакции Windows в .iso формате.
Стоит отметить, что на данный момент упор делался только на оригинальные сборки Microsoft Windows. Поэтому желательно использовать официальные релизы.
· Страница репозитория: Открыть на GitHub
· Страница с последней версией приложения: Открыть на GitHub
При первоначальном запуске вас может встретить сообщение вида:
Почему это происходит? Apple просит $100 за сертификат разработчика для подписи приложения. Платить я не готов, поэтому обходим это предупреждение.
После чего у нас появляется опция запуска приложения.
Приложение на данный момент доступно на двух языках: английский и русский. В качестве примера будет использована международная английская версия.
- Windows Image: Путь к образу с Microsoft Windows в .iso формате
- Target Device: Устройство назначения (USB флешка)
Если устройство не отображается (в основном происходит, если у вас Hackintosh с некорректно настроенной разметкой USB-портов), то в верхнем меню нажмите на «Отладка» → «Сканировать все диски». - Patch Installer Requirements: Включите, если хотите установить Windows 11 на компьютер, который не соответствует требованиям установщика (TPM 2.0 & Secure Boot)
- Install Legacy BIOS Boot Sector: Включите, если записываете образ для компьютера, который не поддерживает UEFI загрузку. Работает даже для Windows 11. (Данная опция требует перезапуска приложения с правами администратора, так как необходимо осуществлять прямую запись бут-сектора на диск)
- File System: Файловая система, в которую будет отформатирована флешка. Оставьте FAT32. exFAT не поддерживается на большинстве прошивок материнских плат.
Нажимаем на «Start«.
Если всё прошло без ошибок — поздравляю!
У вас теперь есть рабочая флешка с Microsoft Windows, которую вы создали на своём компьютере Mac!
Теперь вы можете загрузиться с установочной флешки на вашем ПК.
В качестве примера на скриншоте выше, я записал флешку с Windows 11 с поддержкой UEFI и Legacy, а также с пропатченными требованиями к железу!
| Workable Solutions | Step-by-step Troubleshooting |
|---|---|
| 1. Create Windows 10 Bootable USB on Mac with Boot Camp | Go to Finder. Choose Applications. Select Utilities. Open Boot Camp Assistant. Click on Continue…Full steps |
| 2. Create Windows 10 Bootable USB on Mac with UUByte ISO Editor | Install UUByte ISO Editor on your Mac. Connect the USB drive to the system. The software will detect the…Full steps |
| 3. Create Bootable USB on Mac for Windows with Disk Utility | Plug the USB drive into the system. Open Disk Utility. Format the USB flash drive via MS-DOS (FAT)…Full steps |
| 4. Using Terminal to Create Windows 10 Bootable USB on Mac | Plug the USB drive into your Mac. Open Terminal. To do so, choose Terminal from Utilities folder. Type…Full steps |
Do you want to create Windows 10 bootable USB on macOS Ventura/Monterey/Big Sur? Multiple reasons may prompt a user to do so. Firstly, a new operating system aids in clearing out existing malware. Secondly, it cleans up the system and improves efficiency. Moreover, you can easily create a bootable USB on Mac for Windows.
Creating a Windows 10 Bootable USB on a Windows computer is no big deal. But is it possible to create Windows 10 bootable USB on Mac without Bootcamp? Yes, you can! You can also create Mac bootable USB from Windows.
The latest silicon chips on Mac do not have Bootcamp installed. The new ARM chip architecture doesn’t allow it, so conventional Windows installation is impossible. However, multiple solutions can aid Mac users. It is hassle-free to create Windows 10 bootable USB on Mac with Terminal.
Here’s a video tutorial on how to create Windows bootable USB on a Mac, including Windows 11, 10, 8, 7, and older versions. Take a look!

How to Download Windows 10 ISO File for Bootable USB
The best option to attain the Windows 10 ISO File is to visit Microsoft’s official website. Here are the steps you need to follow:
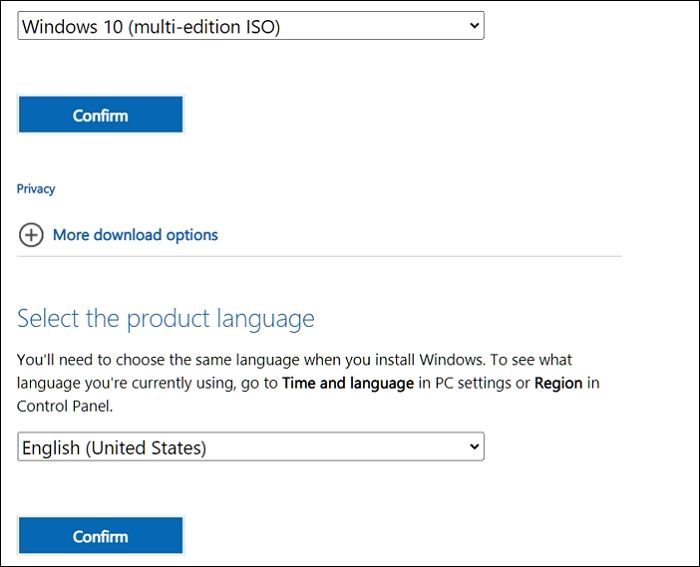
Step 1. Visit the Microsoft Windows 10 download page.

Step 2. Click on the dropdown under Windows 10 version, and then click on confirm.
Step 3. Next, select the language and edition. Click Confirm.
Step 4. Another page will open, giving you a download link. You can choose between Windows 10 32-bit ISO or 64-Bit ISO.
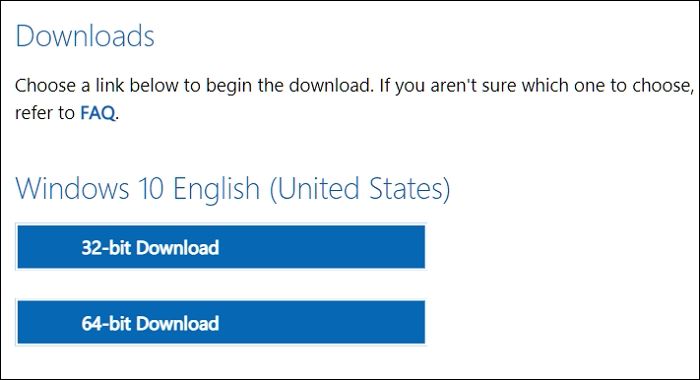
Step 5. Select where you want to save the ISO file. Wait for the download to complete.
How to Format a USB Correctly to Create Windows 10 Bootable USB
Before you go ahead with creating Windows 10 Bootable USB on Mac, it is vital to format the USB. Most users have no idea how to do this or why this is even important. Formatting the USB will erase all existing data and make the space free for the download. Moreover, you also need to ensure that the formatting is compatible with the system you will use it with.
Take a look at the steps you can follow to format drives on Macs:
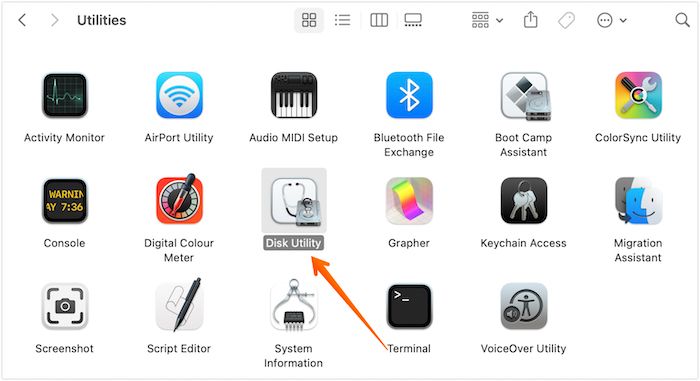
Step 1. Plug in the USB drive. Open Disk Utility. To do so, you need to open the Applications folder. Under that, open the Utilities folder, where you will find Disk Utility app.
Step 2. Choose the USB drive from the list. You will find it on the left-hand sidebar.
Step 3. Choose Erase. Now, type the name you want for the drive.

Step 4. Choose the Format you want. Select Erase.
Step 5. After some time, choose Done. Allow some time for the process to complete.
Download Recovery Software to Avoid Data Loss [Important]
Did you know you may lose data while using Mac to create a bootable USB? Yes! That’s a real possibility. If you want to create a Windows bootable USB on Mac, your Windows PC cannot boot and needs to recover data. Moreover, you can also face data loss after formatting the USB drive. In that case, taking the assistance of professional data recovery software is a great idea.
The EaseUS Data Recovery Wizard for Mac is a highly efficient and user-friendly data recovery tool for Mac. With this tool, you can recover lost data due to various causes, such as malware attacks, USB formatting, accidental deletion, etc. Moreover, you can also retrieve data from Mac-based devices like SSD, HDD, fusion drive, and more!
EaseUS Data Recovery Wizard
- Recover unsaved Word documents on Mac. And it can recover deleted files, documents, photos, audio, music, etc.
- Support data recovery on multiple devices, including USB drives, memory cards, internal hard drives, and digital cameras.
- Recover data from unbootable Mac. If your Mac cannot boot, you can create bootable media with this recovery tool.
Other exciting features include file filters, data protection, iCloud recovery, etc. You can also seek remote IT support if you encounter any issues. Are you eager to use EaseUS Data Recovery Wizard for Mac? In that case, follow these simple steps listed here:
Step 1. Search for lost files
Select the disk location to search for lost files (it can be an internal HDD/SSD or a removable storage device) on macOS Sierra, High Sierra, Mojave, Catalina, Big Sur, Monterey, Ventura, and the latest Sonoma. Click the «Search for lost files» button.

Step 2. Go through the scanning results
EaseUS Data Recovery Wizard for Mac will immediately scan your selected disk volume and display the scanning results.

Step 3. Select the file(s) and recover
In the scan results, select the file(s) to preview and click the «Recover» button to have them back.

Method 1. Create Windows 10 Bootable USB on Mac with Boot Camp
One of the most straightforward solutions to create a Windows 10 Bootable USB on Mac is to use Mac Boot Camp Assistant. It is a multi-faceted boot program that requires an installed Windows ISO file and a USB drive.
Take a look at the steps you need to follow:
Step 1. Go to Finder.
Step 2. Choose Applications.
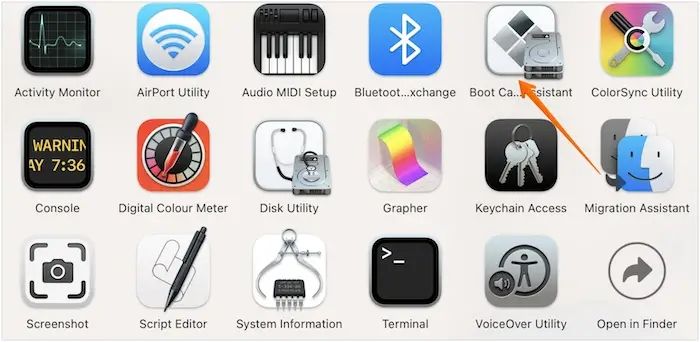
Step 3. Select Utilities.
Step 4. Open Boot Camp Assistant.
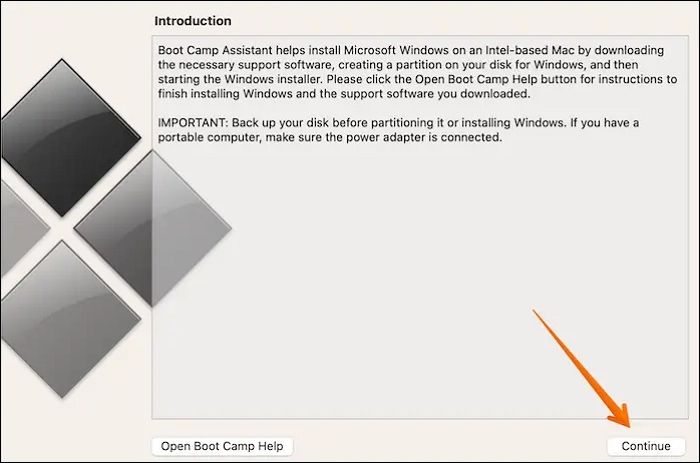
Step 5. Click on Continue.
Step 6. Select the «Create a Windows 10 or later version installs disk» option. Click on Continue. Select Choose.
Step 7. Import the ISO file. Go ahead with Continue. Wait for the process to complete.
Step 8. Check if the bootable USB is named WININSTALL.
Step 9. If it appears so, you can remove the USB.
Note: This solution is only applicable to Intel-based Macs. You can opt for the following methods if you have Macs with an M1 chip.
Method 2. Create Windows 10 Bootable USB on Mac with UU Byte ISO Editor
Another excellent method to create Windows 10 Bootable USB on Mac is with UUByte ISO Editor. The UUByte ISO Editor is a robust tool that enables users to complete the process easily. Most importantly, this app is fully compatible with Apple M1 and M2 Mac. In addition, you can run this app perfectly on the latest macOS Ventura. Here are the steps to follow:
Step 1. Download UUByte ISO Editor app from this link and Install it on your Mac.
Step 2. Connect the USB drive to the system.
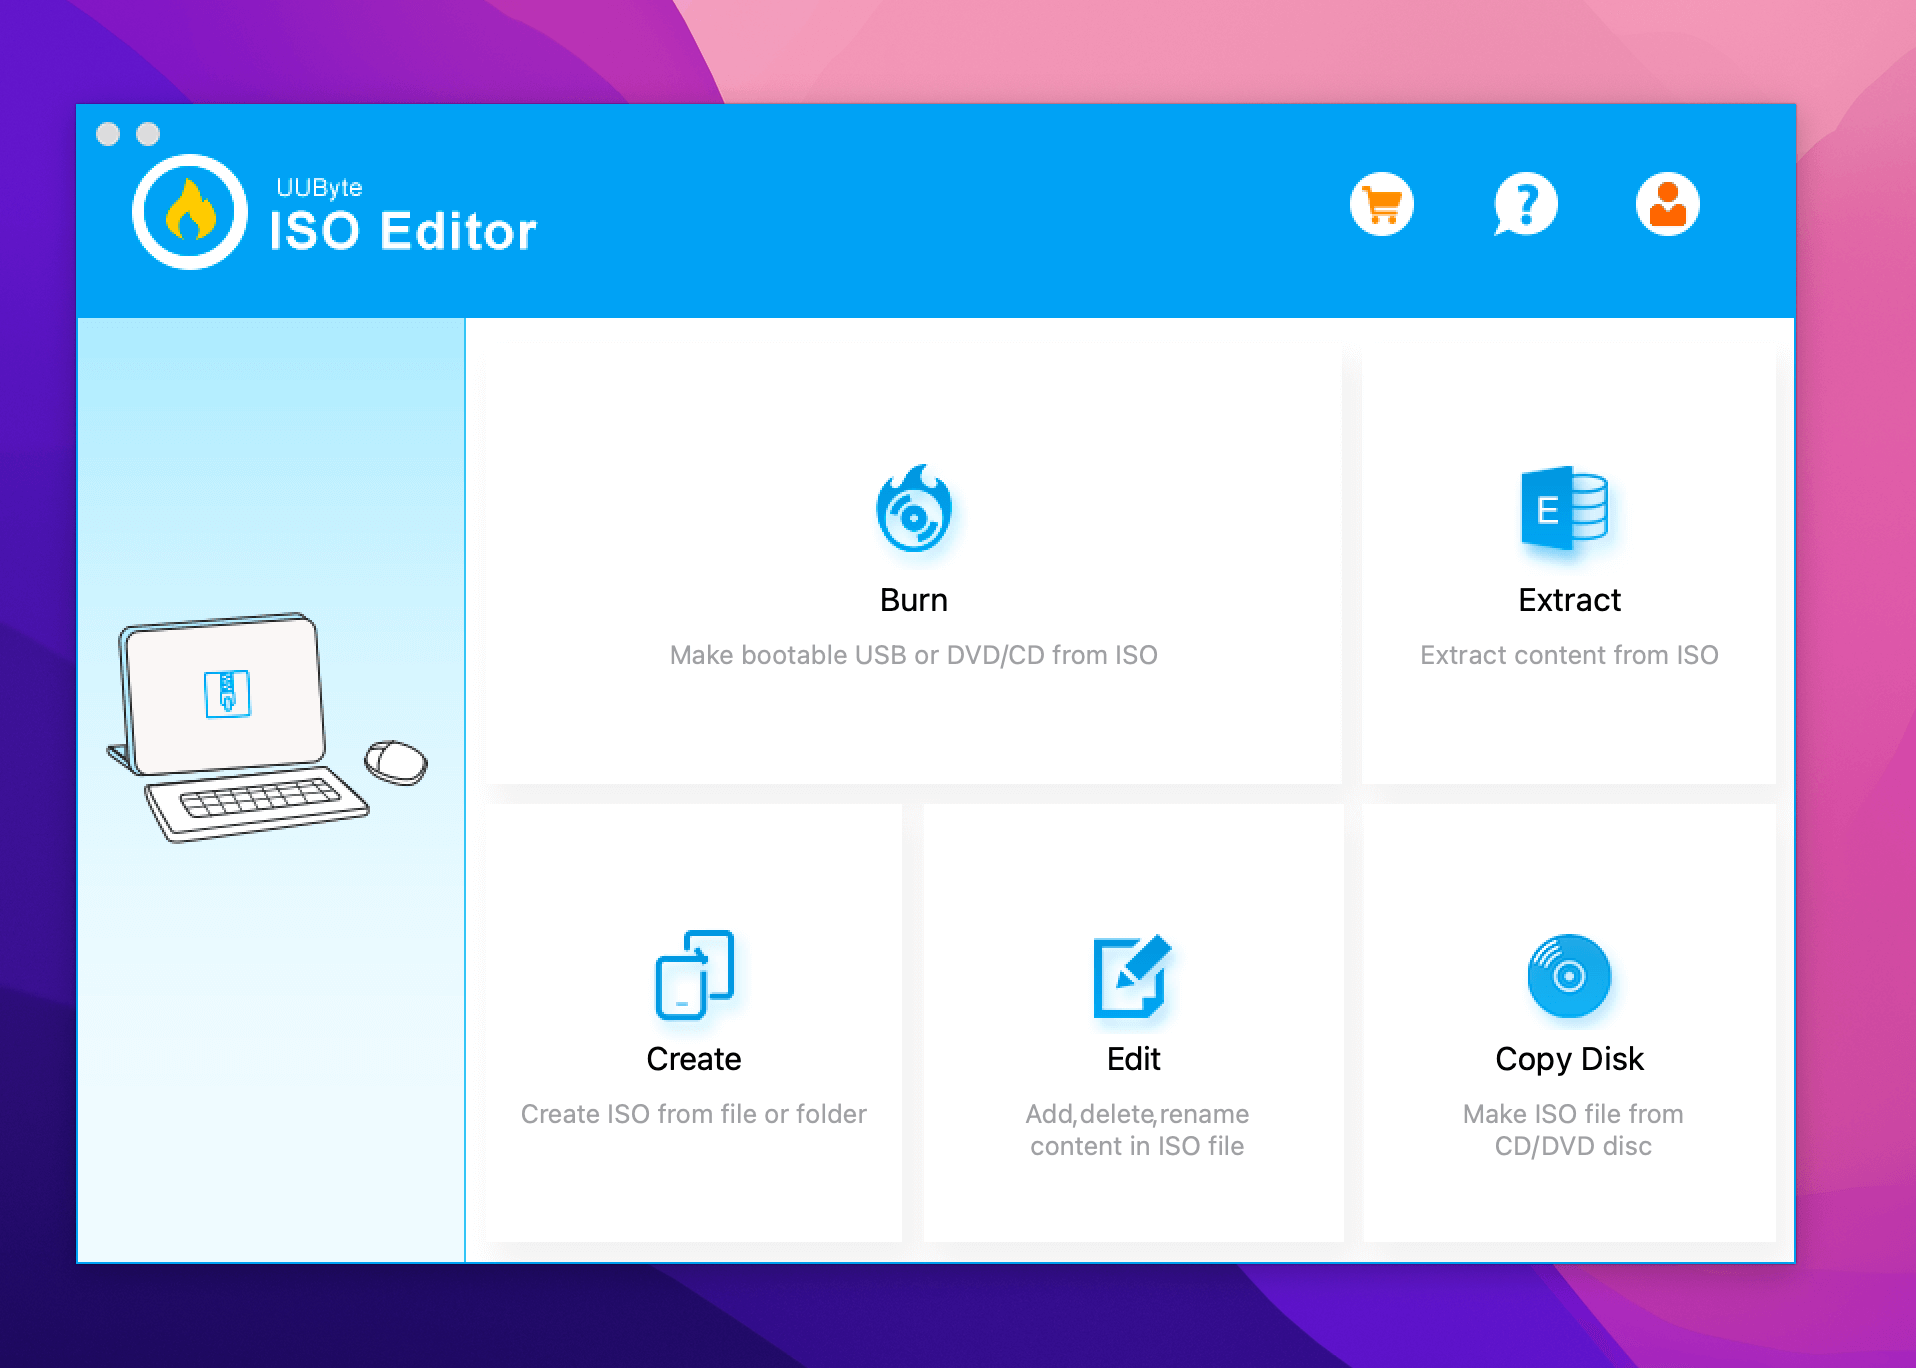
Step 3. Click the Burn tab on the welcome screen and you can see the software detect the USB.
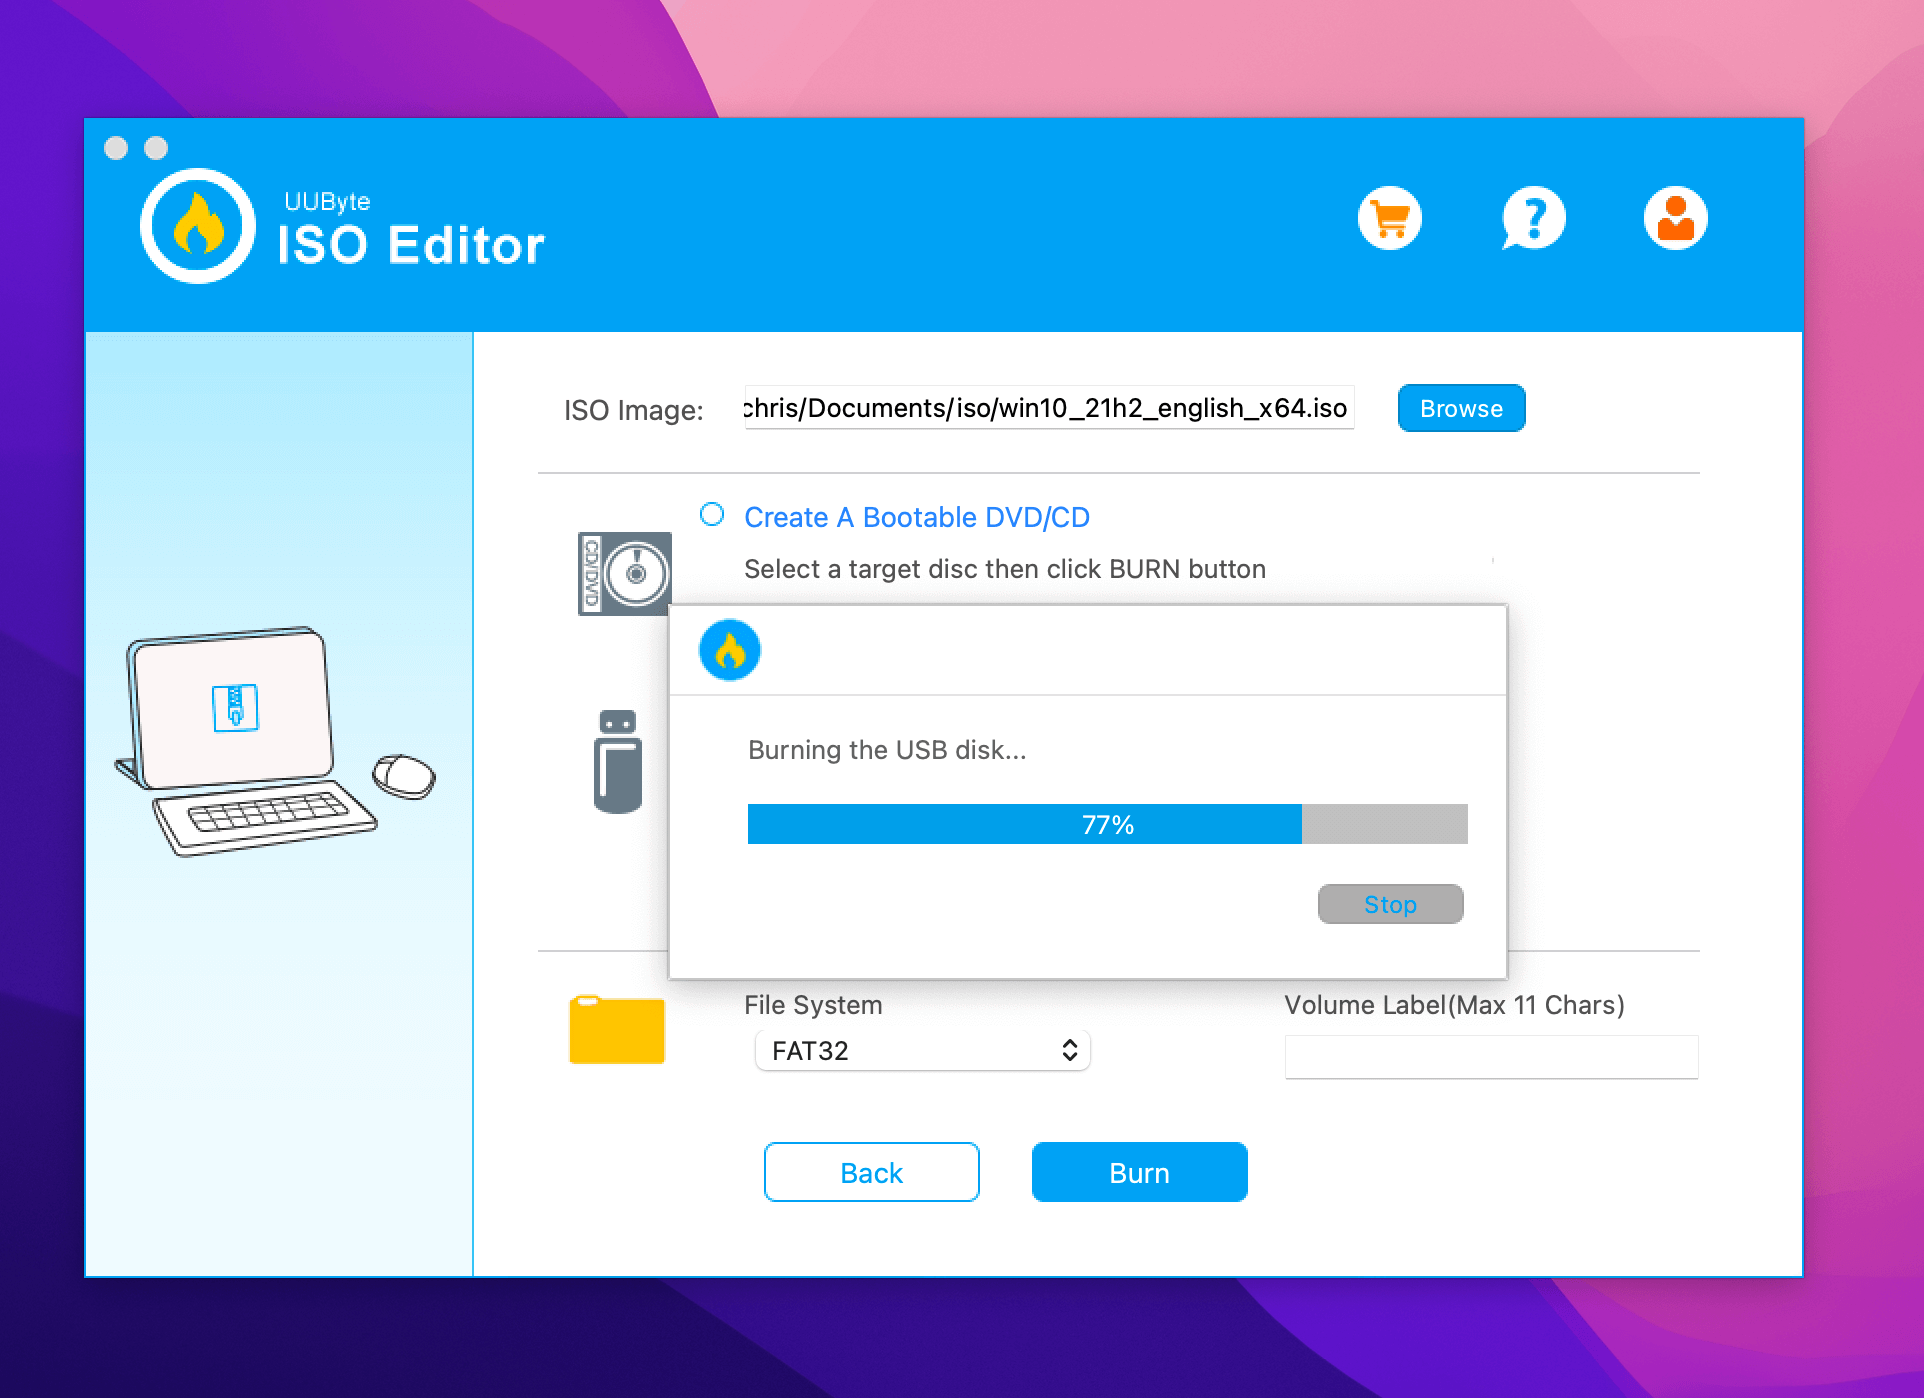
Step 4. Import Windows 10 ISO into the app and choose the right USB drive.

Step 5. Now, click the Burn button at the bottom to start the process. Wait for some time for the completion of the process. It takes approximately 7 minutes to create a bootable USB on Mac. During this step, you can see ISO Editor splits the install.wim file automatically at the end.
Note: While the process is simple, you should be very careful with it, especially don’t touch the USB device. If you have created Windows 10 bootable USB successfully, remember to share this post with more users!
Method 3. Create Bootable USB on Mac for Windows with Disk Utility
Did you know you can create Bootable USB on Mac for Windows with Disk Utility? For that, you need to follow some simple steps –
Step 1. Plug the USB drive into the system.
Step 2. Open Disk Utility.
Step 3. Format the USB flash drive via MS-DOS (FAT).
Step 4. Send the Windows ISO file to the USB.
Step 5. Wait for the ISO file writing process to complete.
Now, you can use the USB to install Windows on Mac. However, it is essential to understand that this method favors older Mac models. If you have the latest version, use other solutions.
Method 4. Use Terminal to Create Windows 10 Bootable USB on Mac
You can use Mac Terminal to create Windows 10 Bootable USB on Mac. We have also included a video to help out users. Take a look:
- 00:48 Download the Windows 10 ISO file.
- 03:00 Copy the ISO file to the USB drive.
- 04:24 Use the Homebrew package manager.
- 07:32 Create a new folder on the USB drive and copy the downloaded contents.
Check out the written steps to follow:
Step 1. Plug the USB drive into your Mac.
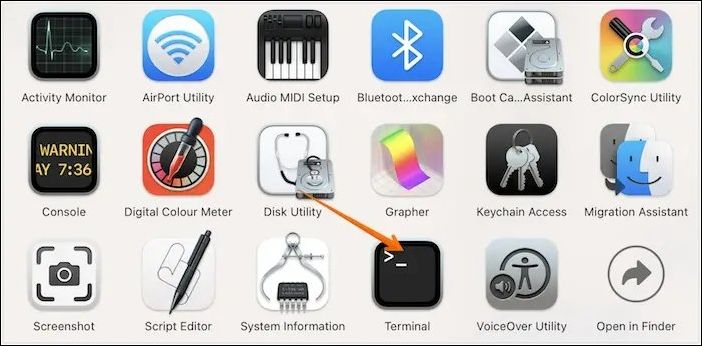
Step 2. Open Terminal. To do so, choose Terminal from Utilities folder.
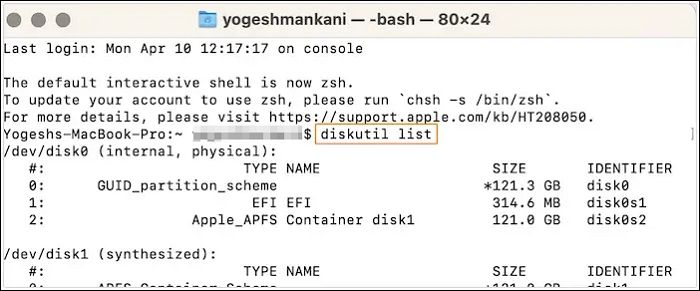
Step 3. Type diskutil list to find the USB name and press the Enter key.
Step 4. Type diskutil eraseDisk MS-DOS «WINDOWS10» GPT drive name@. Here, the drive name is the name of your USB drive.
Step 5. Download the Windows 10 ISO file.
Step 6. Type hdiutil mount ~/Downloads/WINDOWS10IMAGE.iso. Here, it would be best if you used the ISO file name instead of WINDOWS10IMAG.
Step 7. Next, type cp -rp /Volumes/MOUNTED-ISO/* /Volumes/WINDOWS10/. Here, MOUNTED will be replaced by the name of the ISO mounted.
Step 8. Lastly, type hdiutil unmount/Volumes/MOUNTED-ISO. The Terminal will close, and you will get a bootable USB.
If you are also interested in creating macOS Sonoma bootable USB on Mac, check the following passage:
Create macOS Sonoma Bootable USB Installer
If you have macOS Sonoma installed, then it’s essential to create a bootable USB in case of an issue with the OS. Read more >>
Summary
Isn’t creating Windows 10 Bootable USB on Mac easy? This article lists four methods you can use to create Bootable USB on Mac for Windows. You can follow these hassle-free steps and get it done.
However, data loss is always possible while creating Windows 10 Bootable USB on Mac. For that, you need help from reliable data recovery software. You can check out EaseUS Data Recovery Wizard for Mac in that case. It is a practical yet easy-to-use tool that aids in recovering lost data.
Haven’t you installed EaseUS Data Recovery Wizard for Mac yet? Download it today!
Create Windows 10 Bootable USB on Mac FAQs
You can create Windows 10 Bootable USB on Mac in these different ways. To know more, read the questions and answers listed below —
1. How to create macOS Ventura bootable USB on Mac?
To create macOS Ventura bootable USB on Mac, follow these steps:
- 1. Go to the Apple Store and download macOS Ventura.
- 2. Run Terminal on the system.
- 3. Connect the USB to the Mac.
- 4. Type in sudo /Applications/Install\ macOS\ Ventura. app/Contents/Resources/createinstallmedia —volume /Volumes/MyVolume in the Terminal.
- 5. Hit the Return key.
- 6. Enter the password when prompted.
2. How to rescue data from an unbootable Windows computer?
There are multiple ways to rescue data from an unbootable Windows computer. For instance, you can unplug various cables and reset the connection. You can also use the BIOS feature or eject RAM. However, if nothing works, you can opt for professional data recovery software, EaseUS Data Recovery Wizard for Mac.
3. Can I create Windows 10 bootable USB on a Mac with Terminal?
Yes, you can create Windows 10 bootable USB on a Mac with Terminal. But for that, you must use the diskutil, hdiutil commands with mount and unmount. You will also need to copy the ISO to the USB.
- 1. Download the ISO file from Windows.
- 2. Plug the USB drive into your system.
- 3. Enter «diskutil list» on Terminal to see where the USB is.
- 4. Enter «diskutil eraseDisk MS-DOS «WINDOWS10″ GPT@»
- 5. Now, enter «hdiutil mount ~/Downloads/WINDOWS10IMAGE.iso»
- 6. After that, type «cp -rp /Volumes/MOUNTED-ISO/* /Volumes/WINDOWS10/»
- 7. At last, enter «hdiutil unmount /Volumes/MOUNTED-ISO».
4. How to install macOS Ventura on a Windows PC?
To install macOS Ventura on a Windows PC, follow these steps:
- 1. Create a Bootable USB installer for macOS Ventura.
- 2. Go ahead with the EFI partitions configuration.
- 3. Adjust BIOS settings.
- 4. Install macOS Ventura on the system.
Если вам требуется создать загрузочный установочный USB накопитель с Windows 11/10 в MacOS, особенно на устройствах с процессорами Apple Silicon (M1, M2, M3, M4), это может вызвать проблемы: описанные в сети способы сделать это вручную понятны не всем, а однотипные платные приложения не всегда работоспособны.
WinDiskWriter — бесплатное приложение с открытым исходным кодом, позволяющее легко записать загрузочную флешку с Windows 11, Windows 10 или предыдущей системой на MacBook и других компьютерах Mac с процессорами Apple Silicon и Intel, о нём и пойдёт речь далее в статье.
Использование WinDiskWriter
Скачать последнюю версию WinDiskWriter можно с официальной страницы GitHub в разделе Releases.
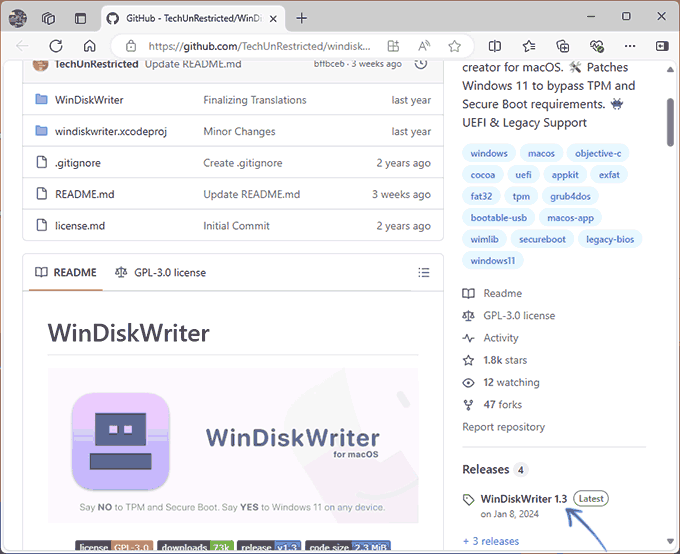
Достаточно распаковать архив и запустить приложение: вы можете получить предупреждение безопасности MacOS о том, что не удается его проверить, потребуется подтвердить открытие (если кнопка запуска отсутствует, перезапустите приложение).
Дальнейшие шаги по созданию загрузочной флешки Windows 11/10 на MacOS не будут отличаться от таковых при использовании аналогичных программ в «родной» операционной системе, к тому же в приложении присутствует русский язык интерфейса:
- Укажите ISO образ Windows, который следует записать на флешку. Скачать его можно, например, с помощью CrystalFetch (к сожалению, для РФ загрузка блокируется) или другими способами. Поддерживаются образы ISO x64 (64-бит) и x86 (32-бит).
- Выберите флешку, на которую будет записан образ. Важно: все данные с накопителя будут удалены.
- Для Windows 11 вы можете установить отметку «Пропатчить требования установщика» для отключения проверки соответствия компьютера техническим требованиям системы.
- Отметка «Установить загрузочный сектор для Legacy BIOS» позволит создать флешку, которая будет загружаться как в UEFI, так и в Legacy режимах (по умолчанию — только UEFI).
- Выберите файловую систему: FAT32 (в этом случае файл install.wim в образе будет разбит на части, если он не может быть помещен на раздел FAT32) и ли ExFAT. Я использовал FAT32 — этот вариант дольше, но по отзывам работает надёжнее.
- Нажмите кнопку «Начать» для запуска записи накопителя. Подтвердите запись.
- Дождитесь завершения создания загрузочной флешки.


Готово, образ будет записан на флешку и её можно использовать для загрузки и установки Windows на ПК:
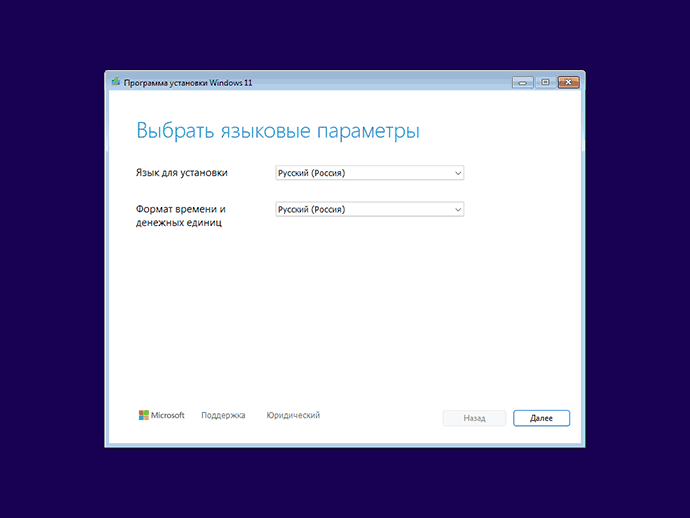
В моём тесте (запись на FAT32) с образом Windows 11 всё работало исправно, каких-либо проблем ни при записи, ни при последующей загрузке с созданного накопителя не возникло — всё прошло в штатном режиме. Для некоторых записанного накопителя может потребоваться отключение Secure Boot в БИОС/UEFI компьютера.
На близкую тему вас может заинтересовать: Как установить Windows на Mac с Apple Silicon M1, M2, M3.
This guide will walk you through the detailed steps on how to create a Windows 10 bootable USB on your Mac, with or without Boot Camp Assistant, regardless of your Mac chip and macOS version. Read on!
Whether you’re a Mac user looking to run Windows through Boot Camp, or you need a portable Windows environment on Mac devices, creating a Windows 10 bootable USB on Mac is indispensable. Depending on your macOS and Mac device, solutions to make bootable Windows 10 USB on Mac can vary.
Luckily, this post offers detailed guides on how to create a Windows 10 bootable USB on a Mac, covering systems from Catalina to Sequoia. For Apple M1/M2/M3 users, you can also find the right instructions.
How to Make a Windows 10 Bootable USB on Mac with Boot Camp
The method in this section applies to Intel-based Macs running Ventura and below, as the built-in Boot Camp Assistant is not available on the latest Sequoia. You won’t be able to proceed with newer Macs with Apple Silicon chips, including M1/M2/M3.
Boot Camp Assistant is an integral utility Apple provides within its macOS, designed to help users install Microsoft Windows on Intel-based Mac computers. Therefore, if your Mac happens to meet the range, here’s a streamlined approach to installing Windows 10 with Boot Camp Assistant.
Step 1. Download Windows 10 ISO File for Installation
Before embarking on your bootable USB creation journey, it’s essential to first secure a Windows 10 ISO file. Follow these outlined steps to download the necessary ISO image.
-
Navigate to the official Microsoft Windows 10 download page.
-
Select the Windows 10 edition you want and follow the on-screen instructions to download it.

-
Launch the tool you just downloaded, agree to the terms, and select ‘Create installation media (USB flash drive, DVD, or ISO file) for another PC’. Specify your desired language, architecture, and edition, ensuring to tick the ‘ISO file’ option, then hit ‘Next’ to download the Windows 10 ISO file.

Step 2. Free Up Mac Space (Highly Recommend)
Before creating a Windows 10 bootable USB, it’s crucial to ensure that your Mac has sufficient free space to accommodate an additional partition for Windows. If your Mac does, it’s all good to go. However, if it’s short on storage, this is where BuhoCleaner comes into play, a handy tool designed specifically for Mac users to efficiently clean up and free up disk space.

BuhoCleaner is a user-friendly application that excels in decluttering your Mac, optimizing its performance, and most importantly, in this context, reclaiming valuable disk space.
Here’s how you can use BuhoCleaner to prepare your Mac for the Boot Camp Assistant:
- Download BuhoCleaner by hitting on the button below and follow the installation instructions to get it up and running on your Mac.
- Open BuhoCleaner and click ‘Scan’ to know what’s occupying your Mac storage.
- After completing the scan, press the ‘View Details’ button, and choose the data you wish to eliminate, including junk files, unnecessary applications, and larger, older files. Then hit the ‘Remove’ button.
With enough disk space, we can go on creating a bootable Windows 10 USB on your Mac.
Step 3. Create a Windows 10 Bootable USB on Mac via Boot Camp Assistant
With the ISO file prepared, you can simply follow the steps below to make your Windows 10 bootable USB on your Mac:
-
Connect a USB flash drive with a minimum capacity of 16 GB to your Mac.
-
Open Boot Camp Assistant by navigating through Launchpad > Other.
-
Opt for the «Create a Windows 10 or later install disk» and proceed by clicking Continue. Here, the focus is solely on creating a bootable USB for Windows 10 on Mac, so avoid selecting the «Install Windows 10 or later version» option.
-
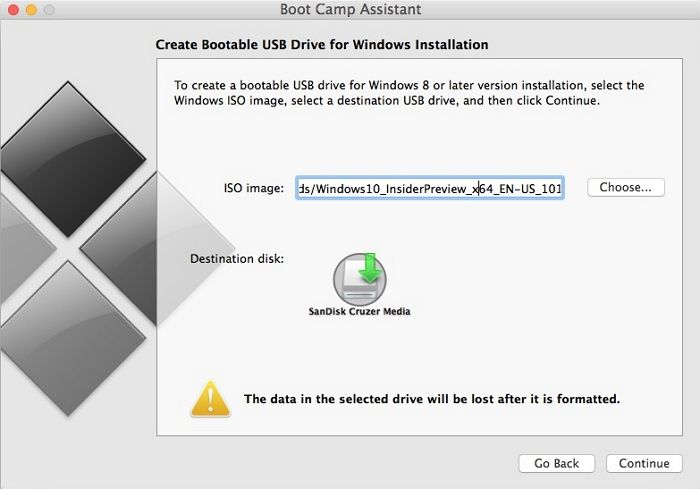
When prompted, locate and select the previously downloaded Windows 10 ISO file, then continue with the process.
-
Boot Camp Assistant will then commence the creation of the Windows 10 bootable USB. Upon completion, verify that your USB drive has been renamed to WININSTALL before safely ejecting it from your Mac.


This method provides a straightforward and efficient way to create a Windows 10 bootable USB on your Mac. Unfortunately, for those using Macs equipped with Apple Silicon chips, it’s advised to explore the following solutions.
How to Create a Windows 10 Bootable USB on Mac without Boot Camp
Methods in this section apply to both Intel-based and Apple Silicon Macs running from Catalina to Seqa, including M1/M2/M3 chips.
In this section, we’ll showcase 3 approaches to creating a Windows 10 bootable USB on Mac, ranging from the easiest to the toughest.
1. Make a Windows 10 Bootable USB on Mac with Third-party Software [Easy]
When it comes to creating a Windows 10 bootable USB on your Mac, never forget the third-party software. These tools can be pretty handy if you have an advanced device, say, Apple M2 with Sonoma, saving you lots of trouble experimenting with traditional methods. Let’s check them out.
UUByte ISO Editor: UUByte ISO Editor simplifies the process of creating a bootable USB drive for Windows 10 on a Mac. It stands out for its intuitive user interface, which is accessible even to those who may not be very tech-savvy.
WonderISO: WonderISO is another reliable application designed for managing and creating bootable USB drives from ISO files. It supports a wide range of ISOs, not just Windows 10, making it a versatile tool for different operating systems.
Virtual Machine (e.g., VMware, VirtualBox): While not directly used for creating bootable USB drives, virtual machines like VMware and VirtualBox offer an indirect method. You can use these applications to run a Windows environment on your Mac, within which you can then use Windows-based tools (like the Windows 10 Media Creation Tool) to create a bootable USB drive. However, these apps require more steps and a certain level of familiarity with virtual machines, making it a bit more complex than using dedicated bootable USB creation tools.
2. Make a Windows 10 Bootable USB on Mac with Disk Utility [Medium]
Creating a bootable Windows 10 USB on a Mac using Disk Utility requires a few more steps compared to using Boot Camp Assistant, primarily because Disk Utility is not inherently designed to create Windows bootable drives. However, it can be done with the correct formatting and a bit of manual setup. Here’s a step-by-step guide:
- Similarly, you have to download the Windows 10 ISO file and prepare a USB drive with at least 16 GB of capacity. Plug the USB flash drive into your Mac.
- Navigate to Finder > Applications > Utilities and open Disk Utility, a built-in application that allows you to manage disks and storage devices on your Mac.
- Select your USB drive from the list on the left-hand side in Disk Utility. Then, click on the ‘Erase’ button at the top of the Disk Utility window. In the dialog that appears:
- Assign the name as you wish.
- For the format, select ‘MS-DOS (FAT)’ if your USB drive is 32 GB or smaller. For drives larger than 32 GB, select ‘ExFAT’.
- For the Scheme, choose ‘Master Boot Record’.
- After configuring these options, click ‘Erase’ again to format the USB drive. Be aware that this will delete all data currently on the drive.
- Once the download is complete, locate the Windows 10 ISO file in Finder and double-click it. This will mount the ISO as a virtual disk on your Mac, making its contents accessible.
- Open the mounted Windows ISO from the desktop or Finder, and select all the files and folders contained within. Copy-paste these files into your formatted USB drive. This step might take some time, depending on the speed of your USB drive and the number of files to transfer.
- After the file transfer is complete, right-click on the USB drive icon on your desktop or in Finder and select ‘Eject’. Your USB drive is now a bootable Windows 10 installer.

3. Create a Bootable USB for Windows 10 on Mac with Terminal [Hard]
Playing with Terminal can be struggling, especially for beginners. Indeed, the process of creating a bootable USB on your Mac via Terminal is not easy. It requires a long list of prompts and careful handling. For anyone who wants to try, get the Windows ISO file and your USB drive, let’s go:
-
To open Terminal, you can use the Spotlight search by pressing Command + Space, typing «terminal», and hitting enter.
- With your USB drive inserted, open Terminal and type
diskutil listto list all the disks. Look for your USB drive in the list, typically named something like /dev/disk2. Note this disk, as you’ll need it for formatting the drive.
-
Now, you’ll format the USB drive to the FAT32 format, which can be recognized by Windows 10. Replace
disk2in the following command with your actual disk identifier from the previous step:

diskutil eraseDisk MS-DOS "WIN10" GPT /dev/disk2
This command will format your USB drive and label it «WIN10». The process should be quick on newer Macs but might take a bit longer on older models.

- Next, mount the Windows 10 ISO file to prepare it for copying to the USB drive. Assuming the ISO file is in your ~/Downloads folder and named Win10_1903_V1_English_x64.iso, use the following command:
hdiutil mount ~/Downloads/Win10_1903_V1_English_x64.iso
- Use the following command to transfer the contents of the ISO file to your USB drive. Remember to substitute
MOUNTED-ISOwith the actual name of your mounted ISO volume.
cp -rp /Volumes/MOUNTED-ISO/* /Volumes/WINDOWS10/
After completing this step, your USB drive will be bootable with Windows 10.
- Execute
hdiutil unmount /Volumes/MOUNTED-ISOin Terminal and then you can close the Terminal window.
So far, you’ve learned three ways to make a Windows 10 bootable USB on any Mac. Depending on your actual scenario, pick one way to carry on.
Conclusion
This post provides comprehensive instructions on creating a Windows 10 bootable USB on Mac of all versions and models, covering systems from Catalina to Sequoia and accommodating both Intel-based and Apple Silicon Macs.
The guide begins with using Boot Camp Assistant for Intel-based Macs, detailing steps from downloading the Windows 10 ISO file to creating a bootable USB. For Macs lacking Boot Camp Assistant or running on Apple Silicon, alternative methods are provided, including using third-party software, Disk Utility, and Terminal with hands-on tutorials. These methods cater to varying levels of technical expertise, ensuring that any user can create a Windows 10 bootable USB on their Mac, regardless of your macOS version or Mac model.
BuhoCleaner
Clean and Speed Up Your Mac Like a Pro
