
This article is intended for beginners and will demonstrate how to create a Windows Forms / WinForms project using Visual Studio 2019 Community Edition, which is a free version of Visual Studio. The WinForms application created by Visual Studio will contain only a main form with no controls. Then in the future article, we will make this application a bit more interesting and useful.
Before we start creating a Visual Studio project, we need to make sure that the Visual Studio we have installed in our system is able to create WinForms projects.
What about creating a WinForms Project using Visual Studio Code?
I’m a big fan of Visual Studio Code and I did wonder if it’s possible to create WinForms project with it. Visual Studio 2019 added the Windows Forms support to the .NET Core 3.0 Framework, so maybe it will be possible in the future, but at the moment, the answer is No as there is no VS Code extension available and there is no support for the WinForms designer.
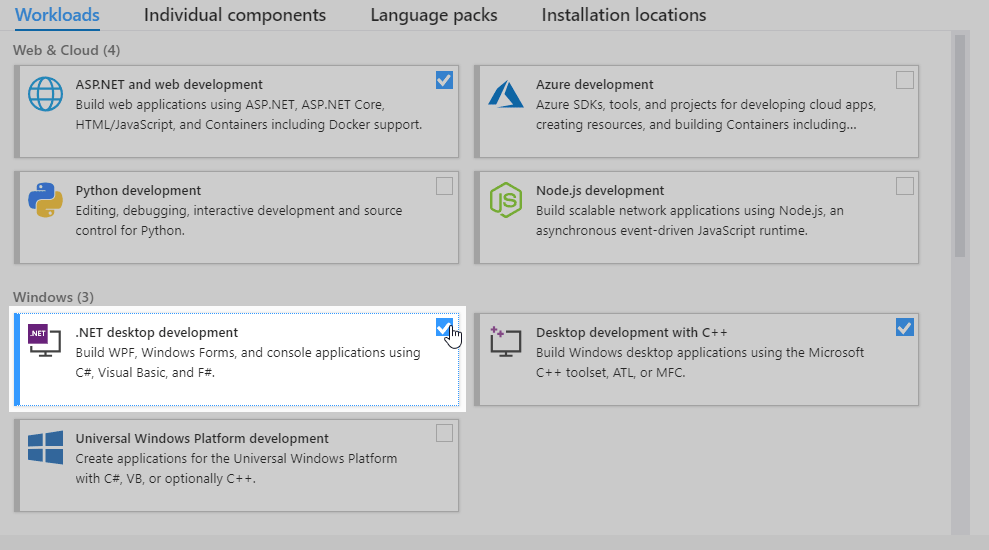
Making sure the .NET desktop development workload is installed for Visual Studio
It is assumed you have installed the Visual Studio Community 2019 in your system and that you have selected the «.NET desktop development» workload during the installation.
If you need to install Visual Studio Community Edition, make sure that during the installation, you select the .NET desktop development workload as we are going to create a WinForms project using the standard .NET Framework.
Note: Starting by Visual Studio 2019, the WinForms support was added to the .NET Core 3.0, so if you have ASP.NET and Web development workload installed, you can make the Windows Forms projects using .NET Core framework. Be aware that there are some breaking changes from the classic WinForms .NET Framework.
Click image to enlarge
Modifying the existing Visual Studio installation
If you already have Visual Studio installed, but you are unsure if a desktop application workload is installed or not, go to the next step to create a new project in VS. If you will see WinForms templates available, you are good to go.
If WinForms templates are missing, no problem, you should be able to easily add them by modifying the Visual Studio installation using these steps:
- Go to Settings > Apps (in Windows 7, go to Control Panel > Programs & Features).
- From the list of apps, find the Visual Studio Community app.
- Click the Modify button.
- After clicking on Modify, the installation window should appear as shown on the image shown earlier. You need to add a checkbox for the «.NET desktop development» workload. Note that this workload might take up to 5GB of HDD space, depending on what is missing.
Now, let’s create a WinForms project in VS.
Creating a WinForms Project in the Visual Studio
The steps to create a new WinForms project are as follows:
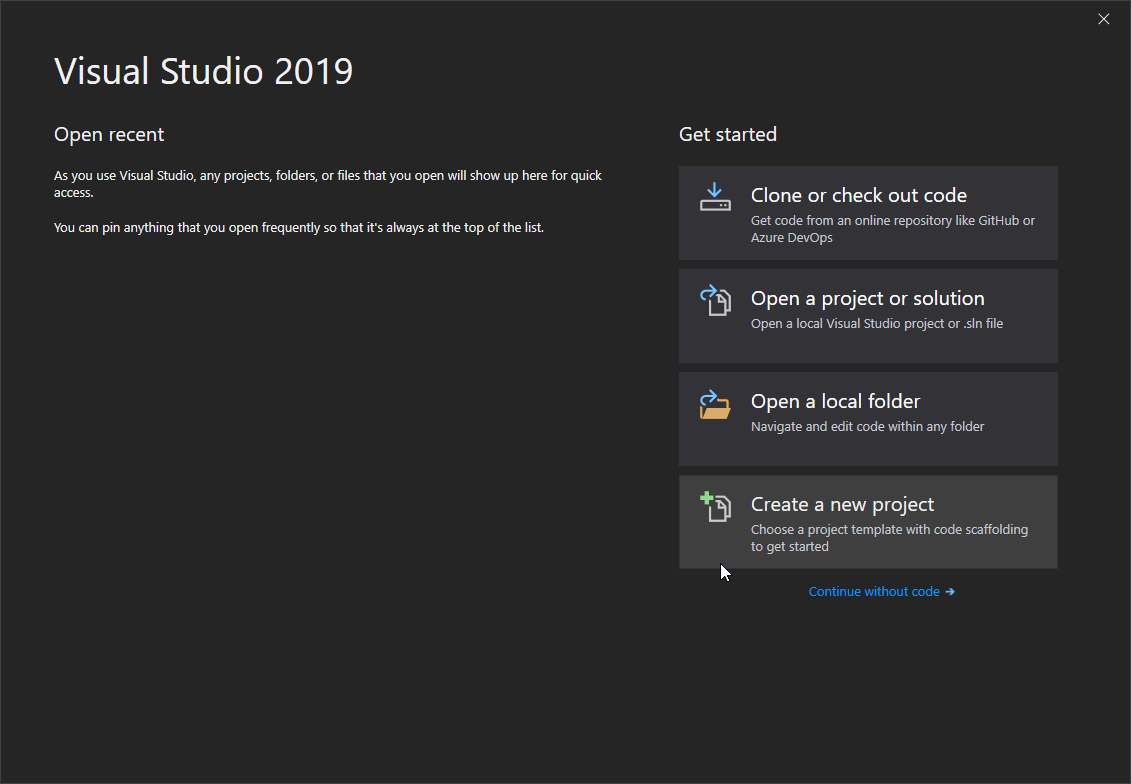
- Start the Visual Studio. After a while, the following window should show up:

Click image to enlarge
On the left side, you will have a list of the recently used project’s and on the right side, you will have several buttons to get started. Click on the «Create new project«.
- This brings us to the window shown below, where we choose the template we want to use for our new project. On the left side we will have a list of the recently used templates and on the right side, we will have a list of all available templates.
We want to create a WinForms project, so inside the search field, type «winforms«. Now, only the WinForms related templates should be listed:
Click image to enlarge
Select the «Windows Forms App (.NET Framework)» template. You might see two of them, one for C# and one for Visual Basic. We will use C#, so select that one and click «Next«.
Note: If you want to check out all the templates in your Visual Studio that are available for the the desktop projects, select «Desktop» under the «Project type» drop-down menu.
What if WinForms template is missing in Visual Studio?
if you are unable to find the WinForms template, it usually means that during the Visual Studio installation, the .NET desktop development workload was not selected. Not to worry though, we can easily add additional packages by modifying the existing installation. Just follow the steps in the first section of this article.
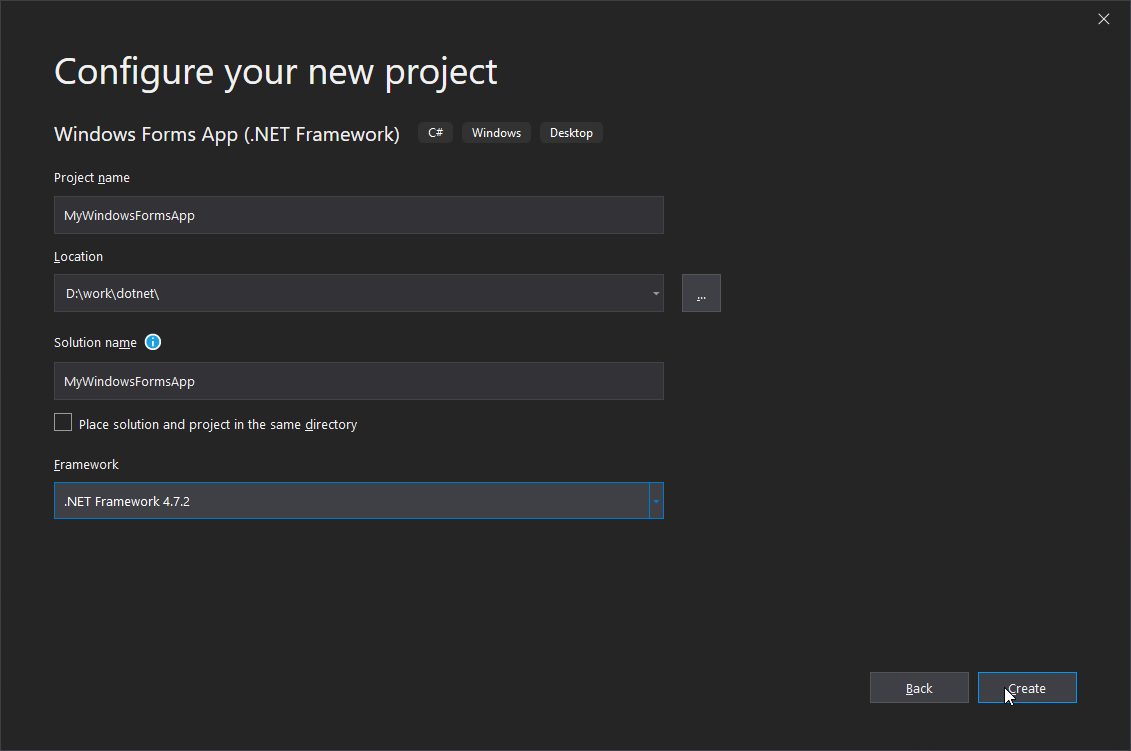
- Now that we selected the WinForms template, the «Configure your new project» window will appear:

Click image to enlarge
Here, we can choose our Project name and Location of the project. I’ll name it «MyWindowsFormsApp«. Notice that your solution name will also be set to the same name. We can change the solution name to something different, but solutions are used to group different projects together and, in our case, we only have one, so we can leave it as it is.
Leave the .NET Framework as it is and click on «Create» button.

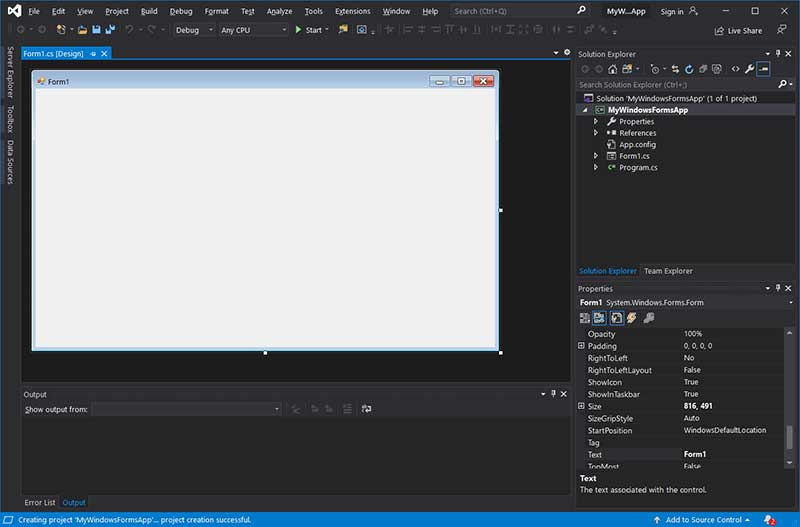
After some processing, the Visual Studio should create a new Windows Forms project and it should look something like this:
Click image to enlarge
Now, let’s quickly explore the opened project in VS.
Exploring the created WinForms project in Visual Studio
As you can see from the image above, we have an open tab named Form1.cs [Design] containing the main form of the project. The [Design] in the name tells us the Form1.cs is opened in «Designer mode», so we can drag & drop other controls to the Form and setting properties to those controls or the form itself.
The WinForms project created by Visual Studio auto-generates enough code for us to start the desktop application. We build and run the project in different ways:
- By clicking on the green «Start» button located in the Visual Studio Toolbar section.
- By pressing F5.
- From the menu by going to Debug > Start Debugging.
The running project will consist of our main form as shown below.
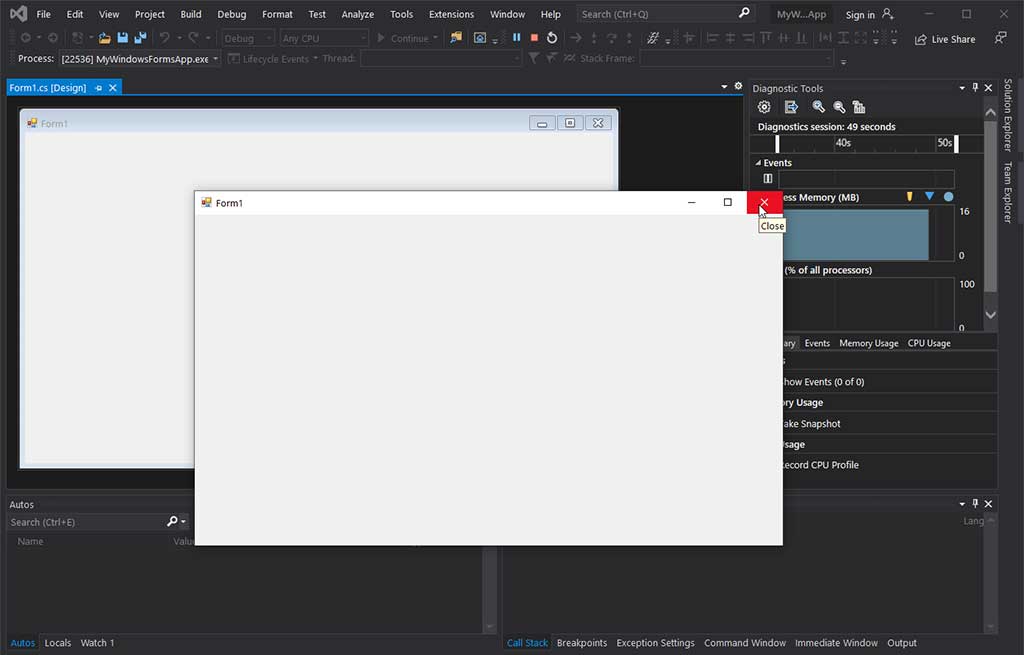
Click image to enlarge
By clicking on the red X close button on the top right corner of the Form1 windows, the application will close.
In the future article we will learn how to add additional WinForms controls into the main form and make the desktop application a bit more functional by adding a button to it that will display a pop-up window when clicked.
Conclusion
In this article we learned how to create WinForms project using Visual Studio and what to do when the WinForms templates are missing in Visual Studio. After the WinForms template was chosen, we configured a project by giving it a name and the location of the project. Finally, with the Windows Forms project in VS successfully created, we learned how to build and run it in three different ways.
In this article, we’ll achieve numerous goals. First of all, we’ll learn through a step-by-step process to create the project in Visual Studio 2019 and create a windows form application. Within the application, we’ll use the features of the drag and drop low code approach supported for the Designer in Visual Studio 2019. A small part of gamification has been creatively put in to make it interesting for beginners. Later, we run the application and look at the prospective possibilities with the windows from the application.
The previous article, C# Connect to MySQL in Visual Studio 2019 will help you connect to the database for applications in C# and the .NET framework from Visual Studio itself.
Step 1
Let us start with the installation of Visual Studio 2019. The Community edition is free for use. Once installed, the following screen will pop up. Click on Launch.
Step 2
To start a new project, click on Create a new project.
Step 3
Now, as we are making a Windows Forms App, we choose the Windows Forms App (.NET Framework).
If you don’t find the options available, it’s probably not installed yet. You can select the Install more tools and features and then choose the .NET desktop development workload which supports console application building, windows forms application, and WPF.
Step 4
Fill in the project name, the location where the solutions repository will be saved, the solution name, and the .NET framework of your choice. After that, Click on Create.
Step 5
The Visual Studio Solution will be created and the window will look similar to as shown below.
Step 6
In caset he Toolbox is not there, you can opt for it from the View section in Menu.
Step 7
The Toolbox should look similar to the following image.
Now, let us start our project. Choose the Button and then drag and top on the Designer.
I’ve created three buttons here, button1, button2, and button3.
The properties of the button can be seen in the Properties section. The Text shows the displayed name of the button — the first button.
Let us change the text to Press Here.
Moreover, the Name of the Design is the one that will call functions for in the program. Here, we name it btnPresshere.
Step 8
Let us go back to Toolbox and search for labels by typing in the search bar. Select the Label and drag and drop one in the designer.
Step 9
The new label i.e. label1 is placed below the button Press Here.
The reason for the label is to call an action while pressing the Press Here button.
Step 10
Let us change the name of the label to labelPressHere. A good convention is to create label names as per the action it operates to.
Step 11
Now double click the Press Here button from the Designer.
A class will be created automatically in the Form1.cs file that would look similar to the one below.
Now, let us add the following code to create action while pressing the Press Here button.
labelPresshere.Text = “Welcome to C# Corner” Let us test what the program can do now. You can run the program, by clicking the Start button.
Let us see, what happens when we click the Press Here button.
See, label1 changes to Welcome to C# Corner now.
Step 12 — ROCK PAPER SCISSOR
Let us get creative now with button2. Let’s create a small Rock Paper Scissor game.
Let us rename the button to Rock Paper Scissor and the label to labelRPS and create another label called labelDYW.
Double Clicking the Rock Paper Scissor button, new classes are created.
Add the following code for button2_Click action.
private void button2_Click(object sender, EventArgs e) {
    string[] game = {
        "Rock",
        "Paper",
        "Scissor"
    };
    Random rand = new Random();
    int index = rand.Next(game.Length);
    labelRockPaperScissor.Text = game[index];
    labelDYW.Text = "Did you win?";
}
An array of strings named game is created. The random function is called and with randomness for the possible outcome for Rock, Paper, and Scissor – this is now a legit game you can play when you are bored.
Step 13
When we run the program, we can see, how every time we press the Rock Paper Scissor button, the new Round comes out with a different answer. So, Did You Win?
Step 14
Let us go, and change the label text to white spaces. This will make the User Interface of the App, cleaner as follows.
Step 15
Think of something creative of your own and making something out of the button3 from the lessons you learned above.
Conclusion
Thus, in this article, we learned about creating the Windows Form Application in C# using Visual Studio 2019. All the tools and resources in this article are freemium versions. So, you can try it without any payment requirement. Here, we went through a step-by-step procedure to create windows form app, design a simple app, call actions when clicking a button and with a pinch of creativity, literally made a game. I wanted to showcase; how powerful programming is. With this bit of learning, you have now entered a huge possibility of creation. You can now make an app, you might in the future make a fun game. Find out problems that can be solved, and with the stepping stone of today, their possibilities of creation are endless for you in days to come.
Are you a developer seeking to build dynamic and user-friendly desktop applications? Look no further, as in this blog post, we will guide you on how to create a Windows Form application in C++ using Visual Studio 2019.
Windows Forms, although an older technology, is still widely used in the development community due to its simplicity and functionality. Whether you are a seasoned professional or a beginner in the realm of programming, this step-by-step tutorial will walk you through the process of building your own Windows Form application using Visual Studio 2019.
So, let’s dive into the world of C++ development and explore the creation of visually appealing and interactive desktop applications!
The Relevance of Windows Forms in 2023 and Beyond
If you’re ready to embark on an exciting journey of creating a Windows Form application with C++ in Visual Studio 2019, you’ve come to the right place! In this guide, we’ll navigate through the twists and turns of this process, all while having a good dose of fun. So hold on tight and let’s dive right in!
Setting the Stage: Creating a New Project
First things first, let’s open up Visual Studio 2019, the superstar of our adventure. Once you have it up and running, select “Create a new project”. Now, bear with me, because this is where the magic begins. From the templates available, make sure to choose “Windows Desktop Wizard”—our trusty sidekick for unleashing the power of Windows Forms.
Designing Your Windows Form
With our trusty sidekick by our side, it’s time to get creative and design our Windows Form. Think of it as your canvas, waiting to be adorned with buttons, textboxes, and all sorts of visual goodies. Visual Studio 2019’s drag-and-drop functionality makes this process a breeze. Want a button? Simply drag it onto your Form. Want a textbox? You got it! Let your imagination run wild, as long as it fits within the realm of Windows Form design, of course.
Writing Your C++ Code
Ah, now comes the true cornerstone of our Windows Form application—the C++ code. Cue epic music. On your Form, locate the button that’ll send your users into a frenzy with its awesomeness. Double click on it, and Voilà! You’re now in the code-behind, where your C++ prowess comes to life.
Here’s where things get really interesting. Let’s say you want the button to display a friendly message when clicked. Simply write some C++ code telling it to do just that. It might look something like this:
cpp
void btnClick_Click(Object^ sender, EventArgs^ e)
{
MessageBox::Show(“Hello, world! Welcome to the future of Windows Form applications!”);
}
You’re engaging your users and leaving them in awe—kudos to you!
From Compilation to Execution
Patience, young padawans! We’ve come a long way, but our journey is not over yet. Now, before the grand finale, we need to compile our code and make sure there are no bugs trying to spoil the party. Hit that build button, fix any issues that arise, and once everything is smooth sailing, it’s time to execute!
Press that exhilarating F5 key or click on “Start Debugging” to witness the marvelous creation you’ve brought to life. Your Windows Form application appears on the screen, ready to conquer the hearts of your users.
Celebrate and Expand
Congratulations, you coding maestro! You’ve successfully created a Windows Form application using C++ in Visual Studio 2019. But wait, the adventure doesn’t end here. Now is the time to let your imagination soar, to experiment with different features and functionalities. Embrace the power of Windows Forms and keep honing your skills.
Remember, the possibilities are endless, and your Windows Form application is the gateway to a world of wonder. So go forth, explore, and let your creativity shine!
Keep Calm and Code on!
This concludes our guide on creating a Windows Form application in C++ using Visual Studio 2019. Happy coding!
FAQ: How do I create a Windows Form application in C++ Visual Studio 2019?
Is MVC still relevant in 2023
MVC (Model-View-Controller) continues to remain relevant in the development world in 2023. It is a popular architectural pattern that helps separate the concerns of an application, making it easier to maintain and test. While there are newer patterns and frameworks available, MVC still provides a solid foundation for building web applications. So, go ahead and embrace MVC without any worries!
How do I open a form in C#
To open a form in C#, you can follow these steps:
- In Visual Studio, open your project.
- In the Solution Explorer, navigate to the folder where you want to add the form.
- Right-click the folder and select “Add” -> “New Item”.
- In the “Add New Item” dialog box, select “Windows Form”.
- Give your form a name, such as “MyForm”.
- Click “Add” to create the form.
- The form will open in the Visual Studio designer, and you can start adding controls and code to it.
How do I create a new ASPX page in Visual Studio
Creating a new ASPX page in Visual Studio is a breeze. Just follow these simple steps:
- In Visual Studio, open your project.
- In the Solution Explorer, right-click the folder where you want to add the ASPX page.
- Select “Add” -> “Web Form”.
- Give your ASPX page a meaningful name, like “MyPage.aspx”.
- Click “Add” to create the ASPX page.
- The new page will be added to your project, and you can start designing and coding it to your heart’s content.
Is MVC better than web forms
While both MVC and web forms have their own strengths and uses, it’s important to choose the right option based on the specific needs of your project. MVC provides a more modern and flexible approach to web development, separating concerns and promoting testability. On the other hand, web forms offer a rapid development experience and are suitable for smaller projects or when you prefer a more event-driven programming model. So, instead of thinking one is universally better than the other, consider which approach best suits your project requirements.
How do I create a desktop application in Visual Studio C++
Creating a desktop application in Visual Studio C++ is an exciting adventure! Follow these steps to get started:
- Open Visual Studio 2019 and create a new project.
- Choose the “Windows Desktop Wizard” template.
- Select “Windows Desktop Application” and give your project a catchy name.
- Click “Next” and configure additional project settings if desired.
- Hit “Finish” to create your new desktop application project.
- Visual Studio will generate a sample window for you, and you can start customizing and adding functionality to create your dream desktop application.
Are Windows forms still used in 2023
Absolutely! Windows forms continue to be widely used in 2023 for building desktop applications. They provide a familiar and easy-to-use framework for creating user interfaces in a Windows environment. While newer technologies like WPF and UWP have emerged, Windows forms still serve as an excellent choice, especially when targeting specific Windows platforms or leveraging existing codebases. So, fear not, Windows forms are here to stay!
Does C# have a future
Certainly! C# has a bright future ahead. As one of the most popular programming languages, it is constantly evolving and adapting to meet the needs of modern software development. With its wide range of applications, including web, mobile, cloud, and game development, C# offers numerous opportunities for developers. So, if you’re wondering about the future of C#, rest assured that it’s a language worth investing your time and skills in.
Is .NET dying in 2023
Not at all! In fact, .NET is far from dying in 2023. It continues to thrive and evolve with new updates and features. Microsoft actively supports and enhances the .NET framework, ensuring its relevance in modern software development. With the introduction of .NET Core and .NET 5, the framework has become cross-platform, opening up new possibilities. So, rest assured, .NET is well and truly alive!
How do I select a startup item in Visual Studio 2019
Setting a startup item in Visual Studio 2019 is a piece of cake. Just follow these simple steps:
- Open your project in Visual Studio.
- In the Solution Explorer, right-click the desired project or file.
- From the context menu, select “Set as Startup Project” or “Set as Start Page”.
- Voila! The selected item is now set as the startup item, and when you run your application, it will start from this point.
How do I make an ASPX file
Creating an ASPX file is easier than pie! Just do the following:
- Open your project in Visual Studio.
- In the Solution Explorer, right-click the folder where you want to add the ASPX file.
- Select “Add” -> “New Item”.
- From the templates, choose “Web Form”.
- Give your ASPX file a catchy name, like “MyPage.aspx”.
- Click “Add” to create the ASPX file.
- You’re all set! Start designing and adding code to your ASPX file to create a web page that wows your users.
How do I create a Windows Form application in C++ Visual Studio 2019
Creating a Windows Form application in C++ within Visual Studio 2019 is a delightful process. Follow these steps:
- Open Visual Studio 2019 and create a new project.
- Choose “Windows Forms App (.NET Framework)” as the project template.
- Enter a unique name for your project and click “Create”.
- Visual Studio will generate a new Windows Form application for you.
- Start designing your user interface by dragging and dropping controls onto the form.
- Write the desired code to make your application come to life.
- Hit the “Start” button or use the F5 key to run your Windows Form application and have fun!
And there you have it! A comprehensive FAQ-style subsection to answer all your burning questions about creating a Windows Form application in C++ Visual Studio 2019. Now go forth and conquer the world of Windows app development with your newfound knowledge!
21 July 2022
|
Viewed 5330 times
Why we need a Setup project?
Setup projects are used to create a installer package for the applications we developed. Setup project will generate .EXE and/or .MSI files which can be installed on server or client machines. By deploying an application, service, or component, we distribute it for installation on other computers, devices, or servers.
Example:-
1. Windows Forms Application
2. Windows Service Application
How to create a Setup Project?
To work with Setup Projects in Visual Studio 2019, we need to install an extension «Microsoft Visual Studio Installer Projects».
Extension: Microsoft Visual Studio Installer Projects
This extension provides the same functionality that currently exists in Visual Studio 2015 for Visual Studio Installer projects.
To use this extension, we can either open the Extensions and Updates dialog, select the online node, and search for «Visual Studio Installer Projects Extension,» or we can download directly from below link.
Once installing the extension and restarted Visual Studio, we will be able to open existing Visual Studio Installer projects, or create new ones.
This extension is designed to work with Visual Studio 2017 and Visual Studio 2019.
See below ink for more details and to download the extension.
https://marketplace.visualstudio.com/items?itemName=visualstudioclient.MicrosoftVisualStudio2017InstallerProjects#overview
PreviousNext
Windows Forms is a framework available in Visual Studio that allows you to build desktop applications with the assistance of a graphical user interface. This allows you to click and drag widgets such as buttons or labels directly onto a canvas, and manipulate the properties of each widget such as its font-size, color or border.
In this article, a simple Celsius to Fahrenheit Converter will be used as an example to go through the basics of how to set up a Windows Form Application. Visual Studio 2019 Community Edition is the edition used for this tutorial.
How to Create the Windows Forms Project in Visual Studio
First, create the project in Visual Studio.
- Open Visual Studio and select Create a New Project.
- Visual Studio will provide you with a list of project templates you can choose from.
-
To create a Windows Forms Application, search for Windows Form App and select it from the list of templates. Once this is selected, click on Next.

If the Windows Form App option is not available on the list, modify your installed version of Visual Studio. In Visual Studio Installer, add the .NET desktop development workload for Desktop and Mobile, and re-launch Visual Studio.
-
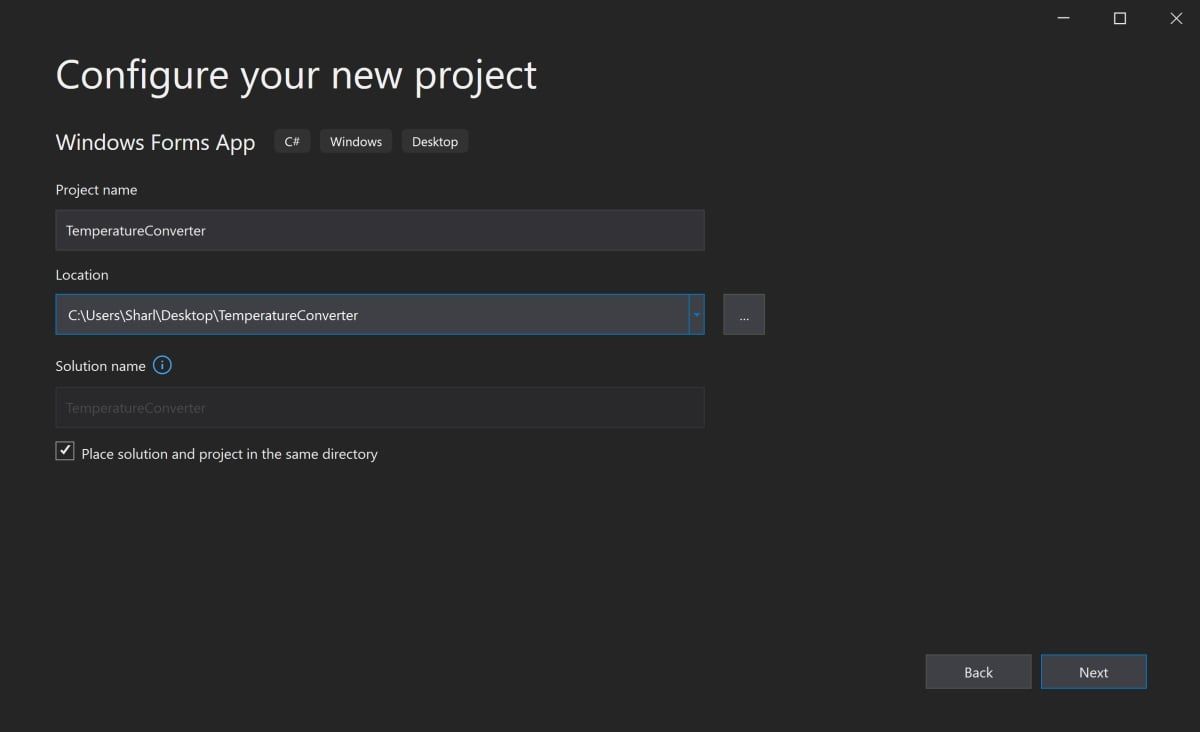
Add a name and location for the project, and click on Next. The location is the directory where the code files will be stored.

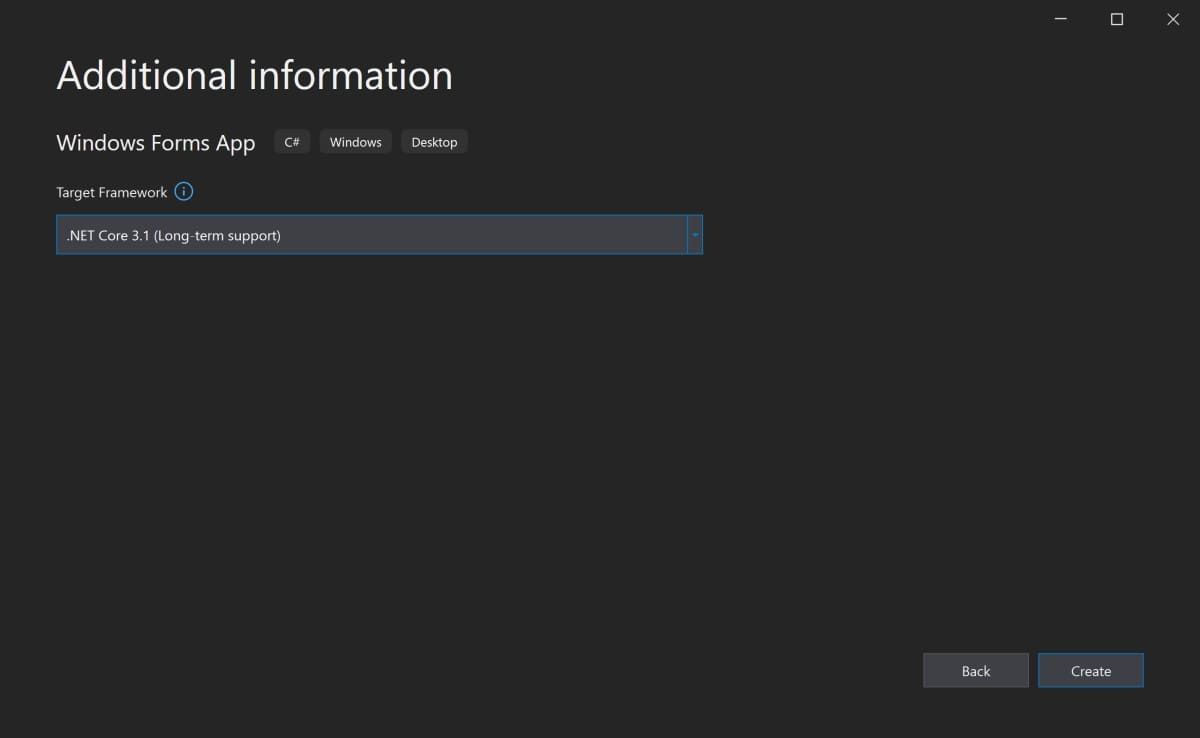
- On the next screen, keep the default selection of .NET Core 3.1.
-
Click Create.

-
Once Visual Studio has finished creating the project, the project will open.


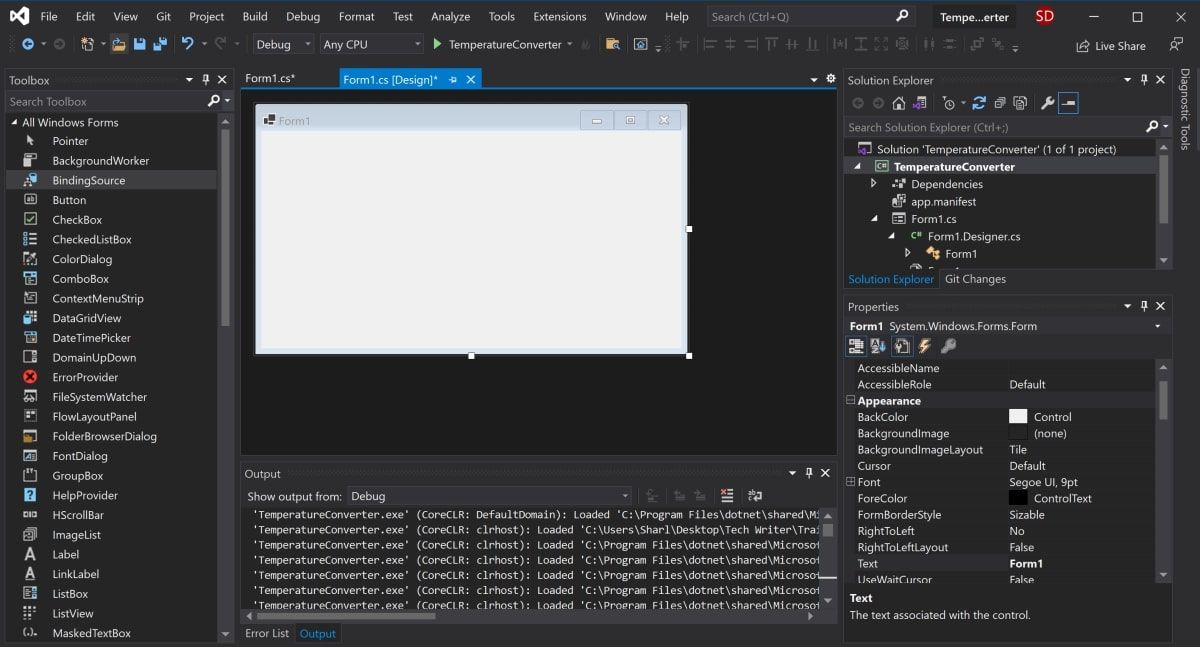
How to Add Elements to the Project Canvas
The canvas is the white area located at the top-left of the screen. Click and drag the points on the bottom, right, or bottom-right of the canvas to resize it if needed.
To create the UI of the application, add widgets such as buttons or text boxes onto the canvas.
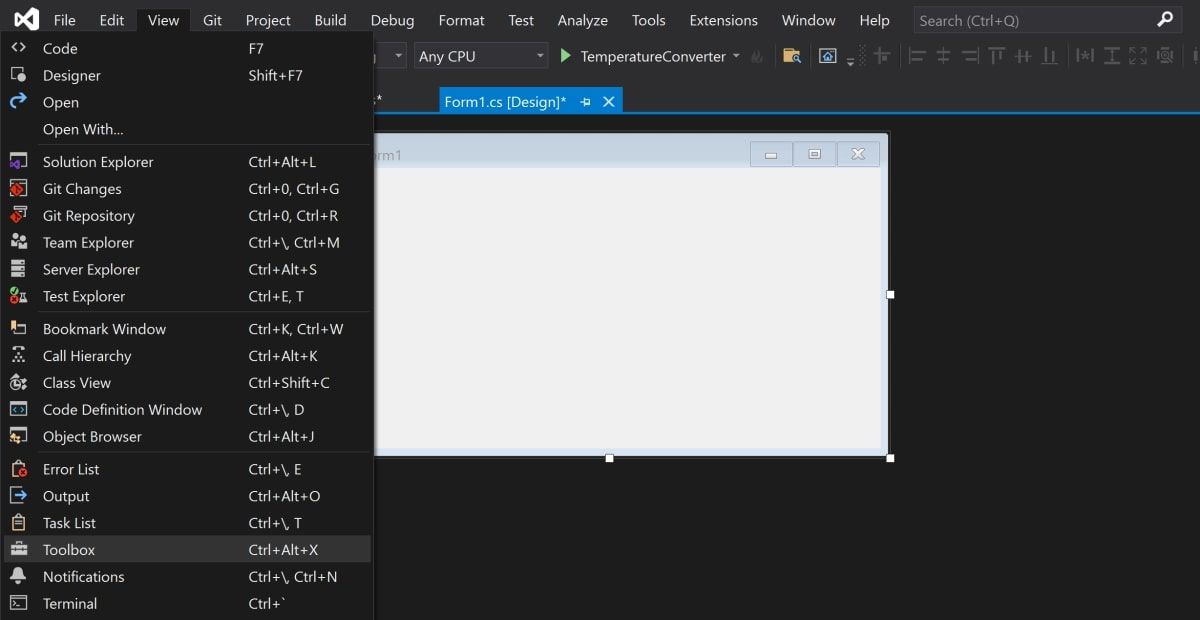
-
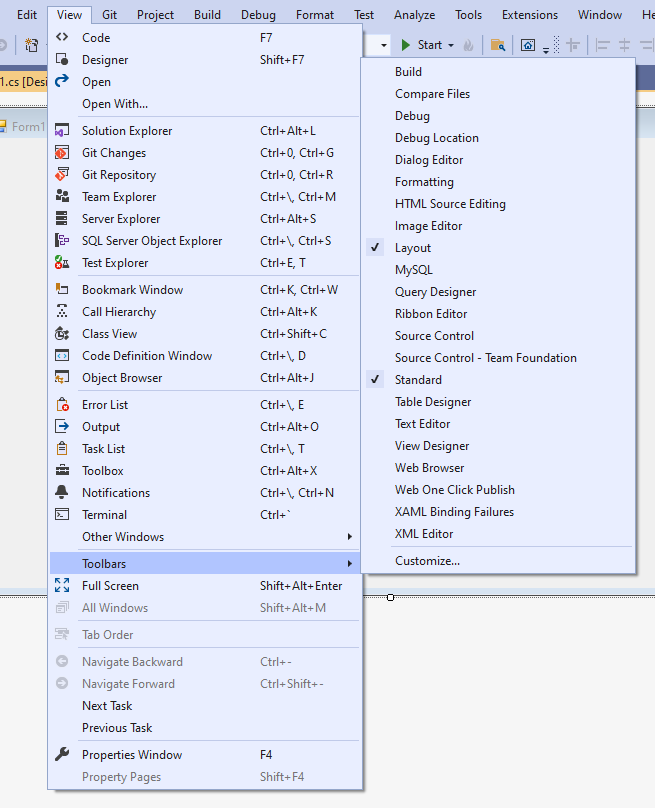
Open the View Tab at the top of the window, and select Toolbox.

- This will add a toolbox to the left side of the application. Select the pin icon in the top-right of the toolbox to pin it there permanently.
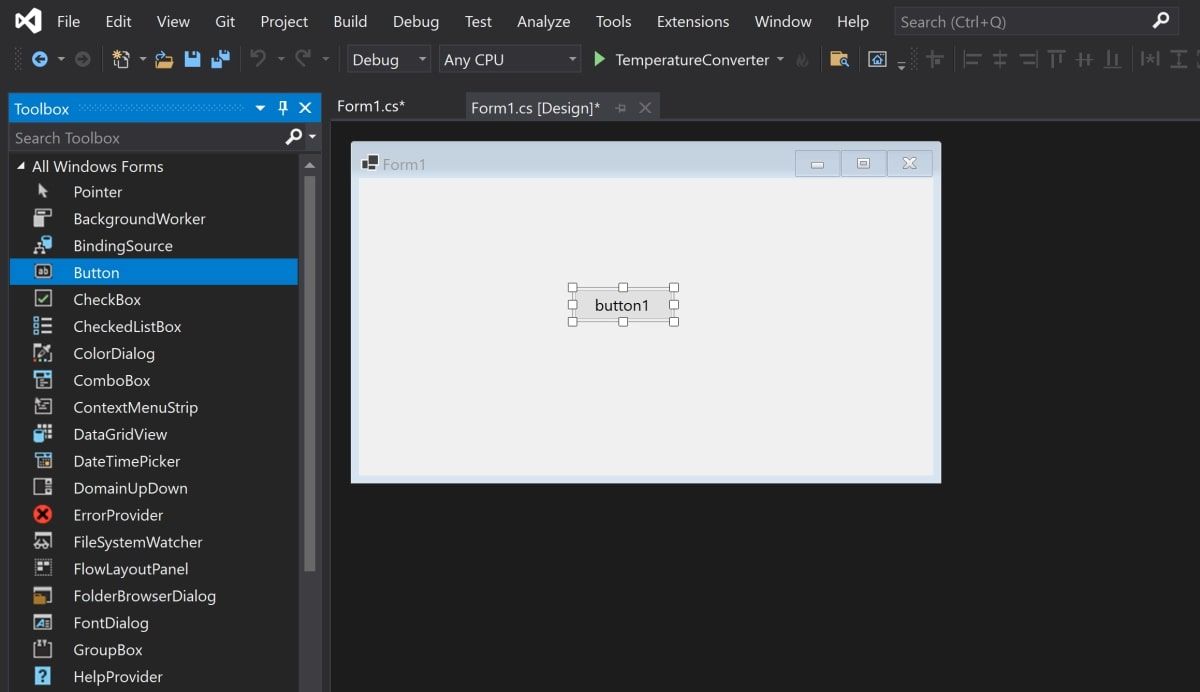
-
This is where you can drag any widget from the toolbox onto the canvas. Highlight a button from the toolbox, and drag it onto the canvas.

-
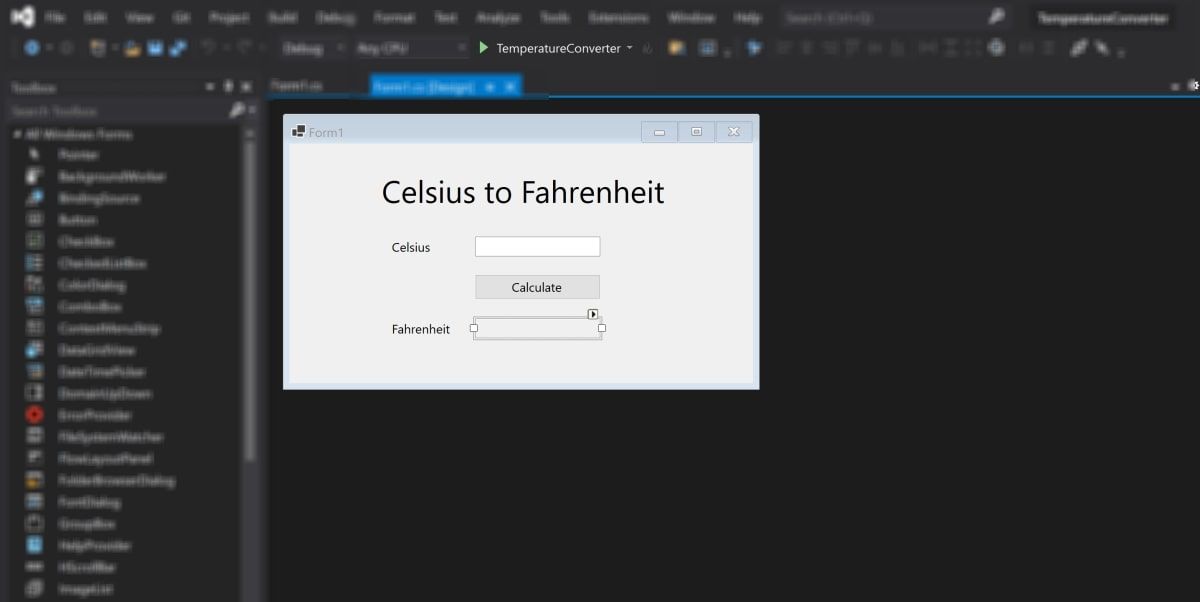
Drag two more text boxes onto the canvas, along with three labels (two labels for each text box, and one label for the title at the top of the application).

- Every widget on the canvas has properties associated with them. Highlight a widget to display the Properties window in the bottom-right of Visual Studio, which lists all the properties that widget has. These properties can include the text, name, font size, border, or alignment of the highlighted widget.
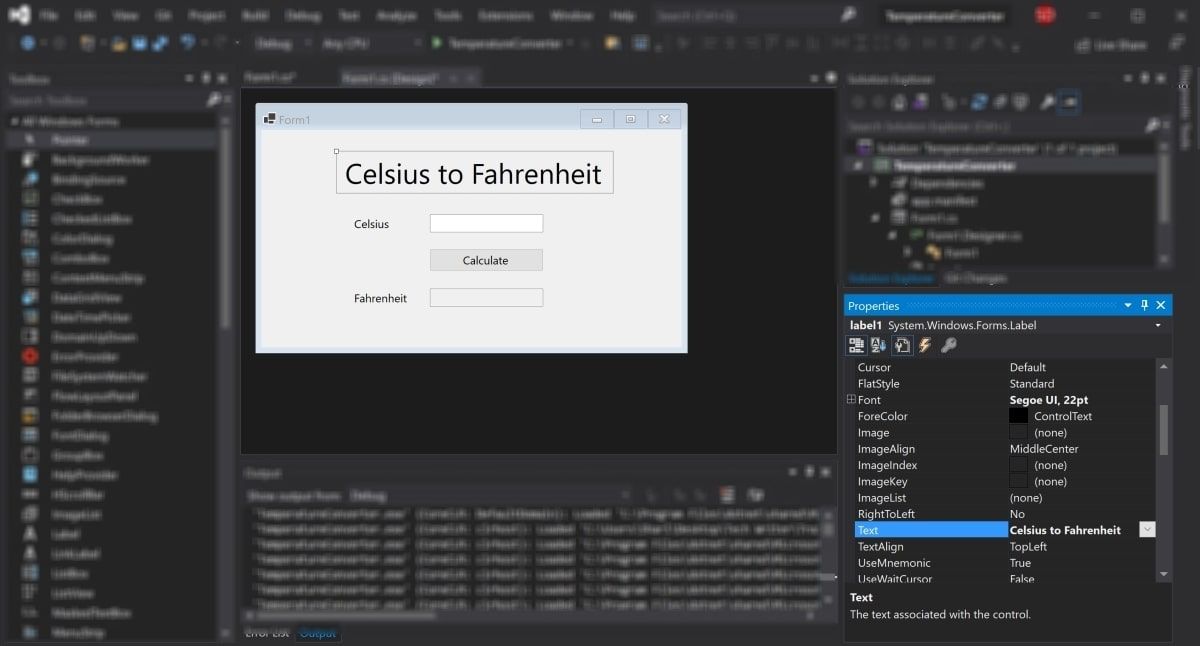
-
At the moment, the text on these widgets still say label1, label2, or button1. Select the label1 widget and edit the Text property in the properties window to say «Celsius to Fahrenheit». Change the font size to be 22pt.

-
Similarly, edit the properties of the other widgets on the canvas to be the following:
Widget
Property
New Value
label2
Text
Celsius
label3
Text
Fahrenheit
button
Text
Calculate
Fahrenheit text box
ReadOnly
True

How to Handle Events and Write Code in the Code-Behind
Widgets on the canvas can be tied to events. Events can include things like clicking on a button, changing the text inside a text box, or selecting a particular radio button. When these events happen, it can cause a section of code in the Code-Behind to trigger.
C# is the language used when creating Windows Forms. If you haven’t already used C#, there are many practical reasons to learn C# programming.
For this particular application, add an event to the Calculate button, to trigger a section of code to run when this button is pressed.
-
Double-click the Calculate button to automatically open Form1.cs with a new Event method:
private void calculateButton_Click(object sender, EventArgs e) - This is where you will add the code that will perform the Celsius to Fahrenheit calculation, and display the result in the Fahrenheit text box. To do this, you need to be able to read the value from the Celsius text box, and modify the Fahrenheit text box to display the result.
-
Go back to the canvas, and re-edit the properties as shown before. This time, edit the Name property for both the Celsius and Fahrenheit text boxes. These names can be used to reference the text boxes in the code.
Widget
Property
New Value
Celsius Text Box
Name
celsiusTextBox
Fahrenheit Text Box
Name
fahrenheitTextBox
- Go back to the calculateButton_Click function in Form1.cs.
-
Now, the Celsius text box can be referred to in the code using the name «celsiusTextBox». The Celsius value the user entered is stored in its Text property. However, since it’s a string, parse this into a double in order to include it in the future Fahrenheit calculations.
        private void calculateButton_Click(object sender, EventArgs e)
{
    // Get the value that the user entered in the Celsius Text Box
   double celsiusValue = Double.Parse(celsiusTextBox.Text);
} -
The celsiusValue variable now stores the value that the user entered in the Celsius Text Box. The formula for converting Celsius to Fahrenheit is (celsiusValue * 9 / 5) + 32. Therefore, the result can now be calculated and stored in the Fahrenheit Text Box.
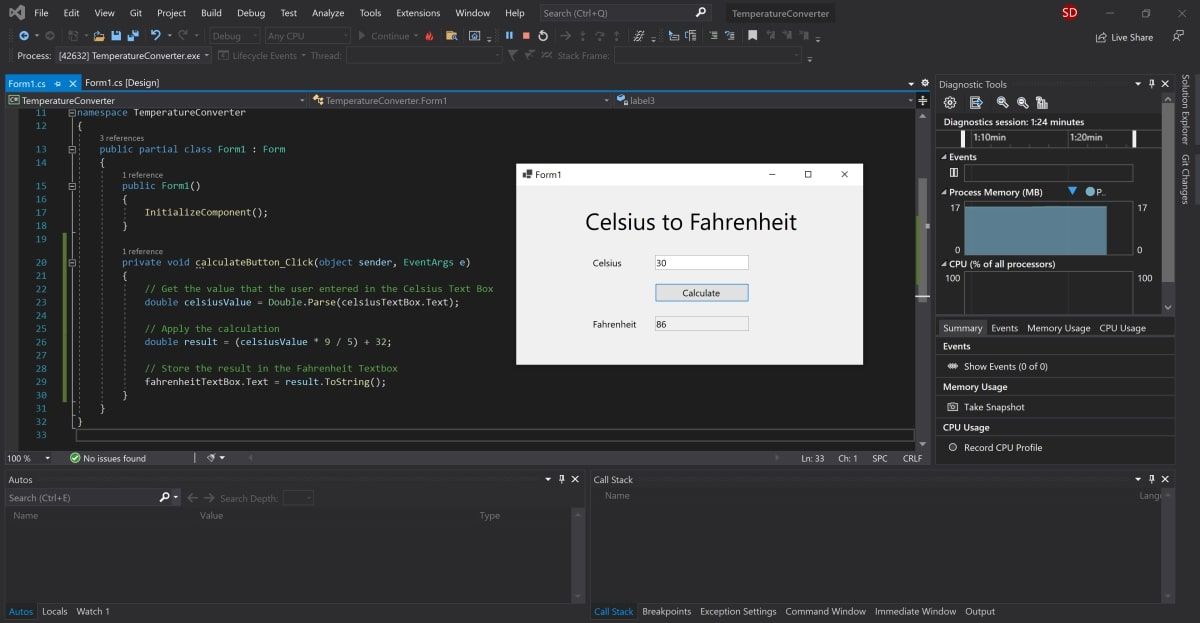
private void calculateButton_Click(object sender, EventArgs e)
{
// Get the value that the user entered in the Celsius Text Box
double celsiusValue = Double.Parse(celsiusTextBox.Text);// Apply the calculation
double result = (celsiusValue * 9 / 5) + 32;// Store the result in the Fahrenheit Textbox
fahrenheitTextBox.Text = result.ToString();
}
How to Run and Debug the Windows Forms Program
Running the Windows Forms Program in Visual Studio
Now that the UI and code logic is set up, run the program to see it working.
-
To run the program, select the green arrow at the top of the toolbar in Visual Studio.

-
Once the project has loaded, add a value into the Celsius text box and press the Calculate button. This will add the result into the Fahrenheit text box.

- If the program is blurry at runtime, it is likely your application is not DPI aware. This can cause scaling and resolution issues, so this will need to be enabled. You can also read more about configuring display scaling on Windows 10 for High-DPI monitors.
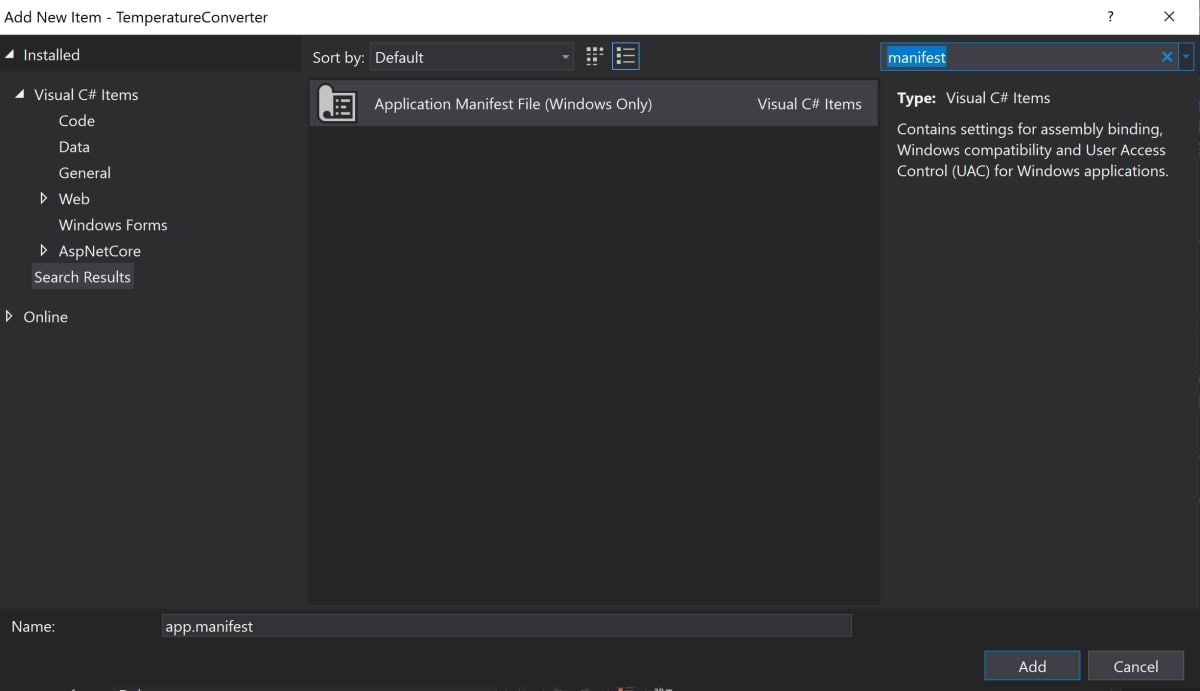
- Right-click on the TemperatureConverter Project in the Solutions Explorer. Select Add, then select New Item.
-
Search for the Application Manifest File, and click Add.

-
Copy the following code into the new app.manifest file, as a child of the assembly tag (if the code is already generated, just un-comment it).
        <application xmlns="urn:schemas-microsoft-com:asm.v3">
 <windowsSettings>
   <dpiAware xmlns="http://schemas.microsoft.com/SMI/2005/WindowsSettings">true</dpiAware>
   <longPathAware xmlns="http://schemas.microsoft.com/SMI/2016/WindowsSettings">true</longPathAware>
 </windowsSettings>
</application> - For this change to take effect, re-run the program. Select the red stop button at the top of the toolbar, then select the green play button again.
Debugging the Windows Forms Program
You may want to debug the program if the logic of your Windows Forms application is not working as expected.
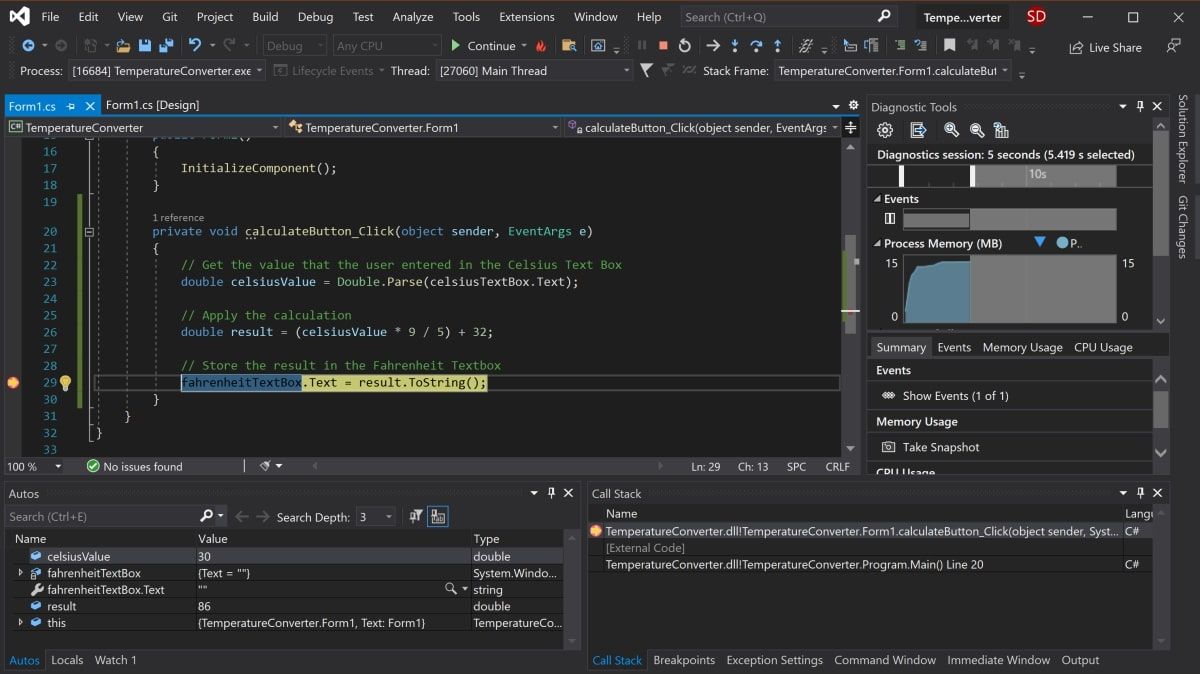
- Navigate back to the calculateButton_Click function in Form1.cs and click anywhere on the gray bar in the far-left of the screen. This will add a breakpoint, which is indicated by a red circle.
- Press the «Calculate» button again to trigger this method to execute. The program will pause when it hits the breakpoint to show all the values stored in the variables at that point.
-
To continue the program, click the green Continue arrow at the top of the toolbar.

Running the Program Using an Executable File
If you don’t want to run your program through Visual Studio, use the standalone executable file for the program. This is automatically generated.
-
Navigate to the executable file, which can be found here:
<your-project-folder>/bin/Debug/netcoreapp3.1/TemperatureConverter.exe - Click on the executable file to directly run the program.
Adding More to Your Windows Form
Hopefully you now have a basic understanding of the basic structure of a Windows Form Application. You can continue exploring additional Windows Forms features by experimenting with new widgets, and taking a deeper dive into the other various events that can be handled.
Once you are more familiar with Windows Forms, you can start creating more complex applications. You can also explore many of the other ways you can create applications on Windows desktop.