
Через удалённое управление нужно чтобы отображалось 3 экрана, 2 из которых физически существуют в качестве мониторов, третий нужно каким-то образом сэмулировать.

№3 сверху, №1 снизу, №2 новый справа которого нет физически на который вправо надо перетянуть одно окно что-бы оно там было. Как это сделать? Не пытаться через незанятый порт VGA видеокарты а подсунуть какой-то искусственный драйвер? Или есть софт для этого?
-
Вопрос задан
-
17265 просмотров
Пригласить эксперта
Для win10 можно использовать usbmmidd_v2.
Проверял на win10 21h2 19044.1766.
Ставится драйвер видеоадаптера и создается виртуальный монитор (НЕ РАБОЧИЙ СТОЛ). Но существует проблема, после перезагрузки ПК, драйвер остается на месте, а виртуальный монитор пропадает и приходится активировать заново (вручную или можно создать батник и добавить в планировщик задач для активации монитора при включении ПК).
Краткая инструкция
1. Распаковать usbmmidd_v2 и поместить папку на диск «С»
2. Запустить usbmmidd.bat от имени администратора (батник сам определит х86-64, установит и активирует монитор).
Готово, переходим в «параметры экрана» и проверяем
3. (не обязательно)
Создаем копию usbmmidd.bat, переименовываем например в «start_virt_monitor.bat», кликаем по нему правой кнопкой мыши «изменить».
Удаляем строки:
«@cmd /c deviceinstaller64.exe install usbmmidd.inf usbmmidd» и
«@cmd /c deviceinstaller.exe install usbmmidd.inf usbmmidd».
В конце вместо «@pause» пишем «@exit».
Готово, после перезагрузки или запуска ПК, активируем виртуальный монитор запуском «start_virt_monitor.bat»
Ссылка на видео с инструкцией (драйвер в описании)
Текстовый вариант инструкции (ссылка на драйвер присутствует)
Ищу решение этой же проблемы на Windows 10 или MacOS.
Виртуальный рабочий стол не нужен!
Войдите, чтобы написать ответ
-
Показать ещё
Загружается…
Минуточку внимания
Introduction
Sometimes it could be very helpfully to have a Virtual Monitor, but please note not to be confused with a Virtual Desktop, i.e. a monitor which is recognized by the system as physical device. The big advantage of a Virtual Monitor is that it has a valid canvas which is available despite it is not visible. In contrast to it, a Virtual Desktop has no valid canvas as long it is not visible. So we can use the Virtual Monitor as like as a physical device with only one difference, we cannot see it, we cannot touch it. What can we do with such a Virtual Display? Here are two examples :
(1) You want test the behaviour of own applications, e.g. on a 4k Monitor despite there is not a physical 4k Monitor connected. You can do this task by a Virtual Monitor because it offers all resolutions which are available in the current system, dependent on the installed graphic.
(2) You have to continuously observe one or more application windows, e.g. windows of a monitoring solutions, and maybe you want share the screen to remote locations or other devices – then you can use the tool CaptShare from dtvTools. By using this tool you can capture and share the screen of a Virtual Monitor and your physical Monitor(s) are available completely for your daily work.
Installation
Windows 7
For Windows 7 / 8.1 it is quite easy to create a Virtual Monitor:
- Right click on the desktop and click ‘Screen Resolution’
- Click ‘Detect’ on the next screen
- Click ‘Another display not detected’ and under the ‘multiple displays’ option select ‘Try to connect anyway on: VGA’
- Click ‘Apply’
- You can now enable your desktop to be extended as if you have a second monitor plugged on your computer.
Windows 10 / Server 2019/2022
Unfortunately, the solution as described for Windows 7 – see on left – is not longer available for Windows 10, so we need another solution. Thanks a driver provided for free by Amyuni Technologies Inc. we can realize a Virtual Monitor also in Windows 10 – Thank for this great work! This driver allows to create up to 4 Virtual Monitors on your system.
Identify and Access the Virtual Monitor
After successful installation the question is now: How can I identify and access my new Virtual Display on my system?
E.g. on Windows 10 right click on the desktop and click ‘Display settings’ then you will get a dialog as shown on right. The Virtual Monitor is identified by index ‘3’. The colour profile is empty, this is the hint that is the Virtual Monitor. You can setup now the desired resolution, the scaling and further properties.
You can experiment with options ‘Multiple Displays’ but it is not a good idea to set ‘Make this my main display’ for the Virtual Monitor, it will not work as expected. But how can I control the Virtual Monitor on my local system and, above all, how can I see what is happening on this monitor. So there are two possibilities, the local control or the remote control by using further tools.
Local Control
On your local system you need a tool which is able to move application windows from a physical monitor to the Virtual Monitor and vice versa and furthermore, to move, resize or close windows on there. The Monitor-Manager application – MonMan – a little free tool provided by decontev, will do these tasks.
In order to monitor your Virtual Display you have to capture the screen and have to display these captures on a physical monitor of your system. For that task you can use the free tool CaptShare from dtvTools. CaptShare is able to create a HTTP Live Stream (HLS) or snapshot sequences from the screen of your Virtual Monitor. HLS can be played back by free tools, e.g. SAMplayer from dtvTools or VLC media player.
Remote Control
Of course, the Virtual Monitor can be controlled via remote access, but you need another machine.
Remote Desktop (Windows)
Access via Remote Desktop does not work, because the Virtual Monitor will not be recognized as an additional device.
AnyDesk, TeamViewer & Co
The access of a Virtual Monitor via remote desktop application like TeamViewer or AnyDesk works perfectly, so that you control your Virtual Monitor very comfortable. But note, there are several disadvantages:
– you need a second machine
– you have to install a remote desktop application on both machines
– this SW is not free for professional usage or feature reduced for private usage
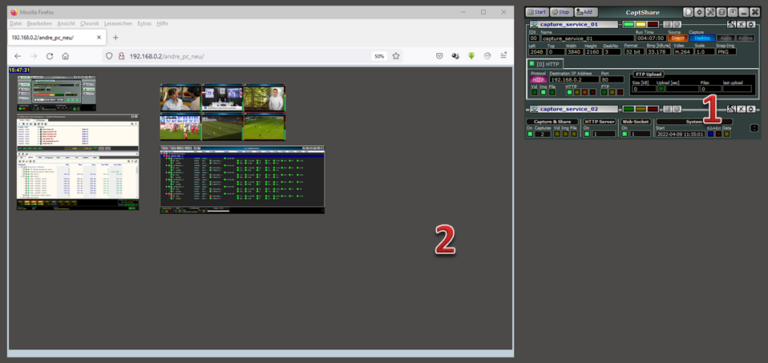
[1] CaptShare from dtvTools – capturing the Virtual Monitor screen
[2] display the captured screen of the Virtual Monitor in a Web-Browser
Распознавание голоса и речи на C#
UnmanagedCoder 05.05.2025
Интеграция голосового управления в приложения на C# стала намного доступнее благодаря развитию специализированных библиотек и API. При этом многие разработчики до сих пор считают голосовое управление. . .
Реализация своих итераторов в C++
NullReferenced 05.05.2025
Итераторы в C++ — это абстракция, которая связывает весь экосистему Стандартной Библиотеки Шаблонов (STL) в единое целое, позволяя алгоритмам работать с разнородными структурами данных без знания их. . .
Разработка собственного фреймворка для тестирования в C#
UnmanagedCoder 04.05.2025
C# довольно богат готовыми решениями – NUnit, xUnit, MSTest уже давно стали своеобразными динозаврами индустрии. Однако, как и любой динозавр, они не всегда могут протиснуться в узкие коридоры. . .
Распределенная трассировка в Java с помощью OpenTelemetry
Javaican 04.05.2025
Микросервисная архитектура стала краеугольным камнем современной разработки, но вместе с ней пришла и головная боль, знакомая многим — отслеживание прохождения запросов через лабиринт взаимосвязанных. . .
Шаблоны обнаружения сервисов в Kubernetes
Mr. Docker 04.05.2025
Современные Kubernetes-инфраструктуры сталкиваются с серьёзными вызовами. Развертывание в нескольких регионах и облаках одновременно, необходимость обеспечения низкой задержки для глобально. . .
Создаем SPA на C# и Blazor
stackOverflow 04.05.2025
Мир веб-разработки за последние десять лет претерпел коллосальные изменения. Переход от традиционных многостраничных сайтов к одностраничным приложениям (Single Page Applications, SPA) — это. . .
Реализация шаблонов проектирования GoF на C++
NullReferenced 04.05.2025
«Банда четырёх» (Gang of Four или GoF) — Эрих Гамма, Ричард Хелм, Ральф Джонсон и Джон Влиссидес — в 1994 году сформировали канон шаблонов, который выдержал проверку временем. И хотя C++ претерпел. . .
C# и сети: Сокеты, gRPC и SignalR
UnmanagedCoder 04.05.2025
Сетевые технологии не стоят на месте, а вместе с ними эволюционируют и инструменты разработки. В . NET появилось множество решений — от низкоуровневых сокетов, позволяющих управлять каждым байтом. . .
Создание микросервисов с Domain-Driven Design
ArchitectMsa 04.05.2025
Архитектура микросервисов за последние годы превратилась в мощный архитектурный подход, который позволяет разрабатывать гибкие, масштабируемые и устойчивые системы. А если добавить сюда ещё и. . .
Многопоточность в C++: Современные техники C++26
bytestream 04.05.2025
C++ долго жил по принципу «один поток — одна задача» — как старательный солдатик, выполняющий команды одну за другой. В то время, когда процессоры уже обзавелись несколькими ядрами, этот подход стал. . .
Увеличьте пространство экрана в два раза с относительной лёгкость
Что нужно знать
Подключите монитор к ПК с помощью кабеля HDMI (на старых компьютерах используйте VGA и DVI).
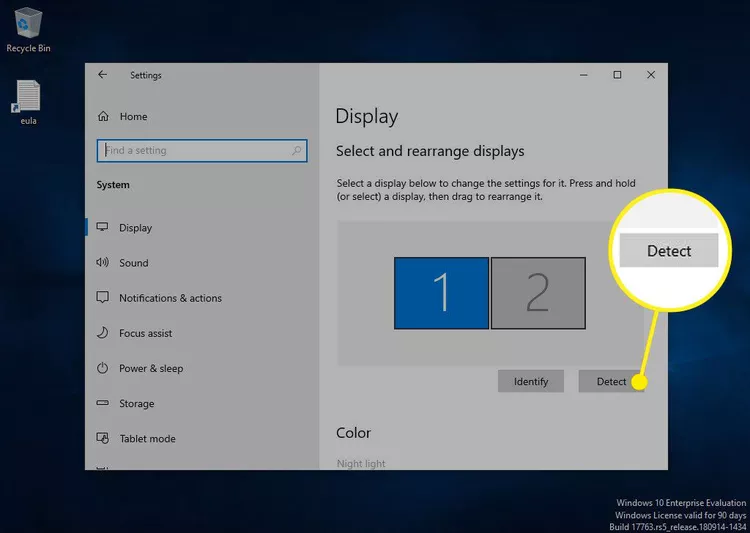
В Windows 10 перейдите в «Настройки» > «Система» > «Дисплей» > «Обнаружить» > «Идентифицировать», чтобы включить и настроить монитор.
В разделе «Дисплей» > «Несколько дисплеев» выберите, как вы хотите отображать второй монитор.
Из этой статьи вы узнаете, как добавить второй монитор к вашему ноутбуку или настольному компьютеру с Windows. Инструкции подходят для Windows 10, 8 и 7.
Рекомендации по подключению
Первое, что необходимо сделать, чтобы подключить второй монитор, это физически подключить его к компьютеру.
-
Для начала посмотрите, какие порты есть на вашем компьютере. На ноутбуках они обычно расположены по бокам, но иногда их можно найти на задней панели. У настольных компьютеров они всегда расположены на задней панели.
-
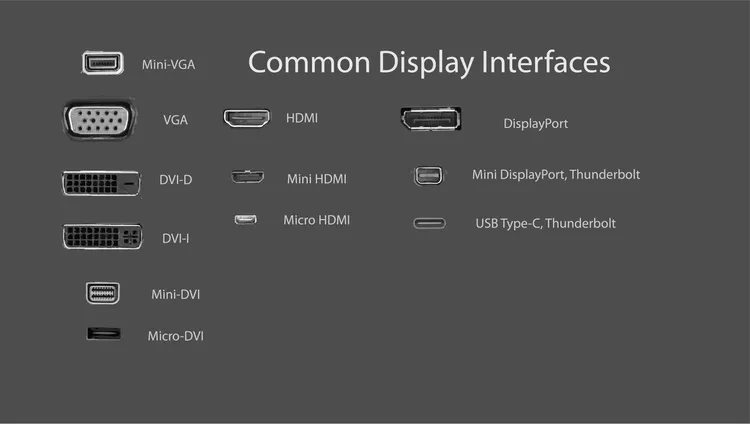
Выясните, какие порты у вас есть. Некоторые из них могут быть вам знакомы, например HDMI. Другие могут быть совершенно незнакомыми.

-
Затем посмотрите, как порты есть у вашего монитора. Порты обычно находятся на задней панели монитора. Также их часто можно встретить на нижней стороне монитора.
-
Выберите правильный кабель для подключения монитора к компьютеру.
VGA и DVI: cтарые компьютеры могут иметь порты DVI или VGA. Эти разъёмы опираются на ряд металлических контактов, которые обычно находятся на кабеле. Порты, в свою очередь, имеют ряд отверстий для размещения контактов. VGA – это соединение с более низким разрешением. DVI поддерживает передачу базового HD. Если у вас более новый монитор, у вас могут возникнуть трудности с подключением, поскольку большинство производителей устройств отказались от поддержки DVI и VGA. Однако, возможно, вам повезёт найти конвертер с DVI на HDMI.
HDMI: HDMI – это наиболее широко поддерживаемый тип подключения монитора. Почти все телевизоры используют HDMI, а большинство компьютерных мониторов имеют по крайней мере один порт HDMI.
Примечание: HDMI может быть идеальным вариантом. Он широко используется, и вам не составит труда найти кабель.
Существует несколько типов кабелей и портов HDMI. Производители ноутбуков могут предпочесть меньшие по размеру разъёмы mini и micro HDMI, чтобы сэкономить место и создать устройство меньшего размера. В этом случае вы получите преимущества HDMI, и вы сможете легко найти кабели с разъёмом micro или mini на одном конце и стандартным подключением HDMI на другом.
DisplayPort и USB-C: с разъёмами DisplayPort, Mini DisplayPort и USB-C всё становится немного сложнее. Они не так широко распространены, но выделенные видеокарты и ноутбуки более высокого класса могут иметь подключения DisplayPort. Относительно новые компьютерные мониторы также поддерживают DisplayPort. Как и в случае с HDMI, подключение Mini DisplayPort экономит место на мобильных устройствах, и вы можете найти кабели с Mini DisplayPort на одном конце и стандартным DisplayPort на другом.
Вы, вероятно, знаете USB-C как соединение на современных Android-смартфонах, но это также достаточно быстрое соединение для монитора. USB-C также встречается в последних версиях Macbook. Если ваш компьютер поддерживает только видеовыход USB-C, рассмотрите монитор, поддерживающий вход USB-C. В противном случае приобретите кабель с разъёмом USB-C на одном конце и HDMI или DisplayPort на другом.
-
Подключите кабель к компьютеру и к монитору, используя соответствующую пару портов.
-
Включите монитор.
Обнаружение монитора в Windows
Теперь, когда ваш монитор физически подключён к компьютеру, пришло время настроить операционную систему Windows на распознавание монитора и его использование.
Совет: В большинстве случаев Windows автоматически обнаружит и настроит ваш второй монитор без каких-либо дополнительных запросов.
Windows 10
В каждой версии Windows процесс включения и настройки второго монитора несколько отличается. Следуйте инструкциям для той версии Windows, которая установлена на вашем компьютере. Вот как это сделать в Windows 10.
-
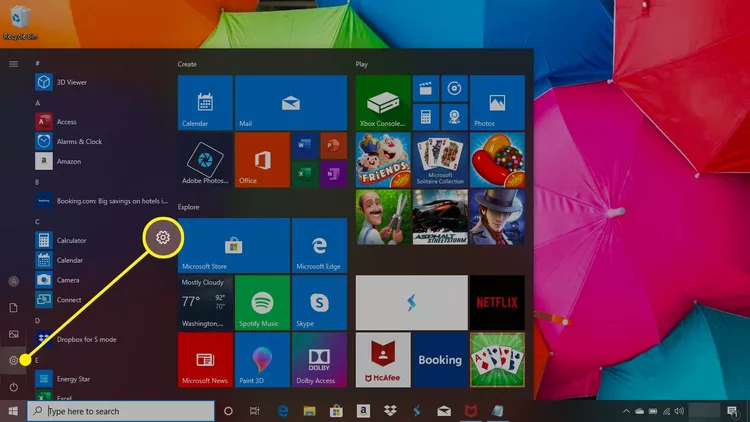
Откройте меню опытного пользователя (Win+X) или меню «Пуск» и выберите «Настройки».
-
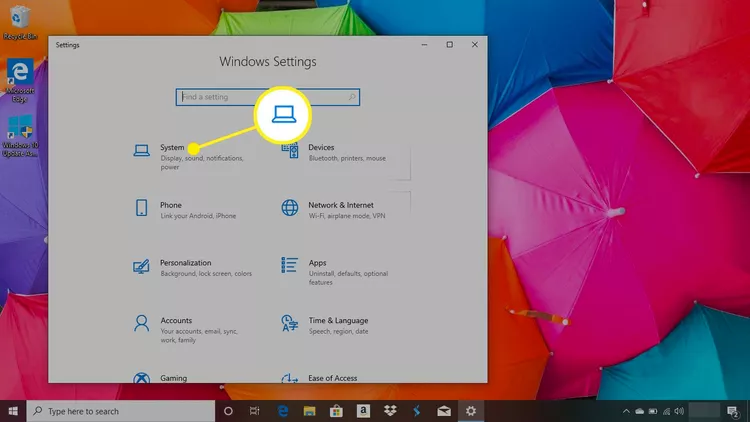
В окне настроек выберите «Система».
-
В разделе «Дисплей» нажмите «Обнаружить» (если кнопка появилась), чтобы зарегистрировать второй монитор. Также есть вероятность, что монитор уже зарегистрирован.
-
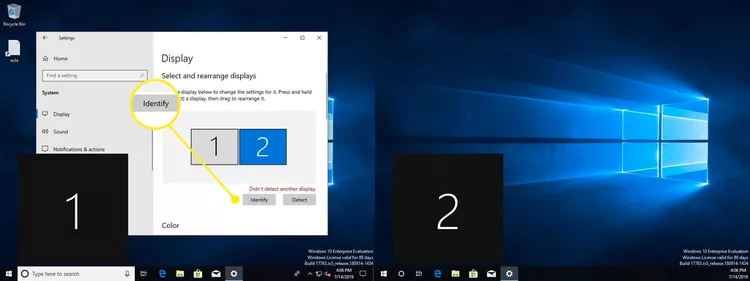
Выберите «Идентифицировать» под мониторами, чтобы увидеть, какой из них является каким. Windows отобразит номер монитора на каждом экране.
Совет: Опция «Сделать этот монитор основным», «Это мой основной монитор» или «Использовать это устройство в качестве основного монитора» позволяет выбрать главный экран. На главном экране будут отображаться меню «Пуск», панель задач, часы и т.д. Однако в некоторых версиях Windows, если вы щёлкните правой кнопкой мыши или щёлкните и будете удерживать панель задач Windows в нижней части экрана, вы сможете перейти в меню свойств, где можно будет выбрать «Показывать панель задач на всех экранах», и тогда часы, меню «Пуск» и т.д. будут отображаться на обоих экранах.
-
Для того, чтобы переставить экраны местами, вы можете использовать схему мониторов. Выберите монитор и перетащите его в нужное положение относительно другого монитора.
Примечание: если на двух экранах используется разное разрешение, в окне предварительного просмотра один из них будет казаться больше другого. Вы можете либо настроить разрешение таким образом, чтобы оно было одинаковым, либо перетащить мониторы вверх или вниз по экрану, чтобы они совпадали внизу.
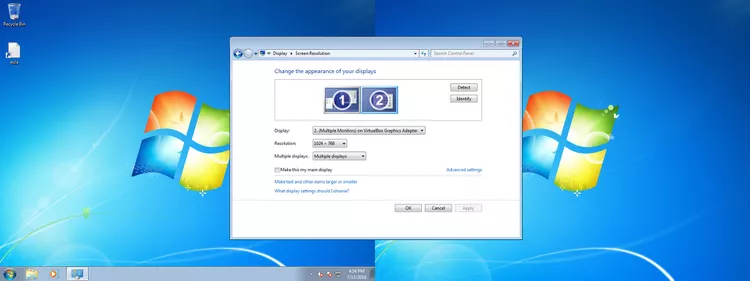
Windows 8 и Windows 7
-
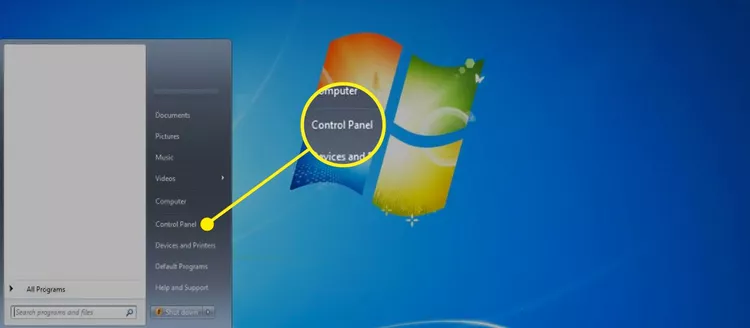
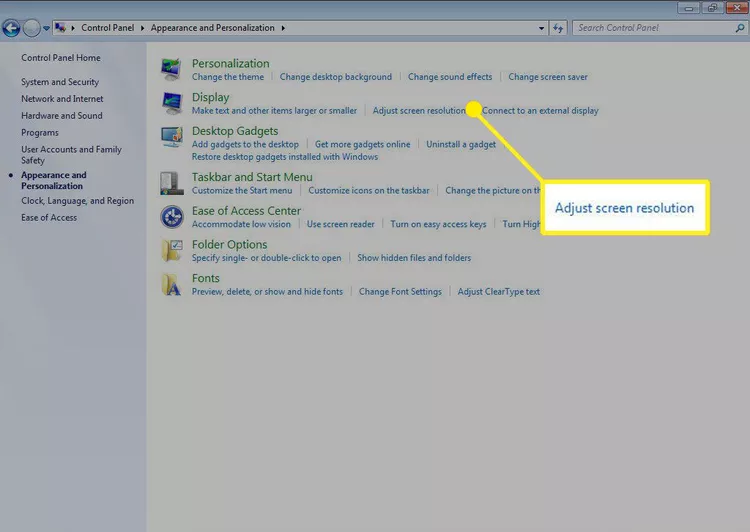
Откройте меню «Пуск» и выберите «Панель управления».
-
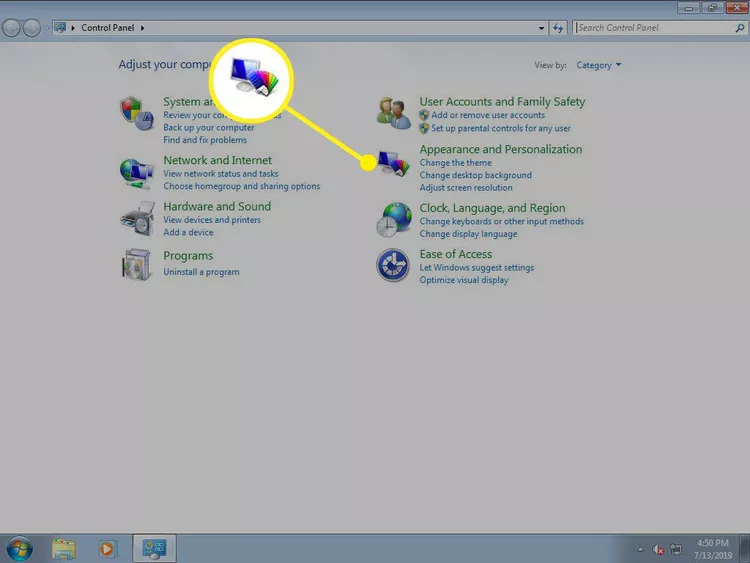
В панели управления откройте опцию «Внешний вид и персонализация». Опция будет видна только в том случае, если вы просматриваете апплеты в режиме «Категория» по умолчанию (а не в классическом режиме или режиме значков).
-
Теперь выберите «Дисплей» и отрегулируйте разрешение экрана.
-
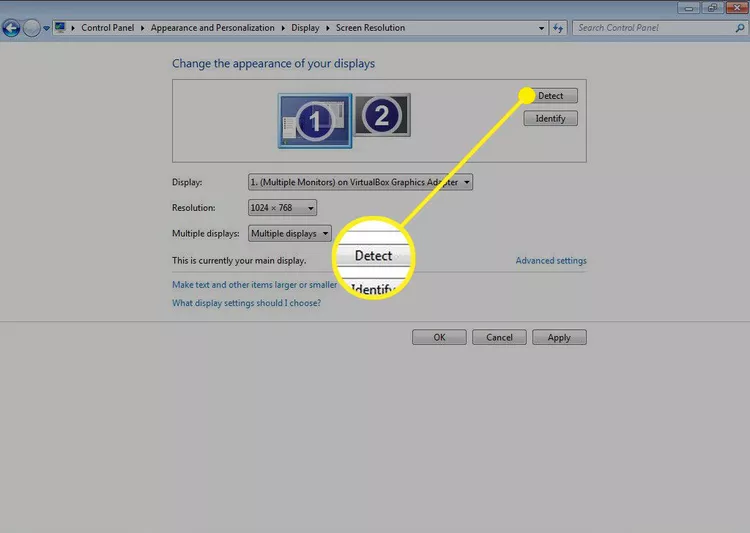
Выберите «Обнаружить», чтобы зарегистрировать второй монитор, если его там ещё нет.
-
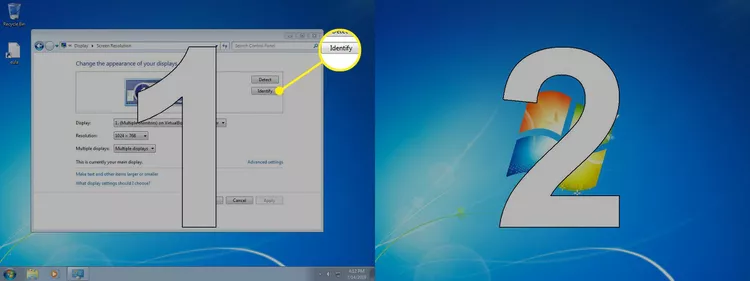
Нажмите «Идентифицировать», чтобы увидеть номер каждого монитора.
-
Выберите и перетащите изображение на картинке, чтобы изменить его положение относительно другого.
Изменить способ работы компьютера со вторым монитором
Windows предоставляет несколько вариантов того, как она будет работать со вторым монитором, подключённым к компьютеру. Вы можете расширить свой рабочий стол на оба монитора, отразить их зеркально или выбрать использование только одного монитора.
Windows 10
-
На экране настройки дисплея, к которому вы пришли в предыдущих инструкциях, прокрутите вниз, пока не увидите «Несколько дисплеев».
-
Выберите выпадающее меню непосредственно под «Несколько дисплеев», чтобы отобразить параметры.
-
Меню расширится, и вы увидите следующие варианты:
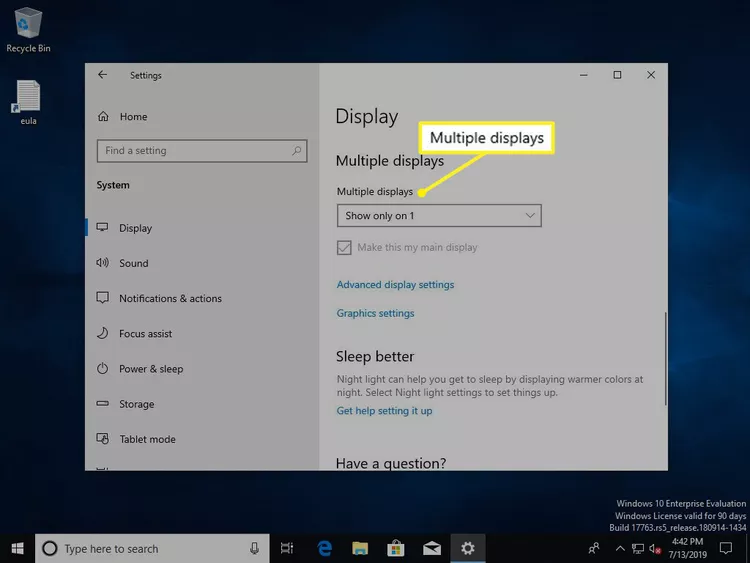
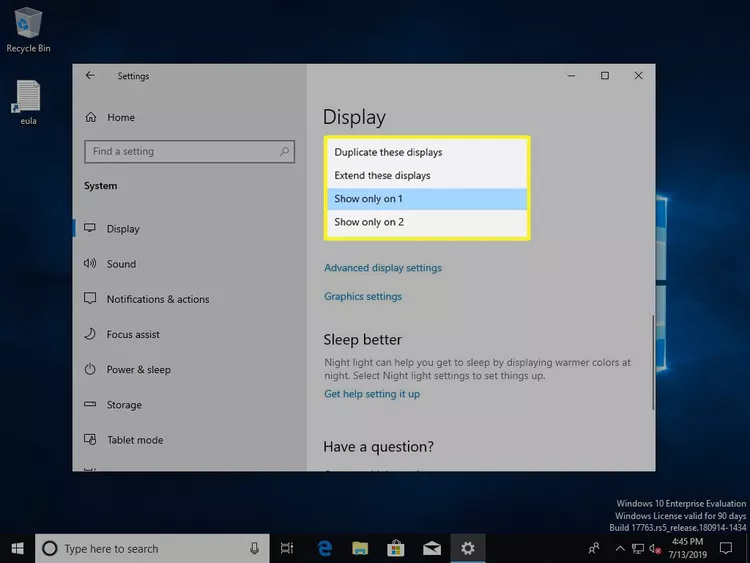
Дублировать эти экраны: один и тот же рабочий стол будет отображён на обоих мониторах.
Расширить эти экраны: рабочий стол растянется на оба монитора, увеличив общий размер экрана.
Показывать только на 1: Использовать только монитор 1.
Показывать только на 2: Использовать только монитор 2.
Выберите что-нибудь одно.
Примечание: для того, чтобы расширить рабочий стол в Windows Vista, выберите «Расширить рабочий стол на этот монитор», в Windows XP выберите опцию «Расширить мой рабочий стол Windows на этот монитор».
-
Откроется новое окно с вопросом, хотите ли вы сохранить свои изменения. Подтвердите, чтобы сохранить новые настройки, или выберите «Вернуть», чтобы вернуться к старым настройкам.
Windows 8.1 и Windows 7
-
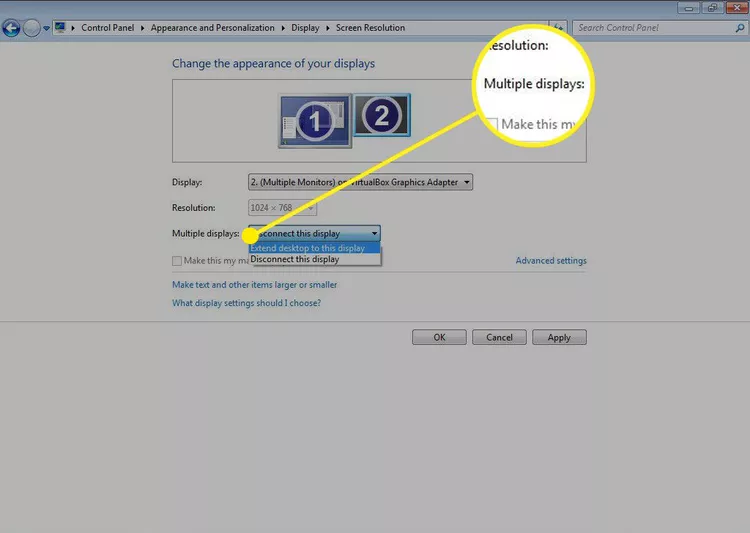
На странице «Разрешение экрана», на которой вы получите доступ к предыдущим инструкциям, найдите опцию «Несколько дисплеев».
-
Выберите выпадающее меню рядом с «Несколько дисплеев», чтобы отобразить доступные параметры.
-
Выберите вариант, который вам больше нравится. «Расширить рабочий стол до этого дисплея» растянет ваш рабочий стол на оба экрана.
FAQ
Как я могу использовать iPad в качестве второго монитора?
Чтобы использовать в качестве второго монитора iPad, откройте системные настройки на вашем Mac и выберите Sidecar. Выберите параметры Sidecar и выберите «Включить двойное нажатие на Apple Pencil». В раскрывающемся списке «Выбрать устройство» выберите свой iPad > на боковой панели выберите «Использовать как отдельный дисплей».
Как мне использовать телевизор в качестве второго монитора?
Чтобы использовать в качестве второго монитора телевизор, найдите порт видеовыхода вашего компьютера и параметры видеовхода вашего телевизора. Подключите один конец кабеля к порту видеовыхода вашего компьютера, а другой — к телевизору. Включите телевизор и переключите его на нужный вход (обычно HDMI). Когда вы увидите экран своего компьютера на телевизоре, отрегулируйте параметры отображения.
Почему мой второй монитор стал чёрным?
Ваш второй монитор может потемнеть из-за перегрева, особенно если вы играете или выполняете другие энергоёмкие задачи. Кроме того, проверьте, нет ли аппаратных сбоев, несовместимых настроек дисплея, проблем с драйверами и конфликтующих приложений.
You should upgrade or use an alternative browser.
-
#1
So I have a 1440×900 monitor and I do some video game capturing from time to time of replays. I want to increase resolution that I’m capturing at to 1080p, WQHD, 4K, etc using my same setup without having to fork out on a 4K resolution monitor.
I tried a virtual machine where you can emulate a monitor at any resolution and this worked however the directx support ended up constantly crashing the application so it’s not practical. Even if it didn’t, it probably would have been too slow to capture without dropping frames.
I’m now looking for a way within Windows 7. One idea is to extend the desktop in windows 7 to a second, «fake» monitor with the desired resolution. I would then drag the application into the extended, faked monitor, maximize it from the keyboard and start recording via a hotkey. It would be unseen but capturing at the higher resolution.
Wondering if anyone has any insight into if it’s possible? What about physically faking that a second monitor is connected to the GPU? See this thread: http://www.overclock.net/t/384733/the-30-second-dummy-plug where monitor terminators are used. Could this also work with multi-monitor, terminated setup?
Is there a way just through software alone?
Any help appreciated.
Many thanks.
-
#2
-
#3
-
#5
-
#6
Alternatively and if the GPU would stop after the monitor is unplugged, what about using a terminated VGA (see http://www.overclock.net/t/384733/the-30-second-dummy-plug) and then VNC in to set the 2560×1440 resolution?
-
#7
That sounds perfect and such a simple solution if it’s possible. I see the option i the nvidia control panel as «adjust desktop size and position» however it doesn’t seem to offer up any way to do it: (image is not my setup)

What about trying under «Change Resolution»? Can you add a custom resolution there?
This super-old guide shows an example, but it’s obsolete by now. Back when I used to do it, hmm that was like 2007? But it worked fine on my Nvidia cards when I used to add the custom resolutions that were bigger than my physical display.
I don’t think you’d need to disconnect the display, because the physical display will just show whatever it’s native resolution is, and the other portions of the ‘virtual’ resolution will just be off the screen so you move your mouse toward the edge of the screen and it will scroll. Very cool feature by Nvidia — I don’t think AMD has it?
-
#8
I created a VNC between the PC and laptop. I then disconnected the VGA cable on the GPU, VNCed in with the laptop, increased the resolution to 2560×1600 and then tried to capture the application. On doing so, I got an error saying that directdraw couldn’t be enabled (the same error through a VM as it turns out) even though I could expand the application did expand to the max resolution.
I then tried another way by disconnecting the VNC completely so that directdraw would no longer be an issue and I fired the application off via the command line. I got a different error this time as: «Problem setting ‘0x224x163789bpp (0hz)‘ display mode» which I guess means something along the lines of.. couldn’t start.
It seems like the gpu really does require a physical connection (at least in Win 7)? How does this work? Is it possible to create a dummy VGA plug which spoofs the gpu into thinking that the resolution is rendering successfully? If so then I guess this method would work. Any help appreciated.
Kittfatty:
There’s no option in the control panel settings to increase the resolution beyond the native. I have no idea what that dialogue is meant to do. I tried everything in there and nothing allows for a higher than native resolution.. :/
-
#10
-
#11
May I ask what your machines in work are doing while headless? I ask because in my test with nothing plugged in, I could set the res to whatever I want, but the application failed to start directdraw because I’m guessing that it needs something to draw to — VNC, VM, physical monitor, etc:
This or that it needs to get a signal back which says that the drawing is being rendered successfully. I’m guessing therefore that a VGA plug won’t make a difference because from what I understand, the VGA dummy plug only tricks the OS into thinking there’s a monitor present.
-
#12
Okay I will try that thank you. If you could test on Win7 that would be amazing!!May I ask what your machines in work are doing while headless? I ask because in my test with nothing plugged in, I could set the res to whatever I want, but the application failed to start directdraw because I’m guessing that it needs something to draw to — VNC, VM, physical monitor, etc:
This or that it needs to get a signal back which says that the drawing is being rendered successfully. I’m guessing therefore that a VGA plug won’t make a difference because from what I understand, the VGA dummy plug only tricks the OS into thinking there’s a monitor present.
I am using Macs. I think Macs are similar in this regard because they need something plugged into the video card in order to do anything OpenGL related. I use VGA terminators combined with DVI to VGA adapters, or DVI Detectives, which can completely clone a specific monitor’s characteristics. I have lots of xserves, Mac Pros and MacMinis in racks and its not practical to have monitors for each, and its hard to get a req for good network KVMs. I will get some terminators from work and try them out on my Windows machine tonight.
-
#13
Now it could be the VNC server (used TightVNC) cannot display the game video, but it can play regular video, so I’m not sure where to go here without investing a lot of time. Might be BF related, who knows. There is also the issue of audio, as you dont get that via VNC, although the sound was recorded in the game capture.
Now, you might be able to do what you originally wanted, in using a VM, setting the game to display on the second monitor, and just play the game scaled. I dont have a Windows VM to try this. You can least build the simple VGA terminator and give it a shot. I have a feeling that the frame rate will be terrible, if it works at all, because then you are trying to play at 4K. Depending on the game and your hardware it might be feasible.
Also, to create a custom resolution, open Nvidia Control Panel, expand Display, click on change resolution, select your monitor (or phantom monitor), then click on Customize, then click on Create Custom Resolution.
-
#14
Could you test capture without the VNC? This would mean launching the game blind via command line or something and then capturing with dxtory via hotkey. Doing so would eliminate the problem with directx / directdraw however maybe the application won’t start — ala the error I had.
If you’re saying that it worked in that the screen was black but dxtory sucessfully captured at the higher resolution, then this satisfies the requirements I have because I do not need to play the game — only record a replay. We are using different applications to test also so I will try and test with BF4 to see what happens. Maybe it’s the case that my application will crash, but BF4 will run.
I really appreciate your work in any event. You’re very kind to take the time. +rep
-
#15
Interesting and what you describe sounds a lot like what I experienced via the TightVNC. I know for sure that VNC / VM do not support directx / directdraw, hence why your BF4 screen was black so this is to be expected. I tested both and both failed to draw.Could you test capture without the VNC? This would mean launching the game blind via command line or something and then capturing with dxtory via hotkey. Doing so would eliminate the problem with directx / directdraw however maybe the application won’t start — ala the error I had.
If you’re saying that it worked in that the screen was black but dxtory sucessfully captured at the higher resolution, then this satisfies the requirements I have because I do not need to play the game — only record a replay. We are using different applications to test also so I will try and test with BF4 to see what happens. Maybe it’s the case that my application will crash, but BF4 will run.
I really appreciate your work in any event. You’re very kind to take the time. +rep
VNC was used just to launch the game remotely, but the recording was done on the machine with the virtual monitor. I thought you needed some interaction using the virtual monitor, but since you dont, this seems to do what you need it to do. Since I couldn’t see the actual game running, I didn’t bother trying to run the game at 4K. I didnt want to introduce any BF specific unknowns. I used the preset resolution of 1600×1200. BF recognized the virtual monitor as another monitor, and it was selectable in the UI. I just wanted to make sure you could create a custom 4K resolution using a VGA terminator. All other Windows functions worked at 4K.
-
#16
I think I really just need to test for myself with the dummy vga plug. You’ve definitely given me a last hope that it could still be viable!!
-
#17
I didn’t bother trying to run the game at 4K. I didnt want to introduce any BF specific unknowns. I used the preset resolution of 1600×1200.
Is your primary, physical display 1600×1200?
-
#18
Interesting. I wonder how the game managed to launch with the VNC. Did you launch with the VNC open, change the res via BF4’s menu, quit the VNC and then go into single player? Maybe the res can be set from notepad / launcher from the desktop instead? Seems a little odd how you were able to even launch if this is the case via the VNC.
I connected to the PC from a Mac using VNC, and simply opened the game, then set the monitor. In the VNC viewer, you see both the physical and the virtual monitor spanned as one display, so you can drag between displays. So I opened BF4, which opened on my primary display like usual, then went into video options and set the game to display on the virtual monitor. At that point the virtual monitor via the VNC viewer went black, but the game was actually running, as evidenced by the game capture.
Is your primary, physical display 1600×1200?
No, its a 144Hz 1080p monitor. I think when the video card can’t get back a list a supported resolutions from the monitor, it defaults to some values which should be support by older displays like CRTs. The terminator tells the video card some display is connected, but since it cant do EDID is must default to core resolutions. It actually defaulted to 1024×768, and 1600×1200 was the highest available resolution. You can of course, create a custom resolution. My DVI Detective can do EDID, and the default resolution was 2560×1440 on the virtual monitor, which is what it should do.
Yeah, I think at this point you should give it a shot. You can pick up resistors cheap at radio shack, and you probably have a dvi to vga adapter from one of your last few video card purchases. I dont quite get what your doing, like manage to get in game, change resolution, then play the replay and capture it if you can’t see the screen. I guess if there is something similar to Automator on the Mac you can automate this.
-
#19
http://www.nvnews.net/vbulletin/archive/index.php/t-53236.html
The solution is to download Coolbits 2 (http://downloads.guru3d.com/download.php?det=815), and run it to modify your registry. Then oad the NVIDIA control panel, and then click on Menu Editing->Restore defaults. After this the «Screen Resolutions & Refresh Rates» menu will pop up. Set a resolution larger than your display, and there you go; you have a custom resolution pan-and-scan desktop.
GiMeSpace Desktop Extender solves this problem in an easy way. It will give you unlimted desktop space and also no size restrictions on your windows size!
-
#21
I tried GiMeSpace Desktop Extender however Dxtory doesn’t recognise the larger window as being «true». It still hooks 1440×900 even though the window size is far larger. In addition the larger window isn’t being drawn to — it’s just black. I think for my case at least, I need a more convincing fake with the dummy plug.
Another similar application is called Infinite Desktop: http://www.addictivetips.com/windows-tips/get-infinite-scroll-on-windows-desktop-with-windowslider/
I will see if I can get Coolbits up on Win7. It was released in 2004 so it could be a little hairy.
I’m still puzzled how Childs was able to run and navigate within BF4 as you did with a VNC running because as far as I know, no VNC supports directx / draw:
I connected to the PC from a Mac using VNC, and simply opened the game, then set the monitor.
Which VNC were you using?
My DVI Detective can do EDID
Why is this hardware useful if the EDID information can be forced (res, hz, etc) or specified in an edited .inf driver?
-
#22
-
#23
The trick is to force detection of the devices, then force connection as a VGA monitor, and then set the desired resolution. Despite it being supposedly VGA, Windows 7 offers me a 2560×1600 resolution for the fake screen. I didn’t try to actually set it, but it may be worth a try for you.
With Lucid MVP and a 4k-capable CPU you might even render to 4k on the not-a-screen, using your primary GPU.
-
#24
I’m still puzzled how Childs was able to run and navigate within BF4 as you did with a VNC running because as far as I know, no VNC supports directx / draw:Which VNC were you using?
Sorry, I didnt know this thread was updated. I used TightVNC as the VNC server, and on my Mac I used the ScreenSharing app as the client.
Why is this hardware useful if the EDID information can be forced (res, hz, etc) or specified in an edited .inf driver?
You clone the monitor so when its not plugged in the system will always think it is. This is useful when you do not have a monitor connected, or use KVMs and switch away from the source. The VGA terminator doesnt store information, so it just uses a generic VGA monitor. The DVI Detective is more used when cloning specific monitors and timings, and it stays with the device so there are no drivers or creating specific profiles.
-
#25
I downloaded CCC 10.4 but it wouldn’t recognize the card for some reason in XP. I downloaded the latest CCC, (13.something) rebooted and it worked. I then forced a higher resolution in XP display properties settings and pan and scan worked right off the bat! I could also successfully hook and capture at the higher resolution!! Finally I have some kind of solution.
There’s an upper resolution limit in CCC / XP right now which is below my 3200×1800 target on the defaulted monitor to something like 2500 x something but I read that additional resolutions and refresh rates can be added / hacked in the registry. Once I do that the next thing will be to try and get both the Nvidia and ATI co-existing in the same system — GTX670 for Windows 7 and 5570 for capture in XP where I can dual boot between them.
I don’t quite know why pan and scan is working in the end given that I read from several threads that it was discontinued after version 10.4. I also worry a little about the power of the card to output at 60fps @ 3200×1600. The application is quite light but even still it’s a lot of pixels. I may need a more powerful card like the 4870 or something which are relatively inexpensive.
- Advertising
- Cookies Policies
- Privacy
- Term & Conditions
-
This site uses cookies to help personalise content, tailor your experience and to keep you logged in if you register.
By continuing to use this site, you are consenting to our use of cookies.