
Если вам по той или иной причине потребовалась загрузочная флешка Windows 10 (или другой версии ОС), при этом на имеющемся компьютере в наличии только Linux (Ubuntu, Mint, другие дистрибутивы), вы сравнительно легко можете записать её.
В этой инструкции пошагово о двух способах создать загрузочную флешку Windows 10 из Linux, которые подойдут как для установки на UEFI-системе, так и для того, чтобы установить ОС в Legacy режиме. Также могут пригодиться материалы: Лучшие программы для создания загрузочной флешки, Загрузочная флешка Windows 10.
Загрузочная флешка Windows 10 с помощью WoeUSB
Первый способ создания загрузочной флешки Windows 10 в Linux — использование бесплатной программы WoeUSB. Созданный с её помощью накопитель работает и в UEFI и в Legacy режиме.
Для установки программы используйте следующие команды в терминале
sudo add-apt-repository ppa:nilarimogard/webupd8
sudo apt update
sudo apt install woeusb
Если эти команды не сработали, попробуйте такой вариант:
wget mirrors.kernel.org/ubuntu/pool/universe/w/wxwidgets3.0/libwxgtk3.0-0v5_3.0.4+dfsg-3_amd64.deb
sudo dpkg -i libwxgtk*_amd64.deb
sudo apt update
sudo apt --fix-broken install
sudo apt install woeusb
После установки порядок действий будет следующим:
- Запустите программу.
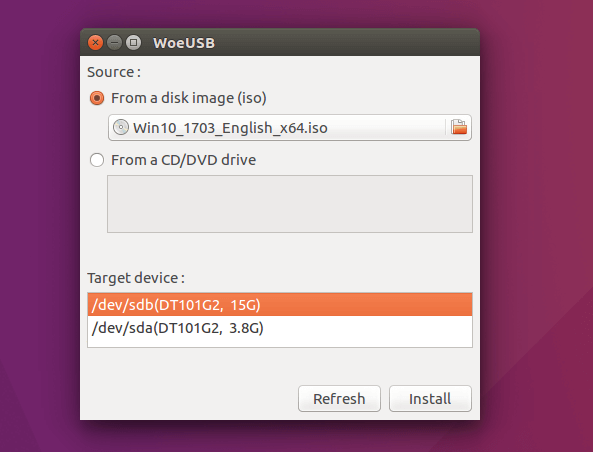
- Выберите ISO образ диска в разделе «From a disk image» (также, при желании, можно сделать загрузочную флешку с оптического диска или смонтированного образа).
- В разделе «Target device» укажите флешку, на которую будет записан образ (данные с неё будут удалены).
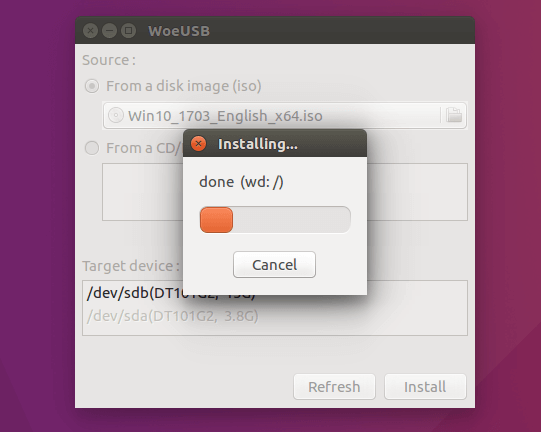
- Нажмите кнопку Install и дождитесь завершения записи загрузочной флешки.
- При появлении ошибки с кодом 256 «Source media is currently mounted», размонтируйте образ ISO с Windows 10.
- При ошибке «Target device is currently busy», размонтируйте и отключите флешку, затем снова подключите её, обычно помогает. Если не сработало, попробуйте предварительно отформатировать её.
На этом процесс записи завершен, можно использовать созданный USB накопитель для установки системы.
Создание загрузочной флешки Windows 10 в Linux без программ
Этот способ, пожалуй, ещё проще, но подойдет только в том случае, если вы планируете загружаться с созданного накопителя на UEFI-системе и устанавливать Windows 10 на GPT диск.
- Отформатируйте флешку в FAT32, например, в приложении «Диски» в Ubuntu.

- Смонтируйте образ ISO с Windows 10 и просто скопируйте всё его содержимое на отформатированную флешку.


Загрузочная флешка Windows 10 для UEFI готова и с неё можно без проблем загрузиться в EFI-режиме.
We have previously looked at how you can create a bootable USB drive of various Linux distributions from a Windows PC. Some of these posts include Creating a Linux Mint Live USB drive on Windows and create a bootable Ubuntu Live USB drive on Windows using tools like Rufus and PowerISO. This post will do the reverse – How to create Windows 10 USB installation Drive in Linux.
Requirements
- Windows 10 ISO file
- A USB drive (at least 8GB)
- Root privileges
- An active internet connection to download some of the tools
Creating Windows 10 USB installation Drive in Linux
To get started, download the Windows 10 ISO file from their official website. Earlier versions were around 4GB in size, but I saw the latest version is nearly 5.7GB. That’s why I recommend you have a USB drive with at least 8GB of space. However, if you are using an earlier Windows ISO version (maybe Windows 10 2015), which is about 3.6GB, a 4GB-USB Drive would be okay.
Download Windows 10
Format the USB Drive
Even though we will look at various methods you can use to make the USB drive bootable, always ensure your USB is formatted with the right file format. We will use the disk utility that comes pre-installed with most Linux distribution and Gparted. Note: GParted is not pre-installed in most Linux distribution, but it’s one of the best tools to manage and partitions your disks. Our post on How to safely create or resize partitions in Linux using GParted can give you a little more insight into this fantastic tool.
Format USB with Disks Utility
Step 1. Insert/Plug your USB drive and launch the Disks utility from the applications menu.

Launch Disks
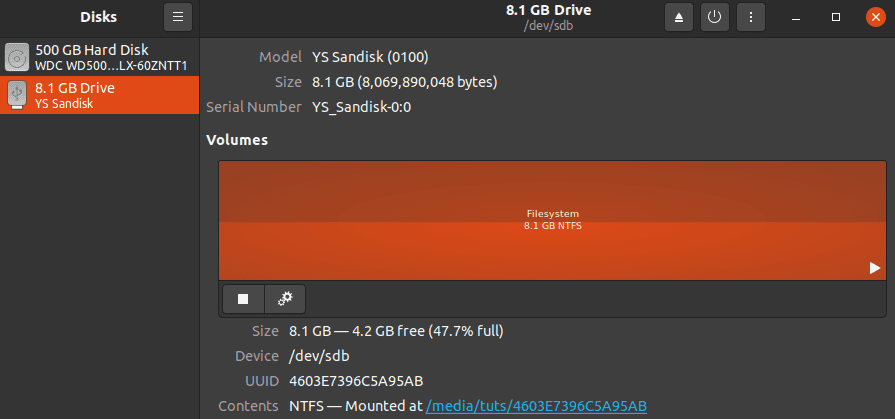
Step 2. The Disk Utility window will open, listing all the available Hard drives and USB drives connected to your PC. Select your USB drive. From the image below, you can see I have my 8GB USB drive selected.
Disk Utility
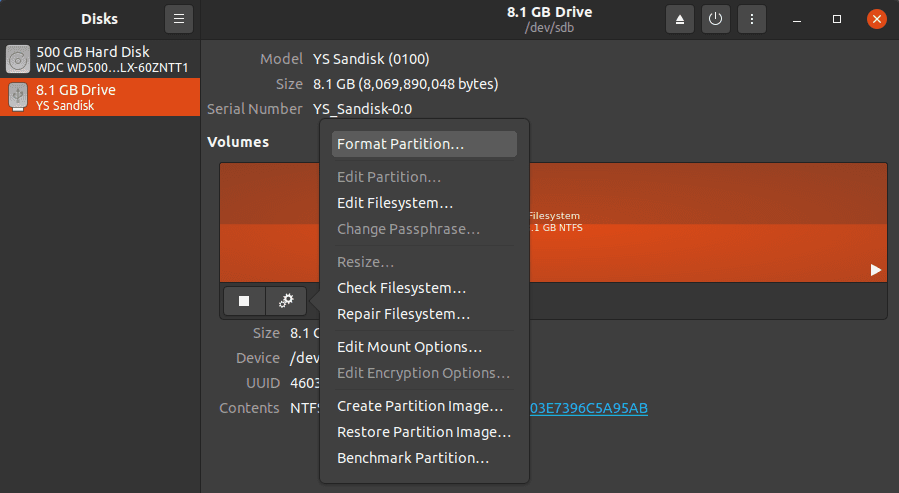
Step 3. With your USB selected, click on the Settings button (represented with a gear icon). A menu will pop-up with several options. Select the first option, which is ‘Format.’
Open Settings
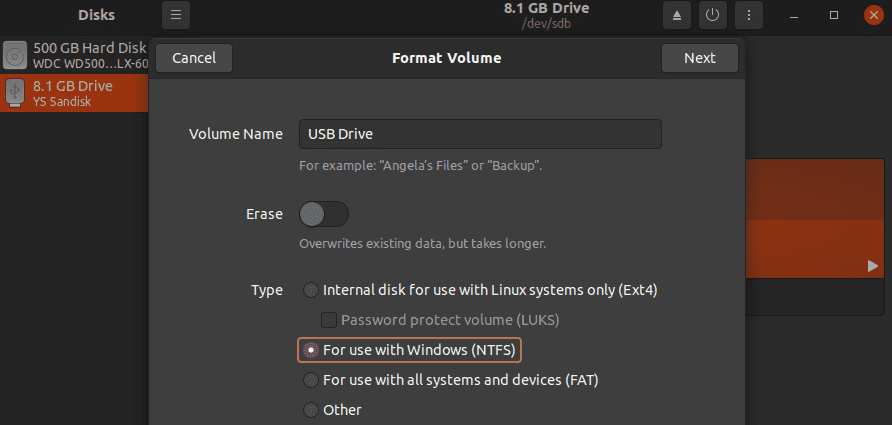
Step 4. A window will pop-up listing several options. Enter the Volume Name (can be any) and select the file format you want to use.
Note: If your Windows ISO file is less than 4GB, you can select the FAT option. However, if it’s bigger than that, use the NTFS option as I have done on the image below. That is because the FAT file system only supports a maximum file size of 4GB; for any file more extensive than 4GB, use exFAT or NTFS. Click Next when done.
Format USB
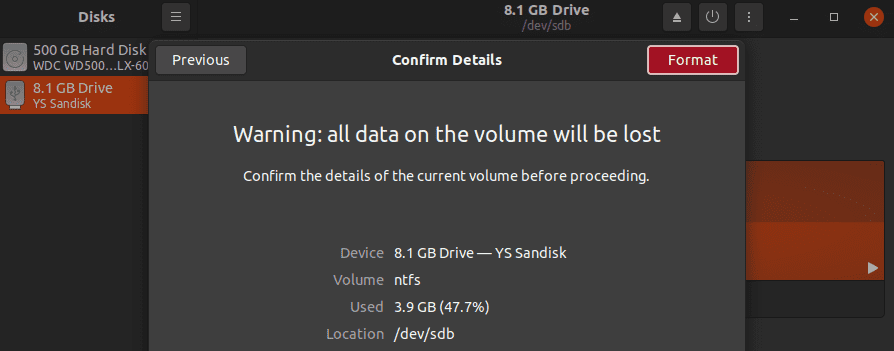
Step 5. You will see a warning – “all data on the volume will be lost.” You can also see the configurations below. Click on Format to finalize the process.
Confirm and Format USB
Once the format process complete, you can now create a bootable USB drive of Windows.
Format USB with GParted
Gparted is a free Disk manager utility available for most Linux distributions. It creates, resize, and move partitions, format and also create partition tables.
To install Gparted, execute any of the commands below depending on your distribution.
-
Ubuntu/Debian
sudo apt install gparted
-
Fedora
su -c "yum install gparted"
-
Mageia
sudo urpmi gparted
-
OpenSUSE
sudo zypper install gparted
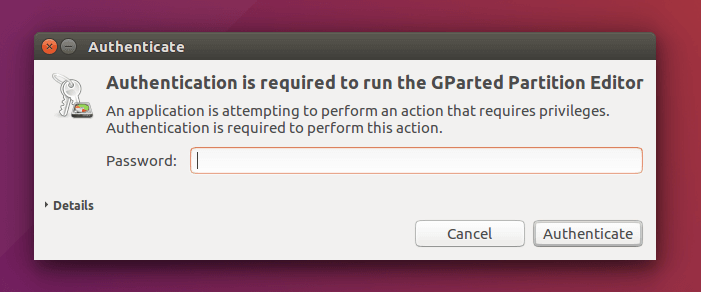
Once you have successfully installed GParted, proceed to launch it from the applications menu or execute the command GParted on the Terminal. Note: GParted requires root privileges. You will, therefore, be required to enter your Root password.

Launch GParted
Select your USB drive from the drop-down menu at the top-left corner.
Select USB drive
Right-click on your USB drive and select the Format option. Use the NTFS file system. If you don’t see these options (or they are greyed out), you might need to unmount your USB drive first. You will see the unmount option when you right-click on the USB.
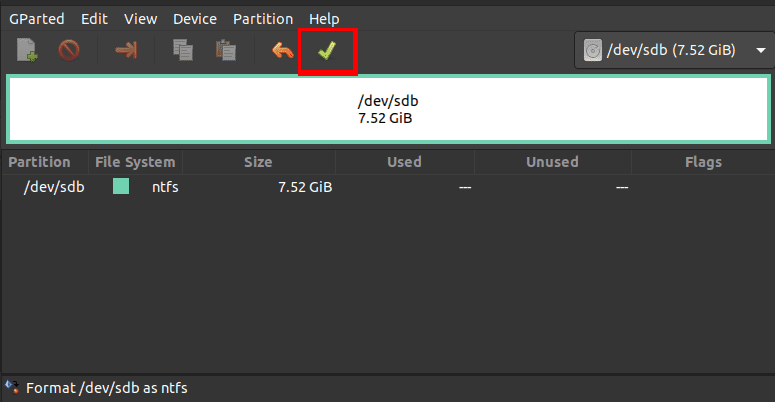
Once done, click on the Green tick at the top to apply the changes.
Apply Changes
Let’s now look at the various methods you can use to create a bootable USB drive of Windows on Linux.
1. Create a bootable Windows USB with Disk Image Mounter
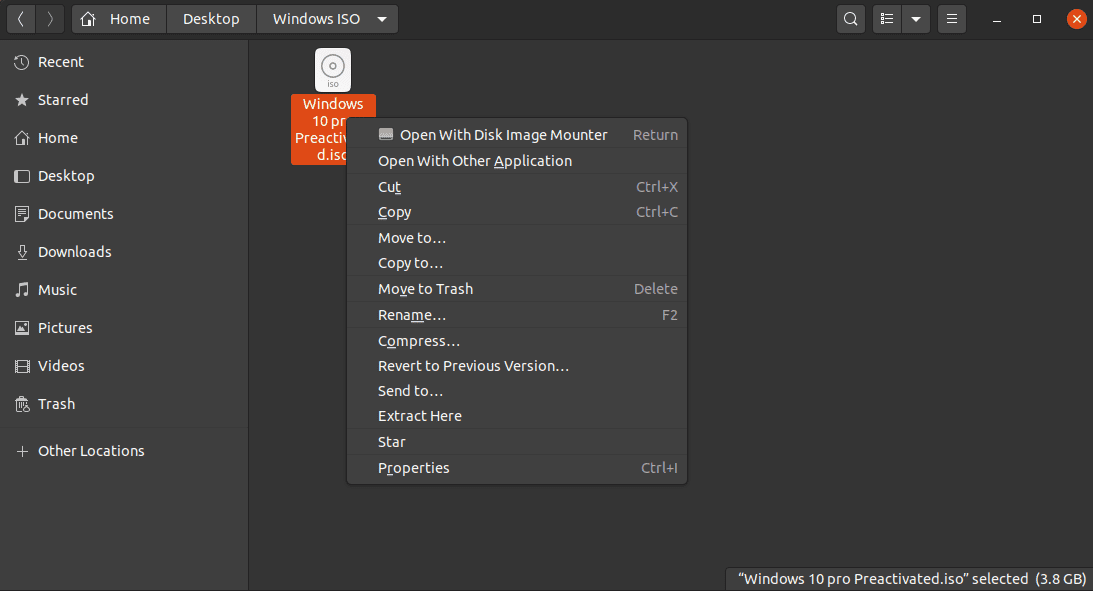
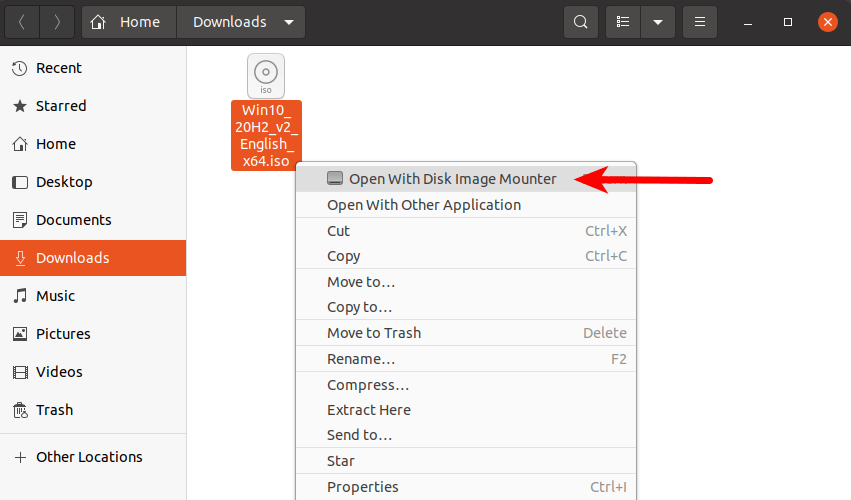
Step 1. Launch the File Manager and navigate to the directory containing your Windows ISO file. Right-click on it and select the option “Open with Disk Image Mounter.”
Disk Image Mounter
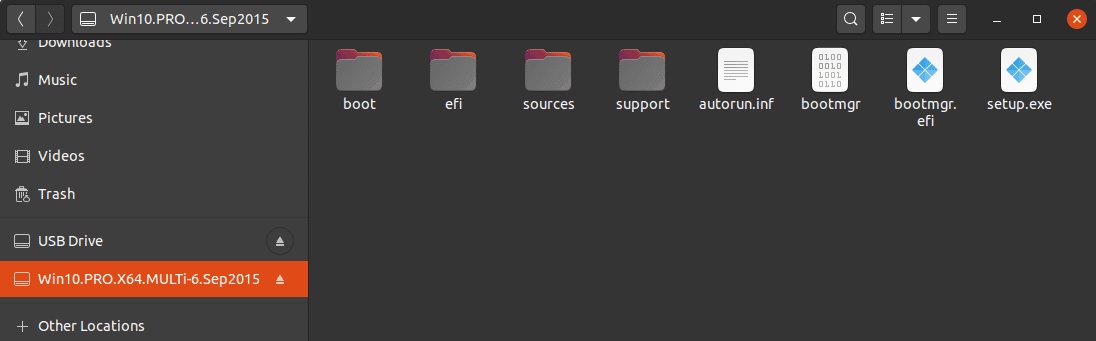
Step 2. The Windows ISO file will be mounted as a drive, and you can find it on the left side of the file manager. For some, you might need to click on “Other Locations” to see the mounted Windows ISO.
Mount Windows ISO
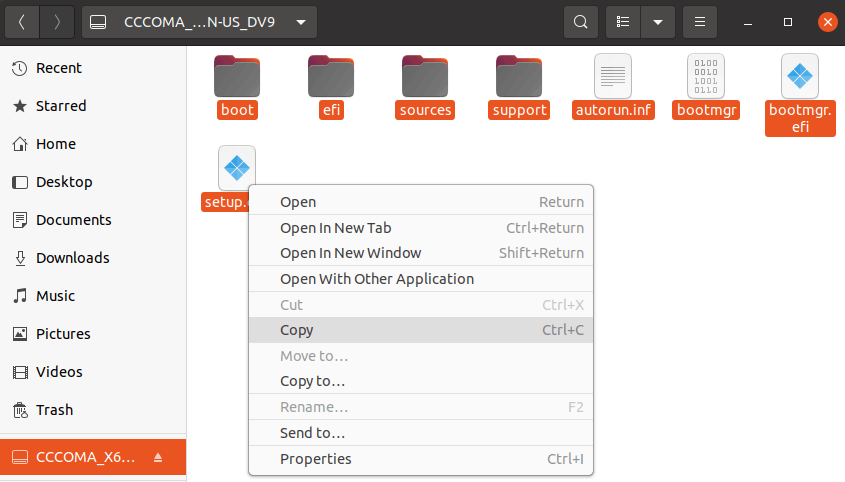
Step 3. Click on the mounted Windows ISO and copy all the contents to the USB drive. You can use the shortcuts Ctrl + A to select everything, Ctrl + C to copy, and Ctrl + V to paste the files to the USB drive.
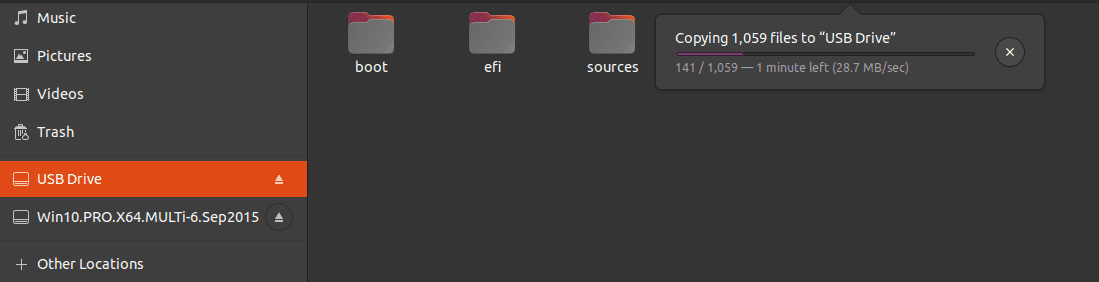
Copy Files to USB
Now, wait for the process to complete. Once done, you can proceed to eject your PC from the file manager. Do this by right-clicking on the drive and clicking the eject option. You might get an error like “Do not unplug the drive until the write process has finished.” Please wait for a while until you see the notification, “can be safely removed.”
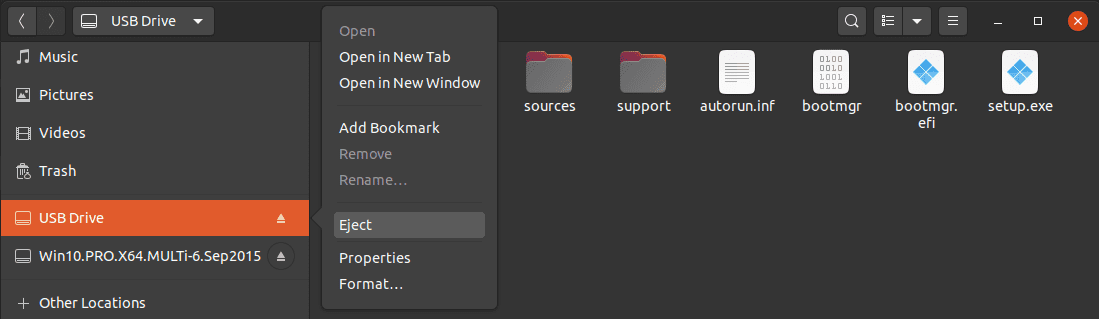
Eject USB Drive
Note: From my experience working with Linux systems, never remove/unplug your USB drive from your PC without ejecting it from the file manager first. That’s especially when copying files. Even though it might show a “tick,” which means the copying process is complete, that might not be the case, and you will lose data if you forcefully unplug it without ejecting it.
If you did everything correctly, you now have a bootable USB drive of Windows 10. You can proceed to use it to boot up your PC and install Windows 10.
2. Create a bootable Windows USB with WoeUSB
WoeUSB is a Linux tool used to create a bootable USB drive for Windows. The tool is available in two formats. The woeusb program runs on the command-line and the woeusbgui, which presents a graphical interface. WoeUSb is free, and the source code is available on GitHub.
Install WoeUSb
Below are the installation procedure and commands for various Linux distributions.
-
Ubuntu/Debian
sudo add-apt-repository ppa:nilarimogard/webupd8
sudo apt update
sudo apt install woeusb
Alternatively, you can download the DEB file from the link below;
Download WoeUSB DEB
Note: If you get an error like “woeusb : Depends: libwxgtk3.0-0v5 (>= 3.0.4+dfsg), but it is not installable – E: Unable to correct problems, you have held broken packages” while executing the commands above, download and install the libwxgtk package from this link. Once done, try installing WoeUSB again.

Broken package error
-
Fedora
To install WoeUSb on Fedora, we will use the Snap package format. Execute the commands below:
sudo dnf install snapd
sudo ln -s /var/lib/snapd/snap /snap
sudo snap install woe-usb --edge
-
Linux Mint
use the commands below:
sudo add-apt-repository ppa:nilarimogard/webupd8
sudo apt update
sudo apt install woeusb
-
Elementary OS
Like Fedora, use the snap package manager to install WoeUSb on Elementary OS:
sudo apt update
sudo apt install snapd
sudo snap install woe-usb --edge
If you are using any other Linux distribution that is not mentioned above, use Snap to install WoeUSb. Now, let’s proceed and see how you can create a bootable USB drive of Windows in Linux systems.
Step 1. Format the USB drive. Use any of the methods described above.
Step 2. Once you have successfully installed WoeUSB, launch it from the applications menu.

Launch WoeUSB
The main WoeUSB window will open. It contains three main sections. The Source section is where you will select the Windows ISO file you want to use. In the File system section, select the file system format you want to use – whether FAT or NTFS. The final section is the Target device. Here, you will need to select the destination USB drive that you want to make bootable.
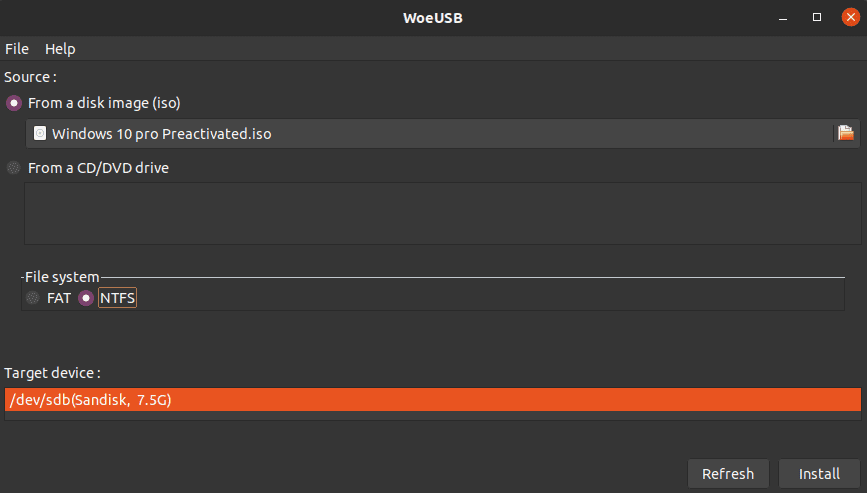
WoeUSB main window
Step 3. After you have selected the ISO file, chosen the file system format to use, and the destination USB drive, click on the Install button at the bottom right. WoeUSB will start copying the files to the destination USB drive.
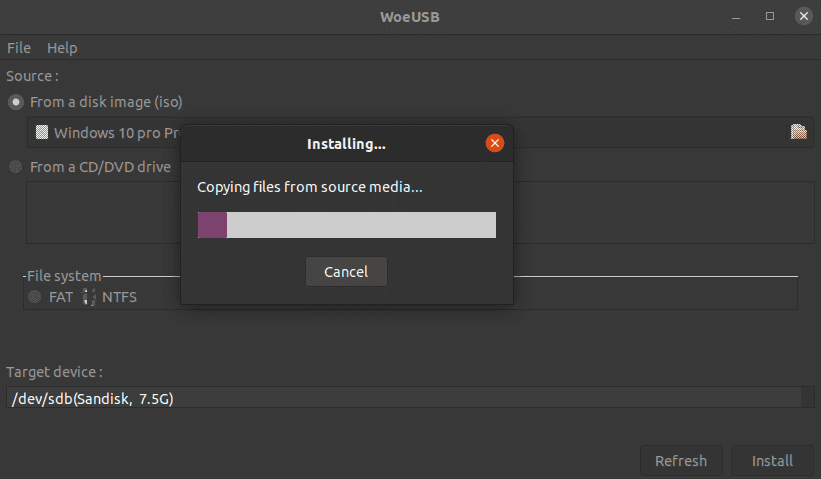
WoeUSB
Note: It might take some time to make the USB drive bootable (up to 15 minutes). You might see the “Done” notification but don’t eject the USB drive until you see an “Installation Success” pop-up window.
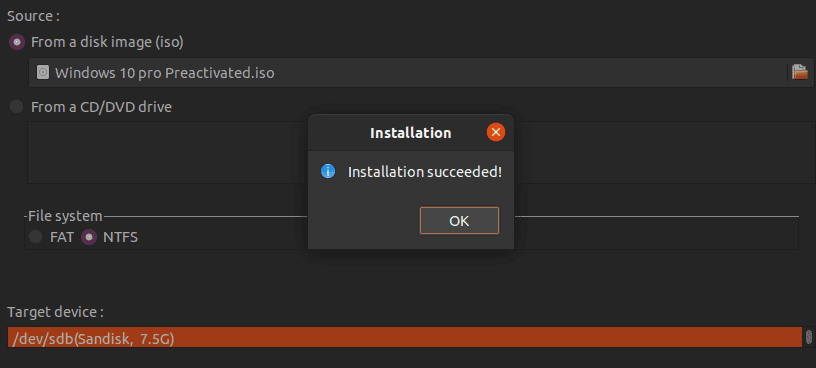
Installation Success
Step 4. Click OK and close the WoeUSb window. You can now eject the USB drive from the file manager and use it to boot and install Windows.
3. Create a bootable Windows USB with UNebootin
UNetbootin is a cross-platform utility used to create a bootable USB drive. Unlike WoeUSb, which supports only Windows ISO files, UNetbootin can also create bootable USB drives of Linux files. One additional exciting feature with the UNetbootin is it is available as a bin file. Therefore, you are only required to make it executable and run it. You don’t need to install it.
Step 1. Download UNetbootin bin file.
To download the 64bit file of UNetbootin, execute the command below.
wget https://github.com/unetbootin/unetbootin/releases/download/675/unetbootin-linux64-675.bin
To download the 32bit file of UNetbootin, execute the command below:
wget https://github.com/unetbootin/unetbootin/releases/download/675/unetbootin-linux-675.bin
In my case, I will download the 64bit file.
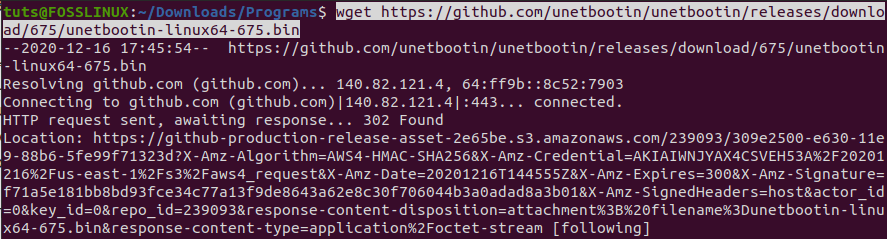
UNetbootin 64bit
Step 2. Make the UNetbootin bin file executable with the command below
chmod +x unetbootin-linux64-675.bin

Make the file executable
Step 3. Once done, you can proceed to run the bin file. Execute the command below to run UNetbootin as root.
sudo QT_X11_NO_MITSHM=1 /home/tuts/Downloads/Programs/unetbootin-linux64-675.bin
Please note, you might need to change the path to point to the directory containing the Windows ISO file.

Launch UNetbootin
The UNetbootin main window will open.
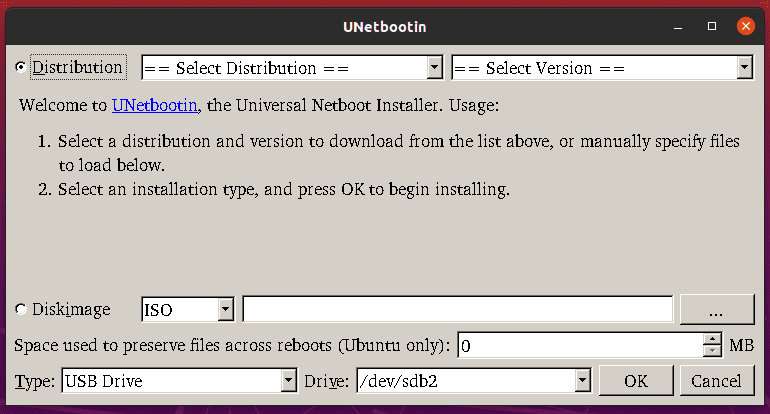
UNetbootin Main Window
Step 4. There are two main sections – Distribution and Diskimage. Select the Diskimage area and choose the path of the Windows ISO file. Just below that, select Disk Type and the USB drive. Once done, Click OK.
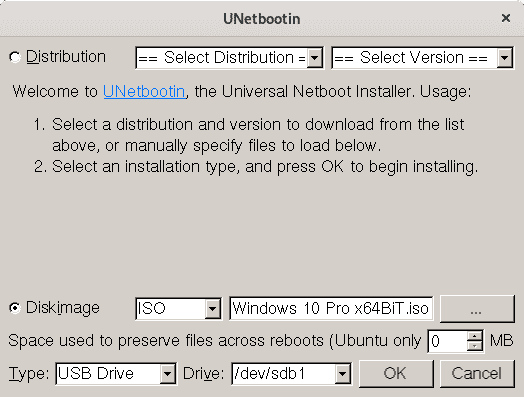
UNetbootin
Step 5. UNetbootin will start making the USB drive bootable. You can follow what’s happening on the UNetbootin window. You can track the overall progress at the bottom of the window in the progress bar.

UNetbootin Booting process
Step 6. Once done, you will see the Complete Installation message. Click on the Exit button that appears.
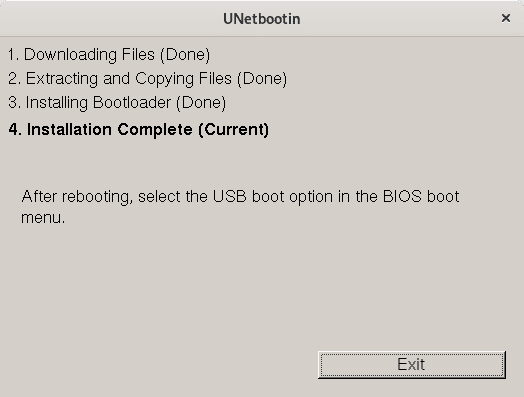
UNetbootin Finish window
You can now eject the USB from the file manager and use it to boot and install Windows.
Conclusion
That’s our complete guide on how you can create a bootable USB drive of Windows on Linux systems. Out of the three methods discussed above, I would highly recommend the Disk Image Mounter method. Do you have another way that you use to create a bootable USB drive of Windows on Linux? Please, share with our readers in the comments below. If you come across any errors executing the commands above, feel free to hit the comments.
If you are new with the whole procedure of booting your PC from a USB drive, please check out our post on How to boot your Windows or Linux PC from a USB Drive. It will give you a detailed guide on the entire process.
В данной статье мы расскажем как создать загрузочную флешку с Windows в системе Linux с помощью утилиты под названием «Ventoy».
Для начала вам потребуется:
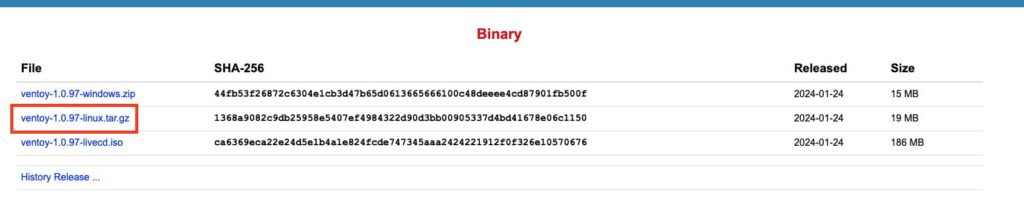
— Сама утилита Ventoy под Linux, скачать вы ее можете с официального сайта.
— ISO Образ нужной вам Windows, скачать его можно в нашем каталоге.
— Так же вам потребуется активировать будущую Windows, оригинальные ключи активации вы можете приобрести у нас в магазине по выгодным ценам от 1140 ₽.
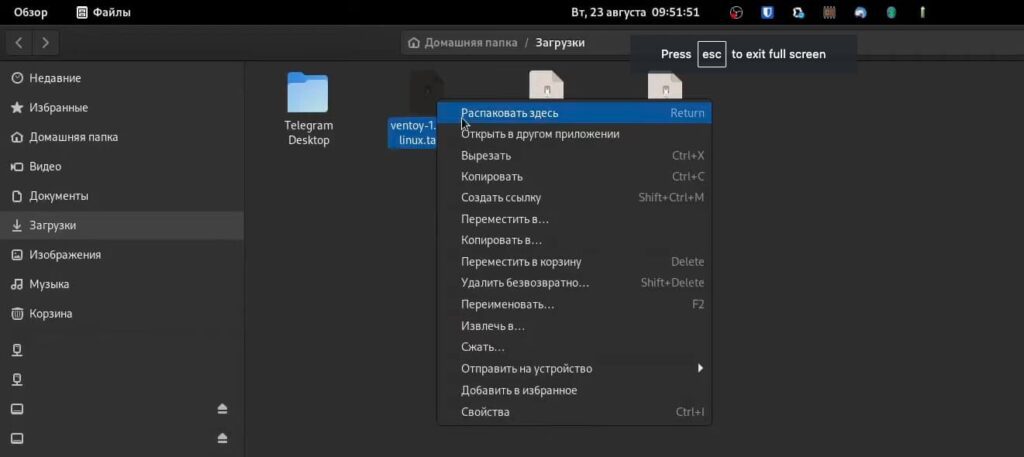
1) После того как вы скачали архив с программой, распаковываем его в удобное для вас место.
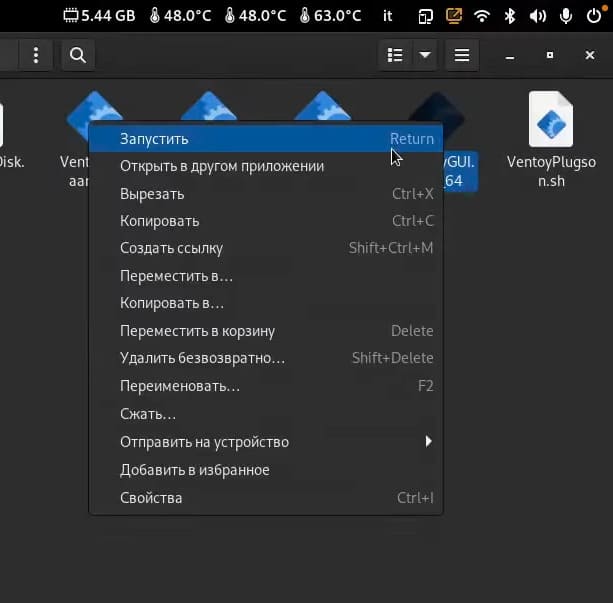
2) Переходим в папу с программой, и нажимаем «Свойство» на файле «VentoyGUIx86_x64».
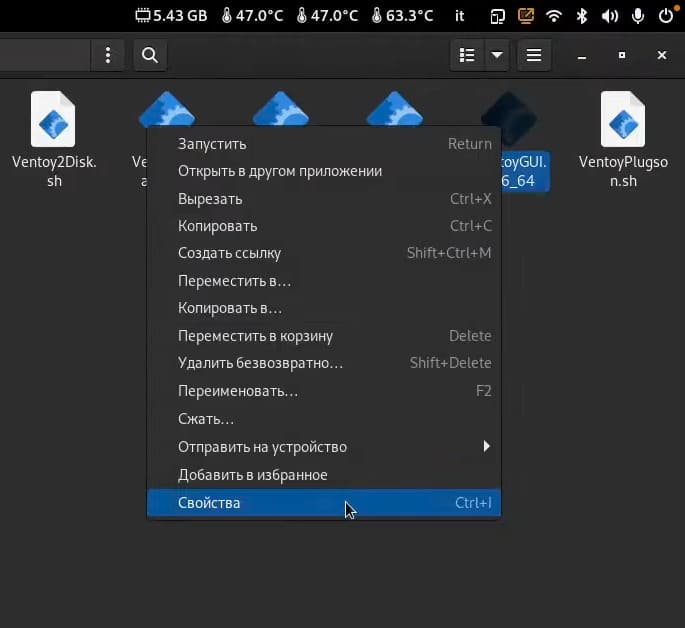
3) В разделе «Права» ставим галочку напротив «Разрешить выполнение файла как программы», чтобы сделать файл исполняемым.

4) После этого запускаем файл.
5) После запуска открывается интерфейс утилиты, если вы будете устанавливать Windows на старый ПК c Legacy Boot, то в разделе Option => Partition Style выбираем «MBR». Если же установка будет производиться на новый ПК с UEFI, тогда выбираем разметку «GPT».
6) После выбора нужной вам разметки, жмем «Install» и ждем какое-то время.
7) После записи программы на флешку, появится два раздела.
— Первый раздел, куда установилась сама утилита с ее файлами.
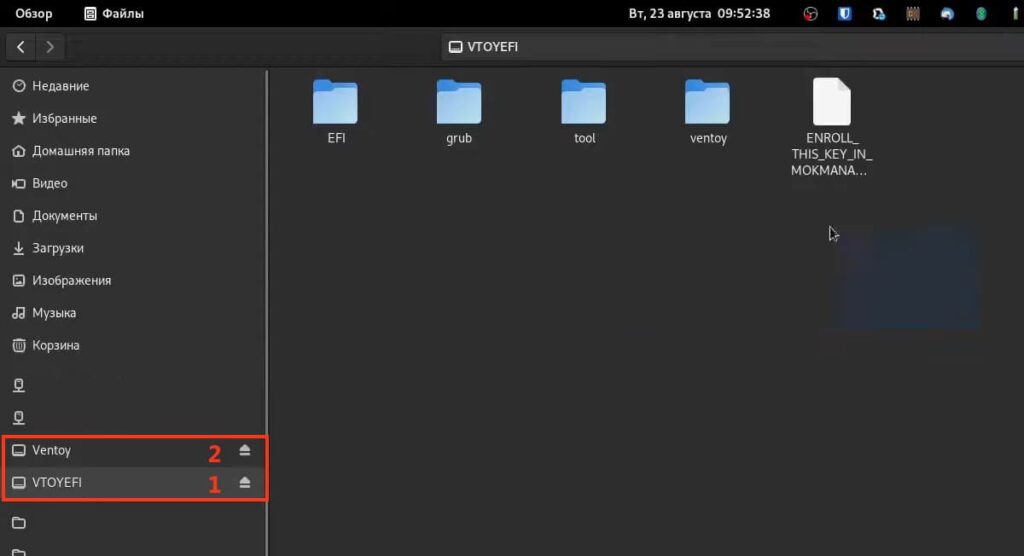
— Второй раздел, куда нужно будет поместить ISO образ Windows.
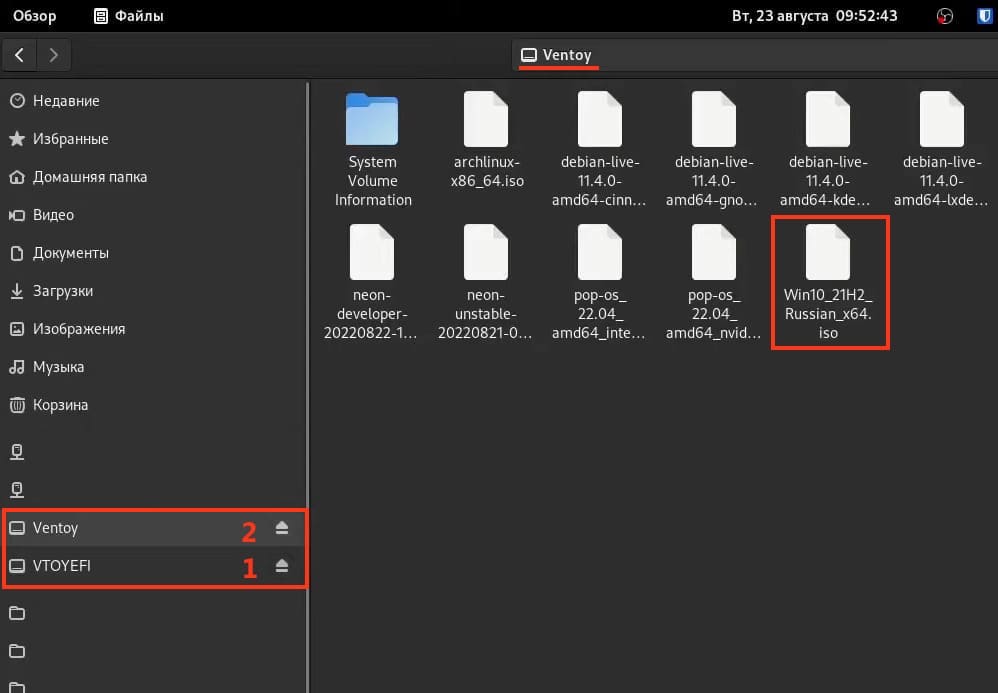
 Все что нам остается, это просто переместить во второй раздел заранее скачанный ISO образ нужной вам Windows.

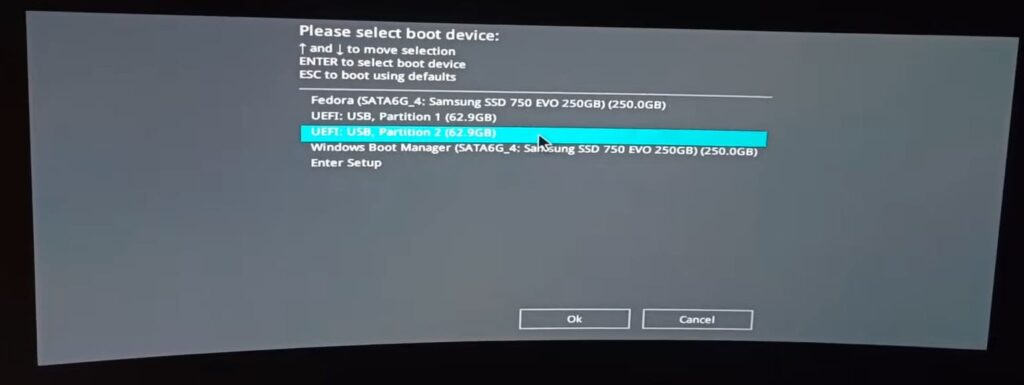
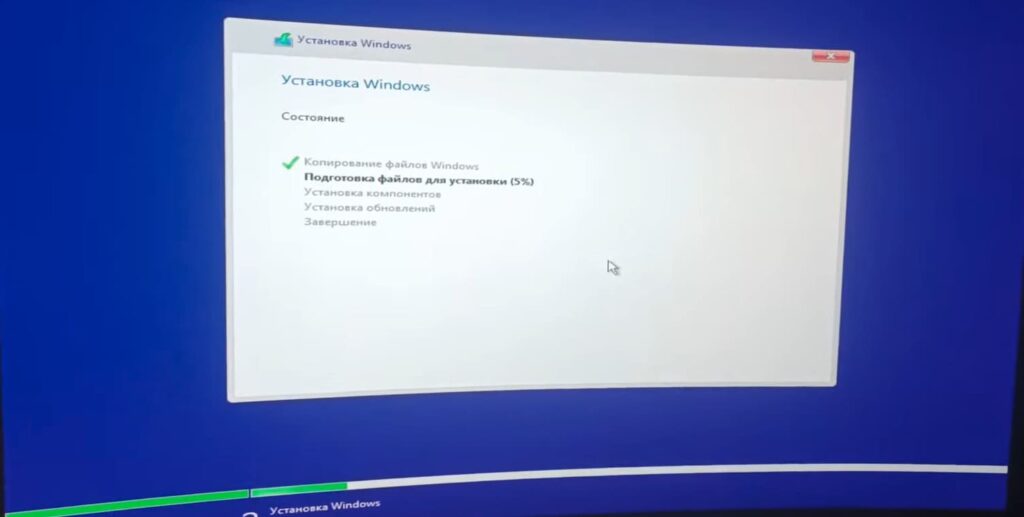
9) После чего запуститься с этой флешки, выбрать второй раздел и начать процедуру установки системы.
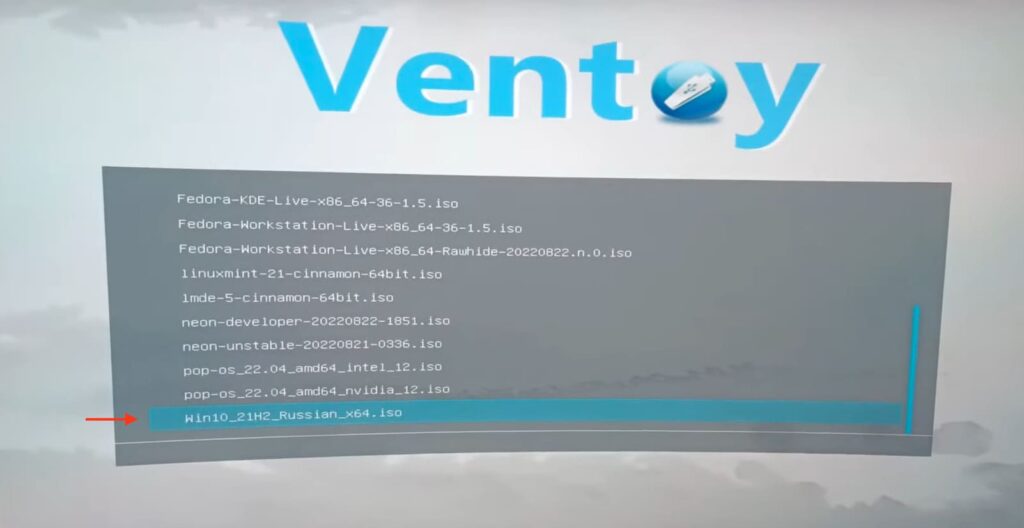
Хотим напомнить что все популярные ISO образы Windows вы можете скачать в нашем каталоге.
— Windows 11
— Windows 10
— Windows 8.1
— Windows 7
This tutorial is going to show you an easy way to create a Windows 10 bootable USB on Linux. I use Ubuntu 20.04 as an example. The method applies to any Linux distribution. I use Windows to do online banking because my bank doesn’t support Linux and sometimes play games that can’t run on Linux.
What you need
- A computer running Linux
- A USB flash drive at least 8GB
- Windows 10 ISO
Download Windows 10 ISO
First, you should download Windows 10 ISO from Microsoft official download link. Note that you might not be able to download the ISO from this link on a Windows computer. This download link is visible to users on Linux computer. Once downloaded, follow the instructions below.
Note: It’s recommended to download the Windows 10 April 2018 update ISO, because the October Update ISO contains a file that is larger than 4GB, which can not be copied to a FAT32 partition.

Update: Microsoft doesn’t allow you to download the Windows 10 April 2018 Update ISO from their website anymore. You can download the ISO via this link: Win10 1803 English x64 ISO
Creating a Windows 10 Bootable USB for UEFI Firmware
This method works for UEFI firmware and is very simple. You create a GUID partition table on your USB stick, create a FAT32 file system on it, and then mount Windows 10 ISO image and copy those Windows 10 files to your USB stick and you are done. The following is a step-by-step guide.
First, install GParted partition editor on your Linux distribution. Ubuntu users run the following command.
sudo apt install gparted
Then insert your USB stick to your computer. Make sure you back up important files in your USB stick if there’s any. Next, launch Gparted. You will need to enter your password in order to use GParted.
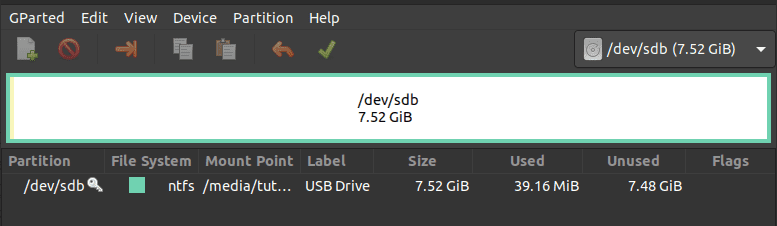
Select your USB stick from the drop-down menu on the upper-right corner. My USB stick is /dev/sdb. Yours may be different.
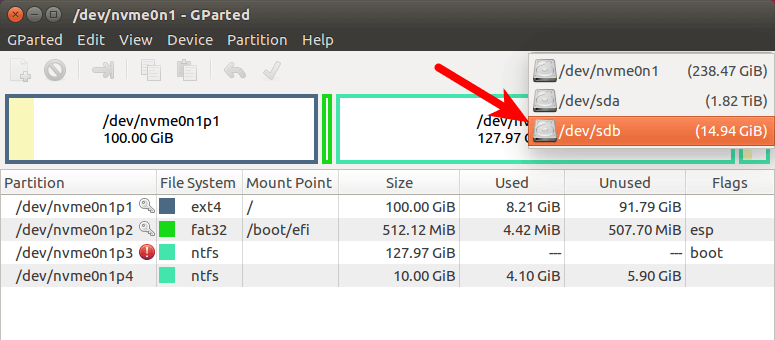
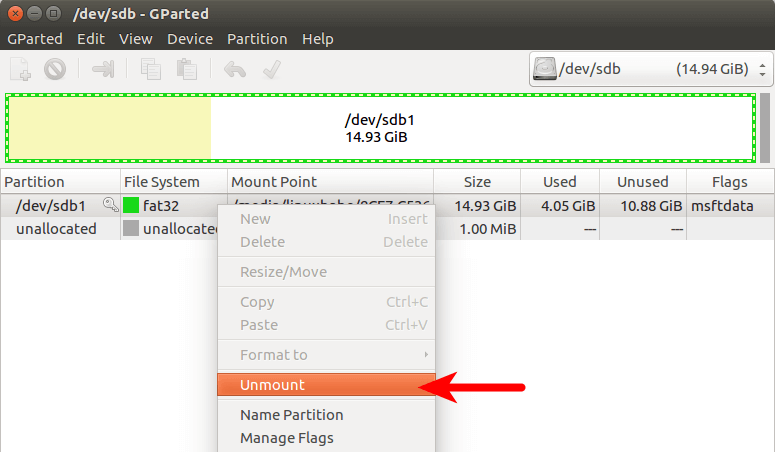
If there’s a key icon after the partition name, that means the partition is mounted. Make sure all partitions on your USB stick are unmounted. To unmount a partition, simply right-click on it and select unmount.
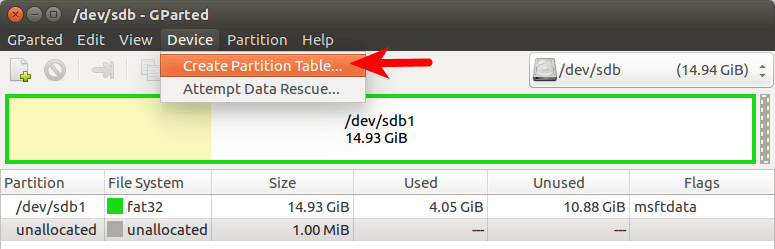
Next, on the menu bar, select Device > Create partition table.
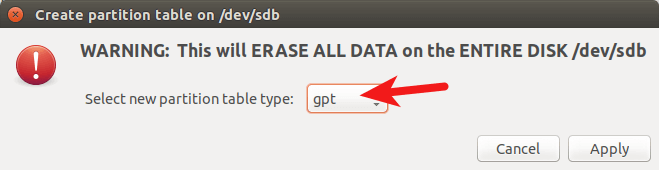
Choose GPT as the partition table type and click Apply.
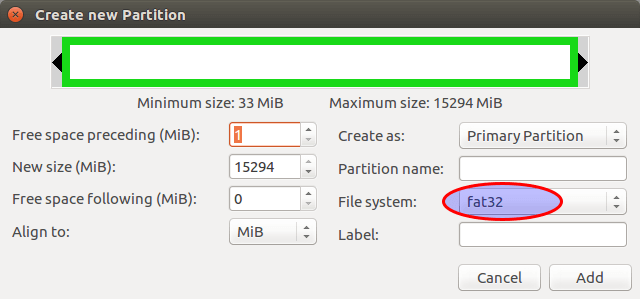
Then right-click on the unallocated space and select New to create a new partition.

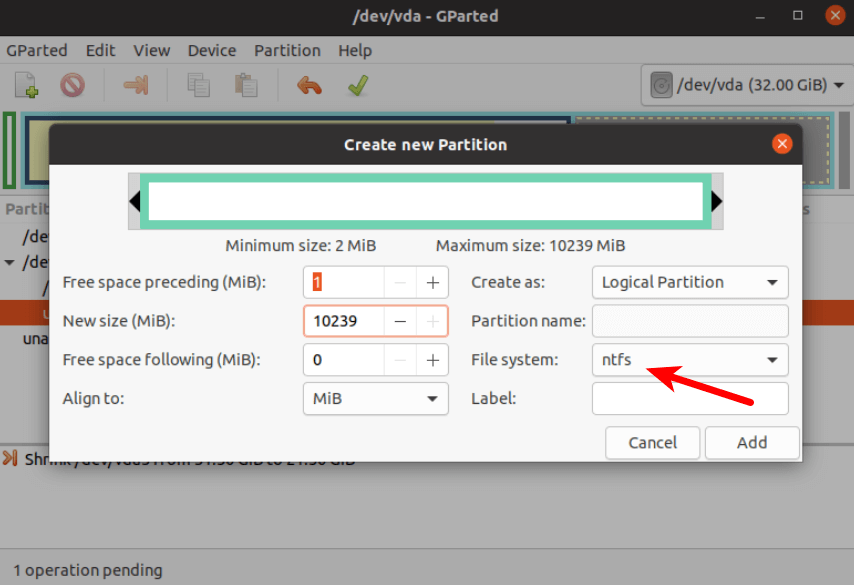
Change file system type from ext4 to fat32 and click Add.
Note: The install.wim file in Windows 10 October 2018 update ISO is 4.1G, so if you downloaded this ISO image, you need to change ext4 to ntfs. If you downloaded Windows 10 April 2018 Update ISO, which contains a 3.9G size install.wim file, you can change ext4 to fat32
Update: It is my observation that my NTFS formatted USB stick isn’t bootable on my old laptop, which was bought in 2012. However, it is bootable on my desktop computer, which was bought in 2017. It has a graphical UEFI firware (I can use my mouse to configure firmware settings).
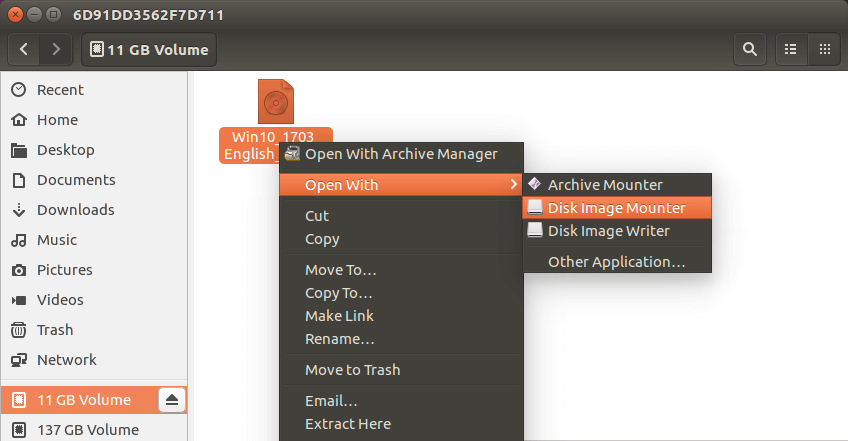
Next, click the green check button on the toolbar to apply this operation. Once that’s done, close GParted (This is important), then find your Windows 10 ISO in file manager. Open it with disk image mounter.
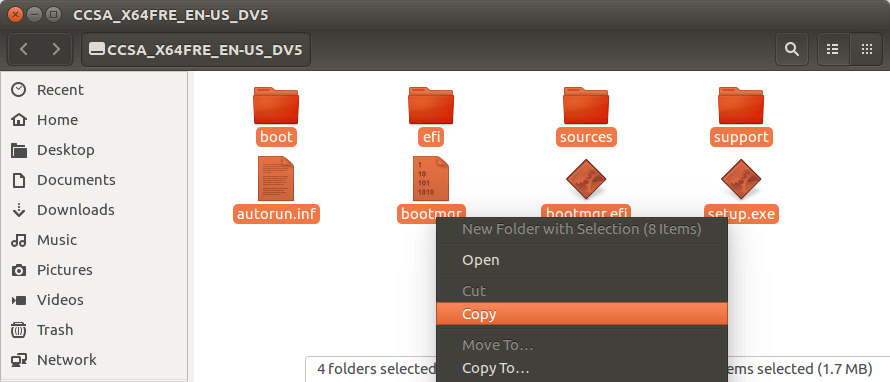
Open the mounted file system. Select all files and folders and copy them to your USB stick.
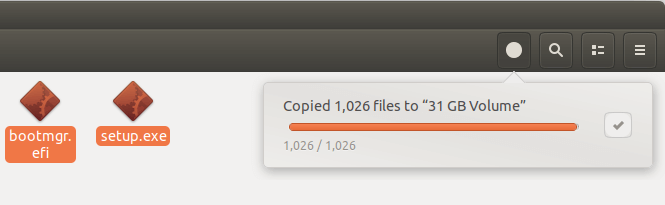
Sometimes the file manager on Ubuntu hangs and it seems that the copy operation has stopped. Actually it’s working, just be patient. When you see a check mark, it means the copy operation has finished.
If your file manager doesn’t have the Disk image mounter in the context menu, then you can use the following commands to mount. The first command will create a mount point for Windows 10 ISO and the second command will mount Windows 10 ISO under that mount point.
sudo mkdir /mnt/windows10/

sudo mount -t auto -o loop /path/to/window-10-iso /mnt/windows10/
Now in your file manager, go to /mnt/windows10/ and copy all files and folders to your USB stick.
Once the file and folders are copied, your windows 10 bootable USB is created! You can shut down your computer, boot it from this USB stick and install Windows 10 in UEFI mode. Keep in mind that you may need to disable compatibility support module (CSM) in the firmware in order to boot in UEFI mode. You may also need to remove USB stick from your computer and insert it back in order for the firmware to detect the boot loader on your USB stick.
Boot Windows 10 ISO Installer without USB (BIOS & UEFI)
Ever wondered if you can boot Windows 10 ISO installer without a USB flash drive? Yes, you can do it with GRUB2, which is the standard boot loader on Linux.
GRUB2 can not boot Windows 10 ISO directly. You need to create a separate NTFS partition on your hard disk or SSD with a partition editor like GParted and extract the Windows 10 ISO to that partition. Download the Windows 10 ISO file. The latest Windows 10 ISO file is 5.8G. The new NTFS partition should be at least 7G and it should not be used to store any other files.
Then find your Windows 10 ISO in file manager. Open it with disk image mounter.
Open the mounted file system. Select all files and folders and copy them to the NTFS partition.
Sometimes the file manager on Ubuntu hangs and it seems that the copy operation has stopped. Actually, it’s working. Just be patient. When you see a checkmark, it means the copy operation has finished.
Next, open up a terminal window and edit the /etc/grub.d/40_custom file with a text editor such as Nano.
sudo nano /etc/grub.d/40_custom
In this file, we can add custom entries to the GRUB boot menu. In this case, we want to add an entry to boot the Windows 10 installer. If your computer still uses the traditional BIOS firmware, then add the following lines in this file.
menuentry "Windows-10-Installer.iso" {
  set root=(hd0,6)
  insmod part_msdos
  insmod ntfs
  insmod ntldr
  #uncomment the following line if your computer has multiple hard drives.
  #drivemap -s (hd0) ${root}
  ntldr /bootmgr
}
My NTFS partition is the 6th partition on my first disk, so I use (hd0,6) as the root. You can run sudo parted -l command to check your NTFS partition number. If your computer has multiple hard drives, use the drivemap command to set the partition (hd0,6) as the first hard disk, so Windows will be able to boot.
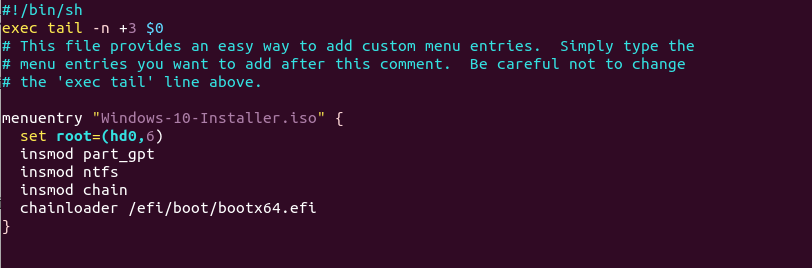
If your computer uses UEFI firmware, then add the following text in this file.
menuentry "Windows-10-Installer.iso" {
  set root=(hd0,6)
  insmod part_gpt
  insmod ntfs
  insmod chain
  chainloader /efi/boot/bootx64.efi
}
Save and close the file. (Press Ctrl+O, then press Enter to save a file in Nano text editor. Press Ctrl+X to exit.)
Then update GRUB boot menu.
sudo grub-mkconfig -o /boot/grub/grub.cfg
or
sudo grub2-mkconfig -o /boot/grub2/grub.cfg
Next, set GRUB to boot the Windows 10 installer for the next boot with the following command.
sudo grub-reboot Windows-10-Installer.iso
or
sudo grub2-reboot Windows-10-Installer.iso
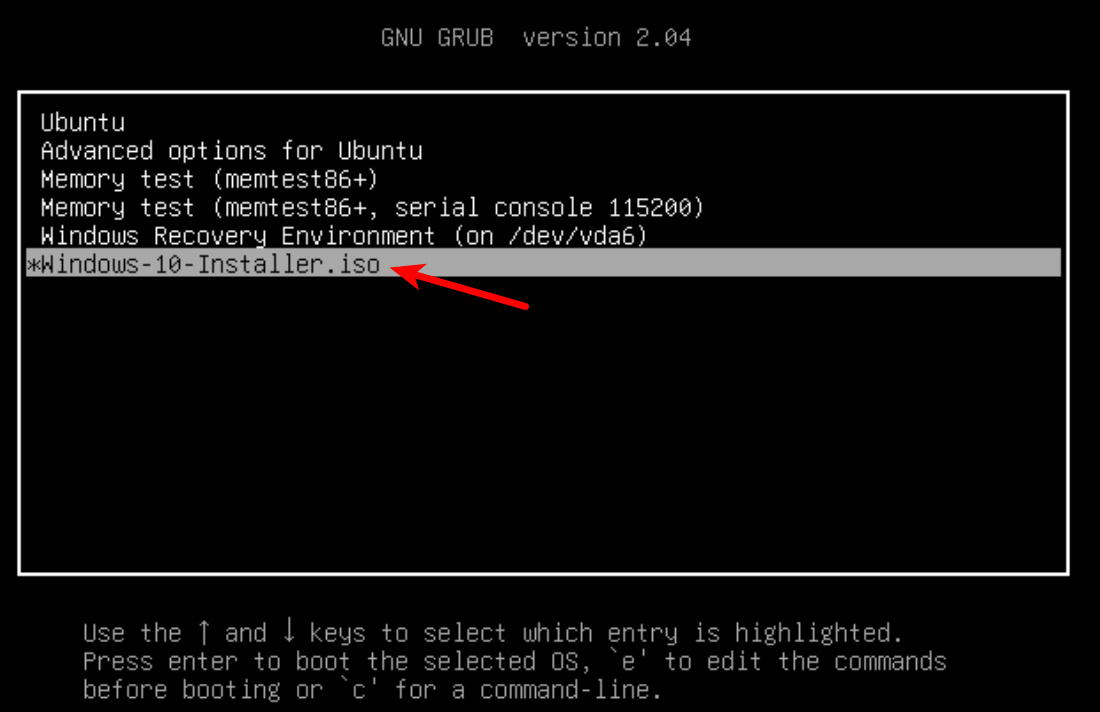
Unplug all your external USB storage devices, then reboot your computer. GRUB will choose the Windows 10 installer.
GRUB2 can also boot Linux ISO files stored on the hard drive, so you don’t need to create Linux live USB.
- How to Boot ISO Files From GRUB2 Boot Loader
Creating a Windows 10 Bootable USB for Legacy BIOS Using WoeUSB
WoeUSB is a fork of WinUSB. Both of them are open-source software (licensed in GPL) for making Windows bootable USB sticks on Linux platform, but the latter hasn’t been updated since 2012. You may be wondering why it’s named WoeUSB. The author said it’s a GNU convention to abbreviate software that support Windows to “woe”.
To install WoeUSB on Ubuntu 14.04/16.04/17.04, you can use the following PPA. Simply open up a terminal window and run the following commands one by one. Other Linux distro users can compile this software by following the instructions on the Github project page.
sudo add-apt-repository ppa:nilarimogard/webupd8

sudo apt update

sudo apt install woeusb
This PPA contains many other software. If you don’t need them, you can now remove this PPA from your system.
sudo add-apt-repository --remove ppa:nilarimogard/webupd8

sudo apt update
You can launch WoeUSB from Unity Dash or your application menu.
You can also start it from command line with:
woeusbgui
It’s very easy to use the WoeUSB GUI. Select Windows ISO image and your target USB device. Make sure your data on the USB device is backed up before hitting the Install button.
Then wait for the installation to complete.
Once done, you can use the bootable USB to install Windows 10 on your computer.
How to Use WoeUSB From the Command Line
First, find the device name of your USB stick using the following command.
lsblk
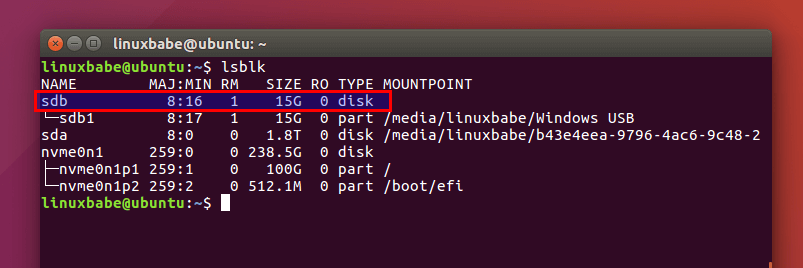
Mine is /dev/sdb. Make sure your USB is unmounted with the following command. Replace /dev/sdb1 with your own partition name.
sudo umount /dev/sdb1
Then create a bootable Windows 10 USB like below. Red texts shoudl be adapted to your own ISO file name and USB device name. The -v (--verbose) option will give more detailed output.
sudo woeusb -v --device windows-10.iso /dev/sdb
In my test, the Windows 10 USB created with WoeUSB can boot in both legacy and UEFI mode on my old computer. On my new computer, it can boot in legacy mode but failed in UEFI mode. I don’t know the exact reason, but it’s probably because of bug in this software.
That’s it! I hope this tutorial helped you create windows 10 bootable USB on Ubuntu or any Linux distribution. As always, if you found this post useful, then subscribe to our free newsletter to get new tutorials.
Rate this tutorial
[Total: 116 Average: 4.3]
Do you use Linux and find yourself needing to create a Windows 10 bootable USB but don’t know how? If so, this guide is for you. Follow along as we go over how to create a Windows 10 bootable USB on Linux.
Note: The Windows 10 ISO file is enormous in size. For this reason, we highly suggest using a USB flash drive no smaller than 8 GB in size.
Download Windows 10 to your Linux PC
Before creating a Windows 10 bootable USB on Linux, we must go over how to download Windows 10 on a Linux PC. Thankfully, Microsoft makes Windows 10 available to all users free of charge (though the software license isn’t free, and you’ll need to buy it to get the most out of it.)
To get your hands on the latest Windows 10 ISO, start by heading over to the Microsoft Windows 10 download page. Once you’ve made it to the Windows 10 download page, scroll down to the “Select edition” section. Here, you’ll need to select the edition of Windows 10 you’d like.
Once you’ve selected the edition of Windows 10 you desire, locate the “Confirm” button and click on it with the mouse. When you’ve clicked on the “Confirm” button, you will see “Select the product language” appear. From here, choose the language that you speak in the menu, and click on “Confirm” to continue.
After confirming your language, the Microsoft Windows 10 website will generate both 32-bit and 64-bit download links. At this point, go through the download options and download the ISO file of Windows 10 that works best for you.
When the Windows 10 ISO file is done downloading to your Linux PC, plug in your USB flash drive to the USB port. Please keep in mind that the Windows 10 ISO file is very large, so you will likely need a big USB flash drive. For best results, use one with 8 GB or higher.
Format your USB flash drive for Windows 10
Your USB flash drive must be formatted to handle Windows 10. Thanks to Windows 10 using UEFI, we do not need to fiddle with any complicated Windows formatting apps. Instead, you’ll just need to format your USB flash drive in Fat32.
There are many different ways to format USB flash drives in Fat32. In this guide, we’ll focus on the Gparted filesystem editor. Why? It’s very easy to use, has a GUI, and is compatible with most Linux OSes.
To start formatting, you will need to install Gparted. To install Gparted, open up a terminal window on the Linux desktop by pressing Ctrl + Alt + T on the keyboard. Then, enter the commands below.
Note: for a more in-depth guide on how to get Gparted working on your Linux PC, please follow this guide on the subject.
Ubuntu
sudo apt install gparted
Debian
sudo apt-get install gparted
Arch Linux
sudo pacman -S gparted
Fedora
sudo dnf install gparted
OpenSUSE
sudo zypper install gparted
After installing Gparted, open it up by searching for “Gparted” in the app menu. Once Gparted is open, find the device menu on the top-right and click on it. Then, use the menu to select your flash drive.
Can’t find your flash drive in Gparted? Remember the size of the device (in GB) while looking through the menu, and you’ll be able to find it.
When you’ve located your USB flash drive in Gparted, select all partitions displayed in the partition layout and press the Delete button to remove them all. Alternatively, right-click all partitions and select “Delete.”
After all partitions are deleted, you should see “Unallocated.” Right-click on the “Unallocated” space and select “New.” Once you’ve selected “New,” look for “File system,” and select “Fat32.”
After selecting the file system, click on the “Add” button to add the new partition to your USB. Then, click the “Apply” button to apply the changes.
With your USB flash drive formatted, the Windows 10 bootable USB can be created. To start the process, open up a terminal window on the desktop. You can open up a terminal window by pressing Ctrl + Alt + T on the keyboard.
Once the terminal window is open, use the mount command to mount the Windows 10 ISO file as a filesystem in the /mnt/ folder on your Linux PC.
sudo mount -o loop ~/Downloads/Win10*.iso /mnt/
After mounting the Windows 10 ISO file in the terminal, open up the Linux file manager. Inside of the file manager, navigate to /mnt/. Then copy every file and folder in the /mnt/ folder to your USB flash drive.
When all files are copied to the USB flash drive, unmount it from your PC. Once the USB flash drive is unmounted, you’ll have created your Windows 10 bootable USB!
