
Учетная запись «Гость» в Windows позволяет предоставить временный доступ к компьютеру пользователям без возможности для них устанавливать и удалять программы, изменять настройки, устанавливать оборудование, а также открывать приложения из Магазина Windows 10. Также при гостевом доступе пользователь не сможет просмотреть файлы и папки, находящиеся в пользовательских папках (Документы, Изображения, Музыка, Загрузки, Рабочий стол) других пользователей или удалить файлы из системных папок Windows и папок Program Files.
В этой инструкции пошагово описаны два простых способа включить учетную запись Гость в Windows 10 с учетом того факта, что с недавних пор встроенный пользователь «Гость» в Windows 10 перестал работать (начиная со сборки 10159).
Примечание: для ограничения пользователя единственным приложением используйте Режим киоска Windows 10.
Включение пользователя Гость Windows 10 с помощью командной строки
Как было отмечено выше, неактивная учетная запись «Гость» присутствует в Windows 10, но не работает так, как это было в предыдущих версиях системы.
Его можно включить несколькими способами, такими как gpedit.msc, «Локальные пользователи и группы» или команда net user Гость /active:yes — при этом он не появится на экране входа в систему, но будет присутствовать в переключении пользователей меню пуск других пользователей (без возможности входа под Гостем, при попытке сделать это вы вернетесь на экран входа в систему).

Тем не менее в Windows 10 сохранилась локальная группа «Гости» и она работоспособна, таким образом, чтобы включить учетную запись с гостевым доступом (правда, назвать её «Гость» не получится, так как это имя занято за упомянутой встроенной учетной записью), потребуется создать нового пользователя и добавить его в группу Гости.
Самый простой способ сделать это — использовать командную строку. Шаги по включению записи Гость будут выглядеть следующим образом:
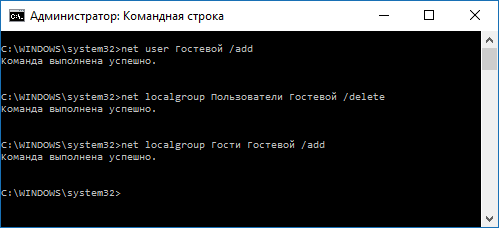
- Запустите командную строку от имени администратора (см. Как запустить командную строку от имени Администратора) и по порядку используйте следующие команды, нажимая Enter после каждой из них.
- net user Имя_пользователя /add (здесь и далее Имя_пользователя — любое, кроме «Гость», которое вы будете использовать для гостевого доступа, у меня на скриншоте — «Гостевой»).
- net localgroup Пользователи Имя_пользователя /delete (удаляем вновь созданную учетную запись из локальной группы «Пользователи». Если у вас изначально англоязычная версия Windows 10, то вместо Пользователи пишем Users).
- net localgroup Гости Имя_пользователя /add (добавляем пользователя в группу «Гости». Для англоязычной версии пишем Guests).

Готово, на этом учетная запись Гость (а точнее — созданная вами учетная запись с правами Гостя) будет создана, и вы сможете войти в Windows 10 под ней (при первом входе в систему некоторое время будут настраиваться параметры пользователя).
Как добавить учетную запись Гостя в «Локальные пользователи и группы»
Еще один способ создать пользователя и включить для него гостевой доступ, подходящий только для версий Windows 10 Профессиональная и Корпоративная — использование инструмента «Локальные пользователи и группы».
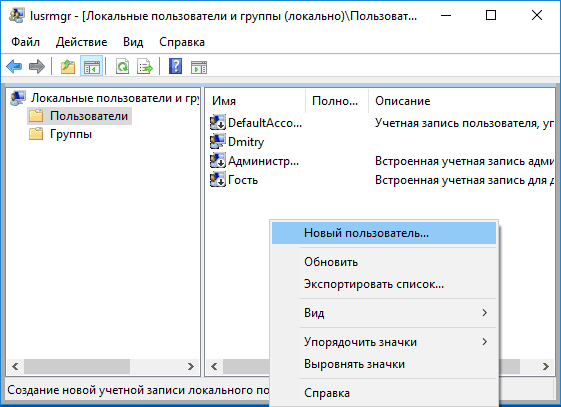
- Нажмите клавиши Win+R на клавиатуре, введите lusrmgr.msc для того, чтобы открыть «Локальные пользователи и группы».
- Выберите папку «Пользователи», нажмите правой кнопкой мышки в пустом месте списка пользователей и выберите пункт меню «Новый пользователь» (или используйте аналогичный пункт в панели «Дополнительные действия» справа).

- Укажите имя для пользователя с гостевым доступом (но не «Гость»), остальные поля заполнять не обязательно, нажмите кнопку «Создать», а затем — «Закрыть».
- В списке пользователей дважды кликните по вновь созданному пользователю и в открывшемся окне выберите вкладку «Членство в группах».
- Выберите в списке групп «Пользователи» и нажмите «Удалить».

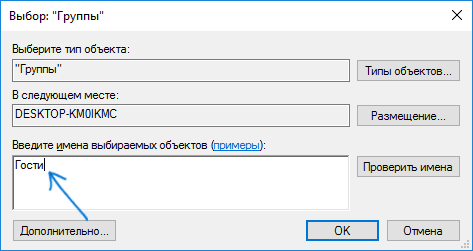
- Нажмите кнопку «Добавить», а затем в поле «Выберите имена выбираемых объектов» введите Гости (или Guests для англоязычных версий Windows 10). Нажмите «Ок».


На этом необходимые шаги закончены — можно закрыть «Локальные пользователи и группы» и войти под учетной записью Гостя. При первом входе некоторое время займет настройка параметров для нового пользователя.
Дополнительная информация

После входа в учетную запись Гостя вы можете заметить два нюанса:
- То и дело появляющееся сообщение о том, что OneDrive невозможно использовать с учетной записью Гостя. Решение — убрать OneDrive из автозагрузки для этого пользователя: правый клик по значку «облака» в панели задач — параметры — вкладка «параметры», убрать отметку автоматического запуска при входе в Windows. Также может пригодиться: Как отключить или удалить OneDrive в Windows 10.
- Плитки в меню пуск будут выглядеть как «стрелки вниз», иногда сменяющиеся надписью: «Скоро выйдет отличное приложение». Связано это с невозможностью устанавливать приложения из магазина «под Гостем». Решение: правый клик по каждой такой плитке — открепить от начального экрана. В результате меню пуск может показаться слишком пустым, но вы можете исправить это, изменив его размер (края меню пуск позволяют изменять его размер).
На этом всё, надеюсь, информация была достаточной. Если же остались какие-то дополнительные вопросы — можно задать их ниже в комментариях, буду стараться отвечать. Также, в плане ограничения прав пользователей может оказаться полезной статья Родительский контроль Windows 10.
The concept of a guest account isn’t a bad one: a locked-down account that you can let other people use on your PC to access the internet, run apps, and not much more — all while keeping your files, settings, and everything else safe (in theory). But when Microsoft rolled out Windows 10, the Guest account disappeared.
You can enable it in a number of ways, but there’s no Guest account to use. In fact, if you manage to turn on the account, it won’t even show up on the sign-in screen.
However, the elements needed to create a guest account are still present in Windows 10, which makes it possible to create your very own restricted account to let guests use your PC. It just take a bit of user assembly.
In this Windows 10 guide, we’ll walk you through the steps to use Command Prompt to create a guest account on your PC.
How to create a guest account
- Open Start.
- Search for Command Prompt.
- Right-click the result and select Run as administrator.
- Type the following command to create a new account and press Enter:
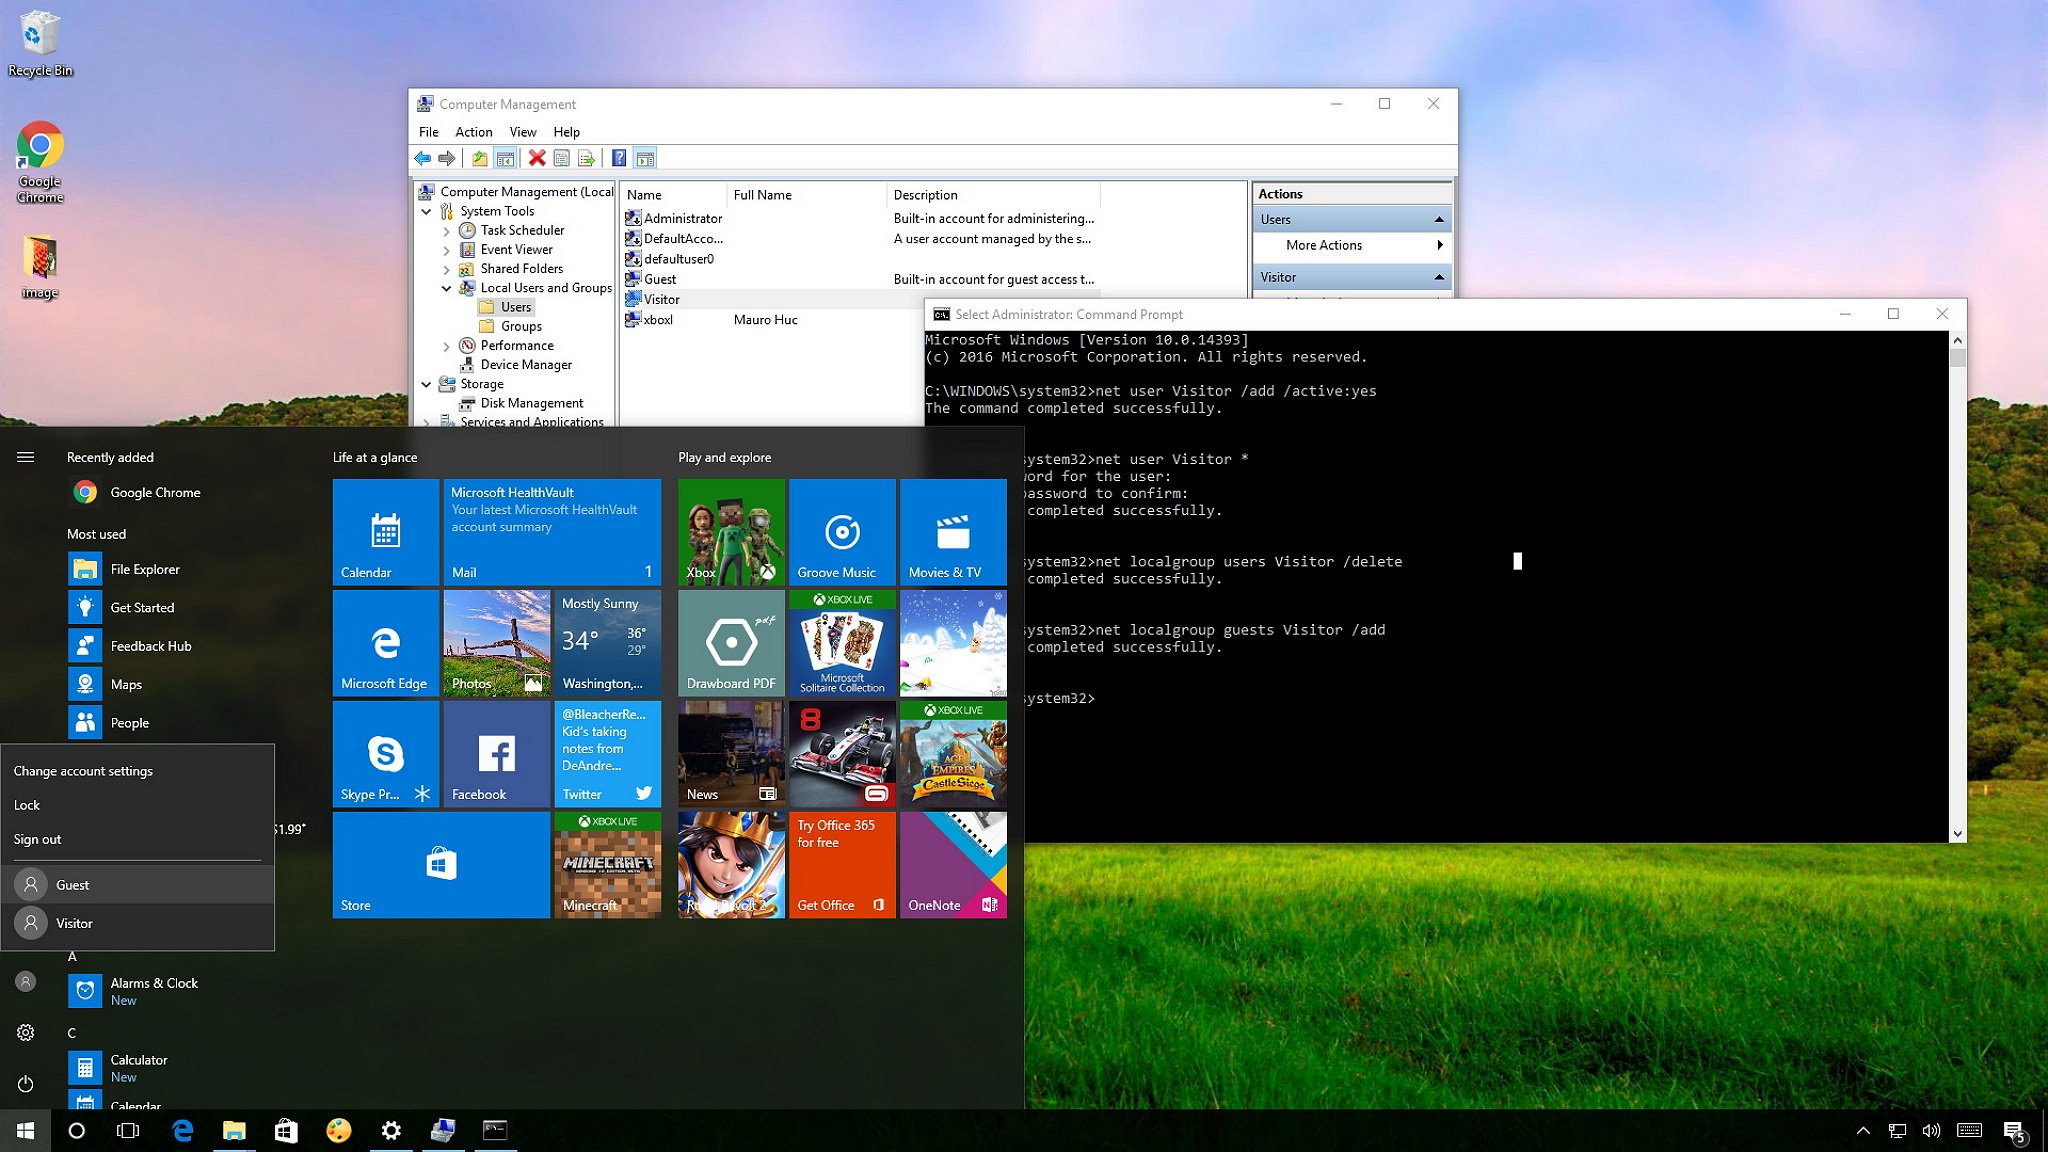
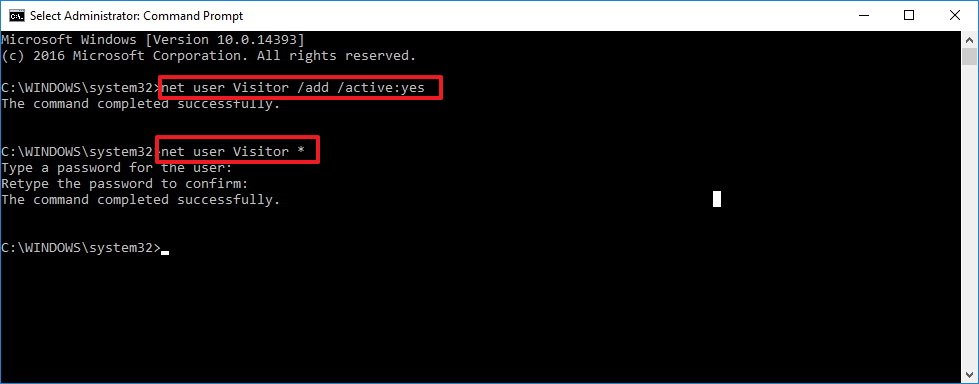
net user Visitor /add /active:yesKeep in mind that we’re using the Visitor as the name of the account, because Guest is a reserved name on Windows 10 and you can’t use it. However, you’re free to name the account anything you like. Just keep it short, you don’t want to go crazy on the name. - Type the following command to create a password for the newly created account and press Enter:
net user Visitor * - You don’t need a password for this account, as such simply press Enter twice to create an empty password.
- Type the following command to remove the new user account from the default Users group and press Enter:
net localgroup users Visitor /delete - Type the following command to add the new user account to the Guests user group and press Enter:
net localgroup guests Visitor /add - Close Command Prompt to complete the task.
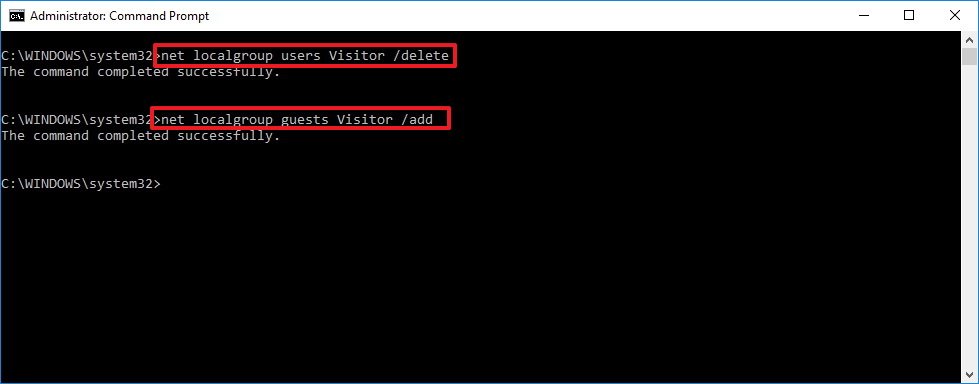
Using the steps mentioned above, you’re creating a traditional standard account, but removing it from the Users and adding it to the Guests user group is what gives the account all the same permissions you would find in the old Guest account.
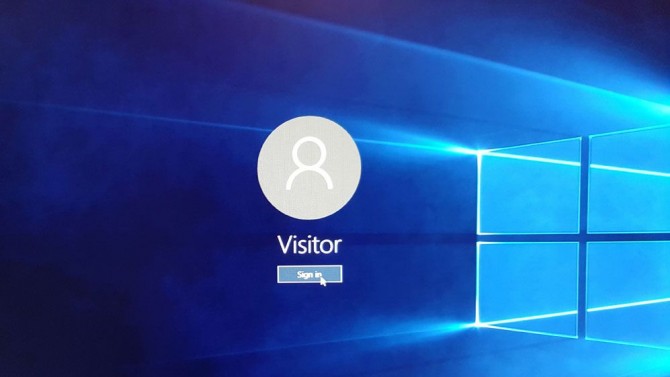
Once you completed the steps, you only need to sign out of your current account, and in the Sign in screen, select the Visitor account and click the Sign in button — no password required.
Now with the new restricted account created, you can now safely share your computer with guests. They will be able to access the internet and use certain applications, but they won’t be able to change settings, install programs, and or access your files.
All the latest news, reviews, and guides for Windows and Xbox diehards.
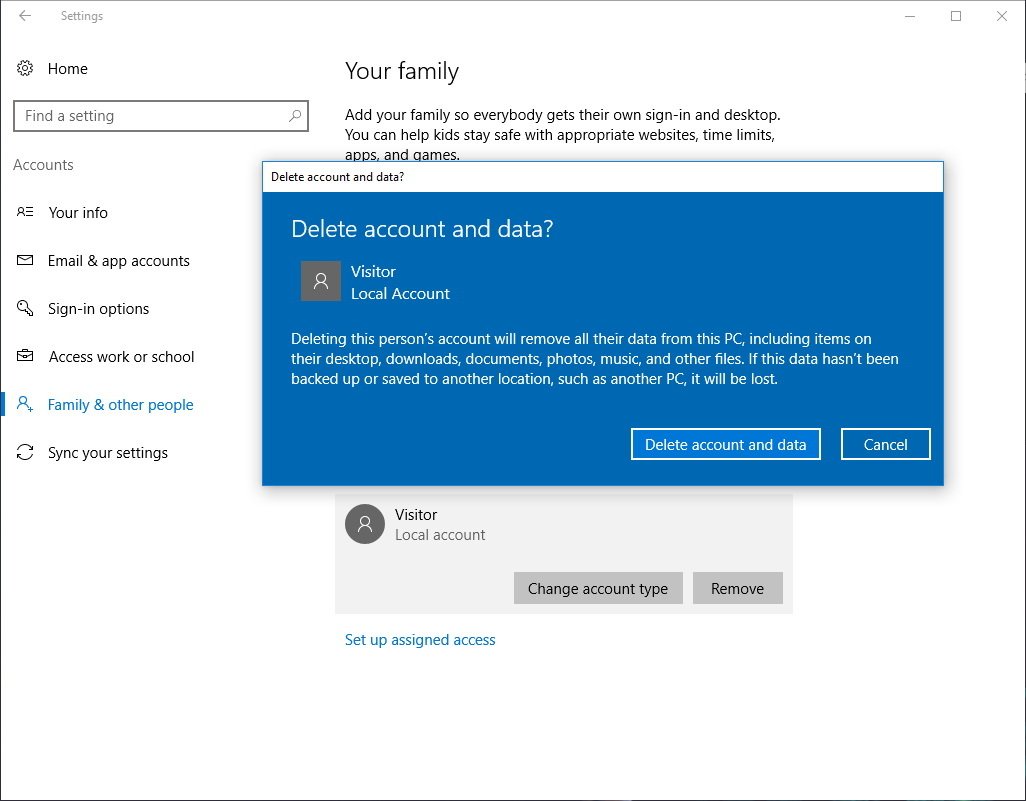
If you no longer need the account, you can go to Settings > Accounts > Family & other people, select the Visitor account and click the Remove button to delete the account.
Do you think Microsoft should bring back the original Guest account to Windows 10? Tell us in the comments below.
More Windows 10 resources
For more help articles, coverage, and answers on Windows 10, you can visit the following resources:
- Windows 10 on Windows Central – All you need to know
- Windows 10 help, tips, and tricks
- Windows 10 forums on Windows Central
Mauro Huculak has been a Windows How-To Expert contributor for WindowsCentral.com for nearly a decade and has over 15 years of experience writing comprehensive guides. He also has an IT background and has achieved different professional certifications from Microsoft, Cisco, VMware, and CompTIA. He has been recognized as a Microsoft MVP for many years.
Windows’ guest account lets other people use your computer without being able to change PC settings, install apps or access your private files. That comes in handy when you have to share your computer temporarily. In Windows 10, you can no longer easily turn on the guest account from the Control Panel. Here’s a workaround to enabling a guest account — that actually works.
Across the web, you’ll find articles that tell you how to enable the «hidden» guest account in Windows 10, using the Command Prompt or the group policy editor in Windows. While these methods do make it look like the guest account is enabled, they don’t actually work. When you try to switch to the guest account, you’ll be instead forced to log into your current account.
- Show the Full Folder Path in File Explorer on Windows 10
- How to get help in Windows 10
There is a method, however, that I’ve tried that does work, adapted from a tip offered by Super User member The Professional: Create a new user account and assign it to the guests group. This will make that account act the same way the built-in guest account should: The user will be able to use your computer without accessing settings or installing apps. Since «Guest» is a reserved account name in Windows, we’ll use «Visitor.»
- Here’s how To Disable Taskbar on a Second Monitor in Windows 10
- This is how to Take a Scrolling Screenshot in Windows 10
- See how to Hide a Recovery Partition (or Any Disk) in Windows 10
- Click-clack: Here’s how to enable keyboard typing sounds in Windows 10
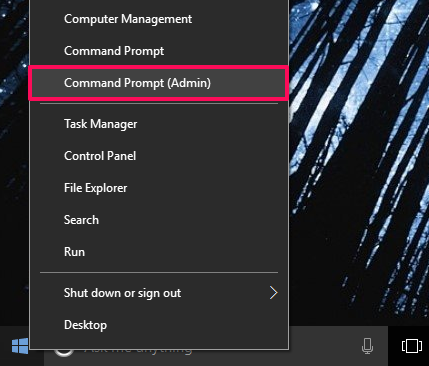
1. Right-click on the Windows button and select Command Prompt (Admin). This is the quickest way to open the Command Prompt as an administrator.
2. Click Yes when asked if you want to continue.
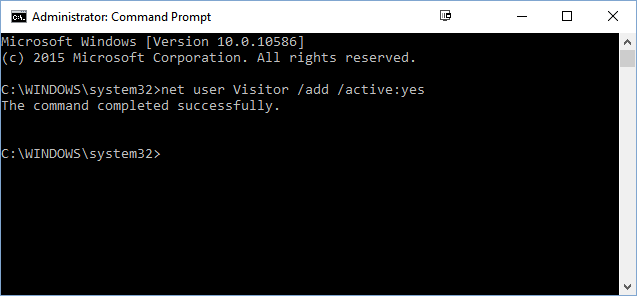
3. Type the following command and then click Enter:
net user Visitor /add /active:yes
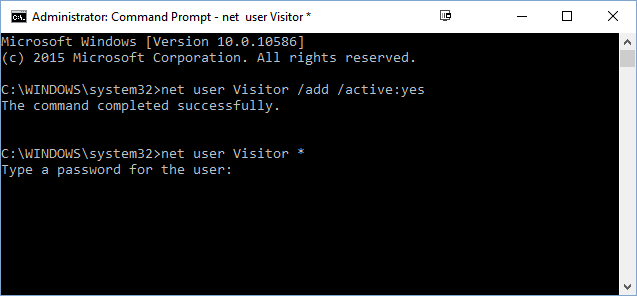
4. Press Enter twice when asked to set a password. This will create a blank password for the account.
Sign up to receive The Snapshot, a free special dispatch from Laptop Mag, in your inbox.
5. Type the following command and then hit Enter:
net localgroup users Visitor /delete
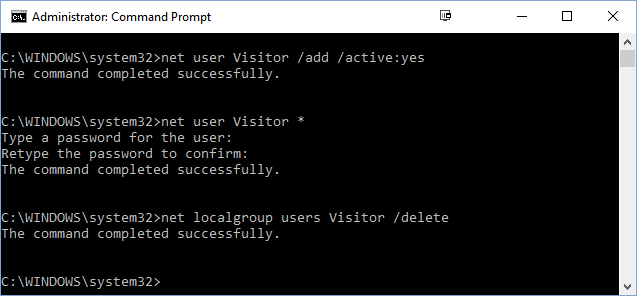
This removes the Visitor user from the default users group.
6. Type the following command and then hit Enter:
net localgroup guests Visitor /add
This adds the Visitor user to the guests group, which is more restricted than local users.
That’s all there is to it. You can now close the Command Prompt window.
How to Switch to the Guest Account
1. Click the Windows button.
2. Click on your username.
3. Click Visitor.
Alternatively, you can choose the Visitor account from the Windows login screen.
Now that you’ve learned how to create a guest account in Windows 10, why not figure out how to map a network drive so you can quickly access shared folders, or read our guide on how to access the BIOS on your Windows 10 system to change important settings.
Windows 10 Security and Networking
- Previous Tip
- Next Tip
- Use the Windows 10 Parental Controls
- Find Your MAC Address
- Turn Your Windows PC into a Wi-Fi Hotspot
- Password Protect a Folder
- Create a Guest Account in Windows 10
- Enable Windows Hello Fingerprint Login
- Set Up Windows Hello Facial Recognition
- How to Restrict Cortana’s Ever-Present Listening in Windows 10
- Automatically Lock Your PC with Dynamic Lock
- Blacklist Non-Windows Store Apps
- Find Saved Wi-Fi Passwords
- Set Up a Metered Internet Connection
- Use Find My Device
- Stream XBox One Games
- All Windows 10 Tips
- Map a Network Drive
- Create Limited User Accounts
- Set Time Limits for Kids
- Pin People to Your Taskbar
Has anyone ever asked to use your computer? Would you let them use your user account knowing that they can access everything? Good thing there’s a solution – use a Windows 10 guest account.
In this article, you’re going to learn all the ways to create a Windows 10 guest account. You’ll learn how to create restricted accounts with the GUI and PowerShell and you’ll even see how to convert accounts, let’s get started!
Prerequisites
Before going any further, below are some prerequisites. You’ll need these requirements to follow along with the examples in this article.
- You must use a Windows 10 computer. The examples in this article use Windows 10 Home.
- Windows PowerShell 5.1 – This version already ships with Windows 10. If you already have PowerShell 7 installed, you can use that, too.
Related: How to Check your PowerShell Version (All the Ways!)
- Local admin access to the Windows 10 computer.
When you’ve settled the requirements, then you’re ready to start making Windows 10 guest accounts.
Creating a Windows 10 User Account using the Windows System Settings
In previous Windows versions, you have the option to enable the built-in guest account. However, in Windows 10 version 1607, the built-in guest account is usable only in Shared PC mode, which is not available by default.
Don’t worry, though; there’s still a way to create a user account that simulates the Windows 10 guest account.
In this section, you’ll learn how to set up a new local guest user account on your Windows 10 PC with the least number of steps possible using the graphical user interface (GUI).
The two main steps to create a Windows 10 guest account are as follows:
- Create a new standard user account. Newly created accounts are standard accounts by default.
- Modify the new user’s group membership, effectively converting the standard user account to a guest account.
Read on to learn how to create a standard Windows account, underpinning the guest account.
Creating a New Standard Account
The following steps will walk you through creating a standard account in Windows, a precursor to creating a visitor account.
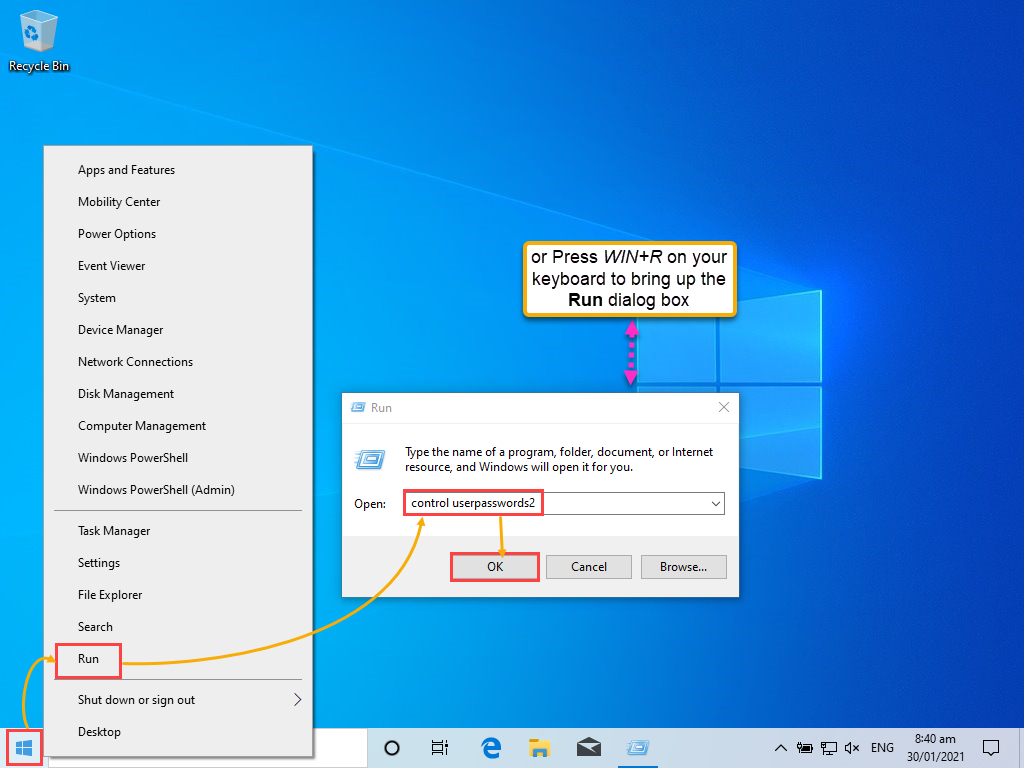
- First, on your Windows desktop, right-click on the Start menu, or press the
WIN+Xshortcut on your keyboard to bring up the context menu.
2. Click on Run to open the Run dialog.
3. Once the Run dialog appears, type control userpasswords2 inside the Open text entry section.
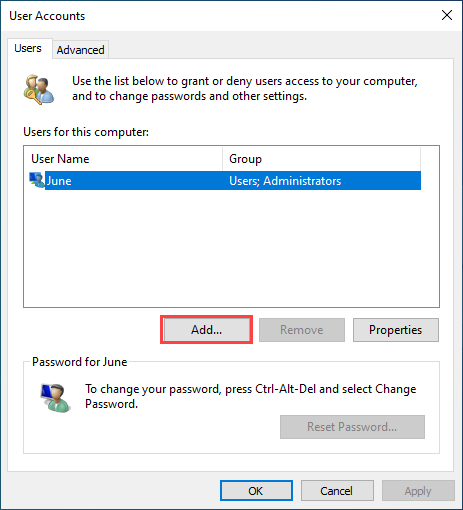
4. Click OK or press Enter to open the User Accounts window, where you will see a list of existing user accounts on your computer.
5. In the screenshot below, click Add to add a new user.
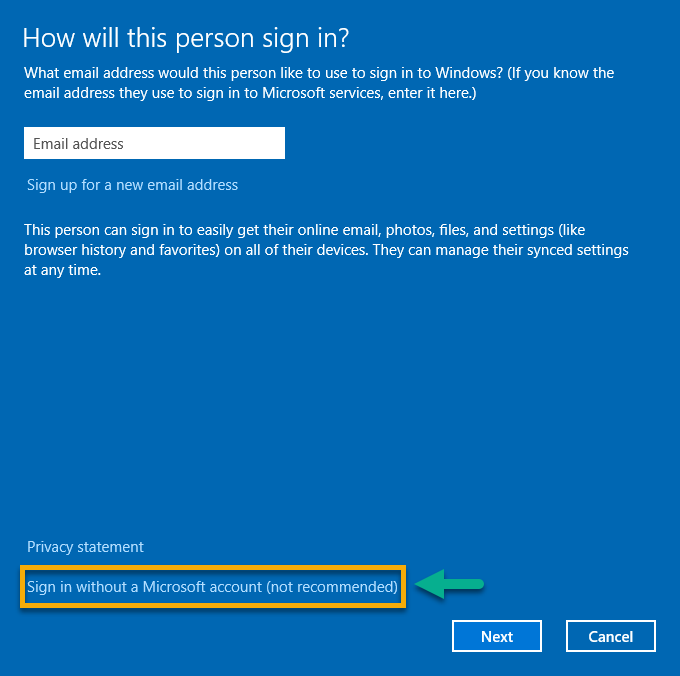
6. The next window asks, How will this person sign in?. Because your goal is to create a local user, you do not need to enter an email address. Instead, click on the Sign in without a Microsoft account link at the bottom of the window.
7. The differences between a Microsoft account and a local account are listed in the Add a user window. As you are creating a local user account, click on the Local account button.

8. In the User name box, type in the account name you want to create. Although this article uses the name Visitor, choose a descriptive name for your guest account. Adding a password is optional, but doing so will increase the guest accounts security. Click Next to finalize the account.

Click on the Finish button to exit the Add a user window.
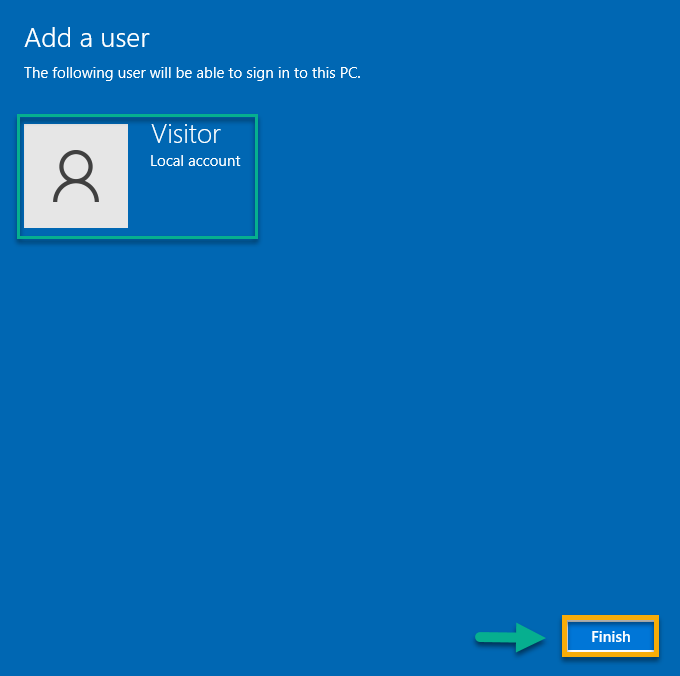
After creating the standard user account, you’ll be directed back to the User Accounts window. You’ll find that there is now an additional user listed, Visitor, as you can see in the screenshot below.
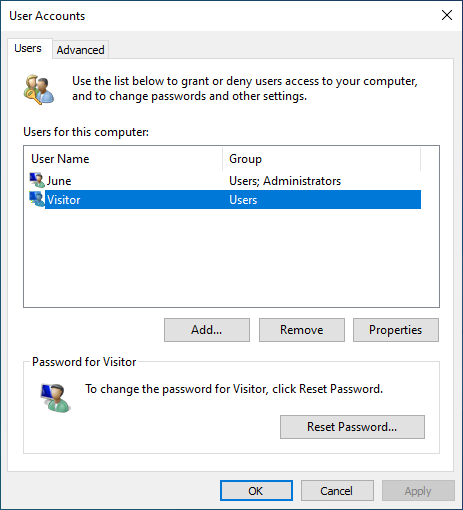
By default the Visitor account is a member of the Users group. As this account is a standard user, you’ll now need to convert the user account to a guest. Read on to learn how to convert a standard account into a guest account!
Converting the Standard User Account to a Guest User Account
Your newly created Visitor account is a Standard account. A standard account has many more permissions than a guest account. Let’s now convert a standard user account to a guest user account to remove these extra permissions. Assuming you’re still in the User Accounts window:
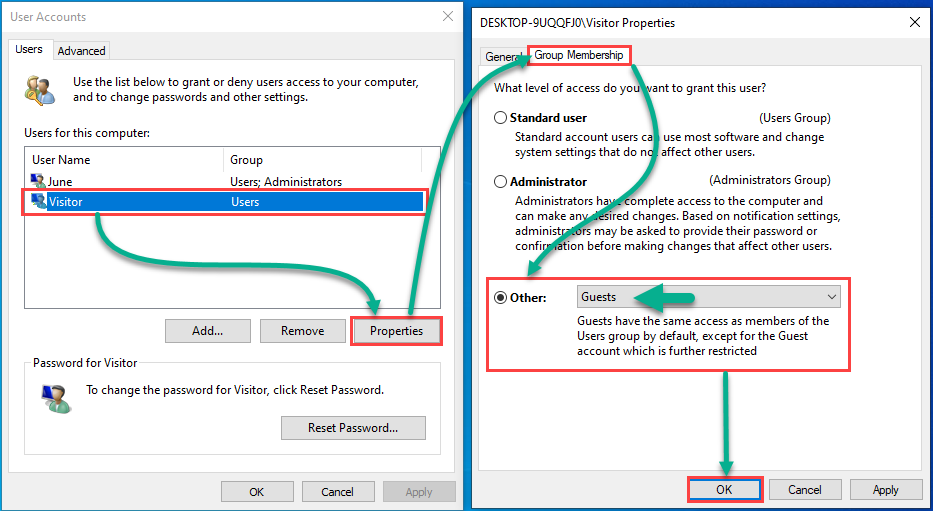
- First, click to highlight the Visitor account in the User Accounts window.
- Once selected, click on Properties.
- When the Visitor account properties window appears, click on the Group Membership tab.
- On the Group Membership tab, you’ll see several different account types. The Guest account type is not one of the displayed options. Click the radio button next to Other, click on the dropdown selection box, and choose the Guests option.
- Finally, click on the OK button to finalize your chosen user account membership.
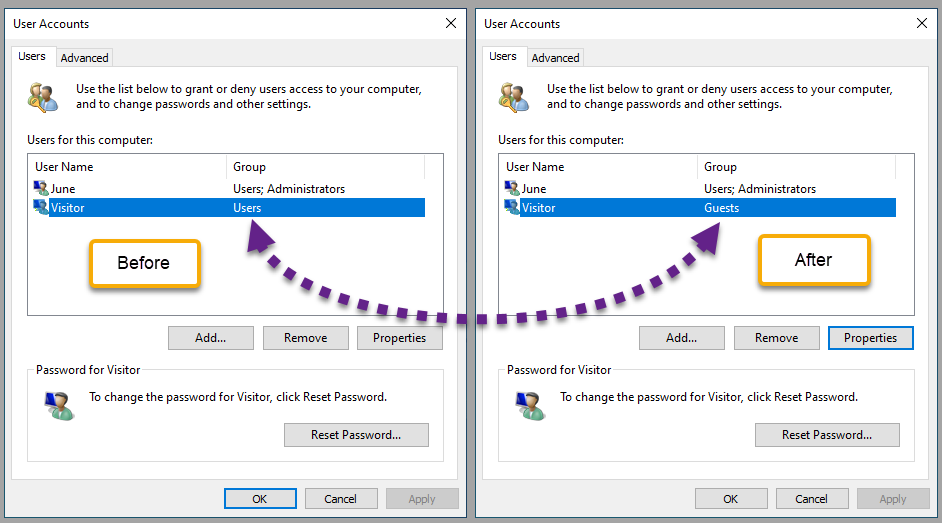
Great! You have successfully converted a standard user account to a guest user account type. As you can see in the image below, the group membership changed from Users to Guests.
What if you need to remove the guest account? Read on to learn how you can do so via the User Accounts window.
Removing the Guest Account using the GUI
Guest accounts are typically used temporarily. If you no longer need a guest account you can remove the account.
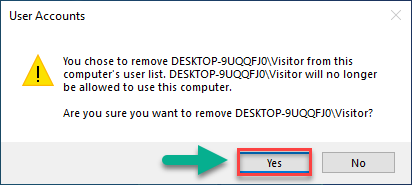
To delete the guest account, highlight the guest account from the User Accounts list and click on Remove, as shown in the screenshot below.
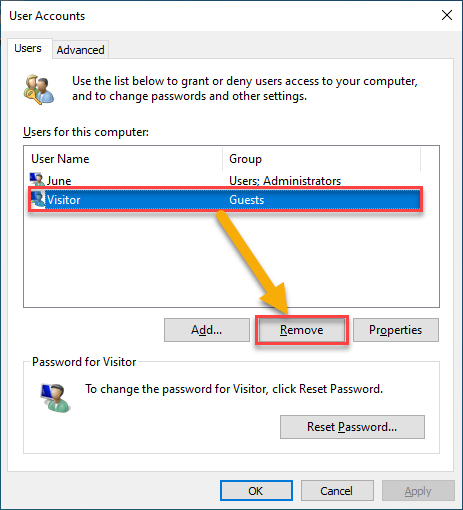
As you can see in the image below, you will receive a warning message confirming the removal operation. Click Yes to confirm removing the Windows 10 guest account.
As is often the case, there are many ways to create a user account in Windows, read on to learn how to do so using the command prompt.
Adding a Windows 10 Guest Account using the Command Prompt
Using the command prompt is a potentially faster method of creating guest accounts than using the GUI. In this example, you’ll use the command prompt to create a Windows 10 guest account.
- Create a local user named Visitor.
- Remove the Visitor account as a member of the Users group.
- Add the Visitor account as a member of the Guests group.
Creating a Guest Account using Only Three Lines of Commands
Originating in earlier versions of Windows, the net user commands allow adding, removing, and modifying user accounts on a computer via the command-line.
In this section, you’ll use the net user command to create a user account and then convert that user account into a guest user. To start creating a guest account, follow the below steps.
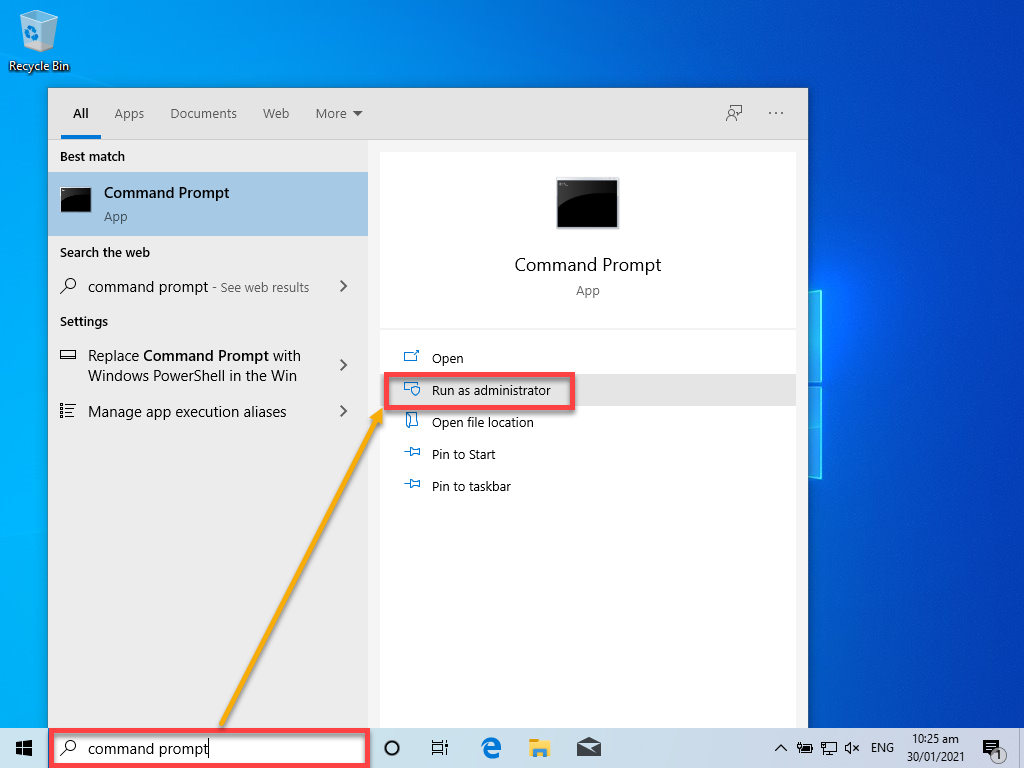
First, open an elevated command prompt by entering the text, Command Prompt, in the Windows search box. Once the Command Prompt application is shown in the search result, highlight the Command Prompt application, and click the Run as administrator option as shown below.
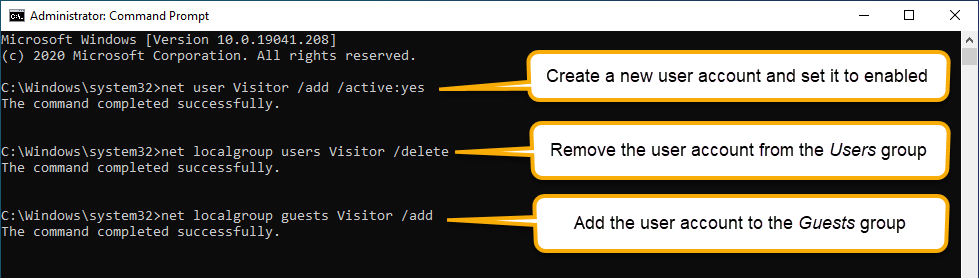
Next, it is easiest to copy and paste each command below into the opened command prompt window. The /active:yes parameter will also enable the account, which would otherwise be disabled by default.
net user Visitor /add /active:yes
net localgroup users Visitor /delete
net localgroup guests Visitor /add
Just like that, you’ve created a new Windows 10 guest account using the command prompt. Read on to learn how to remove a user account using the command prompt as well.
Removing the Guest Account using the Command Prompt
When you no longer need a guest account, you can delete the guest account in an elevated command prompt. To remove the guest account, use the command below, substituting Visitor for the user account to remove.
The deletion process will not prompt for a confirmation! You will only see a command completion message upon account removal.
Adding a Windows 10 Guest Account using PowerShell
In this section, you’ll learn an alternative to the net commands using the PowerShell cmdlets, New-LocalUser and Add-LocalGroupMember to provision a new guest account in a single line of code!
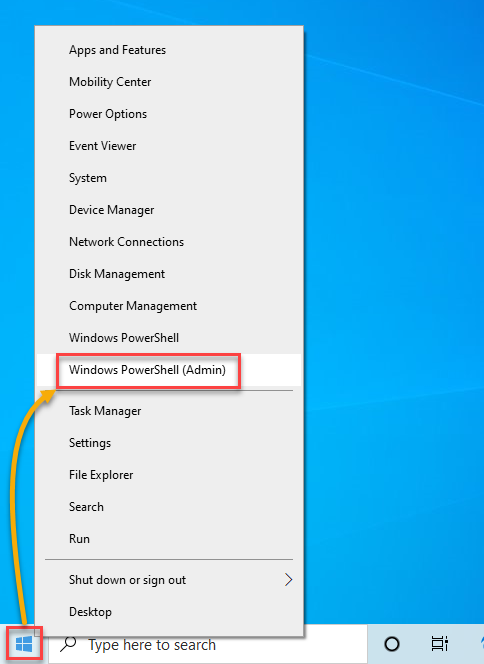
- To create a guest account open an elevated PowerShell session. To run PowerShell as an administrator, right-click on the Start menu and click on Windows PowerShell (Admin).
Related: How to Run PowerShell as Administrator
2. Next, the command below will create a new local user account named Visitor without a password via the NoPassword parameter. The resulting object is passed into the Add-LocalGroupMember cmdlet adding the account into the Guests group.
You will not receive a confirmation unless there was an error in the process. In this case, no news is good news.
Related: Back to Basics: Understanding PowerShell Objects
New-LocalUser -Name Visitor -NoPassword | Add-LocalGroupMember -Group Guests3. To confirm whether the command successfully created the Visitor account, use the Get-LocalGroupMember command below. The below command looks for a group member called Visitor in the Guests group.
Get-LocalGroupMember -Group Guests -Member VisitorThe screenshot below shows the actual output when running the commands in PowerShell. As you can see, the Get-LocalUser command returned the user named Visitor, which indicates that you’ve successfully created a new guest account.

Removing the Guest Account using PowerShell
As in the previous examples, when you need to remove a Windows 10 guest account, you can use PowerShell. To remove a user, use the Remove-LocalUser cmdlet in an elevated PowerShell session. To remove the guest account named Visitor, run the command below in PowerShell.
Remove-Localuser -Name Visitor
Be aware that you will not receive a confirmation prompt when running
Remove-LocalUser!
To verify that the Visitor account has been removed, run the Get-LocalUser command as shown below. The resulting error will indicate that the user account no longer exists.
Get-LocalUser -Name Visitor

Next Steps
Allowing guests to use your computer need not be risky with a Windows 10 guest account. In this article, you’ve learned how to use the GUI, the command prompt, and PowerShell to create a new Windows 10 guest user account.
To further apply what you’ve learned here, try to automate the Windows 10 guest account creation process. Create a PowerShell script that asks for the name of the new guest user!
Related: Read-Host: A Great Way to Get Input to your PowerShell Scripts