
Все способы:
- Способ 1: «Редактор локальных групповых политик»
- Способ 2: «Редактор реестра»
- Способ 3: «Локальные пользователи и группы»
- Способ 4: «Командная строка»
- Вопросы и ответы: 2
Способ 1: «Редактор локальных групповых политик»
Если вы хотите скрыть учетные записи всех пользователей, чтобы они не отображались на экране блокировки и входа в систему, тогда лучшим способом для этого будет использование встроенной утилиты «Редактор локальных групповых политик».
Важно! Этот способ подойдет только для тех пользователей, у которых установлена операционная система Windows 10 редакции «Профессиональная» или «Корпоративная». В других версиях необходимый компонент попросту отсутствует.
-
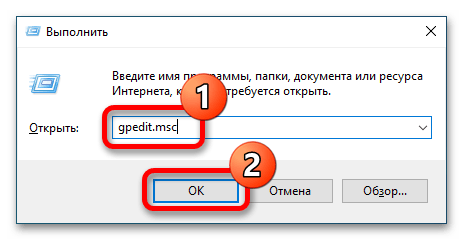
Откройте окно «Локальных групповых политик» любым доступным способом. Проще всего это сделать посредством ввода команды в окне «Выполнить». Вызовите его нажатием горячих клавиш Win + R, после чего вставьте приведенную ниже строку и щелкните по кнопке «ОК».
gpedit.msc -
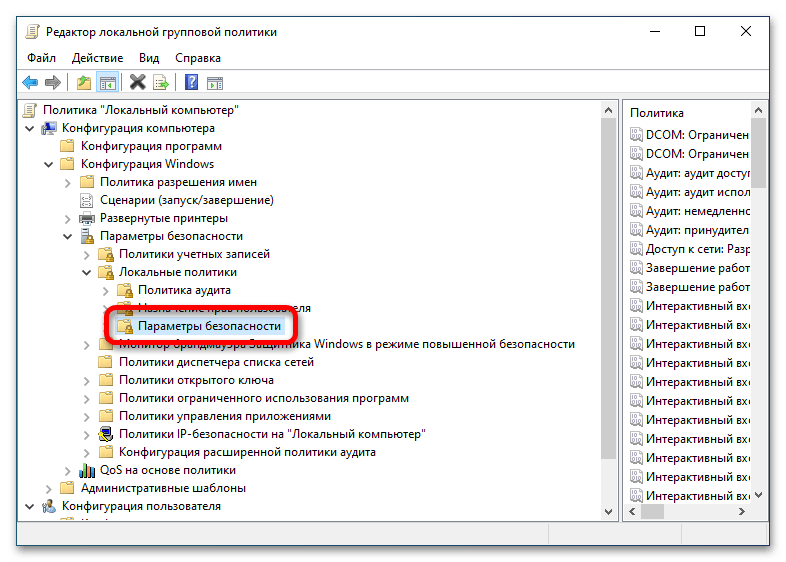
Воспользовавшись древовидной структурой каталогов в левой части интерфейса программы, перейдите по следующему пути:
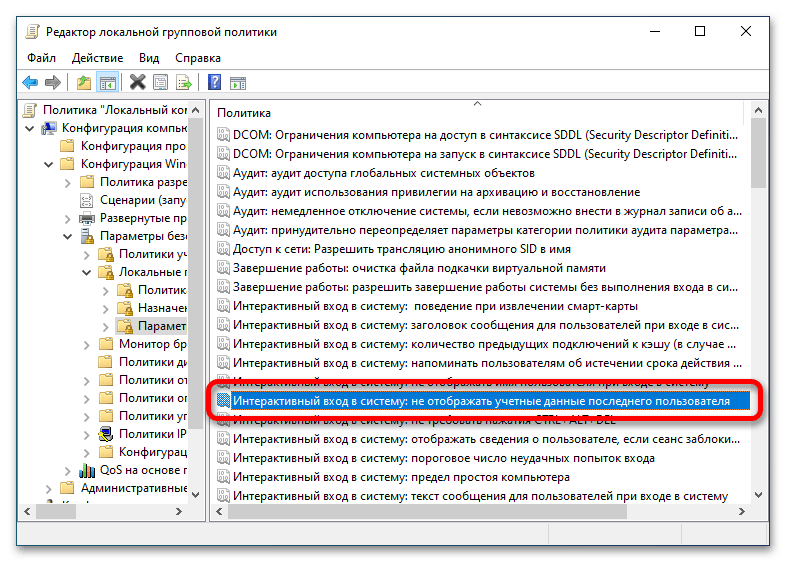
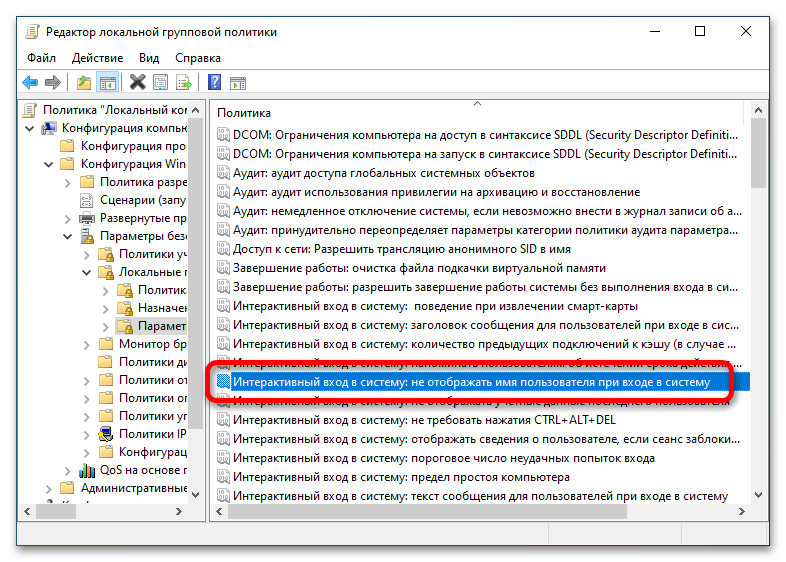
«Конфигурация компьютера» → «Конфигурация Windows» → «Параметры безопасности» → «Локальные политики» → «Параметры безопасности» - В основной части окна найдите параметр «Интерактивный вход в систему: не отображать последнее имя пользователя» и откройте его свойства. Для этого дважды кликните левой кнопкой мыши по имени.
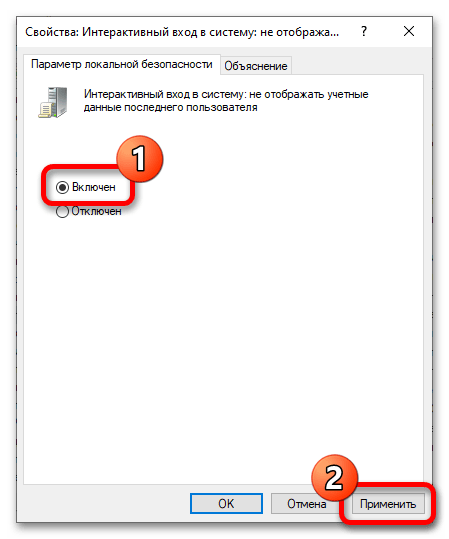
- В появившемся меню, находясь на вкладке «Параметр локальной безопасности», переведите переключатель в положение «Включен». Затем щелкните по кнопке «Применить», чтобы сохранить изменения, и закройте окно нажатием по кнопке «ОК».
- Повторите те же действия с параметром «Интерактивный вход в систему: не отображать имя пользователя при входе в систему» — откройте его свойства, установите переключатель «Включено» и нажмите «Применить».
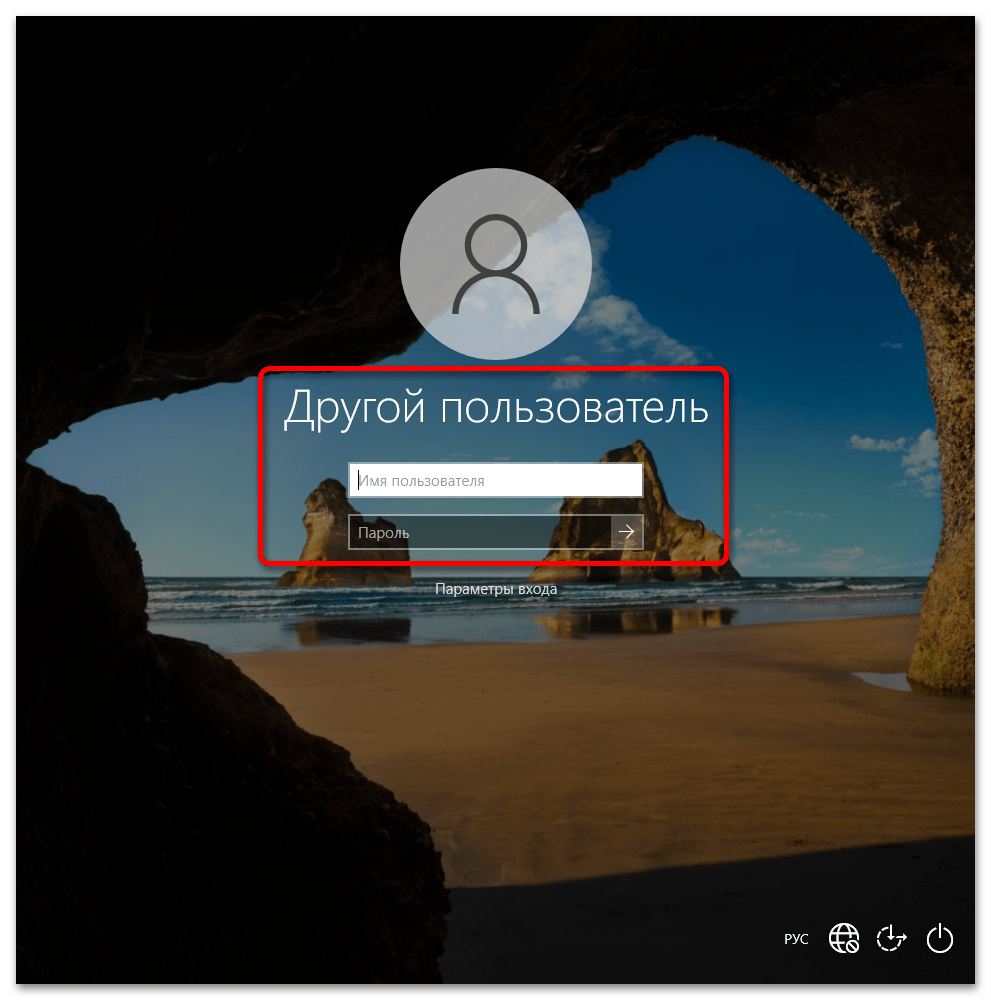
После выполнения указанных действий на экране блокировки будет отсутствовать упоминание обо всех пользователях, в частности, активном. Чтобы осуществить вход в учетную запись, сначала потребуется ввести имя, а затем пароль.
Способ 2: «Редактор реестра»
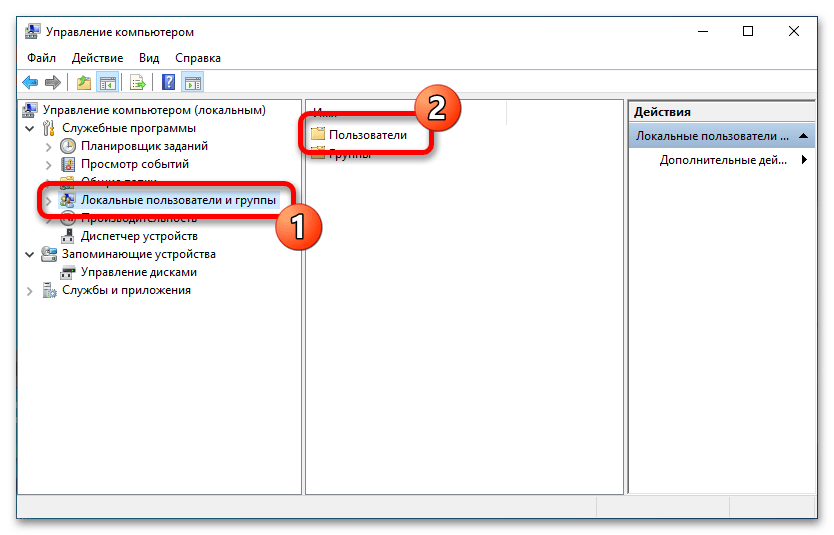
Если вы не хотите на экране авторизации убирать всех пользователей, а только определенного, предыдущий способ не подойдет. Для выполнения поставленной задачи необходимо будет внести изменения в реестр операционной системы. Но прежде потребуется узнать имя аккаунта, который впоследствии будет скрыт. Для этого нужно открыть специальное меню «Локальные пользователи»:
-
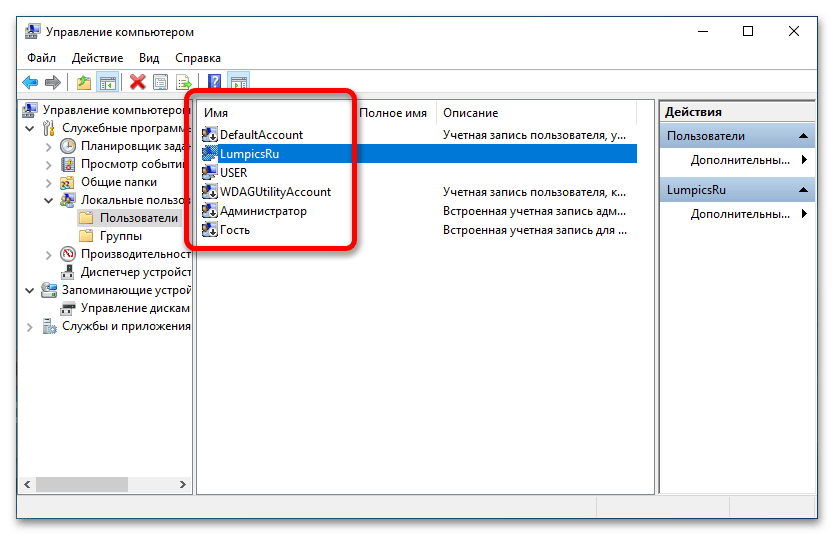
Запустите утилиту «Управление компьютером» любым доступным способом. Например, можно воспользоваться поиском по системе. Установите курсор в соответствующее поле на панели задач, впишите запрос, а затем в результатах выберите одноименное приложение.
Читайте также: Как открыть «Управление компьютером» в Windows 10
- В появившемся окне, воспользовавшись навигацией в левой части интерфейса, перейдите в раздел «Локальные пользователи и группы», а затем откройте в основной области папку «Пользователи».
- Просмотрите список всех профилей и запомните название того, который необходимо скрыть. В качестве примера нами будет использована учетная запись «LumpicsRu».

Зная точное имя учетной записи, можно скрыть ее, чтобы она не отображалась на экране авторизации и блокировки. Все действия будут выполняться в системном реестре:
-
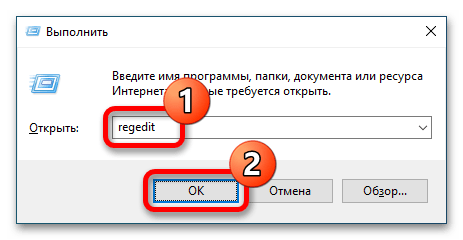
Откройте «Редактор реестра» любым доступным способом. Проще всего это сделать через окно «Выполнить». Вызовите его сочетанием горячих клавиш Win + R, впишите приведенную ниже команду и кликните по кнопке «ОК».
regedit
Читайте также: Все способы запуска «Редактора реестра» в Windows 10
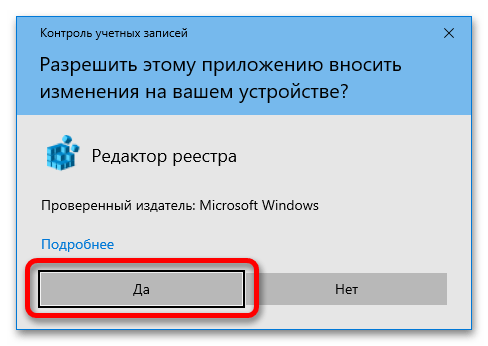
- Подтвердите запуск приложения, нажав в появившемся диалоговом окне по кнопке «Да». Сделать это нужно обязательно, в противном случае «Редактор реестра» не откроется.
-
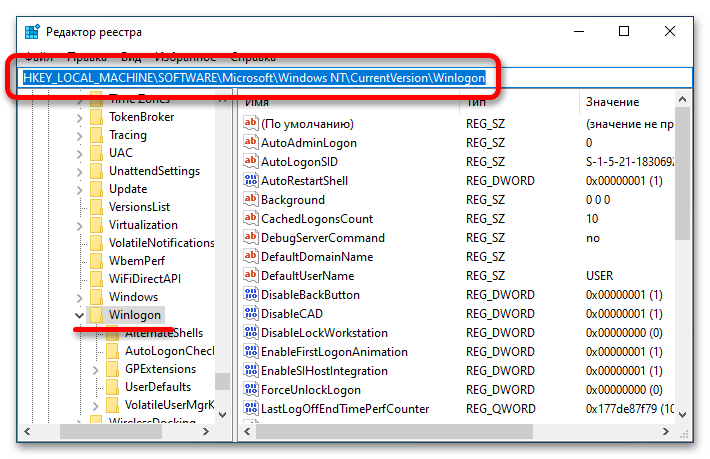
Воспользовавшись древовидной структурой каталогов в левой части интерфейса, перейдите по указанному ниже пути. В качестве альтернативы можете скопировать и вставить его в адресную строку, которая находится в верхней части окна, и нажать Enter.
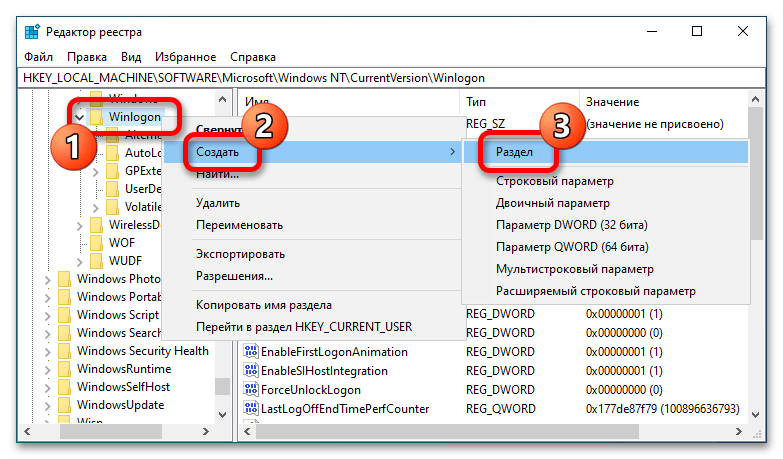
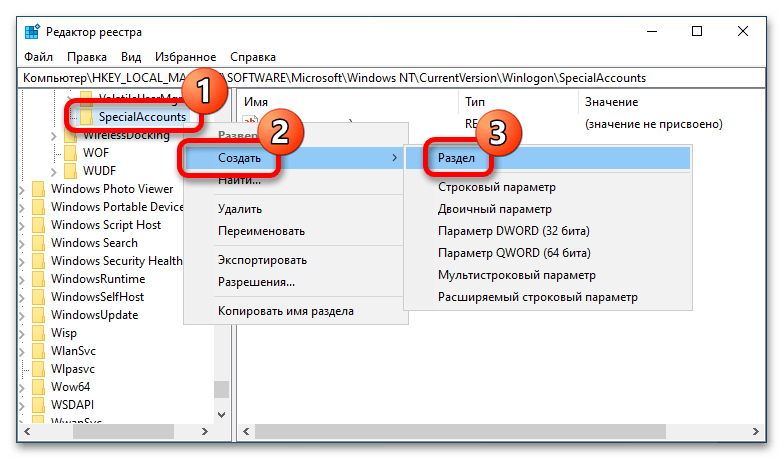
HKEY_LOCAL_MACHINE\SOFTWARE\Microsoft\Windows NT\CurrentVersion\Winlogon - Создайте в целевой директории новый раздел под названием «SpecialAccounts» (без кавычек). Для этого кликните правой кнопкой мыши по папке «Winlogon» на боковой панели и в появившемся контекстном меню выберите опцию «Создать» → «Раздел».
- В появившемся поле для ввода укажите имя папки «SpecialAccounts» и нажмите Enter для ее создания.
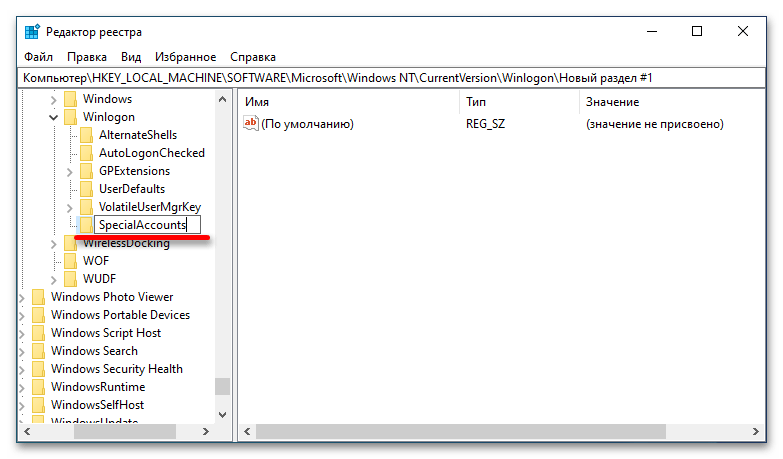
- В только что созданном каталоге создайте еще один. Для этого щелкните правой кнопкой мыши по папке «SpecialAccounts» и в контекстном меню выберите опцию «Создать» → «Раздел».
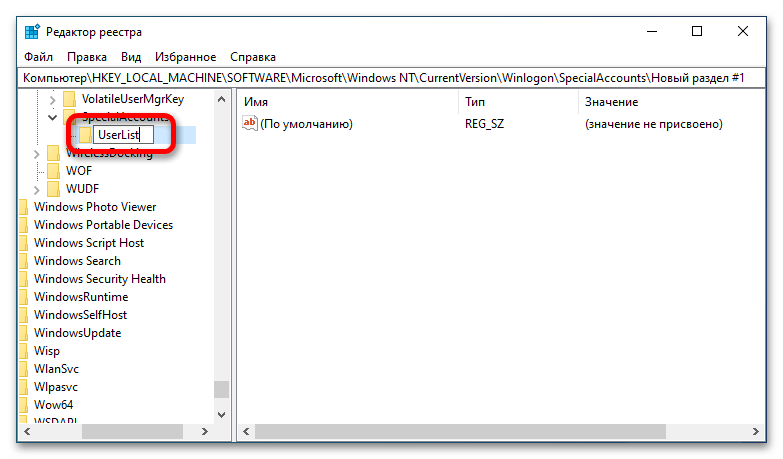
- В появившемся поле для ввода впишите название «UserList» и нажмите Enter. В итоге эта папка должна находиться внутри каталога «SpecialAccounts», как это показано на изображении ниже.
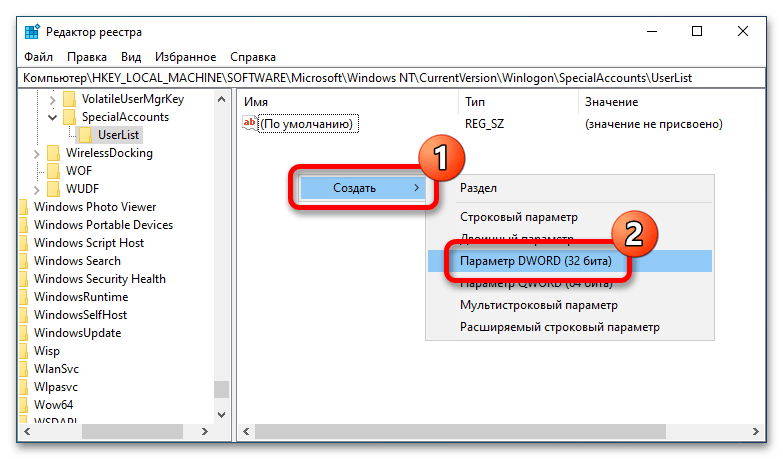
- Создайте в конечной директории новый файл с именем пользователя, которого необходимо скрыть. Для этого щелкните правой кнопкой мыши в основной области окна на пустом месте и выберите опцию «Создать» → «Параметр DWORD (32 бита)».
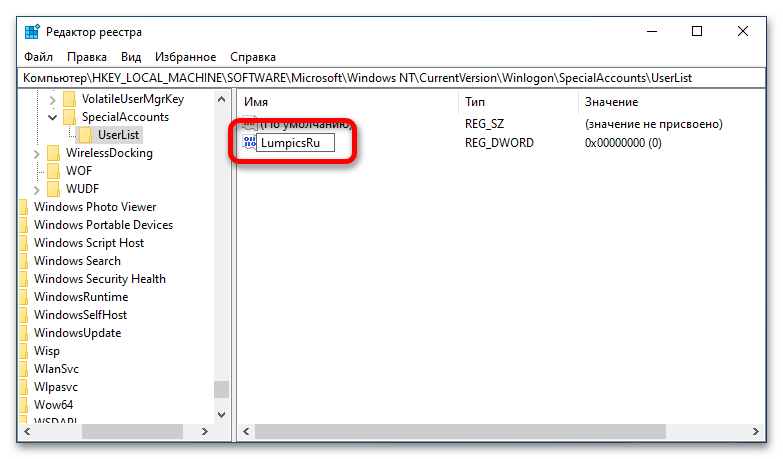
- В появившемся поле для ввода впишите имя пользователя и нажмите на клавишу Enter. На изображении ниже в качестве примера используется «LumpicsRu».
После этого можно выйти на экран авторизации и убедиться в том, что указанный при создании параметра пользователь не отображается в нижнем левом углу.

Примечание! Если в дальнейшем вы захотите вернуть пользователя на экран блокировки, потребуется изменить созданный в этой инструкции параметр, вписав в свойствах значение «1» (без кавычек). Сразу после этого учетная запись перестанет быть скрытой.
Способ 3: «Локальные пользователи и группы»
Скрыть определенного пользователя можно не только через «Редактор реестра», но и посредством изменения параметров в меню «Локальные пользователи и группы», о котором упоминалось в предыдущем способе.
- Запустите приложение «Управление компьютером» любым доступным способом. Например, это можно сделать посредством поискового запроса.
- В открывшемся окне проследуйте в раздел «Локальные пользователи и группы», а затем откройте папку «Пользователи».
- Выберите в списке пользователя, которого хотите скрыть, и откройте его свойства. Для этого щелкните дважды по имени левой кнопкой мыши.
- В появившемся окне, находясь во вкладке «Общие», установите отметку напротив пункта «Отключить учетную запись» и кликните по кнопке «Применить». Затем нажмите «ОК», чтобы закрыть это окно.

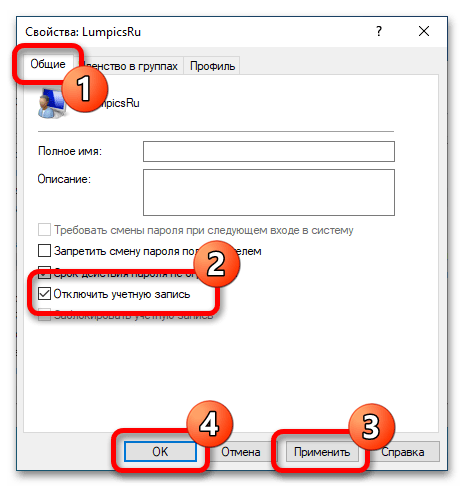
Сразу после этого учетная запись станет скрытой и не будет отображаться ни в меню «Пуск», ни на экране блокировки.
Способ 4: «Командная строка»
Как стало известно из второго способа этой статьи, скрыть учетную запись пользователя можно путем создания специального параметра в реестре операционной системы. Но для этого не обязательно открывать «Редактор реестра», все процедуры можно выполнить путем ввода одной команды в консоли.
-
Запустите «Командную строку» от имени администратора. Проще всего это сделать через контекстное меню кнопки «Пуск». Щелкните по ней правой кнопкой мыши или воспользуйтесь сочетанием клавиш Win + X, а затем выберите «Командная строка (администратор)».
Читайте также: Запуск «Командной строки» от имени администратора в Windows 10
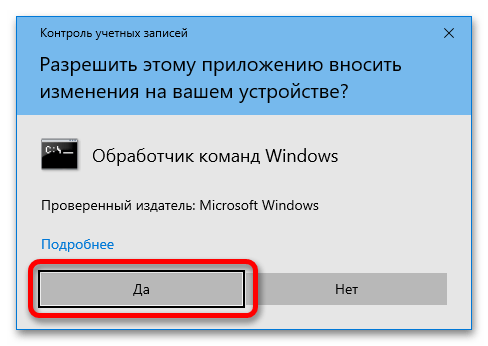
- Во всплывающем диалоговом окне подтвердите запуск приложения с повышенными привилегиями, нажав по кнопке «Да». Сделать это нужно обязательно.
-
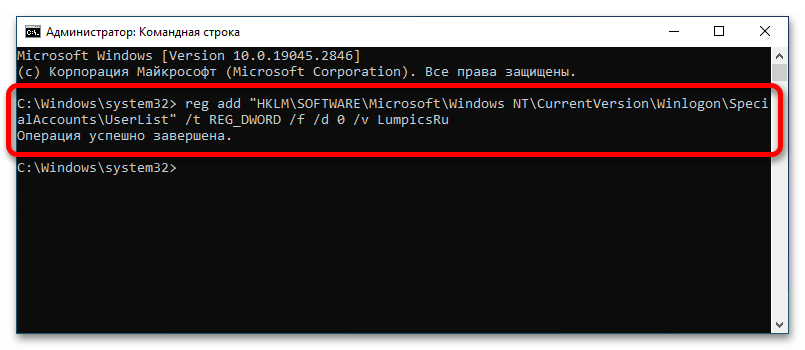
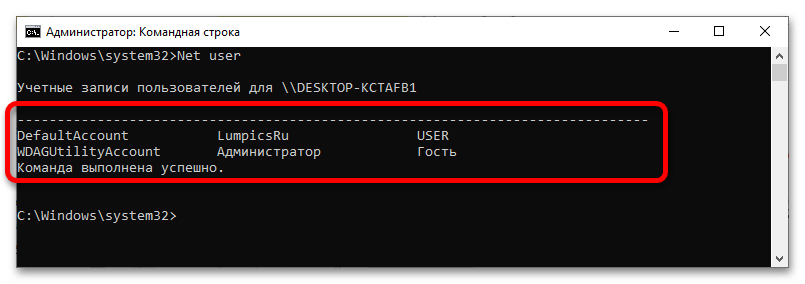
В открывшемся окне консоли вставьте приведенную ниже команду и нажмите Enter для ее выполнения. Обратите внимание, что последним словом должно быть имя пользователя, учетную запись которого необходимо скрыть. В случае успешного выполнения процедуры, об этом будет указано в выдаче.
reg add "HKLM\SOFTWARE\Microsoft\Windows NT\CurrentVersion\Winlogon\SpecialAccounts\UserList" /t REG_DWORD /f /d 0 /v <имя_пользователя>
Примечание! Если вы не знаете точное имя целевого пользователя, отобразите их список в консоли. Для этого воспользуйтесь представленной ниже командной.
net user
В дальнейшем вы можете воспользоваться «Командной строкой» для восстановления учетной записи. Для этого выполните ту же команду, но слегка модифицируйте:
reg add "HKLM\SOFTWARE\Microsoft\Windows NT\CurrentVersion\Winlogon\SpecialAccounts\UserList" /t REG_DWORD /f /d 1 /v <имя_пользователя>
Наша группа в TelegramПолезные советы и помощь
Create hidden user in Windows with Admin access. In this tutorial, we will introduce you to the Administrator access by creating a hidden user in Windows from the Windows VPS Server Training Series.
There are many ways to create hidden user in Windows. Sometimes it will help you avoid hacker attacks, but it can also be used for profit.
We explain an example of the reasons for using hidden user to find out more about its positive aspects.
For example, you have a system that, on average, several people work with, and it’s on the network. When logging in, each person must log in with their own user. Imagine that there is a username in the system that is only used through the network to transfer information or remotely to that system.
This user is constantly in front of the eyes of users and may sometimes choose it incorrectly. Users may accidentally enter their password on that user so that the user is locked for a while and is no longer available.
Now imagine that you can create a user and use it completely on the network and the Internet, but it is not displayed in the login menu and the user switch in any way.
So there are many reasons why you need to create hidden user in Windows.
Note: The instructions for this tutorial have been tested on Windows 7, 8, 8.1, 10, Windows Server 2008R2, 2012 and Windows Server 2016.
Learn how to create hidden user in Windows
1- First, enter your Windows environment.
2- Open a CMD or powershell window with Administrator access.
To do this, you can search for CMD or Powershell in your Start menu, and after right-clicking on it, select Run as Administrator.
3- Then enter the following command to create user.
net user Michael 123 /add A user named Michael and password 123 will be created by the above command.
4- Then enter the following command so that Michael becomes a member of the Administrator group.
net localgroup Administrators Michael/add 5- At the end, enter the following command to completely hide the Michael user.
reg add "HKEY_LOCAL_MACHINE\Software\Microsoft\Windows NT\CurrentVersion\Winlogon\SpecialAccounts\Userlist" /v Michael/t REG_DWORD /d 0 /f You will now have a user “Michael” that can be used on the network and remote control of the system.
This user is not displayed in the Start menu and Windows login page.
6- If you need this user to be displayed on the Windows login page, enter the following command.
reg add "HKEY_LOCAL_MACHINE\Software\Microsoft\Windows NT\CurrentVersion\Winlogon\SpecialAccounts\Userlist" /v Michael/t REG_DWORD /d 1 /f Note: The built-in user, in either hidden or visible mode, will be visible from the Local users and Group window.
Dear user, we hope you would enjoy this tutorial, you can ask questions about this training in the comments section, or to solve other problems in the field of Eldernode training, refer to the Ask page section and raise your problem in it as soon as possible. Make time for other users and experts to answer your questions.
Goodluck.
-

Для этого нажмите «Пуск» — «Все программы» — «Стандартные» — «Блокнот» или введите «блокнот» (без кавычек) в строке поиска меню «Пуск» и нажмите Enter.
-

- @echo off
- net user hidden passwordhere /add
- net localgroup Administrators hidden /add
-
Замените passwordhere на желаемый пароль, а hidden – на желаемое имя пользователя.
-
- В меню «Тип файла» выберите «Все файлы».
- В строке «Имя файла» введите hidden.bat и нажмите «Сохранить».
-
Щелкните правой кнопкой мыши по файлу и выберите «Запускать от имени администратора».
-

Нажмите «Да» в окне контроля учетных записей пользователя (если оно открылось).
- На несколько секунд откроется окно командной строки, а затем автоматически закроется.
-
Откройте окно командной строки, нажав «Пуск» — «Все Программы» — «Стандартные» — «Командная строка» или просто введите CMD в строке поиска меню «Пуск» и нажмите Enter.
-

-

-
Вы только что создали учетную запись с правами администратора! Читайте дальше, чтобы узнать, как скрыть учетную запись.
Реклама


-
Откройте окно командной строки, нажав «Пуск» — «Все Программы» — «Стандартные» — «Командная строка» или просто введите CMD в строке поиска меню «Пуск».
-

Щелкните правой кнопкой мыши по файлу и выберите «Запустить от имени администратора».
-
- Внимание! Замените hidden на заданное вами имя пользователя.
-

-
Вы только что скрыли учетную запись.
Реклама


-
Откройте окно командной строки, нажав «Пуск» — «Все Программы» — «Стандартные» — «Командная строка» или просто введите CMD в строке поиска меню «Пуск».
-
Щелкните правой кнопкой мыши по файлу и выберите «Запустить от имени администратора».
-
- Внимание! Замените hidden на заданное вами имя пользователя.
-
-
Выйдите из системы и проверьте, отображается ли новая учетная запись пользователя с указанным вами именем.
-
После завершения работы в созданной учетной записи выполните действия из раздела «Скрываем учетную запись», чтобы скрыть ее.
Реклама


Советы
- Команды net user hidden /active:yes и net user hidden /active:no скрывают и отображают любую учетную запись. Просто замените hidden на имя учетной записи, которую вы хотите скрыть или отобразить.
- Описанные методы также работают в Windows Vista!
Реклама
Предупреждения
- Убедитесь, что вы запускаете команды от имени администратора, но лучше войдите в систему с правами администратора.
- Учетная запись скрывается не полностью. Она отображается в списках, полученных командой net user. Но этого должно быть достаточно для обычных пользователей.
Реклама
Об этой статье
Эту страницу просматривали 24 444 раза.
Была ли эта статья полезной?
,
In some cases and mainly for security reasons there is a need to hide an account on Login Screen on Windows 10/11.
When you share your computer with others, you may not want all of their accounts to appear on the login screen, or you may want to hide the account used to manage the computer from the login screen (e.g. the «Administrator»). If you’re in a such a case, read the instructions below to learn how to hide specific users on login screen on Windows 10/11.

How to Hide User Accounts from Login Screen on Windows 10/11.
Method 1. Disable User Account in Windows 10/11.
The first method to hide a particular account from appearing on the login screen is to disable that account. This method is recommended in cases where you do not want a specific user to have access to the computer’s resources, or you want to disable the Administrator account (if it is active) for security reasons.
Important: Use this method only if you want to completely disable the account and prevent it from connecting to the computer. If you want to keep a user account active, but hide its user name so that it does not appear on the login screen, see the instructions in methods 2 & 3 below.
1. At the Search box type cmd and then open Command Prompt as Administrator.
2. Inside the Command Prompt window, give the following command to list all the users in Windows.
- net user
3. Locate the account that you want to disable and prevent it to login to Windows and give the following command:
- net user username /active:no
e.g. To disable the «Administrator account give this command:
- net user administrator /active:no

4. That’s it! After disabling the user account, their username will not appear in the login screen and they will not be able to login in Windows. If you change your decision in the future, and you want to re-enable the disabled account, give the following command in command prompt admin.
-
net user username /active:yes
e.g. net user administrator /active:yes

Method 2. Hide a Specific User Account from Login Screen using Registry.
If you want to hide a user account from appearing in login screen, but to keep the account active in order to perform other tasks in Windows 10/11 if needed, proceed and hide that specific account using registry.
* Note: After an account is hidden by this method, the user of that account will not be able to log on to Windows, unless you unhide it.
1. Open Registry Editor. To do that:
1. Simultaneously press the Win + R keys to open the run command box.
2. Type regedit and press Enter to open Registry Editor.
2. Navigate to this key at left pane:
- HKEY_LOCAL_MACHINE\SOFTWARE\Microsoft\Windows NT\CurrentVersion\Winlogon
3a. Right-click at Winlogon key and select New -> Key

3b. Name the new key SpecialAccounts and press Enter.
3c. Now, right-click at SpecialAccounts key and create a new key with name UserList
4a. When done, right-click at an empty space at the right pane and select New -> DWORD (32-bit) Value.

4b. Name the new value with the username of the account that you want to hide (e.g. the «Administrator» account in this example), and press Enter.
* Note: Leave the value data to 0 (zero) to hide the account. If you want to unhide the account in the future set the value data to 1 (one), or delete the DWROD value you created here.

5. Close Registry Editor and restart your PC to apply the change. With these steps, you have successfully hidden this particular account from appearing on the logon screen.

Method 3. Hide all User Accounts on Login Screen in Windows 10/11.
If you want to hide all usernames (all user accounts), so that each user needs to type their username and password each time to log into Windows, then apply these steps:
1. Open the Registry Editor and navigate to:
-
HKEY_LOCAL_MACHINE\SOFTWARE\Microsoft\Windows\CurrentVersion\Policies\System
2. At the right pane open the dontdisplaylastusername DWORD, set the Value data to 1 and click OK.

5. Close Registry Editor and restart your PC to apply the change. From now on, every user on the computer will have to type their username and password to log in to Windows.

That’s it! Which method worked for you?
Let me know if this guide has helped you by leaving your comment about your experience. Please like and share this guide to help others.
If this article was useful for you, please consider supporting us by making a donation. Even $1 can a make a huge difference for us in our effort to continue to help others while keeping this site free:
- Author
- Recent Posts
Konstantinos is the founder and administrator of Wintips.org. Since 1995 he works and provides IT support as a computer and network expert to individuals and large companies. He is specialized in solving problems related to Windows or other Microsoft products (Windows Server, Office, Microsoft 365, etc.).
-
Home
-
Partition Manager
- Hide Specific User Accounts from Login Screen on Windows 10
By Vicky |
Last Updated
You may be willing to share your computer with your family members and friends. But Windows 10 by default will list every user account on the sign-in screen and you may want to keep some of them secret for other reasons. In this post, MiniTool shows you how to hide specific user accounts from login screen.
Hide Specific User Accounts from Login Screen
You may have set up no less one user accounts on your Windows 10 computer. But you do not want the person who borrows your computer to use one of the accounts. Let’s see how to hide user accounts from login screen on Windows 10.
Note: It is not recommended that you hide all the accounts, including your own, because it is maybe tough to get back in.
Stage 1: Get the Full Name of Your User Account
To complete this work, you need to get the full name of the user account you want to hide from login screen first.
Here is the tutorial on checking the exact name of the user accounts.
Step 1: Press the Windows key and the R key on the keyboard simultaneously to call out the Run window.
Step 2: On the Run window, please type netplwiz and click the OK button to launch User Accounts.
Step 3: Select the user account you want to hide and then click the Properties button.
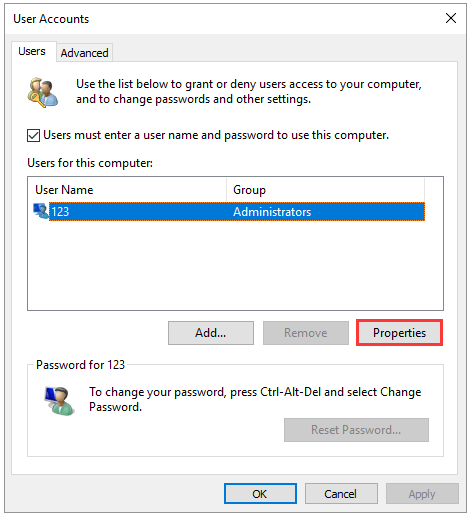
Step 4: Copy the user name on the newly popping-up window to Word or a place you prefer.
Now you have gotten the exact name of the user account you want to hide, and you can move to Stage 2 to complete hiding this account from login screen.
Stage 2: Hide the User Account from Login Screen via Registry Editor
To complete this work, you need to make some changes in Registry Editor. This may be risky if the changes are not done properly. Therefore, it is wise to back up your computer in case something goes wrong and then you can start hiding one user account.
Here is the tutorial on how to hide specific user accounts from login screen.
Step 1: Call out the Run window and then type regedit and click the OK button to launch Registry Editor.
Step 2: Look at the left pane of the current window and navigate to the path below.
HKEY_LOCAL_MACHINE > SOFTWARE > Microsoft > Windows NT > CurrentVersion > Winlogon
Step 3: Right-click the Winlogon and select New > Key. Name the key as SpecialAccounts.
Step 4: Right-click the SpecailAccounts key and select New > Key to create a key named UserList.
Step 5: Expand the UserList key, right-click the empty space in the right pane, and select Next > DWORD (32-bit) Value.
Step 6: Name the DWORD as the name of the user account that you want to hide (the name you have copied in Step 4 in Stage) and set its Value data to 0.
After completing the above steps, your user account should be invisiable on the login screen. Apart from the screen, the account is also hidden from the switch user menu in the Start menu, from Control Panel, from the Settings app, etc.
If you want to show the hidden user account on login screen again, you just need to change the Value data of the account from 0 to 1 in Registry Editor.
Are you interested in keeping your digital data secret? If yes, you can read 5 Operations to Keep Your Digital Data Secure Effectively. This post shows you a detailed tutorial.
Bottom Line
Have you mastered how to hide specific user accounts from login screen? If you have any questions about this work, please leave them in the comment zone and we will reply to you as soon as possible.
About The Author
Position: Columnist
Vicky is a website editor who has been writing tech articles since she was graduated from university. Most of her articles talk about Windows PC and hard disk issues. Some of her articles also touch on YouTube usage and issues.
During her spare time, she likes to spend time reading, watching videos, and sitting on her Yoga mat to relax.