
Создание учетных записей и групп занимает важное место в обеспечении безопасности Windows Server 2003, поскольку, назначая им права доступа и привилегии, администратор получает возможность ограничить пользователей в доступе к конфиденциальной информации компьютерной сети, разрешить или запретить им выполнение в сети определенного действия, например архивацию данных или завершение работы компьютера.
Для работы с локальными учетными записями используется оснастка Local Users and Groups. Управление доменными учетными записями ведется централизованно на контроллерах домена, при этом используется оснастка Active Directory Users and Computers (см. главу 20 «Администрирование доменов»). Управление локальными учетными записями на контроллерах домена невозможно.
Оснастка Local Users and Groups
Оснастка Local Users and Groups (Локальные пользователи и группы) — это инструмент ММС, с помощью которого выполняется управление локальными учетными записями пользователей и групп — как на локальном, так и на удаленном компьютере. Запускать оснастку может любой пользователь. Выполнять администрирование учетных записей могут только администраторы и члены группы Power Users (Опытные пользователи).
Пример окна оснастки Local Users and Groups приведен на рис. 10.5.

Рис. 10.5. Окно оснастки Local Users and Groups в составе оснастки Computer Management
Папка Users
Сразу после установки системы Windows Server 2003 папка Users (Пользователи) содержит три автоматически создаваемые встроенные учетные записи, перечисленные ниже. Две первые записи имелись и в системах Windows 2000, третья появилась в Windows XP.
- Administrator (Администратор) — эту учетную запись используют при установке и настройке рабочей станции или сервера, являющегося членом домена. Она не может быть уничтожена, блокирована или удалена из группы Administrators (Администраторы), ее можно только переименовать.
- Guest (Гость) — эта учетная запись применяется для регистрации в компьютере без использования специально созданной учетной записи. Учетная запись Guest не требует ввода пароля и по умолчанию заблокирована. (Обычно пользователь, учетная запись которого блокирована, но не удалена, при регистрации получает предупреждение, и входить в систему не может.) Она является членом группы Guests (Гости). Ей можно предоставить права доступа к ресурсам системы точно так же, как любой другой учетной записи.
- SUPPORT_388945a0 — компания Microsoft зарезервировала эту запись за собой для поддержки справочной службы Help and Support Service; запись является заблокированной.
Примечание
Учетная запись HelpAssistant, использующаяся в системах Windows XP при работе средства удаленной помощи Remote Assistance; в Windows Server 2003 отсутствует.
Кроме того, могут появиться и другие пользовательские учетные записи, например, после установки служб Интернета — Internet Information Services.
Для работы с локальными пользователями можно использовать утилиту командной строки net user.
Команда net user <имяПользователя> /times позволяет определять день и время, когда пользователь может входить в данную систему.
Папка Groups
В системах Windows 2000 (на рабочей станции или сервере, являющимся членом домена) папка Groups (Группы) содержит шесть встроенных групп. Они создаются автоматически при установке системы. Ниже описаны свойства этих групп.
- Administrators (Администраторы) — ее члены обладают полным доступом ко всем ресурсам системы. Это единственная встроенная группа, автоматически предоставляющая своим членам весь набор встроенных прав. По умолчанию содержит встроенную учетную запись Administrator. Если компьютер подключен к домену, эта группа также содержит группу Domain Admins.
- Backup Operators (Операторы архива) — члены этой группы могут архивировать и восстанавливать файлы в системе независимо от того, какими правами эти файлы защищены. Кроме того, операторы архива могут входить в систему и завершать ее работу, но они не имеют права изменять настройки безопасности. По умолчанию пуста.
- Guests (Гости) — эта группа позволяет выполнить регистрацию пользователя с помощью учетной записи Guest и получить ограниченные права на доступ к ресурсам системы. Члены этой группы могут завершать работу системы. По умолчанию содержит пользователя Guest.
- Power Users (Опытные пользователи) — члены этой группы могут создавать учетные записи пользователей, но они имеют право модифицировать настройки безопасности только для созданных ими учетных записей. Кроме того, они могут создавать локальные группы и модифицировать состав членов созданных ими групп. То же самое они могут делать с группами Users, Guests и Power Users. Члены группы Power Users не могут модифицировать членство в группах Administrators и Backup Operators. Они не могут быть владельцами файлов, архивировать или восстанавливать каталоги, загружать и выгружать драйверы устройств и модифицировать настройки безопасности и журнал событий. По умолчанию пуста.
- Replicator (Репликатор) — членом группы Replicator должна быть только учетная запись, с помощью которой можно зарегистрироваться в службе репликации контроллера домена. Ее членами не следует делать рабочие учетные записи. По умолчанию пуста.
- Users (Пользователи) — члены этой группы могут выполнять большинство пользовательских функций, например, запускать приложения, пользоваться локальным или сетевым принтером, завершать работу системы или блокировать рабочую станцию. Они также могут создавать локальные группы и регулировать состав их членов. Они не могут получить доступ к общему каталогу или создать локальный принтер. По умолчанию содержит служебные учетные записи NT AUTHORITY\Authenticated Users (S-1-5-11) и NT AUTHORITY\INTERACTIVE (S-1-5-4). Если компьютер подключен к домену, эта группа также содержит группу Domain Users.
В системах Windows XP появились еще три группы.
- Network Configuration Operators (Операторы настройки сети) — группа, члены которой имеют некоторые права по настройке сетевых служб и параметров. По умолчанию пуста.
- Remote Desktop Users (Удаленные пользователи рабочего стола) — эта группа содержит имена пользователей, которым явно разрешен удаленный доступ к рабочему столу.
- HelpSenicesGroup (Группа служб поддержки) — группа для поддержки справочной службы Help and Support Service. По умолчанию содержит учетную запись SUPPORT_388945aO.
Еще четыре группы появились в системах Windows Server 2003.
- Performance Log Users — члены этой группы могут удаленно запускать журналы регистрации. По умолчанию содержит служебную учетную запись NT AUTHORITY\NETWORK SERVICE (S-l-5-20).
- Performance Monitor Users — группа, члены которой могут выполнять мониторинг производительности компьютера. По умолчанию пуста.
- Print Operators — члены этой группы могут администрировать принтеры в домене. По умолчанию пуста.
- TelnetClients — группа, члены которой имеют доступ к службе Telnet Server на данном компьютере. По умолчанию пуста.
Для работы с локальными пользователями можно использовать утилиту командной строки net localgroup.
Создание пользовательской учетной записи
Для создания учетных записей пользователей:
1. В оснастке Local Users and Groups установите указатель мыши на папку Users и нажмите правую кнопку. В контекстном меню выберите команду New User (Новый пользователь). Появится диалоговое окно New User (рис. 10.6).
Рис. 10.6. Создание новой локальной учетной записи
2. В поле User name (Пользователь) введите имя создаваемого пользователя, которое будет использоваться для регистрации в системе. В поле Full name (Полное имя) введите полное имя создаваемого пользователя; это имя будет отображаться в меню Start. В поле Description (Описание) можно ввести описание создаваемой учетной записи. В поле Password (Пароль) введите пароль пользователя и в поле Confirm password (Подтверждение) подтвердите его правильность вторичным вводом.
3. Установите или снимите флажки User must change password at next logon (Потребовать смену пароля при следующем входе в систему), User cannot change password (Запретить смену пароля пользователем), Password never expires (Срок действия пароля не ограничен) и Account is disabled (Отключить учетную запись).
4. Нажмите кнопку Create (Создать). Чтобы создать еще одного пользователя, повторите шаги 2 и 3. Для завершения работы нажмите кнопку Close (Закрыть).
Созданный пользователь автоматически включается в локальную группу Users; вы можете открыть вновь созданную учетную запись и изменить членство пользователя в группах.

Рис. 10.7. Окно свойств локальной учетной записи пользователя
Имя пользователя должно быть уникальным для компьютера. Имя пользователя не может состоять целиком из точек и пробелов. Оно может содержать до 20 символов верхнего и нижнего регистра. Ниже приведены символы, применение которых в имени пользователя недопустимо: » / \ [ ]:; | =, + *?<>
Обратите внимание на то, что в окне свойств учетной записи пользователя (рис. 10.7) имеется множество вкладок, на которых можно устанавливать различные параметры, определяющие возможности этой учетной записи при работе в различных режимах (например, вкладки Remote control и Sessions), а также конфигурацию пользовательской среды (например, вкладки Profile и Environment).
Управление локальными группами
Создание локальной группы
Для создания локальной группы:
1. В окне оснастки Local Users and Groups установите указатель мыши на папке Groups и нажмите правую кнопку. В появившемся контекстном меню выберите команду New Group (Новая группа). Откроется окно New Group (рис. 10.8).
Рис. 10.8. Создание локальной группы
2. В поле Group name (Имя группы) введите имя новой группы.
3. В поле Description (Описание) можно ввести описание новой группы.
4. В поле Members (Члены группы) можно сразу же добавить пользователей и группы, которые войдут в данную группу: для этого нужно нажать кнопку Add (Добавить) и указать члена группы в окне Select Users (Выбор Пользователей). Окно Select Users позволяет непосредственно ввести имя пользователя (и проверить его правильность, если будет нажата кнопка Check names). Нажав кнопку Advanced (Дополнительно), можно выполнить поиск всех учетных записей на компьютере и выбрать нужную запись из полученного списка. Если компьютер подключен к домену, то при наличии достаточных полномочий можно выполнять поиск в каталоге Active Directory и выбирать доменных пользователей и группы.
5. Для завершения нажмите кнопку Create и затем — Close.
Имя локальной группы должно быть уникальным в пределах компьютера. Оно может содержать до 256 символов в верхнем и нижнем регистрах. В имени группы запрещено применение символа обратной наклонной черты (\).
Изменение членства в локальной группе
Чтобы добавить или удалить учетную запись пользователя из группы:
1. Выберите модифицируемую группу в окне оснастки Local Users and Groups и нажмите правую кнопку. В появившемся контекстном меню выберите команду Add to Group (Добавить в группу) или Properties (Свойства).
2. Для того чтобы добавить новые учетные записи в группу, нажмите кнопку Add. Далее следуйте указаниям диалогового окна Select Users.
3. Для того чтобы удалить из группы некоторых пользователей, в поле Members (Члены группы) окна свойств группы выберите одну или несколько учетных записей и нажмите кнопку Remove (Удалить).
На компьютерах — членах домена в локальную группу можно добавлять как локальных пользователей, созданных на компьютере, так и пользователей и глобальные группы, созданные в домене, к которому принадлежит компьютер, или в доверяемых доменах.
Примечание
Встроенные группы не могут быть удалены. Удаленные группы не могут быть восстановлены. Удаление группы не отражается на учетных записях входящих в нее пользователей.
Изменение и удаление учетных записей
Изменять, переименовывать и удалять локальные учетные записи пользователей и групп можно с помощью контекстного меню, вызываемого щелчком правой кнопки мыши на имени пользователя, либо посредством меню Action (Действие) на панели меню оснастки Local Users and Groups (при этом в правом подокне оснастки должна быть выбрана модифицируемая или удаляемая учетная запись пользователя).
Поскольку переименованная учетная запись сохраняет идентификатор безопасности (Security Identifier, SID), она сохраняет и все свои свойства, например: описание, полное имя, пароль, членство в группах и т. д. Поскольку S1D уникален, нельзя после удаления пользователя или группы создать новую учетную запись со «старыми» свойствами. Поэтому иногда учетные записи пользователей просто временно блокируют.
03.07.2009 —
Опубликовал: |
ms windows server 2003
Sorry, the comment form is closed at this time.
In a Windows server environment, it is very important that only authenticated users are allowed to log in for security reasons. To fulfill this requirement the creation of User accounts and Groups is essential.
User Accounts
In Windows Server 2003 computers there are two types of user accounts. These types are local and domain user accounts. The local user accounts are the single user accounts that are locally created on a Windows Server 2003 computer to allow a user to log on to a local computer. The local user accounts are stored in Security Accounts Manager (SAM) database locally on the hard disk. The local user accounts allow you to access local resources on a computer
On the other hand the domain user accounts are created on domain controllers and are saved in Active Directory. These accounts allow to you access resources anywhere on the network. On a Windows Server 2003 computer, which is a member of a domain, you need a local user account to log in locally on the computer and a domain user account to log in to the domain. Although you can have a same login and password for both the accounts, they are still entirely different account types.
You become a local administrator on your computer automatically because local computer account is created when a server is created. A domain administrator can be local administrator on all the member computers of the domain because by default the domain administrators are added to the local administrators group of the computers that belong to the domain.
This article discusses about creating local as well as domain user accounts, creating groups and then adding members to groups.
Creating a Local User Account
To create a local user account, you need to:
1. Log on as Administrator, or as a user of local administrator group or Account Operators local group in the domain.
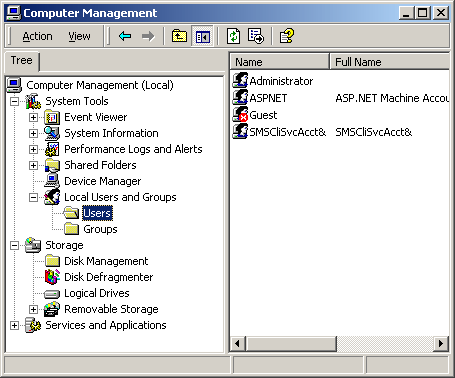
2. Open Administrative Tools in the Control Panel and then click Computer Management, as shown in Figure 1.
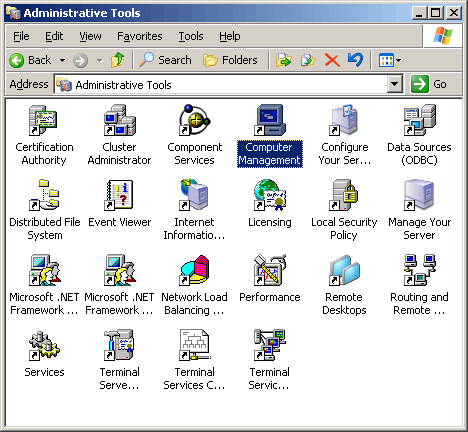
Figure 1
3. Click Users folder under Local Users and Groups node, as shown in Figure 2.
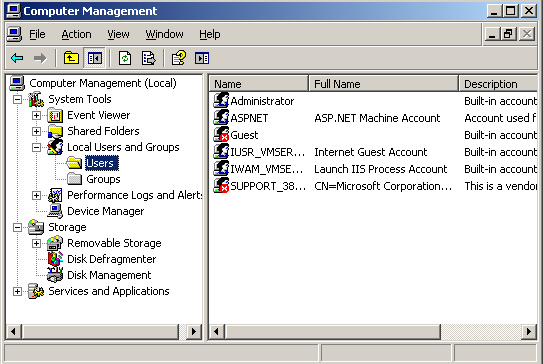
Figure 2
4. Right-click Users and then click New User in the menu that appears, as shown in Figure 3:
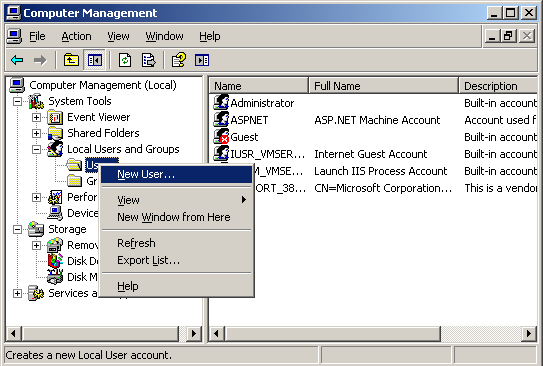
Figure 3
The New User dialog box appears as shown below in Figure 4.
5. Provide the User name and the Password for the user in their respective fields.
6. Select the desired password settings requirement.
Select User must change password at next logon option if you want the user to change the password when the user first logs into computer. Select User cannot change password option if you do not want the user to change the password. Select Password never expires option if you do not want the password to become obsolete after a number of days. Select Account is disabled to disable this user account.
7. Click Create , and then click Close:
Figure 4
The user account will appear on clicking Users node under Local Users and Groups on the right panel of the window.
You can now associate the user to a group. To associate the user to a group, you need to:
8. Click Users folder under Local Users and Groups node.
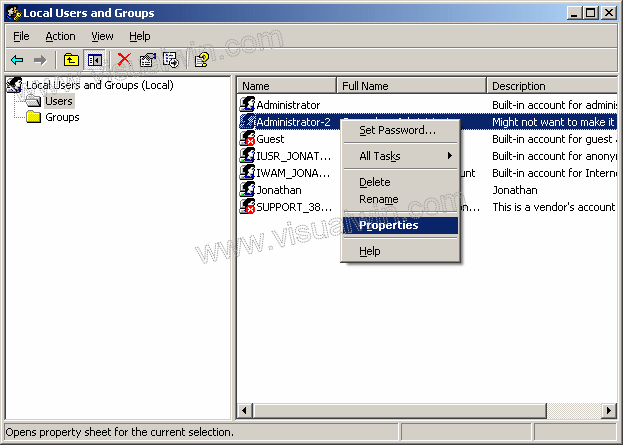
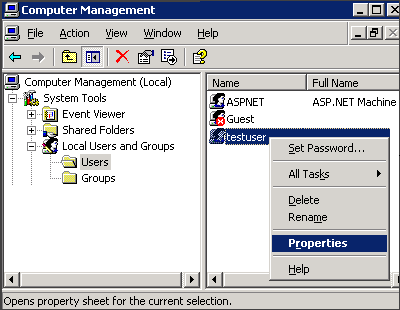
9. Right-click the user and then select Properties from the menu that appears, as shown in Figure 5:
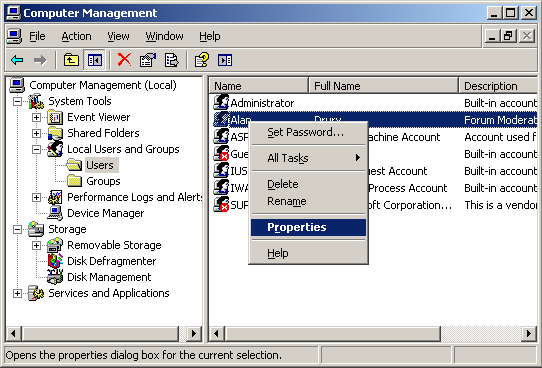
Figure 5
The Properties dialog box of the user account appears, as shown in Figure 6:
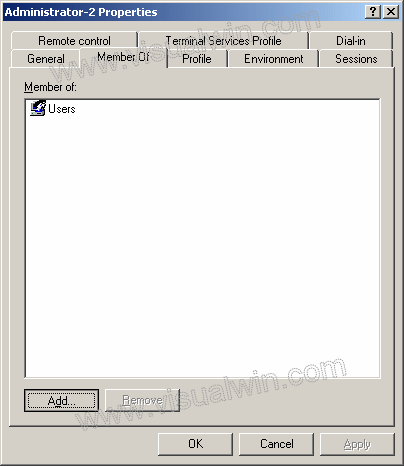
10. Click Member of tab.
The group(s) with which the user is currently associated appears.
11. Click Add.
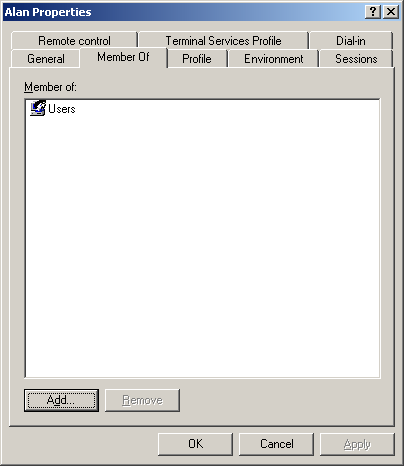
Figure 6
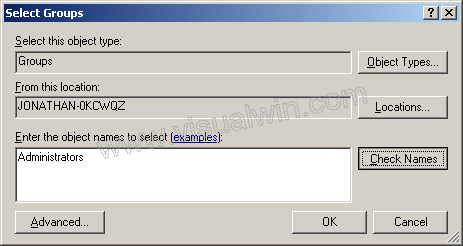
The Select Groups dialog box appears, as shown in Figure 7.
12. Select the name of the group/object that you want the user to associate with from the Enter the object names to select field.
If the group/object names do not appear, you can click Advanced button to find them. Also if you want to choose different locations from the network or choose check the users available, then click Locations or Check Names buttons.
13. Click OK .
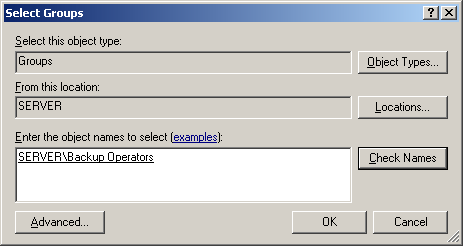
Figure 7
The selected group will be associated with the user and will appear in the Properties window of the user, as shown in Figure 8:
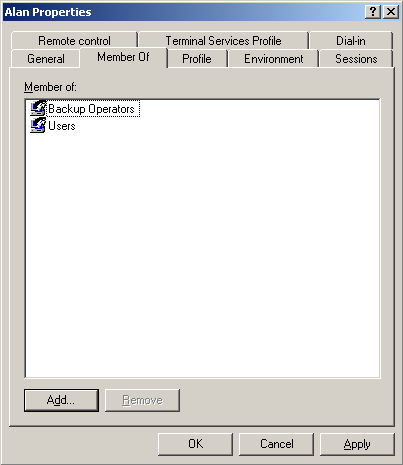
Figure 8
Creating a Domain User Account
The process of creating a domain user account is more or less similar to the process of creating a local user account. The only difference is a few different options in the same type of screens and a few steps more in between.
For example you need Active Directory Users and Computers MMC (Microsoft Management Console) to create domain account users instead of Local Users and Computers MMC. Also when you create a user in domain then a domain is associated with the user by default. However, you can change the domain if you want.
Besides all this, although, a domain user account can be created in the Users container, it is always better to create it in the desired Organization Unit (OU).
To create a domain user account follow the steps given below:
1. Log on as Administrator and open Active Directory Users and Computers MMC from the Administrative Tools in Control Panel, as shown in Figure 9.
2. Expand the OU in which you want to create a user, right-click the OU and select New->User from the menu that appears.
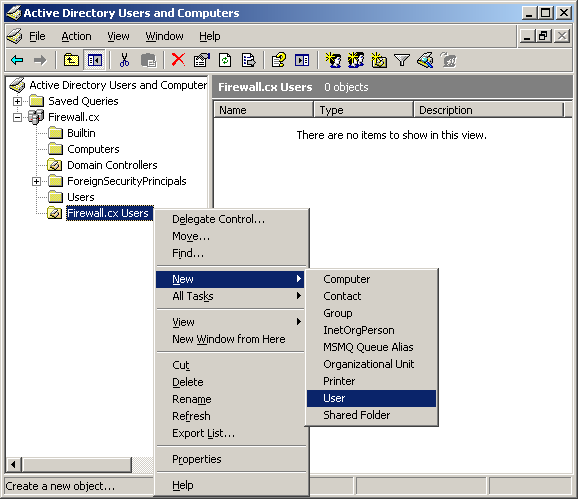
Figure 9
3. Alternatively, you can click on Action menu and select New->User from the menu that appears.
The New Object –User dialog box appears, as shown in Figure 10.
4. Provide the First name, Last name, and Full name in their respective fields.
5. Provide a unique logon name in User logon name field and then select a domain from the dropdown next to User logon name field if you want to change the domain name.
The domain and the user name that you have provided will appear in the User logon name (pre-Windows 2000) fields to ensure that user is allowed to log on to domain computers that are using earlier versions of Windows such as Windows NT.
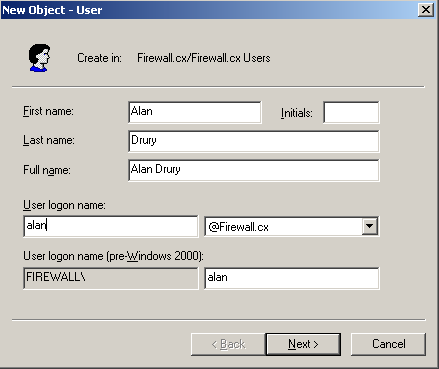
Figure 10
6. Click Next.
The second screen of New Object –User dialog box appears similar to Figure 4.
7. Provide the User name and the Password in their respective fields.
8. Select the desired password settings requirement:
Select User must change password at next logon option if you want the user to change the password when the user first logs into computer. Select User cannot change password option if you do not want the user to change the password. Select Password never expires option if you do not want the password to become obsolete after a number of days. Select Account is disabled to disable this user account.
9. Click Next.
10. Verify the user details that you had provided and click Finish on the third screen of New Object –User dialog box.
11. Follow the steps 9-13 mentioned in Creating a Local User Account section to associate a user to a group.
Creating Groups
Just like user accounts, the groups on a Windows Server 2003 are also of two types, the built in local groups and built in domain groups. The example of certain built in domain groups are: Account Operators, Administrators, Backup Operators, Network Configuration Operators, Performance Monitor Users, and Users. Similarly certain built in local groups are: Administrators, Users, Guests, and Backup operators.
The built-in groups are created automatically when the operating system is installed and become a part of a domain. However, sometimes you need to create your own groups to meet your business requirements. The custom groups allow you limit the access of resources on a network to users as per your business requirements. To create custom groups in domain, you need to:
1. Log on as Administrator and open Active Directory Users and Computers MMC from the Administrative Tools in Control Panel, as shown in Figure 9.
2. Right-click the OU and select New->Group from the menu that appears.
The New Object –Group dialog box appears, as shown in Figure 10.
3. Provide the name of the group in the Group name field.
The group name that you have provided will appear in the Group name (pre-Windows 2000) field to ensure that group is functional on domain computers that are using earlier versions of Windows such as Windows NT.
4. Select the desired group scope of the group from the Group scope options.
If the Domain Local Scope is selected the members can come from any domain but the members can access resources only from the local domain.
If Global scope is selected then members can come only from local domain but can access resources in any domain.
If Universal scope is selected then members can come from any domain and members can access resources from any domain.
5. Select the group type from the Group Type options.
The group type can be Security or Distribution . The Security groups are only used to assign and gain permissions to access resources and Distribution groups are used for no-security related tasks such as sending emails to all the group members.
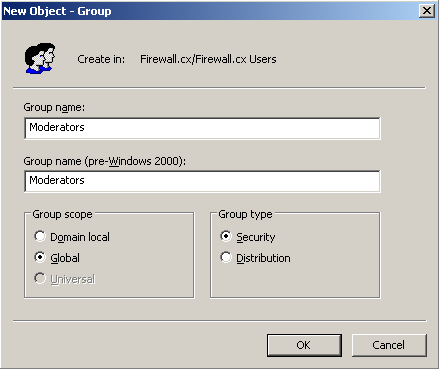
Figure 11
6. Click OK.
You can add members to group just as you add groups to members. Just right-click the group in Active Directory Users and Computers node in the Active Directory Users and Computers snap-in, select Properties, click Members tab from the Properties window of the group and then follow the steps from 11-13 from Creating Local User Accounts section.
Article Summary
Dealing with User & Group accounts in a Windows Server environment is a very important everyday task for any Administrator. This article covered basic administration of user and group accounts at both local and domain environments.
Creating a New User on Windows Server 2003
Preface:
Even if you will not be using Terminal Services or have any
other users using your server it is ALWAYS recommended to create an additional
two (2) users, apart from Administrator. These two users are — another
member of the «Administrators» group (to avoid actually logging on with the
Administrator account, but you have the same privileges) AND a regular user, who
is part of the «Users» group. It is recommended to only log on with the
regular user, and use the «runas» command when you need to run a program as an
Administrator, and to only log on with the secondary Administrator user when it
is absolutely needed. This will show you how to create a secondary
Administrator.
Method:
Click the Start button, then Run…
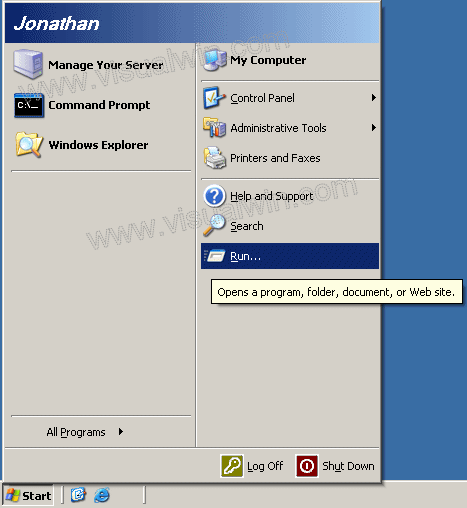
Then type «lusrmgr.msc» without the quotes
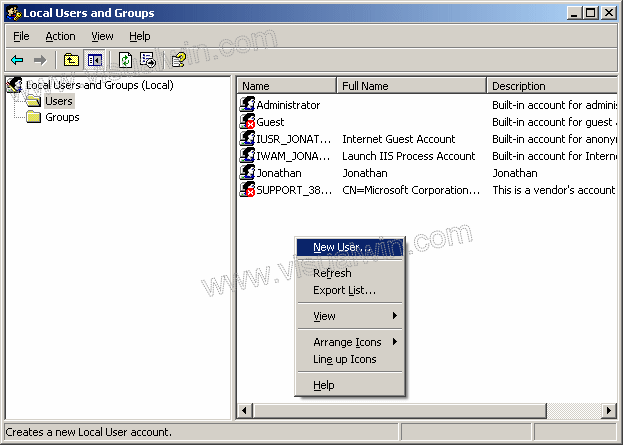
In the window that opens, right click in the right panel and
click «New User»
In the New User dialog, type in your preferences for a new user
name and password (this will be our secondary Administrator account).
Uncheck User must change password, and check Password never expires
Now, right click the new user and click Properties in the pop up
menu
Go to the «Member of» tab and
press the Add button
Type «Administrators» without the quotes, then press the Check
Names button (to complete the name, it will add the name of your computer) and
press OK when it is done, then press OK on the Local Users and Groups dialog
We now have a secondary Administrator account! To have a regular
user (highly recommended) do the same as above, until the User properties.
My reasoning
Q: If I already made a new Administrator account why do I have
to make a user account?
A: You don’t have to, you never have to, but it is recommended
in case you stay logged on, and someone gains control of the desktop (locally or
remotely).
Q: Should I stay logged in with the Administrator account or the
plain user account?
A: You should log out when you are not doing work on the server
directly, however, if you have a program that requires you to be logged in for
it to work (a good example is the bandwidth monitoring program, DU Meter) then
you should stay logged in with the ordinary user account.
<— Go back to the main tutorial page
Copyright © 2002-2025 Jonathan Maltz. For trademark/copyright information,
click here. About me.
Main page. Contact me.
The following article describes the steps to create a new user for your server. New Users can be used to log into your server through Terminal Services, added as FrontPage users or configured as FTP users.
To create a new User, please follow these steps:
- Log into your server through Terminal Services or Remote Desktop Connection.
- Open Computer Management using either method below:
- Right-click on the My Computer Icon and select Manage.
- Click Start, Programs, Administrative Tools, and Computer Management.
- Expand Local Users and Groups.
- Click on Users. In the right window you will see a list of the current users on the server.

- Right-click Users and select New User.
- Enter the following information:
- User Name (required): all usernames must be unique.
- Full Name (optional): the full name of the user
- Description (optional): a description of the user
- Password (required): we strongly recommend you use at least 6 characters and mixture of uppercase letters, lowercase letters and numbers for your passwords. For example, ft5yH7.
- Confirm Password (required): this entry must be identical to the Password field.
- Set the options that suit your needs:
- User must change password at next login: if checked, the user must change their password the next time they login. We recommend you uncheck this so that you have full control over the password.
- User cannot change password: if the first option is unchecked you will be able to set this option. We recommend you check this option so that only the administrator of the machine can modify the users password.
- Password never expires: controls if the password will expire 30 days. Once the password expires you will need to reset it manually.
- Account is disabled: when checked, the User will no longer be valid.
- Click Create to add the new user.
By default, new users are added to the Users group. This will allow the user to later be configured as an FTP user through IIS or as a FrontPage User. If you wish for this user to have access to the server through Terminal Services or Remote Desktop Connection you will need to add the user to the Administrators group. We do not recommend adding additional Administrative users as this gives more people direct access to your machine.
To add a user to the Administrators group, please follow these steps:
- Right-click the username and select Properties.
- Select the Members Of Tab. You will see a list of groups the User is assigned to.
- Click Add.
- Type in the name of the group, Administrators.
- Click OK. You will now see the Administrators group in the list.
- Click OK.
[Удален]
28466
Помогите, пожалуйста, если можно пошагово, или ткните носом в мануал 
На сайте с 25.11.2006
Offline
1762
#1
Какую учётку? Пользователя прописать в сеть или доступ к самому серваку?
[Удален]
#2
LEOnidUKG:
Какую учётку? Пользователя прописать в сеть или доступ к самому серваку?
Я особо не разбираюсь, но выглядит вот так: одна учетная запись уже имеется под которой я могу войти, мне надо создать еще одну. Делаю вроде б все правильно, а все равно не получается войти с новым логином и паролем.
M
На сайте с 16.09.2009
Offline
278
#3
Darkstoch:
Я особо не разбираюсь, но выглядит вот так: одна учетная запись уже имеется под которой я могу войти, мне надо создать еще одну. Делаю вроде б все правильно, а все равно не получается войти с новым логином и паролем.
Event Log по этому поводу что говорит? Почему пользователя не пускают?
Абонементное сопровождение серверов (Debian)
Отправить личное сообщение (),
написать письмо ().
[Удален]
#4
myhand:
Event Log по этому поводу что говорит? Почему пользователя не пускают?
Это при входе? Выкидывает окно в котором три строчки, я не могу сскрин сделать. Я так понял этому пользователю надо дать права администратора, но я это уже пытался сделать — пытаюсь добавить к группе администраторов, выбираю в выпадающем меню соответствующуб папку, около нее плюсик (т.е. можно открыть — есть что то внутри) нажимаю на плюсик, он пропадает и ничего не открывается. Если честно уже второй день сижу ни черта не выходит😒 Может кто то может написать пошагово как делает при создании учетки и присвоение ей прав админа?
M
На сайте с 16.09.2009
Offline
278
#5
H
На сайте с 08.10.2009
Offline
52
#6
Если я правильно понял. Создание учетной записи в windows 2003, если сервер вне домена.
Правой клавишей мыши на «Мой компьютер» — выберите «Управление»-далее «Локальные пользователи и группы» — нажимаете «+»- откроется подконтейнер «пользователи» — на него правой клавишей мыши – «новый пользователь» — вводите «логин и пароль», если учетная запись постоянная установите галочку «срок действия пароля неограничен» (обратите внимание на запрос о смене пароля при следующем входе в систему) . Затем выбираете вновь созданного пользователя, на него правой клавишей мыши – «свойства», вторая вкладка – «членство в группах», далее «добавить» и добавляете его в нужную (вводите имя группы в окне) вам группу. Чтобы не запутаться можете при поиске группы выбрать «дополнительно» и затем «поиск». Там отобразятся группы.