To be successful, malware and other security exploits frequently leverage the powers of highly privileged Windows user accounts. It’s not entirely a shock, then, that a new report reveals that 86 percent of all Windows security threats patched in 2015 would have been stopped or rendered toothless if they had attacked users who were using limited, rather than administrator, accounts, and hence lacked the power to install, modify or delete software.
The 2015 Microsoft Vulnerabilities Study by Manchester, England-based enterprise-security provider Avecto, released Tuesday (Feb. 2), showed that 85 percent of remote-code-execution bugs (some of the most dangerous flaws) detailed in Microsoft’s monthly Patch Tuesday reports would be nullified if the Windows active user did not have administrative rights. (The same company reached similar conclusions two years ago.)
Microsoft Office and Windows 10 would also be much safer, as 82 percent of the security flaws would be blocked. Users with limited, a.k.a. «regular» accounts would have been protected from a whopping 99.5 percent of Internet Explorer vulnerabilities on all platforms, and 100 percent of Microsoft Edge security flaws in Windows 10.
MORE: 12 Computer Security Mistakes You’re Probably Making
We advise all Windows users to operate their PCs primarily from regular/limited accounts, and to sign into administrative accounts only when they need to install, remove or update software. The default account that ships on most Windows computers is an admin account, so you’ll need to create additional, regular accounts. OS X and Linux users would also be wise to use non-administrative accounts for their daily activity, but fewer exploits exist overall on those platforms.
Here are step-by-step instructions for how to set up a limited-privilege user account in Windows 10.
How to Create Limited-Privilege User Accounts in Windows 10
1. Tap the Windows icon.
Sign up to receive The Snapshot, a free special dispatch from Laptop Mag, in your inbox.
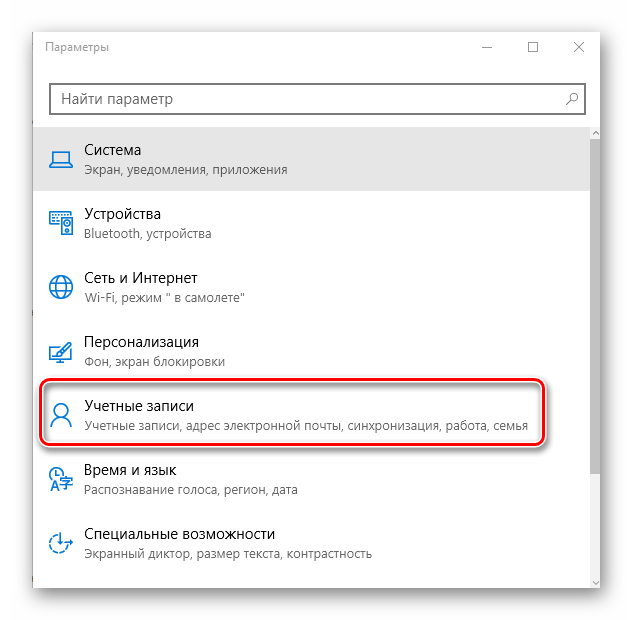
2. Select Settings.
3. Tap Accounts.
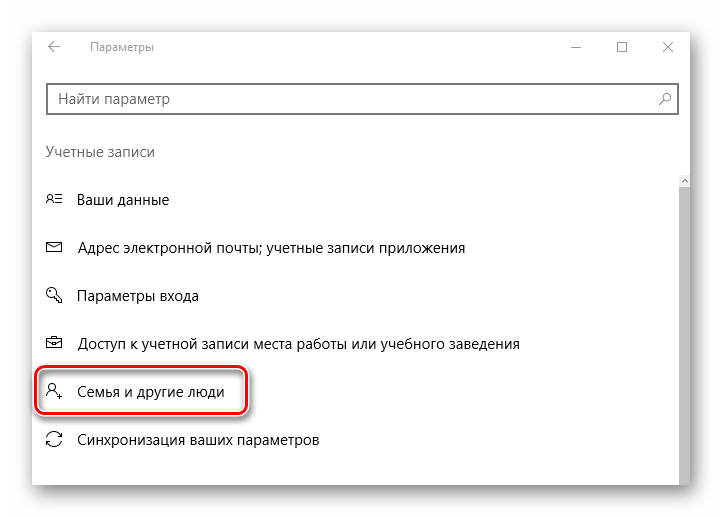
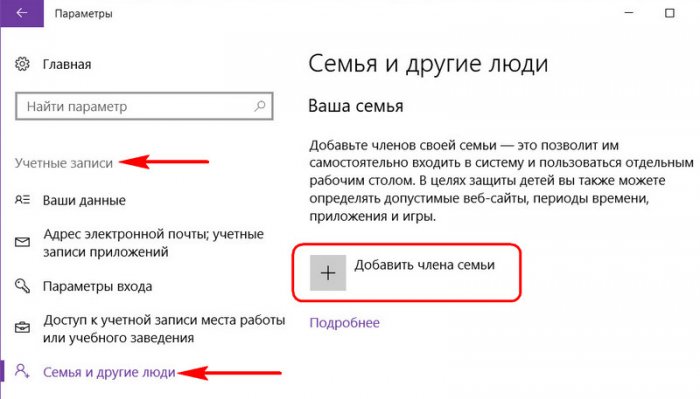
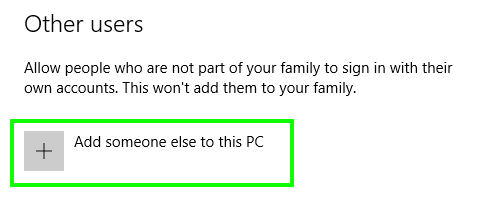
4. Select Family & other users.
5. Tap «Add someone else to this PC.»
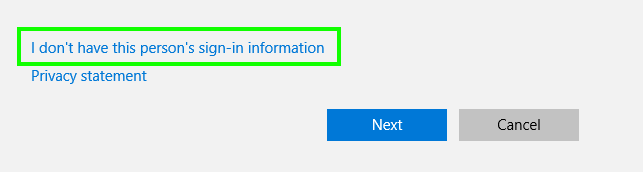
6. Select «I don’t have this person’s sign-in information.»
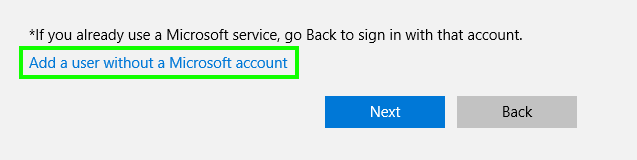
7. Select «Add a user without a Microsoft account.»
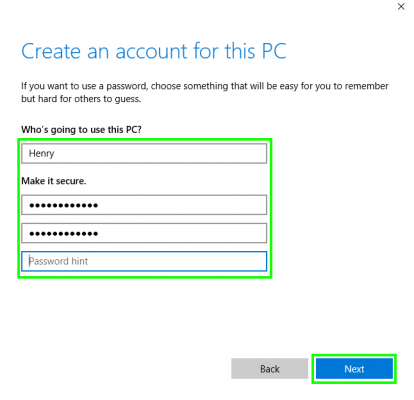
8. Enter a username, type the account’s password twice, enter a clue and select Next.
9. Tap the Windows icon.
10. Select the User icon at the upper left corner of the Start menu.
11. Select the new user. You’ll then sign into your account with your password from step 8.
You’re now using a non-Administrator account!
How to Change a User Account to Administrator on Windows 10 and 11
In today’s digital age, the operating system remains at the core of our computing experiences, dictating how we interact with our devices and manage our daily tasks. Windows 10 and 11 are two of the most widely used operating systems globally, providing users with a user-friendly interface and robust features. A crucial aspect of managing a Windows operating system involves user account control, especially when it comes to administrative privileges.
Understanding the importance of user accounts is vital for any Windows user. An administrative account holds the key to extensive system modifications, allowing users to install applications, manage settings, and secure their system better. Conversely, standard user accounts come with restrictions that prevent significant changes. For users acquiring administrative privileges, be it for personal needs, work tasks, or other purposes, this article will guide you comprehensively on how to change a user account to administrator on both Windows 10 and 11.
Why Change to Administrator Account?
Before delving into the technical details, it’s essential to understand why one might want to change a user account to an administrator account. Administrative accounts provide users with certain privileges, such as:
-
Installation of Software: Only users with administrative privileges can install or uninstall software and applications.
-
System Settings Changes: Administrators can change system settings that affect all users or the system itself.
-
User Management: Admins can create, modify, or delete other user accounts.
-
Security Settings: Administrators can manage security settings, including firewall and antivirus configurations.
-
Access Control: They can change file permissions and access controls on shared folders.
With these powerful capabilities, it becomes clear why a user might wish to switch their account type to administrator. The following sections outline the methods available for changing a user account to administrator in both Windows 10 and Windows 11.
Methods to Change a User Account to Administrator in Windows 10 and 11
Method 1: Using Windows Settings
One of the simplest ways to change a user account type is through the Windows Settings application. Here’s how you can do this:
Step 1: Open Settings
- Click on the Start Menu.
- Type Settings and press Enter, or click on the gear icon on the left side of the Start Menu.
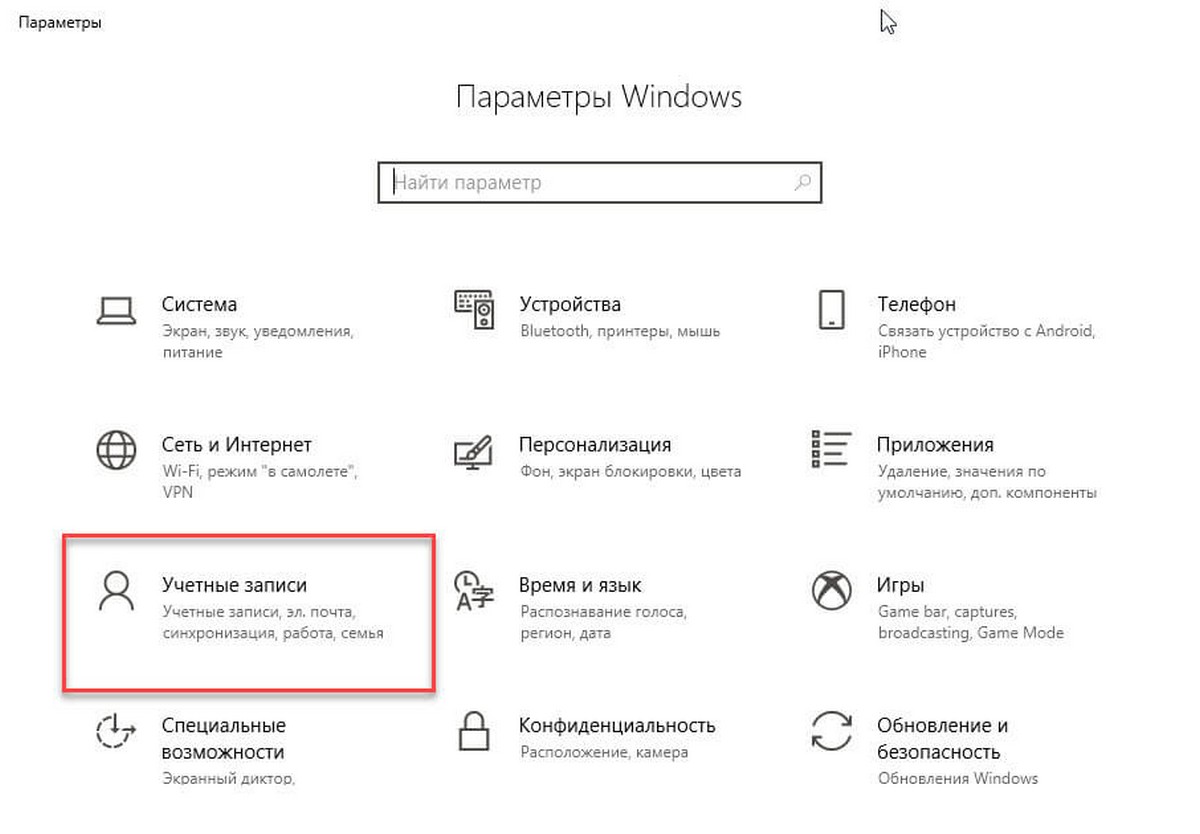
Step 2: Navigate to Accounts
- In the Settings window, click on Accounts.
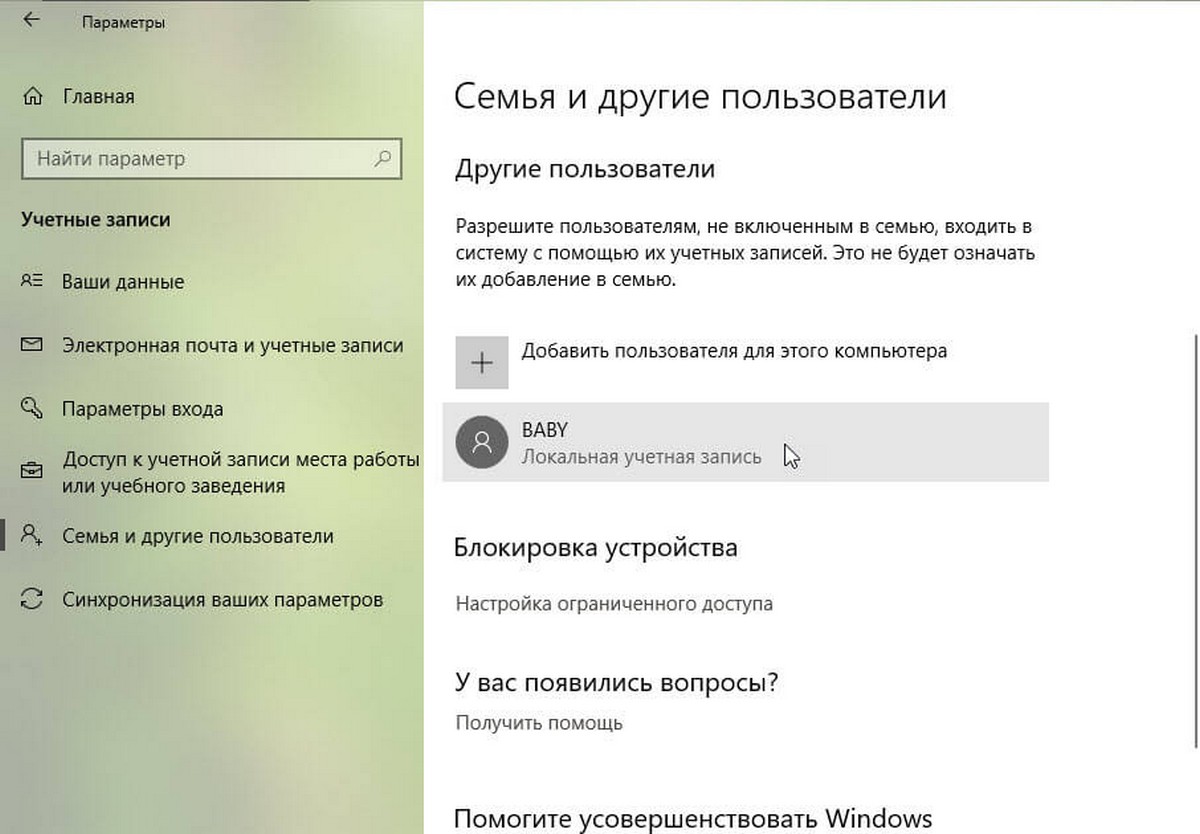
- Select Family & other users (in Windows 10) or Other users (in Windows 11) from the left sidebar.
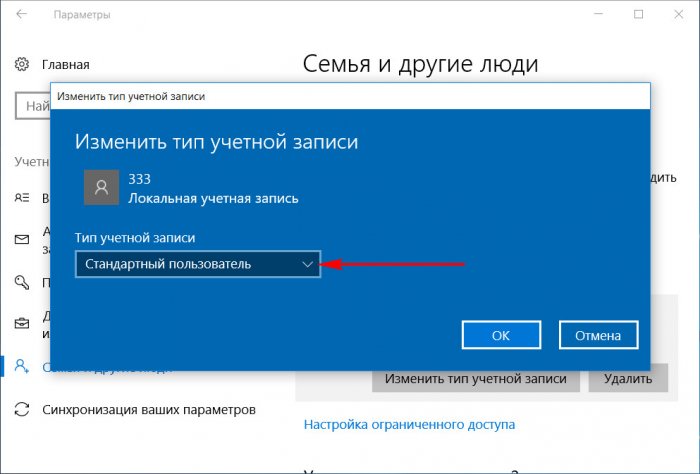
Step 3: Change Account Type
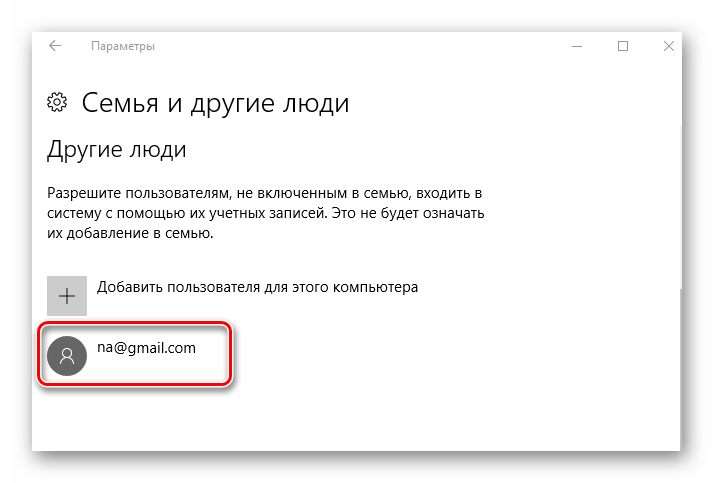
- Under the Other users section, you will see a list of accounts. Click on the account you want to change.
- Click on Change account type.
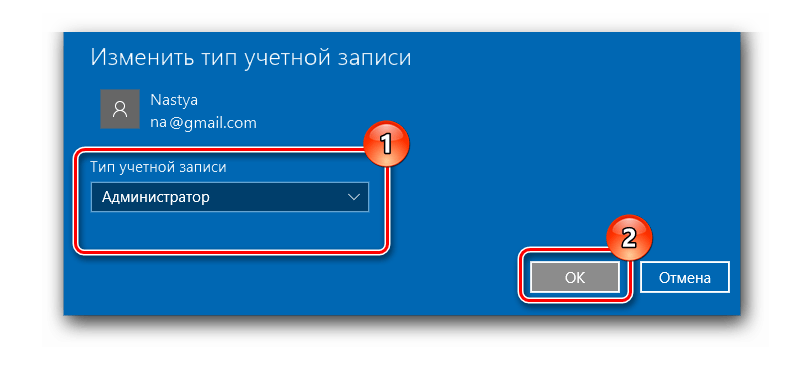
Step 4: Select Administrator
- In the new dialog box that appears, click the dropdown menu that says Standard User.
- Change it to Administrator.
- Click OK to confirm your changes.
Method 2: Using Control Panel
Another reliable method involves the classic Control Panel, which many users still prefer for certain administrative tasks.
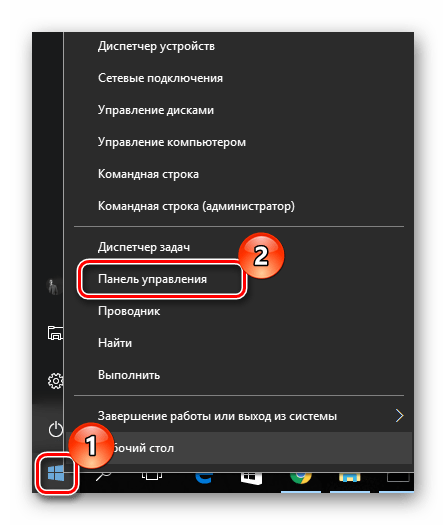
Step 1: Open Control Panel
- Right-click on the Start Menu and select Run or press
Windows + Rto open the Run dialog. - Type control and hit Enter to open the Control Panel.
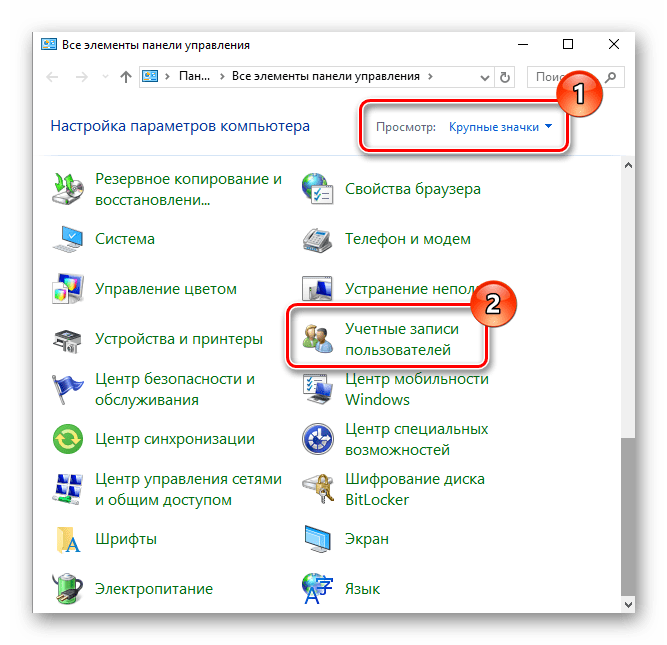
Step 2: Access User Accounts
- Set the view to Large icons or Small icons.
- Click on User Accounts.
- Click on User Accounts again to access account settings.
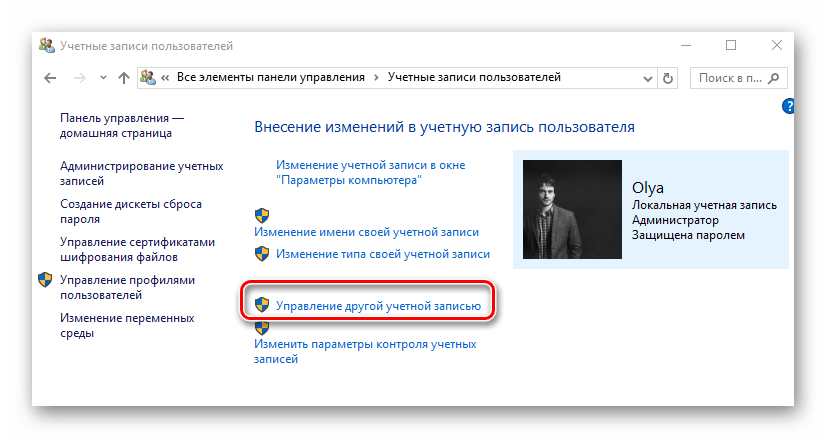
Step 3: Manage Another Account
- Select Manage another account.
- Click on the account you want to change.
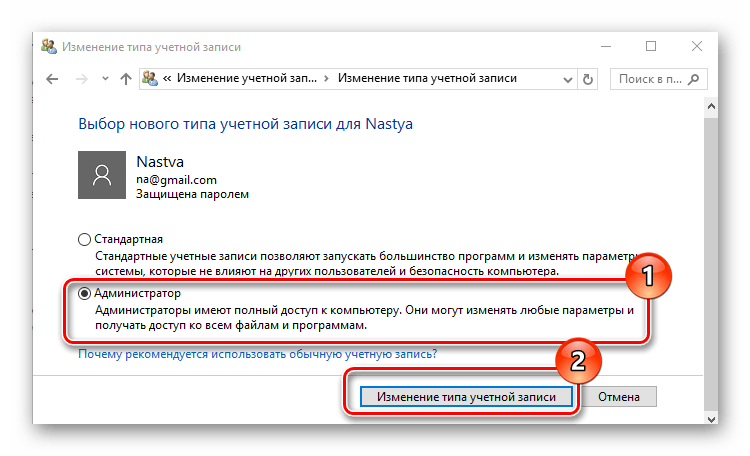
Step 4: Change Account Type
- Click on Change the account type.
- Select Administrator and click on Change Account Type to save your changes.
Method 3: Using the Computer Management Console
For users who prefer a more detailed approach, the Computer Management Console is a powerful tool.
Step 1: Open Computer Management
- Right-click on the Start Button and select Computer Management.
- Alternatively, you can press
Windows + Xand choose Computer Management from the list.
Step 2: Navigate to Local Users and Groups
- In the Computer Management window, expand the Local Users and Groups section located in the left sidebar.
- Click on Users.
Step 3: Change User Account Properties
- Right-click on the user account you want to change and select Properties.
- In the properties window, navigate to the Member Of tab.
Step 4: Add to the Administrators Group
- Here, you will see the current groups the user is part of. Click on Add.
- In the «Enter the object names to select» field, type Administrators and click Check Names to confirm.
- Click OK to add the user, and then click OK again to close the properties window.
Method 4: Using Command Prompt
For advanced users and those who are comfortable with command-line interfaces, the Command Prompt provides a straightforward method to change user accounts.
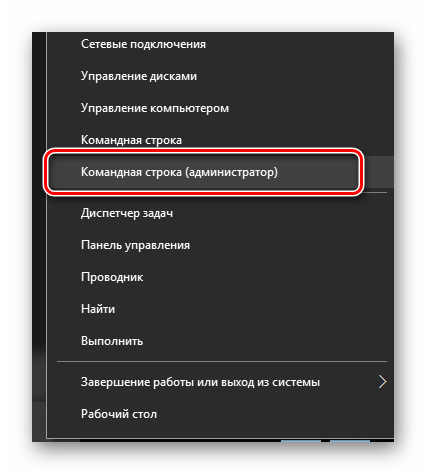
Step 1: Open Command Prompt as Administrator
- Type cmd in the Start Menu search bar.
- Right-click on Command Prompt from the results and select Run as administrator.
Step 2: Enter the Command
In the Command Prompt window, type the following command, replacing «USERNAME» with the actual username of the account you want to change:
net localgroup Administrators USERNAME /addPress Enter to execute the command. A message indicating that the command completed successfully will confirm that the user account type has been changed.
Method 5: Using Windows PowerShell
Windows PowerShell offers a modern command-line environment with more capabilities.
Step 1: Open Windows PowerShell as Administrator
- Type PowerShell in the Start menu search bar.
- Right-click on Windows PowerShell and select Run as administrator.
Step 2: Execute the Command
In the PowerShell window, input the following command, again replacing «USERNAME» with the appropriate user account name:
Add-LocalGroupMember -Group "Administrators" -Member "USERNAME"Press Enter. You should see no output if the command was successful.
Method 6: Using Local Security Policy (For Windows Pro and Enterprise)
This method applies mainly to users of Windows Pro and Enterprise editions, as it provides a more granular level of user management.
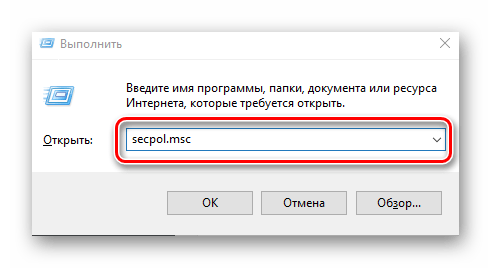
Step 1: Open Local Security Policy
- Press
Windows + Rto open the Run dialog. - Type secpol.msc and hit Enter.
Step 2: Navigate to Local Policies
- Expand Local Policies and then click on User Rights Assignment.
Step 3: Modify User Policies
- Find the policy named «Deny log on locally» and double-click it.
- Check if the user account is listed there. If so, remove it.
Step 4: Add User to Administrators Group
- Navigate back to Local Users and Groups (similar to Method 3).
- Right-click the user account and add it to the Administrators group.
Post-Change Steps
After successfully changing a user account to an administrator, there are a few recommended actions to ensure system stability and security:
User Notification
Communicate with the user whose account has been upgraded. This is especially important in shared or organizational environments.
Security Assessment
Examine security settings, especially if the upgrade involves multiple users. It may also be wise to run a security audit of your account administration effectively.
System Backup
If you frequently handle sensitive data or frequent administrative tasks, consider creating regular system backups to avoid data loss.
Regular Monitoring
After upgrading an account to administrator status, keep an eye on software installations and system changes. Regular monitoring can preempt potential problems.
Conclusion
Changing a user account to an administrator on Windows 10 and 11 is a straightforward process, whether through the Windows Settings app, Control Panel, Command Prompt, PowerShell, or the Local Security Policy. Understanding and leveraging administrative privileges can significantly improve the user’s interaction with their operating system and overall system management.
Before making such changes, consider the implications of elevated privileges. Always ensure that changes align with security best practices to protect your system from unauthorized access and potential security breaches.
With this comprehensive guide, you should be equipped to handle administrative account changes confidently and securely, empowering you to get the most out of your Windows experience. Whether you are setting up a personal computer or managing a multi-user environment, the knowledge of how to change user accounts will serve you well in navigating the Windows ecosystem.
Ограниченный режим доступа позволяет ограничить локальную учетную запись пользователя так, чтобы она имела доступ только к одному приложению UWP. Вот как выбрать приложение для корректной работы в режиме ограниченного доступа для Windows 10.
Ограниченный доступ — это способ запретить запуск любых универсальных приложений (Universal Platform App) для стандартной учетной записи пользователя, кроме указанного вами. Это означает, пользователь будет иметь доступ, только к одному приложению. Эта функция весьма полезна для общедоступных систем, таких как кафе, торговые площадки и т. Д.
Настройка режима ограниченного доступа довольно проста в Windows 10. Ниже мы рассмотрим два способа, которыми вы можете воспользоваться для этого.
Как настроить назначенный доступ в Windows 10 с помощью приложения «Параметры».
Способ 1.
1. Кликните правой кнопкой мыши кнопку «Пуск» или нажмите клавиши Win + X и выберите «Параметры».
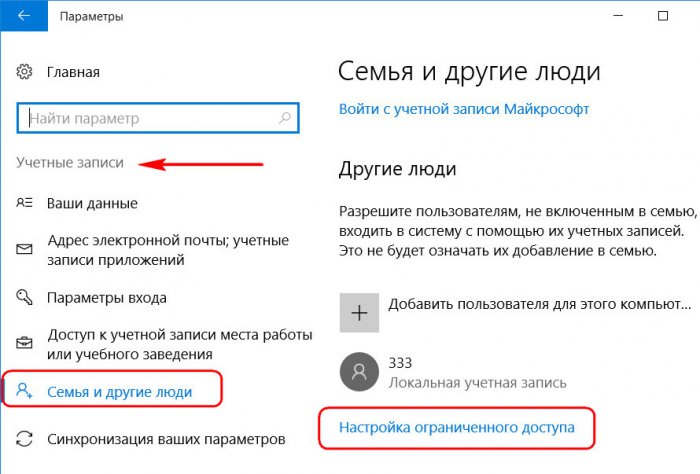
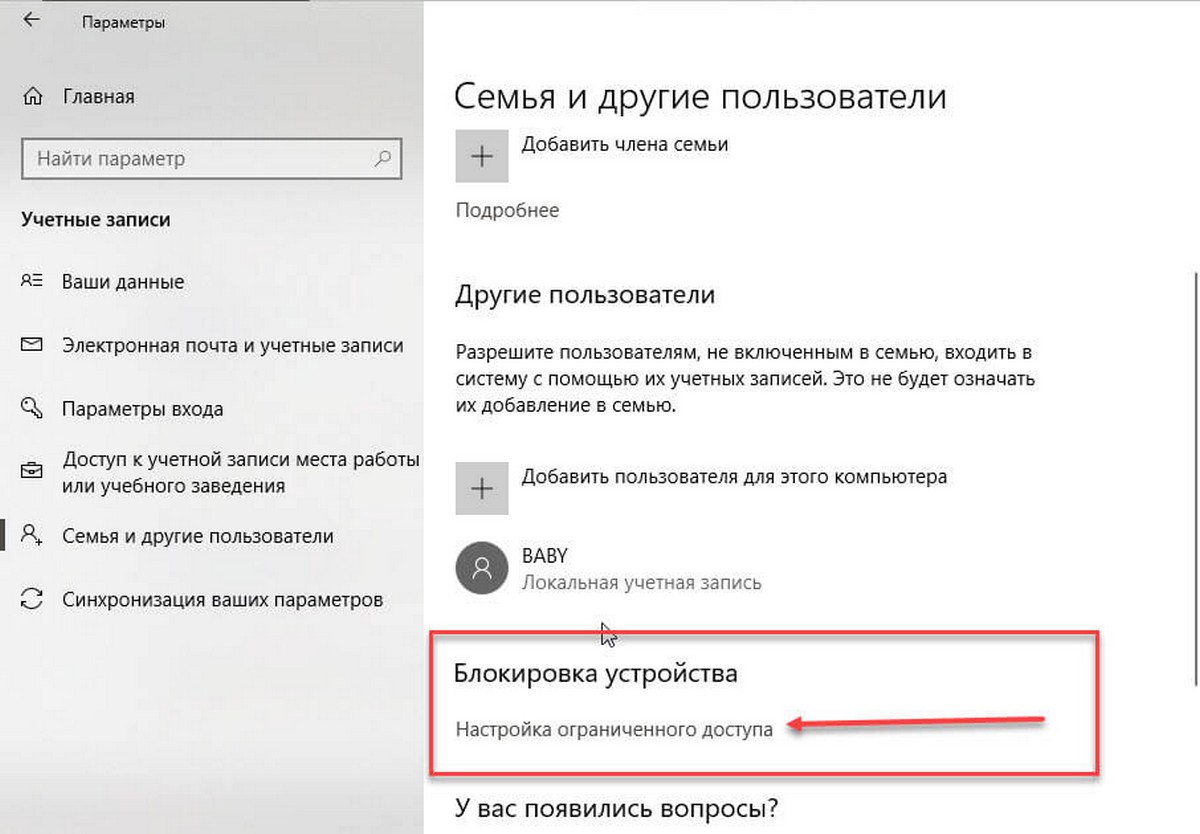
2. В приложении «Параметры» перейдите в раздел «Учетные записи» → «Семья и другие пользователи».
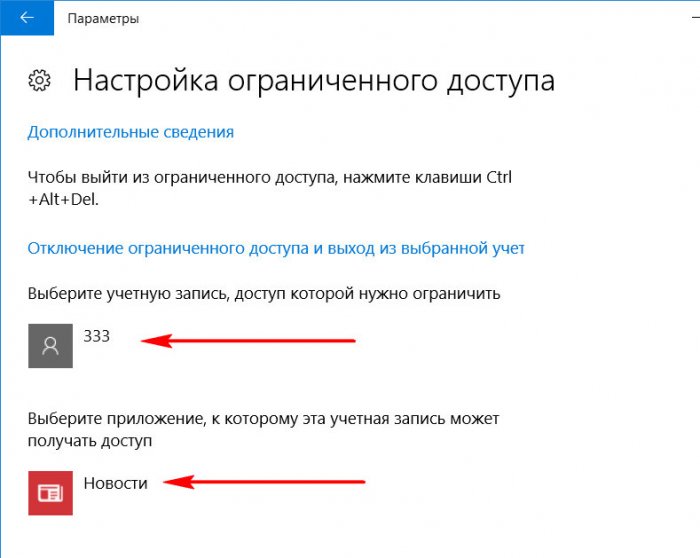
3. В разделе «Семья и другие пользователи» в разделе «Блокировка устройства» нажмите ссылку «Настройка ограниченного доступа».
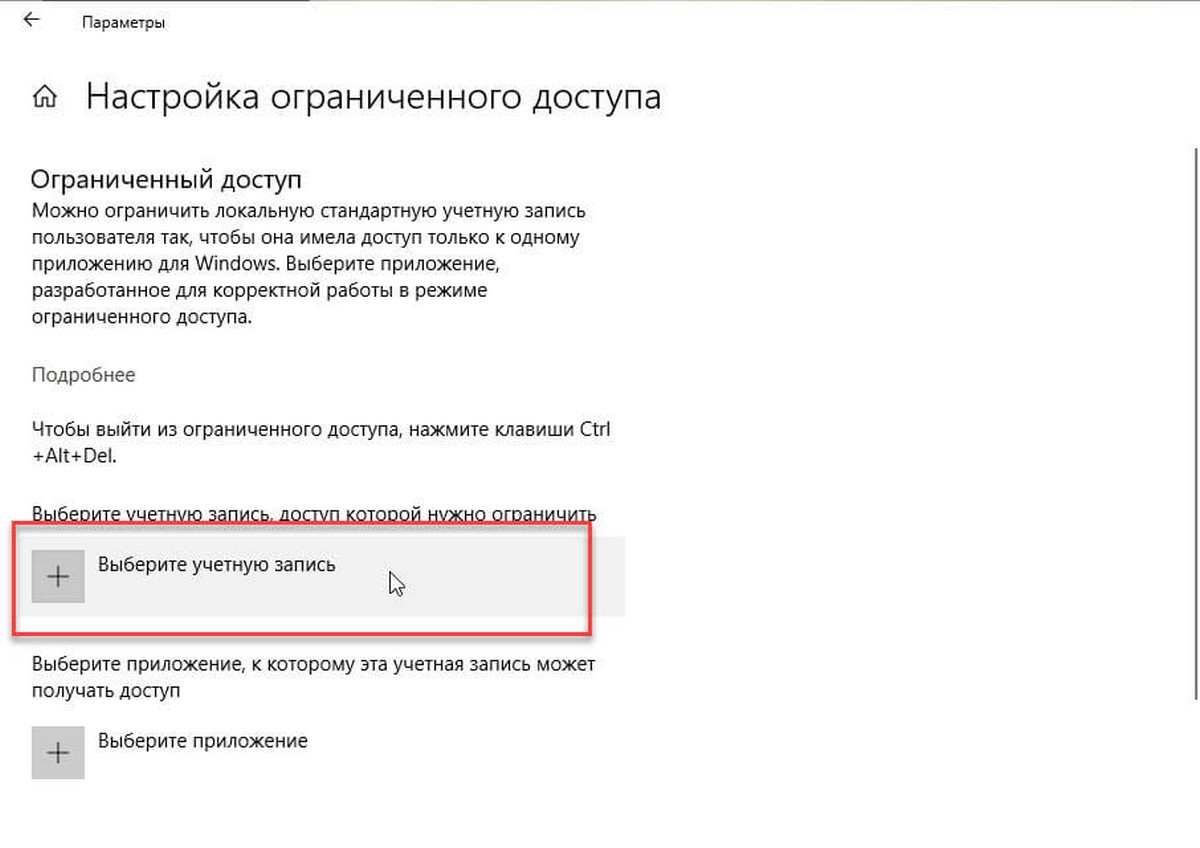
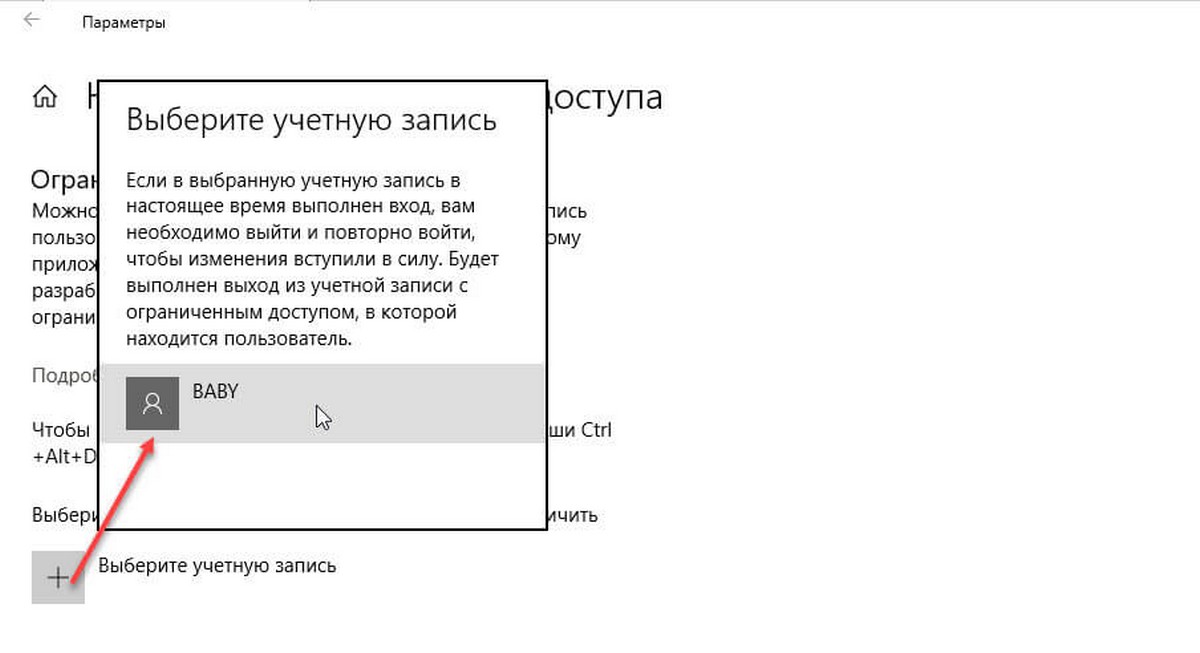
4. Затем нажмите «Выберите учетную запись» и укажите учетную запись пользователя, для которого вы хотите настроить доступ только к одному приложению.
5. Теперь, нажмите «Выберите приложение», а затем укажите приложение, к которому будет разрешён доступ.
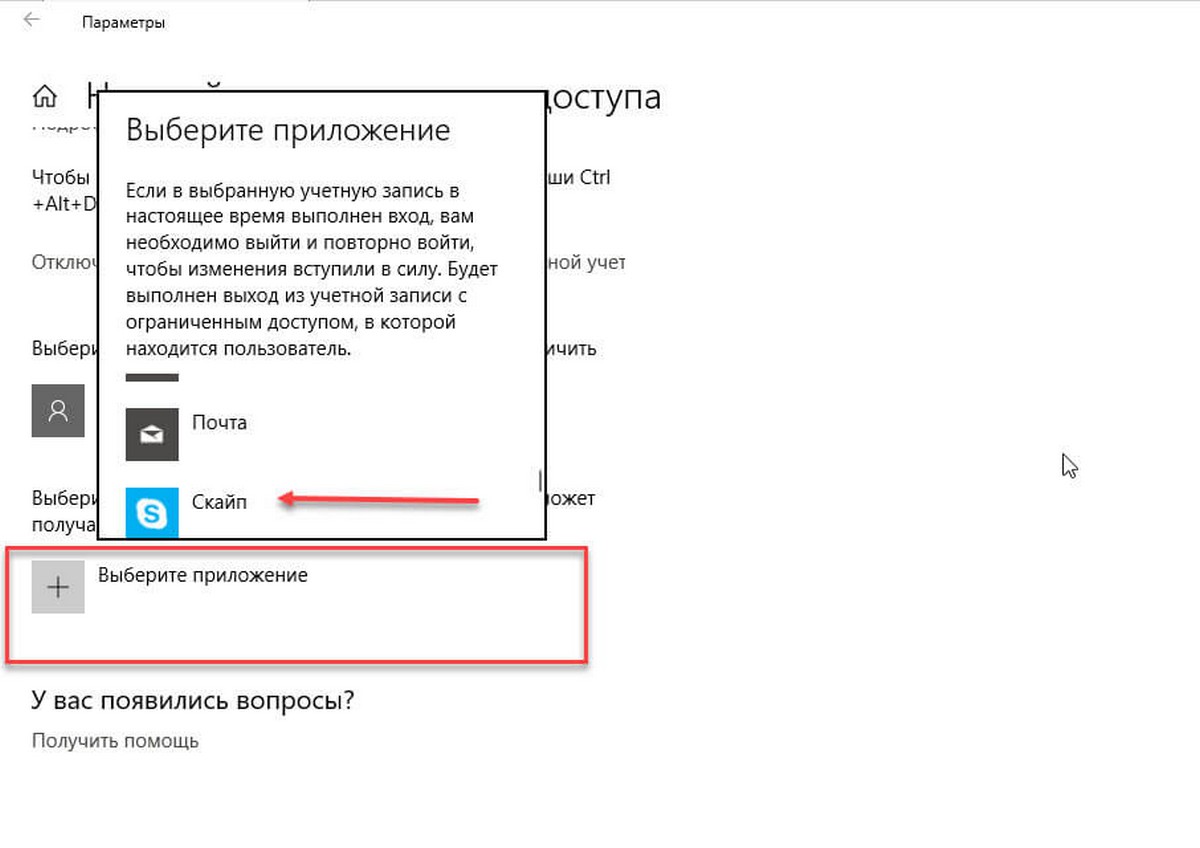
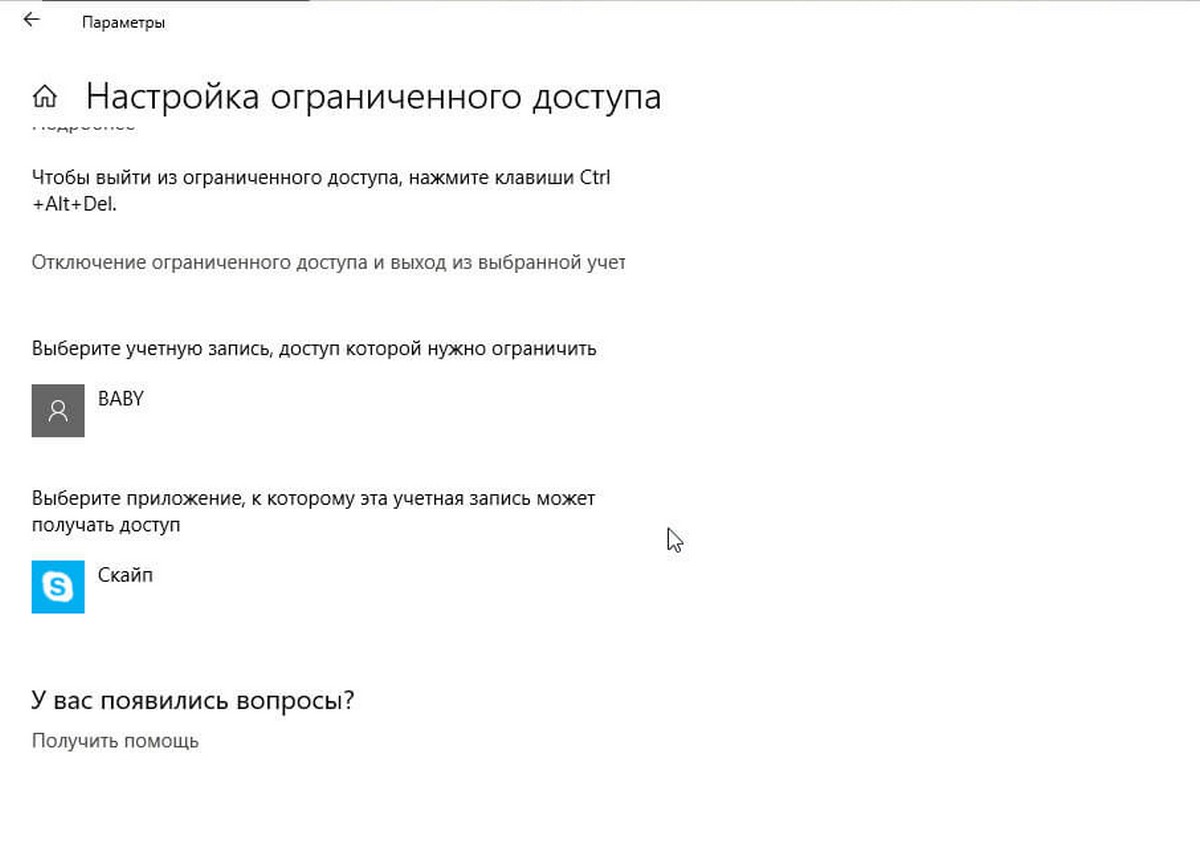
Все, вы только что настроили ограниченный доступ.
Если вы все выполнили правильно, после входа под данной учетной записью, будет выполнен автоматический запуск указанного вами приложения, к другим приложениям и к самой системе доступа не будет.
Чтобы выйти из ограниченного доступа, вы можете просто нажать комбинацию клавиш Ctrl+Alt+Del. Кроме того, вы можете нажать ссылку «Отключение ограниченного доступа» на самой странице настройки.

Как настроить ограниченный доступ с помощью PowerShell в Windows 10.
Способ 2.
1. Откройте Windows PowerShell от имени администратора (см. как).
2. Затем введите следующий командлет и нажмите клавишу Enter :
Get-AppxPackage
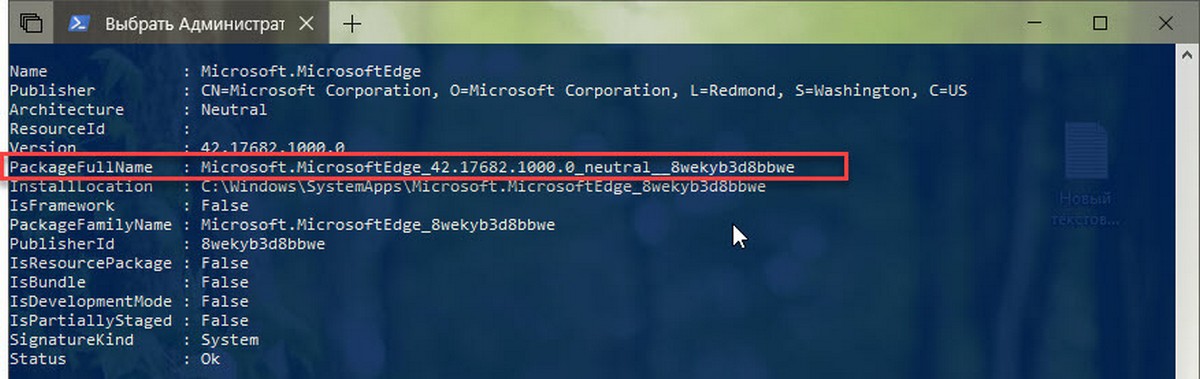
3. Теперь скопируйте строку PackageFullName для приложения, которое вы хотите использовать для ограниченного доступа.
4. Введите следующий командлет и нажмите клавишу Enter:
Set-AssignedAccess -AppUserModelId <PackageFullName>!app -UserName <USERNAME>
* Замените <PackageFullName> полным именем пакета приложения и <USERNAME> учетной записью пользователя, которую вы хотите ограничить.
Это должно настроить ограниченный режим доступа. Чтобы выйти из режима, просто нажмите Ctrl+Alt+Del, как было упомянуто ранее.
Таким образом, вы можете управлять пользователями которые получают доступ к вашему устройству с Windows 10.
Все!
Вам может быть интересно: Как ограничить или установить время доступа пользователя в Windows 10.