
Вы можете установить SMTP сервер с помощью встроенных средств во всех версиях Windows Server. Такой SMTP сервер внутри организации может работать в качестве почтового релея, который должен принимать и пересылать через себя SMTP сообщения от различных устройств (к примеру, сендеров, сканеров, устройств СКД и пр.) и приложений (веб приложения, SQL Reporting Services, SharePoint), которым необходимо иметь возможность отправлять почту через SMTP сервер. Такой релей может пересылать сообщения на полноценные Exchange сервер или на публичные почтовые сервисы в Интернет типа Gmail, Mail.ru, Office 365 и т.д (ведь не всегда целесообразно разворачивать полноценную внутреннюю почтовую инфраструктуру на базе Microsoft Exchange Server или других почтовых служб).
В этой статье мы покажем, как установить, настроить и протестировать работу SMTP сервера на Windows Server 2012 R2, 2016 и 2019, который будет функционировать в качестве mail релея. Такой SMTP сервер не хранит почтовые сообщения и на нем отсутствуют почтовые ящики, он сможет только отправлять или пересылать почту.
Содержание:
- Установка службы SMTP на Windows Server 2016/2012 R2
- Настройка SMTP сервера на Windows Server
- Автозапуск службы SMTPSVC
- Проверка работы SMTP сервера на Windows Server
Установка службы SMTP на Windows Server 2016/2012 R2
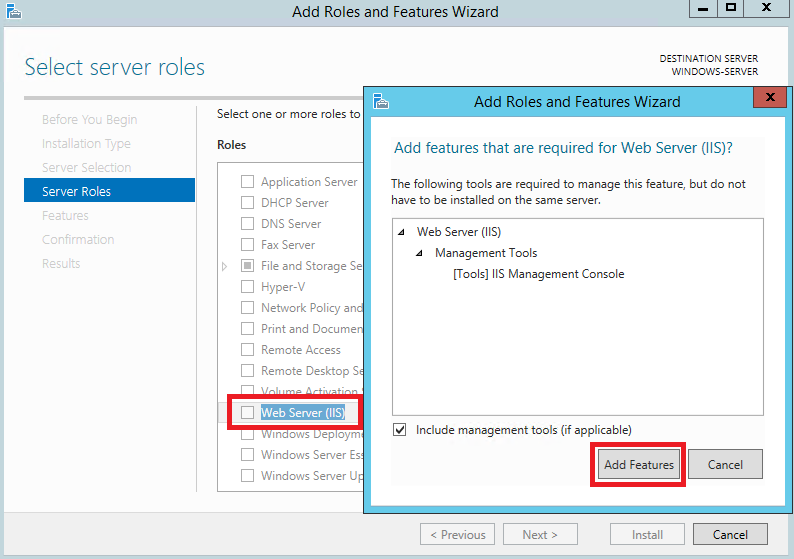
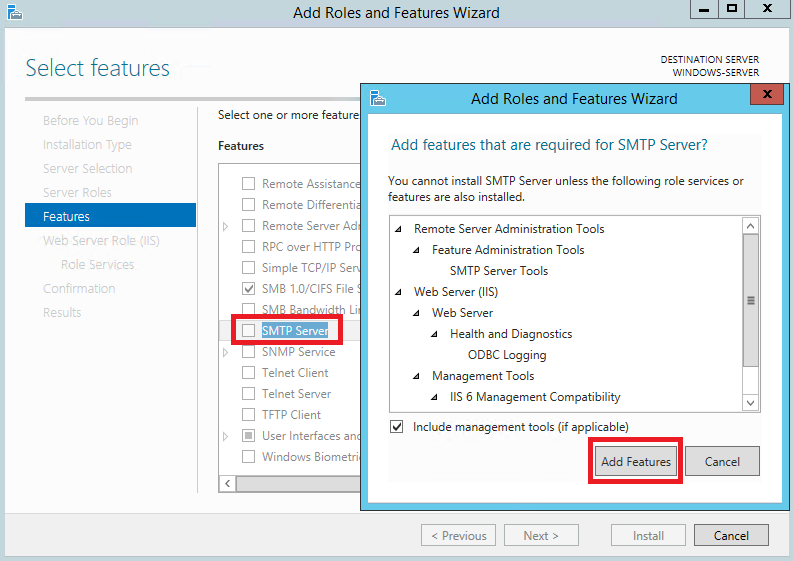
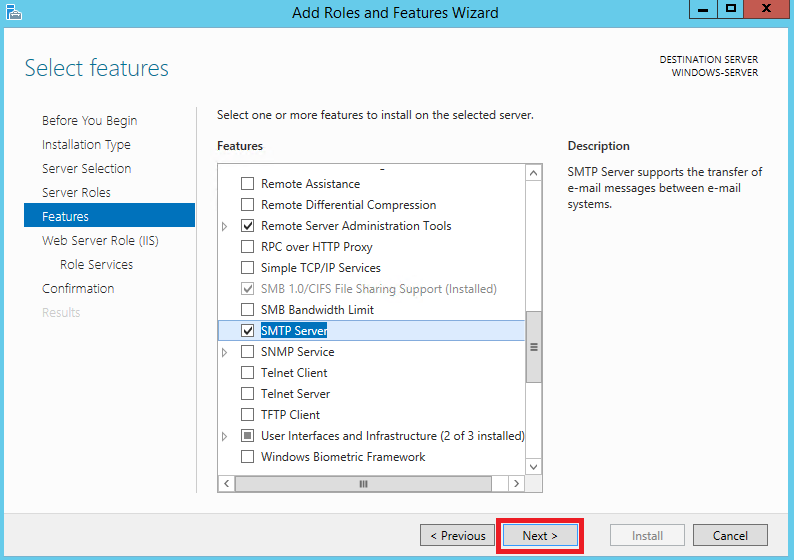
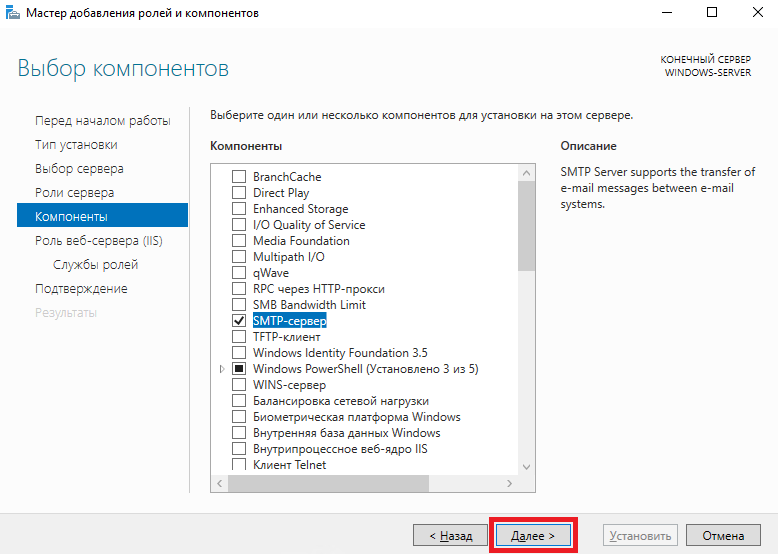
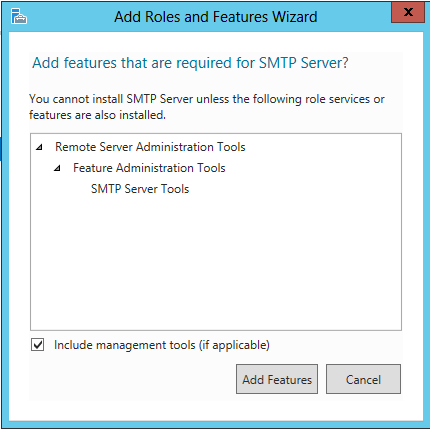
SMTP сервер – это один из компонентов Windows Server, который можно установить через Server Manager. Для этого откройте консоль Server Manager Dashboard (servermanager.exe), перейдите в режим Add roles and features и на этапе выбора функций отметьте чекбокс у пункта SMTP Server. Для управления службой SMTP нужно установить консоли управления, которые входят в комплект роли Web Server IIS (вам будет предложено установить IIS Management Tools).
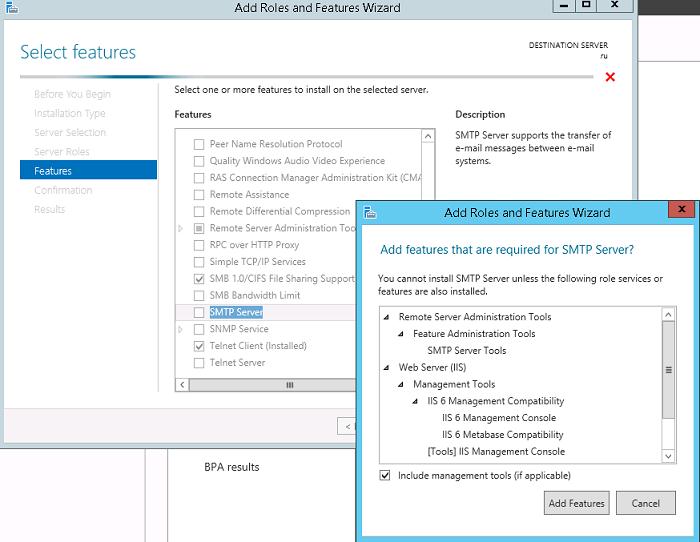
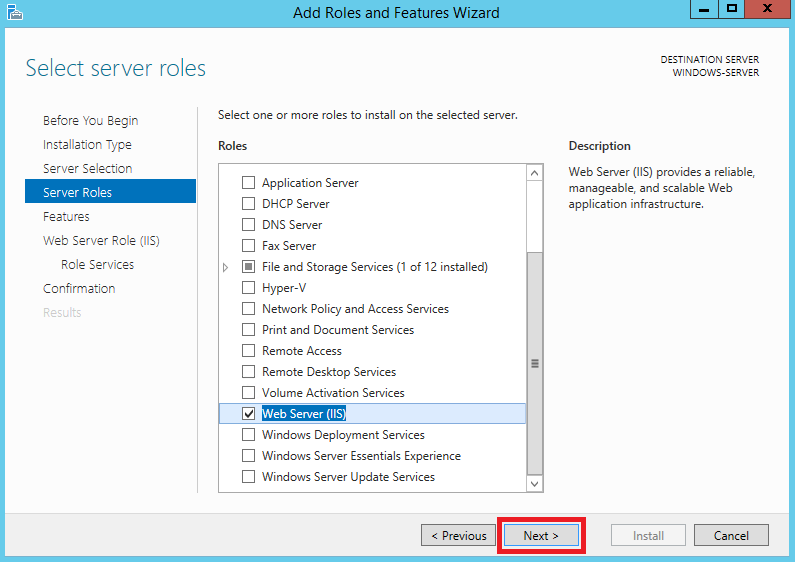
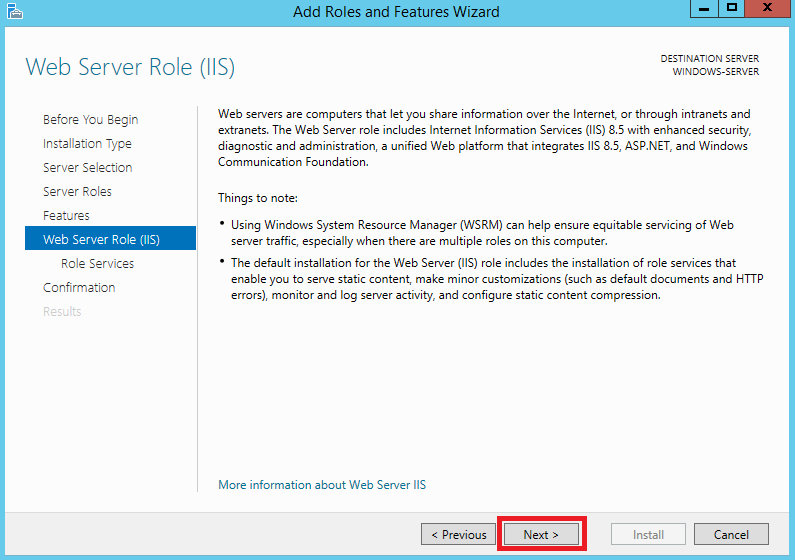
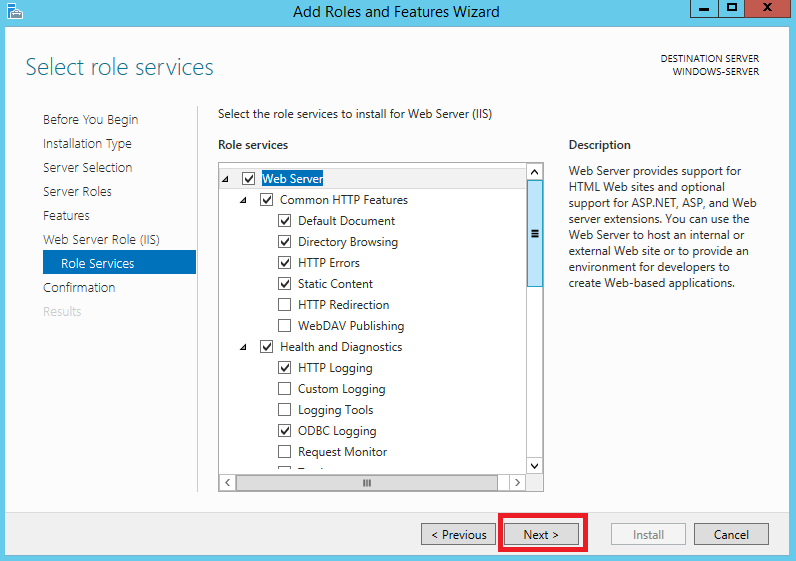
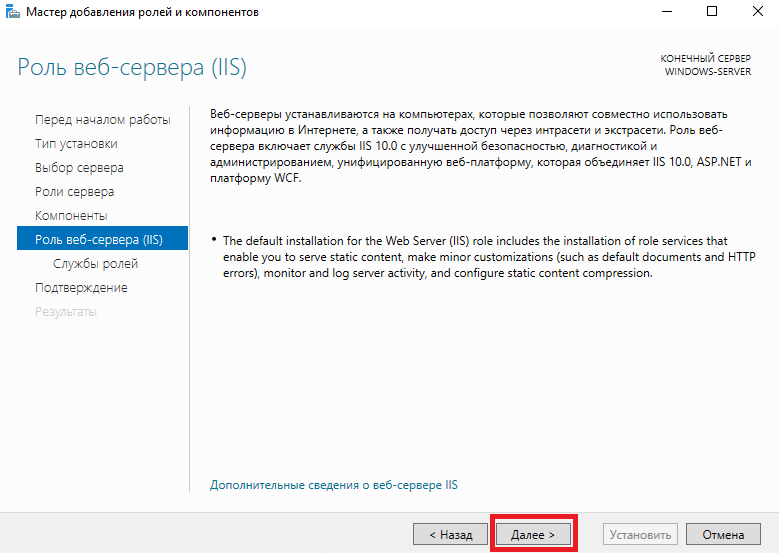
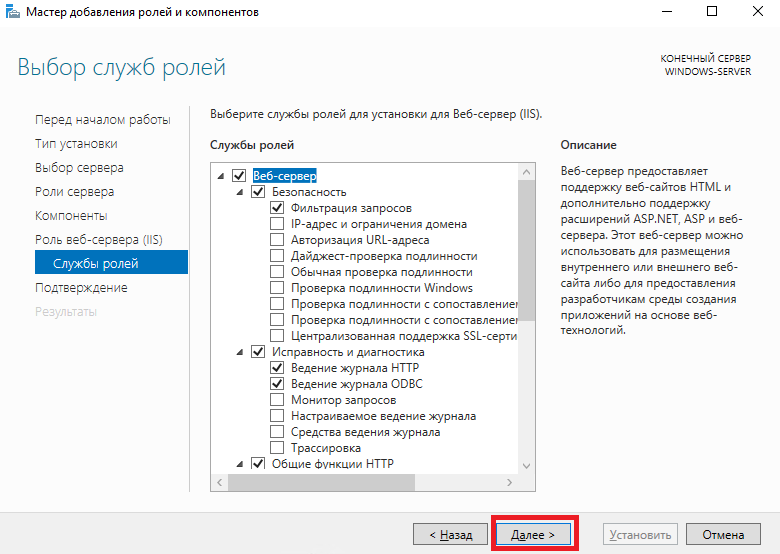
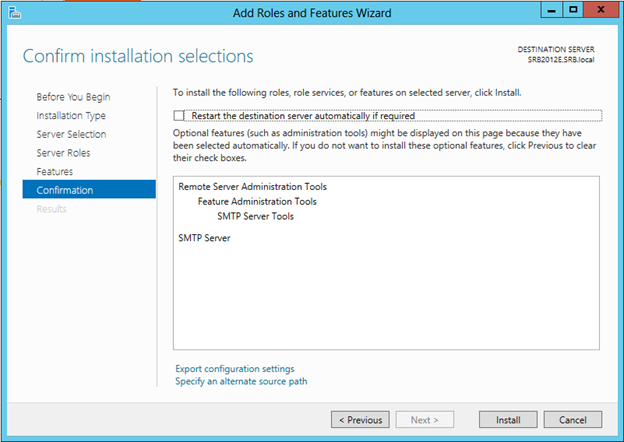
Оставьте все предлагаемые опции роли Web Server (IIS) и запустите установку.

Также вы можете установить компонент SMTP сервера с помощью одной команды PowerShell:
Install-WindowsFeature smtp-server
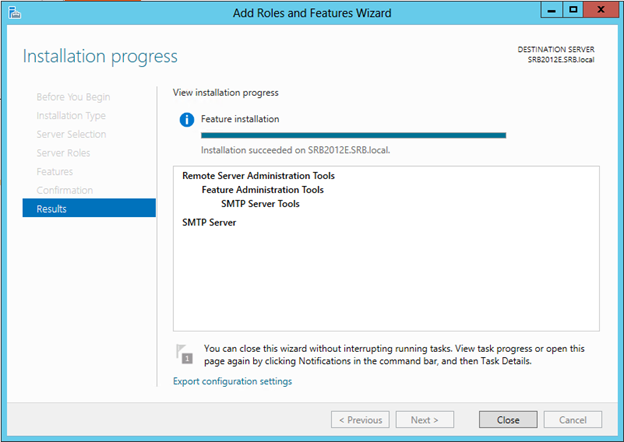
После окончания установки компонентов может потребоваться перезагрузка системы.
Настройка SMTP сервера на Windows Server
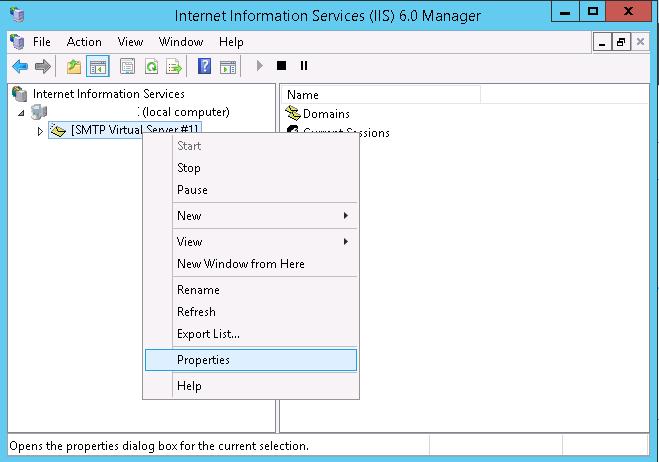
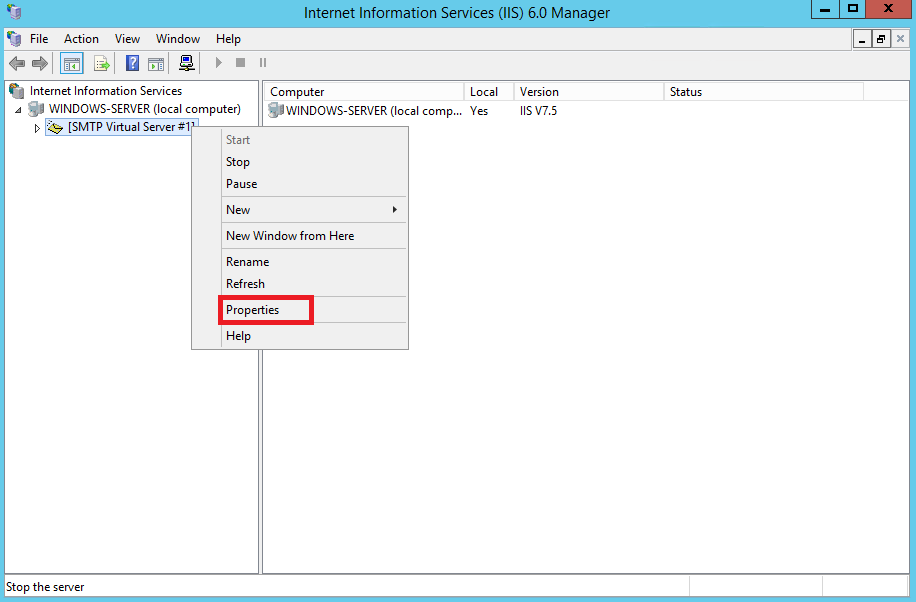
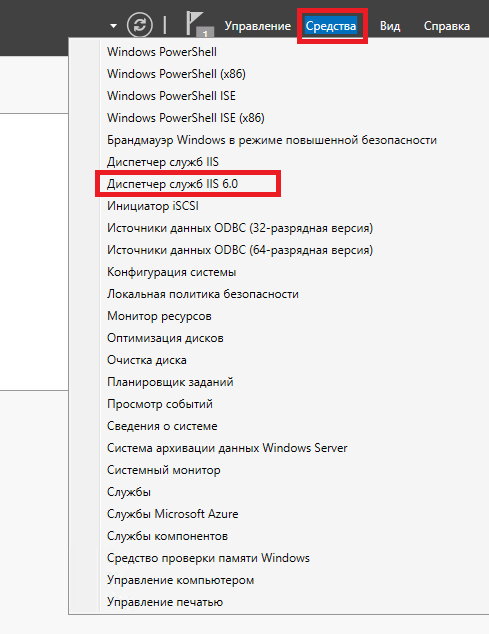
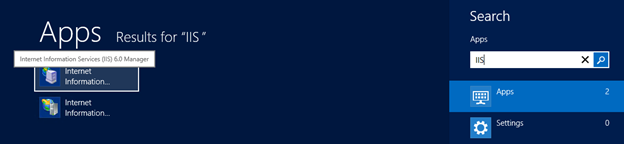
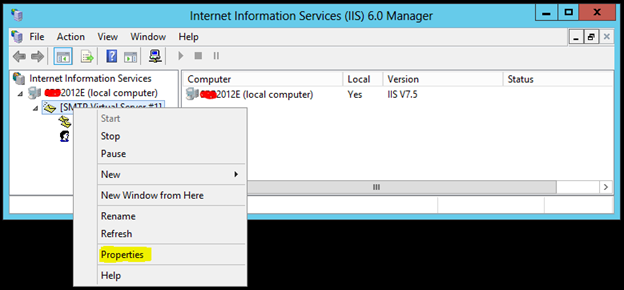
Управляется SMTP сервер консоль управления Internet Information Services (IIS) Manager 6. Открыть эту консоль можно через Server Manager: Tools-> Internet Information Services (IIS) 6.0 Manager или командой inetmgr6.exe.
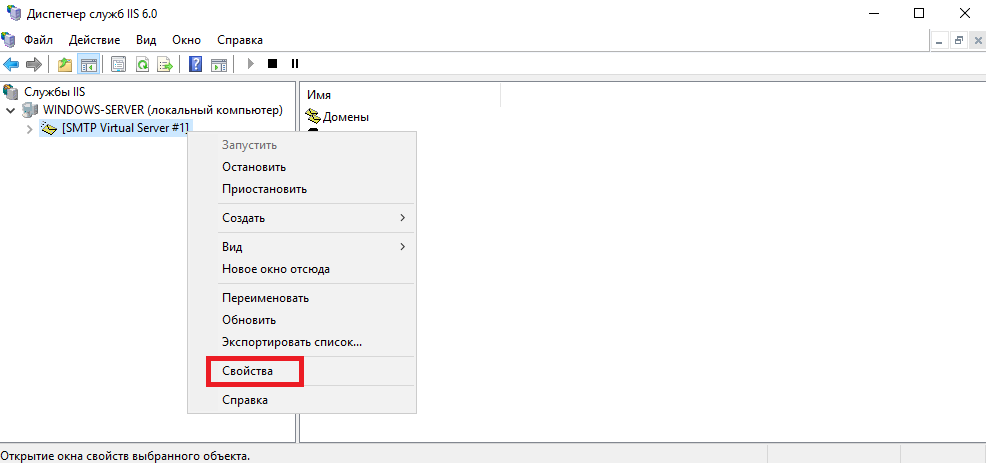
В консоли IIS 6 Manager разверните ветку с именем сервера, щёлкните ПКМ по SMTP Virtual Server и откройте его свойства.
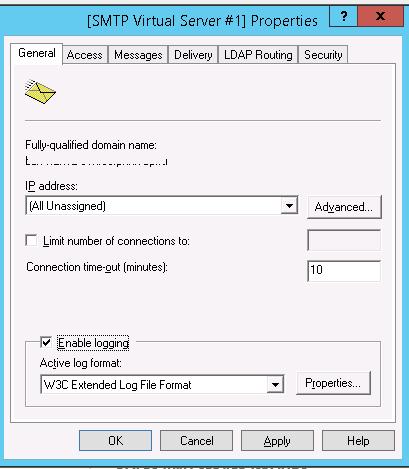
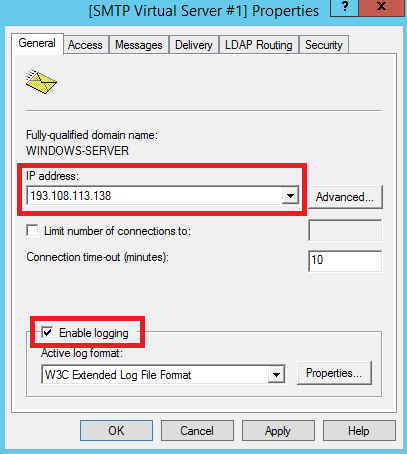
На вкладке General, если необходимо, выберите IP адрес, на котором должен отвечать SMTP сервер (если у сервера несколько IP адресов), и включите ведение логов Enable logging (чтобы сохранялась информация обо всех полученных письмах).
Затем перейдите на вкладку Access.
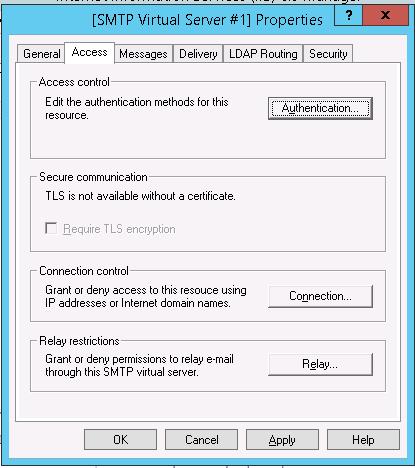
Здесь нажмите на кнопку Authentication и убедитесь, что разрешен анонимный доступ (Anonymous access).
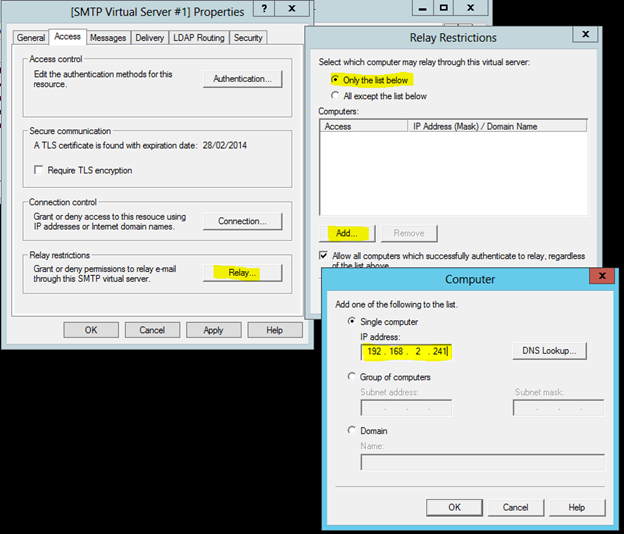
Вернитесь на вкладку Access и нажмите кнопку Connection. Здесь вы можете указать IP адреса устройств, которым разрешено отправлять почту через наш SMTP релей. Нужно выбрать опцию Only the list below и указать список IP адресов, не забыв самого себя (127.0.0.1).
Аналогичным образом настройте список разрешенных IP в настройках Relay (нажмите соответствующую кнопку). В этой секции указано каким IP адресам (или подсетям) можно пересылать почту через ваш SMTP сервер.
Примечание. Как правило, обязательно стоит включать эту опцию, как минимум ограничив список обслуживаемых устройств диапазоном IP адресов. В противном случае ваш SMTP сервер может использоваться спамерами и другими злоумышленниками как открытый релей для массовых почтовых рассылок.
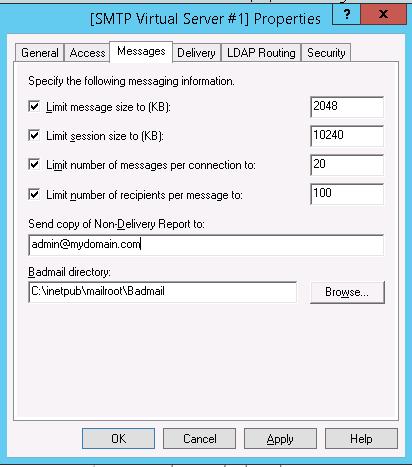
Перейдите на вкладку Messages. Здесь указывается email, на который будут отправляться копии всех NDR отчетов (Send copy of Non-Delivery Report to:). Также здесь можно указать ограничения на максимальный размер писем (Limit message size KB) и количество получателей (Limit number of recepients per message).
Перейдите на вкладку Delivery:
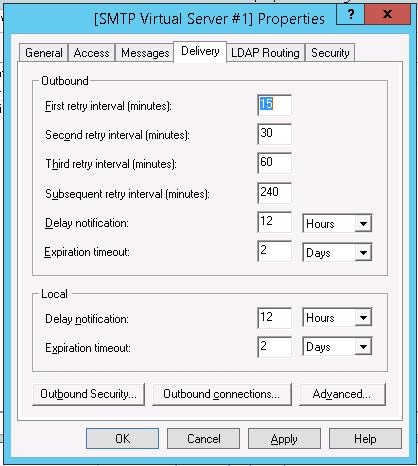
Затем нажмите на кнопку Outbound Security. Здесь указывается, как нужно авторизоваться на почтовом сервере, на который ваш SMTP-сервере будет пересылать (relay) всю почту. К примеру, если вся почта будет отправляться на почтовый сервер Gmail и уже с него пересылаться адресатам, вам нужно выбрать тип аутентификации Basic authentication, указав в качестве пользователя и пароля данные для доступа к почтовому ящику на сервисе Gmail (в настройках аккаунта Google нужно разрешить отправку через smtp сервера gmail).
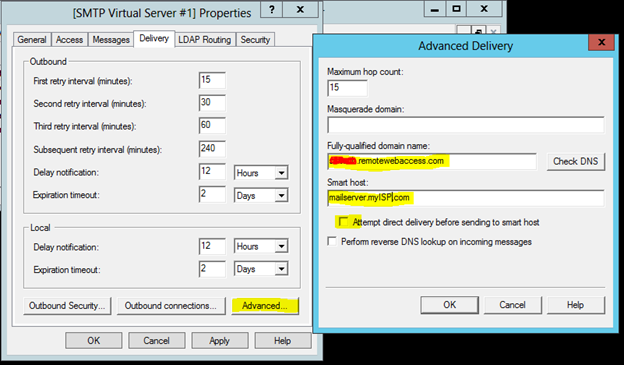
Затем нажмите на кнопку Advanced.
Здесь указывается FQDN имя вашего SMTP сервера. Нажмите кнопку Check DNS, чтобы проверить корректность записи в DNS.
Если сервер должен пересылать почту внешнему smtp серверу, нужно указать его имя в поле Smart host (к примеру smtp.gmail.com или smtp.office365.com).
Некоторые внешние почтовые сервера принимает почту только при использовании защищенного SMTP соединения с помощью TLS Encryption (используется порт TCP 587). Это настраивается в разделе Delivery-> Outbound Security и Outbound Connections. Ознакомитесь с документацией вашего почтового провайдера.
Сохраните настройки SMTP сервера и перезапустите ваш виртуальный SMTP сервер для применения изменений.
Примечание.
- Настройки DNS критичны с точки зрения работоспособности почтовой системы. Если ваш SMTP сервер не может корректно разрешить DNS имена доменов, на которые он пытается отправить письма, доставка не удастся.
- Если ваш сервер сам будет отправлять почту в другие домены, важно, чтобы для вашего адреса была сформирована правильная PTR запись для разрешения обратных DNS запросов. PTR запись для белого IP адреса должна указывать на FQDN имя. В противном случае большинство внешних smtp серверов не будут принимать от вас почту, считая ваш сервер спамерским.
Автозапуск службы SMTPSVC
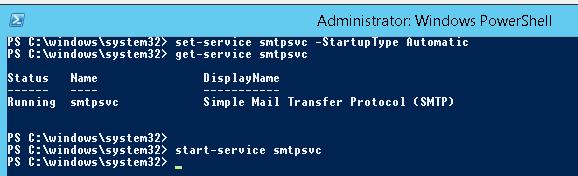
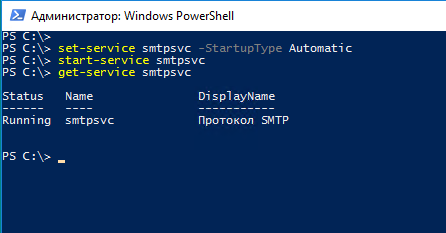
Осталось настроить автозапуск службы SMTP сервера. Быстрее всего это сделать из командной строки PowerShell:
set-service smtpsvc -StartupType Automatic
Запустим службу:
start-service smtpsvc
Проверим, что запущена служба SMTPSVC :
get-service smtpsvc
Status Name DisplayName
—— —- ————
Running smtpsvc Simple Mail Transfer Protocol (SMTP)
Проверка работы SMTP сервера на Windows Server
Ну и последнее, что осталось сделать, проверить работу созданного SMTP сервера. Проще всего это сделать, создав на рабочем столе текстовый файл smtp-test-email.txt и скопировав в него следующий текст, заменив имя отправителя и получателя на ваши.
From: [email protected]
To: [email protected]
Subject: Email test
This is the test email
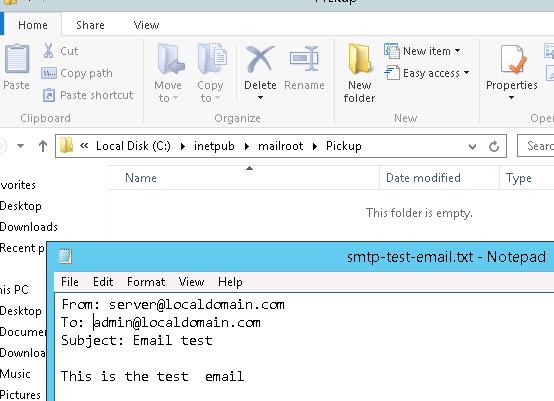
Скопируйте файл smtp-test-email.txt в каталог C:\inetpub\mailroot\Pickup. SMTP сервер следит за появлением файлов в этой каталоге и при обнаружении файла прочтет его содержимое и попытается отправить письмо с данной темой и текстом адресату, указанному в разделе To:.
Проверьте ящик получателя, в него должно прийти такое письмо.
Совет. Протестировать работу SMTP сервера можно и из командой строки telnet, скрипта vbs или PowerShell:
Send-MailMessage -SMTPServer localhost -To [email protected] -From [email protected] -Subject "Email test" -Body "This is the test email sent via PowerShell"
Если вы хотите, чтобы вы включили Basic Authentication (Обычная проверка подлинности) для авторизации всех ваших SMTP клиентов (вместо анонимной аутентификации), вы можете отправить письмо с smtp-аутентификацией через telnet следующим образом.
Также убедитесь, что на вашем SMTP сервере не блокируется порт TCP 25 при удаленном подключении (локальным файерволом, антивирусом или межсетевым экраном). Проще всего это сделать с компьютера Windows, IP адрес которого добавлен в разрешенные. Проверку доступности порта можно выполнить с помощью командлета Test-NetConnection:
Test-NetConnection smtpsrv1.name.local –port 25
Если 25 порт блокируется, проверьте настройки Windows Firewall, антивируса и аппаратных межсетевых экранов.
Итак, вы настроили собственный почтовый SMTP релей на Windows Server 2016/2012 R2 и протестировали отправку писем через него.
Почтовый сервер – это устройство, при помощи которого происходит доставка электронных сообщений от отправителя к получателю. Собственно, это и следует из его названия. В данной статье рассмотрим, как происходит установка и базовая настройка почтового сервера на VPS с операционной системой семейства Windows Server, а также на виртуальном сервере, работающем на Ubuntu 20.04.
Установка сервера SMTP на Windows Server
На серверах, работающих под управлением операционных систем Windows, для передачи почтовых сообщений часто используется протокол SMTP. В Windows Server служба SMTP является одним из компонентов операционной системы.
Для корректной отправки почтового сообщения от имени домена, к которому будет привязан сервер SMTP, нам необходимо иметь доменное имя. При этом в настройках домена должна быть указана A-запись, содержащая IP-адрес VPS. В нашем примере мы будем использовать имя домена my-domain.host.
Установку почтового сервера нужно будет начать именно с добавления необходимых компонентов. Для этого запустите Server Manager, перейдите Manage → Add Roles and Features.
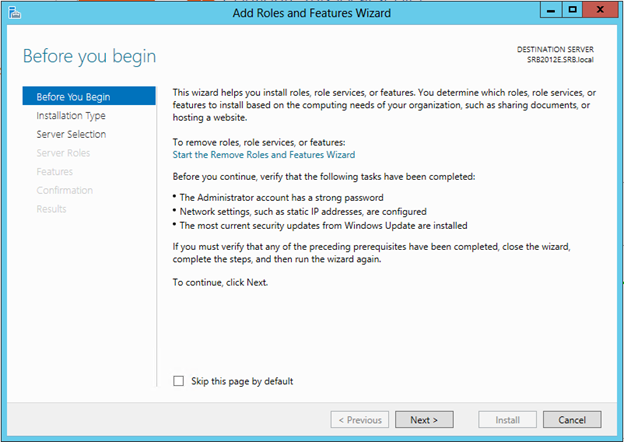
В открывшемся окне нажмите Next.

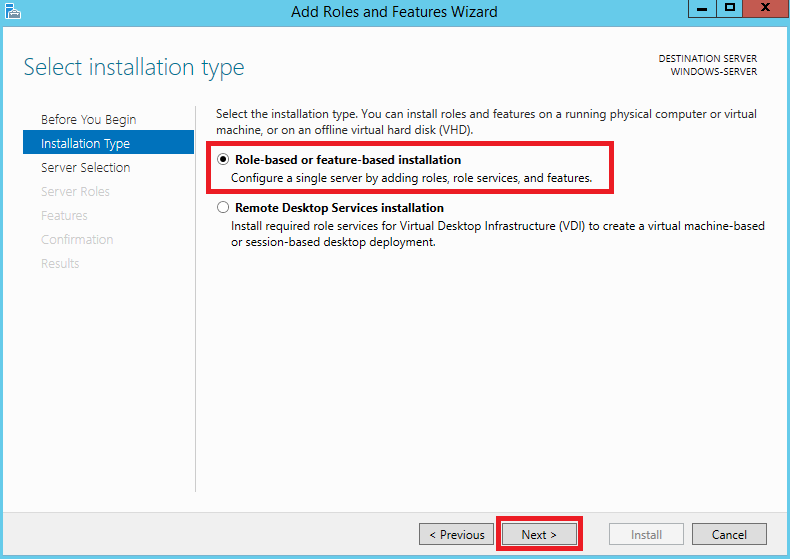
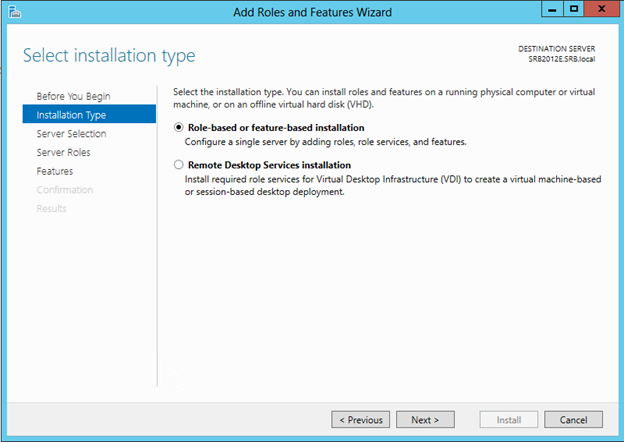
Далее выберите опцию Role-based or feature-based installation, после чего нажмите Next.
В следующем окне укажите сервер, на который будет производиться установка новых компонентов, либо просто нажмите Next, если в вашем пуле серверов одна-единственная запись.

На следующем шаге активируйте строку Web Server (IIS), после чего нажмите Add Features.
Далее нажмите Next.
После чего отметьте строку SMTP Server и нажмите Add Features.
И нажмите Next.
Далее ещё раз нажмите Next.
В следующем окне снова нажмите Next.
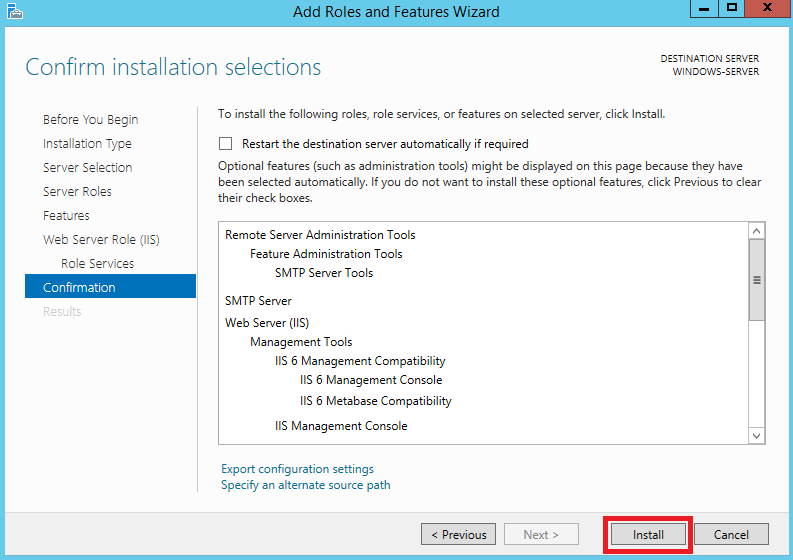
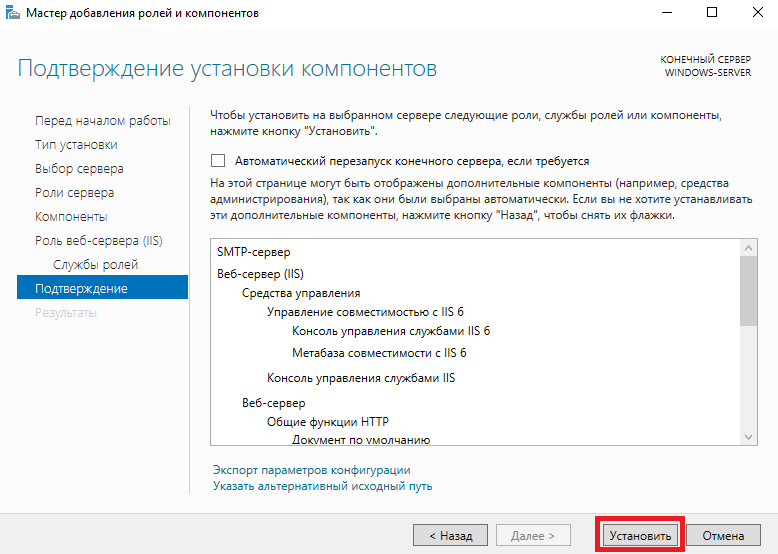
Для запуска установки выбранных компонентов нажмите Install.
Настройка сервера SMTP
На следующем этапе необходимо будет настроить сервер SMTP. Для чего в Server Manager перейдите Tools → Internet Information Services (IIS) 6.0 Manager.
В открывшемся окне менеджера IIS раскройте ветку вашего сервера и на строке SMTP Virtual Server нажмите правую кнопку мыши, после чего перейдите в Properties.
Далее в строке IP address: необходимо выбрать IP-адрес вашего сервера и активировать опцию Enable logging.
Во вкладке Access нажмите кнопку Authentication...
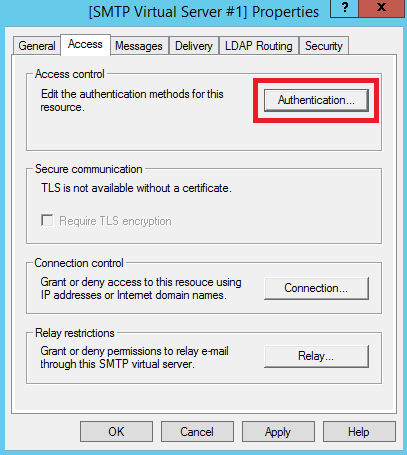
В открывшемся окне активируйте опцию Anonymous access. Активация данной опции нужна, чтобы пользователи и приложения смогли бы использовать сервер SMTP анонимно. Позже можно будет настроить более безопасную аутентификацию, пока же нажмите OK.
Далее в разделе Connection control нажмите кнопку Connection...
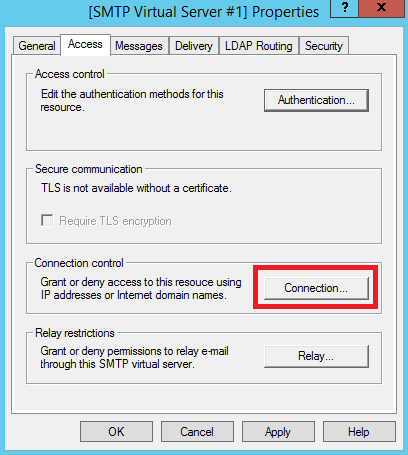
В окне Connection установите переключатель на Only the list below и при помощи кнопки Add... добавьте IP-адрес вашего VPS. После чего нажмите OK.
Точно такую же настройку необходимо проделать в разделе Relay restrictions. Для чего нажмите кнопку Relay... и добавьте IP-адрес вашего сервера установив переключатель в Only the list below.

После чего перейдите во вкладку Delivery и нажмите Advanced...

Здесь в строку Fully-qualified domain name: необходимо внести имя вашего домена, в нашем примере это – my-domain.host.
Для того, чтобы проверить корректность данной настройки, нажмите кнопку Check DNS.
Далее сохраните все внесённые в настройки изменения при помощи кнопки OK.
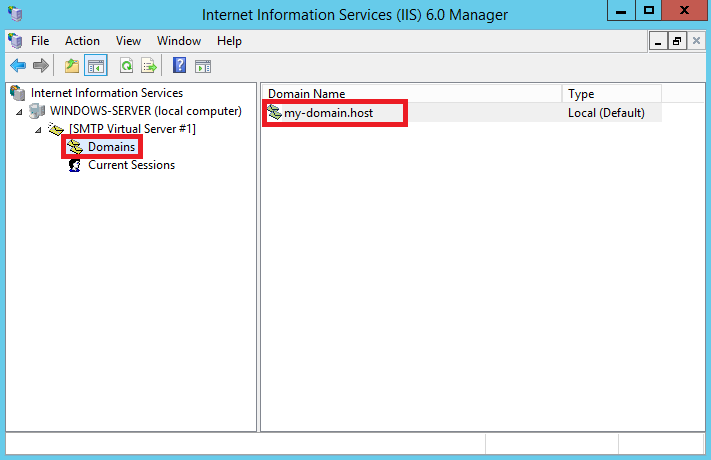
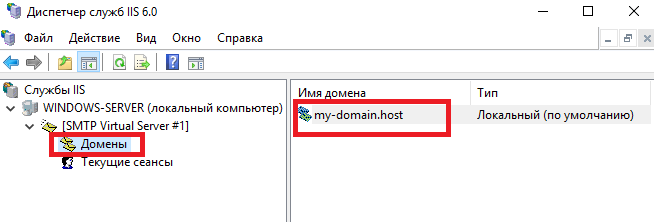
Также необходимо указать корректное имя домена в ветке Domains.
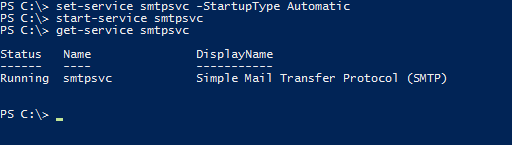
На следующем шаге нужно активировать функцию автоматического запуска сервера SMTP. Для этого запустите командную строку PowerShell и выполните следующие команды для запуска службы:
set-service smtpsvc -StartupType Automatic
start-service smtpsvc
Чтобы убедиться, что служба запущена, необходимо выполнить ещё одну команду:
get-service smtpsvcВывод данной команды должен выглядеть примерно следующим образом:
Теперь там же, в командной строке PowerShell, при помощи следующей команды отправьте сообщение на свою электронную почту:
Send-MailMessage -SmtpServer my-domain.host -To your@email.address -From mail@my-domain.host -Subject "Message Subject" -Body "Message Body"Здесь:
my-domain.host– имя домена, с которого будет производиться отправка сообщения;your@email.address– адрес электронной почты, на который будет отправлено сообщение;mail@my-domain.host– этот электронный адрес будет указан в сообщении как адрес отправителя;Message Subject– тема письма;Message Body– тело письма.
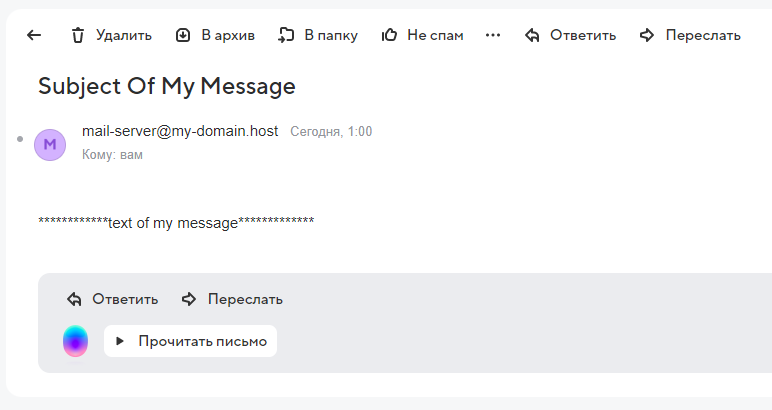
После чего проверьте свою почту, на которую должно прийти сообщение от вашего почтового сервера.
Установка и настройка Postfix на Ubuntu 20.04
Для операционной системы Ubuntu существует довольно популярный почтовый сервер – Postfix. Для установки Postfix мы будем использовать виртуальный сервер, работающий на Ubuntu 20.04. При этом на VPS должны быть произведены работы по первоначальной настройке, описанные в соответствующей статье нашего справочника.
Также, для работы Postfix нужен домен с привязанной A-записью, которой является IP-адрес вашего виртуального сервера.
Плюс ко всему, необходимо соотнести имя домена с именем сервера и его IP-адресом. Для этого запустите следующую команду:
$ sudo hostnamectl set-hostname ubuntu-serverЗдесь, ubuntu-server – имя нашего сервера, вместо которого вы можете использовать своё.
Теперь при помощи текстового редактора откройте файл /etc/hosts:
$ sudo nano /etc/hostsВ данный файл добавьте строку:
XXX.XXX.XXX.XXX my-domain.host ubuntu-serverВ данном случае:
XXX.XXX.XXX.XXX– IP-адрес вашего сервера;my-domain.host– имя вашего домена;ubuntu-server– имя вашего сервера.
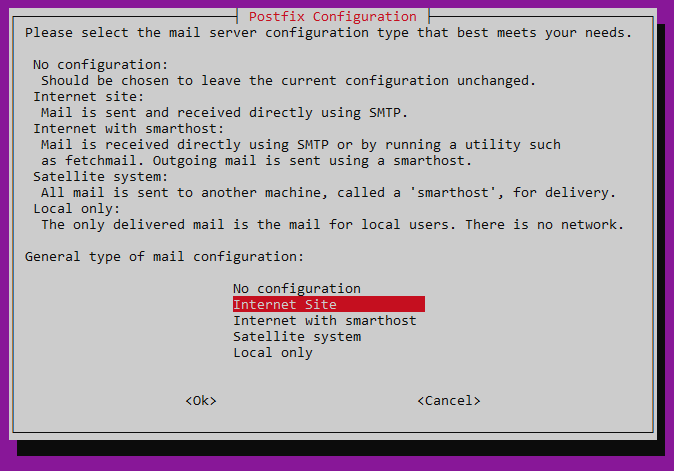
Теперь запустите установку Postfix и почтового пакета mailutils:
$ sudo apt install postfix mailutilsВ процессе установки система попросит вас выбрать тип конфигурации. Необходимо указать Internet Site:
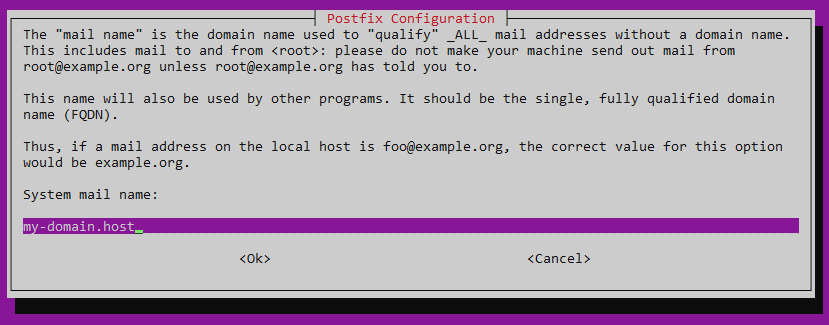
Также установщик попросит согласиться с именем домена, в отношении которого производится настройка почтового сервера. В нашем случае это будет my-domain.host.
По окончании установки можно попробовать с нашего почтового сервера отправить тестовое сообщение. Команда для отправки сообщения выглядит следующим образом:
$ echo "Message Body" | mail -s "Message Subject" your@email.addressВ данной команде:
Message Body– тело письма;Message Subject– тема письма;your@email.address– адрес электронной почты, на который будет отправлено сообщение.
Проверьте свой почтовый ящик (в нашем примере это – your@email.address), на который должно прийти отправленное из Postfix сообщение.
Почтовым является сервер, с помощью которого, как следует из названия, производится доставка электронных сообщений. Данный мануал — о том, каким образом происходит установка и первоначальная настройка почтового сервера на VDS, работающем под управлением операционной системы Windows Server 2016.
Установка сервера SMTP
Для передачи почтовых сообщений на серверах, работающих на Windows, довольно часто применяется протокол SMTP. В Windows Server 2016, в частности, данный протокол представлен в виде компоненты операционной системы.
Корректная отправка электронного сообщения сервером SMTP от лица домена возможна при наличии доменного имени. При этом к доменному имени должна быть привязана A-запись, содержащая IP-адрес сервера. В данном руководстве в качестве примера мы используем домен my-domain.host, имеющий A-запись, которая содержит IP-адрес виртуального сервера, а именно, 194.58.71.188.
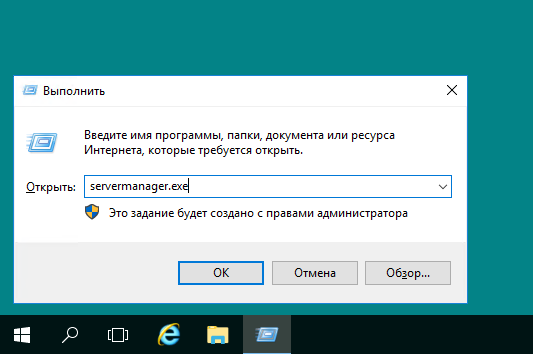
Начать установку почтового сервера необходимо с добавления соответствующих компонентов. Поэтому во-первых следует запустить Диспетчер серверов, для чего, например, можно использовать комбинацию клавиш Win + R, где нужно набрать servermanager.exe.
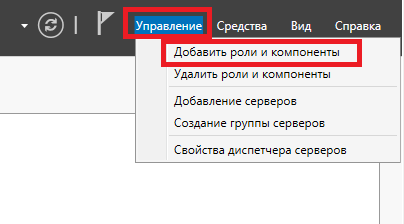
В Диспетчере серверов необходимо перейти Управление → Добавить роли и компоненты.
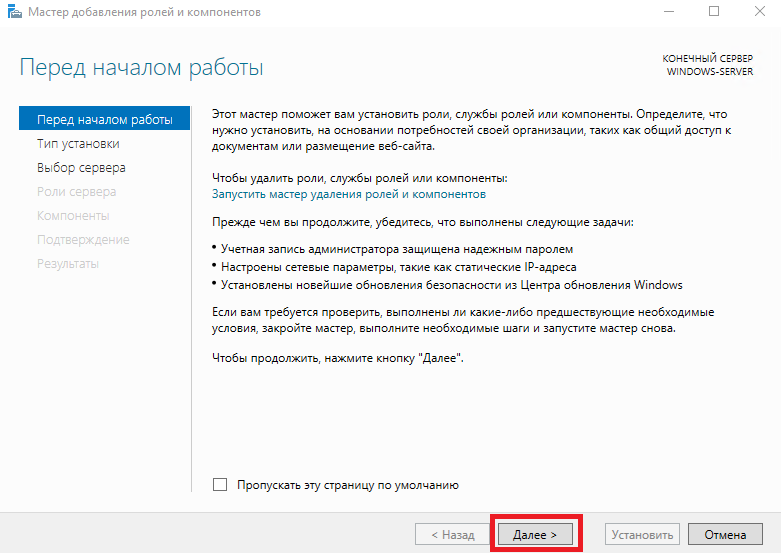
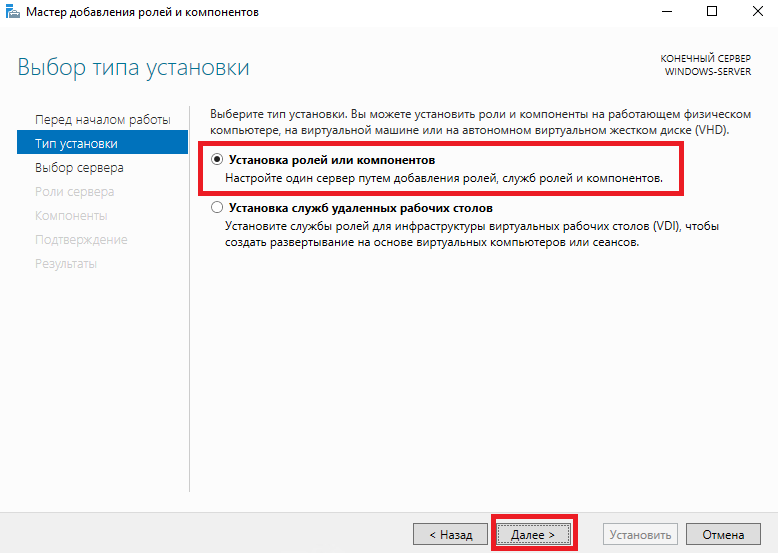
В открывшемся окне Мастера добавления ролей и компонентов следует нажать Далее.
На следующем шаге нужно выбрать опцию Установка ролей или компонентов и нажать Далее.
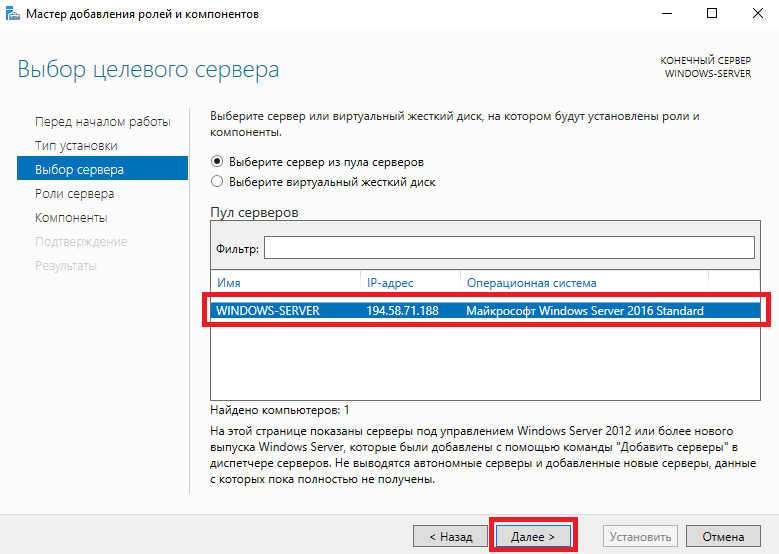
В окне Выбор целевого сервера следует указать сервер, на который планируется произвести установку компонентов, или не внося изменений нажать Далее в случае, если в пуле серверов присутствует лишь одна запись.
Далее необходимо активировать строку Веб-сервер (IIS) и после этого нажать Добавить компоненты.
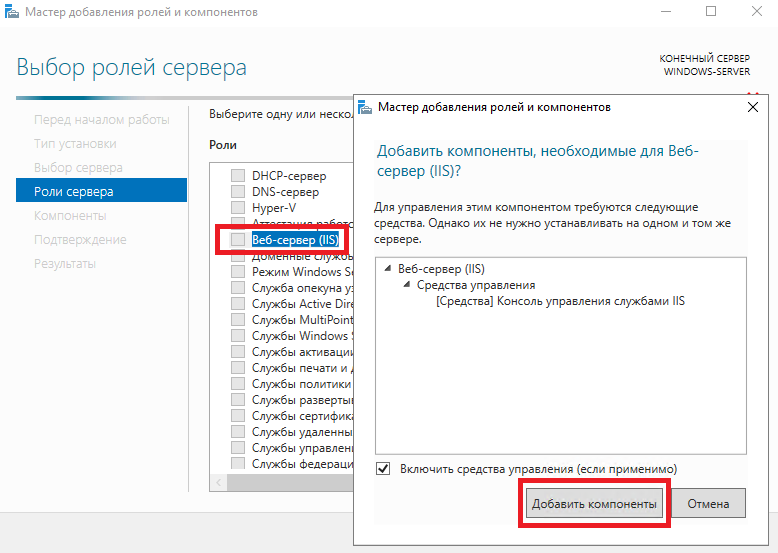
В следующем окне нужно нажать Далее.

На следующем шаге следует выбрать компоненту SMTP-сервер и нажать Добавить компоненты.
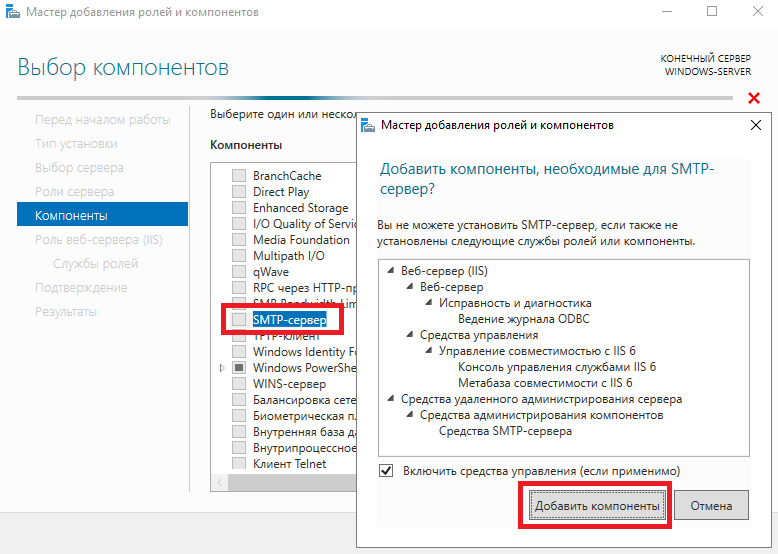
После чего нужно нажать Далее.
В окне Роль веб-сервера (IIS) также следует нажать Далее.
Также и в следующем окне нужно нажать Далее.
Для подтверждения установки выбранных компонентов необходимо нажать Установить.
После завершения установки новых ролей и компонентов перезагрузка VPS не требуется. Следовательно, можно переходить к первоначальной настройке сервера SMTP.
Настройка сервера SMTP
Для того, чтобы настроить сервер SMTP, необходимо в Диспетчере серверов перейти в Средства и открывшемся меню выбрать Диспетчер служб IIS 6.0.
В Диспетчере служб IIS 6.0 нужно раскрыть ветку сервера, на строке SMTP Virtual Server нажать правую кнопку мыши и выбрать Свойства.
Здесь во вкладке Общие следует выбрать строку с IP-адресом сервера и поставить галочку в строке Включить ведение журнала.
Далее во вкладке Доступ необходимо нажать на кнопку Проверка подлинности...
В окне Проверка подлинности нужно активировать опцию Анонимный доступ, после чего нажать ОК.
На этой же вкладке необходимо нажать на кнопку Подключение... в разделе Управление подключением.
Здесь следует активировать опцию только компьютеры из списка ниже и нажать кнопку Добавить...
В открывшемся окне необходимо переключиться на Один компьютер и в строке ниже указать IP-адрес сервера. После чего следует нажать ОК.
Для сохранения изменений нужно нажать ОК.
Те же действия необходимо проделать нажав кнопку Ретрансляция... в разделе Ограничение ретрансляции. То есть, там тоже нужно установить переключатель в только компьютеры из списка ниже и добавить туда IP-адрес виртуального сервера.
На следующем шаге во вкладке Доставка следует нажать кнопку Дополнительно...
Здесь в строке Полное доменное имя необходимо прописать имя домена, используемое для настраиваемого сервера. В нашем примере это — my-domain.host. После чего нужно нажать ОК.
Здесь же можно проверить допустимость введённого имени домена при помощи кнопки Проверка DNS.
Все внесённые изменения необходимо сохранить нажав ОК.
Теперь следует переименовать домен в ветке Домены, который будет использоваться сервером SMTP. В нашем примере домен называется my-domain.host.
Завершение настройки, отправка сообщения
На завершающем этапе настройки необходимо активировать автоматический запуск сервера SMTP. Для чего следует запустить оболочку PowerShell и выполнить следующие команды:
set-service smtpsvc -StartupType Automatic start-service smtpsvc
После того, как команды отработают, можно будет убедиться в том, что служба SMTP в данный момент выполняется. Это делается ещё одной командой:
get-service smtpsvc
На этом первоначальная настройка сервера SMTP завершена. Таким образом, теперь уже можно отправить электронное сообщение от имени почтового сервера. Для этого следует использовать следующую команду:
Send-MailMessage -SmtpServer my-domain.host -To your-address@e.mail -From mail-server@my-domain.host -Subject "Subject Of My Message" -Body "************text of my message*************"
В данном случае:
my-domain.host— имя домена, с которого отправляется сообщение;your-address@e.mail— электронный адрес, на который отправляется сообщение;mail-server@my-domain.host— в отправленном сообщении данный электронный адрес будет указыван как адрес отправителя;Subject Of My Message— тема отправляемого сообщения;************text of my message*************— тело отправляемого сообщения.
После выполнения команды на указанный адрес электронной почты должно прийти отправленное почтовым сервером сообщение. Если не удаётся найти полученное письмо в папке входящих сообщений, имеет смысл проверить папку, содержащую спам.
All versions of Windows Server come with tools that can be used to install an SMTP server. This SMTP server can function as a mail relay service, receiving and transmitting SMTP emails from various devices within the company.
This article will explain how to set up and configure an SMTP server on virtual servers running Windows.
What is an SMTP Server
An SMTP server is an email protocol that is in charge of sending emails. It operates in accordance with the Simple Mail Transfer Protocol (SMTP). The email client sends emails to an SMTP server. Then it forwards them to an additional SMTP server and the incoming mail server.
Install the SMTP Service
- Activate the Server Manager. Enter “Server Manager” into the Search charm to discover it.

- Add Roles and Features using the dashboard. The wizard to add roles and features will now launch. On the first screen, select Next.
- Click Role-based or feature-based installation.
- Click Essentials Server.

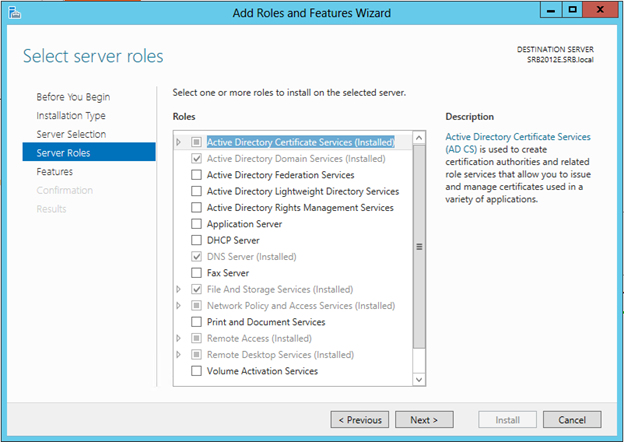
- Select Next to bypass the Roles selections.
- Scroll down the list and tick the SMTP Server feature.
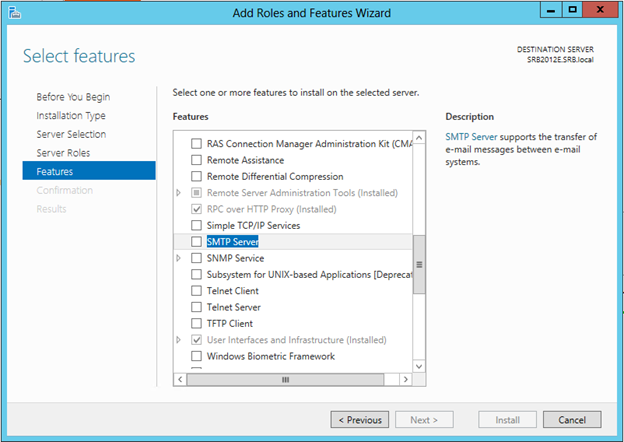
- You will receive notice in a new window that more services will also be deployed. To confirm and proceed, click Add Features. To proceed past the features selection screen, click Next.
- Select install to finish the Installation.
- Select Close when the installation has finished.
Configure the SMTP Service
- Type in IIS into the Search charm. Click on one of the options to launch the Internet Information Services (IIS) 6.0 Manager.
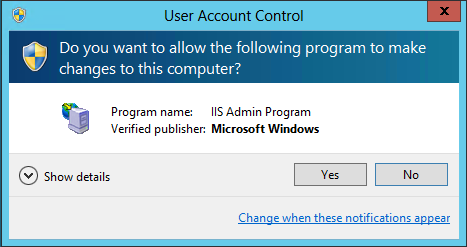
- Select Yes to the UAC Prompt.
- Right-click on SMTP Virtual Server #1, expand it, and then choose Properties.
- General Tab: Set the IP Address to the server’s IP address.

- Access Tab: In the connection button, set the IP address for the internal devices. Add the same IP address to the Relay list.
- Delivery Tab: Select an external domain; you can add a Smart host if necessary or use the free customized domain from Microsoft. Tick the Attempt direct delivery box if you want the server to try to deliver the email directly first before using the Smart host.
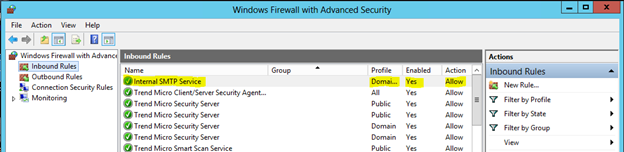
- To find and launch the Windows Firewall with Advanced Security console, type “Firewall” into the Search charm.

- New Inbound Rule added. To create a new rule, right-click Inbound Rule and choose New Rule.
- Choose Port.
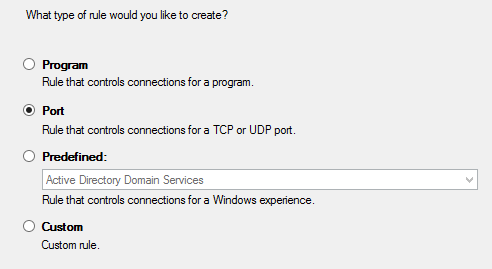
- Fill in 25 as the local port.
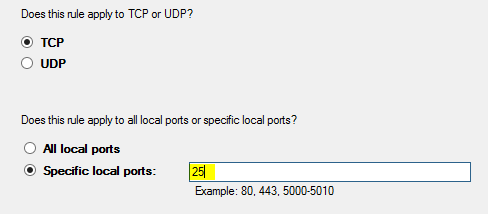
- Select Next (Allow the Connection).

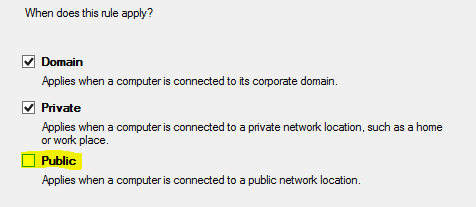
- Uncheck Public. (Prevents external access to the server)
- Give the rule a name, and select Finish to create the rule.
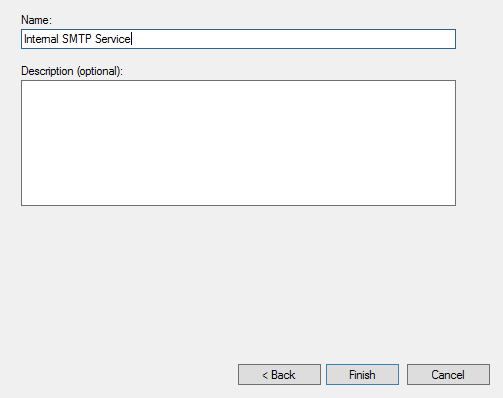
- A new rule ought to now be active in the firewall administration panel.
- Set the SMTP Service to Automatic Start and restart it. the Services Management Console should be opened. The Simple Mail Transfer Protocol service should be double-clicked. Start the service first, then stop it. Select Automatic as the Startup type.
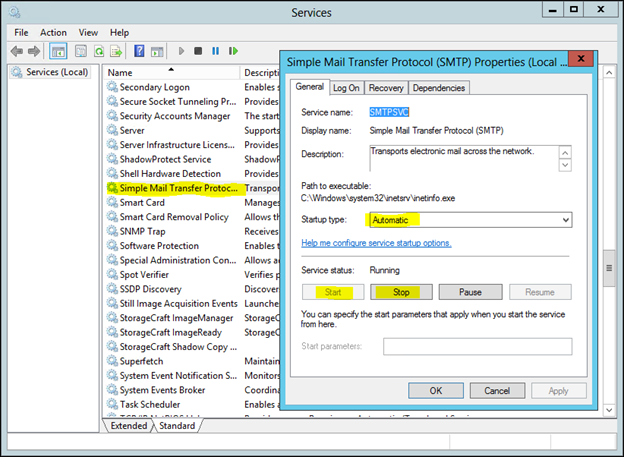
That’s it. The service is ready and waiting.
Conclusion
If you’re looking for a more secure setting for email transmission, Skysnag’s automated software safeguards your email communications from direct domain phishing attacks. Our automated software is easy to use and increases email deliverability. By ensuring that only emails from approved senders will be transmitted while protecting them from being spoofed by fraudsters. Sign up using this link for a free trial today and protect your domain’s reputation.
Sending email is crucial for any organization, but configuring SMTP servers and relay can be tricky. This guide explores Windows Server 2022’s built-in capabilities for optimizing email architecture and deliverability. Learn to enable SMTP relay and TLS encryption, troubleshoot issues, utilize virtualization for scalability, and follow best practices for performance and redundancy. Master email on Windows Server 2022!
Overview of SMTP and Email Relay
Sending and receiving email is an essential part of business operations and personal communication in the digital age. But how exactly are emails able to traverse the internet and land in our inboxes? The answer lies in SMTP, or Simple Mail Transfer Protocol.
SMTP is a set of communication guidelines that allows mail servers to transmit emails across the internet. It establishes a standardized way for servers to negotiate the transfer of email messages, directing them to their final destinations. When you hit send on an email from your local device, your email client connects to your outgoing SMTP server, which then communicates with the recipient’s incoming SMTP server through a chain of relay hops, eventually depositing the email in their inbox.
Here’s a simple example:
- You compose an email in Microsoft Outlook on your laptop.
- Outlook connects to your company’s SMTP server (like smtp.yourcompany.com) using port 25 or 587.
- Your SMTP server verifies your identity and access.
- It establishes a connection with the recipient’s SMTP server and transfers the email message.
- The receiving SMTP server accepts and stores the message for the recipient.
- The recipient can now access the email in their inbox.
SMTP handles the routing, transport, and delivery details that occur behind the scenes, providing a standardized protocol so any mail server can communicate with any other mail server. This interoperability is key for global email transmission.
Of course, reality is more complex than this linear example. There are often multiple hops between the originating SMTP server and the final destination, involving intermediary servers that relay messages closer to the recipient’s server. This is where email relay enters the picture.
Email relay occurs when one mail server receives an email from another server and forwards it towards its ultimate destination instead of actually delivering it. Relaying through intermediate mail servers on the open internet is normal and expected.
But sometimes businesses will configure dedicated SMTP relay servers on their private network perimeter to control the flow of outgoing email more securely. By funneling all outbound mail through your owned relay machine, you can implement protections like spam filters, antivirus scans, and authentication requirements before allowing messages out to public servers.
A properly configured SMTP relay server provides key benefits:
- Centralized control over external email delivery for security and policy enforcement
- Reduced risk of blacklisting if spam originates from specific internal hosts
- Flexibility to support different internal mail systems and email domains
- Scalability to handle large volumes of outgoing email traffic
- Resiliency through redundancy, load balancing, and failover capabilities
Whether you want your public-facing SMTP server to act as a relay or deploy a dedicated relay machine internally, careful configuration is required for proper mail routing and delivery. Protocols, authentication, encryption, andALLOWED_IP relay restrictions must be defined based on your infrastructure.
Microsoft Windows Server provides robust built-in capabilities for enabling an SMTP relay using Internet Information Services (IIS). Alternatives like hMailServer also exist if you need a standalone third-party relay solution. With the right setup, an SMTP relay can provide a critical intermediate stage in your email transmission process to enhance security, efficiency, and deliverability.
We’ll explore the technical specifics of configuring SMTP servers and relay options using Windows Server later in this article. First, let’s look at how to find your current email settings. Understanding your existing server details provides the foundation.

Checking Your Email Server Settings on Network Solutions
Before making any changes to your SMTP configuration, it’s important to understand your current email server settings within Network Solutions. This will show you the existing ports, servers, and encryption enabled on your account so you can determine if any modifications are needed.
Logging into your Network Solutions control panel is easy. Just go to networksolutions.com and click Sign In at the top right. Enter your username and password when prompted.
Once you’re logged in, click on the “Manage” button for your domain and select the “Email” tab. This will display your email account settings.
Under “Connection Details”, you’ll see various parameters defined:
- Incoming mail server (IMAP) – The hostname of the IMAP server for retrieving incoming messages
- Incoming mail server port – The port used by IMAP, usually 143 or 993 (SSL)
- Outgoing mail server (SMTP) – The hostname of the SMTP server for sending outgoing messages
- Outgoing mail server port – The port used by SMTP, usually 25, 587 (TLS) or 465 (SSL)
- Requires sign-in – Whether authentication is needed to send mail through this SMTP server
It’s critical to identify both your IMAP and SMTP servers, as they may use different hostnames. IMAP handles retrieving email while SMTP deals with sending.
Next, check the encryption configured under “Advanced Settings”:
- None – No encryption, insecure transmission of credentials and emails
- SSL/TLS – Secure Sockets Layer and Transport Layer Security protocols for encrypted connections
- STARTTLS – Opportunistic TLS, upgrades connection to use TLS encryption after establishing a cleartext connection
TLS (sometimes listed as STARTTLS) is recommended for secure transmissions without compatibility issues. Avoid using None if possible.
Additionally, toggle “Use SMTP Authentication” to On to enable sending username and password credentials when connecting to SMTP for added security.
Make note of each of these current settings from your Network Solutions control panel. This will allow you to determine if your Windows SMTP server needs to be reconfigured to match.
For example, if your Network Solutions outgoing SMTP server uses smtp.yourdomain.com on port 465 with SSL encryption, you would need to set the same server, port, and TLS/SSL parameters when configuring the new Windows SMTP server.
If the settings differ, it could lead to authentication errors, insecure connections, or emails being rejected or blocked. Syncing the configurations avoids these types of issues.
Sometimes, the existing settings may not be ideal and you’ll actually want to adjust your Windows SMTP environment to improve security or deliverability. Common changes include:
- Enabling TLS encryption by specifying port 587 if currently set to None
- Requiring authentication if not already mandatory
- Adding allowed IPs instead of open relay access
- Directing relay through a dedicated internal SMTP server rather than using Network Solutions’ SMTP
In these cases, update your Network Solutions SMTP settings after configuring Windows to match its improved security parameters going forward.
Carefully analyzing your current server details on Network Solutions empowers you to configure optimal aligned settings on Windows Server for sending emails securely and reliably. Don’t skip this important step!
Setting up an SMTP Server on Windows Server 2022
Windows Server 2022 includes robust built-in SMTP server capabilities through Internet Information Services (IIS). With the proper configuration, you can use it to send outgoing emails securely following industry best practices.
Let’s walk through considerations for installation, basic setup steps, allowing relay permissions, and securing connections with TLS encryption when deploying an SMTP server on Windows Server 2022.
Installing the SMTP Server Role
The first step is installing the SMTP Server role and required dependencies. You can use either the graphical Server Manager dashboard or PowerShell commands.
When installing on Server Core, you must use PowerShell since the GUI isn’t available. Here are the PowerShell commands to run elevated:
Install-WindowsFeature -Name SMTP-Server -IncludeManagementToolsThis will install the SMTP Server role along with associated management tools for configuration.
If using Server Manager instead, navigate to Dashboard > Add Roles and Features to launch the wizard. Select Role-based or feature-based installation and click Next.
On the server selection screen, choose your desired server and click Next. Then on the server roles screen, expand the Application Server category and check the box for SMTP Server.
The wizard will automatically include required features like Web Server (IIS) if they aren’t already installed. Click Next until you reach the confirmation page and then Install to finish.
Basic SMTP Server Configuration
Once installation completes, some basic configuration is required before you can start sending emails. Open the IIS 6 Management Console located at:
Start > Administrative Tools > Internet Information Services (IIS) Manager
Right-click the SMTP Virtual Server node and select Properties. Go to the Access tab and click Authentication. Check the Basic Authentication box to enable encrypted credentials when sending emails.
Next, go back to the Properties window and click Advanced under Delivery. Set the Fully Qualified Domain Name (FQDN) field to a hostname like smtp.contoso.com.
You may also want to define smart hosts like your Office 365 endpoint if funneling email through them. Finish by restarting the SMTP service for changes to take effect.
Enabling Relaying from Allowed IPs
By default, the Windows SMTP server won’t allow arbitrary hosts to relay mail through it. You need to explicitly configure IP-based relay permissions.
Navigate back to the Access tab under SMTP Virtual Server Properties. Click the Relay button and choose Add to specify IP addresses that may relay outbound mail through this server.
For example, you may want to allow the IP ranges or subnets for your internal company network. Just be sure not to leave it completely open to the public internet!
Securing Connections with TLS Encryption
To encrypt the connection between your SMTP server and sending/receiving mail servers using TLS, first request and install a valid SSL certificate on the host. You can use an internal PKI or public CA like Digicert.
Import the certificate .PFX file into the local computer’s Personal certificate store. Then in IIS Manager, go to the SMTP Virtual Server Properties > Delivery tab. Click Outbound Security and choose TLS Encryption.
This ensures all message contents and client credentials are protected in transit over the network. Verify the Access tab shows the proper certificate expiration date for additional confirmation.
With that, your core Windows Server 2022 SMTP server setup is complete! Proper configuration helps ensure your email communications remain secure and reliable. Let’s move on to configuring an SMTP relay next if needed.
In some scenarios, configuring a dedicated SMTP relay server can provide advantages over routing email directly from your internal mail server to external domains. Let’s explore reasons to use a relay, options for implementation on Windows Server 2022, and steps to set it up.
When to Use an SMTP Relay
Adding an intermediary SMTP relay server provides benefits:
- Centralized outgoing email delivery and security policies
- Reduced risk of blacklisting if spam originates on internal hosts
- Support for diverse internal email environments and domains
- Scalability to handle large volumes of outbound mail
- Redundancy and uptime through failover capabilities
You may want to utilize an on-premise SMTP relay if you have:
- Compliance or security requirements to control internet mail flow
- Numerous internal mail systems needing internet delivery
- Problems with blacklisting of dynamic internal IP ranges
- Need for high scalability and redundancy behind a static IP
Using your primary SMTP server directly for external delivery can cause issues. A dedicated relay system offers flexibility.
Options for SMTP Relay Setup
You have two primary options for deploying an SMTP relay on Windows Server:
1. IIS SMTP Relay
Internet Information Services (IIS) has built-in relay functionality through SMTP virtual servers. This lets you quickly enable Windows as an SMTP relay.
2. Third-Party SMTP Relay Software
Alternatively, dedicated relay software like hMailServer offers an on-premise solution. This provides a standalone application purely for relay duties.
Factors like existing infrastructure, cost, complexity, and feature requirements dictate the best choice. Let’s walk through both in more detail.
Configuring an IIS SMTP Relay
If leveraging Windows IIS, first ensure you’ve installed the SMTP Server role and dependent features like Web Server (IIS).
Open IIS Manager and right-click to create a new SMTP Virtual Server. Give it an internal domain name and specify TCP port 25 for insecure or 587 for TLS-encrypted connections.
Next, define your smart host in the virtual server properties under Delivery > Advanced. Enter the hostname like smtp.office365.com with port 25 or 587.
You’ll also need to import a valid public SSL certificate or internal PKI certificate to enable TLS encryption.
Finally, allow the IP range of internal hosts that will relay outbound through this server under the Access tab. Test connectivity from a client to confirm proper relaying functionality.
Using Third-Party SMTP Relay Software
If opting for dedicated relay software, hMailServer is a popular Windows platform option. After installing, you need to:
- Add your internal domains to relay permissions
- Set destination smart hosts like your email provider
- Choose inbound listening ports
- Configure authentication and TLS encryption
- Test relay functionality
This keeps SMTP duties separate from your Exchange or other mail systems.
Comparing Solutions
Factors like cost, complexity, features, and resource usage help determine the best SMTP relay approach:
- IIS is built-in with Windows Server, reducing extra software costs
- Third-party software may provide more granular control and role separation
- IIS relies on Windows server resources while apps have lower overhead
- Third-party options include antispam, antivirus, and metrics capabilities
Evaluate your needs and environment to decide which strategy is the right fit.
A properly configured SMTP relay enhances the security, scalability, and resiliency of your email architecture on Windows Server 2022.

Testing and Troubleshooting Your SMTP Configuration
Once you finish setting up your Windows Server SMTP environment, testing and troubleshooting are critical next steps. This confirms everything is working and helps resolve common errors if issues arise.
Let’s explore useful techniques for validation and debugging your server’s SMTP functionality.
Confirming Basic SMTP Functionality
Start by performing basic connectivity testing from the server itself or a client. Open a command prompt and use the telnet command like:
telnet smtp.yourdomain.com 25This checks that you can reach the SMTP port and exchange basics like:
EHLO yourdomain.com
MAIL FROM: [email protected]
RCPT TO: [email protected]
DATA
From: [email protected]
To: [email protected]
Subject: Test email

This is a test body.
.
Verify you can connect, initiate a test message, enter the content, and terminate properly with a period on its own line. If successful, further testing from clients is recommended.
Sending Test Emails via Telnet
Use the same telnet approach to transmit test messages completely through your SMTP server to external accounts. Leverage a telnet client from a Windows desktop for more robust testing.
Try enveloping the test email content with header/body separators:
HEADER
From: [email protected]
To: [email protected]
Subject: SMTP test

BODY
This is a test email sent via the telnet client.
.
Check whether your external recipient receives the message with the proper content intact. Be sure to authenticate if your SMTP server requires it.
Using the Pickup Directory
Servers running SMTP have a local pickup directory, usually C:\inetpub\mailroot\Pickup. Pasting a .eml file with email content into this folder will automatically submit it for processing and delivery.
Construct a test .eml file and drop it into the pickup folder, then verify successful delivery. The file gets deleted once picked up.
Checking Log Files
Enable logging under SMTP Virtual Server properties in IIS Manager. Then monitor the C:\Windows\System32\LogFiles\SMTP logs.
Look for connection entries from clients and delivery status codes. Error messages here provide insight during troubleshooting.
Common SMTP Issues and Resolutions
If you encounter problems, try these fixes:
TLS/SSL Encryption Errors
- Validate the certificate was issued properly and imported correctly.
- Double check TLS is enabled on both client and server.
- Use TCP port 587 or 465 instead of 25 to force encryption.
Authentication Failures
- Confirm allowed IPs or relay permissions are configured correctly.
- Ensure client is providing proper domain, username, and password.
- Try alternating between basic auth, integrated auth, or no authentication.
Timeouts and Access Denied
- Check firewalls for blocked TCP ports between client and server.
- Validate client IP has been added to relay access list if required.
- Test telnet connectivity on port 25 or 587 to isolate issues.
Network Solutions Specific Troubleshooting
If experiencing problems connecting to Network Solutions for delivery:
- Verify SMTP server hostname and ports match their setup requirements.
- Try toggling between SSL, TLS, and no encryption based on their capabilities.
- Ensure any blacklisted IP ranges are allowed in their filters.
- Check that your reverse DNS records match SMTP server names.
Proper testing and debugging helps get your Windows Server SMTP environment humming along smoothly. Don’t hesitate to engage Microsoft support if issues persist.
Best Practices for Optimized Windows Server Email
Properly configuring SMTP and implementing email relay capabilities provide the foundation for sending outbound mail from Windows Server. However, more advanced architectural practices can take your environment to the next level.
Let’s explore key recommendations for enhancing security, deliverability, resilience, and performance of your email solution through industry best practices.
Recommended Architectural Principles
When designing a Windows Server email architecture, keep these principles in mind:
Redundancy – Employ multiple SMTP servers behind a load balancer to remove single points of failure. Distribute services across nodes.
Separation of Concerns – Isolate SMTP duties on dedicated servers instead of mixing with other apps on the same host. Separate internal vs external traffic.
Compartmentalization – Segment SMTP servers into their own secured network zone with tight firewall policies restricting access.
Monitoring – Track SMTP server health metrics, logging, and security events centrally to detect issues proactively.
Diversification – Spread delivery across multiple reputable email service providers to avoid reliance on a single vendor.
Automation – Script installation and configuration using tools like PowerShell DSC for consistency and efficiency.
Thoughtfully applying these principles enhances reliability, security, and performance.
Leveraging Virtualization
Running SMTP servers on virtual machines rather than physical hardware provides advantages:
- Easy Scalability – Spin up additional SMTP VMs quickly to handle increased loads.
- High Availability – Use failover clustering across hosts to minimize downtime.
- Resilient Delivery – Distribute redundant SMTP VMs across data centers for geographic diversity.
- Efficient Infrastructure – Consolidate multiple servers onto powerful virtualized hosts, optimizing resources.
Properly configuring Hyper-V](https://docs.microsoft.com/en-us/windows-server/virtualization/hyper-v/hyper-v-on-windows-server) or [VMware provides a scalable, resilient platform for SMTP services.
Maintaining Email Deliverability
To ensure reliable delivery of outbound messages, focus on:
- Warming Up IPs – Gradually increase volumes on new IPs to build reputation over time.
- Monitoring Blacklists – Check major DNSBLs regularly and remediate if listed.
- Managing Bounces – Detect and handle bounces gracefully, identifying persistent issues.
- Controlling Outbound Spam – Implement outbound spam filters to protect sending reputation.
- Enforcing Authentication – Require SMTP authentication from clients to reduce anon abuse.
- Checking DNS Records – Validate proper PTR, SPF, and DKIM entries are published.
Proactively maintaining your email deliverability helps bolster your domain’s reputation and ensures customers reliably receive your messages.
Following SMTP email best practices on Windows Server sets your infrastructure up for scalability, security, resilience, and deliverability down the road. Your architecture choices and operational processes make a difference!

Key Takeaways for Configuring SMTP Servers and Email Relay on Windows Server 2022
Setting up and optimizing SMTP email capabilities on Windows Server involves several key steps and best practices:
- Audit current email settings on Network Solutions to determine correct ports, servers, and encryption protocols needed.
- Install the SMTP Server role and IIS dependencies to enable built-in Windows email functionality.
- Configure basic SMTP parameters like relay permissions, authentication, and TLS encryption for security.
- Evaluate the potential advantages of deploying a dedicated SMTP relay server for flexibility.
- Use IIS Manager to set up a relay or leverage a third-party SMTP software solution.
- Follow a methodical testing and troubleshooting approach to identify and correct any issues.
- Design a redundant, segregated architecture using virtualization for scalability and failover protection.
- Maintain email deliverability through warmup techniques, monitoring, and spam controls.
Carefully optimizing your Windows Server environment for stable, secure SMTP operations ensures your organization can exchange emails reliably. Utilizing industry best practices for performance, availability, and deliverability is key.
The steps and recommendations covered provide a blueprint for configuring robust SMTP servers and relays on Windows Server 2022 tailored to your infrastructure needs. With a properly designed email environment, your communications won’t be left out in the cold!
Here are some frequently asked questions related to configuring SMTP servers and email relay on Windows Server 2022:
Frequently Asked Questions
Q: What are the benefits of using Windows Server for SMTP?
A: Windows Server offers robust native SMTP capabilities through IIS without needing third-party software. It provides centralized management using role-based administration and PowerShell automation. Built-in functionality like SMTP relay, TLS encryption, and authentication simplify configuration.
Q: When should I use an SMTP relay server?
A: Consider deploying a dedicated SMTP relay if you need to funnel mail through a single gateway for security, have problems with host blacklisting, utilize multiple internal mail systems, or require high volume capacity and redundancy.
Q: How do I enable SMTP relay in Windows Server?
A: Use the IIS Manager console to configure an SMTP Virtual Server, define a smart host target, and specify client IP addresses allowed to relay under the Access tab. Import any required TLS/SSL certificates.
Q: What are some common SMTP issues?
A: Typical problems include SMTP connection timeouts, protocol mismatches, TLS encryption errors, authentication failures, and access denied messages. Check firewalls, permissions, certificates, and protocols to resolve.
Q: How can I validate my SMTP configuration?
A: Perform basic SMTP port testing with telnet. Transmit test messages with sample headers and body content. Utilize the pickup directory and inspect protocol logs. Check for successful external delivery.
Q: What are some best practices for enterprise SMTP?
A: Recommended practices include redundancy, separation of concerns, compartmentalization, virtualization for HA and DR, automation, blacklisting prevention, bounce management, outbound spam filtering, and authentication.
Q: What should I check on Network Solutions when troubleshooting?
A: Audit SMTP server hostname, ports, encryption settings, and any blacklisting of your IP addresses on Network Solutions. Confirm TLS and authentication align between servers.
Q: What benefits does virtualizing SMTP provide?
A: Virtualization enables easy scalability, redundancy and uptime through failover clustering, resource optimization, and flexible network architecture.
Let us know if you have any other common SMTP questions we should add to help IT administrators!