
Applies ToWindows 10 Windows 11
Вы можете создавать новые папки различными способами, но два самых простых способа — с помощью команды Сохранить как или проводник. В этой статье описываются эти два способа.
В этой статье:
-
Создание папки при сохранении документа с помощью команды «Сохранить как»
-
Создание папки перед сохранением документа с помощью проводника
Создание папки при сохранении документа с помощью команды «Сохранить как»
-
Открыв документ, выберите Файл > Сохранить как.
-
Сохранить как — это место, где можно создать новую папку. Возможно, вам потребуется перейти к расположению новой папки.
-
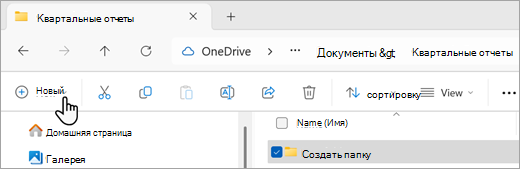
В открывшемся диалоговом окне » Сохранить как» выберите Создать папку.
-
Введите имя новой папки и нажмите кнопку ОК.
Примечание: В имени папки нельзя использовать косую черту, двоеточие, точку с запятой, дефис или точки.
-
Документ будет сохранен в новую папку.
Создание папки перед сохранением документа с помощью проводника
-
Откройте проводник, используя один из следующих способов:
-
Нажмите клавишу с логотипом Windows+E.
-
Найдите его в меню «Пуск» (Windows 7 или Windows 10).
-
Щелкните значок проводник.
-
В Windows 8 или Windows 8.1 проведите пальцем по экрану справа налево и коснитесь пункта «Поиск». (Если вы используете мышь, наведите указатель мыши на правый верхний угол экрана, переместите указатель вниз, а затем щелкните Поиск.) Введите Проводник в поле поиска, а затем нажмите или щелкните Проводник.
-
-
Перейдите в место, где нужно создать папку, и выберите Создать > папку.

-
Укажите имя папки и нажмите клавишу ВВОД.
-
Чтобы сохранить документ в новой папке, откройте документ и выберите Файл > Сохранить как, а затем перейдите в новую папку и нажмите кнопку Сохранить.
См. также
Сохранение, резервное копирование и восстановление файла в Microsoft Office
Настройка возможностей сохранения в Office
Нужна дополнительная помощь?
Нужны дополнительные параметры?
Изучите преимущества подписки, просмотрите учебные курсы, узнайте, как защитить свое устройство и т. д.
Организация файлов и папок — ключевой аспект удобной и эффективной работы на компьютере под управлением Windows. В этом огромном руководстве мы рассмотрим, как можно создать папку в различных версиях Windows, используя различные методы.
- Создание папки через Проводник Windows
- Создание папки с использованием контекстного меню
- Создание папки с помощью сочетания клавиш
- Создание папки через командную строку
- Создание папки через PowerShell
- Дополнительные советы по управлению папками
- Часто задаваемые вопросы
- Заключение
Шаг 1: Откройте Проводник Windows. Вы можете сделать это двумя способами:
- Нажмите Win + E на клавиатуре.
- Кликните по иконке папки на панели задач или в меню Пуск.
Шаг 2: Перейдите в расположение, где вы хотите создать новую папку.
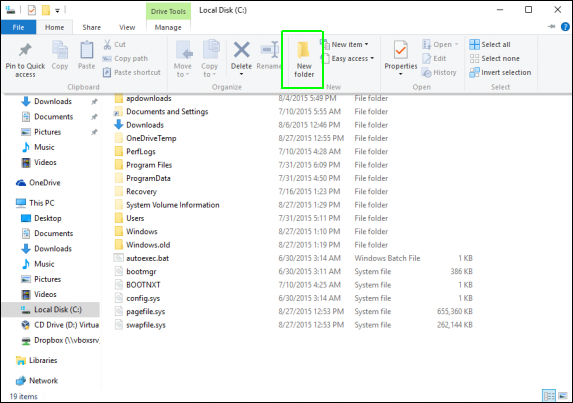
Шаг 3: В меню сверху выберите «Главная», затем нажмите «Создать папку» или «Новая папка».
Шаг 4: Введите название для вашей новой папки и нажмите Enter.
Шаг 1: Откройте Проводник Windows, используя вышеупомянутые методы.
Шаг 2: Перейдите в место, где должна быть создана папка.
Шаг 3: Кликните правой кнопкой мыши в пустом пространстве в окне Проводника.
Шаг 4: В появившемся контекстном меню выберите «Создать», а затем «Папку».
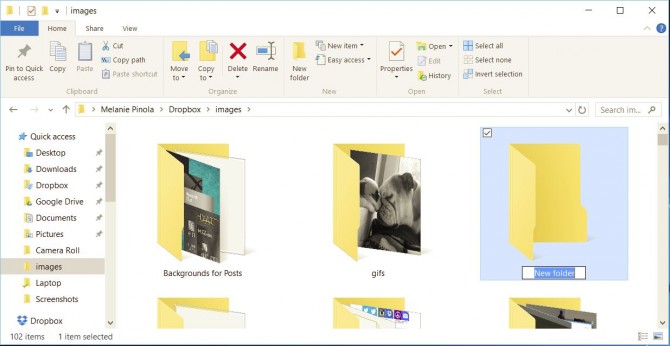
Шаг 5: Появится новая папка с выделенным названием «Новая папка», которое можно изменить, введя желаемое имя и нажав Enter.
Шаг 1: Откройте нужное расположение в Проводнике Windows.
Шаг 2: Нажмите сочетание клавиш Ctrl + Shift + N.
Шаг 3: Как только появится новая папка, введите её имя и нажмите Enter, чтобы сохранить.
Шаг 1: Откройте командную строку, нажав Win + R, введите cmd и нажмите Enter.
Шаг 2: Используйте команду cd, чтобы перейти к каталогу, где вы хотите создать папку. Например:
cd C:\Users\YourUsername\Documents
Шаг 3: Введите команду mkdir Название_Папки, чтобы создать папку. Например:
mkdir МоиДокументы
Шаг 4: Нажмите Enter, и в указанном расположении будет создана новая папка.
Шаг 1: Откройте Windows PowerShell через поиск в меню Пуск или нажав Win + X и выбрав соответствующий пункт.
Шаг 2: Перейдите в каталог, где хотите создать новую папку:
cd C:\Users\YourUsername\Documents
Шаг 3: Создайте папку, используя команду New-Item. Пример:
New-Item -ItemType Directory -Name «НоваяПапка»
Шаг 4: После выполнения команды в выбранном месте появится новая папка.
- Чтобы быстро переименовать папку, вы можете нажать на неё правой кнопкой мыши и выбрать «Переименовать», или просто кликнуть по названию папки и ожидать секунду, пока оно не станет редактируемым.
- Используйте систему названий, которая поможет вам легко ориентироваться среди файлов. Например, можно структурировать папки по датам, проектам или категориям.
- Для лучшей организации ваших папок вы можете изменить иконки папок, нажав правой кнопкой по папке, выбрав «Свойства», затем «Настройка» и «Изменить иконку».
В.: Могу ли я создать вложенные папки сразу? Д.: Да, используйте команду mkdir с опцией -p в командной строке или PowerShell для создания вложенной структуры папок за одну команду.
Создание папок в Windows — простая, но важная задача, которая помогает поддерживать порядок на вашем компьютере. Используйте любой из предложенных методов, чтобы легко организовать свои файлы и документы, и не забывайте о продуманной системе наименования папок для более эффективного доступа к вашим данным.
нунунну а на самом деле ребят я люблю мужчин
Download Article
A user-friendly guide to creating folders to separate, label, and move files with ease
Download Article
- Using File Explorer
- Using Save As
- Using Command Prompt
- Video
- Q&A
|
|
|
|
Are you trying to organize your Windows computer? Folders can be used to organize any part of your computer, including your desktop. You can quickly create a folder by right-clicking an empty area, using a keyboard shortcut, or using the Command Prompt. This wikiHow will show you how to create a new folder on your Windows 8, 10, or 11 computer.
Things You Should Know
- Right-click the area where you want a new folder. Hover over «New» and click «Folder».
- Alternatively, click the «new folder» icon in the top-left to create a new folder.
- Open the Command Prompt and navigate to the folder location. Type «mkdir [folder name]» to create a new folder.
-

Open the File Explorer. The File Explorer allows you to manage all of the files and folders on your computer and devices connected to it.[1]
-

If you’re going to be accessing the files often, you can create the folder on your desktop for quick access. Otherwise, you can save it to your Documents folder or another location.
Advertisement
-

A menu will open.
-
The new folder will be created in the location.
- Alternatively, you can click the «new folder» icon at the top-left corner of the window, or use the keyboard shortcut: Ctrl+ Shift + N. A new folder will be created immediately.
-
You’ll be able to name the folder immediately. Otherwise, you can right-click the folder and click Rename to change it at any time.
-

You can drag and drop any type of file you’d like into your new folder, such as files from a flash drive, music, photos, and more.
- To open those files, double-click them.
- You can also place another folder into your folder.


Advertisement
-
When you save a document in Word, you can create a new folder at the same time.
-

This is at the top-left corner.
-
This will open a new window.
-
The new folder will be created. You can now save the document into the new folder.


Advertisement
-

Open the Command Prompt. You can start the Command Prompt by pressing the Windows key + R and typing «cmd» into the Run box.
- If you’re using Windows 8, you can also press the Windows key + X and select Command Prompt from the menu.
-
Use the Command Prompt navigation commands to open the location that you want your folder to reside in.
-
This will create a folder in your current location.
- To open the new folder, type cd [folder name].
-

You can create a set of directories inside each other with one command. This is useful if you are building a directory tree that you’re going to populate later. Add the -p flag to your mkdir command to add multiple directories nested in each other.
- For example, mkdir -p Vacation\Images\Favorites would create the Vacation directory in your current location, with the Images directory inside, and the Favorites directory located inside the Images directory.
-
Once you have your folder created, you can start populating it with files.


![Step 3 Type mkdir [folder name] and press ↵ Enter.](https://www.wikihow.com/images/thumb/9/9d/Create-a-Folder-on-a-PC-Step-8-Version-2.jpg/v4-460px-Create-a-Folder-on-a-PC-Step-8-Version-2.jpg)


Advertisement
Add New Question
-
Question
How do I put a picture in a folder?
You click and drag either the icon or the name of the picture onto the icon or name of the folder you want it in. If this doesn’t work, drag the picture to an empty space and then try dragging it back onto the folder.
-
Question
How do I create a folder on my PC?
Right click on the empty space where you want the folder to be, and then click the ‘New Folder’ button. If there is no ‘New Folder’ button, see if there is a button called ‘New’ or ‘New…’. If there is, click on it and then click ‘New Folder’ or ‘Folder’.
-
Question
How do I drag a group of pictures into a folder?
Daniel Tucker
Community Answer
Click the first picture you want to drag, hold shift, and then click on the last picture you want to drag. Now, you can easily drag the pictures into the folder. If you don’t like that method of dragging them, you can just right-click on anything (including folders) and select «Cut,» enter the folder, right-click again, and then select «Paste.»
See more answers
Ask a Question
200 characters left
Include your email address to get a message when this question is answered.
Submit
Advertisement
Video
Thanks for submitting a tip for review!
About This Article
Thanks to all authors for creating a page that has been read 296,706 times.
Is this article up to date?
Do your files and documents need better organization? If you group related files into distinct folders on your laptop or desktop, it’ll always be easy to find what you need. You can also change the icon size to make it more visually pleasing. Here are a few ways to quickly create a new folder in Windows 10, and after you master this, learn how to password protect a folder in Windows 10.
Method #1: Create a new folder with a keyboard shortcut
The fastest way to create a new folder in Windows is with the CTRL+Shift+N shortcut.
1. Navigate to the location where you want to create the folder. You can create a new folder at any location on your hard drive or within another folder (creating a subfolder) in File Explorer. You can also create a new folder on your desktop with this method.
2. Hold down the Ctrl, Shift, and N keys at the same time. Windows will immediately create the new folder with the not-very-imaginative suggested folder name of «New folder.»
3. Enter your desired folder name. It takes just seconds to create a new folder this way, but be sure to immediately begin typing your folder name when the folder first appears, because if you click on the folder or click away from File Explorer, the folder name will be «New folder» and you’ll have to rename it.
Method #2: Create a new folder by right-clicking
If you don’t remember the keyboard shortcut (or you just prefer using the mouse):
1. Navigate to the location where you want to create the folder.
Sign up to receive The Snapshot, a free special dispatch from Laptop Mag, in your inbox.
2. Right-click on a blank space in the folder location. Take care with this: If you right-click on an existing item in the folder, you’ll get the wrong menu.
3. Select New then Folder from the contextual menu. Windows will create the new folder at your current location.
4. Enter your desired folder name to replace «New folder» and hit Enter.
You can create folders on the Desktop using this method too. Right-click on a blank space on the Desktop, then go to New > Folder.
Another simple way to create a new folder is to use the New folder button in the File Explorer menu.
Just navigate to the place you want the folder and click or tap «New folder» in the Home tab.
These three methods are the simplest and quickest ways to create a new folder, so you can get right to organizing your files.
Windows 10 basics
- Previous Tip
- Next Tip
- 7 Settings to Change Right Away
- Windows 10 Keyboard Shortcuts to Save You Clicks
- 5 Ways to Take Screenshots
- Change Your Password in Windows 10
- Uninstall Programs in Windows 10
- Enable or Disable Tablet Mode
- Add a User (Child or Adult)
- Change the Screen Resolution
- Sync Your Settings Across Devices
- Sync iPhone with Windows 10
- Control Windows 10 with Your Voice
- Upgrade to Windows 10 From Windows 7 or 8
- Eliminate Blue Light With Night Light
- Create a New Folder
- Get to the Desktop in Windows 10
- Add a Printer
- All Windows 10 Tips
- Set Alarms
Instructions for Windows 10 and 11
Published on December 7, 2021
What to Know
- Right-click anywhere on the desktop or in File Explorer and select New > New Folder to create a new, unnamed folder.
- Using Windows 10 File Explorer menus: Home > New; on Windows 11 File Explorer menus: New > Folder.
- Using the keyboard: Go to where you want to create the folder and type: CTRL+Shift+N.
This article explains how to create a new folder in Windows 10 and Windows 11.
How Do I Create a New Folder in Windows 11?
Adopting the latest version of Windows doesn’t mean learning a whole new set of shortcuts and methods. You can rest easy knowing that much of Windows 11’s functionality is similar enough to Windows 10. One area which doesn’t stray too far from the path that previous iterations created is how to create a new folder.
The following are two different methods for creating a new folder in Windows 11.
Creating a New Folder in the Windows 11 File Explorer
If you prefer using File Explorer to create new folders in Windows 10, you’ll be pleased to learn you can still use the same method in Windows 11.
-
Open File Explorer by right-clicking the taskbar and selecting File Explorer, pressing and holding Windows+E, or searching for it in the Start menu.
-
Once in the File Explorer, select a location for the new folder, such as Desktop or any other file folder on your hard drive. Then, you can click on the New button in the Ribbon Menu at the top left and select Folder.
Creating a New Folder in Windows 11 Using the Right-Click Menu
In addition to using the Ribbon Menu to create new folders, Windows 11 users can create a new folder nearly anywhere their mouse cursor points. You can quickly create a new folder thanks to the highly contextualized and in-depth options found when right-clicking.
-
Decide where and go where you’d like to make a new folder. If it’s on the desktop, then move your mouse cursor to an empty spot on the desktop.
-
Once there, right-click with your mouse to bring up a context menu and hover over the New option.
-
With your cursor over the New option, hover over the Folder option and left-click Folder. A new folder will be created.
How to Do I Create a New Folder in Windows 10?
If you read the previous section, you’re in luck because the newest iteration essentially took its folder creation methods from past versions of Windows.
Creating a New Folder in the Windows 10 File Explorer
At first blush, there are a few differences between the File Explorers found in Windows 10 and Windows 11. Though the latter’s Ribbon Menu is a bit more flashy, both versions function the same. As a result, these steps will look eerily similar.
-
Open File Explorer by either searching for it in the taskbar or pressing Windows+E. Navigate to the folder that you will use to house your new folder.
-
Once at your desired location, click the Home menu option near the top of the window. A new toolbar will appear, with a large New Folder button. Click New Folder to create a new folder.
-
Alternatively, you can click on the folder icon at the top of the window to create a new folder.
Creating a New Folder in Windows 10 Using the Right-Click Menu
The similarities between Windows 10 and Windows 11 continue, as you can also use a right-click menu to create a new folder wherever you want.
-
Find a suitable location for your new folder, whether within the File Explorer or on your Desktop.
-
Once that location is selected, use your mouse’s right-click function to pull up a contextual menu. Then select the New option, followed by the Folder option. A new folder will be created in its location.
-
You can use the same method when creating a new folder on your Desktop.
The Keyboard Shortcut and Other Methods
You can also use your keyboard to create a new folder in Windows 10 and Windows 11. Whether you’re on your Desktop or in the File Explorer, all you need to do to create a new folder is press CTRL+Shift+N. This shortcut will immediately create a new folder which you can then rename and use as you wish.
Additionally, if you’re saving a file, you can create a folder by right-clicking in the prompt and selecting new folder. Other methods may depend on the program you’re using at the time, so keep an eye out for those.
FAQ
-
To create a folder on your iPhone, tap and hold an app until it starts to shake. Place the app on top of another app to make a new folder. To rename the folder you created, touch and hold it or tap the name field to edit the label.
-
Gmail uses labels instead of a folder system. When you want to make a new label in Gmail, select Settings > See all settings > Labels > Create new label > assign the new label name > and click Create. You can also make a new label from an email; at the top of the message, select Labels > Create new.
-
To create a new folder on your Mac’s desktop, right-click the desktop and select New Folder. You can also open the Finder app and go to the area where you want a new folder. Then select File > New Folder > enter a name > press Enter. Alternatively, use the Shift+Command+N keyboard shortcut.
-
To create a new folder in Outlook, right-click Inbox > select New Folder > type the name for the folder > Enter. To make new folders on Outlook.com, choose New Folder at the bottom of the left panel > assign a name > press Enter.
Thanks for letting us know!
Get the Latest Tech News Delivered Every Day
Subscribe