
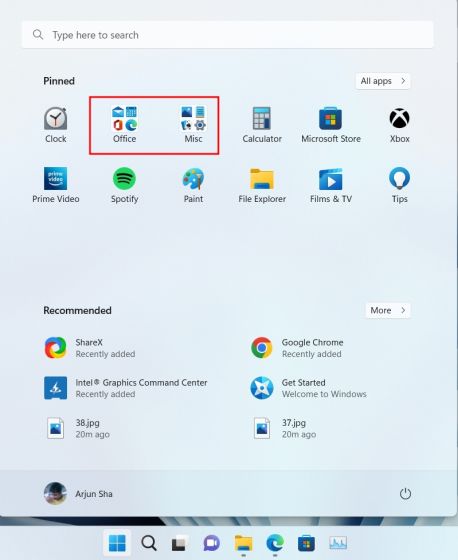
A little organization goes a long way. When you edit your Start menu in Windows 11 to group apps into folders, you can save time and effort in your day-to-day. Do you want all the apps for creative projects in one place? How about keeping your work apps separate from your entertainment apps? Whatever organization or order you want, follow these tips to create, move, and remove Windows 11 Start menu folders and add a little more organization to your digital day.
Create, name, and move a Start menu folder
Follow these steps below to start organizing your Start menu apps into folders:
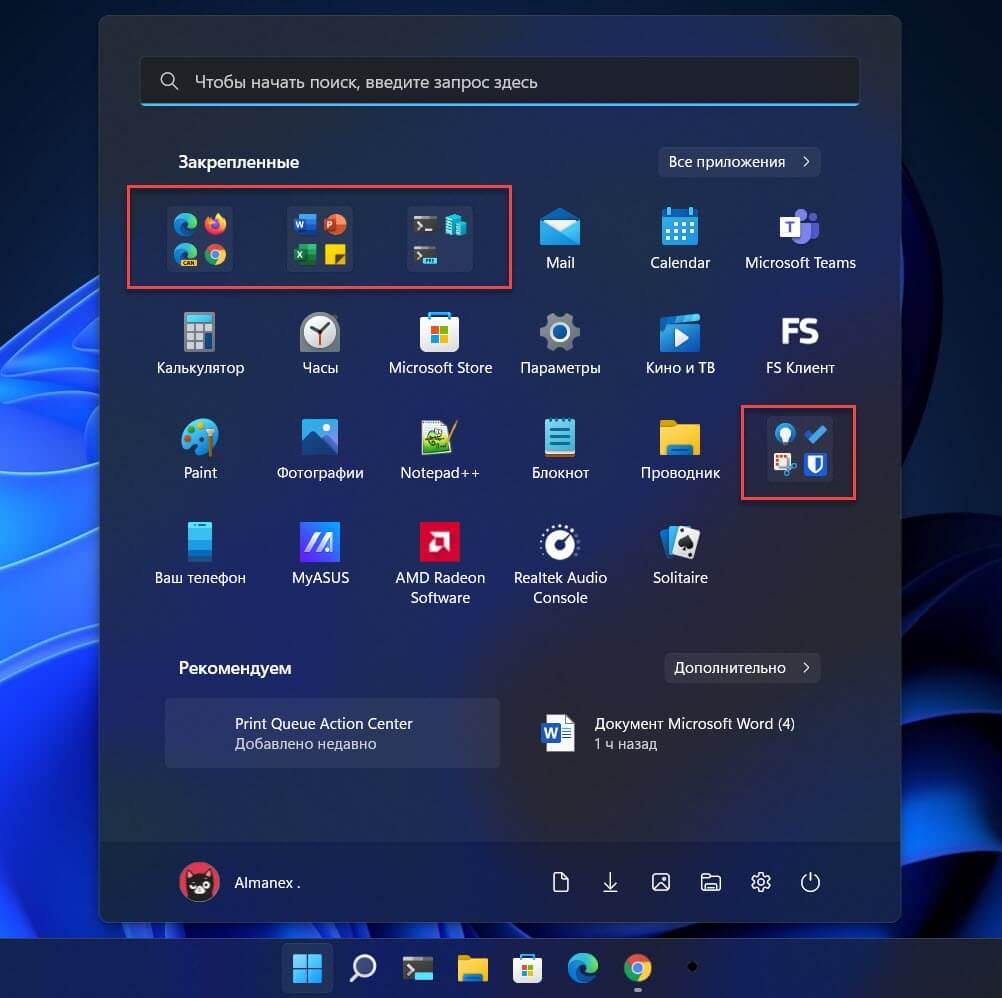
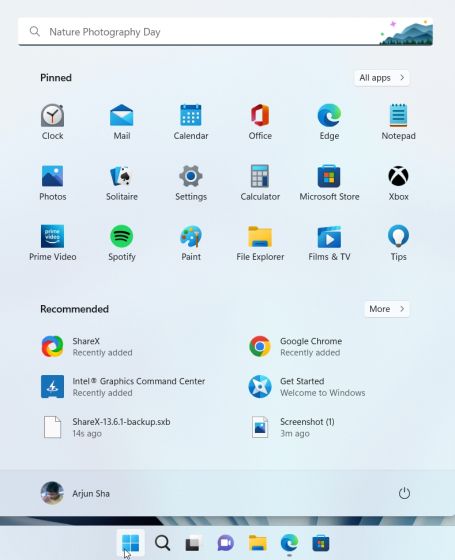
- Open the Start menu by selecting the Windows icon (four squares) on your taskbar or keyboard.
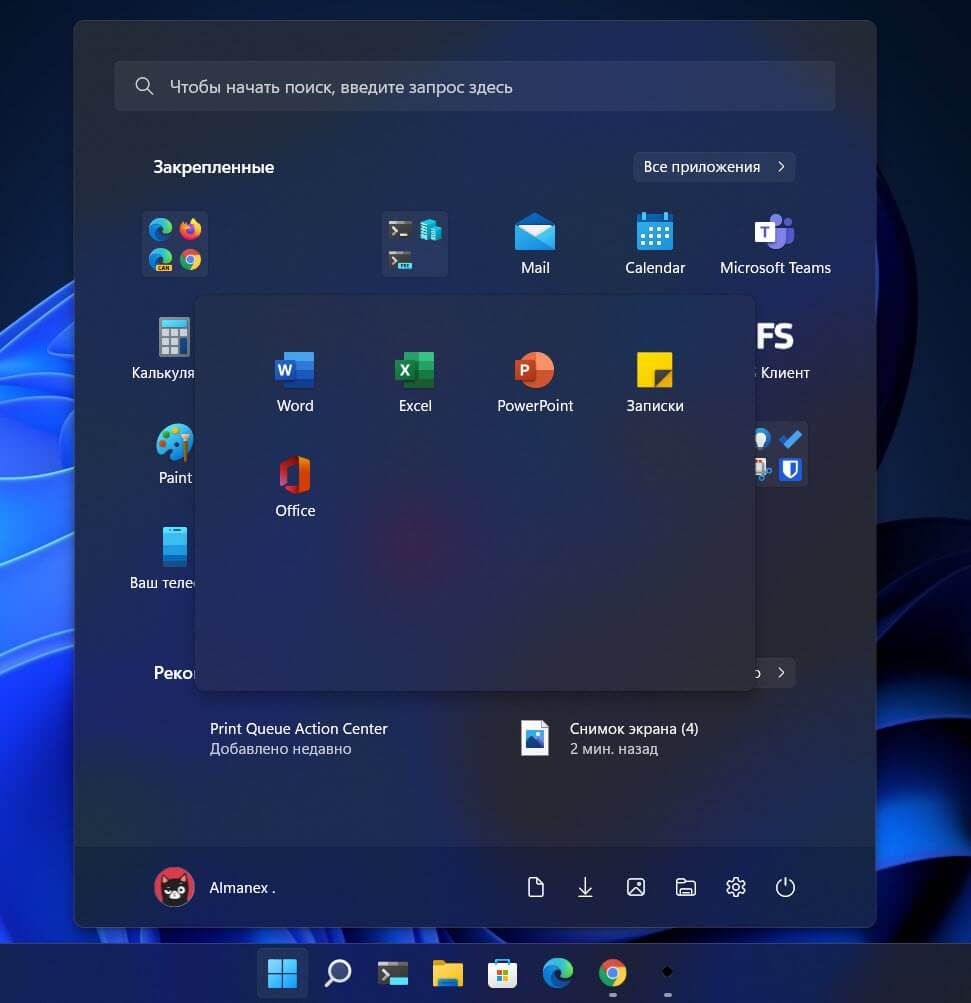
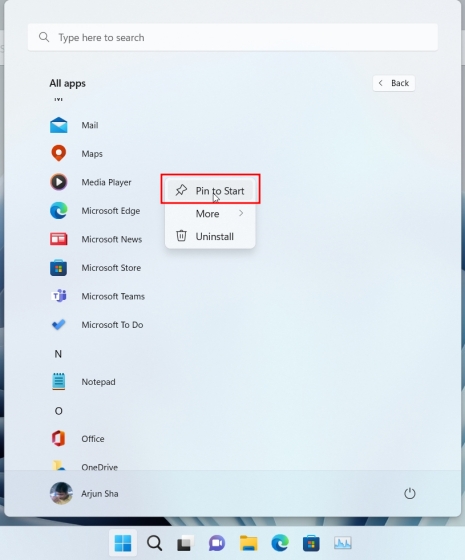
- If you don’t see the app you want to add to a folder, select All apps. When you find the app you want, right-click to select Pin to Start.
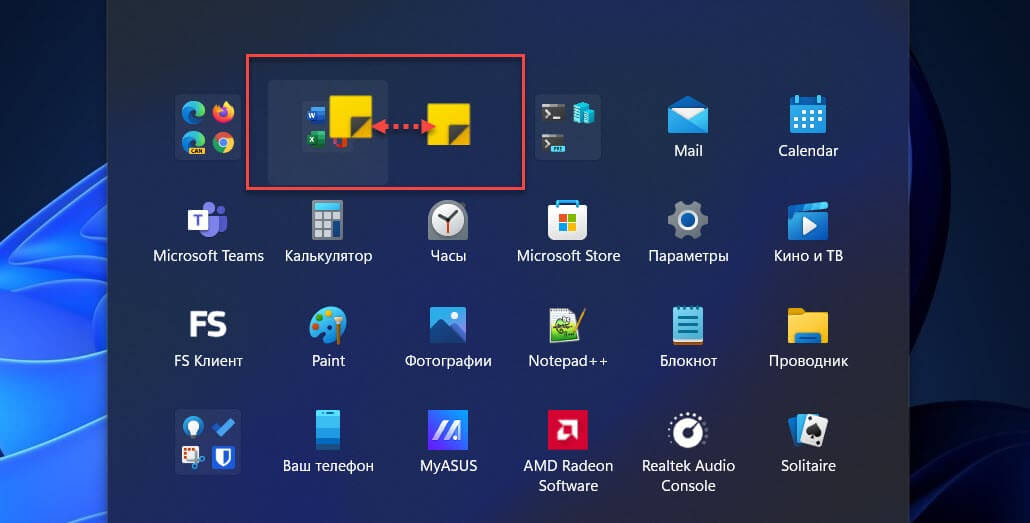
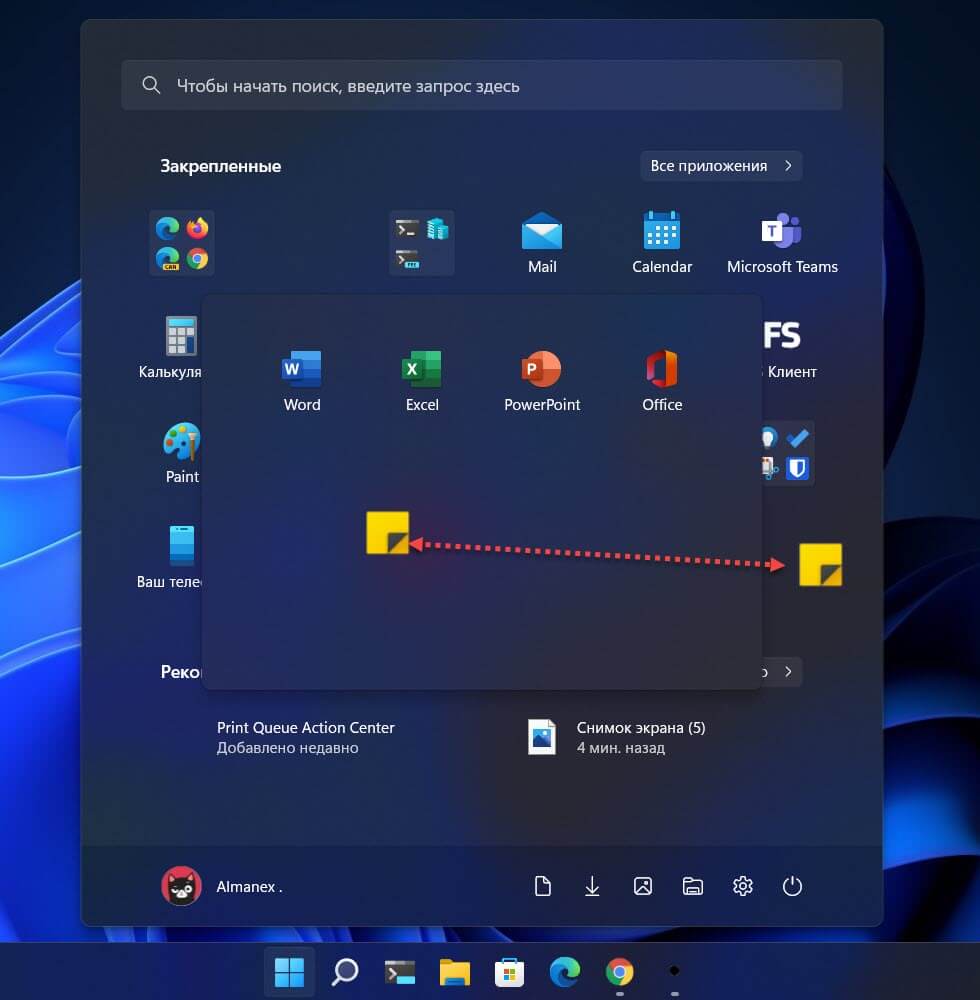
- Select any app icon in the Start menu, drag it and hover over another app icon. Both app icons will shrink, signaling that they are being put into a folder together.
- Drop the app, and you’ll see that a folder has been created.
- Add more apps to the folder by dragging and dropping.
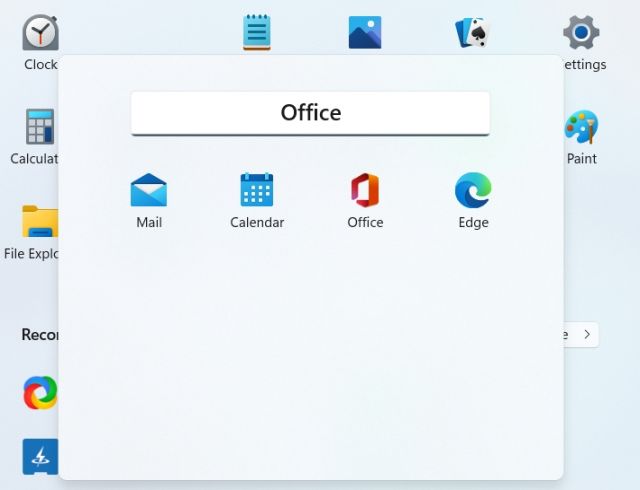
- To name the folder, select it. You can now see all the apps inside it and change the folder title.
- Create as many folders as you like, drag and drop to move folders to new positions within the Start menu.
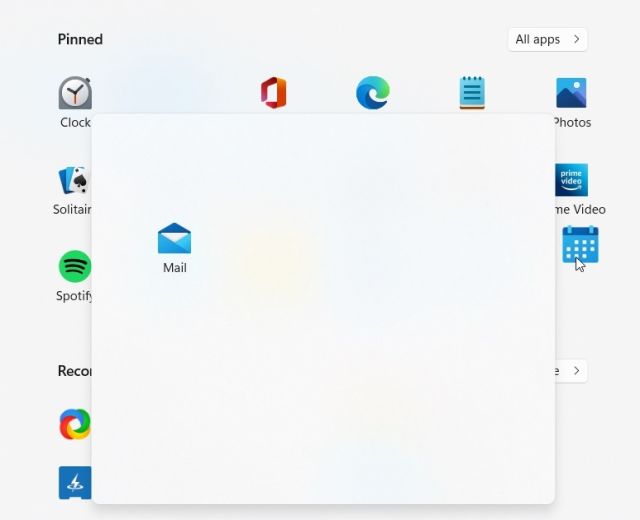
Remove apps from a Start menu folder
If you want to move apps between folders or remove apps from folders altogether, it just takes a few quick steps:
- Open the Start menu by selecting the Windows icon (four squares) on your taskbar or keyboard.
- Select the folder with the apps you want to remove.
- Select the app that you want and drag it out of the folder.
- Drop the app anywhere you’d like it within the Start menu.
Three ways to organize your Start menu apps into folders
Need some quick organization ideas? Here are a few ways you might organize your Start menu apps into folders.
- Work-life balance. Separate your personal and professional lives by keeping work-only apps in their own folder.
- Like with like. Put similar apps together. You might place language-focused apps, like Microsoft Word, with related apps, like your favorite digital reader. Perhaps you use Excel for finances and want it grouped with the Calculator app, or you want your Photos app with your favorite graphic design software.
- By user. If you share your device, you might create folders for apps specific to any one user. That way, you don’t have to sift through each other’s apps to find what you need.
Pin Start menu folders to your taskbar
Now that you’ve edited the Start menu to group apps into folders, you can extend that organization to your taskbar. Here’s how to pin Start menu folders to the taskbar at the bottom of your desktop for easy access.
- Open the Start menu by selecting the Windows icon (four squares) on your taskbar or keyboard.
- Right-click the folder you want to pin to your taskbar.
- Select Pin to taskbar. The folder will appear on your taskbar.
- Drag and drop to move the folder to a new position on the taskbar.
With these tips, you can edit your Start menu to work best for you. For more ways to stay organized and get the most out of Windows 11, head to the Windows Learning Center.
Microsoft Excel
Среди прочих нововведений Windows 11 версии 22H2 — поддержка создания папок в меню Пуск: теперь вы можете объединить несколько приложений в одну папку и дать ей название. Функции не хватало после релиза системы, хотя в Windows 10 она присутствовала и работала.
В этой очень простой и короткой инструкции для начинающих пользователей о том, как создать папки в меню Пуск Windows 11, переименовать их, отменить создание папки, если она была создана случайно.
Работа с папками в меню Пуск Windows 11
Для того, чтобы функция папок поддерживалась в меню Пуск, у вас должна быть установлена Windows 11 версии 22H2 или новее.

Проверить версию можно следующим образом: нажмите правой кнопкой мыши по кнопке «Пуск», выберите пункт «Выполнить», введите winver и нажмите Enter. В открывшемся окне вы увидите текущую версию системы. На всякий случай: Как обновиться до Windows 11 22H2 на неподдерживаемом ПК или ноутбуке.
Если нужная версия установлена, для создания папки в меню Пуск достаточно выполнить следующие шаги:
- Откройте меню Пуск Windows 11.
- Начните перетаскивать любой из значков приложения на другой значок.
- Отпустите его, когда значок, на который выполняется перенос, будет обведен рамкой.
- Готово, папка создана. Тем же способом можно добавить в неё новые значки.

- Если открыть папку в меню «Пуск», то кликнув в поле вверху можно ввести любое название для этой папки, чтобы установить нужное вам название.


Если нужных ярлыков в меню Пуск нет, вы можете закрепить новые элементы в меню «Пуск»: нажмите правой кнопкой мыши по ярлыку или исполняемому файлу в любом расположении на компьютере (на рабочем столе, в папке), выберите пункт «Закрепить на начальном экране». Тем же способом можно закрепить в меню Пуск и обычную папку с диска компьютера.
Если папка была создана случайно или вы более не планируете размещать папки в меню Пуск, достаточно просто открыть папку и перетащить значки из папки в область меню Пуск за ней. Когда в папке останется лишь один значок, она перестанет быть папкой и будет отображаться как значок оставшегося приложения.

On Windows 11 2022 Update (version 22H2), the Start menu receives an update that allows you to organize your apps in the “Pinned” section as folders, similar to the feature available on Windows 10 and mobile devices, such as Android and iOS.
In this guide, you will learn the steps to organize apps into folders in the Start menu on Windows 11.
Create folders to organize apps on Start menu
On Windows 11 22H2, you can group your favorite apps in folders, change the folder’s name to describe their content, and delete folders when they are no longer needed.
Create folder
To create a folder in Start, use these steps:
-
Open Start.
-
Drag and drop an app on another app to create a folder.

-
Drag and drop another app to add it to the folder.
-
Click the folder to open it and access the apps.

Once you complete the steps, the app folder will create, showing a preview of the first four icons in the group.
Rename folder
To rename a folder in Start, use these steps:
-
Open Start.
-
Click the app folder.
-
Click the Edit name option.
-
Confirm a name for the folder and press Enter.


After you complete the steps, the folder will reflect the new name in the Pinned section.
Delete folder
To delete a folder in Start, use these steps:
-
Open Start.
-
Click the app folder.
-
Drag and drop each app out of the folder.


Once you complete the steps, the folder will delete automatically from the Start menu.
Mauro Huculak is a
Windows How-To Expert and founder of
Pureinfotech
(est. 2010). With over 21 years as a technology writer and IT Specialist,
Mauro specializes in Windows, software, and cross-platform systems such as Linux, Android, and macOS.
Certifications:
Microsoft Certified Solutions Associate (MCSA),
Cisco Certified Network Professional (CCNP),
VMware Certified Professional (VCP),
and
CompTIA A+ and Network+.
Mauro is a recognized Microsoft MVP and has also been a long-time contributor to Windows Central.
You can follow him on
YouTube,
Threads,
BlueSky,
X (Twitter),
LinkedIn and
About.me.
Email him at [email protected].
Windows 11 регулярно получает новые функции и изменения в дизайне. Начиная со сборки Windows 11 с номером 2257, Вы можете в Меню «Пуск» группировать приложения с помощью папок.
Многим пользователям это изменение придется по душе. Если в меню «Пуск» на начальном экране, присутствует большое количество закрепленных приложений, и вы не готовы открепить некоторые из них, группировка решит проблему. Папки в меню пуск Windows 11, напоминают группировку приложений в Windows 10, с помощью которых вы можете организовывать свои приложения. Размещение ваших приложений и игр в отдельных группах влияет на повышение производительности и несомненно, облегчит вам жизнь.
Как создать папку для группировки приложений в меню Пуск Windows 11
Шаг 1: Чтобы создать папку с приложениями в меню «Пуск», откройте его.
Шаг 2: Перетащите с помощью мыши значок приложения на значок другого и отпустите его.
Это действие автоматически создаст папку в меню «Пуск». Папка будет отображать значки приложений, которые в ней находятся.
Шаг 3: Кликните папку, она откроется, и вы сможете увидеть все приложения, которые находятся в ней, повторный клик на одном из приложений откроет его.
Шаг 4: Чтобы добавить в папку больше приложений, просто перетащите их в папку.
Стоит отметить, что, папка в свернутом состоянии будут показывать только первые четыре приложения. Но, вы можете изменить порядок приложений в папке. Откройте ее и перетащите приложение чтобы изменить порядок.
Шаг 5: Если хотите удалить приложение из папки, перетащите его из созданной ранее группы в любое место на начальном экране. Оно будет автоматически удалено из папки и появится справа от редактируемой папки, независимо от того, куда вы его перетащите.
Чтобы удалить папку полностью, вам придется перетащить оттуда все приложения, пока не останется только одно.
На данный момент созданной группе нельзя присвоить имя. Но это предварительная версия функционала. Надеюсь в следующих выпусках появилась возможность подписывать и переименовывать папки.
Группировка приложений привносит дополнительный функционал в меню «Пуск», не нарушая при этом эстетику Windows 11. Те из вас кто применял это в Windows 10, будут рады подобным нововведениям, остальные могут просто игнорировать его.
Вам может быть интересно: Как закрепить файлы и папки из проводника в меню Пуск в Windows 11
Windows 11 22H2 update is coming to all users in October 2022, and it brings a long list of features. Among all the new Windows 11 22H2 features, the ability to create app folders in the Start menu is one of the best additions to Microsoft’s latest desktop OS. This was one of the primary pain points for users who upgraded from Windows 10 to Windows 11, and it’s being fixed. In fact, Microsoft is also working on an upcoming Windows 11 feature that lets you create app folders on the desktop. That’s cool, right? Nevertheless, in this article, we are going to learn how to group apps in a folder in the Start menu.
In this tutorial, we have included steps to create app folders in Windows 11 Start menu, along with the steps to name the app folders and remove them. On that note, let’s begin.
Note: To create app folders in the Start menu on Windows 11, you need to be on the Release Preview channel (Build 22621 or higher). Currently, the app folder feature works only for Windows Insider. General users will get the app folder feature in October 2022 as part of the Windows 11 22H2 update.
With that out of the way, here are the steps you need to follow to make app folders in the Windows 11 Start Menu:
1. To begin, you first need to open the Start menu. To do so, press the Windows key or click the Windows icon on the Taskbar.
2. Before you make an app folder, you need to head to the “All apps” section in the Start Menu and “Pin to Start” all the apps you wish to combine in a folder.
3. Then, you can drag an app onto another app to create an app folder in Windows 11 instantly. You can drag more than 12 apps into a folder if you want, but it will expand to a scrollable interface.
1. You can also label an app folder in the Start menu. Just open the folder and click the “Edit name” option on top and rename the app folder.
2. There you have it! Labeled app folders in the Start menu on Windows 11.
Now, the feature feels barebones right now as there is no direct way to add or remove programs in app folders. To remove apps, you need to remove each one individually and can’t directly delete the folder. Here’s how it works:
1. To remove an app folder, drag all the apps out of the folder.
2. Finally, the app folder in the Start menu will be removed.

Overall, the app folder feature in Windows 11 feels lacking and requires more attention. Microsoft should make it easier to add or remove apps from the folder before releasing the feature in Windows 11 22H2.
Frequently Asked Questions (FAQ)
Q. How to create app folders in Windows 11 Start menu?
Open the Start menu and drag an app onto another app to create an app folder in Windows 11. You can follow our step-by-step tutorial for detailed instructions.
Q. How many apps can you add to app folders in Windows 11 Start menu?
You can add as many apps as you want. In the standard interface, the app folder supports up to 12 apps, and if you add more apps, then it expands into a scrollable interface.
Q. I can’t create app folders in Windows 11. Why?
The feature is currently available only to Windows 11 Insider users in the Release Preview channel. In October 2022, the Windows 11 22H2 update will be available to everyone, and then general users will be able to use this feature.
So this is how you can group apps in a folder in the Start Menu on Windows 11. You can create multiple app folders for productivity, office tools, music, work, etc. The app folder feature in Windows 11 is not similar to Windows 10 and offers a smaller preview space, but it works nonetheless. Anyway, that’s all for this guide. If you want to add live tiles on your Windows 11 desktop, you can do that with a third-party app. And to further customize the Windows 11 Start menu, follow our linked article. Finally, if you have any questions, let us know in the comment section below.