
December 26, 2015 updated by
Leave a reply »
The best practice for fixing Windows account issues is to create another account with administrative rights. When the account you used everyday is corrupt or you forgot the password, you can then log in to the alternate admin account for troubleshooting the issues. In this article we’ll show you 3 ways to create a new administrator account in Windows 10.
Method 1: Create Administrator Account from Command Prompt
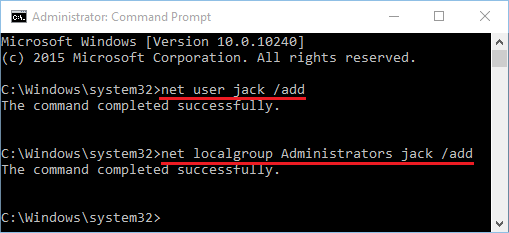
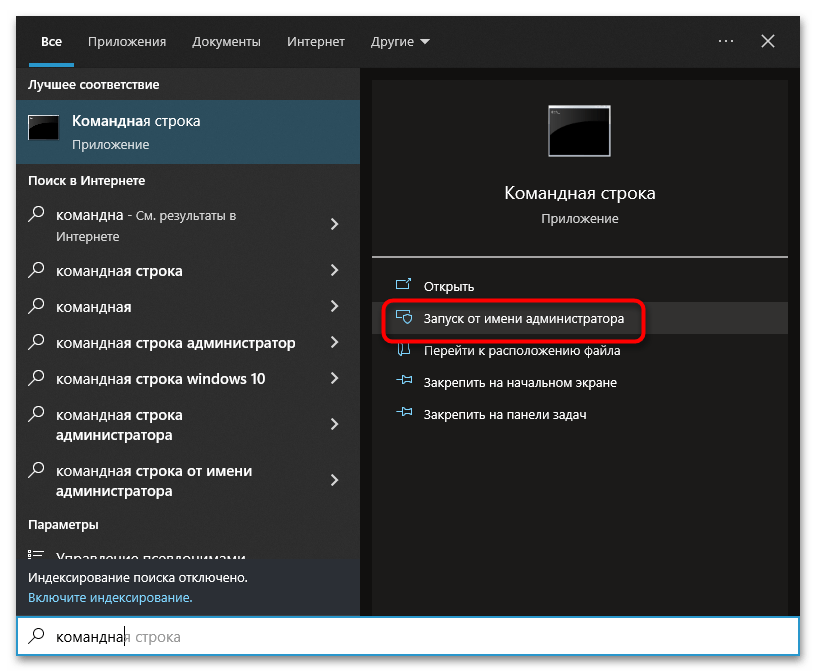
- To get started, you need to open an elevated Command Prompt in Windows 10. Press the Windows key + X to open the Quick Access menu and click Command Prompt (Admin).
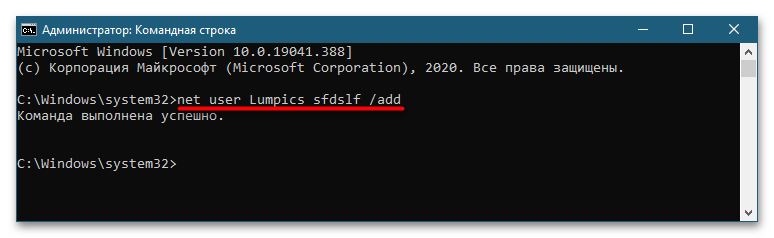
- Type the following commands to create a new local account and then join it to the Administrators group. Replace Jack with the name of your new local admin account.
net user jack /add

net localgroup Administrators jack /add
- Now you’ve successfully added a new local administrator account in Windows 10.
Method 2: Create Administrator Account from PC Settings
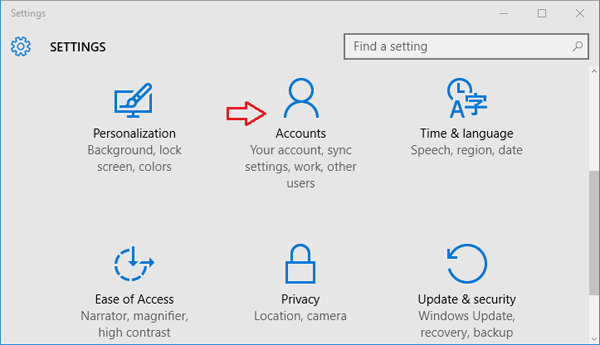
- Click on the Start button to open the Start menu. Select Settings.
- The PC Settings window should open. Click on Accounts.

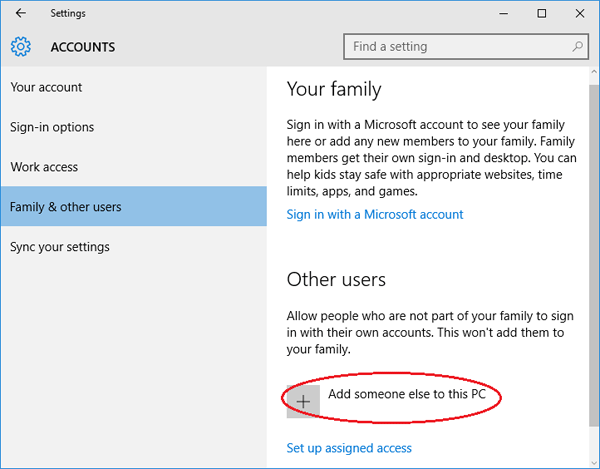
- From the left pane, click on the Family & others tab. Next click on Add someone else to this PC.

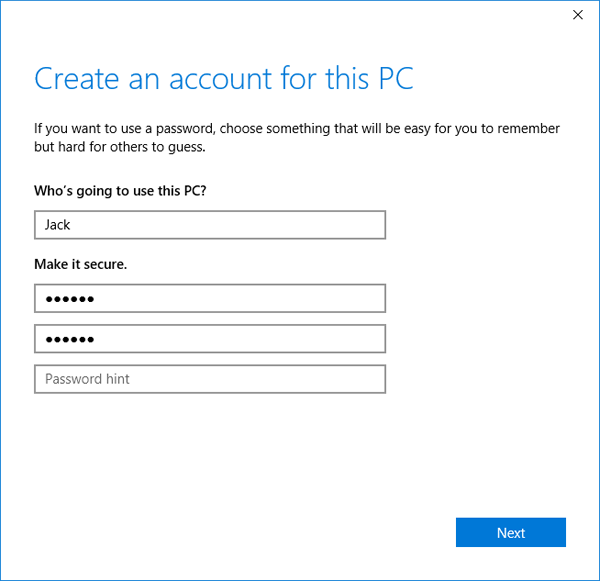
- Enter the name for your new local account, password and password hint. Click Next.

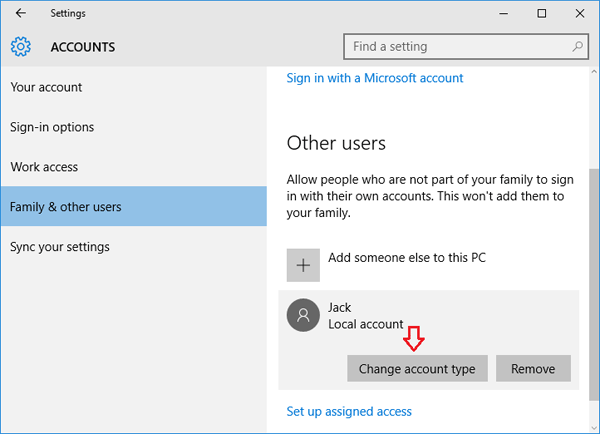
- Once you’ve clicked Next, you’ll be taken back to the Accounts screen and but now you can see the new account. By default, the newly-created account is a standard/limited account. From there click on the new user account you just created and then Change account type.

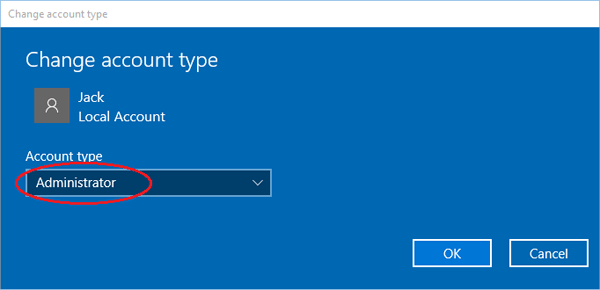
- When the pop-up window appears, change the account type from Standard User to Administrator and click OK.

- So, this was about how to add a new administrator user account in Windows 10 computer.
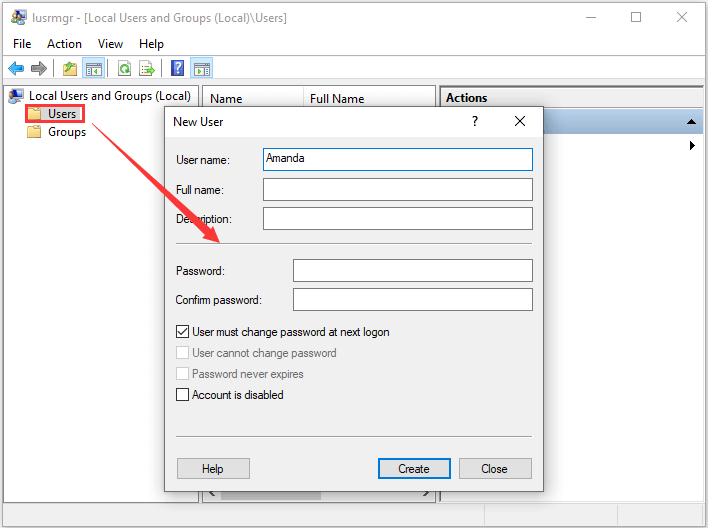
Method 3: Create Administrator Account from the Local Users and Groups Console
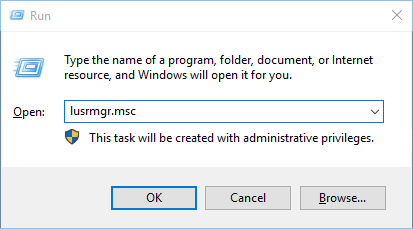
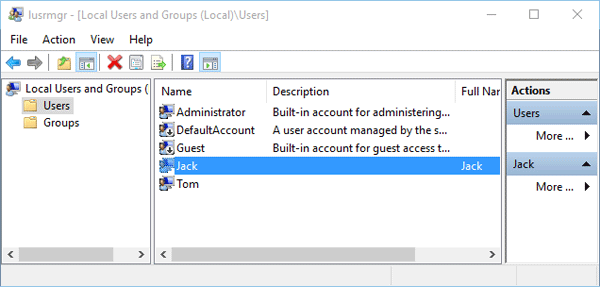
- Press the Windows key + R to open the Run box. Type lusrmgr.msc and press Enter.

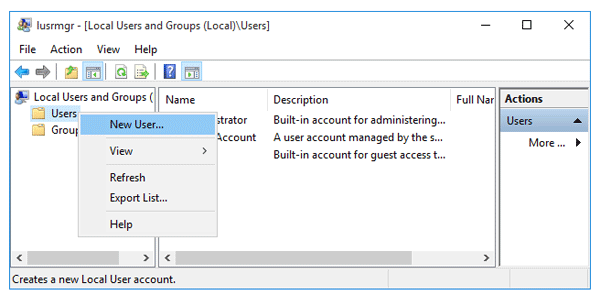
- When the Local Users and Groups console opens, right-click on Users on the left pane and select New User….

- Type the name for your new local account, password. Uncheck the “User must change password at next logon” option. Click on Create and then Close.
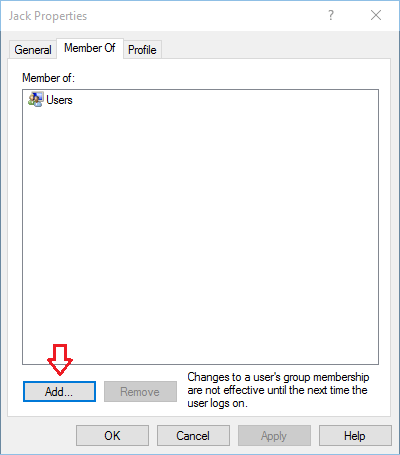
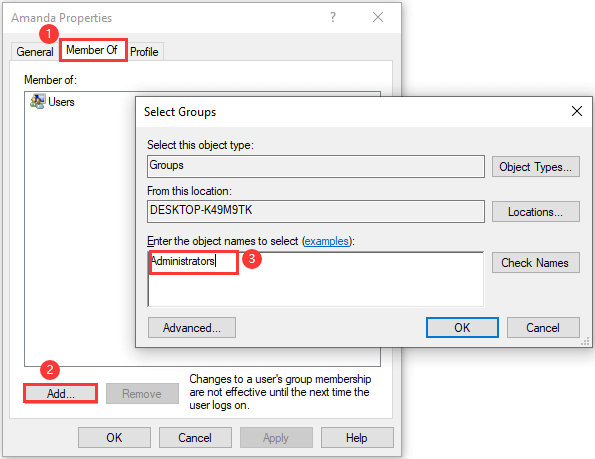
- Now you can see the newly-create account on the right pane. It’s a limited account and we need to add it to the Administrators group. Double-click on the new account.

- When the Properties window opens, click on the Add… button.

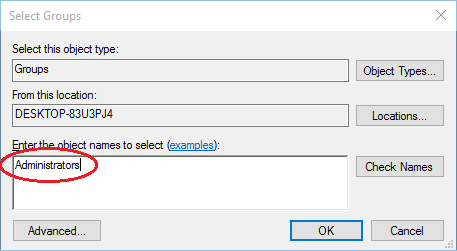
- In the Select Groups window, type Administrators into the object names box. Click OK.

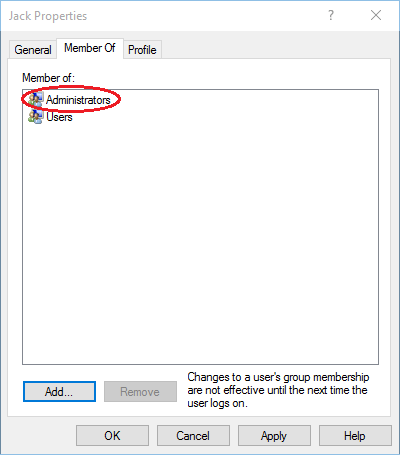
- Now you’ll see your new account is also a member of the Administrators group. Click Apply for the changes to take effect.
- Reboot or log off. You can then sign into your new administrator account and perform admin tasks.
- Previous Post: 2 Options to Delete $WINDOWS.~BT Folder After Windows 10 Update
- Next Post: How to Rename User Profile Directory in Windows 11, 10, 8 and 7
-
Home
-
Partition Magic
- How to Create Administrator Account in Windows 10
By Amanda |
Last Updated
Do you know how to create administrator account in Windows 10? In this post, MiniTool software puts together 3 methods to help you create admin account. Keep reading to get the detailed instructions.
Commonly, a local user account will be created when you install Windows, and you will use this account to log into the computer later.
But sometimes, the administrative privileges are required when you are performing certain operations with this user account. So, you might want to create an administrator account and log in with it. Besides, creating another account with administrative rights is always a good solution to various Windows account issues.
How to create administrator account in Windows 10? Here’s the method!
Method 1: Create Administrator Account via Settings
This should be the most popular method to create admin account among ordinary users, as they can easily complete the operation all by themselves with the onscreen instructions. The detailed steps are as below.
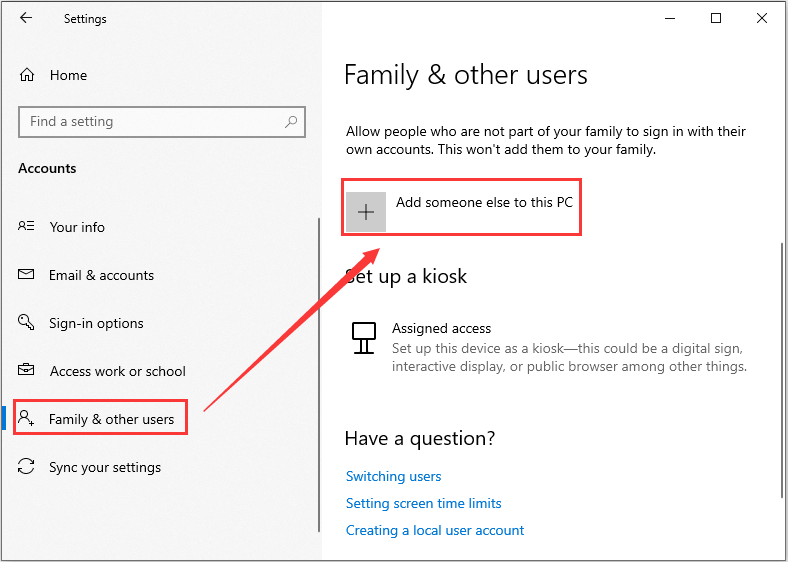
Step 1: Press Windows + I to open Windows Settings app.
Step 2: Go to Accounts category.
Step 3: Choose Family & other users section from the left pane and click Add someone else to this PC in the right pane.
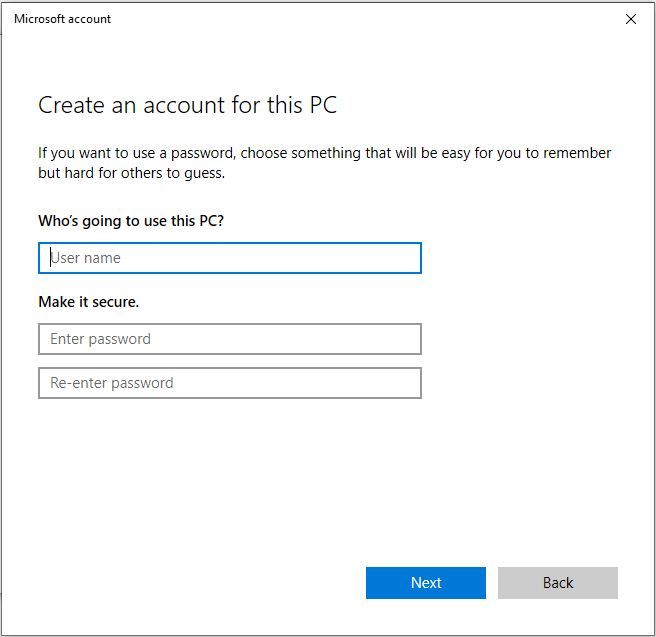
Step 4: Click I don’t have this person’s sign-in information in the pop-up window.
Step 5: Click Add a user without a Microsoft account.
Step 6: Enter a user name for the new account and assign a password as your needs. Click Next to continue.
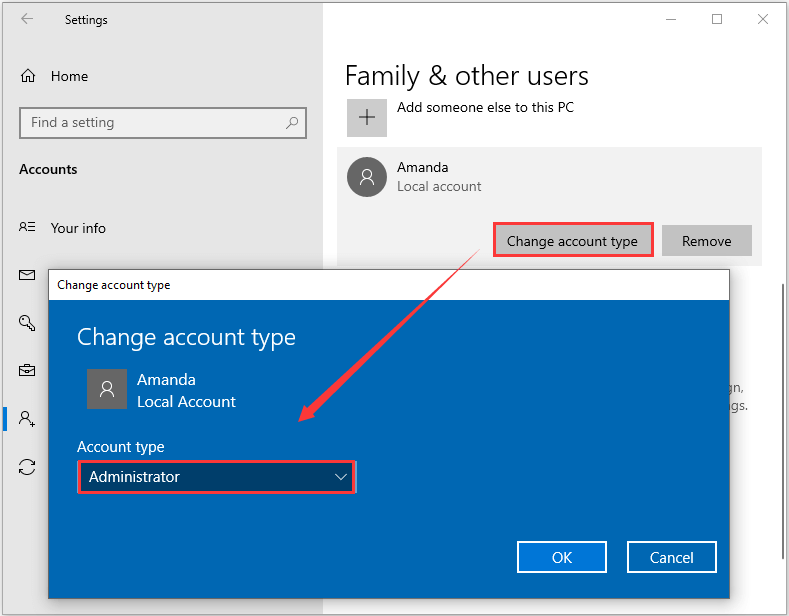
Step 7: Now, you need to set the account to administrator type, because any new account is created as a standard one by default. To do that, click Change account type and choose Administrator from the list of Account type. Click OK to save the changes.
Method 2: Create Administrator Account via Command Prompt
Alternatively, you can create administrator account with certain command lines in Command Prompt, which is a rather simple method. Let’s have a closer look at this method.
Step 1: Press Windows + R to invoke Run dialog.
Step 2: Input cmd and press Ctrl + Shift + Enter to run Command Prompt as administrator.
Step 3: Input the following command lines and press Enter after each to execute them:
- net user Amanda /add (to create a local user account with the given username)
- net localgroup Administrators Amanda /add (to add the newly created account to the Administrator group)
Note: The Amanda here is the username I assign for the new account. You can replace it with your preferred name.
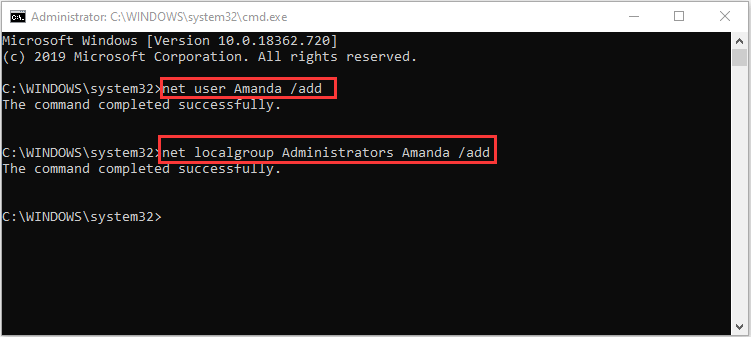
When the commands completed successfully, the new administrator account was also created successfully.
Method 3: Create Administrator Account via Local Users and Groups
Finally, you can also go to Local Users and Groups to create a new local administrator account. Just follow the steps below:
Step 1: After opening Run window, type lusrmgr.msc and click OK to enter the Local Users and Groups console.
Step 2: Right-click Users from the left pane and click New User.
Step 3: In the pop-up dialog, assign the username of the new account and enter password if needed. Click Create button.
Note: You can also choose to check or uncheck the below options about password and the account.
Step 4: The new account will be listed in the right pane. Double-click the account to open its Properties.
Step 5: Switch to the Member of tab and click Add. In the pop-up window, type Administrators in the empty box and click OK to add the new account to the administrator group.
Step 6: Click Apply and OK button to save the changes you have made just now.
Here’s all about how to create administrator account in Windows 10. After successfully creating a new administrator account, you can restart your computer or log off the current account to sign into the new account.
About The Author
Position: Columnist
Amanda has been working as English editor for the MiniTool team since she was graduated from university. She enjoys sharing effective solutions and her own experience to help readers fix various issues with computers, dedicated to make their tech life easier and more enjoyable.
Amanda has published many articles, covering fields of data recovery, partition management, disk backup, and etc. In order to provide more useful tips and information, she is still committed to expand her technical knowledge.
Способ 1: Классическая «Командная строка»
За создание и управление пользователями из оболочки «Командной строки» в Windows 10 отвечает консольная утилита net.exe, способная принимать порядка двадцати параметров. Чтобы создать с ее помощью пользователя, выполните следующие действия.
- Откройте «Командную строку» от имени администратора из поиска Windows или любым другим известным способом.
- Выполните команду
net user UserName Password /add, где UserName – имя пользователя, а Password – пароль. - В результате в системе будет создан новый пользователь с обычными правами. Если вы хотите сделать его администратором, выполните команду
net localgroup Администраторы UserName /add, где UserName — имя только что созданного пользователя.
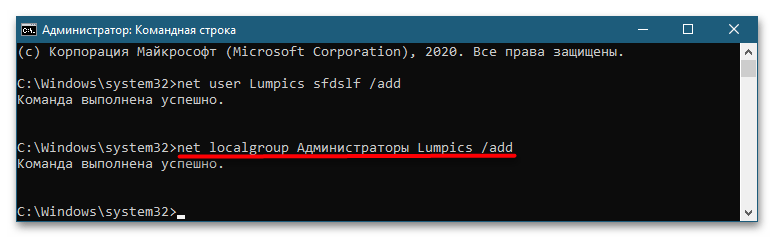
В имени пользователя допускается использование кириллицы, а если имя содержит пробел, его следует заключить в двойные прямые кавычки. Наконец, чтобы Windows 10 создала для пользователя необходимые файлы, выйдите из текущей учетной записи и войдите в созданную.
Способ 2: Консоль «PowerShell»
Расширяемое средство автоматизации «PowerShell» позиционируется как продвинутая версия классической «Командной строки». Укомплектованная интерфейсом «Командной строки», консоль «PowerShell» обладает более широкими возможностями, чем интерпретатор CMD. Естественно, в них входит и создание в системе новых пользователей.
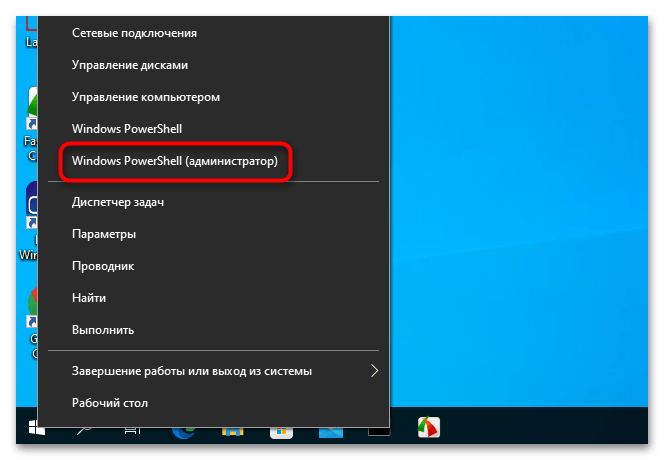
- Запустите «PowerShell» от имени администратора из контекстного меню кнопки «Пуск».
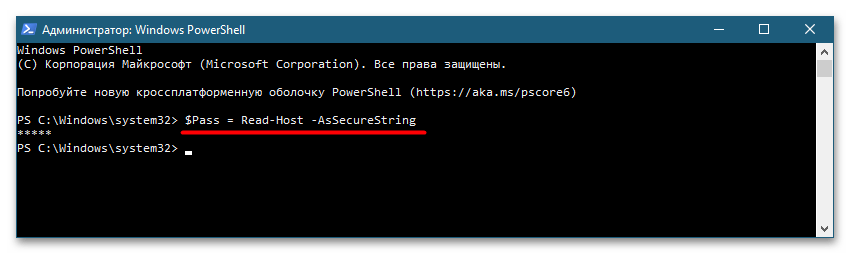
- Придумайте для создаваемого пользователя пароль и сохраните его во временную переменную pass, для чего выполните команду
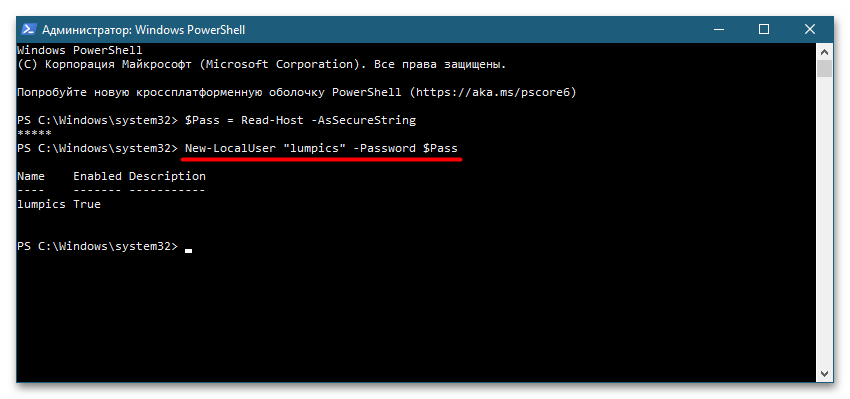
$Pass = Read-Host -AsSecureString, введите в новой строке пароль и нажмите клавишу ввода. - Теперь выполните команду создания нового пользователя
New-LocalUser "UserName" -Password $Pass, где UserName – имя пользователя. При желании можно добавить полное имя пользователя и описание учетной записи. В этом случае команда будет выглядеть так:New-LocalUser "UserName" -Password $Pass - FullName "полное имя" -Description "описание аккаунта". - Если в этом есть необходимость, можете добавить созданного пользователя в группу Администраторов. Для этого выполните команду
Add-LocalGroupMember -Group "Администраторы" -Member "UserName", заменив UserName именем пользователя.
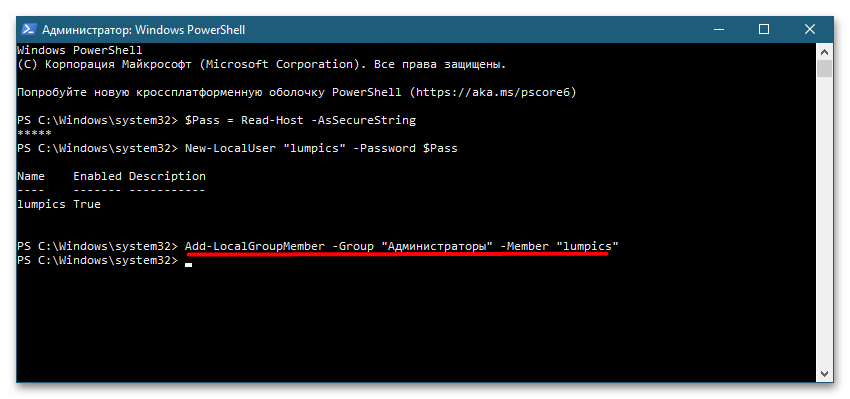
Готово, осталось только перезагрузить компьютер и зайти в новую учетную запись, чтобы Windows 10 создала для нее все необходимые файлы.
Наша группа в TelegramПолезные советы и помощь
In this tutorial, you will learn how to use the net user command to create, delete and change user accounts in the Windows command prompt (CDM).
We can perform the following tasks using the net user command:
- View user accounts.
- Add and Remove user accounts.
- Activate and Deactivate user accounts.
- Change the user password.
If you are operating in an Active Directory domain environment, always use the /domain command switch to execute the net user command on the domain controller rather than on the local computer.
Examples
List users on the local computer:
net userList users on the domain controller:
net user /domainThis command displays detailed information about the Administrator account:
net user AdministratorCreate a user named user1 with a password of strongPassword:
net user /add user1 "strongPassword"Delete the user user1 from the computer:
net user /delete user2This command enables the built-in Administrator account on Windows 10/11:
net user Administrator /active:yesThis command sets (changes) the Administrator account password:
net user Administrator "adminPassWord"Execute the following command to disable the Administrator account on Windows 10/11:
net user Administrator /active:noThis command forces the user user1 to change the password at the next logon:
net user user1 /logonpasswordchg:yesCreate a user; the user must change the password at the next logon:
net user /add user1 "strongPassword" /logonpasswordchg:yesCreate a new user; the account expires on January 31st:
net user /add user1 "strongPassword" /expires:01/31/2023Command Options
| username | The name of the user to create, delete, view, or modify. |
| password | Password for the user. |
| * | Use this option to produce a prompt for the password. |
| /add | Use this option when you want to create a new user. |
| /delete | Use this option to remove a user from the Windows system. |
| /active:{yes | no} | Activates or Deactivates a user. The default is yes when creating a new user. |
| /expires:{date | never} | Use this option to set the expiration date (mm/dd/yy) for an account. The default is never. |
| /fullname:»name» | Full name of the user. |
| /passwordchg:{yes | no} | Specifies whether users can change their own password. The default is yes. |
| /passwordreq:{yes | no} | No means the user can log in without a password. The default is YES. |
| /logonpasswordchg:{yes|no} | Specifies whether the user should change the password at the next logon. The default is NO. |
| /homedir:path | The home directory location. |
| /comment:»text» | Use this option to add a description to the user’s account. |
You can view the manual page by typing net help user at the command prompt.
View a User
When you execute the net user command without any options, it displays a list of user accounts on the computer.
net userYou will see an output similar to the following:
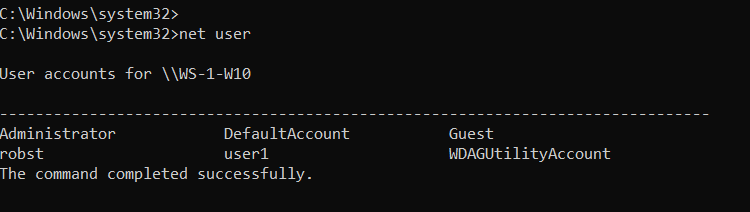
Add the /domain command switch if you want to list users on the Active Directory Domain controller.
net user /domainTo see detailed information about a particular user, execute the command net user Username, where the Username is the name of the user you want to view. For example, you can view the Administrator account by running the following command:
net user AdministratorCreate and Delete User Accounts
To create a user account, use the following syntax:
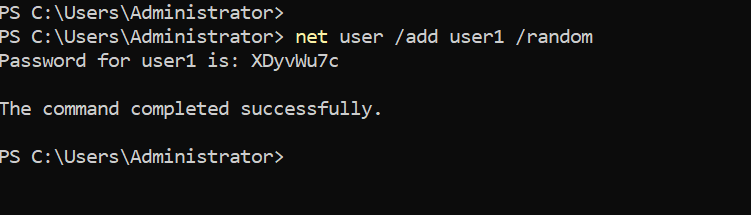
net user /add UserName PasswordFor example, the following command creates a user named user1 with a password of strongPassword:
net user /add user1 "strongPassword"Use an asterisk (*) in place of the password to produce a prompt, as shown in the following example:
net user /add user1 *
Alternatively, you can also use the /random option to generate a strong random password, as shown in the following example:
net user /add user1 /randomThe randomly generated password will be displayed on the command prompt after you execute the command.
To delete a user, use the following syntax:
net user /delete UserNameThe following command deletes the user user1 from the computer:
net user /delete user2Change Passwords
To change passwords, use the following syntax:
net user UserName New-PasswordUse an asterisk (*) or /random in place of the password to produce a prompt or generate a random password:
net user UserName *
net user user1 /random
Notes
The net user command is most of the time used in Windows Server to manage Active Directory users.
Windows 10/11 uses a new Settings pane to manage users, but the net user command is still useful for some tasks. For example, if you want to activate the built-in Administrator account, it is easy to do that using this command.
While working at the command prompt, run the net help user command to see all available command options.
In the next tutorial, we are going to learn how to manage Windows groups using the net localgroup CMD command.
В этой инструкции для начинающих о том, как создать нового пользователя Windows 10 несколькими способами, как сделать его администратором или наоборот, создать ограниченную учетную запись пользователя компьютера или ноутбука. Также может пригодиться: Как удалить пользователя Windows 10.
В Windows 10 присутствуют два типа учетных записей — учетные записи Майкрософт (требующие адреса электронной почты и синхронизирующие параметры онлайн) и локальные учетные записи пользователей, не отличающиеся от тех, которые могут быть вам привычны по ранним версиям Windows. При этом одну учетную запись всегда можно «превратить» в другую (например, Как удалить учетную запись Майкрософт). В статье будут рассмотрено создание пользователей с обоими типами учетных записей. Также может быть полезным: Как сделать пользователя администратором в Windows 10.
- Создание нового пользователя в Параметрах Windows 10
- Как создать пользователя в командной строке
- Локальные пользователи и группы Windows 10
- Добавление пользователя в control userpasswords2
- Видео инструкция
Создание пользователя в параметрах Windows 10
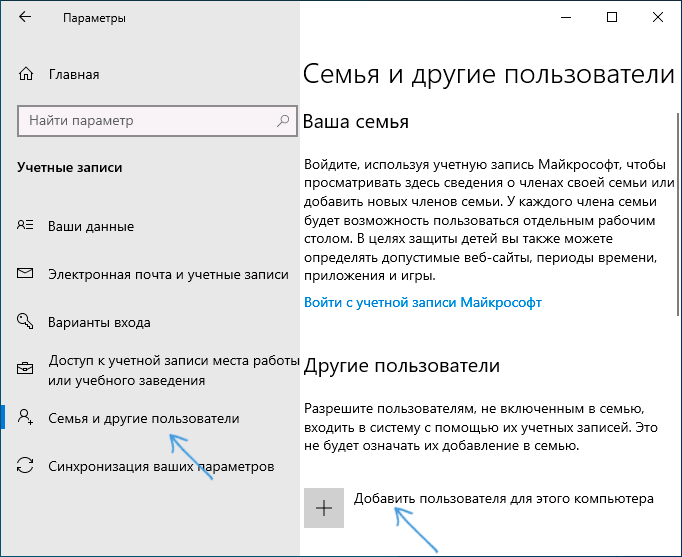
Основной способ создания нового пользователя в Windows 10 — использование пункта «Учетные записи» нового интерфейса настроек, доступного в «Пуск» — «Параметры». В указанном пункте настроек откройте раздел «Семья и другие пользователи».
- В разделе «Ваша семья» вы сможете (при условии, что используете учетную запись Майкрософт) создать учетные записи для членов семьи (также синхронизируемые с Майкрософт), подробнее о таких пользователях я писал в инструкции Родительский контроль Windows 10.
- Ниже, в разделе «Другие пользователи» можно добавить «простого» нового пользователя или администратора, учетная запись которого не будет контролироваться и являться «членом семьи», можно использовать как учетные записи Майкрософт, так и локальные учетные записи. Этот вариант будет рассматриваться далее.
Для создания нового пользователя, не входящего в семью и без возможностей родительского контроля, выполните следующие шаги:
- В разделе «Другие пользователи» нажмите «Добавить пользователя для этого компьютера».

- В следующем окне вам будет предложено указать адрес электронной почты или номер телефона — введите их, при условии, что вы хотите добавить пользователя с уже существующей учетной записью Майкрософт.
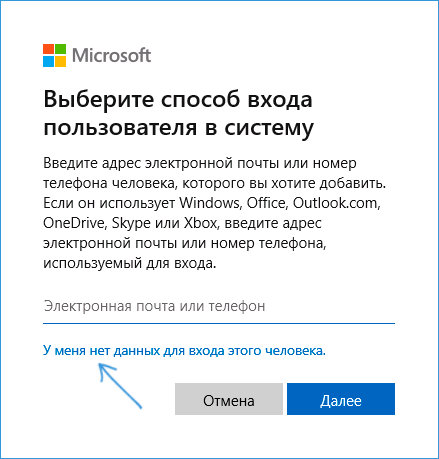
- Если вы собираетесь создавать локальную учетную запись (или даже учетную запись Майкрософт, но пока не зарегистрировали e-mail для нее), нажмите «У меня нет данных для входа этого человека» внизу окна.

- В следующем окне будет предложено создать учетную запись Майкрософт. Вы можете заполнить все поля для создания пользователя с такой учетной записью или нажать «Добавить пользователя без учетной записи Майкрософт» внизу.

- В следующем окне останется ввести имя пользователя, пароль (если требуется пользователь без пароля, просто не вводите ничего в соответствующие поля), подсказку для пароля и указать вопросы для восстановления пароля, на случай, если он будет забыт. Этого достаточно, чтобы новый пользователь Windows 10 появился в системе и под его учетной записью был возможен вход.


По умолчанию, новый пользователь имеет права «обычного пользователя». Если нужно сделать его администратором компьютера, выполните следующие шаги (при этом, вы для этого также должны быть администратором):
- Зайдите в Параметры — Учетные записи — Семья и другие пользователи.
- В разделе «Другие пользователи» нажмите по пользователю, которого нужно сделать администратором и кнопку «Изменить тип учетной записи».
- В списке выберите «Администратор» и нажмите Ок.


Войти под новым пользователем можно, нажав по имени текущего пользователя вверху меню пуск или с экрана блокировки, предварительно выйдя из текущей учетной записи.
Как создать нового пользователя в командной строке
Для того, чтобы создать пользователя с помощью командной строки Windows 10, запустите ее от имени администратора (например, через меню правого клика по кнопке «Пуск»), после чего введите команду (если имя пользователя содержит пробелы, используйте кавычки, пароль брать в кавычки не нужно):
net user имя_пользователя пароль /add
И нажмите Enter.
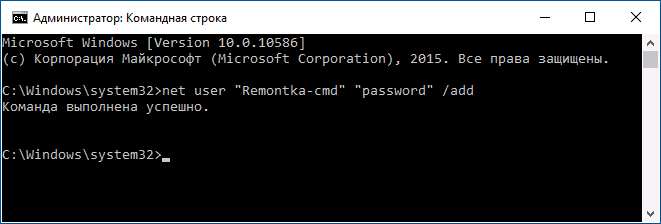
После успешного выполнения команды, в системе появится новый пользователь. Также вы можете сделать его администратором, используя следующую команду (если команда не сработала, а у вас не лицензия Windows 10, попробуйте вместо Администраторы писать administrators):
net localgroup Администраторы имя_пользователя /add
Вновь созданный таким образом пользователь будет иметь локальную учетную запись на компьютере.
Создание пользователя в «Локальные пользователи и группы» Windows 10
И еще один способ создания локальной учетной записи с помощью элемента управления «Локальные пользователи и группы»:
- Нажмите клавиши Win+R, введите lusrmgr.msc в окно «Выполнить» и нажмите Enter.
- Выберите «Пользователи», а затем в списке пользователей кликните правой кнопкой мыши и нажмите «Новый пользователь».

- Задайте параметры для нового пользователя.

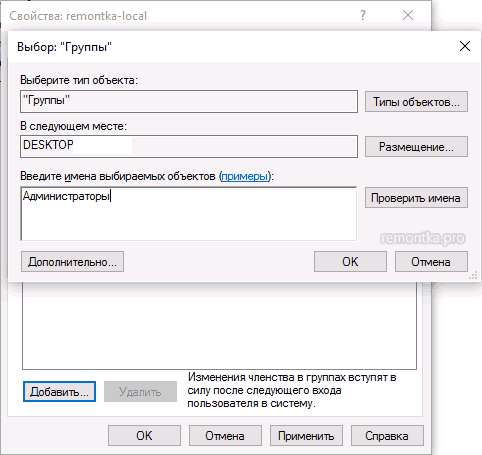
Чтобы сделать созданного пользователя администратором, кликните по его имени правой кнопкой мыши, выберите пункт «Свойства». Затем, на вкладке «Членство в группах» нажмите кнопку «Добавить», наберите «Администраторы» и нажмите «Ок».
Готово, теперь выбранный пользователь Windows 10 будет иметь права администратора.
Добавление учетной записи в control userpasswords2
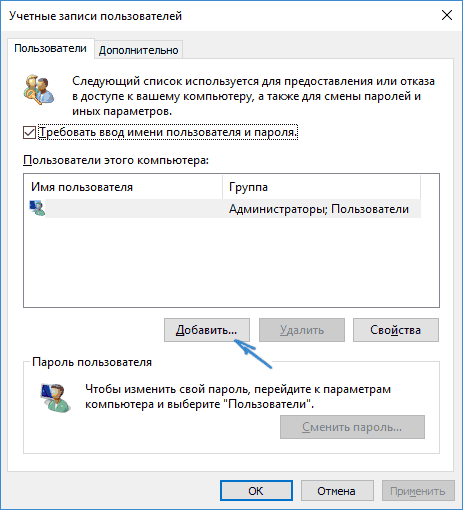
И еще один очень простой способ добавления новой учетной записи пользователя Windows 10:
- Нажмаем клавиши Win+R, вводим control userpasswords2

- В списке пользователей нажимаем кнопку добавления нового пользователя

- Дальнейшее добавление нового пользователя (доступны как учетная запись Майкрософт, так и локальная учетная запись) будет выглядеть тем же самым образом, что и в первом из описанных способов.


Видео инструкция
Если остались какие-либо вопросы или что-то не получается так просто, как это описано в инструкции — пишите, постараюсь помочь.