
Последние версии Windows 10 Домашняя при чистой установке и при условии, что вы подключились к Интернету не предлагают возможности создать автономную учетную запись (локальный аккаунт), оставляя лишь два варианта действий: ввод существующей учетной записи Майкрософт или регистрация новой такой же учетной записи. Однако, создание автономной учетной записи всё ещё возможно.
В этой инструкции два простых способа создать автономную учетную запись при установке Windows 10 последних версий и дополнительная информация, которая может оказаться полезной для целей создания локального аккаунта пользователя или администратора.
Способы использования автономной учетной записи при установке Windows 10
Самый простой метод создания автономной учетной записи вместо использования учетной записи Майкрософт в облаке — выполнение чистой установки Windows 10 Домашняя без подключения к Интернету. Однако, если вы уже подключились к Интернету и дошли до этапа «Войдите с помощью учетной записи Майкрософт», начинать процесс установки заново — не самый удобный метод.
Вместо этого вы можете поступить следующим образом, что тоже даст возможность создания локального аккаунта:
- Если у вас уже есть учетная запись Майкрософт, введите соответствующий E-mail. Если нету, введите любой адрес электронной почты, для которого такая учетная запись существует, например, вот этот: test@outlook.com

- Введите любой пароль, кроме правильного.
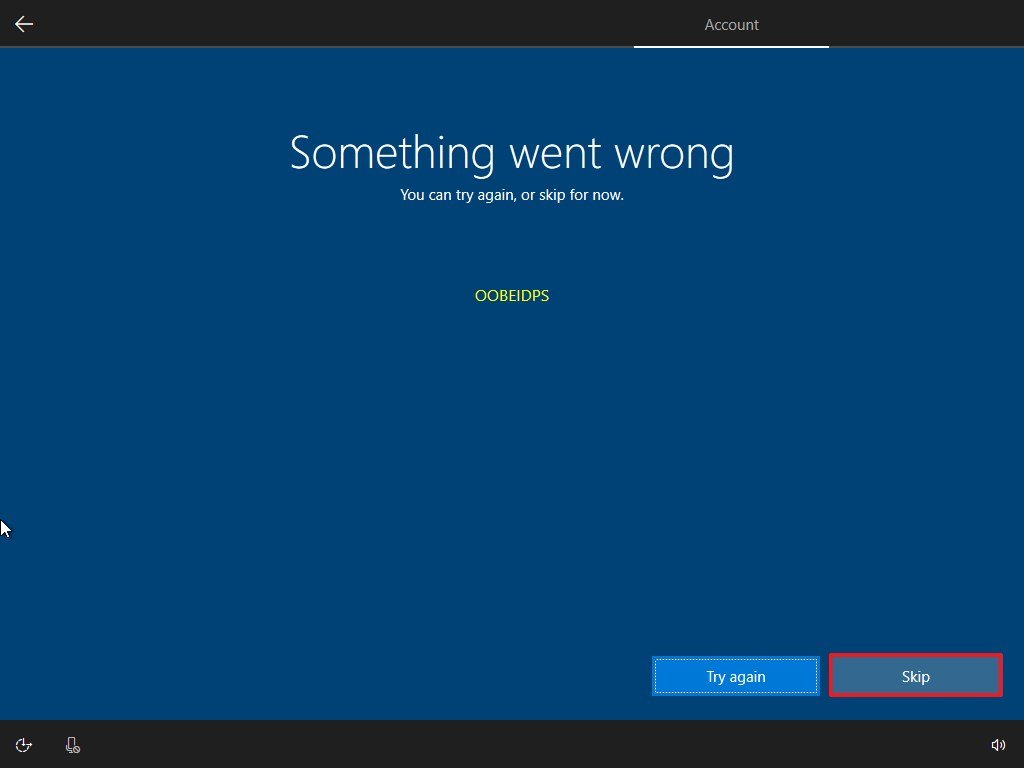
- После ввода неправильного пароля вам предложат восстановить его, но здесь же появится еще один вариант действий «Пока что пропустите этот шаг» — выберите этот вариант.
- На следующем экране выберите «Ограниченные возможности».
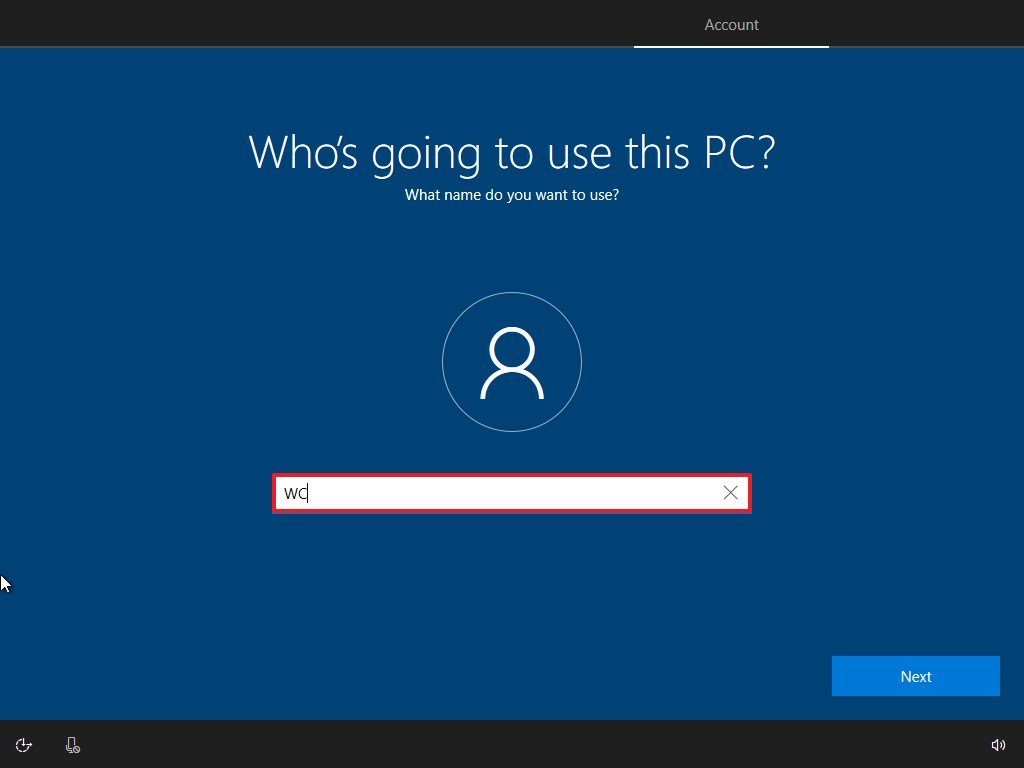
- Создайте локальную учетную запись для использования на компьютере (сразу после создания у этой записи будут права администратора, еще один важный пункт: не используйте имя «Администратор» для учетной записи, это имя зарезервировано за скрытым системным пользователем).


Вот в общем-то и всё — автономная учетная запись на вашем компьютере создана и её можно использовать вместо учетной записи Майкрософт.
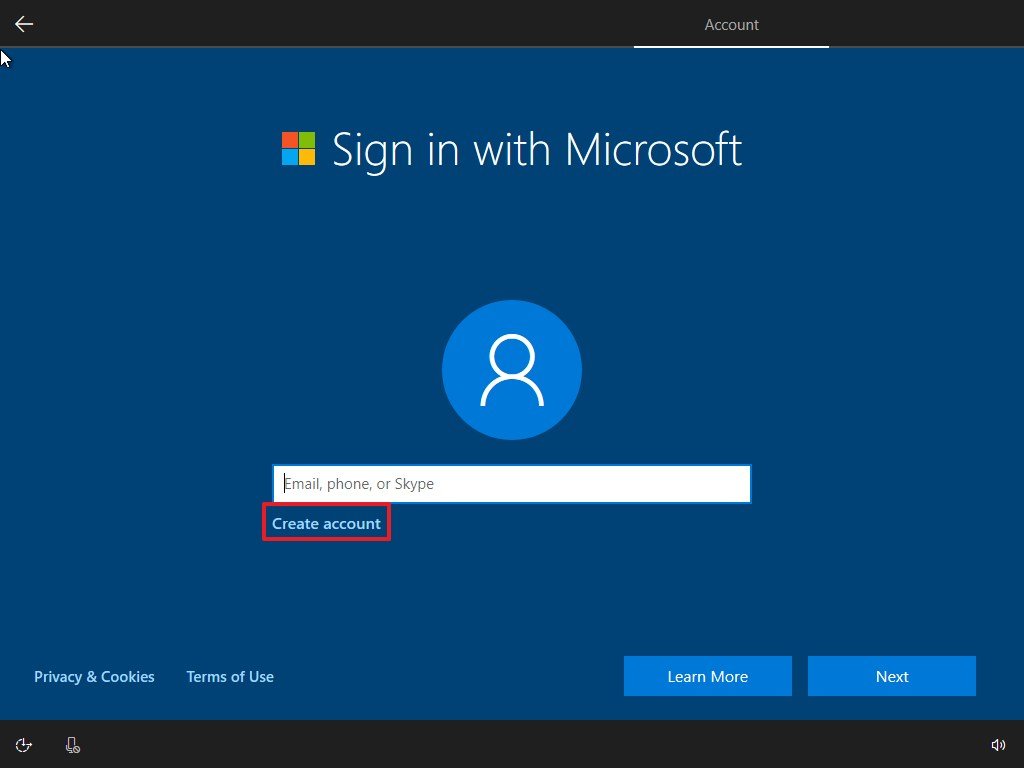
Ещё один простой метод, если вы легко можете отключить Интернет (вынуть кабель, выключить Wi-Fi роутер из розетки) — нажать «Создать учетную запись» на экране с предложением входа в учетную запись Майкрософт, подождать некоторое время и, после появления сообщения об ошибке (так как Интернет отключен), нажать кнопку «Пропустить этот шаг» — на следующем шаге откроется окно для ввода имени локального аккаунта.
Дополнительная информация
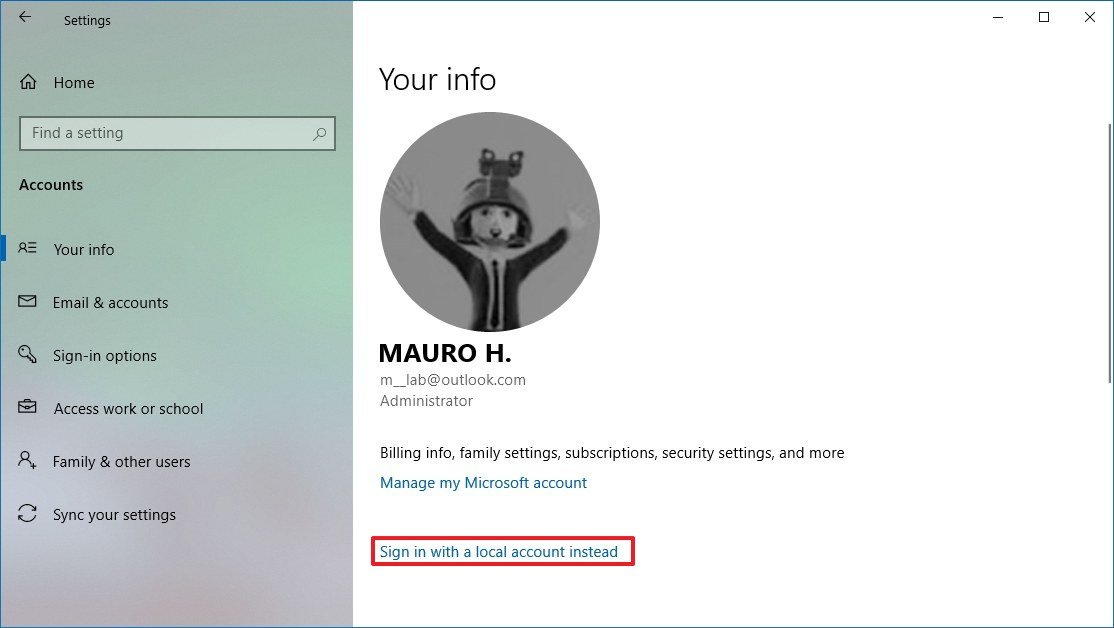
Если вы всё-таки создали учетную запись Майкрософт или вошли под ней при установке Windows 10, а теперь по какой-либо причине хотите использовать автономную учетную запись вместо неё, то можно зайти в Параметры — Учетные записи — Ваши данные и нажать по пункту «Войти вместо этого с локальной учетной записью», подробнее об этом и других методах — Как удалить учетную запись Майкрософт в Windows 10.

Еще один метод — создать локальную учетную запись пользователя и дать её права администратора, зайти под ней, а потом в разделе Параметры — Учетные записи — Семья и другие пользователи удалить имеющуюся учетную запись Майкрософт.

Windows 10 Home users no longer has the option to create a local account during the out-of-box experience (OOBE) setup, but there’s a workaround if you don’t want to use a Microsoft account. Although you have been able to choose between a Microsoft account or traditional local account during the setup process, the experience has always been intended to lure users into selecting the Microsoft account option.
The reasoning behind this approach is that Microsoft wants you to use the cloud-based account system to take advantage of additional benefits, such as access to many of the company’s online services, the ability to sync settings and files across devices, as well as manage various aspects of your devices, including updating personal information, easily reset the account password, and find your comptuer if it’s lost or stolen.
However, there are still people who prefer the security, privacy, and simplicity of a local account, which was one of the reasons the option was available during the setup process. But since version 1903 (May 2019 Update), the choice has disappeared entirely from the Windows 10 Home setup.
If you’re among those who use the Home version of Windows 10 and prefer the offline account type, the next time that you reset or set up a new device, or perform a clean installation, you will have to use a workaround if you want to create a local account.
In this Windows 10 guide, we’ll walk you through two ways in which you can create a local account now that Microsoft no longer includes the option for Home users.
- How to create local account during installation of Windows 10
- How to create local account after installation of Windows 10
How to create local account during installation of Windows 10
To create a local account within the out-of-box experience for Windows 10 Home, while in the account setup stage, use these steps:
Quick note: If you’re stuck creating a Windows 10 account, we assume you already went through the steps to perform a clean install of Windows 10, or you’re setting up a new device.
All the latest news, reviews, and guides for Windows and Xbox diehards.
- Disconnect the computer from the network.Quick tip: If you’re using an Ethernet connection, disconnect the cable from the back of your computer. If you’re using a wireless connection, turn off the adapter using the shortcut on your laptop. (In the case that there’s no way to disable the Wi-Fi adapter, then restart your computer, and skip the network connection step.)
- In the «Sign in with Microsoft» section, click the Next button without specifying an account name.
- Click the Create account option.
- Click the Skip button.
- Specify a name for your local account.
- Click the Next button.
- Create a password for the local account.
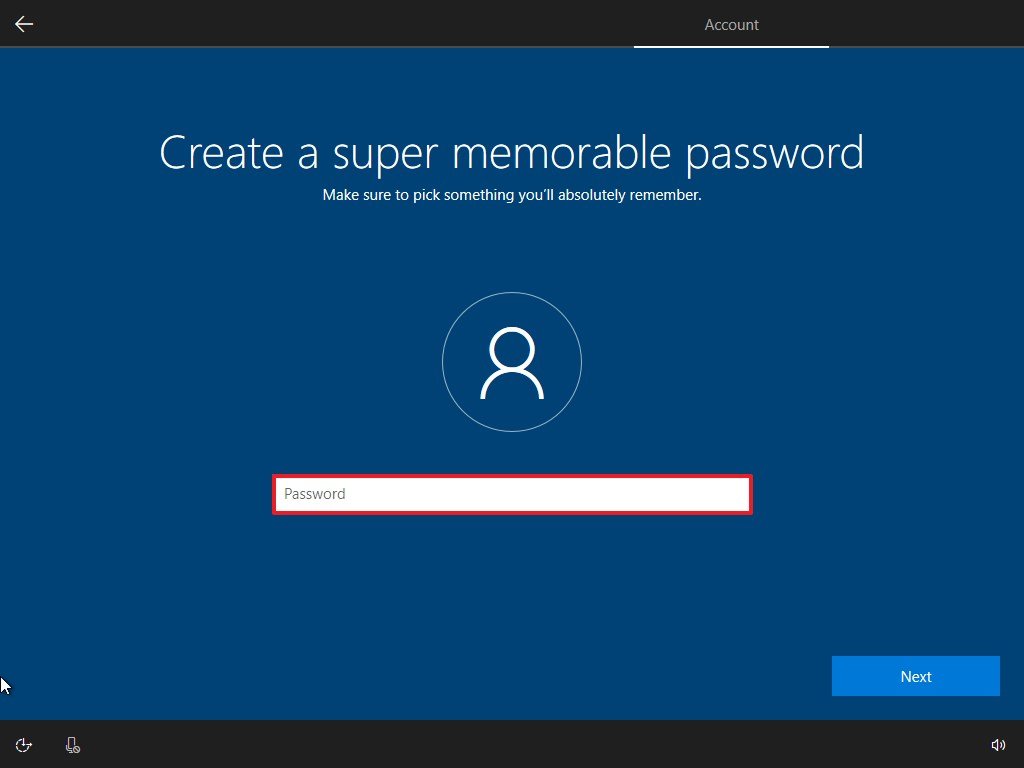
- Click the Next button.
- Confirm the password.
- Click the Next button.
- Select your first security question using the drop-down menu.
- Confirm your first answer.
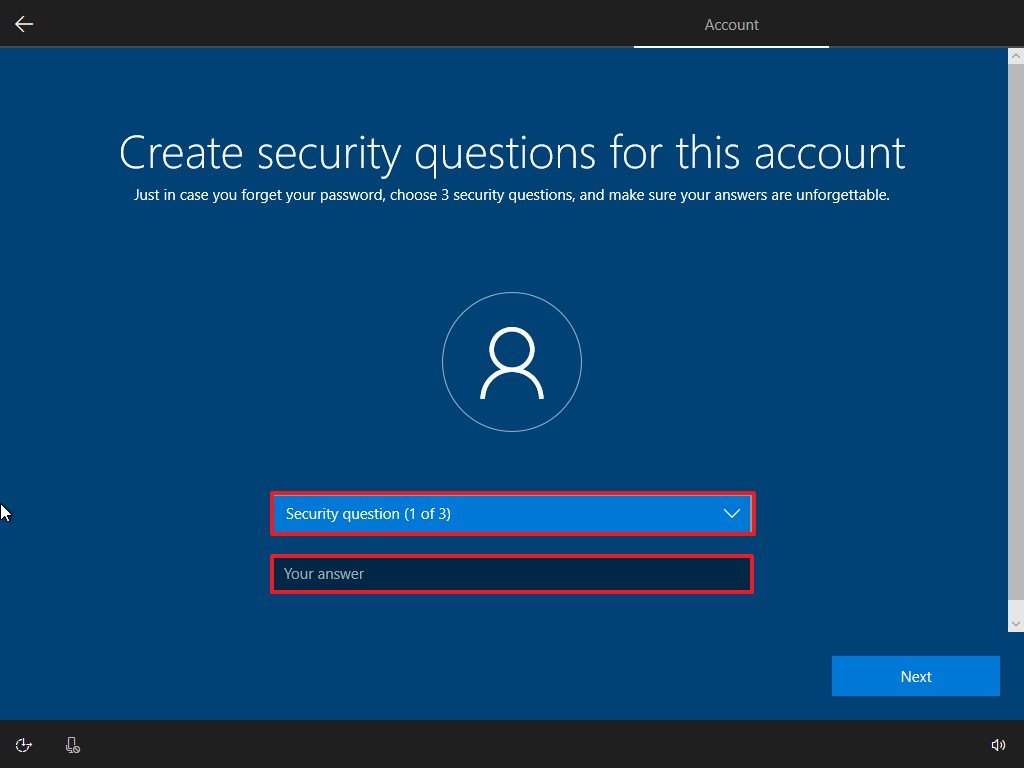
- Click the Next button.
- Repeat step No. 11, 12, and 13 two more times to complete setting up the local account security.
- Continue with the on-screen directions.
Once you complete the steps, and you’re back on the desktop, reconnect the device to the network, and continue using Windows 10 with a local account.
How to create local account after installation of Windows 10
If you completed the Windows 10 Home setup using a Microsoft account, you could still use a local account. You can do this by removing the Microsoft account link from the Windows 10 account, or you can create a local account and move your content to the new account.
To convert a Microsoft account to a local account, use these steps:
- Open Settings.
- Click on Accounts.
- Click on Your Info.
- Click the Sign in with a local account instead option.
- Click the Next button.
- Specify your account information, such as username, password, and password hint.
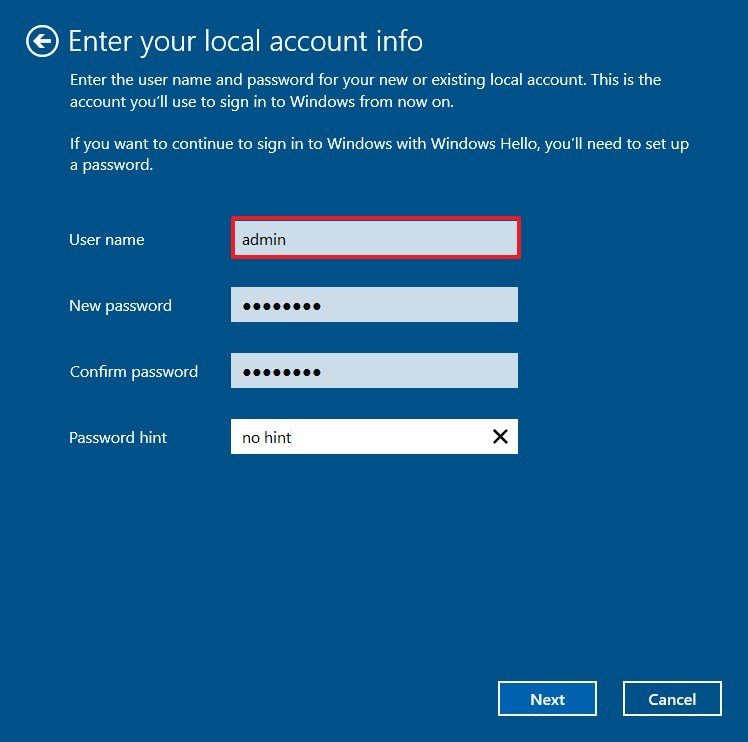
- Click the Next button.
- Click the Sign out and finish button.
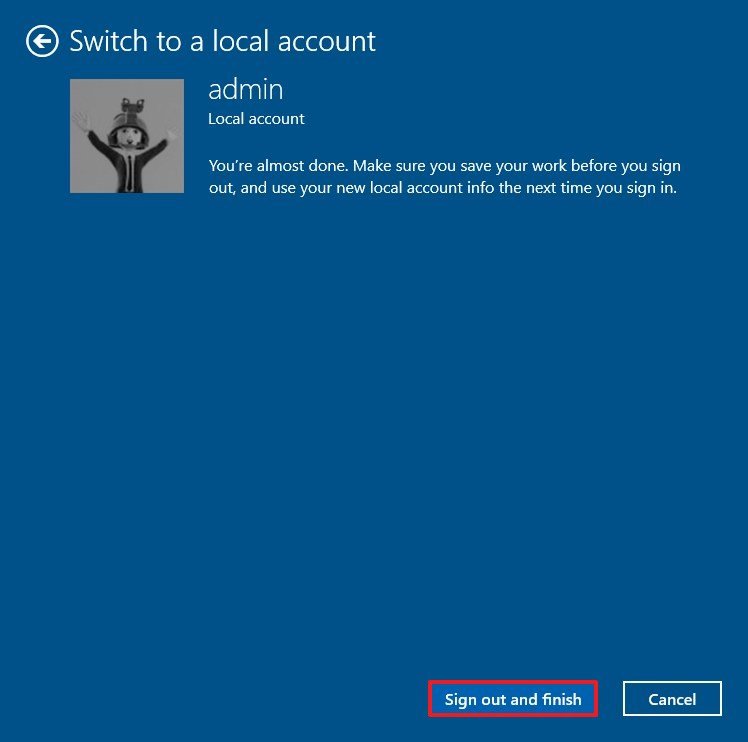
After you complete the steps, sign back into the account to continue your Windows 10 experience using local account.
Mauro Huculak has been a Windows How-To Expert contributor for WindowsCentral.com for nearly a decade and has over 15 years of experience writing comprehensive guides. He also has an IT background and has achieved different professional certifications from Microsoft, Cisco, VMware, and CompTIA. He has been recognized as a Microsoft MVP for many years.
Did you know you can add a Windows 10 local account and log in to the PC without using a Microsoft account or an email address? If you’re looking for a way to do it, then this tutorial is for you.
With Windows 10, you have the option of creating a local user or using your existing Microsoft account to log in to the PC. Let’s look at different options in creating a local user account.
In this tutorial, you will learn all the different ways to create a local user account on Windows 10. Let’s jump right in.
Prerequisites
- Windows 10 PC with administrator account. This tutorial will use Windows 10 21H1 Enterprise version.
Creating Windows 10 Local Account User While Installing Windows 10
One of the first ways you’ll find to create a local user account in Windows 10 is via Windows Setup. Once installation is complete, you’ll be asked to sign in with a Microsoft account. Even though it seems you must use a Microsoft account, you can create a local account instead. The option to do so is just hidden.
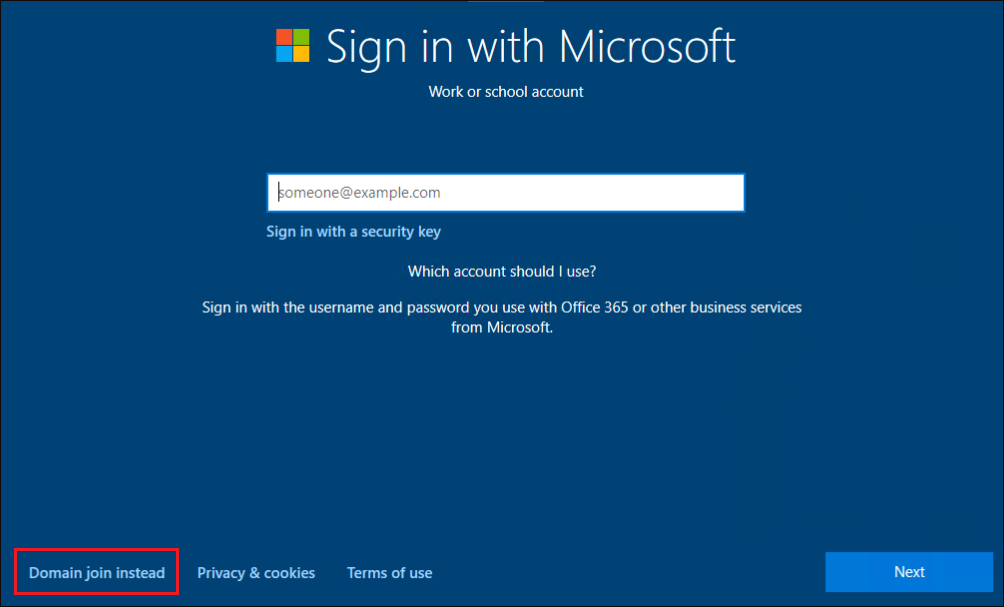
- When prompted to login with a Microsoft account, click Domain join instead option in Sign in with Microsoft work or school account step.
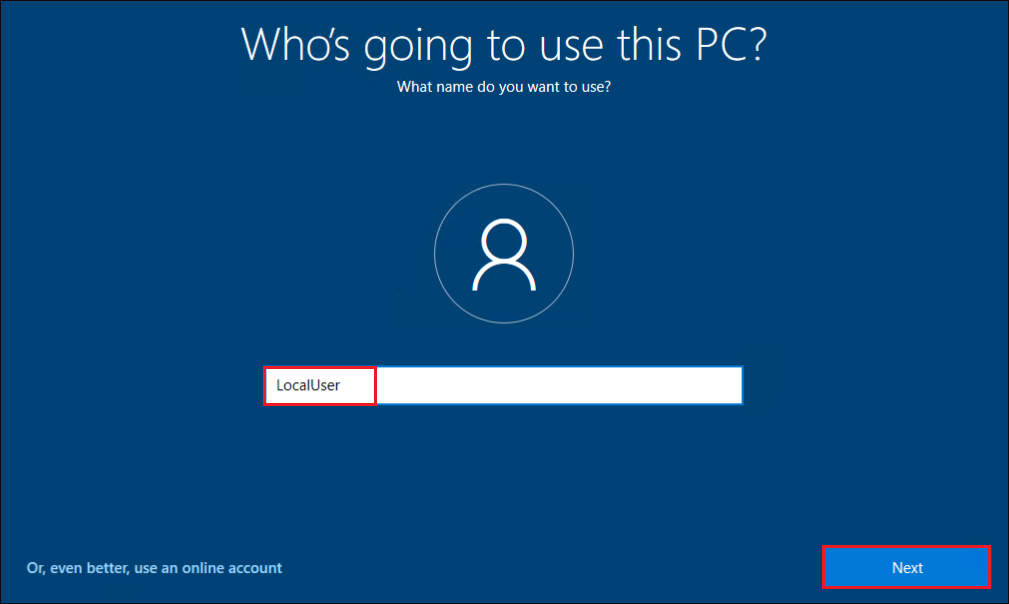
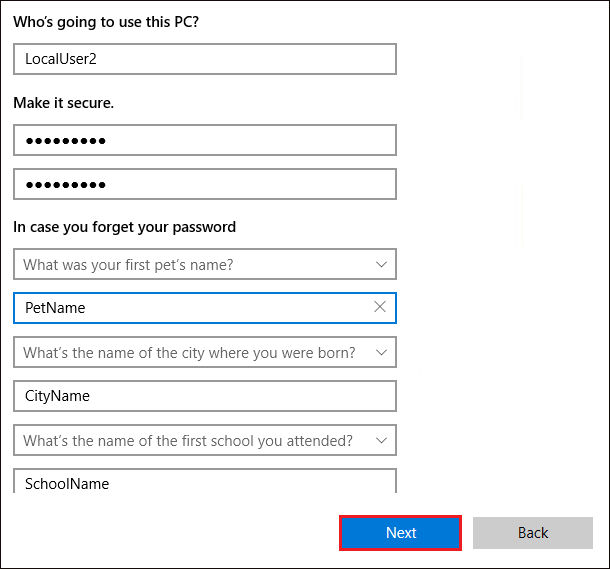
2. Enter a username for the local user account and click Next.
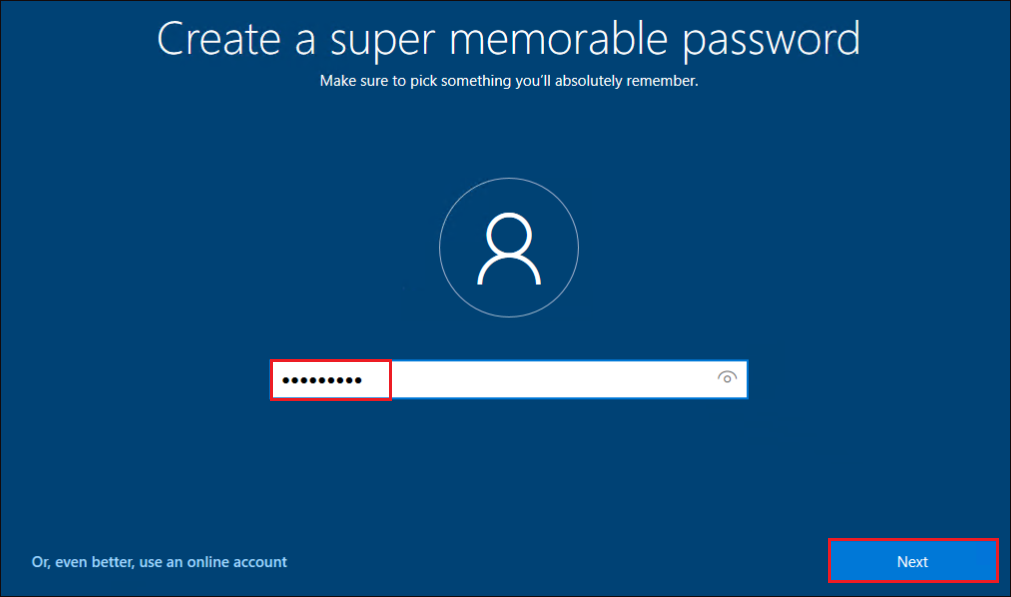
3. Type a password and confirm the password in the next step. Click Next.
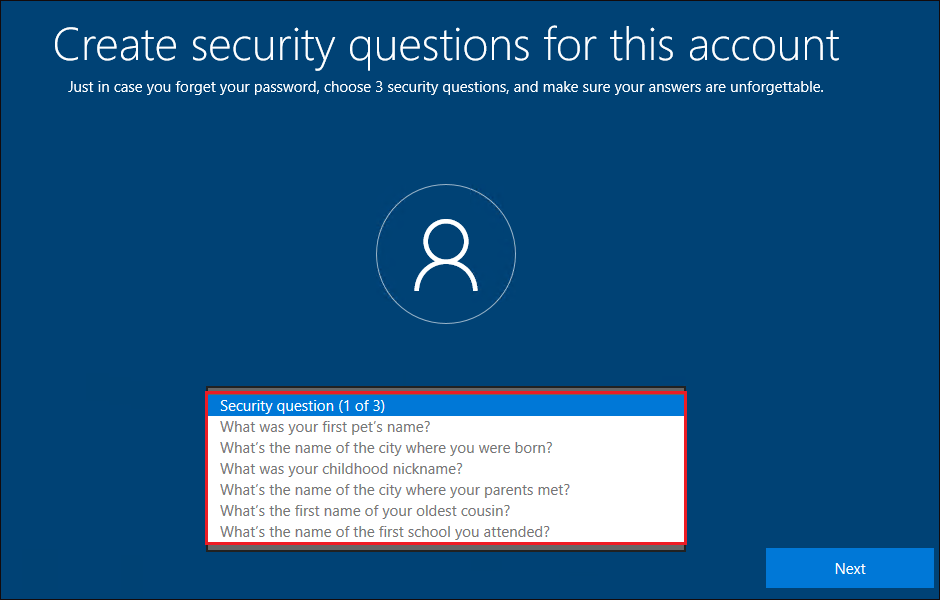
4. Provide answers to the security questions and click Next.
When you forget your login password, you will be prompted to enter answers for all these three questions to reset your password.
5. Accept the defaults through the next few steps. Once complete, you will be logged in with your local account.
Creating a Local User Account From the Settings App
Now that you’ve learned how to create a local user account at the time of OS installation, let’s now dig into creating a local user account post-installation.
1. Access the Windows settings by right-clicking on the start menu, then select Settings.
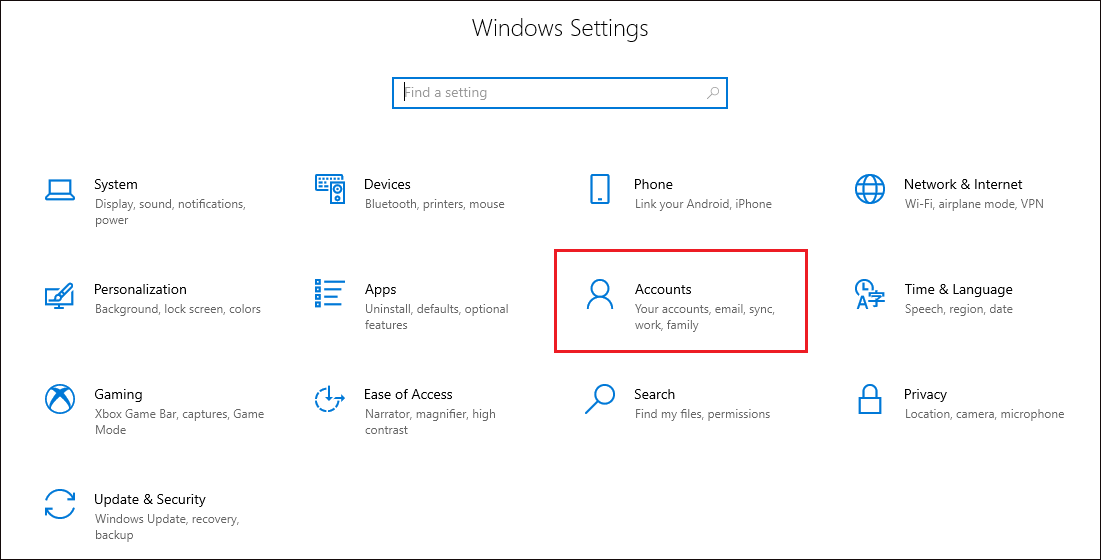
2. Get access to Account settings by clicking on Accounts in the Windows Settings box.
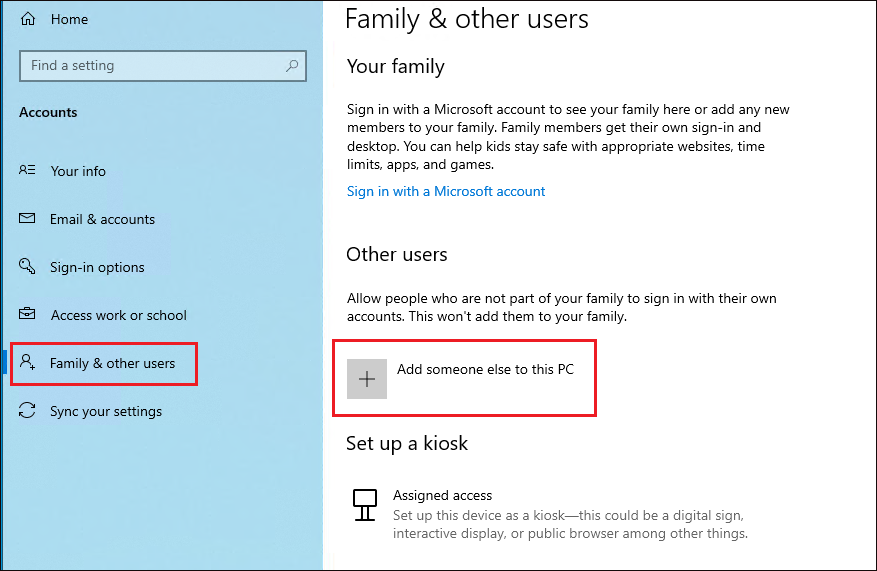
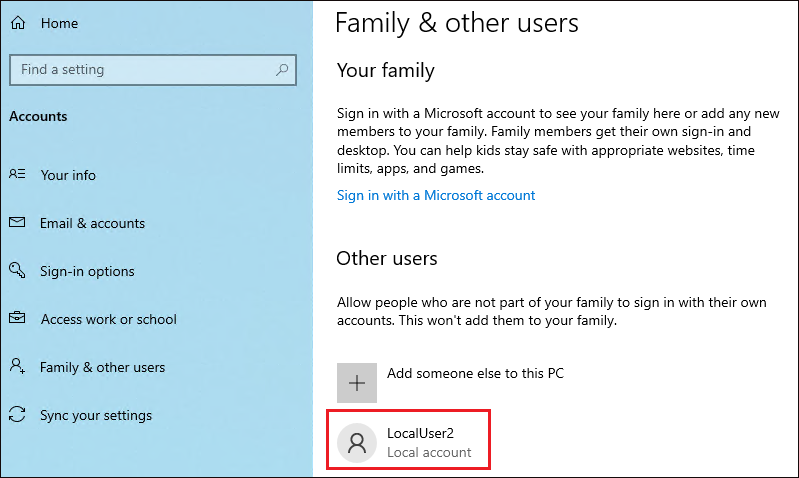
3. To add a local account, click on Family & other users option at the left panel. Click Add someone else to this PC option to the right and Microsoft’s sign-in screen will appear.
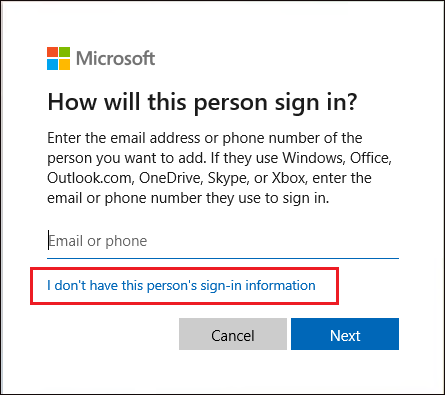
4. In the sign-in window below, an email address is not needed. Since you’re creating a local account, click on I don’t have this person’s sign-in information and click Next.
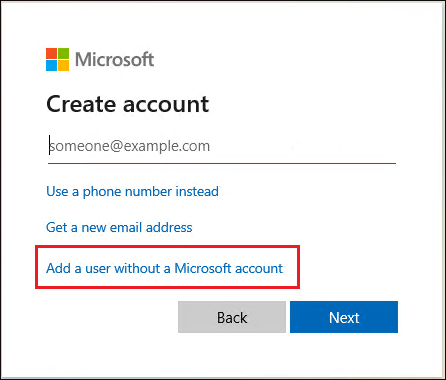
5. Next click on Add a user without a Microsoft account option.
6. Enter a username and password. The moment you start typing, password security questions will be displayed automatically. Once they do, select each security question and provide your answers and click Next when complete.
7. Finally, log off from your PC and log in with the new user account!
Creating a Local User Account with Computer Management
Up to this point, you’ve seen how to create a local user account in Windows 10 post-installation and via the Settings app. Let’s continue on the journey and now dig into creating a local user account via the Computer Management console.
1. Right-click on start menu, and click File Explorer option.
2. Right-click on This PC and click manage. This will open computer management console.
Need another way of opening the computer management console? Open run dialog box and enter compmgmt.msc. This will open computer management console.
3. In the Computer Management console, expand Local Users and Groups tab. Then right-click on the Users node and click New User to create an account under Users account type.

Optionally open the Local Users and Groups console but running lusrmgr.msc.
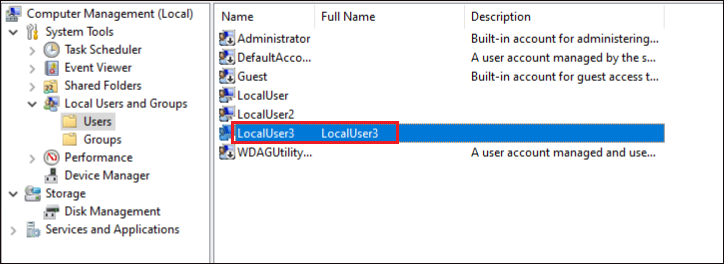
4. In the new user dialog box, provide the User name, an optional Full name, and Password. When complete, click Create and then Close.
You’ll now notice that the local user account is added under the Users account type folder, in the Local Users and Groups section, as shown below. Now you have an active local account that is just like a Microsoft account in in Windows.
Creating Local User Account with the Advanced User Accounts Control Panel
To finish off this tutorial’s whirlwind tour of creating local Windows 10 user accounts, let’s go through creating a local user account with the Advanced User Accounts Control Panel, sometimes referred to as netplwiz.
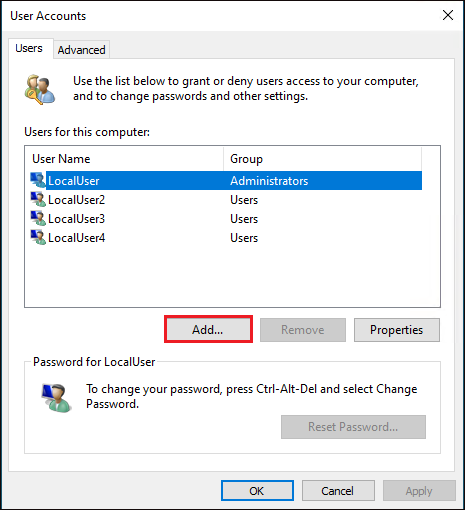
1. Click on the Start menu, type netplwiz, and run it.
2. In the User Accounts console, click Add you’ll be taken to the Microsoft account sign-in page.
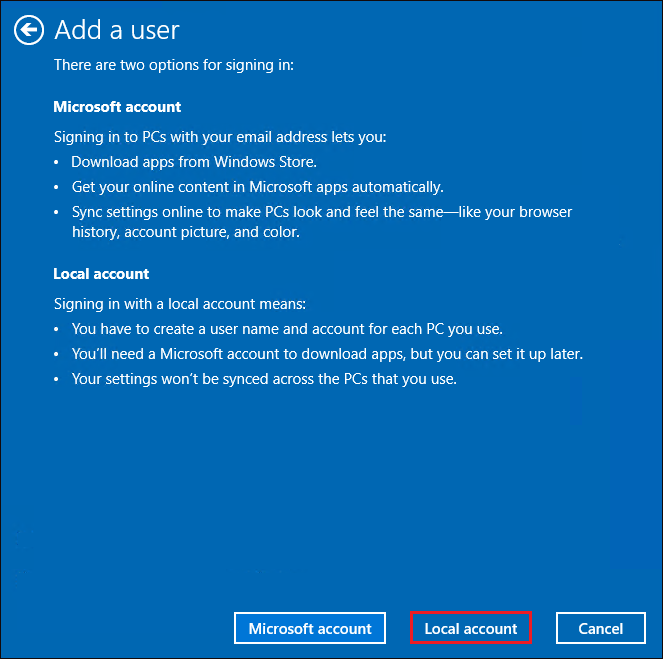
3. On the Microsoft account sign-in page, click on Sign in without a Microsoft account (not recommended) option and click Next.

4. On the Add a user page, click the Local account option.
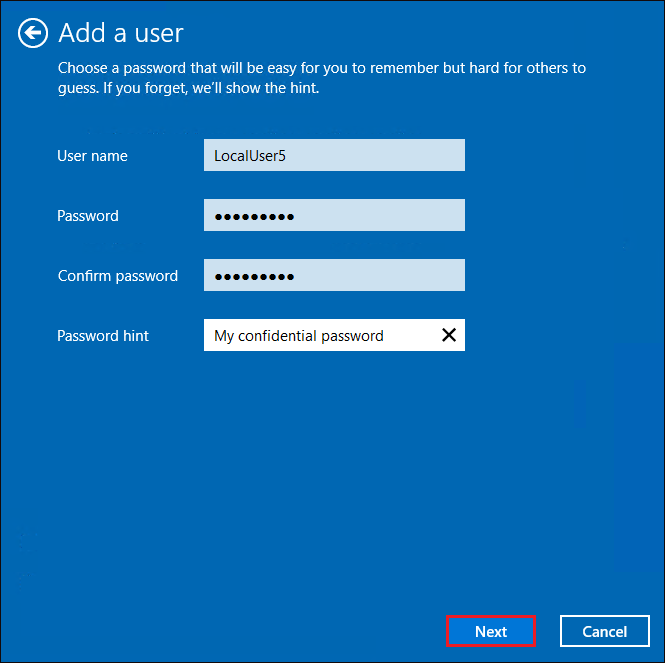
5. Provide a User name, Password and a Password hint for use when resetting the password.
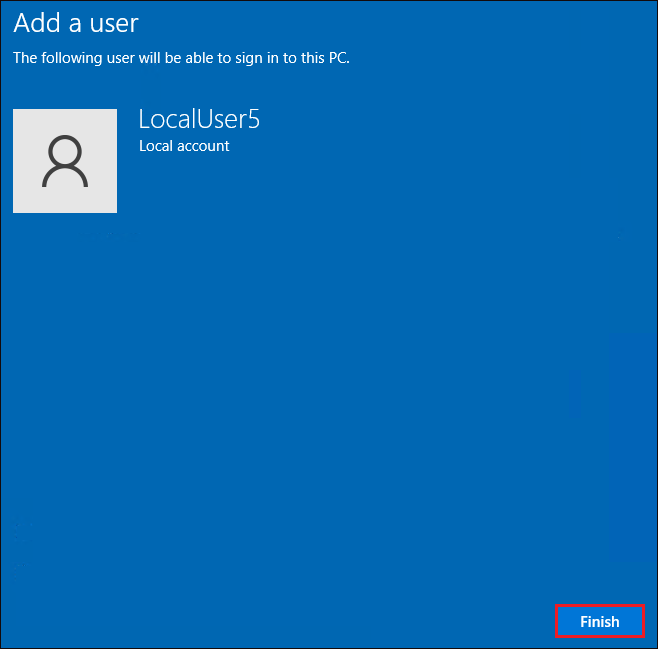
6. Click Finish on the final confirmation page.
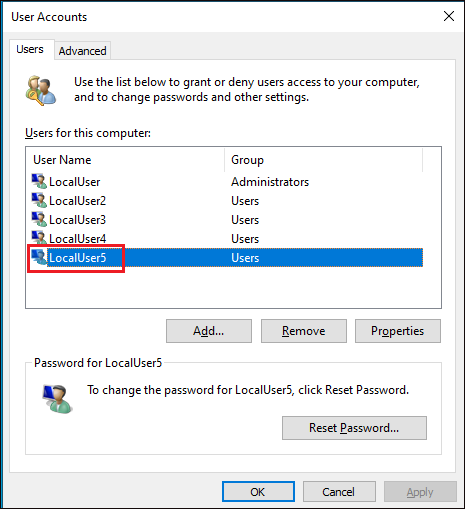
When complete, you’ll then see a new user account displayed in the User Accounts dialog box shown below.
Creating a Local User Account with the Net User Command
If creating a Windows 10 local user account via the GUI isn’t your thing, or you’re working on some automation scripts, the command line is your friend. Let’s now jump into creating local user accounts via cmd.exe.
Open a command prompt as administrator and run the below command. This command creates a new local user (/add) called LocalUser4 with a password of MyPassword!
This command will not enable any of the options like user must change password at next logon, user cannot change password, password never expires and account is disabled.
net user LocalUser4 MyPassword! /addCreating a Local User Account with PowerShell
Continuing on with the list of ways to create a local Windows 10 user account, next up is PowerShell!
Open PowerShell console as administrator.
Next, run the New-LocalUser cmdlet, as shown below.
The New-LocalUser cmdlet has a Password parameter but you cannot specify a simple string. To pass a password to the Password parameter, you must first convert your password into a secure string or encrypted string using the ConvertTo-SecureString cmdlet.
The below command first encrypts the password of MyComplexPassword!. Then using the $password variable sets the password for a user account called LocalUser6.
$password = ConvertTo-SecureString -String MyComplexPassword! -AsPlainText -Force
New-LocalUser -Name LocalUser6 -FullName LocalUser6 -Password $password
The
New-LocalUsercmdlet also supports other parameters likePasswordNeverExpiresorAccountNeverExpires.
Conclusion
You’ve seen a lot of different ways to create Windows 10 local accounts. Although the GUI options have more steps than the command-line, some prefer the graphical interface walking you through the steps vs. the command line options when automating the process, perhaps.
With what you’ve learned in this tutorial, which option would you choose to create user accounts, GUI way or command line? Let us know in the comments.
При обновлении Windows 10 ваша старая учетная запись остается. При чистой установке вы создаете новую учетную запись в процессе установки, но что делать, если вы хотите добавить дополнительные локальные учетные записи? Мы покажем вам, как это сделать.
Для чего мне это нужно?
Миллионы пользователей Windows никогда не создают вторичные учетные записи на своих компьютерах и используют свою основную административную учетную запись. Это небезопасная привычка, от которой нужно избавиться.
Создание дополнительной учетной записи для себя (чтобы не всегда входить в систему с правами администратора) — отличная идея, которая значительно повышает безопасность вашего компьютера. Создание отдельных локальных учетных записей для ваших детей и других пользователей означает, что они могут настроить вещи по своему усмотрению, иметь отдельные пользовательские папки — Документы, Изображения и т. д. — и дает гарантию того, что те загрузки Minecraft, которые они находят на сомнительных веб-сайтах, не заразят ваш аккаунт.
Хотя вы можете использовать учетную запись Microsoft для предоставляемых ею сетевых функций, стандартная локальная учетная запись – та, которая была у вас в Windows 7 и в предыдущих версиях – отлично подходит для людей, которые не хотят связывать свой логин с Microsoft, и это идеально подходит для детей, которым не нужны все дополнения (и, возможно, даже не имеют адреса электронной почты для связи с учетной записью в первую очередь).
Рассмотрим процесс создания новых учетных записей локальных пользователей в Windows 10.
Создать новую учетную запись локального пользователя в Windows 10
Во-первых, вам нужно получить доступ к настройкам учетной записи пользователя. Обратите внимание, что в Windows 10 это отдельный зверь из записи панели управления «Учетные записи пользователей».
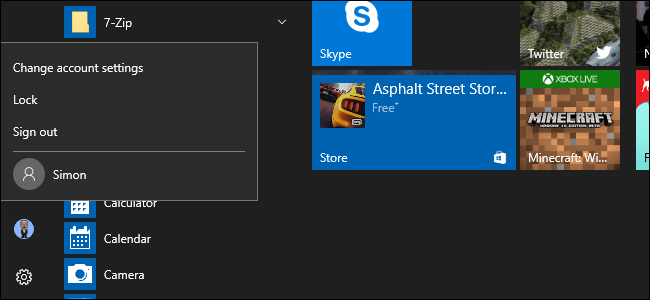
Нажмите Windows + I, чтобы открыть приложение «Настройки», а затем нажмите «Учетные записи».
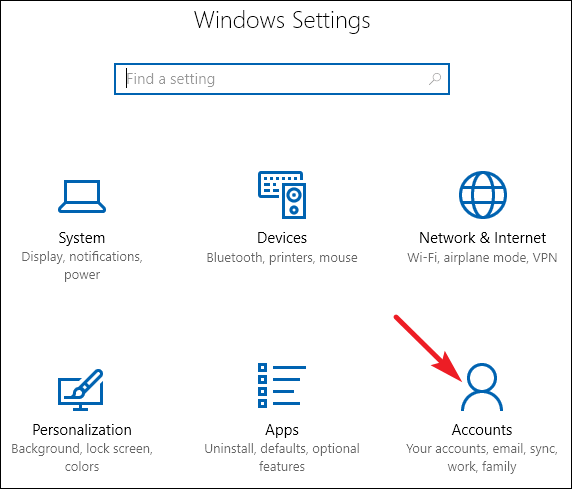
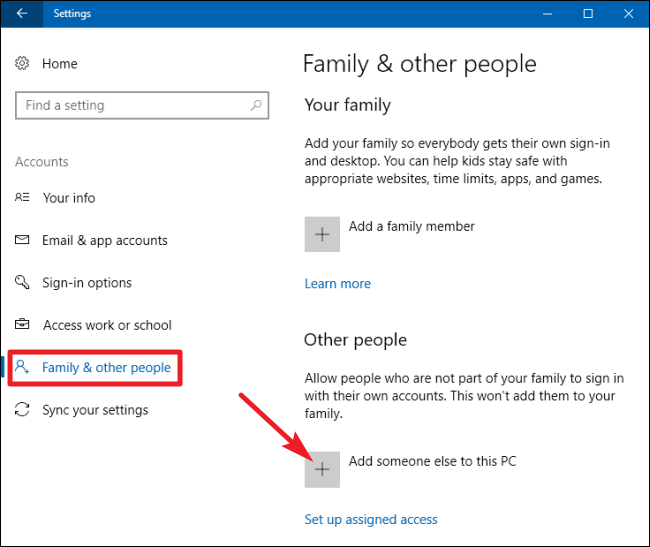
На странице «Учетные записи» перейдите на вкладку «Семья и другие люди», а затем нажмите кнопку «Добавить кого-то еще на этот компьютер». Вас может соблазнить кнопка «Добавить члена семьи», но эта функция требует настройки онлайн-учетной записи Microsoft и назначения членов вашей семьи. Это полезная функция, которая позволяет вам контролировать учетную запись ребенка, но сейчас нам это не нужно.
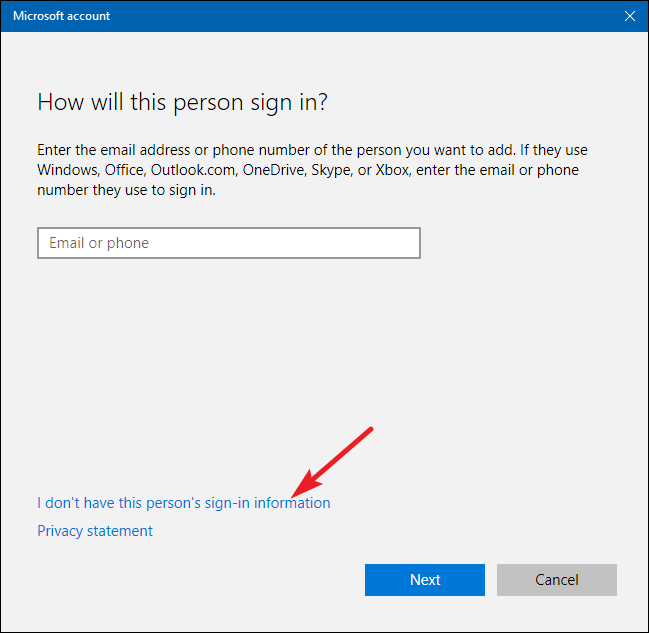
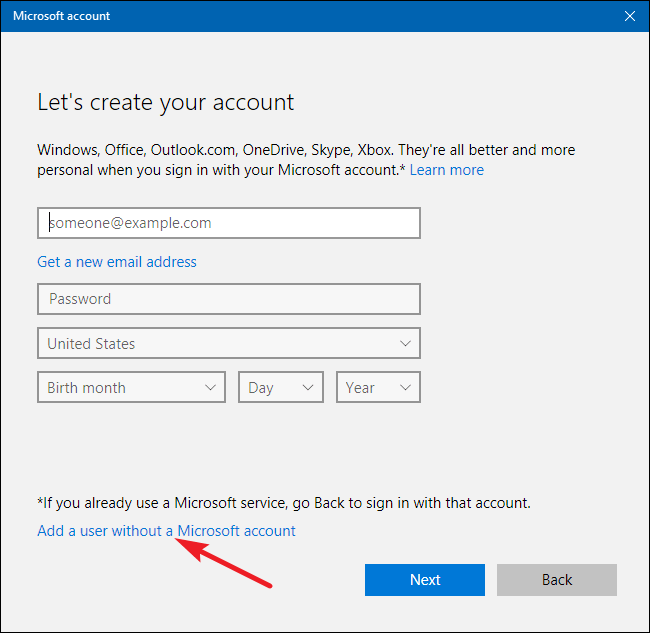
В открывшемся окне «Учетная запись Microsoft» вы будете направлены на создание учетной записи Microsoft онлайн. Не обращайте внимания на запрос предоставить адрес электронной почты или номер телефона. Вместо этого нажмите ссылку «У меня нет информации для входа этого человека».
На следующей странице Windows предложит вам создать учетную запись в Интернете. Опять же, проигнорируйте и нажмите ссылку «Добавить пользователя без учетной записи Microsoft».
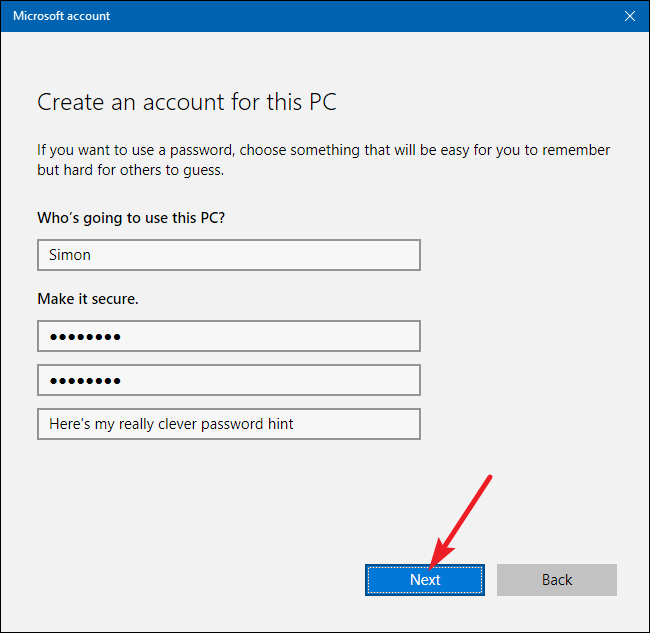
Если вы создали новые учетные записи в Windows 7 и предыдущих версиях, следующий скриншот будет вам знаком. Введите имя пользователя, пароль и подсказку к паролю, а затем нажмите «Далее».
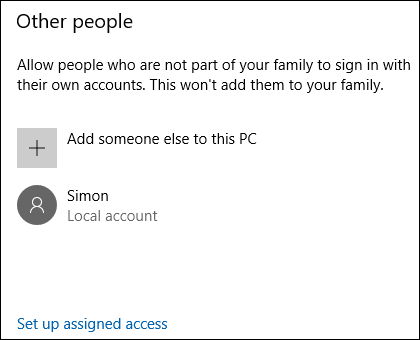
После того, как вы нажмете «Далее» вы вернетесь к экрану «Учетные записи», который видели ранее, но теперь должна появиться ваша новая учетная запись. При первом входе в систему с использованием учетной записи, Windows создаст пользовательские папки и завершит настройку.
По умолчанию ваша локальная учетная запись пользователя является ограниченной, то есть она не может устанавливать приложения или вносить административные изменения в компьютер. Если у вас есть веская причина изменить тип учетной записи на учетную запись администратора, вы можете нажать на учетную запись, выбрать «Изменить тип учетной записи», а затем переключить ее с ограниченной на административную. Опять же, если у вас нет реальной необходимости настраивать учетную запись администратора, оставьте ее в гораздо более безопасном ограниченном режиме.
Источник:
https://www.howtogeek.com/226540/how-to-create-a-new-local-user-account-in-windows-10/