
После того, как установлена роль Active Directory в домене windows server 2019, появляется возможность управления доменом. Далее необходимо создать пользователей, которые будут входить под учетными записями, группы и подразделения.
Как создать и удалить пользователя, группу и объект в домене
- Создание пользователя в домене
- Создание группы в домене
- Создание объекта в домене
- Удаление пользователя в домене
- Удаление группы в домене
- Удаление подразделения в домене
Для создания и удаления пользователя, группы и подразделения воспользуемся средством централизованного управления сервером — Диспетчер серверов. Далее выбираем «Пользователи и компьютеры Active Directory».
Создание пользователя в домене.
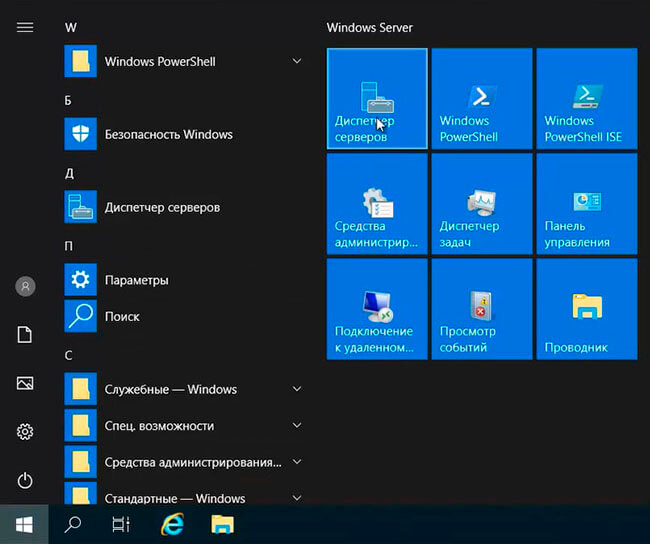
1. Нажимаем «Пуск«, далее выбираем «Диспетчер серверов«.
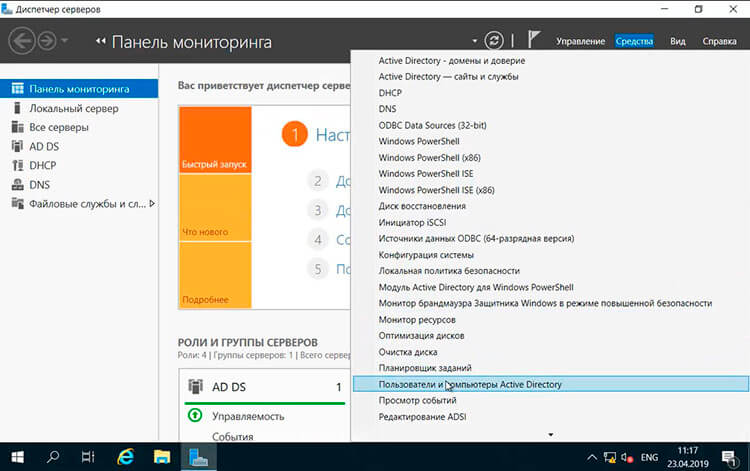
2. В новом окне нажимаем «Средства«, в открывшемся списке выбираем «Пользователи и компьютеры Active Directory«.
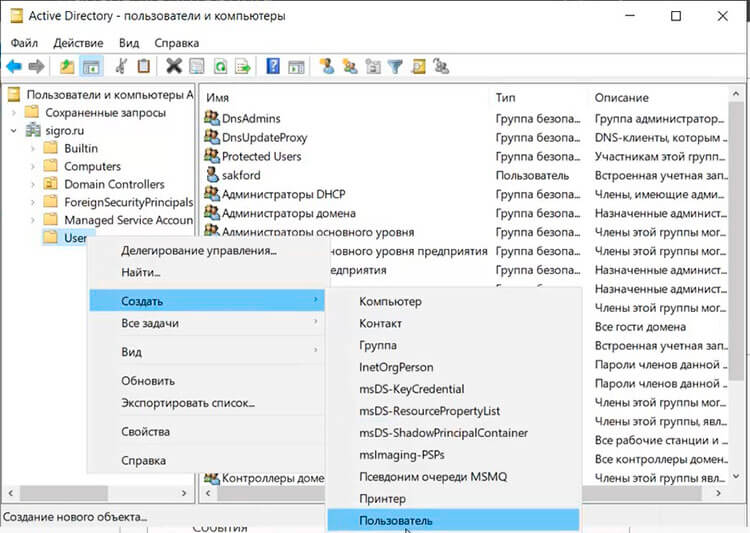
3. Далее нажимаем правой клавишей на «User«, далее «Создать» — «Пользователь«.
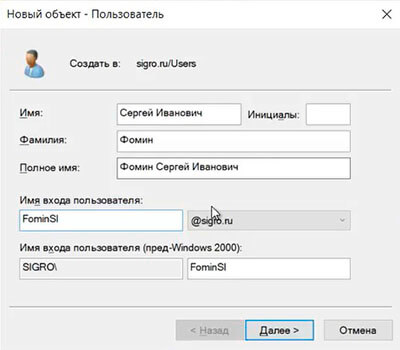
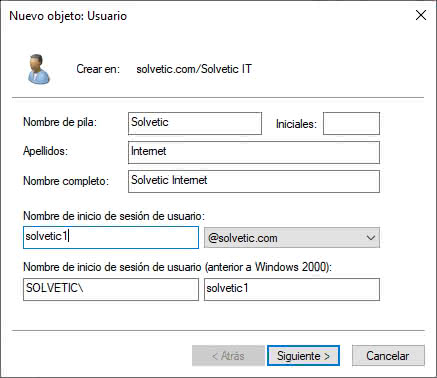
4. Заполняем необходимые поля для создания пользователя (Имя, Фамилия, Имя входа пользователя). «Полное имя» заполнится автоматически. Затем нажимаем «Далее«.
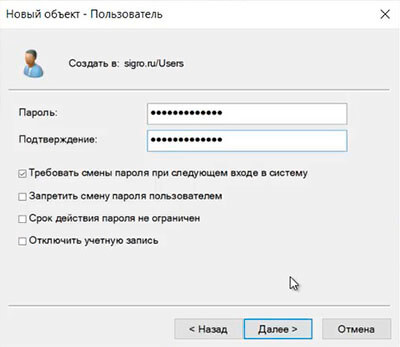
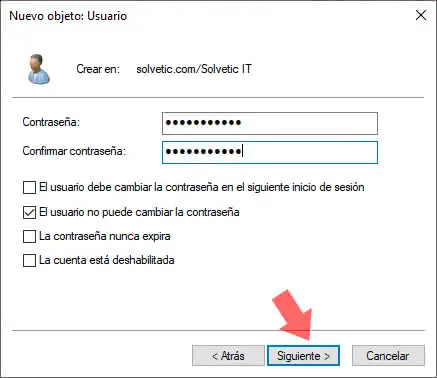
5. В следующем окне дважды набираем пароль для пользователя. Затем устанавливаем чекбокс на «Требовать смены пароля при следующем входе в систему«. Тогда при входе в систему пользователю будет предложено заменить текущий пароль. Нажимаем «Далее«.
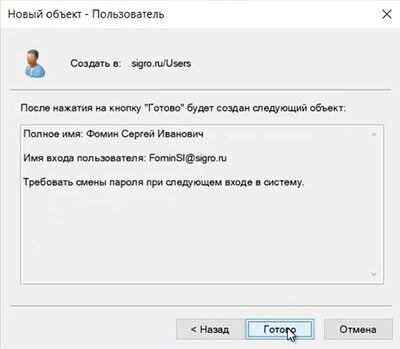
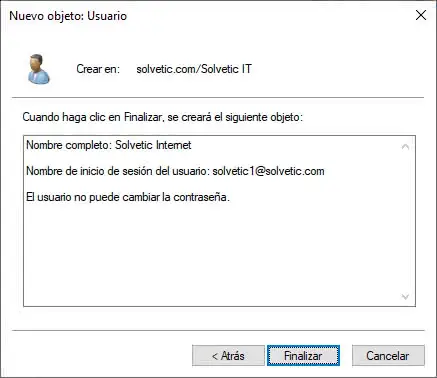
6. В новом окне смотрим сводную информацию по вновь созданному пользователю и нажимаем «Готово«. Будет создан новый пользователь.
Создание группы в домене
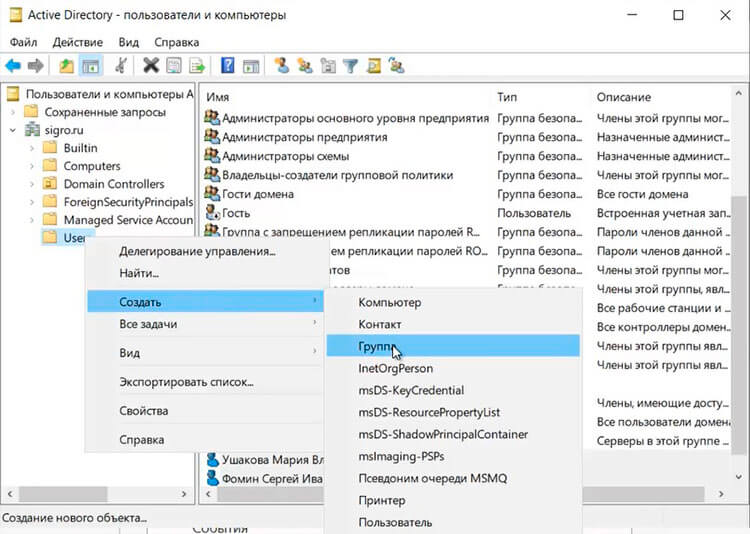
1. Для создания группы в домене, нажимаем правой клавишей мыши на «Users«, далее «Создать» — «Группа«.
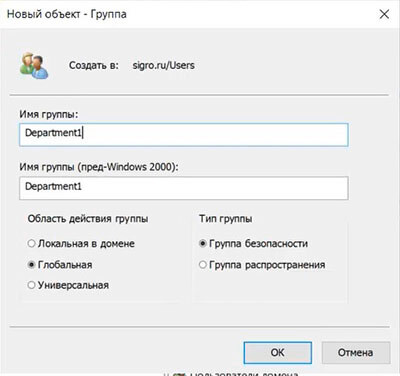
2. Задаем «Имя группы«, «Область действия группы» и «Тип группы«, далее нажимаем «ОК«. Будет создана группа.
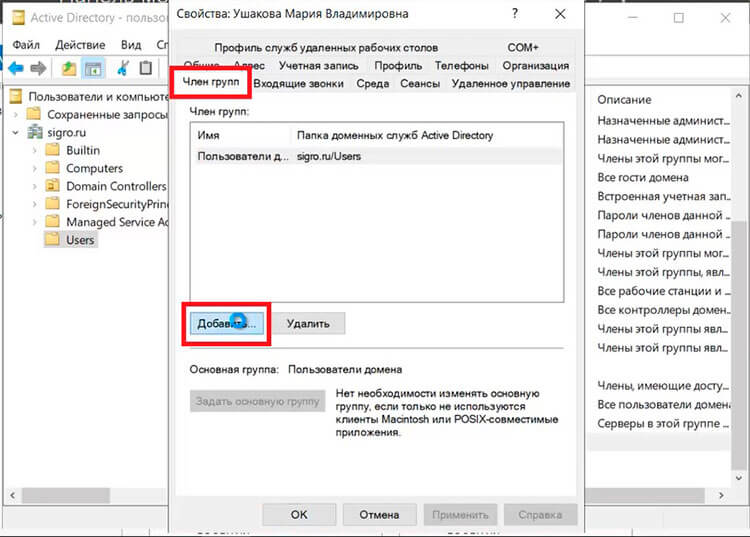
3. Для добавления пользователей в группу, открываем пользователя, выбираем вкладку «Член групп«, нажимаем кнопку «Добавить«.
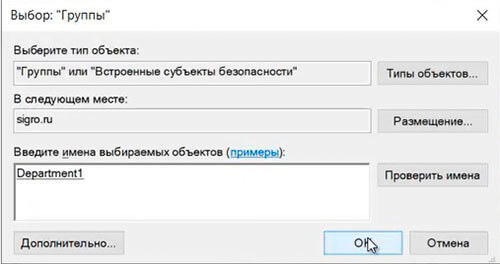
4. В новом окне вводим имя группы, в которую будет добавлен пользователь. Проверяем нажав кнопку «Проверить имена«, далее «ОК«.
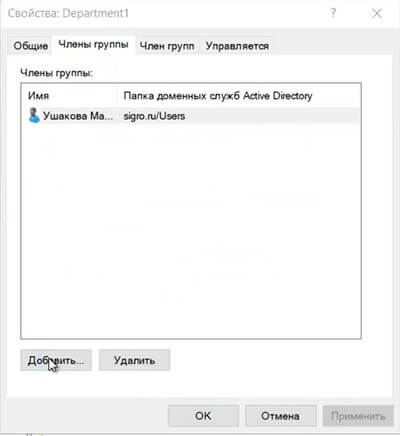
5. Также возможно добавить пользователя в группу, открыв нужную группу. Далее выбираем вкладку «Члены группы«. Нажимаем «Добавить«.
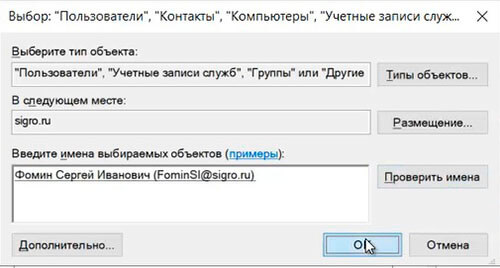
6. В новом окне вводим имена пользователей, которые будут добавлены в группу. Проверяем нажав клавишу «Проверить имена«, далее «ОК«.
Добавление подразделения в домене
1. Для добавления подразделения в домене нажимаем правой клавишей мыши на домен, в появившемся меню «Создать» — «Подразделение«.
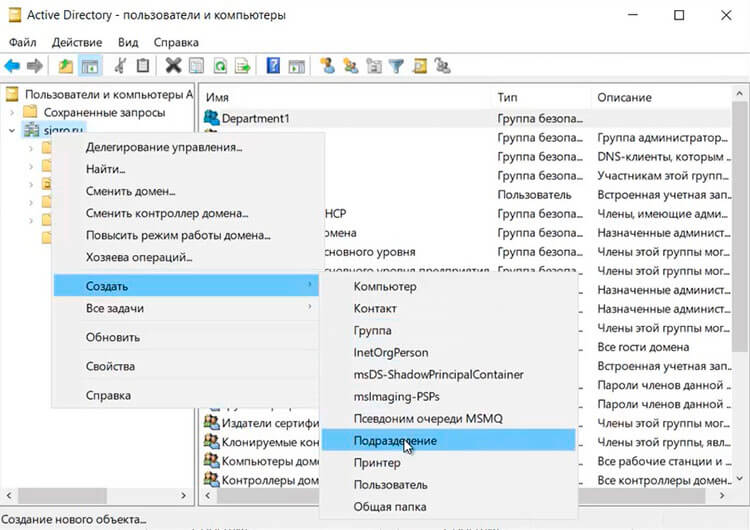
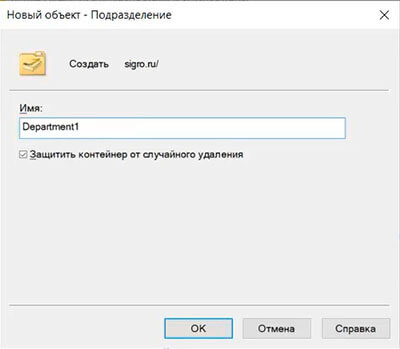
2. Задаём имя подразделения, далее «ОК«.
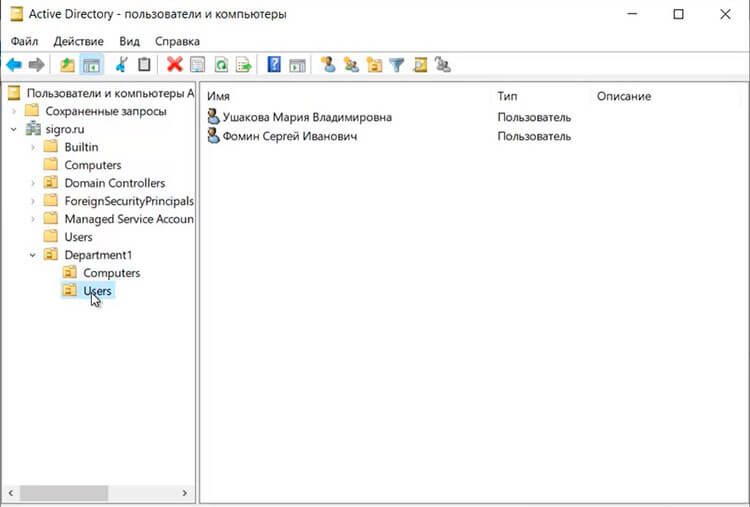
3. Если необходимо, в созданном подразделении создаём вложенные подразделения. Далее в созданные подразделения можно перенести или создать различные объекты (пользователи, компьютеры, группы).
Удаление пользователя
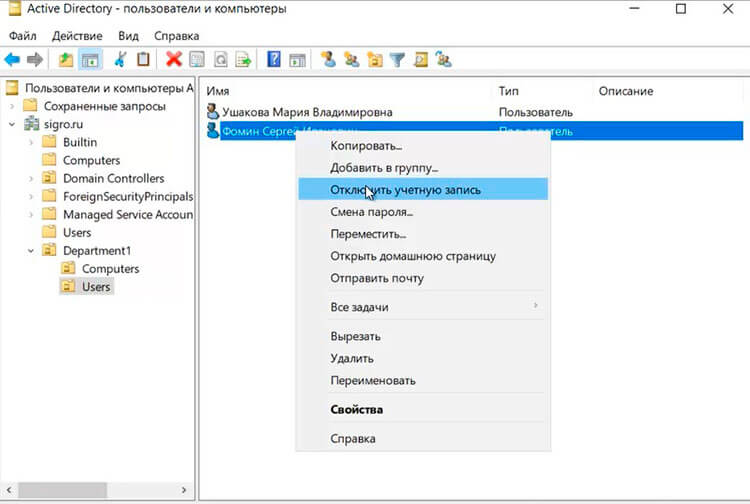
1. Обычно сначала пользователя отключают и по истечении определенного промежутка времени удаляют. Для этого выбираем пользователя, правой клавишей мыши — «Отключить учетную запись«.
2. Для удаления выбирают необходимого пользователя, далее правой клавишей мыши — «Удалить«.
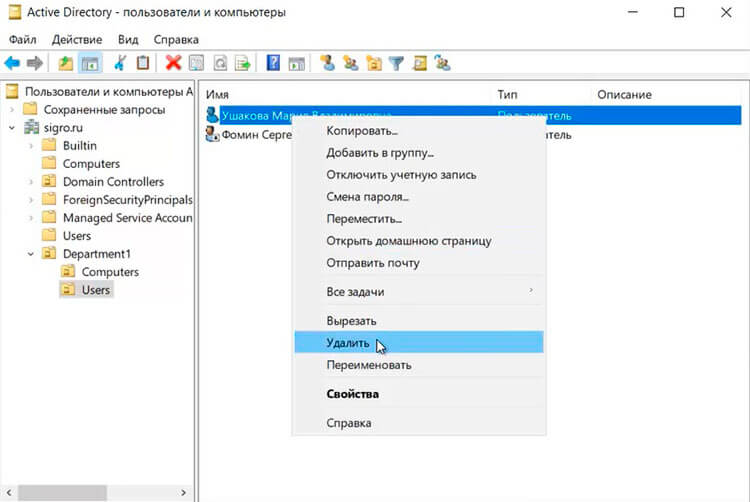
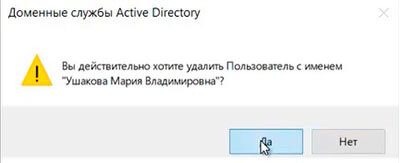
3. Появится предупреждение о том, что «Вы действительно хотите удалить Пользователь с именем…«. Нажимаем «Да» и выбранный пользователь будет удален из домена.
Удаление группы
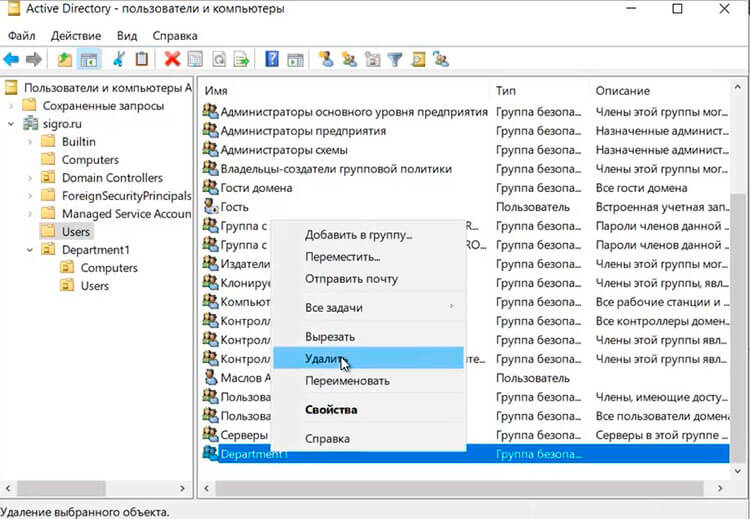
1. Для удаления группы в домене выбираем нужную группу, нажимаем правой клавишей — «Удалить«.
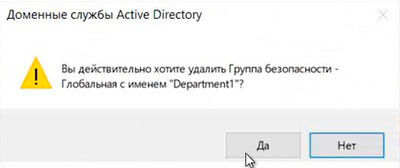
2. Появится предупреждение о том, что «Вы действительно хотите удалить Группу безопасности….«. Нажимаем «Да«. Выбранная группа будет удалена из домена.
Удаление подразделения
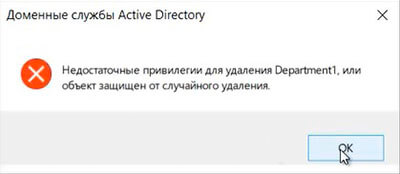
1. Перед тем, как удалять подразделение, необходимо снять защиту, которая не дает удалить объект от случайного удаления. Если попробовать просто удалить подразделение, то появится предупреждение — «Недостаточные привилегии для удаления Departmnet1, или объект защищен от случайного удаления«.
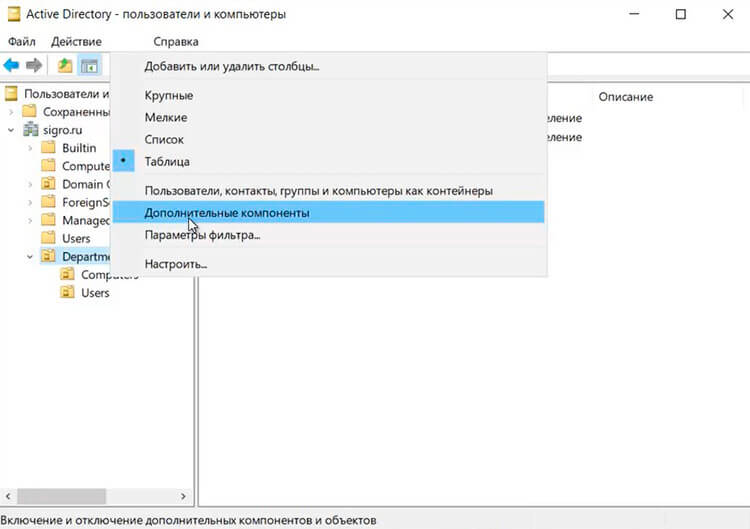
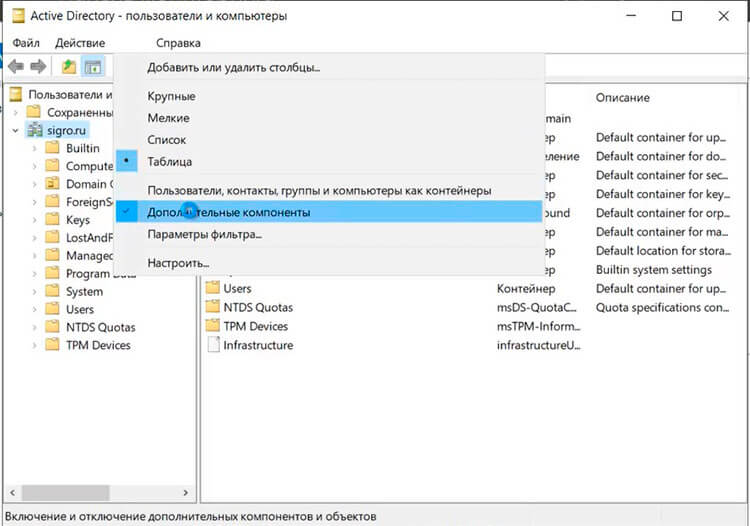
2. Для снятия защиты в меню «Вид» выбираем «Дополнительные компоненты«.
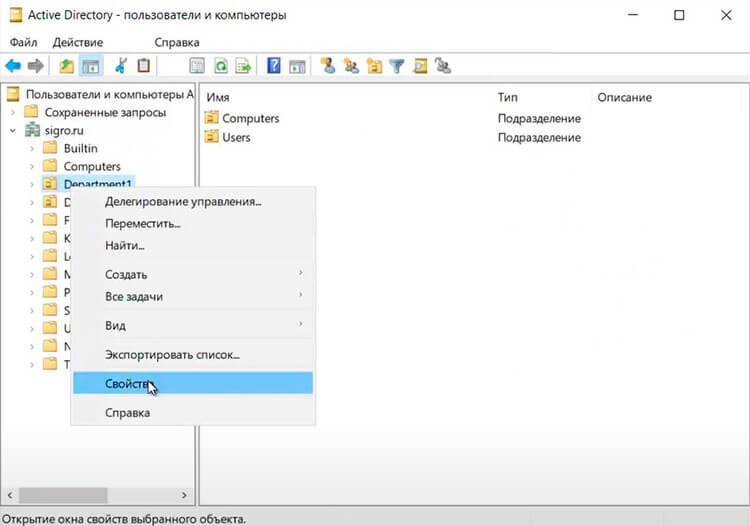
3. Далее выбираем подразделение (объект), которое хотим удалить. Правой клавишей мыши — «Свойства«.
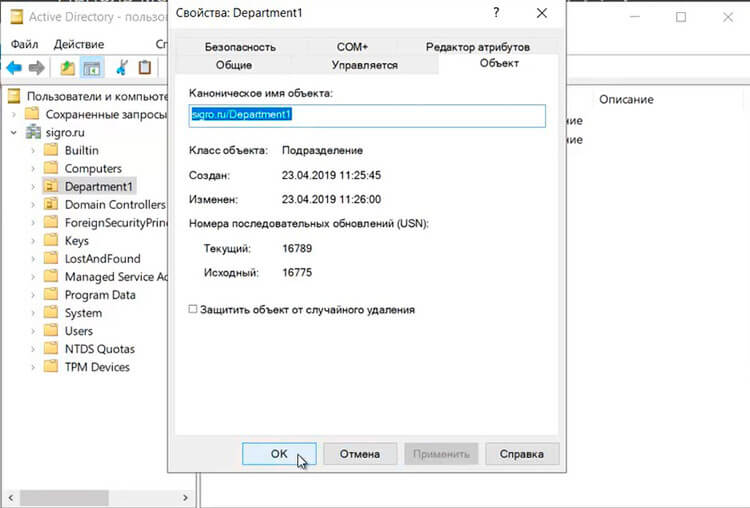
4. Выбираем вкладку «Объект«. Убираем чекбокс «Защитить объект от случайного удаления«, далее «ОК«.
5. Далее нажимаем правой клавишей мыши на выбранное подразделение — «Удалить«.
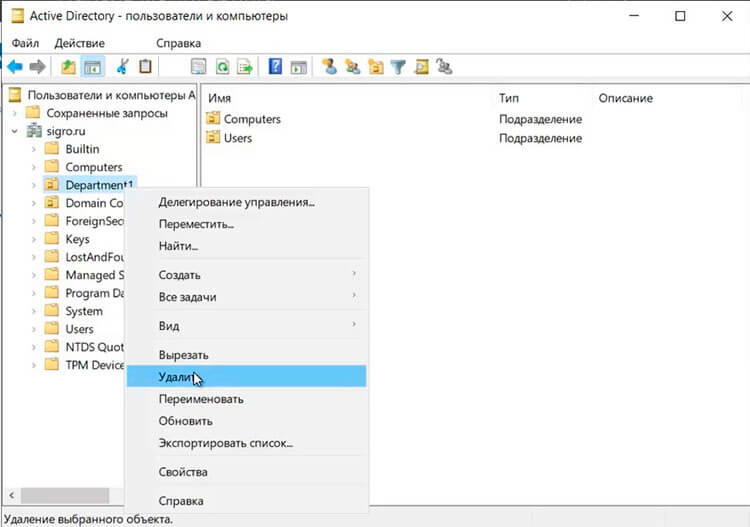
6. Появится предупреждение о том, что «Вы действительно хотите удалить Подразделение с именем….?«. Нажимаем «Да«. Если в выбранном объекте не будет других вложенных объектов, то подразделение будет удалено.

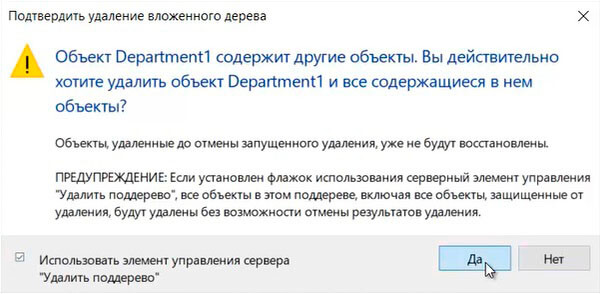
7. Если объект содержит другие объекты, то появится предупреждение «Объект Department1 содержит другие объекты. Вы действительно хотите удалить объект Department1 и все содержащиеся в нем объекты?«. Нажимаем «Да» и выбранный объект будет удален с вложенными объектами.
8. Далее в окне «Active Directory — пользователи и компьютеры» в меню «Вид» возвращаем галочку напротив «Дополнительные компоненты«.
Посмотреть видео о том, как создать или удалить пользователя, группу, объект в домене можно здесь:
- Windows server 2019 — установка и настройка WSUS, создание и настройка GPO
- Windows server 2019 — добавление и удаление компьютера в домене
- Windows server 2019 — переименование администратора домена, изменение формата выводимого имени пользователя
- Windows server 2019 — установка и настройка Active Directory, DNS, DHCP
- Windows server 2019 — установка и настройка сервера печати, разворачивание МФУ с помощью GPO
- Windows server 2019 — GPO изменение экранной заставки, отключение монитора, изменение политики паролей
{/source}
A Complete Guide to Managing Users and Groups in Windows Server 2019
The robust operating system Windows Server 2019 is capable of efficiently managing users and groups. Any organisation must manage users and groups in Windows Server 2019 because it improves security and resource management.
This guide will cover effective user and group management in Windows Server 2019.
Establishing Users and Groups
Creating new users and groups is the first step in managing users and groups in Windows Server 2019.
Follow these steps to create a new user:
- Launch the «Local Users and Groups» section of the Server Manager console.
- From the context menu, click «Users» and choose «New User.»
- Type the user’s name, full name, description, and password in the «New User» dialogue box.
- To create a new user, click «Create.»
The steps below should be followed to create a new group:
- Launch the «Local Users and Groups» section of the Server Manager console.
- From the context menu, click «Groups,» then choose «New Group.»
- Enter the group name, description, and group type in the «New Group» dialogue box.
- To create the new group, click «Create.»

Taking care of Users and Groups
The next step is to manage new users and groups efficiently after they have been created.
Various tools are available in Windows Server 2019 to manage users and groups.
These tools consist of:
- Active Directory Users and Computers: This application is used for Active Directory user and group management.
- Local Users and Groups: On a local computer, users and groups are managed using this tool.
- PowerShell: PowerShell is an effective scripting language that can be used to manage users and groups.
Active Directory Users and Computers User Management
Follow these steps to manage users with Active Directory Users and Computers:
- Launch the console for Active Directory Users and Computers.
- Locate the container labelled «Users.»
- Double-click the user whose account you wish to manage.
- You can change a number of attributes, including the user’s name, description, password, and group membership, in the user’s properties dialogue box.
- To save the changes, click «OK.»
Using Active Directory Users and Computers for Group Management
The steps listed below can be used to manage groups with Active Directory Users and Computers:
- Launch the console for Active Directory Users and Computers.
- Select the «Groups» container from the list.
- Double-click the group that needs management.
- You can change a number of attributes, including the group’s name, description, membership, and scope, in the group’s properties dialogue box.
- To save the changes, click «OK.»
Using PowerShell for User and Group Management
An effective command-line interface for managing users and groups is offered by PowerShell.
Follow these steps to manage users and groups using PowerShell:
- Launch the PowerShell console.
- Use the «Get-ADUser» and «Set-ADUser» cmdlets to manage users.
- Use the «Get-ADGroup» and «Set-ADGroup» cmdlets to manage groups.
- Use the appropriate parameters to change different user and group attributes.
Managing Permissions for Users and Groups
Enhancing security and resource management requires managing user and group permissions.
Various tools are available in Windows Server 2019 to manage user and group permissions.
These tools consist of:
- File Explorer: File Explorer can be used to control folder and file permissions.
- Security Configuration Wizard: You can set up security settings on servers and applications using the Security Configuration Wizard.
- Group Policy: Group Policy allows users and groups to have their security settings customised.
File Explorer’s User and Group Permissions Management
2. Select «Security» from the tabs.
3. To change the permissions, click the «Edit» button.
4. You can edit the permissions for users and groups in the «Permissions for [file or folder]» dialogue box by adding or removing them.
5. To save the changes, click «OK.»
Utilizing Group Policy to Manage User and Group Permissions
The steps listed below can be used to manage user and group permissions using Group Policy:
- Launch the console for Group Policy Management.
- Make changes to an existing Group Policy Object (GPO) or create a new one.
- Select «Computer Configuration> Policies> Windows Settings> Security Settings> Local Policies> User Rights Assignment.»
- Double-click the user right that needs to be changed.
- You have the option to add or remove users and groups in the user right properties dialogue box.
- Press «OK» to save the modifications.
Conclusion
In conclusion, optimising security and resource management in an organisation requires managing users and groups in Windows Server 2019.
In order to effectively manage users, groups, and resources, Windows Server 2019 offers a variety of features and tools.
Using tools like Active Directory Users and Computers, Local Users and Groups, and PowerShell, we covered how to create and manage users and groups in Windows Server 2019 in this guide.
We also covered the use of tools like File Explorer, Security Configuration Wizard, and Group Policy for managing user and group permissions.
You can effectively manage users and groups in Windows Server 2019 and improve resource management and security in your company by following the instructions provided in this guide.
FAQs
- How do I define Windows Server 2019?
The robust operating system Windows Server 2019 is made for servers, and it offers many features and tools for efficiently managing users, groups, and resources.
- In Windows Server 2019, what role does managing users and groups play?
Enhancing security and resource management in an organisation requires managing users and groups in Windows Server 2019.
It aids in maintaining data integrity and limiting access to resources.
- What tools are available in Windows Server 2019 for managing users and groups?
Active Directory Users and Computers, Local Users and Groups, PowerShell, and other tools are available in Windows Server 2019 to manage users and groups.
- In Windows Server 2019, how do I manage user and group permissions?
In Windows Server 2019, tools like File Explorer, the Security Configuration Wizard, and Group Policy can be used to manage user and group permissions.
- What advantages does Windows Server 2019’s management of user and group permissions offer?
In Windows Server 2019, managing user and group permissions improves resource management and security within an organisation. It aids in regulating resource access, preserving data integrity, and preventing unauthorised access.
Содержание
- DATAENGINER
- Добавление нового пользователя в Windows Server 2012 R2
- 0. Оглавление
- 1. Добавление пользователя
- 2. Изменение настроек пользователя
- Смотрите также:
- Как создать и удалить пользователя, группу и объект в домене
- Создание пользователя в домене.
- Создание группы в домене
- Добавление подразделения в домене
- Удаление пользователя
- Удаление группы
- Удаление подразделения
- Как добавить пользователя на Windows Server
- Добавление учётной записи в Windows Server 2012/2016
- Добавление учётной записи в Windows Server 2019
- Зачем нужны RDP-лицензии и где их взять
- Создание пользователя в Windows Server 2016
- Создание пользователя
- Способ 1
- Способ 2
- Виртуальный сервер на базе Windows
- Разрешение на удаленное подключение
- Способ 1
- Способ 2
- Подключение к виртуальному серверу
DATAENGINER
Добрый день! Сегодня мы продолжаем настройку нашего ftp-servera на ОС Windows Server 2019. В данной статье мы рассмотрим создание группы для пользователей ОС Windows Server 2019.
Если вам интересно, для чего создавать группу пользователей?
То пользователи группируются, для объединения и разделения пользователей по набору прав и разграничения доступа.
Итак, приступим к созданию группы.
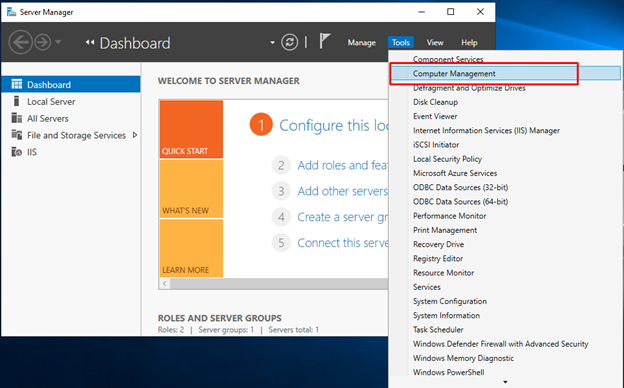
Шаг 1. Откроем консоль управления сервером и перейдем во вкладку computer manager.
Шаг 2. Далее в левом боковом меню открываем вкладку локальных пользователей и групп, и переходим в папку Groups.
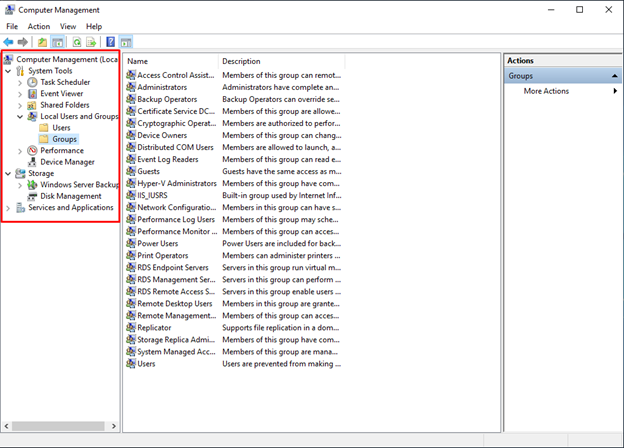
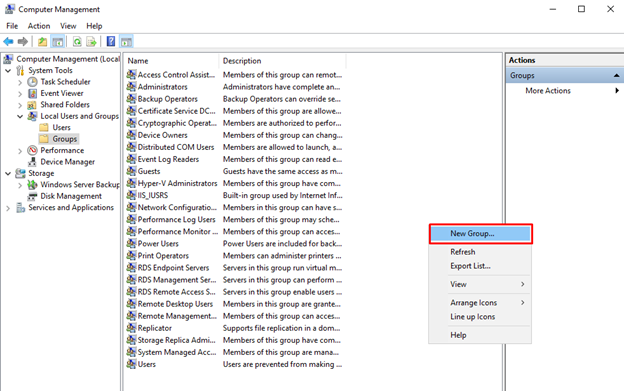
Шаг 3. В папке уже находятся стандартные группы windows server 2019. Добавим свою группу, которую назовем ftp-test. Для этого в списке групп на свободном пространстве нажмем правой кнопкой мыши и нажмем New Group.
Шаг 4. Далее в окне создания новой группы укажем имя и зададим простое описание, для уточнения информации о группе пользователей.
Шаг 5. Далее мы сразу можем добавить членов, для новой группы для этого нажмем Add. Если вы помните название всех необходимых пользователей, вы можете их перечислить в текстовом поле.
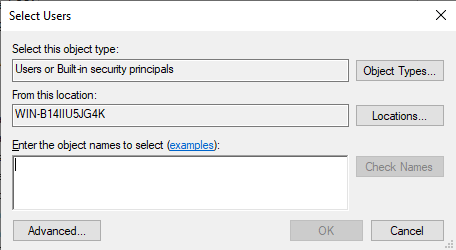
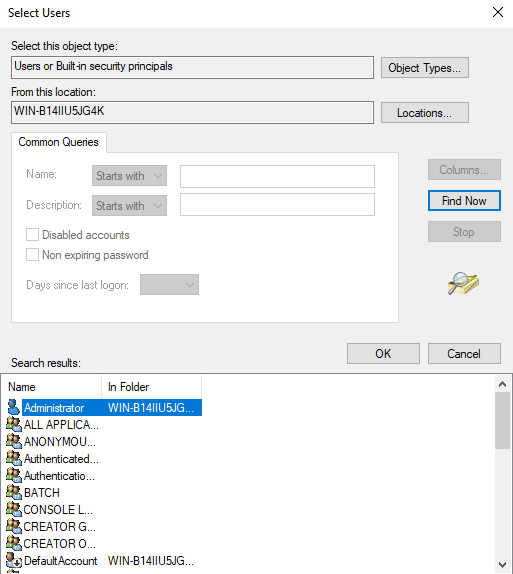
Если же вы не знаете точное название пользователей, то нажмем advanced и перейдем к расширенному окну для поиска пользователей. Нажмем Find Now и в списке пользователей отобразятся все существующие пользователи.
Шаг 6. Найдем ранее созданного нами пользователя test. Далее нажмем ОК. Пользователь появится в текстовом поле.
Шаг 7. Нажмем ОК и пользователь появится как член новой группы windows server.
Шаг 8. Нажмем create и списке групп появится наша новая группа пользователей, членом которой является наш тестовый пользователь, созданный ранее.
Источник
Добавление нового пользователя в Windows Server 2012 R2
Ниже будет подробно рассказано о том, как добавить нового пользователя на локальный компьютер под управлением Microsoft Windows Server 2012 R2.
0. Оглавление
1. Добавление пользователя
Запускаем оснастку «Управление компьютером» (Computer Management). Сделать это можно кликнув правой кнопкой мыши по меню «Пуск» (Start) и выбрав в меню «Управление компьютером» (Computer Management).

Или же выполнив команду compmgmt.msc. (Нажать комбинацию клавиш Win + R, в окне «Выполнить» (Run) ввести команду в поле «Открыть» (Open) и нажать «ОК«)

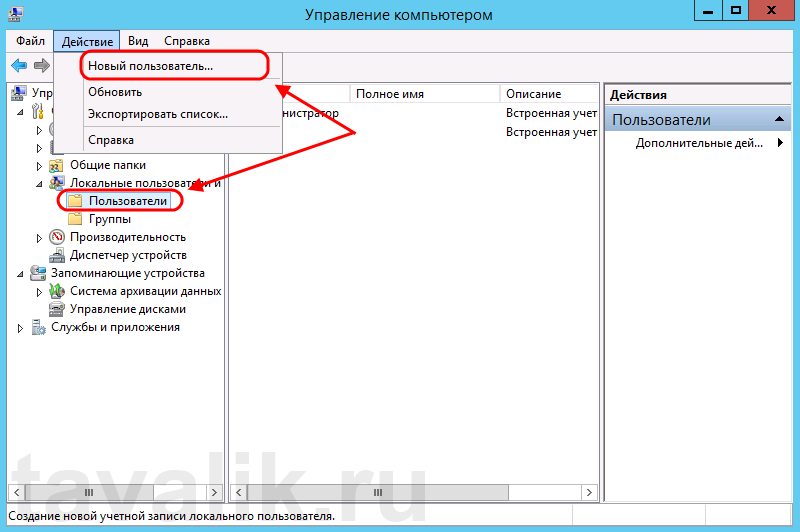
В открывшемся окне раскрываем вкладку «Служебные программы» (System Tools), затем «Локальные пользователи» (Local Users and Groups) и выделив вкладку «Пользователи» (Users) выбираем «Новый пользователь…» (New User…) в меню «Действие» (Action).
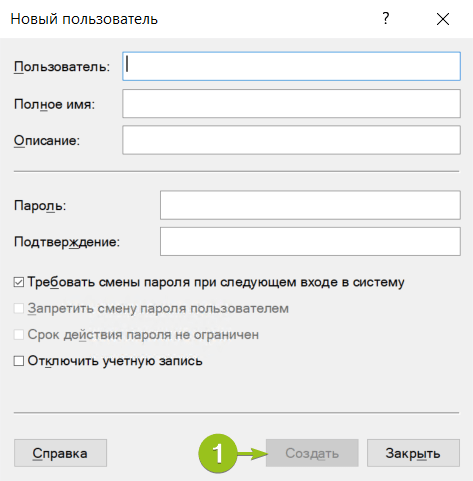
Откроется окно создания нового пользователя (New User). Впишем имя пользователя (имя, которое будет использоваться для входа в систему) в графе «Пользователь» (User name), полное имя (будет показываться на экране приветствия) в поле «Полное имя» (Full name) и описание учетной записи в поле «Описание» (Description). Затем дважды введем пароль для создаваемого пользователя. По умолчанию пароль должен отвечать политики надежности паролей. О том как изменить данную политику читайте в статье Изменение политики паролей в Windows Server 2012 R2.
Рекомендую сразу записать введенный пароль в отведенное для хранение паролей место. Для этих целей удобно использовать специальные менеджеры паролей, например бесплатную программу KeePass.
Далее снимем флаг «Требовать смены пароля при следующем входе в систему» (User must change password at next logon) если требуется оставить введенный только что пароль. В противном случае пользователю придется сменить пароль при первом входе в систему.
Установим флаг «Запретить смену пароля пользователем» (User cannot change password) если хотим лишить пользователя данного права.
Установим флаг «Срок действия пароля не ограничен» (Password never expires) если нет необходимости в периодической смене паролей.
Флаг «Отключить учетную запись» (Account is disabled) отвечает за возможность входа пользователя в систему. Оставляем неизменным.
Нажимаем «Создать» (Create) чтобы создать нового пользователя системы.
2. Изменение настроек пользователя
Добавленного только что пользователя мы найдем в таблице пользователей системы на вкладке «Пользователи» (Users) оснастки «Управление компьютером» (Computer Management). Для того чтобы изменить настройки пользователя, необходимо в таблице кликнуть по нему правой кнопкой мыши и в контекстном меню выбрать пункт «Свойства» (Properties).

Откроется окно свойств выбранного пользователя. Пробежимся по наиболее часто используемым настройкам.
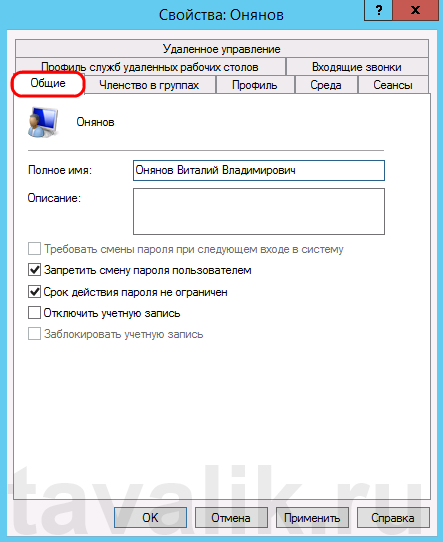
На вкладке «Общие» (General) можно изменить параметры, которые мы задавали при добавлении пользователя.
На вкладке «Членство в группах» (Member of) можно увидеть участником каких групп является данный пользователь. Кроме того, здесь можно добавить пользователя в группу или удалить его из выбранной группы.
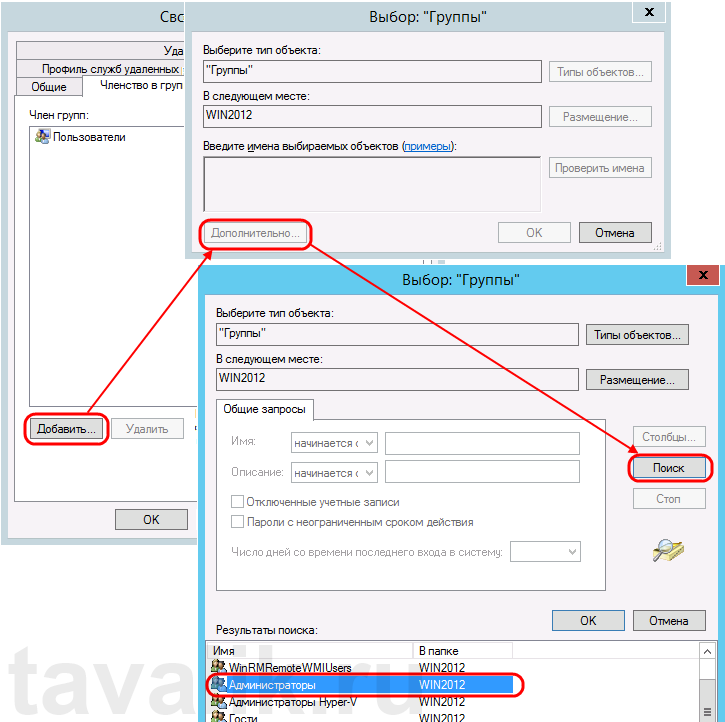
Например, чтобы сделать пользователя администратором сервера, его необходимо добавить в группу «Администраторы» (Administrators). Для этого нажмем кнопку «Добавить…» (Add…), находящуюся под списком групп, в открывшемся окне выбора группы нажмем «Дополнительно…» (Advanced…) и затем кнопку «Поиск» (Find Now) в окне подбора групп. Выделим необходимую группу в таблице результатов поиска (в нашем случае это группа «Администраторы» (Administrators)) и завершим выбор нажав «ОК» во всех открытых окнах.
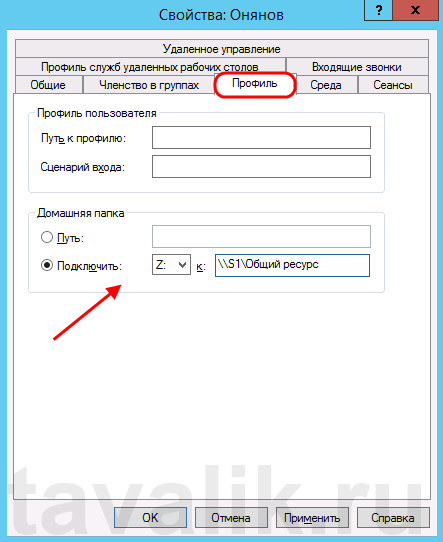
На вкладке «Профиль» (Profile) можно задать путь к профилю пользователя (Profile Path), сценарий входа (Logon script), а также подключить сетевой диск, который будет автоматически подключаться при входе пользователя в систему. Для этого установим переключатель «Домашняя папка» (Home folder) в «Подключить:» (Connect:), выберем букву сетевого диска и укажем путь к ресурсу, где будут располагаться файлы. Это может быть локальный путь к папке или сетевой ресурс.
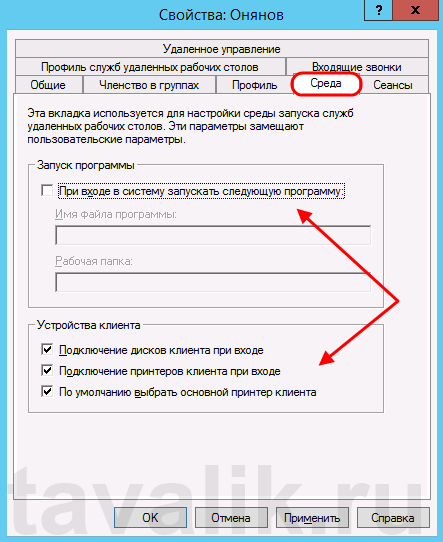
На вкладке «Среда» (Environment) возможно указать программу, которая будет запускаться автоматически при входе пользователя через службу удаленных рабочих столов. В этом режиме работы другие программы и рабочий стол пользователю будут недоступны.
Также здесь можно разрешить/запретить подключение дисков клиента при входе (Connect client drivers at logon), подключение принтеров клиента при входе (Connect client printers at logon) и переопределить основной принтер клиента (Default to main client printer) при работе через удаленных рабочий стол, установив/сняв соответствующие флаги на форме.
На вкладке «Сеансы» (Sessions) можно установить параметры тайм-аута и повторного подключения при работе через службу удаленных рабочих столов.

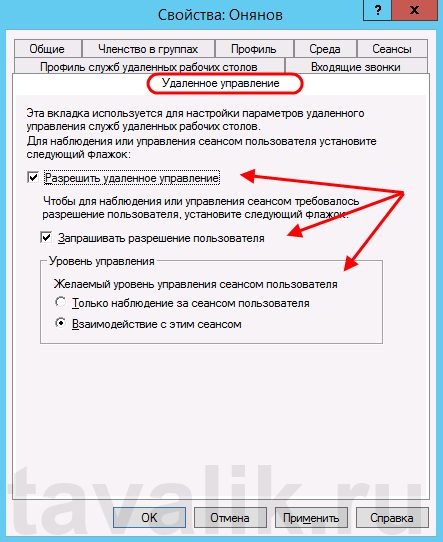
Вкладка «Удаленное управление» (Remote control) используется для настройки параметров удаленного управления сеансом пользователя при работе через службу удаленных рабочих столов.
Смотрите также:
Ниже приведена небольшая инструкция об изменении политики паролей в Microsoft Windows Server 2012 R2. По умолчанию политика паролей определена таким образом, что все пароли учетных записей пользователей должны удовлетворять следующим…
В данной статье я расскажу как добавить разрешающее правило в Брандмауэр Windows Server 2012 R2 (в Windows Server 2008 R2 действия аналогичны). Правило будем добавлять на примере работы сервера 1С:Предприятие…
Источник
Как создать и удалить пользователя, группу и объект в домене
Создание пользователя в домене.
1. Нажимаем «Пуск«, далее выбираем «Диспетчер серверов«.
2. В новом окне нажимаем «Средства«, в открывшемся списке выбираем «Пользователи и компьютеры Active Directory«.
4. Заполняем необходимые поля для создания пользователя (Имя, Фамилия, Имя входа пользователя). «Полное имя» заполнится автоматически. Затем нажимаем «Далее«.
5. В следующем окне дважды набираем пароль для пользователя. Затем устанавливаем чекбокс на «Требовать смены пароля при следующем входе в систему«. Тогда при входе в систему пользователю будет предложено заменить текущий пароль. Нажимаем «Далее«.
6. В новом окне смотрим сводную информацию по вновь созданному пользователю и нажимаем «Готово«. Будет создан новый пользователь.
Создание группы в домене
2. Задаем «Имя группы«, «Область действия группы» и «Тип группы«, далее нажимаем «ОК«. Будет создана группа.
3. Для добавления пользователей в группу, открываем пользователя, выбираем вкладку «Член групп«, нажимаем кнопку «Добавить«.
4. В новом окне вводим имя группы, в которую будет добавлен пользователь. Проверяем нажав кнопку «Проверить имена«, далее «ОК«.
5. Также возможно добавить пользователя в группу, открыв нужную группу. Далее выбираем вкладку «Члены группы«. Нажимаем «Добавить«.
6. В новом окне вводим имена пользователей, которые будут добавлены в группу. Проверяем нажав клавишу «Проверить имена«, далее «ОК«.
Добавление подразделения в домене
2. Задаём имя подразделения, далее «ОК«.
3. Если необходимо, в созданном подразделении создаём вложенные подразделения. Далее в созданные подразделения можно перенести или создать различные объекты (пользователи, компьютеры, группы).
Удаление пользователя
3. Появится предупреждение о том, что «Вы действительно хотите удалить Пользователь с именем. «. Нажимаем «Да» и выбранный пользователь будет удален из домена.
Удаление группы
2. Появится предупреждение о том, что «Вы действительно хотите удалить Группу безопасности. «. Нажимаем «Да«. Выбранная группа будет удалена из домена.
Удаление подразделения
2. Для снятия защиты в меню «Вид» выбираем «Дополнительные компоненты«.
4. Выбираем вкладку «Объект«. Убираем чекбокс «Защитить объект от случайного удаления«, далее «ОК«.
6. Появится предупреждение о том, что «Вы действительно хотите удалить Подразделение с именем. «. Нажимаем «Да«. Если в выбранном объекте не будет других вложенных объектов, то подразделение будет удалено.
7. Если объект содержит другие объекты, то появится предупреждение «Объект Department1 содержит другие объекты. Вы действительно хотите удалить объект Department1 и все содержащиеся в нем объекты?«. Нажимаем «Да» и выбранный объект будет удален с вложенными объектами.
Посмотреть видео о том, как создать или удалить пользователя, группу, объект в домене можно здесь:
Источник
Как добавить пользователя на Windows Server
Добавление учётной записи в Windows Server 2012/2016
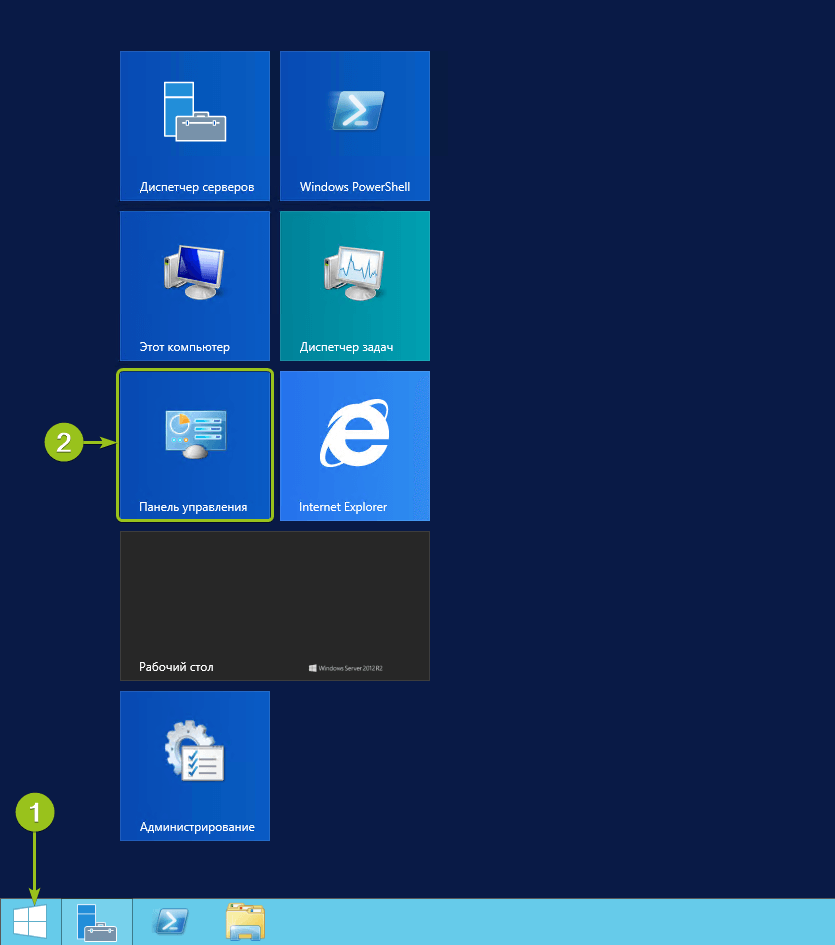
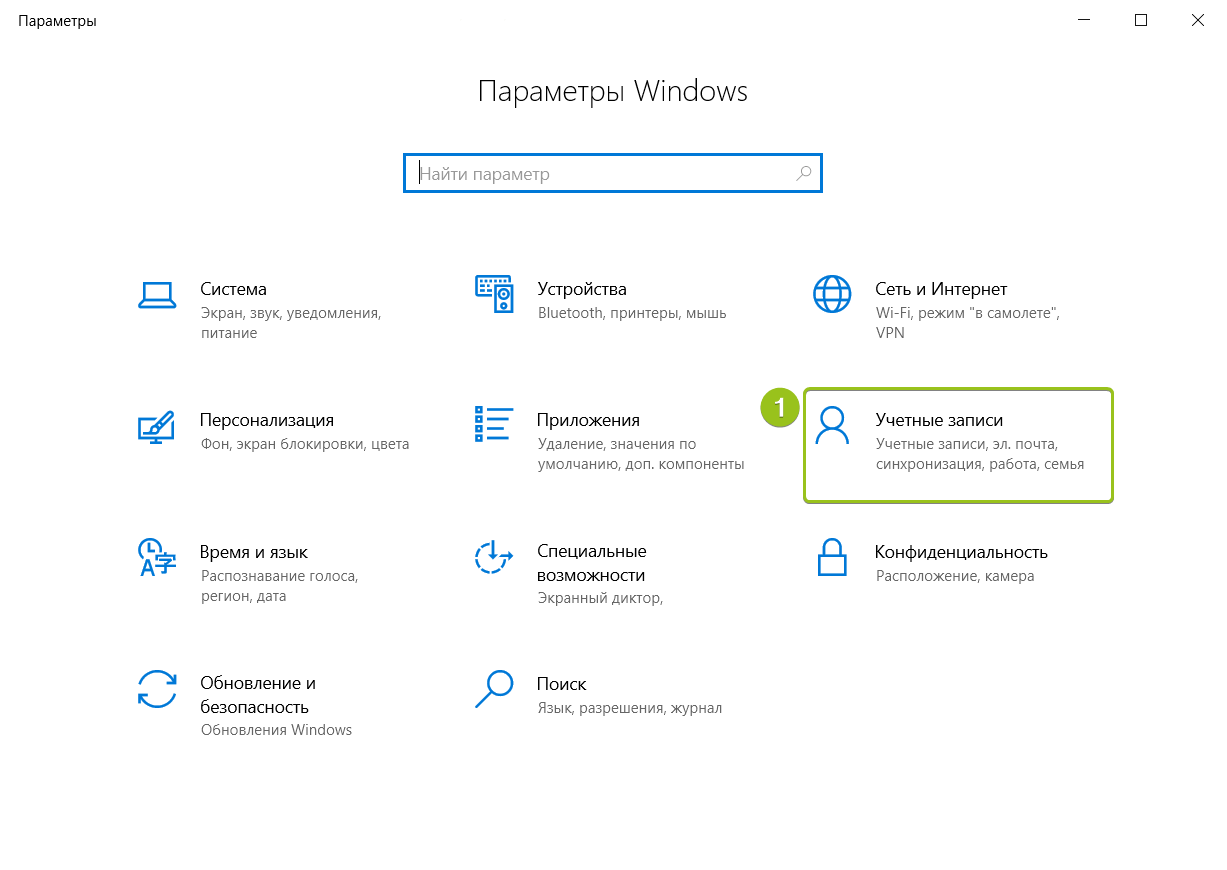
Чтобы создать нового пользователя, на Windows Server 2012 откройте меню «Пуск» и перейдите в Панель управления :
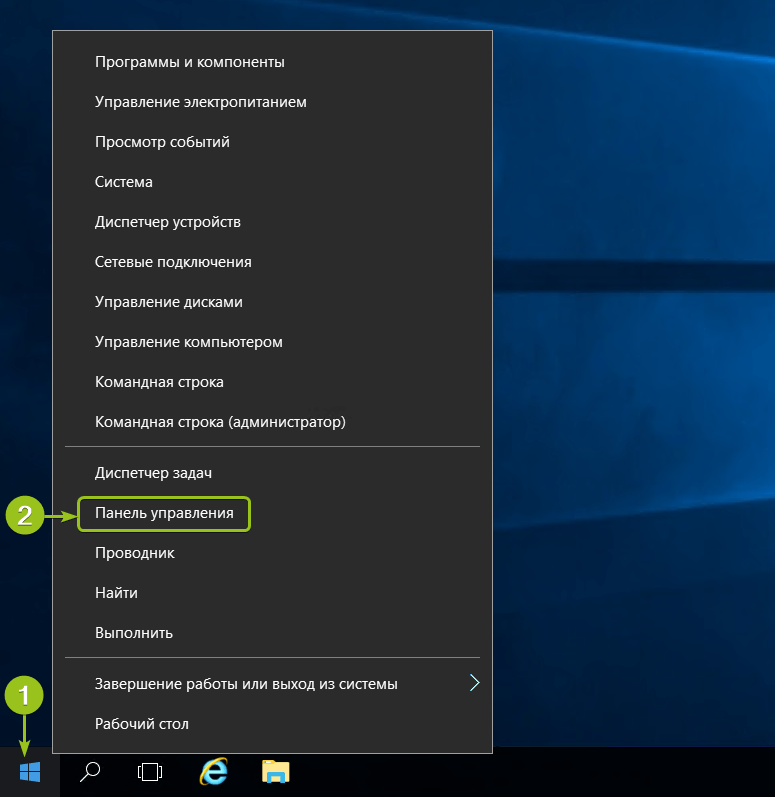
В Windows Server 2016 в панель управления можно перейти из контекстного меню при клике правой кнопкой мыши по меню «Пуск» :
Система добавит новую учётную запись и отобразит её данные — имя и уровень прав. Для завершения настройки нажмите «Готово» :
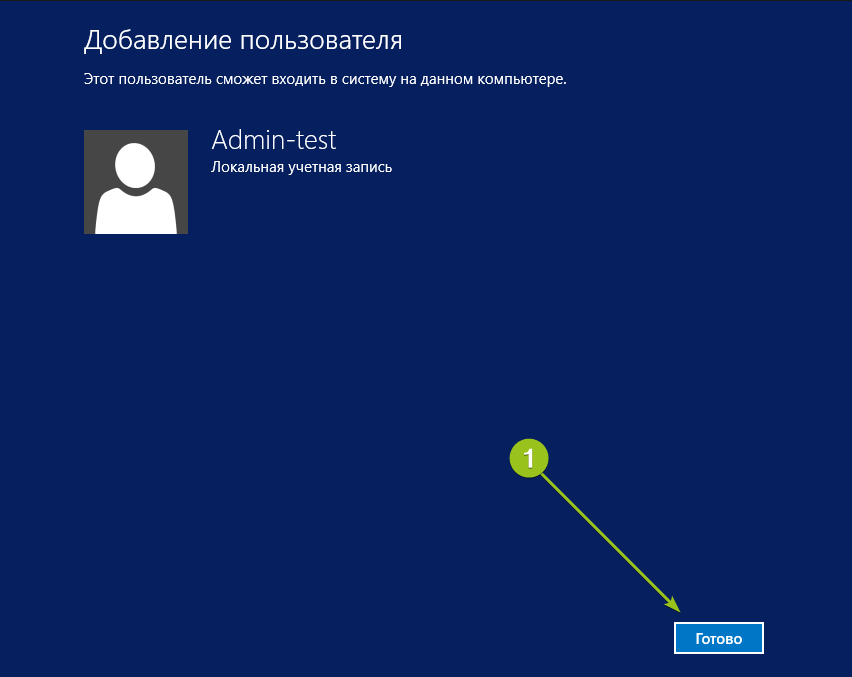
После этого в списке пользователей появится новая учётная запись.

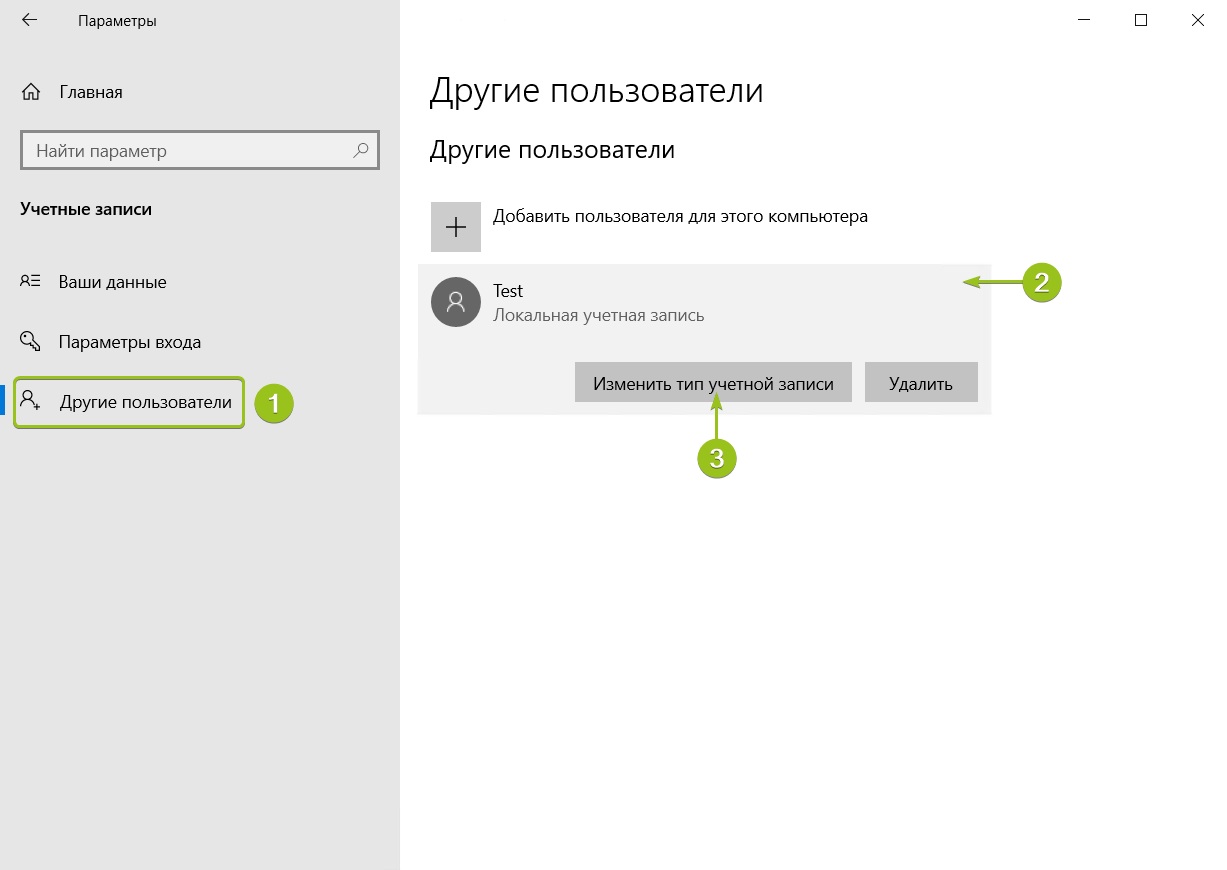
При необходимости вы можете изменить тип созданного пользователя — дать ему права администратора. Для этого кликните на карточку учётной записи — откроется окно настройки:
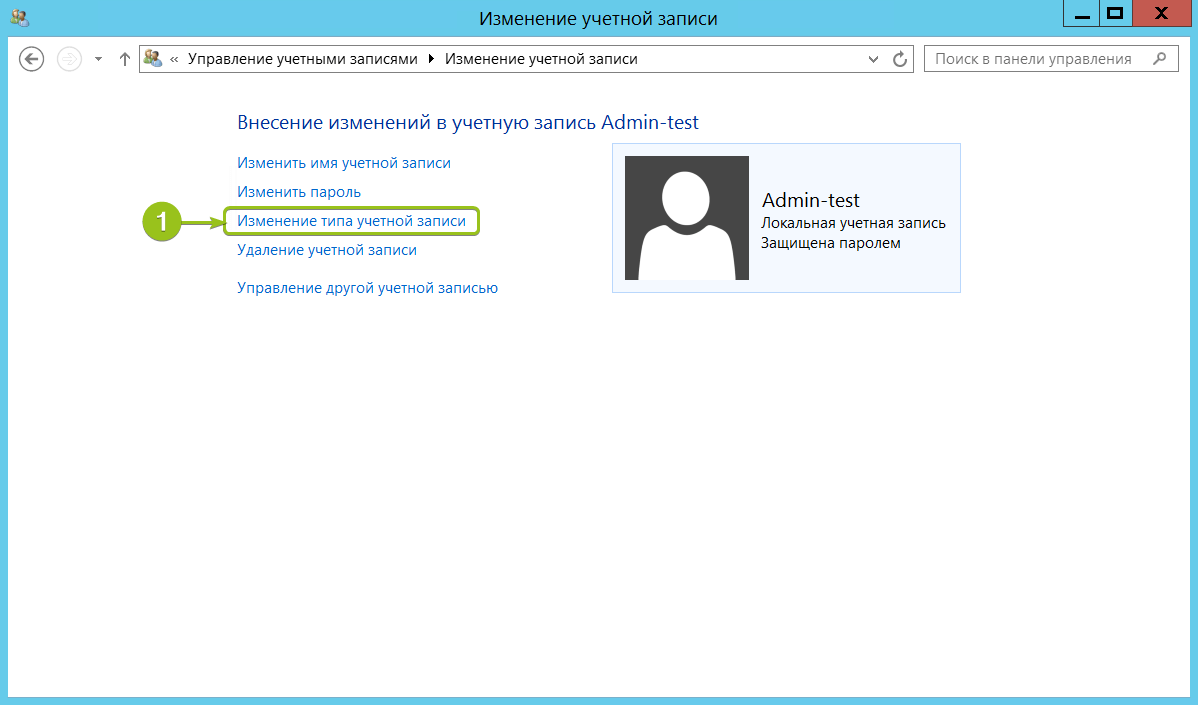
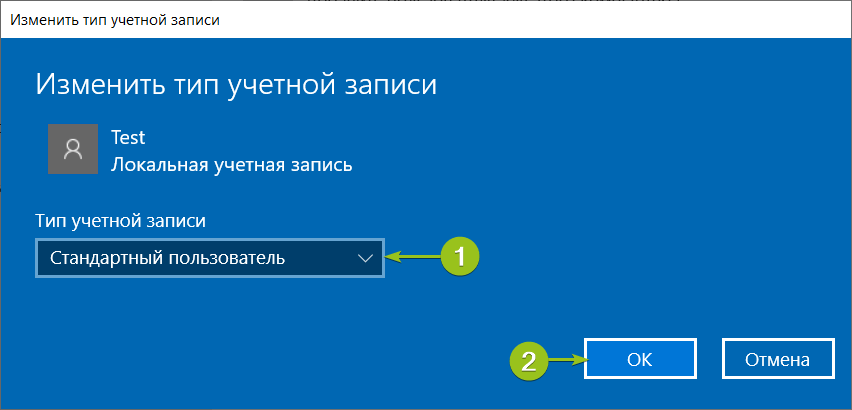
В меню слева выберите «Изменение типа учётной записи» — система предложит настроить уровень доступа:
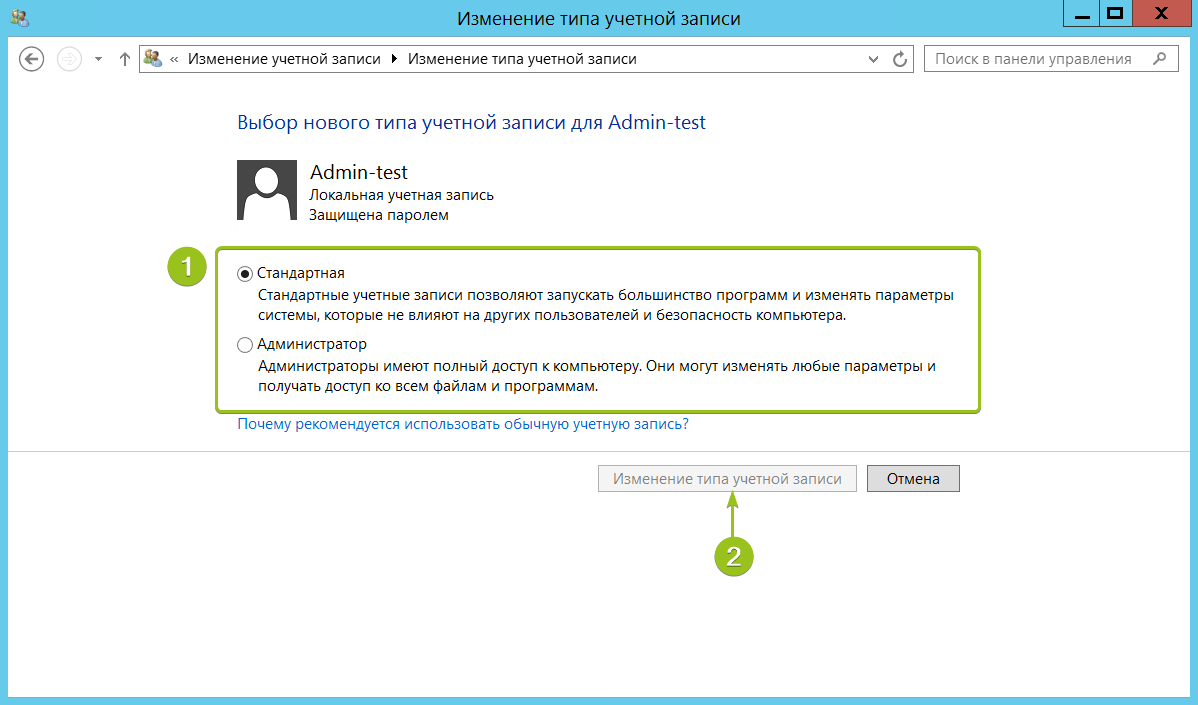
Укажите требуемый уровень прав и нажмите «Изменение типа учётной записи» для вступления настроек в силу.
На этом процесс создания пользователя на Windows Server 2012 завершён. Чтобы новый пользователь мог подключиться к серверу по RDP, ему потребуются следующие данные:
Добавление учётной записи в Windows Server 2019

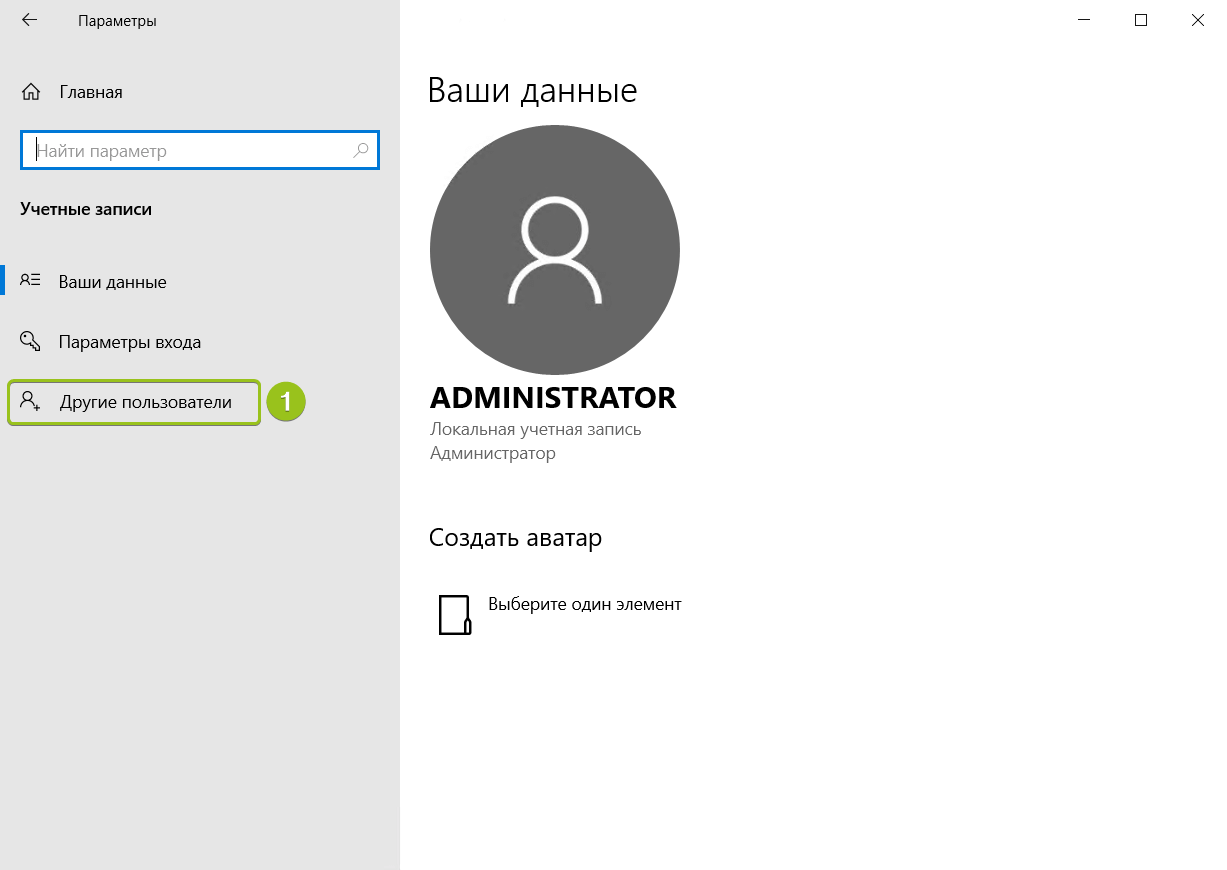
Система перенаправит вас на страницу с данными текущего пользователя. В меню слева перейдите в раздел «Другие пользователи» и нажмите «Добавить пользователя для этого компьютера»
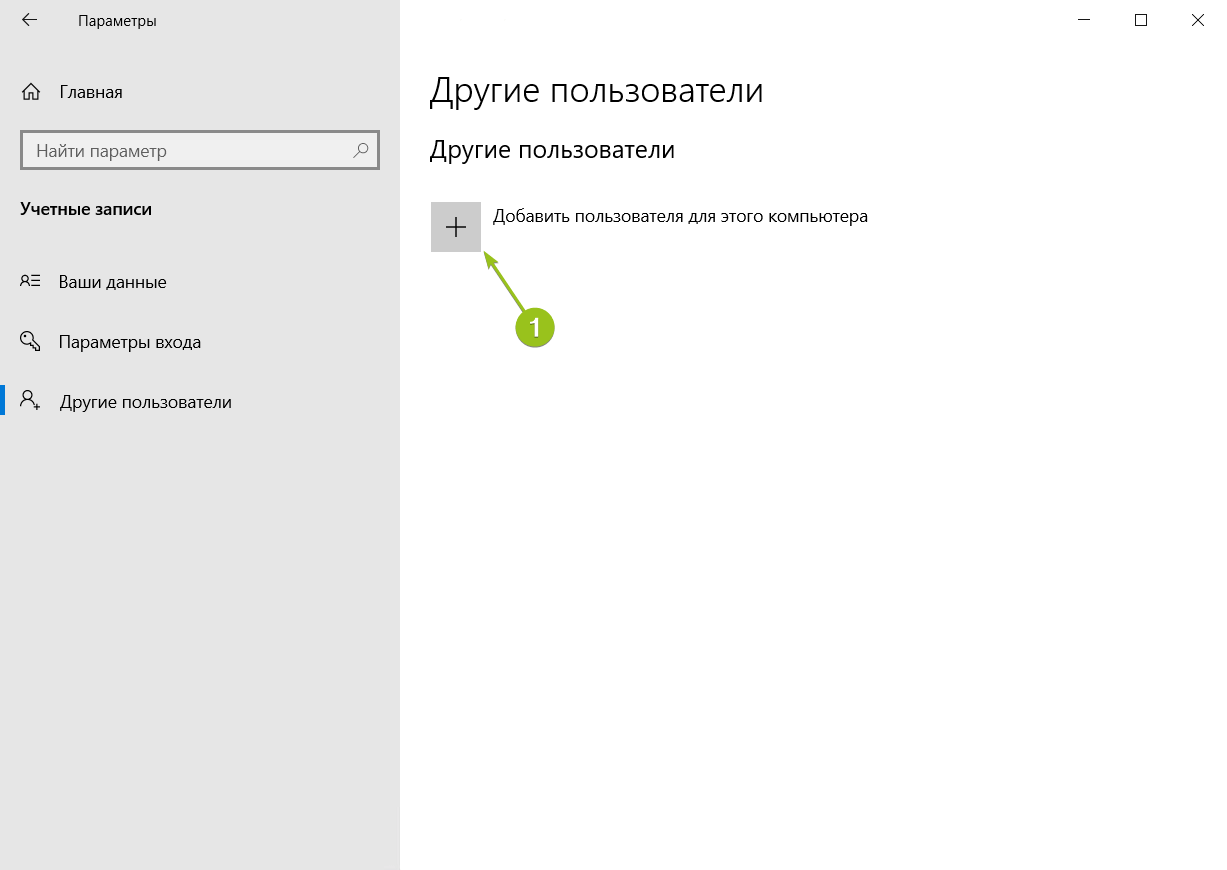
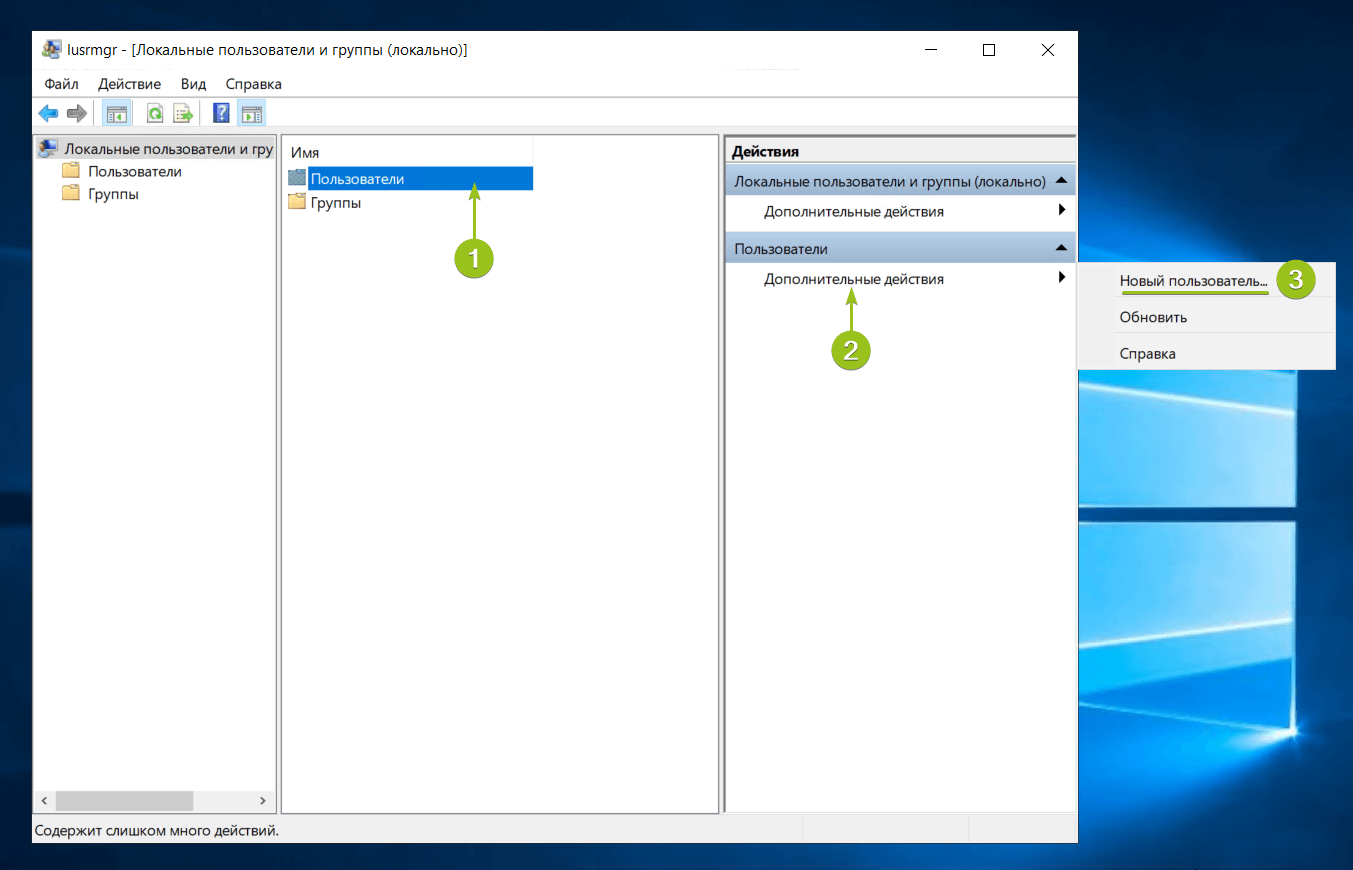
Запустится оснастка настройки локальных пользователей и групп. Выберите раздел «Пользователи» и в блоке «Действия» в соответствующем подразделе справа перейдите в меню «Дополнительные действия» — «Новый пользователь. » :
После добавления нужного количества пользователей нажмите «Закрыть» — вы вернётесь к списку пользователей, где появятся созданные учётные записи.

На этом процесс добавления пользователя завершён. Чтобы новый пользователь мог подключиться к серверу по RDP, ему потребуются следующие данные:
Зачем нужны RDP-лицензии и где их взять
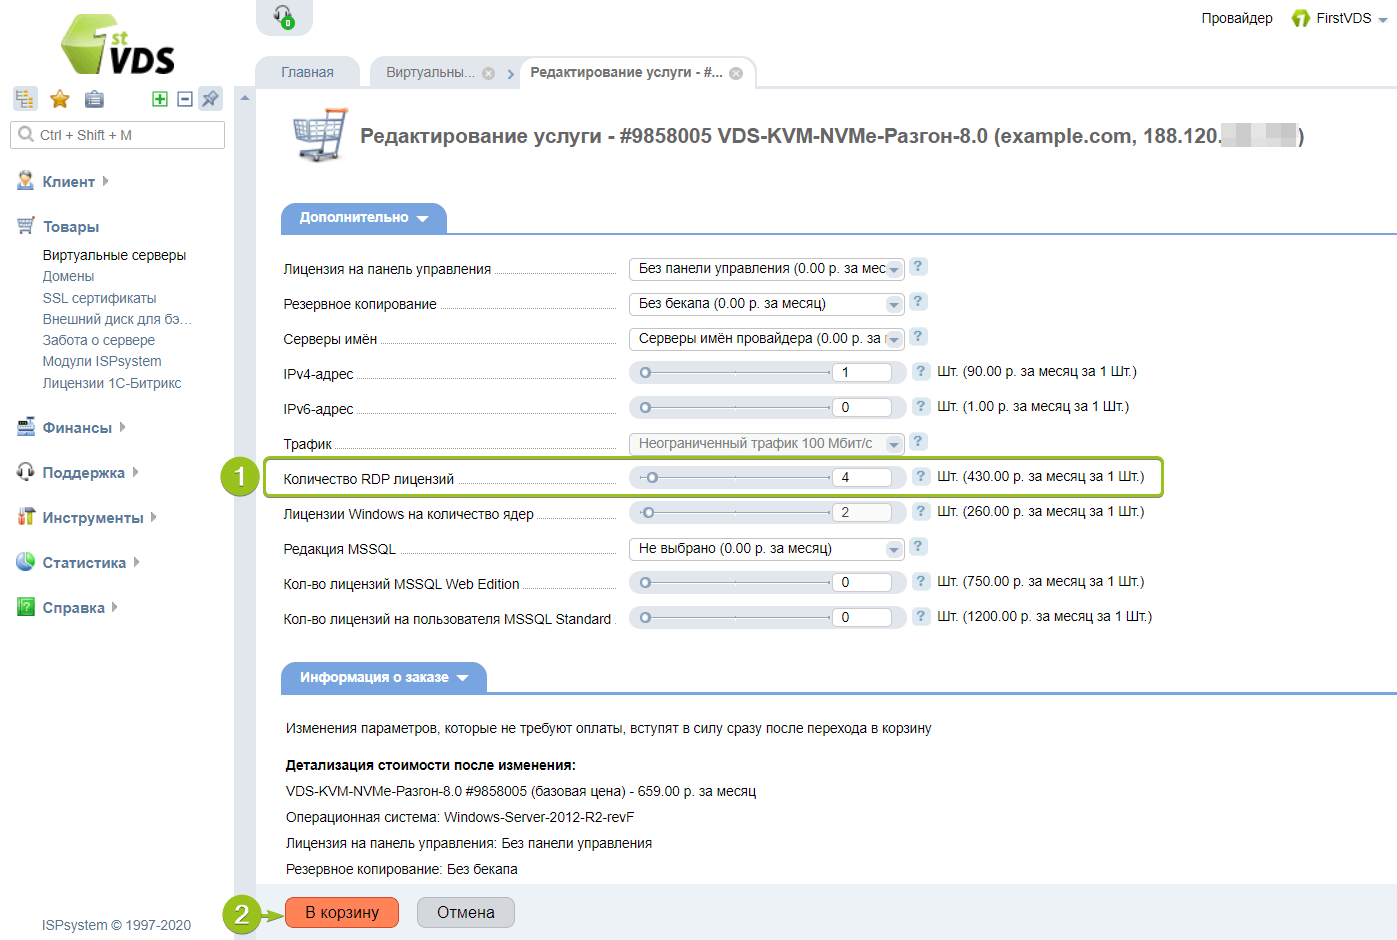
После оплаты в течение получаса к серверу подключится наш системный администратор для активации лицензий и настройки терминального сервера.
Источник
Создание пользователя в Windows Server 2016
Для того, чтобы еще один пользователь мог подключиться к виртуальному серверу с операционной системой Windows Server 2016, необходимо его создать и выдать права на удаленное подключение к серверу.
Создание пользователя
Способ 1
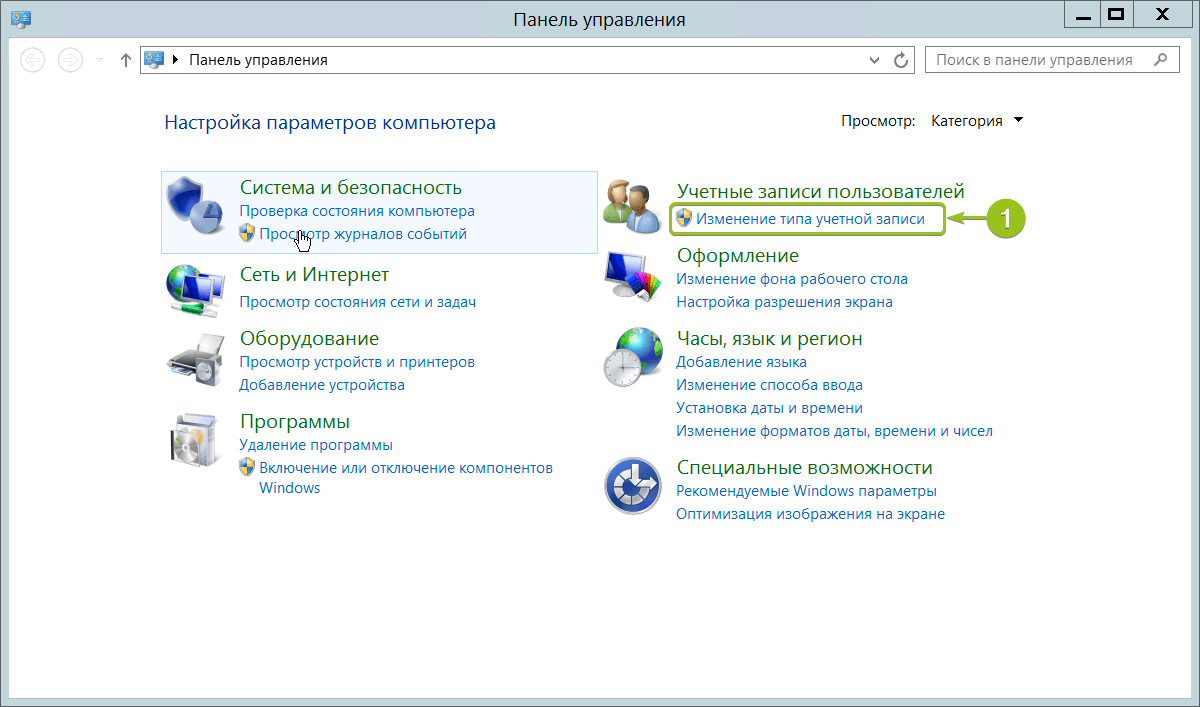
Для создания пользователя в Windows откройте Панель управления сервером и выберете вкладку User Accounts.
Далее снова перейдите во вкладку User Accounts.
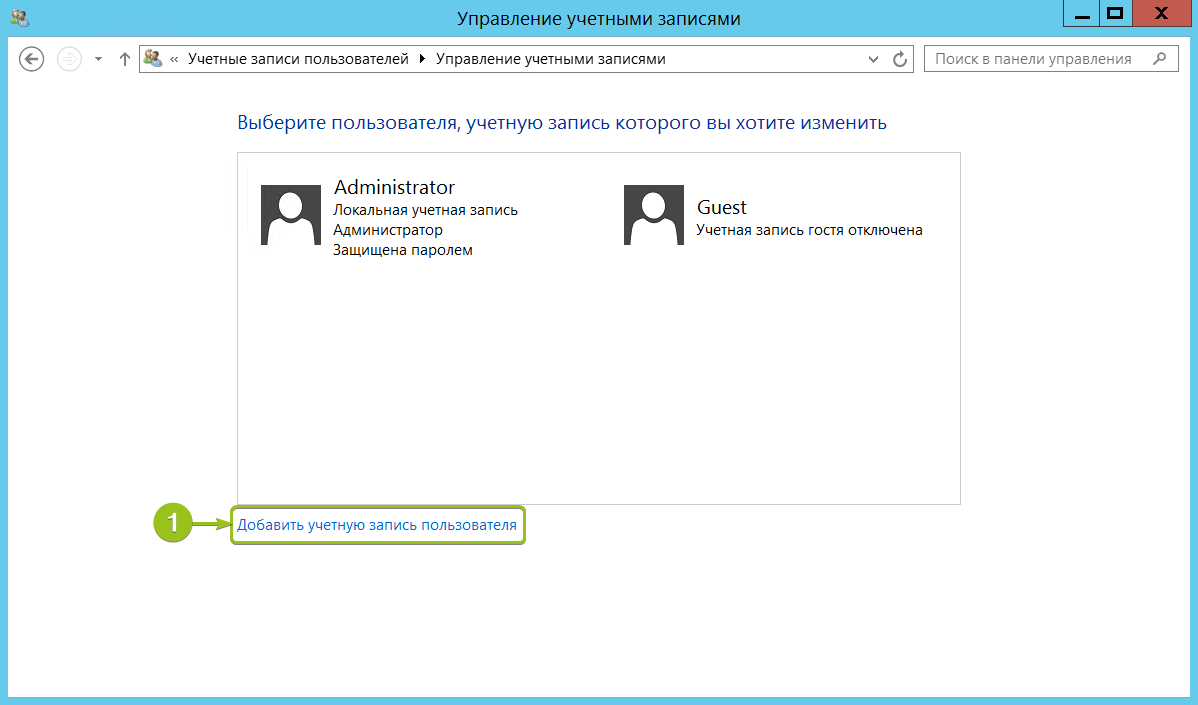
Далее выберете Manage other account.
В нижней части экрана выберете Add a user account.
a
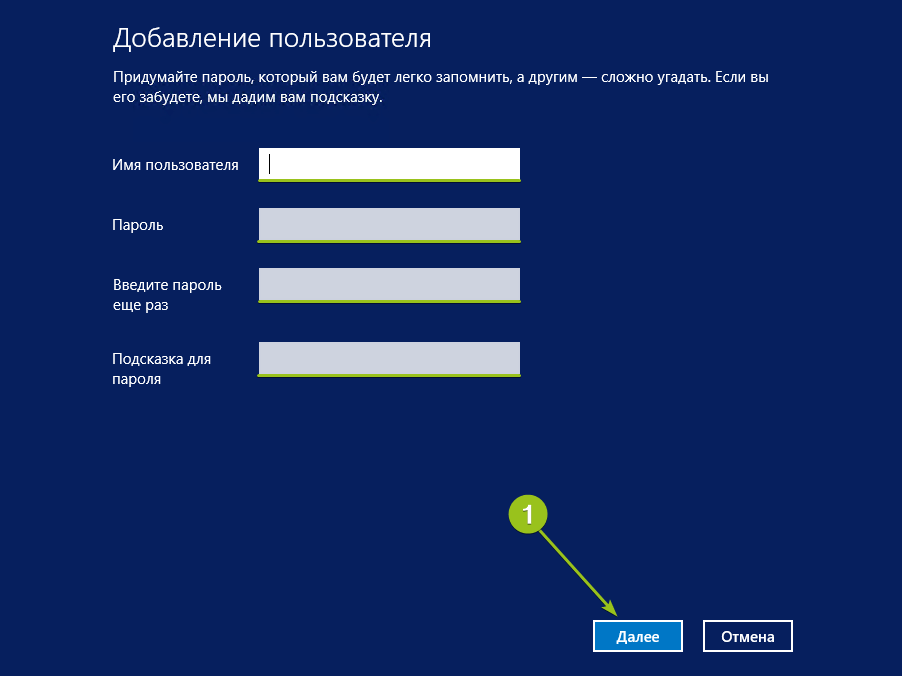
В открывшемся окне введите имя и пароль, соответствующий правилам безопасности. Мастер настройки сообщит, если пароль не достаточно надежный. В поле Password hint введите подсказку на случай, если вы забудете пароль.
В итоге вы увидите нового пользователя Windows Server 2016.
Способ 2
Запустите консоль управления Windows, для этого в поиске найдите команду mmc. Или с помощью комбинаций клавиш Win+R перейдите к поиску и введите mmc.
Найдите нужную нам оснастку Local Users and Groups и кликните кнопку Add, затем OK.
На этом шаге выберете Local computer и нажмите Finish.
Раскройте иерархию оснастки и в разделе Users с помощью правой кнопки мыши создайте нового пользователя Windows (New User).
В итоге вы увидите нового пользователя.
Виртуальный сервер на базе Windows
Разрешение на удаленное подключение
Способ 1
Снова откройте консоль управления Microsoft, для этого с помощью комбинаций клавиш Win+R перейдите к поиску и введите mmc.
Найдите нужного пользователя и правой кнопкой мыши откройте свойства. Перейдите во вкладку Member Of и нажмите Add.
В открывшемся окне откройте расширенные возможности с помощью кнопки Advanced.
Для поиска нужной группы кликните Find Now и выберете группу с именем Remote Desktop Users. Кликните OK.
Отобразится полное название группы, нажмите OK.
Способ 2
Для того, чтобы новый пользователь Windows Server мог подключиться к виртуальному серверу, необходимо добавить его в список пользователей, которым разрешено удаленное подключение.
Далее нажмите кнопку Add, чтобы добавить нового пользователя.
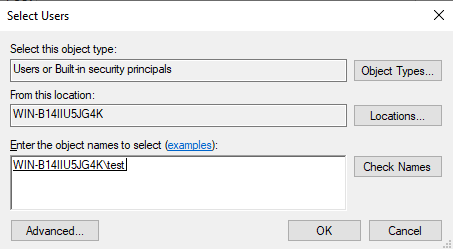
В новом окне введите имя созданного пользователя, например “test”, и нажмите Check Names. Появится полное системное имя. Нажмите OK.
В списке появится новый пользователь. Сохраните изменения, нажав OK.
Теперь вы можете подключиться к виртуальному серверу от имени нового пользователя.
Подключение к виртуальному серверу
О том как подключиться к виртуальному серверу написано в нашей инструкции. При подключении необходимо выбрать Другую учетную запись (Use a different account).
Введите имя и пароль созданного пользователя Windows и подключитесь к виртуальному серверу.
Источник
Windows Server 2019 is the new bet that Microsoft has launched for small, medium and large companies thanks to all the innovations and improvements that are integrated into it. But before we talk a bit about these developments, it is vital that we understand the needs of a Windows Server 2019 server . This implies constant maintenance, avoiding shutdowns or unforeseen restarts (this is because there are used many roles and services to which the users and client teams of the organization are linked, using the most special dedicated hardware and many other actions..
Windows Server 2019 is available for official download at the following Microsoft link:
Windows Server 2019
Benefits Windows Server 2019
To understand a bit all the benefits of using Windows Server 2019 in our organizations we find:
- Improvements in the migration tasks of clusters between domains.
- Greater security using the function of software defined networks (SDN) which has been created to optimize the execution of workloads in the different environments where Server 2019 is used.
- System Insights has been integrated as a new feature of the server thanks to which it has a greater capacity of local predictive analysis natively for the Windows Server 2019 operating system.
- Support for Kubernetes.
- Compatibility of the Server Core application on demand.
- Improvements in the performance history.
- HTTP / 2 integration in order to access faster and more secure web browsing on the server (although this is not a good security practice)
- News in the advanced protection against threats of Windows Defender (ATP) (Windows Defender Advanced Threat Protection) which will avoid attacks at the kernel and memory level preventing malicious files from being executed.
- Windows Admin Center support and many more functions.
Even with all the novelties of networks, security, protocols, interfaces, etc, there will be simple but essential tasks in the server so that everything works as it should be and this is with the use of users and groups, it is logical, if you do not have a user How do you access the server or the domain on a client computer), and if we are not in a group, how do we have the necessary permissions ?, hence the importance of both users and groups .
Importance Windows Server domain
Because these objects are important in a domain in Windows Server 2019, there are fundamental reasons such as:
- Security
- Organization
- Administration
- Control
- Audit and more.
In this way, a specific area, for example IT, can have a specific group and users that have special permissions on the server, permissions or accesses that others will not have. This prevents us from granting permits to users who do not require them but who do put at risk the security of the system and its structure..
We clarify that we can create a user as the type of dedicated service accounts to be used in unique applications on the server.
In Windows Server 2019, after creating the domain, by default several integrated accounts and security groups are created and preconfigured with the respective rights and permissions as the case may be, to see these user accounts and groups we must go to the following route:
- Server administrator
- Tools
- Active Directory Users and Computers
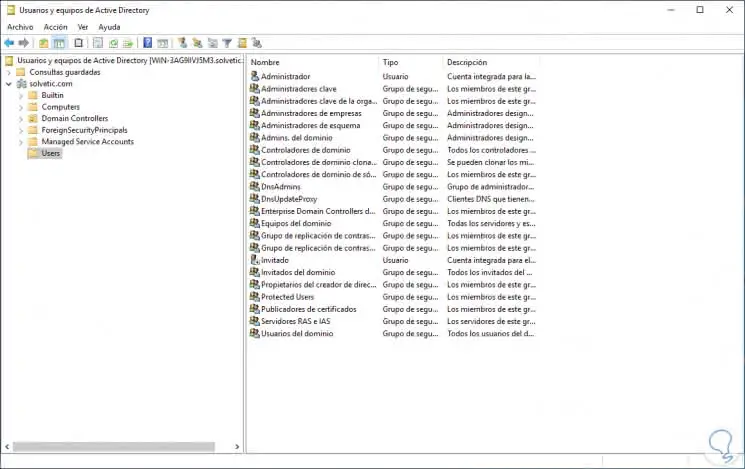
We can see the different types of users and groups with a short description about what role or role meets..
Windows Server Management
In the Windows Server 2019 domain we find two types of management that are:
- Service administrators who are responsible for maintaining and managing the Active Directory Domain Services (AD DS), also counting the management of domain controllers and the configuration of AD DS.
- Data administrators which manage the data stored in AD DS, in the servers and in the client computers of the domain.
We can not reach and create a group or user just because, we must know what function that user will do and what type of group will be created, for this Windows Server offers the following types of users:
Windows Server user types
- Standard accounts which fulfills the role of access to server functions to which the respective permission has been assigned.
- Administrator accounts which have total control in the domain and this is in the Administrators group
Now, at the group level we find the following options in Windows Server 2019:
- Distribution groups which we can implement to create email distribution lists.
- Security groups, which are special, since they assign the permissions to the shared resources in the domain
Apart from this we must keep in mind that Windows Server 2019 manages the groups at the next level:
- Universal
- Global
- Local domain
Now, with this small introduction we will learn to create a user and a group in Windows Server 2019 to better manage all these parameters and control each action of these.
To stay up to date, remember to subscribe to our YouTube channel! SUBSCRIBE
1. How to create a user in Windows Server 2019
In Windows Server 2019 we can create new OUs (Organizational Units) to manage the work in areas, that is, we can create an OU called HR for human resources, an OU called IT for the technology area etc, then add the users in each of these OUs as the case may be.
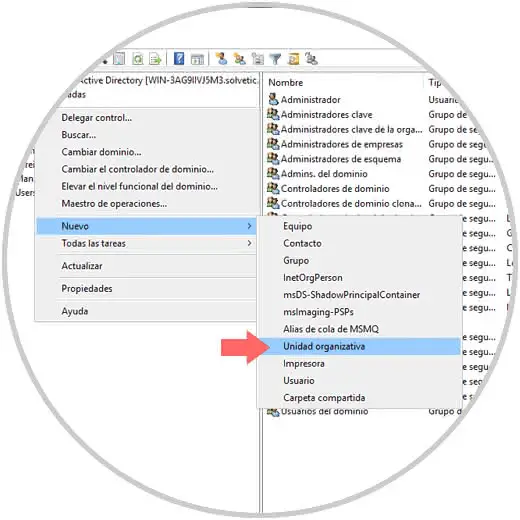
Step 1
If we want to create an OU, we go to Active Directory Users and Computers and there we must right click on the domain and select the option «New / Organizational Unit»
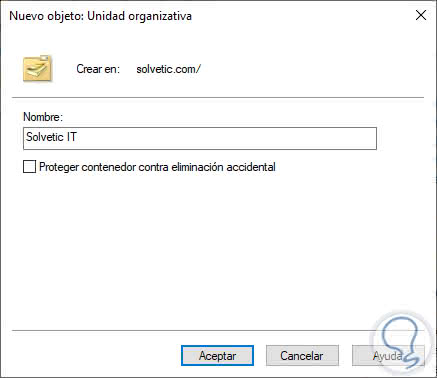
Step 2
We assign the desired name of the OU. Click OK to create it in the server structure.
Step 3
Once created, we will create the user in said organizational unit and for that we access it, we right click in some free place and select the option «New / User»
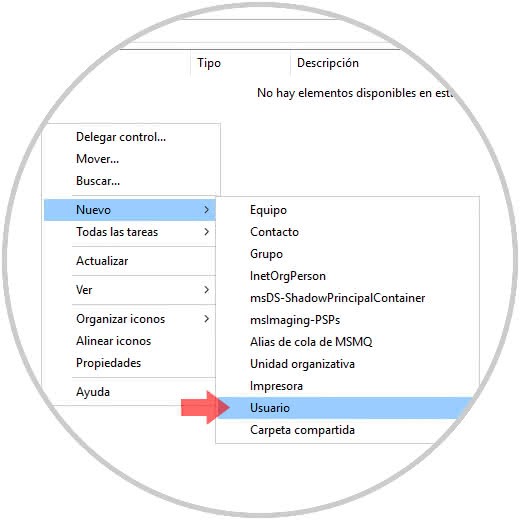
Note
Another option for this task is to go to the Action / New / User menu.
Step 4
The following wizard will be displayed where we register the following:
- Names and surnames of the user
- Mail account to assign
Step 5
Click on Next and then define:
- User password
- Permissions on the account such as not changing the password, preventing the password from expiring, forcing the change of the same, etc.
Step 6
We will see a summary of the user to create as details and OU where it will be hosted. Click on Finish
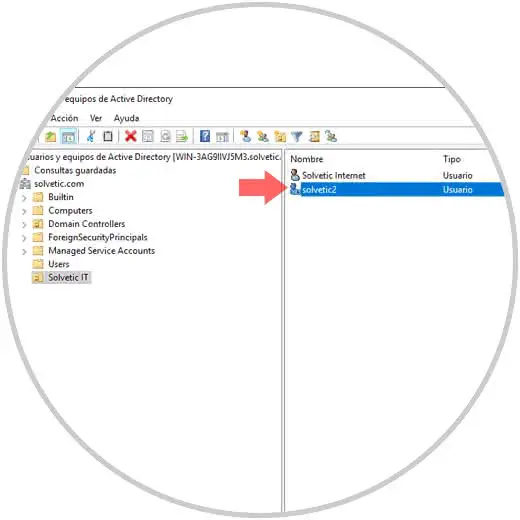
Step 7
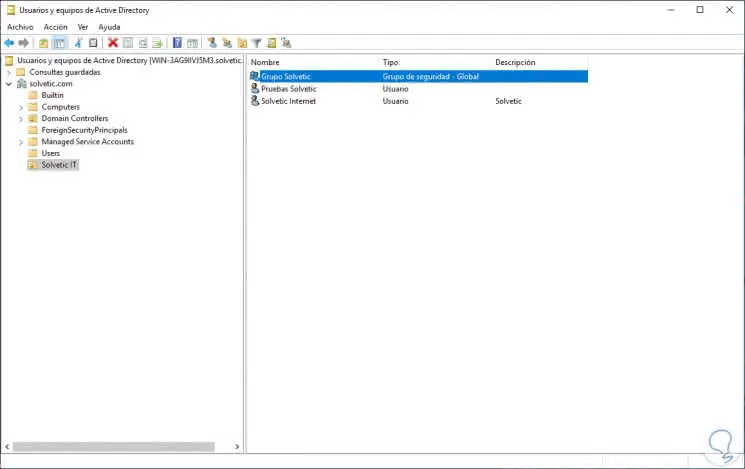
Now we will see that user in the unit that we have selected:

Step 8
This is the basic process of creating a user in Windows Server 2019, but as we know you are a professional and you like to go further, we will show you how to create a user using Windows PowerShell which is the server administration console. For this we must use a very simple syntax, in this case we are going to create the user solvetic2 in the TechnoWikis IT OU, so that we execute the following:
dsadd user "CN = solvetic2, OU = TechnoWikis IT, DC = TechnoWikis, DC = com"
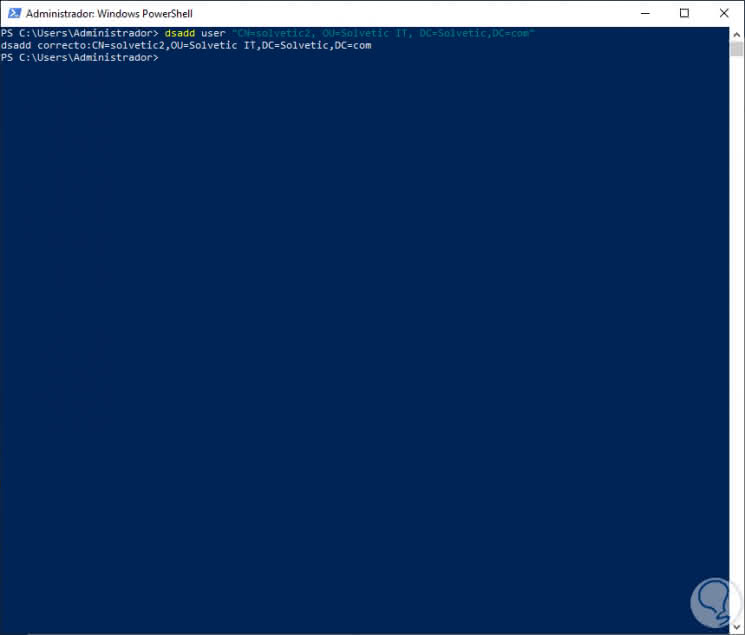
Step 9
This will create this default account disabled. There we can access the account and activate it by assigning a password.
Step 10
We know very well that the profile of the user is his identity in the domain, so when double clicking on it we will see the following:
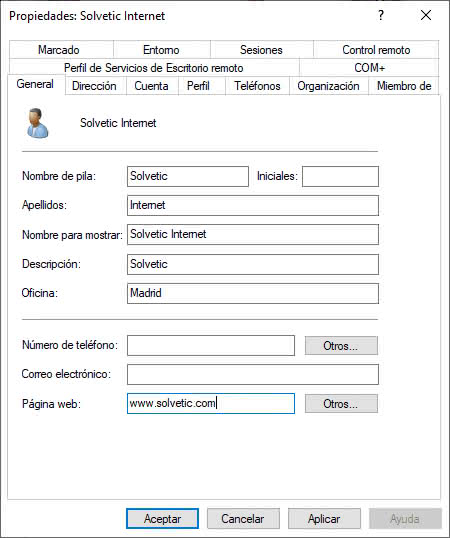
We can see a series of tabs where it is possible to assign specific data of this user as website, location, address, fax or telephone number, groups to which it belongs, range of activity hours and more, each of these fields we can assign in PowerShell also using the following syntax and completing the correct values:
dsadd user <UserDN> [-samid <SAMName>] [-upn <UPN>] [-fn <FirstName>] [-mi <Initial>] [-ln <LastName>] [-display <DisplayName>] [-empid <EmployeeID>] [-pwd {<Password> | *}] [-desc <Description>] [-memberof <Group> ...] [-office <Office>] [-tel <PhoneNumber>] [-email <Email>] [-hometel <HomePhoneNumber>] [- pager <PagerNumber>] [-mobile <CellPhoneNumber>] [-fax <FaxNumber>] [-iptel <IPPhoneNumber>] [-webpg <WebPage>] [-title <Title>] [-dept <Department>] [-company <Company>] [-mgr <Manager>] [-hmdir <HomeDirectory>] [-hmdrv <DriveLetter>:] [- profile <ProfilePath>] [-loscr <ScriptPath>] [-mustchpwd {yes | no}] [-canchpwd {yes | no}] [-reversiblepwd {yes | no}] [-pwdneverexpires {yes | no}] [-acctexpires <NumberOfDays>] [-disabled {yes | no}] [{-s <Server> | -d <Domain>}] [-u <UserName>] [-p {<Password> | *}] [-q] [{-uc | -uco | -uci}]
2. How to manage users in Windows Server 2019
Step 1
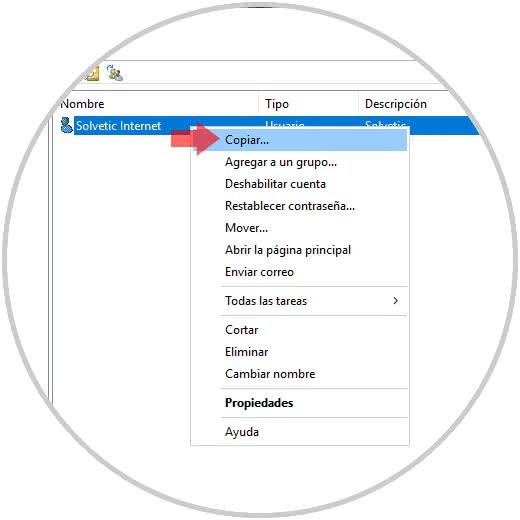
Windows Server 2019 saves us time in creating and editing a user, for example, in case of editing a user’s profile, it is normal for another new user to have the same profile, so instead of adding the data manually we can copy the user, this is simple, we can use any of the following options:
- Right click on the user and select the option Copy
- Go to the Action menu and there select Copy
Step 2
When selecting this option the following window will be displayed where we will enter the data of the new user:
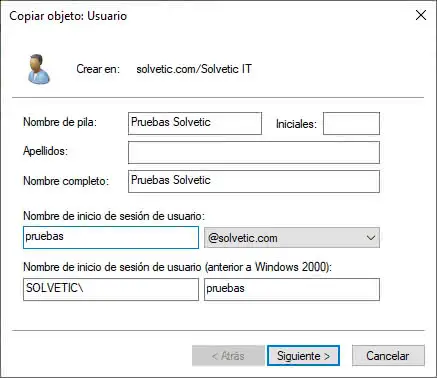
Step 3
In the next window we assign the desired password and in this way all the parameters of the original user will be copied to the new user.
Additional options
By right clicking on the user we find additional options such as:
- Add the user to a new group
- Disable this user’s account
- Assign a new password
- Move it to another OU
- Modify your name
- Remove it, etc.
So far we have seen how to create a user in Windows Server 201, now we will learn to create a group and then add this user to this new group.
3. How to create a group in Windows Server 2019
As we mentioned at the beginning, the groups are essential to grant permissions to the different applications or general configuration of the Windows Server 2019 server.
Step 1
To create our group, we will do it in the OU TechnoWikis IT, we will right click on it and select New / Group:

Step 2
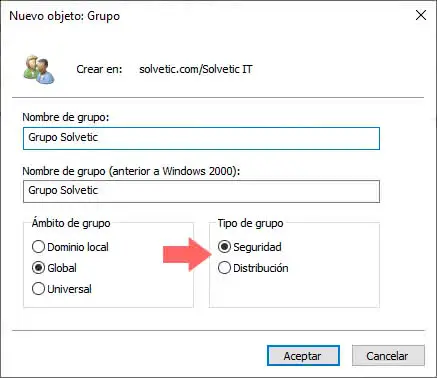
The following wizard will be displayed where we will enter the name of the group and define the following:
- The scope of the group
- Type of group, if it is for mailing lists, we will select Distribution and if it is to grant permits, we select Security
Step 3
The possible areas are:
Local domain
This applies only to the local server with Windows Server 2019
Global
Applies to all computers and servers in the domain
Universal
Applies for both local and external connections
Step 4
In this case we leave this option and click on OK to apply the changes and we will see our created group:
Step 5
If we want to add a user to this group, we can do it in one of the following ways:
Method 1
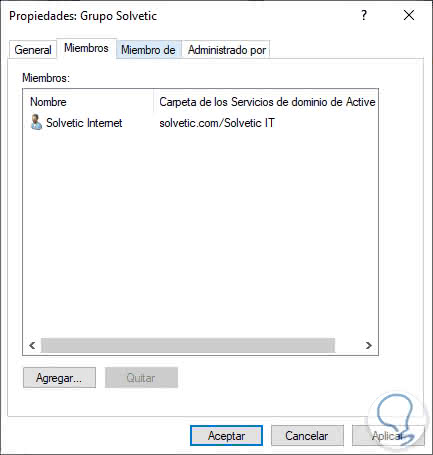
The first is to double click on the group and go to the Members tab:
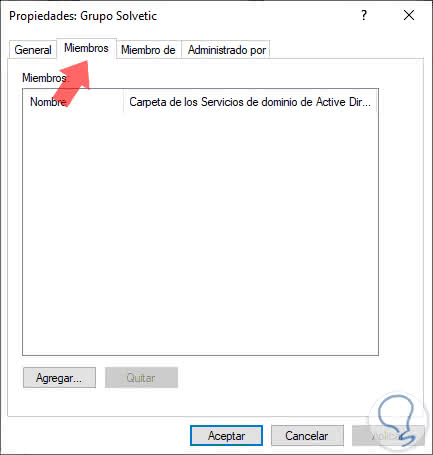
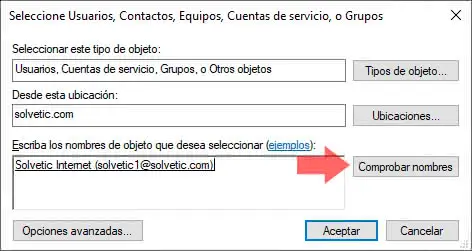
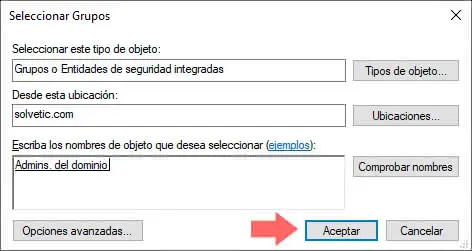
There we click on the Add button and in the pop-up window we enter the name of the desired user and click on the button Check names to validate the existence of that user:
Click OK and we will see that this user has been added to the selected group. Click on Apply and Accept to save the changes.
Method 2
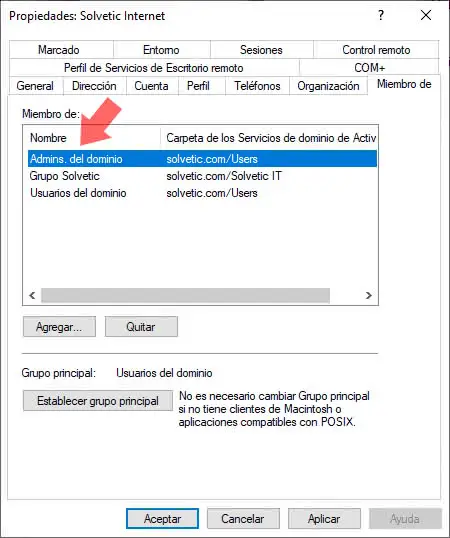
The next method is to double-click on the user and go to the Member tab and there we check the groups in which you are currently:
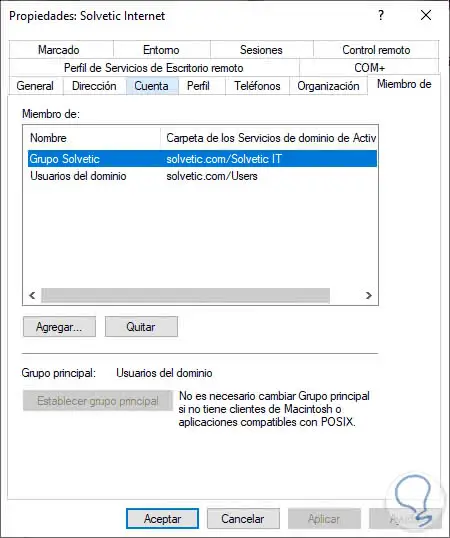
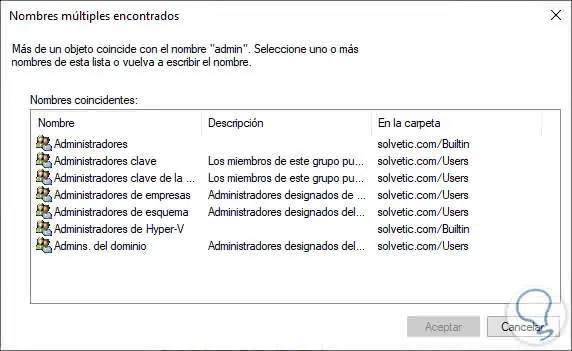
As we see is the group that we have created previously, to add it to a new group we click on the Add button and in the pop-up window we enter the name or initials of this to display the results:
Select the desired group and click on OK to integrate it:
Click OK and now we will see this new group in the selected user profile. Click on Apply and Accept to save the changes.
Step 6
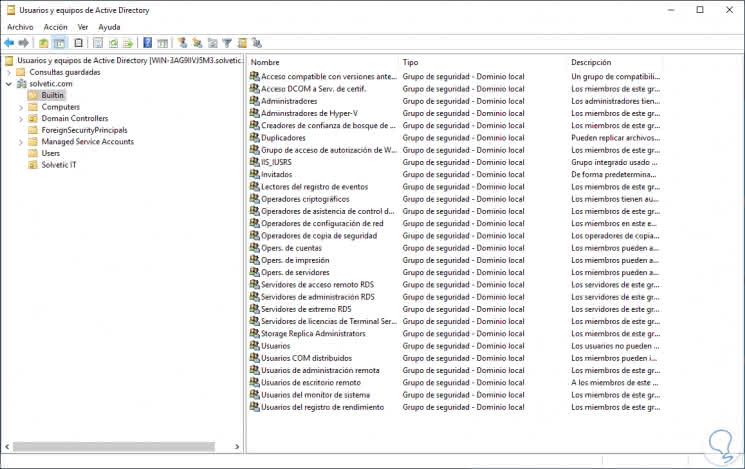
If we want to see all the groups that are installed by default in Windows Server 2019 we must go to the Active Directory Users and Computers option and there go to the Builtin folder, this will display all the groups currently available:
Step 7
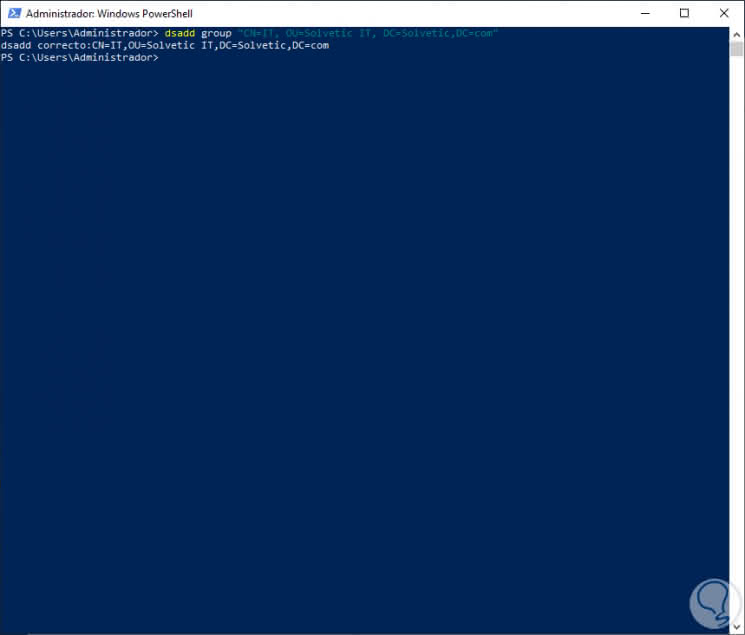
As with the users, it will be possible to create a group in Windows Server 2019 using Windows PowerShell, in this case we are going to create a group called IT using the following line:
dsadd group "CN = IT, OU = TechnoWikis IT, DC = TechnoWikis, DC = com"
Step 8
Now we can see that said group is available to be used at the desired time. By default this will be created as a Global Security group.

Step 9
For this command the global syntax is the following:
dsadd group <GroupDN> [-secgrp {yes | no}] [-scope {l | g | u}] [-samid <SAMName>] [-desc <Description>] [-memberof <Group> ...] [-members <Member> ...] [{-s Server> | -d <Domain>}] [-u <UserName>] [-p {<Password> | *}] [-q] [{-uc | -uco | -uci}]
There we can set on the line -secgrp {yes | no} if the group is security or not (yes it is security and not that it will be distribution). On the line -scope {l | g | u} we define the scope of the group (it is local, g is global or is universal).
We see how both users and groups play a fundamental role in Windows Server 2019 and its use and administration is a task of responsibility and care.
Today we will talk a bit about the organizational structure in Windows Server. Specifically, about the Active Directory Groups in the Domain. Previously we saw how to create a user in the domain controller. However, today we will go further and see how to create Groups. This allows you to group several users within a single unit. Consequently, it is easier to manage the permissions and rules assigned. For this reason, today we will see how to create Active Directory Groups in Windows Server 2019/2016.
How to create Active Directory Group in Windows Server 2019
For better administration, Windows Server classifies the groups as follows:
- Distribution groups. Used to create e-mail distribution lists
- Security groups. Implemented to assign permissions to shared resources in the domain
As for the scope of location, Windows Server classifies the groups in:
- Universal: Applies to both local and external connections
- Global: Applies to all computers and servers in the domain
- Domain local: This applies only to the local server with Windows Server 2019
Before starting to create the group it is advisable to create an organizational unit, as I show you here. The first thing you have to do is go to the Server Manager. Then, from the Tools menu please select Active Directory Users and Computer:

Then right-click on the organizational unit. Then select New>Group

A wizard will immediately be displayed to assign the group name and manage other aspects. Such as the scope and type of the group.

Finally, you can see the successfully created group:

How to add members to a group in Windows Server
There are a couple of methods to add users to a group on Windows Server. The first is through the properties of the group itself. To do this, double-click on the group and then click on the Members tab. Then click on Add.

Then enter the name of the user you want to add to the group. It is also necessary to check the name to verify the existence of the user.

Back to the previous screen you can see that the user has been added successfully. Please press OK to save the changes.

The other way to add a user to a group is through the user’s own properties. With this in mind, double-click on it and then select the Member of tab

Once again, add the name of the group and check to verify its existence:

Back to the previous window, you can see the new group added. Please click OK to save the changes.

Conclusion
At the end of the day we have seen how to create Active Directory Groups in Windows Server 2019/2016. Therefore, user management tasks are greatly facilitated. All right, that’s it for now. Stay tuned for more info on Windows Server. See you later!
— Advertisement —
Everything Linux, A.I, IT News, DataOps, Open Source and more delivered right to you.
Subscribe
«The best Linux newsletter on the web»