
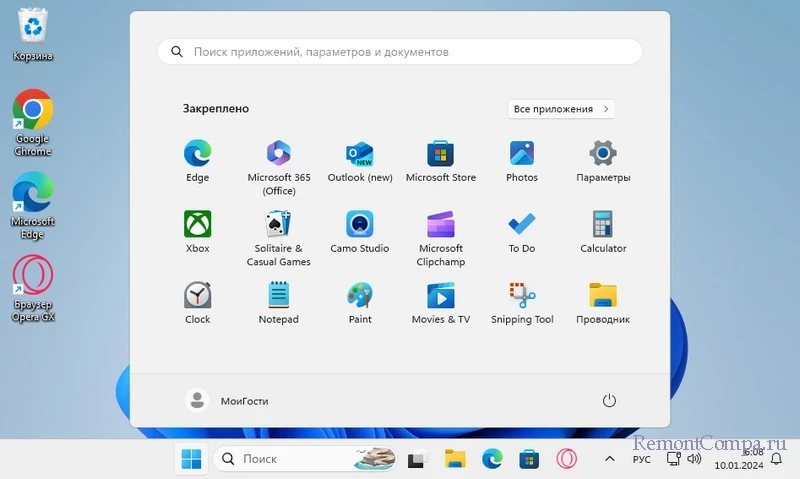
В этой публикации, друзья, рассмотрим, как организовать в Windows 11 учётную запись «Гость». И рассмотрим этот вопрос расширено – не только как включить встроенного в операционной системе пользователя «Гость», но также как создать гостевую учётную запись другим способом, и какие есть альтернативы использования компьютера гостями. Эти возможности Windows 11 могут стать решением для тех из вас, кому приходиться делиться своим компьютером с другими пользователями, чтобы предотвратить внесение ими нежелательных изменений.
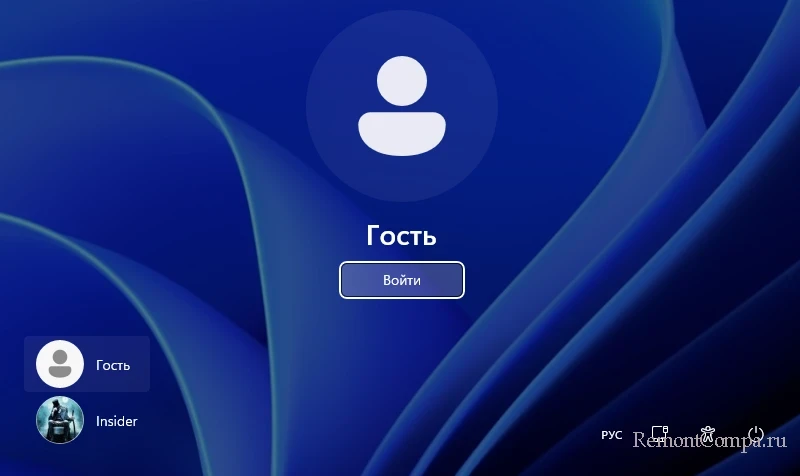
«Гость» — это встроенная в Windows специальная локальная учётная запись для временного использования. Не предусматривает пароля. Предназначена для использования в общественных местах, где людям нужен краткосрочный доступ к компьютеру без сохранения данных.
Такая учётная запись имеет много ограничений, в ней:
- Отсутствует меню «Пуск» и панель задач, переключаться между окнами можно только клавишами Alt+Tab, проводник запускается клавишами Win+E;
- Нет доступа к современным настройкам Windows в приложении «Параметры», только к классическим в панели управления;
- Невозможен запуск любых операций, требующих прав администратора, без пароля последнего;
- Запись данных возможна только в папках пользовательского профиля «Гостя» — «Загрузки», «Документы», «Музыка» и пр., а также на съёмных устройствах информации. В других местах на внутренних логических дисках компьютера для этого потребуется пароль администратора;
- Нет магазина Microsoft Store, невозможно установить никакие современные UWP-приложения, нет даже штатных таких приложений;
- Нет OneDrive и доступа к локальным сетевым ресурсам.

Без пароля администратора в такой учётной записи можно только использовать классические установленные программы и портативные на флешке, запускаемые без прав администратора. И перемещать данные между доступными местами.
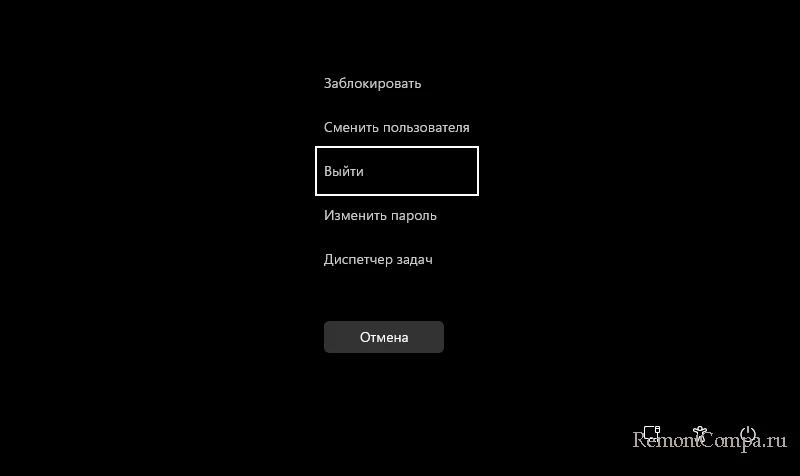
Выход из учётной записи «Гость» выполняется с помощью экрана безопасности, запускаемого клавишами Ctrl+Alt+Del.
Данные и настройки, внесённые в браузер и, возможно, какие-то другие программы, скачанные или перемещённые файлы – всё это сохраняется в учётной записи «Гость» по завершении сеанса работы.
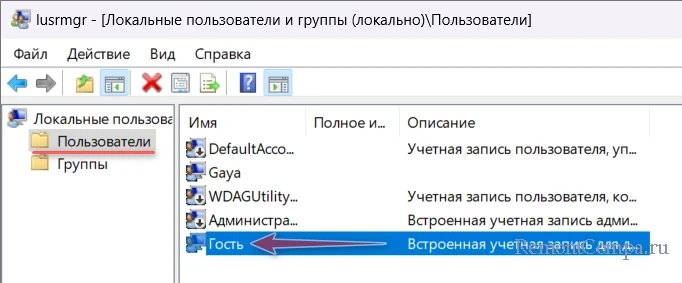
В Windows по версию 8.1 включительно пользователя «Гость» можно было активировать в настройках учётных записей панели управления. Начиная с Windows 10 «Гость» недоступен в настройках учётных записей. Включить его можно помощью оснастки локальных пользователей и групп. Затем потребуется кое-что настроить в локальных групповых политиках. Оба эти системные инструмент доступны в редакциях Windows начиная с Pro.
Жмём клавиши Win+R. Вписываем:
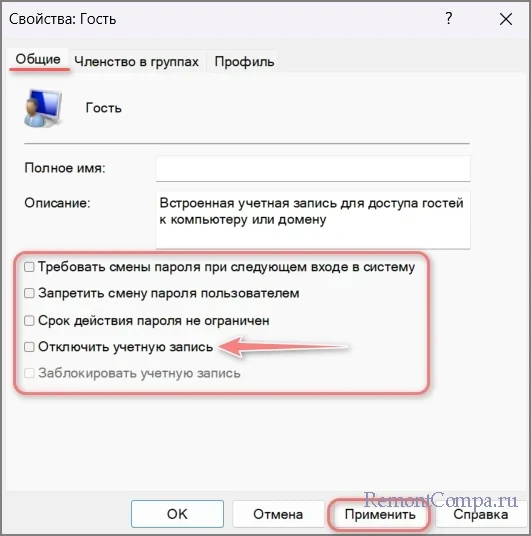
В разделе «Пользователи» двойным кликом открываем свойства учётной записи «Гость».
В свойствах, в открывшейся их вкладке «Общие» снимаем галочки всей опций. Жмём «Применить».
Далее снова жмём клавиши Win+R. Вписываем:
Раскрываем путь:
Конфигурация компьютера → Конфигурация Windows → Параметры безопасности → Локальные политики → Назначение прав пользователя
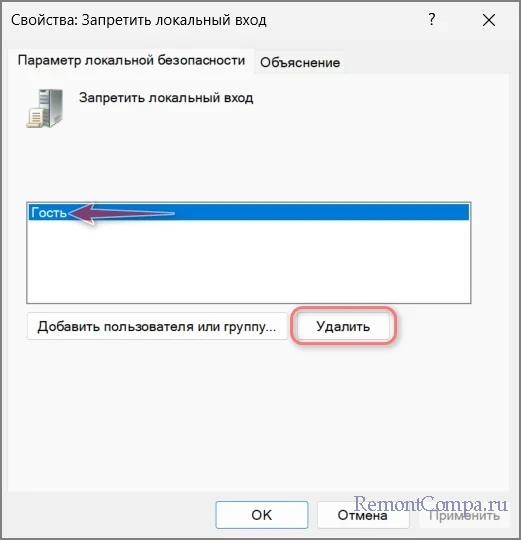
Делаем двойной клик на параметре «Запретить локальной вход».
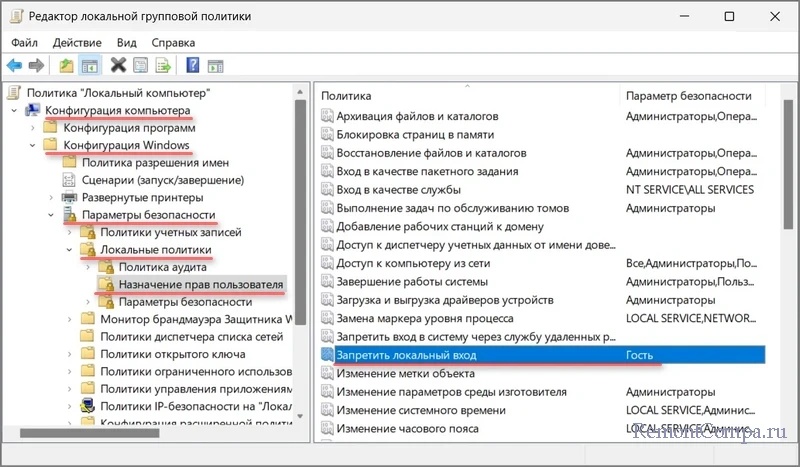
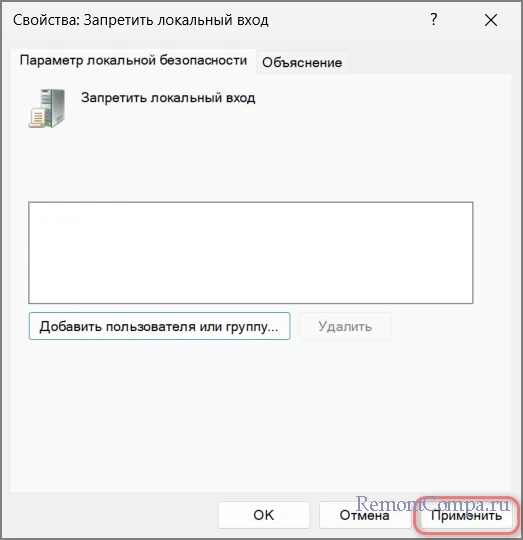
Этот параметр, как видим из его названия, запрещает вход в Windows с учётной записи «Гость». Кликаем «Гостя». Жмём «Удалить».
И жмём «Применить».
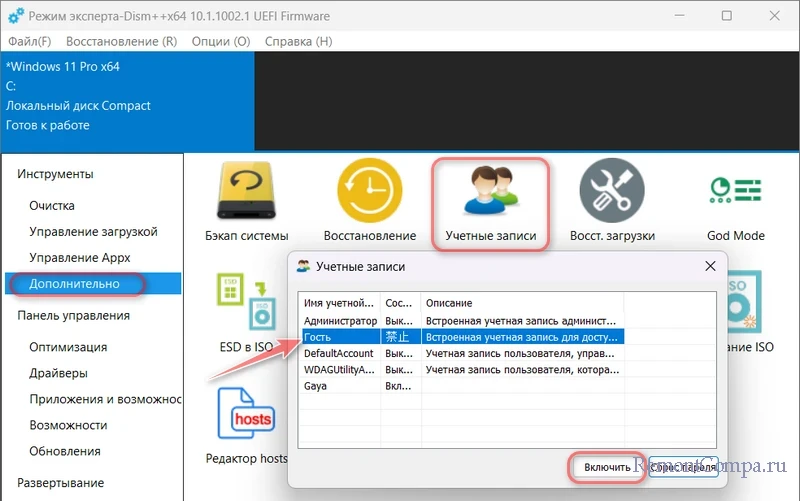
Друзья, если у вас Windows 11 Home, можете включить учётную запись «Гость» с помощью программы Dism++. В разделе «Дополнительно» выбираем «Учётные записи». Кликаем «Гость», жмём для него «Включить».
А для доступа к локальной групповой политике используем различные сторонние средства.
Друзья, в Windows 11 гостевую учётную запись можно организовать путём создания обычной учётной записи стандартного пользователя и определения её в группу «Гости». В плане возможностей такая учётная запись не сильно отличается от встроенного в Windows пользователя «Гость». Имеет те же ограничения, но в ней можно записывать данные на внутренние диски компьютера без пароля администратора, есть панель задач и меню «Пуск». Правда, это меню мало чем поможет гостю, поскольку всё, что там отображается — магазин Microsoft Store, UWP-приложения, системные инструменты, лишь отображается, но не запускается.
Создать учётную запись из группы «Гости» можно в любой редакции Windows, включая Home. Как создать такую гостевую учётную, запись смотрим здесь.
Максимально ограничить своих гостей можно, организовав им доступ к компьютеру в режиме терминала (киоска). В таком режиме есть доступ только к одному современному приложению из Microsoft Store или браузеру Microsoft Edge.
Гостевые учётные записи имеют массу ограничений, но в них есть доступ к панели управления. Без прав администратора с её помощью мало что можно изменить, но в числе этого малого, например, настройки электропитания компьютера. Запретить доступ к панели управления, запретить запуск каких-то программ и внести другие ограничения для гостей можно с помощью локальных групповых политик. Также гостей можно ограничить в использовании Интернета.
Возможно, друзья, вам нужно не урезание возможностей гостей, а, наоборот, расширение возможностей гостей. Гостевые учётные записи не позволяют работать с современными приложениями из Microsoft Store. Гости не смогут запустить на компьютере элементарно системный блокнот, калькулятор, приложение погоды и т.п. Можно создать для гостей учётную запись стандартного пользователя. Без пароля администратора он не запустит программ и системных функций, требующих прав администратора. И не установит программ, требующих прав администратора. Скорректировать возможности стандартного пользователя можно с помощью тех же локальных групповых политик.
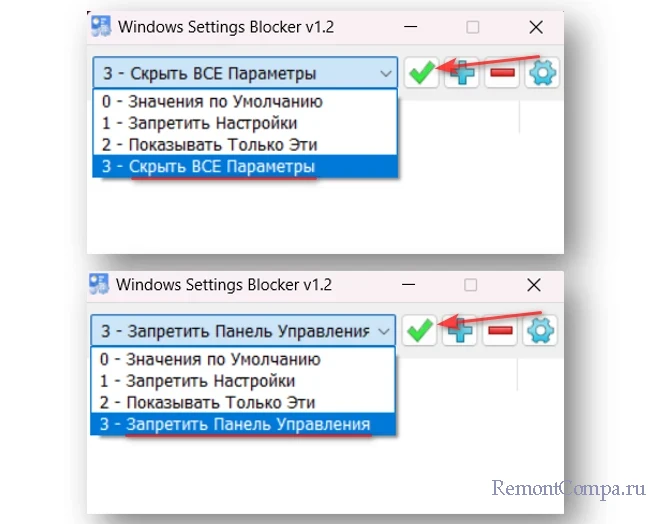
В Windows 11 Home, где отсутствует доступ к локальным групповым политикам, можно использовать бесплатную утилиту Windows Settings Blocker. Она блокирует доступ ко всем или отдельным настройкам в приложении «Параметры» и панели управления. Запускаем её в гостевой учётной записи. В настройках снимаем галочку «Применить ко всем пользователям». Поочерёдно выбираем настройки приложения «Параметры» и панели управления.
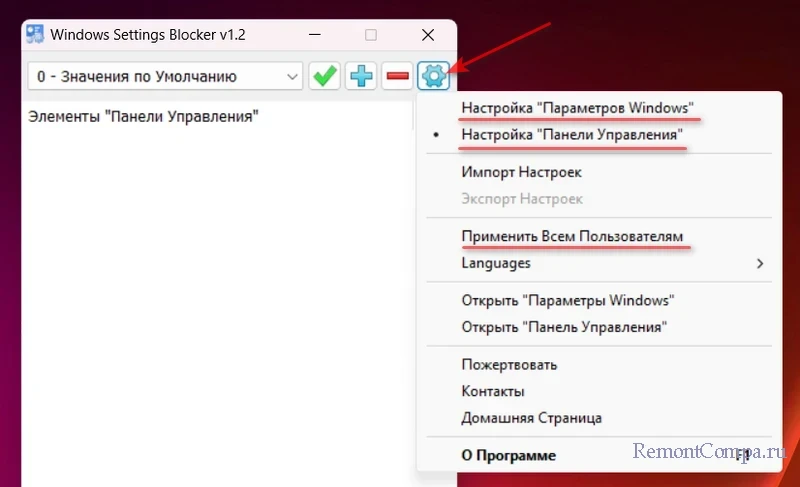
Запрещаем эти настройки. И применяем изменения зелёной галочкой.
Более гибкие или более удобные возможности для ограничения возможностей гостей могут предложить программы родительского контроля.
Creating a guest account in Windows used to be a fairly straightforward process that anyone could do in a few clicks. That’s no longer the case, but you can still create a guest account in newer versions of Windows, such as Windows 11. In this article, we have explained how to create a Windows 11 guest account using Settings, Command Prompt, and PowerShell. So without further ado, let’s dive in.
Create Guest Account in Windows 11 (2022)
Add Guest Account using Windows 11 Settings App
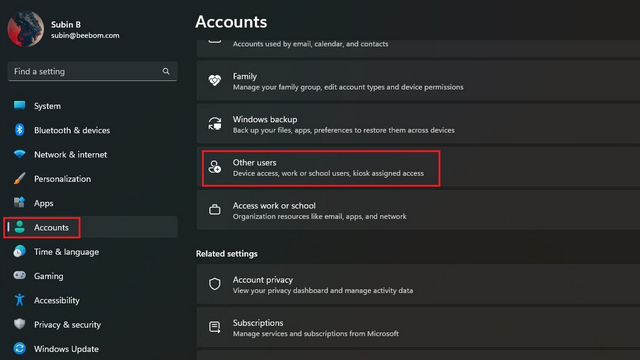
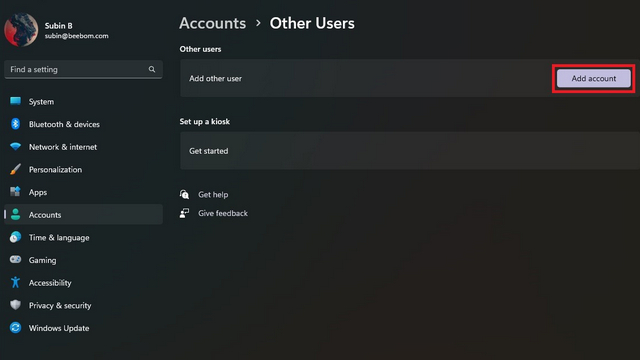
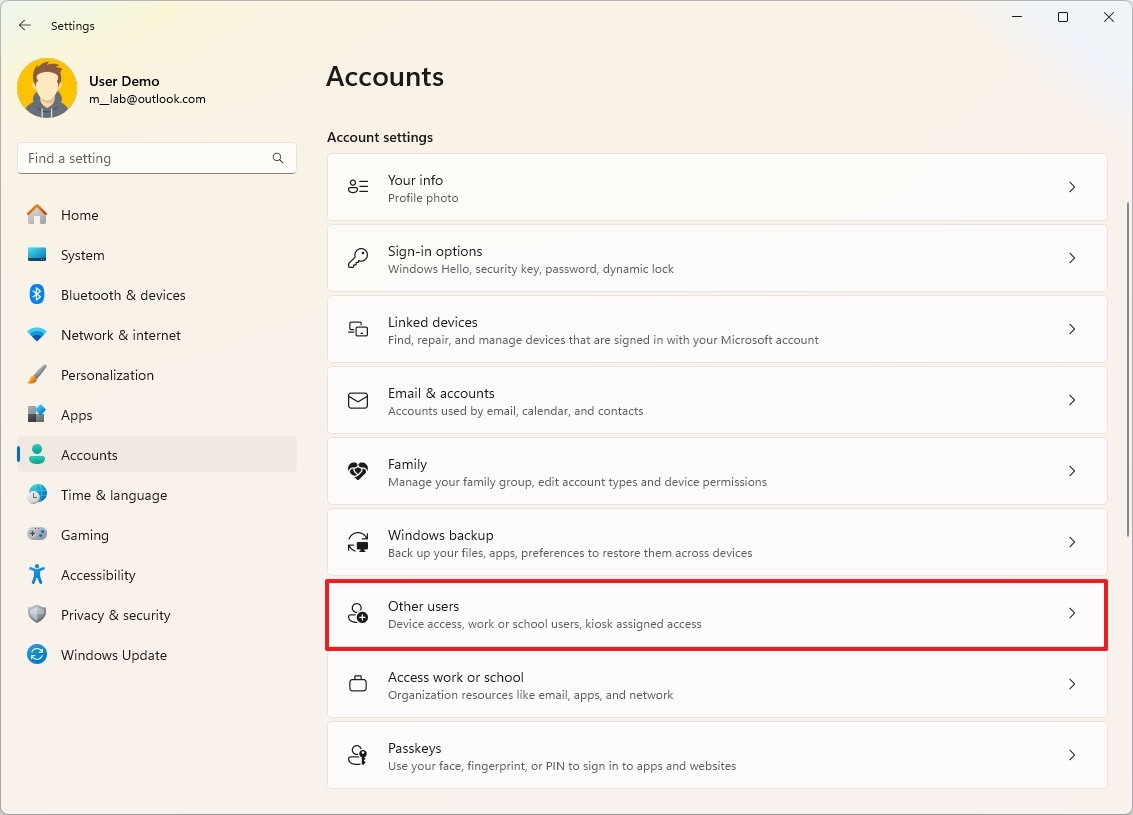
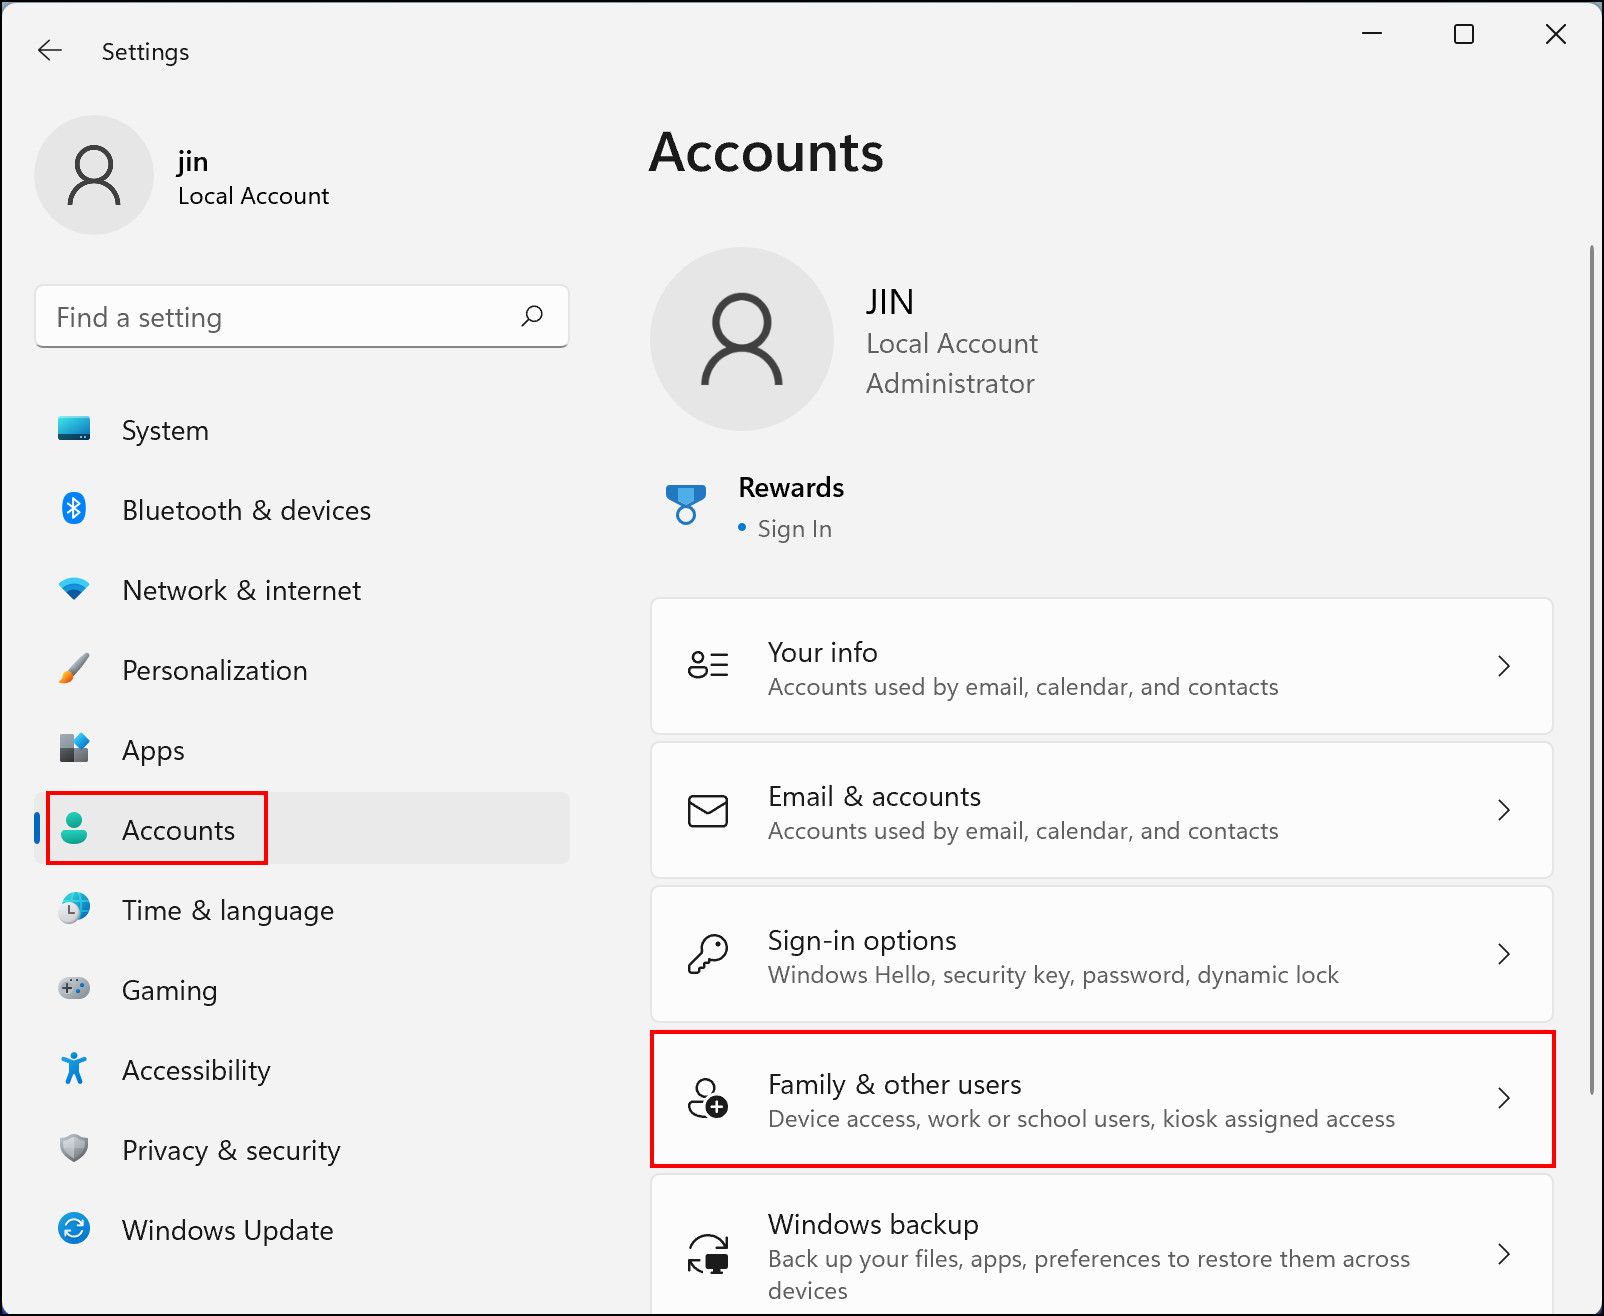
1. Open the Settings app using the Windows 11 keyboard shortcut ‘Win+I’ and switch to the “Accounts” section from the left sidebar. From here, click on “Other users” to set up a guest account. If you’re on an older build of Windows 11, you will find this option as “Family & other users” instead.
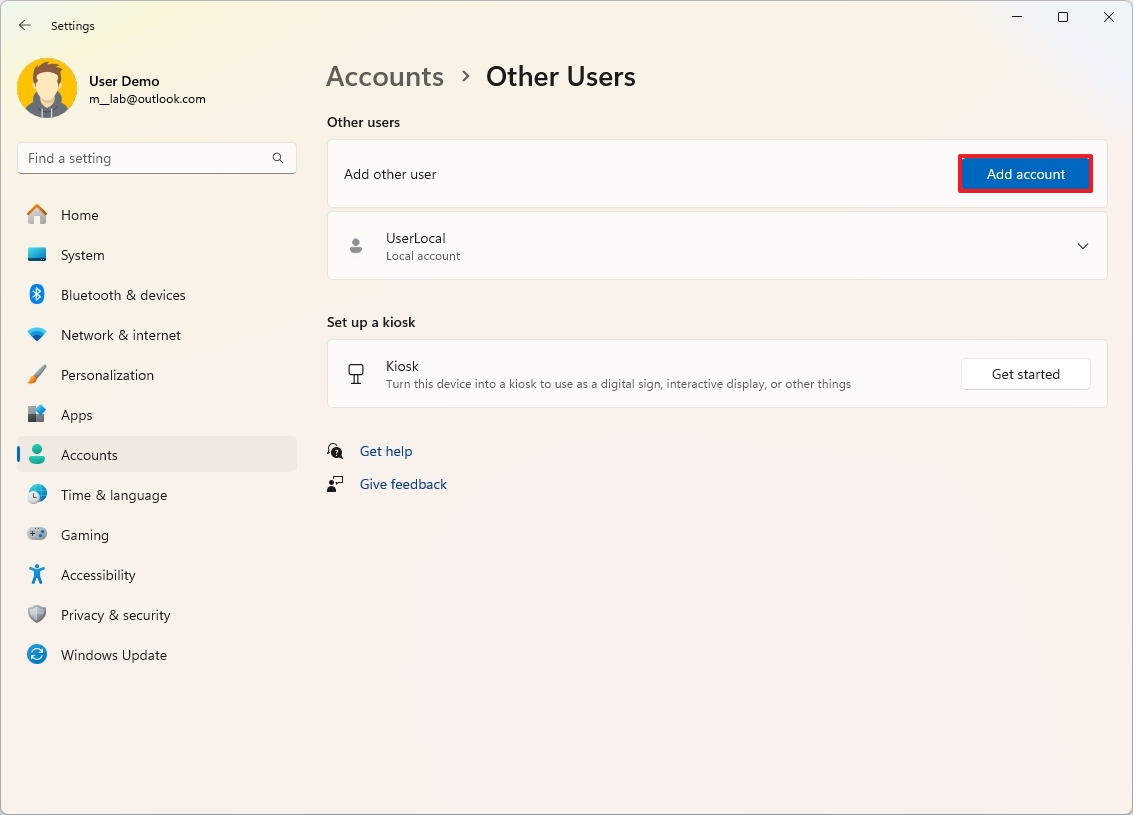
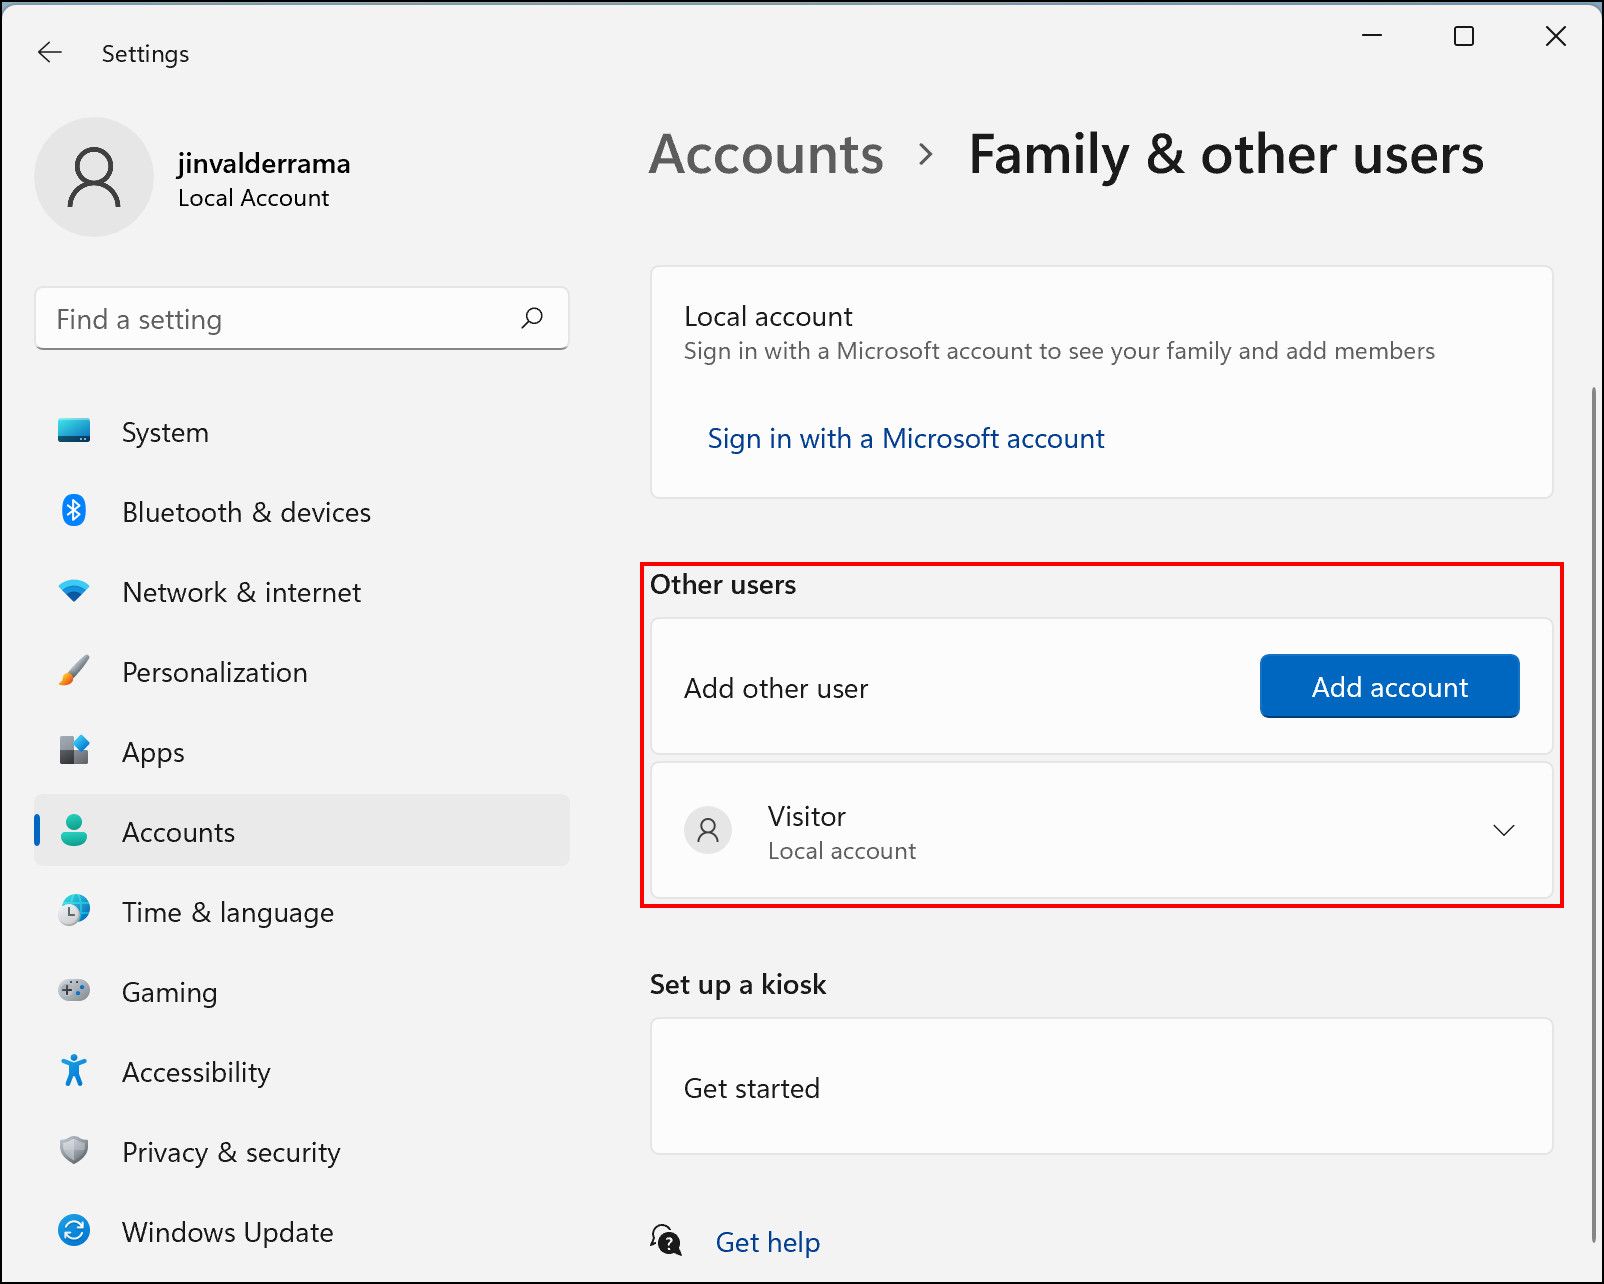
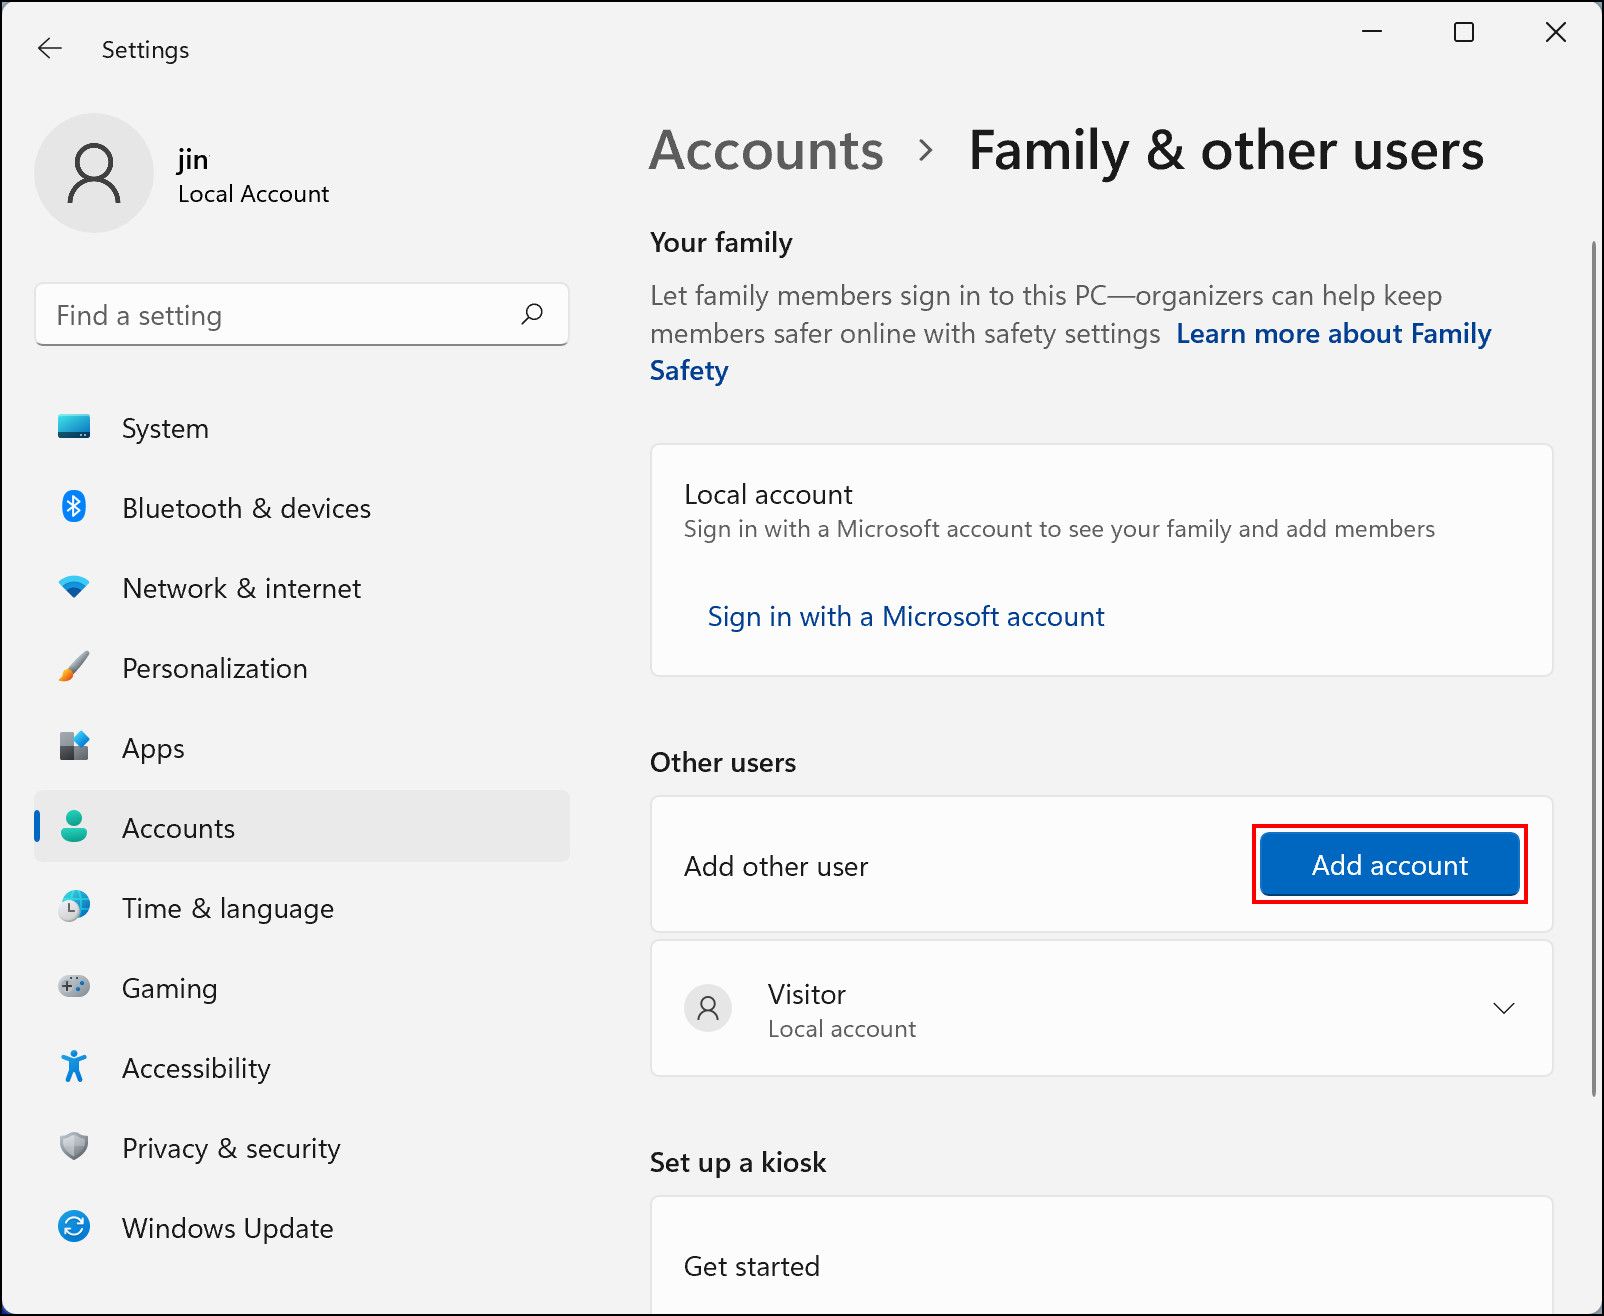
2. Up next, click on “Add account” to create a new user account.
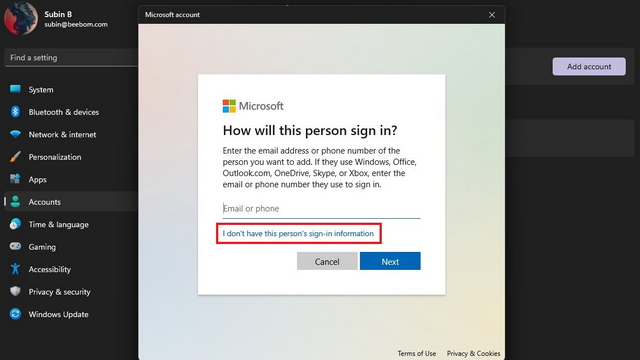
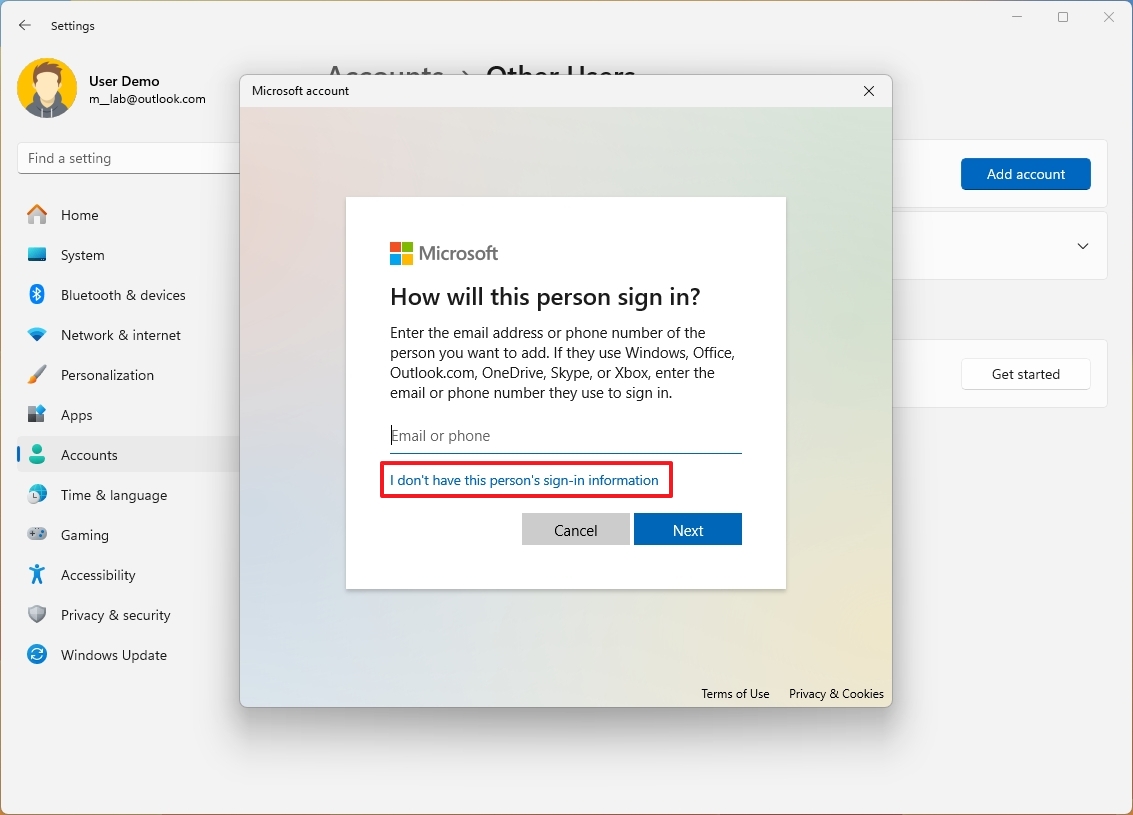
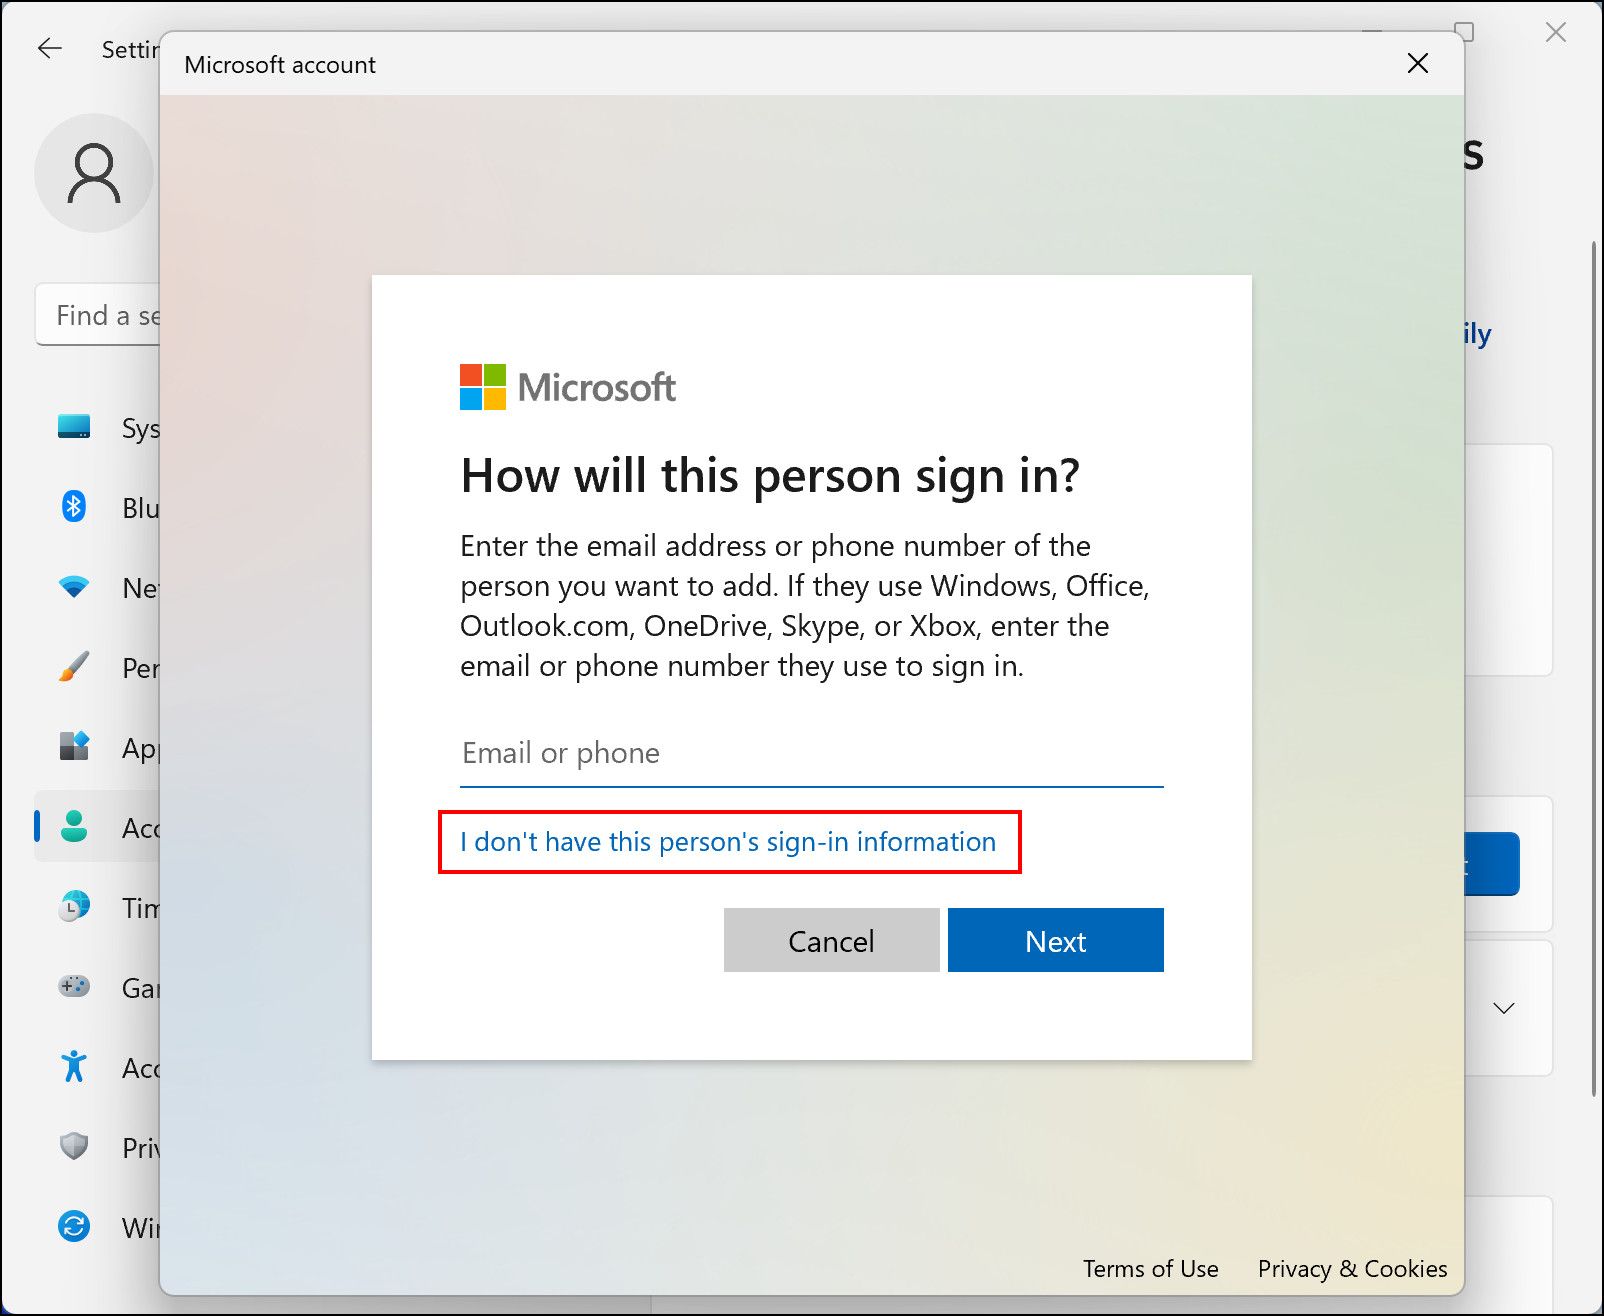
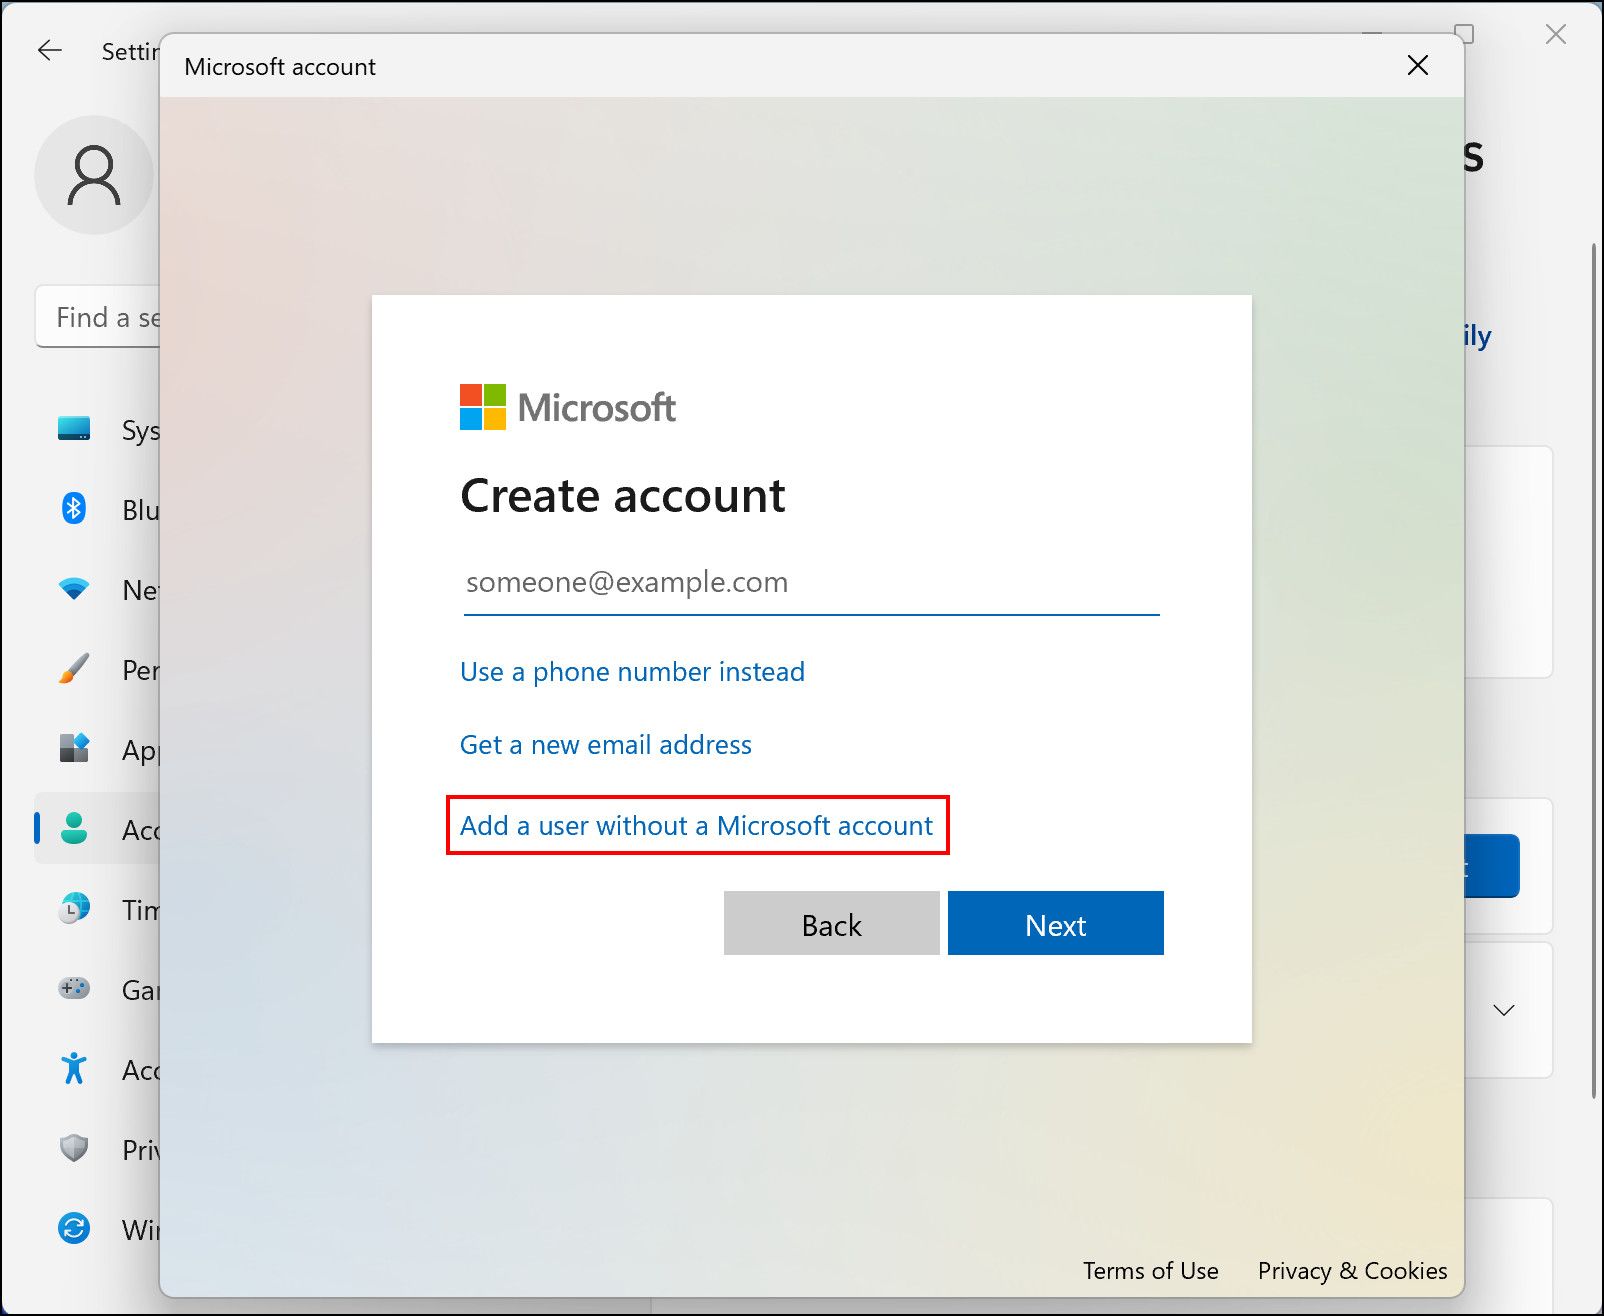
3. When Microsoft’s account creation screen appears, choose “I don’t have this person’s sign-in information”.
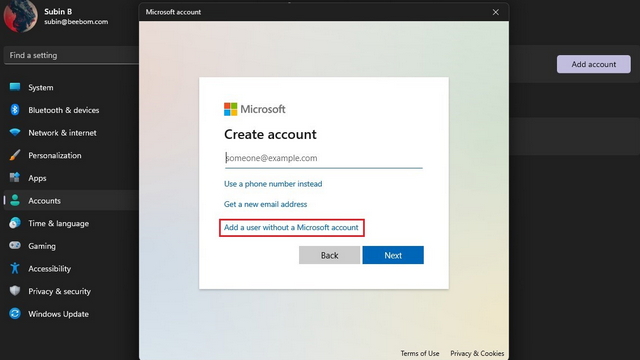
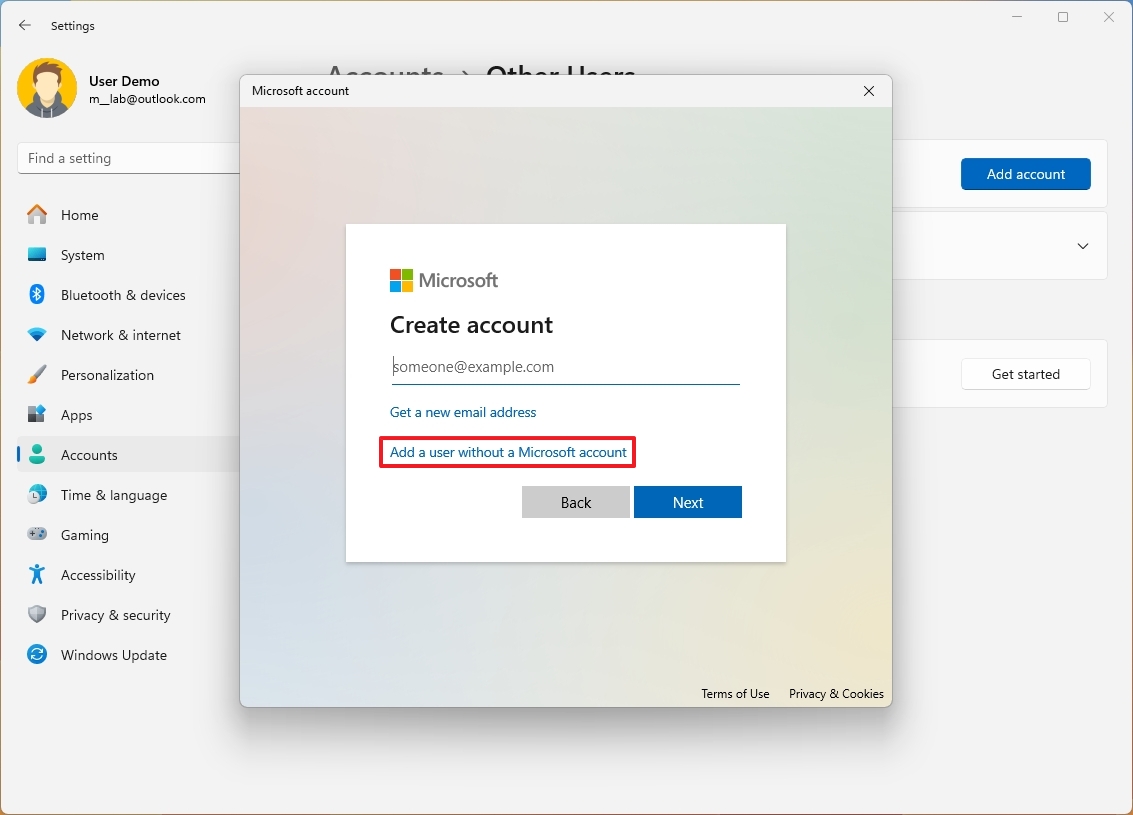
4. From the next page, click on “Add a user without a Microsoft account” to create the guest account without linking a Microsoft account.
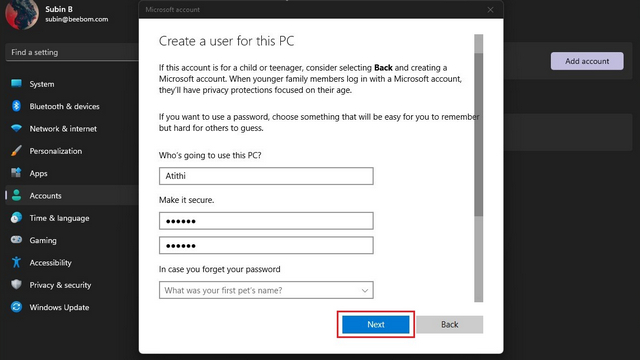
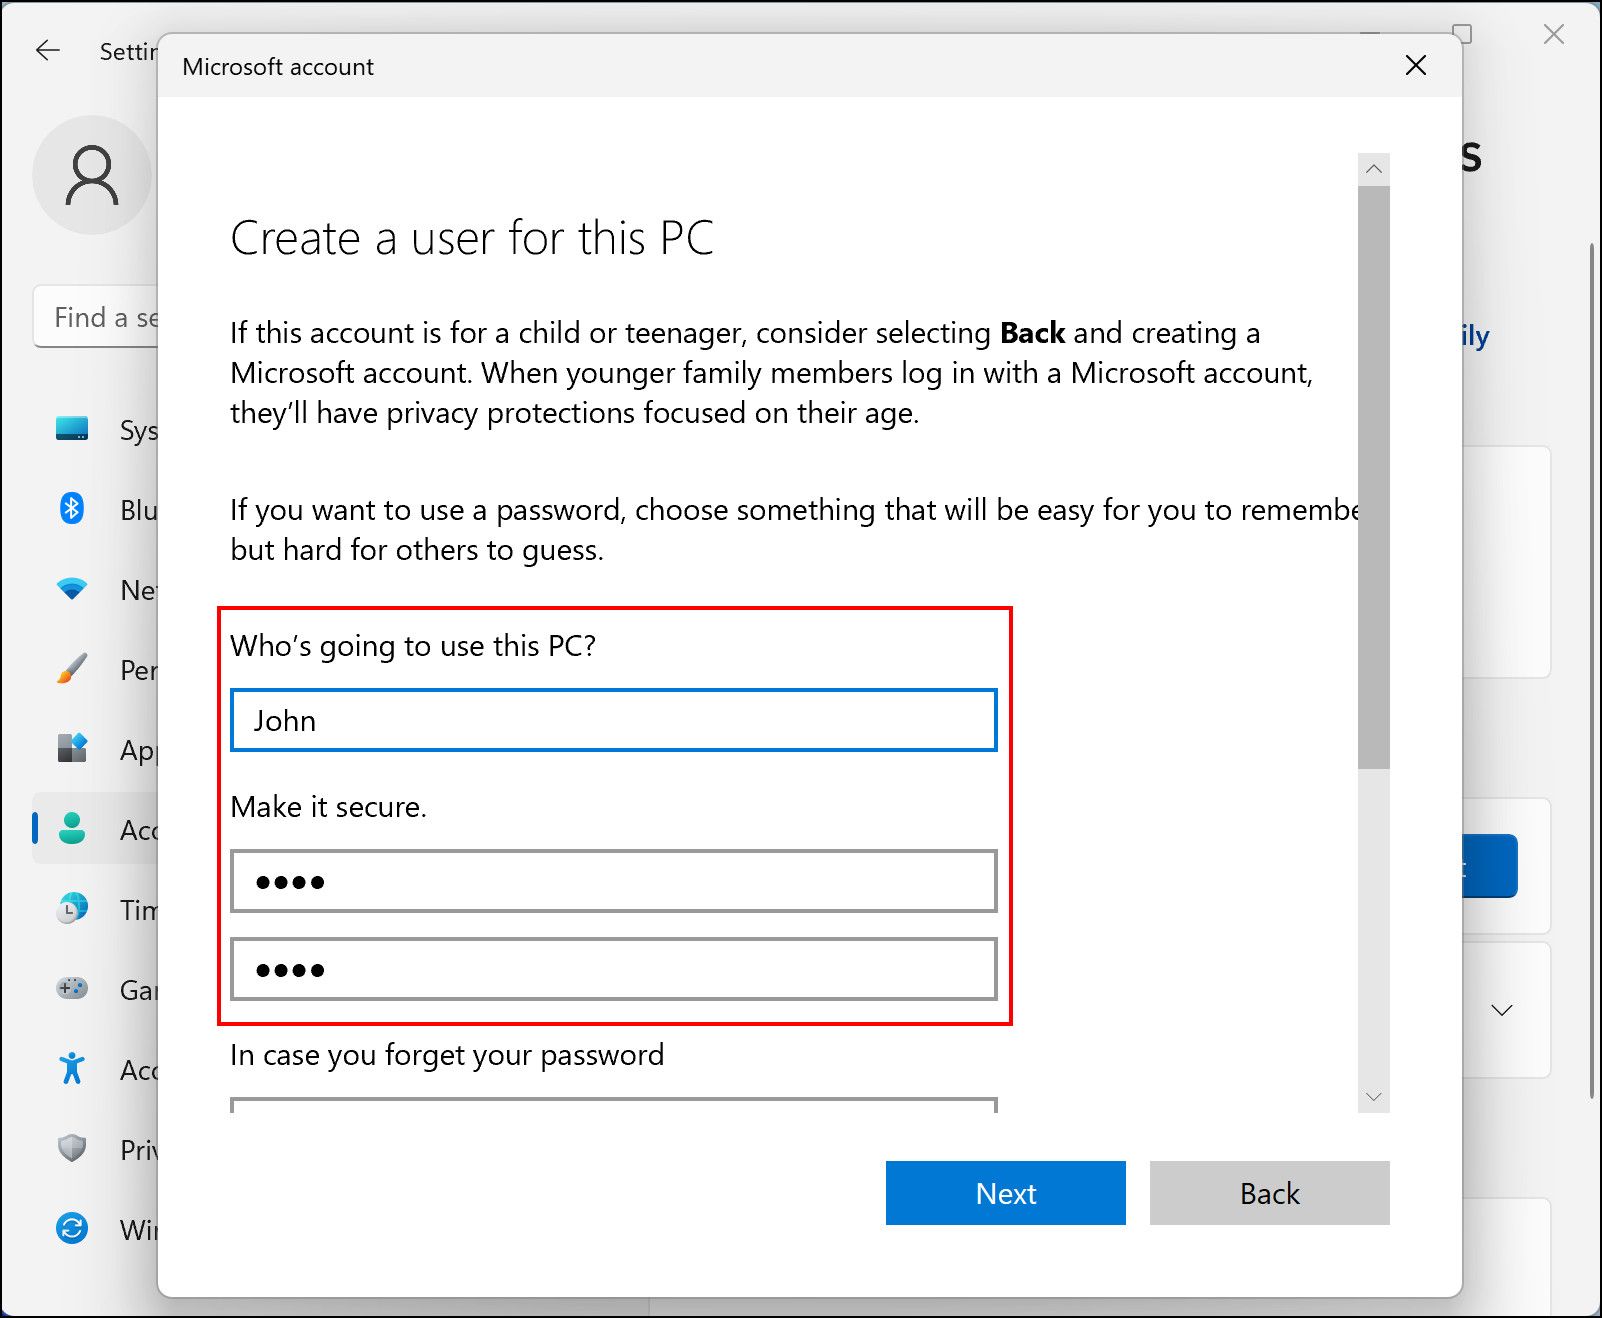
5. You should now set the username, password, and three security questions for the guest account. Do note that you can’t use “Guest” as the username since it is reserved in the OS. Click “Next”, and you now have a second account in Windows 11.
Add New Account to Guest User Group
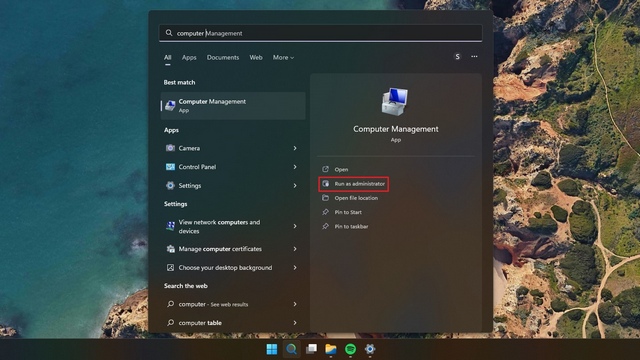
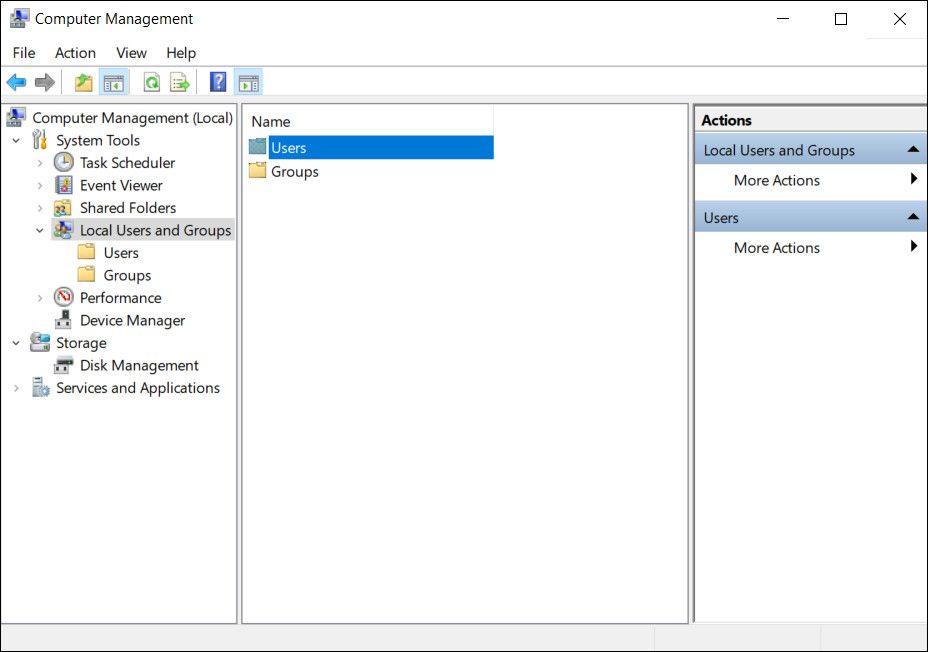
1. Now that you have created an account, you should add it to the guest user group so that the account doesn’t have complete access to your PC. To do this, open Windows Search and open “Computer Management” as an administrator.
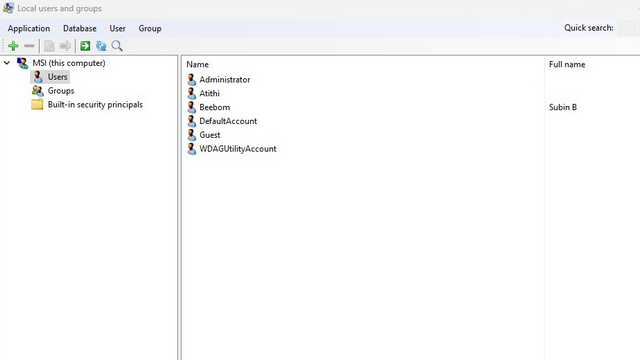
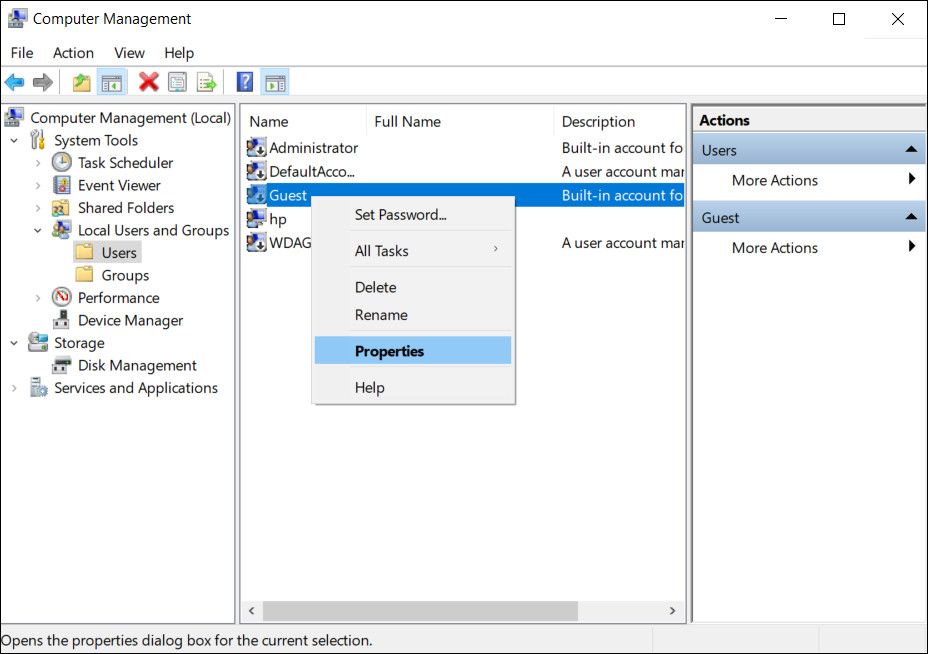
2. When Computer Management appears, navigate to System Tools -> Local Users and Groups -> Users to add the account to the user group. Notably, you won’t find the “Local Users and Groups” option if you’re on the Home edition of Windows 11. As a workaround, you can install and use the Local User and Group Management tool from GitHub. To get started, double-click on the user you just created.
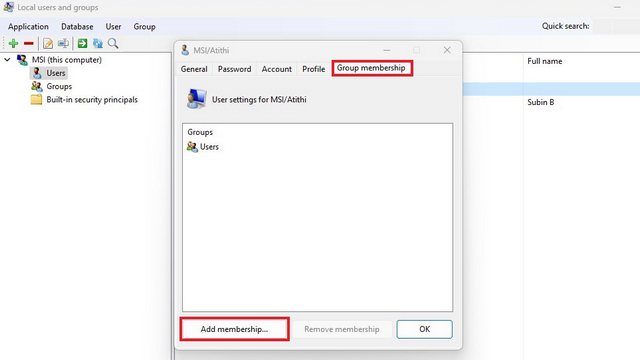
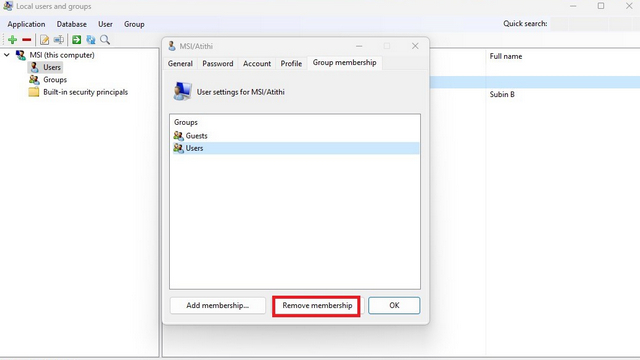
2. Switch to the “Group membership” tab and choose “Add membership” to pick the guest user group.
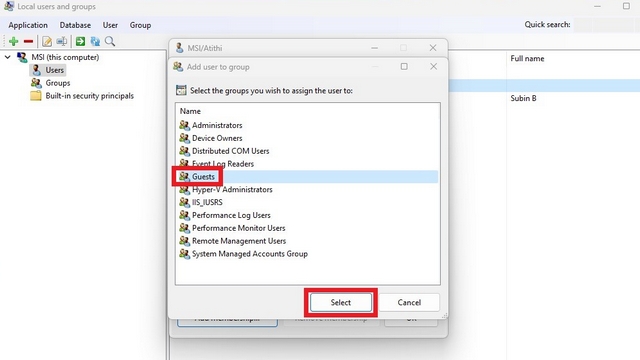
3. Choose “Guests” from the list of groups and click on “Select” to confirm the selection.
4. After adding the guest user group, click on “Users” and hit the “Remove membership” button. You have successfully created a guest account in Windows 11.
Use Command Prompt to Create Guest Account
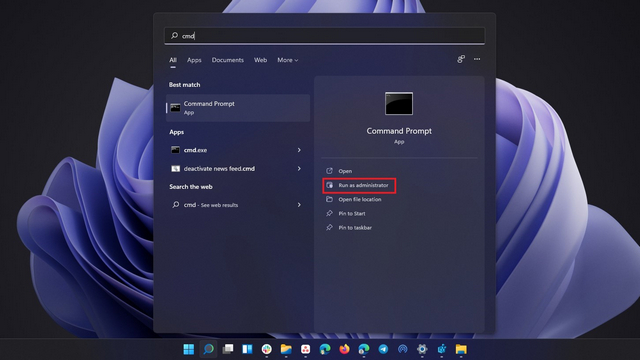
1. Search “Command Prompt” in Windows Search and run it as administrator.
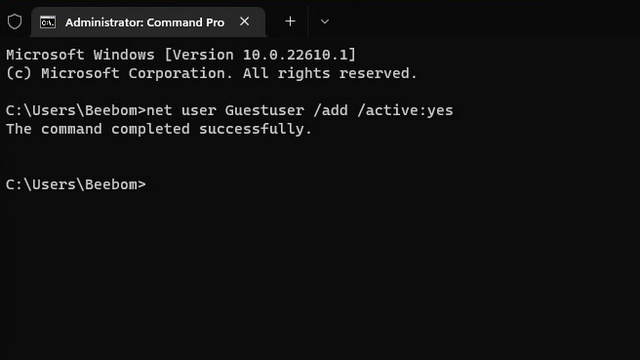
2. Type the following command to create a new guest user. Do note that you can replace “Guestuser” in the command with a name of your choice.
net user Guestuser /add /active:yes
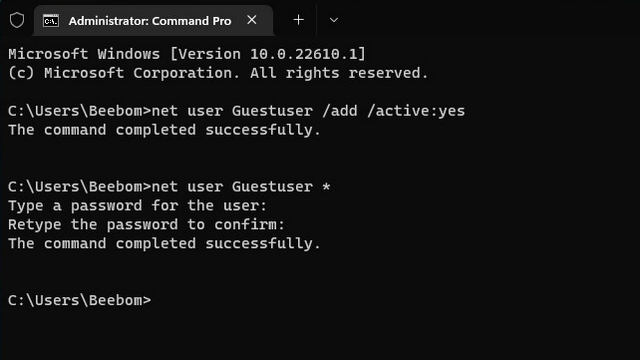
3. Use the command below to set a password for the guest account. And that’s it, you have created a guest account in Windows 11 using Command Prompt.
net user Guestuser *
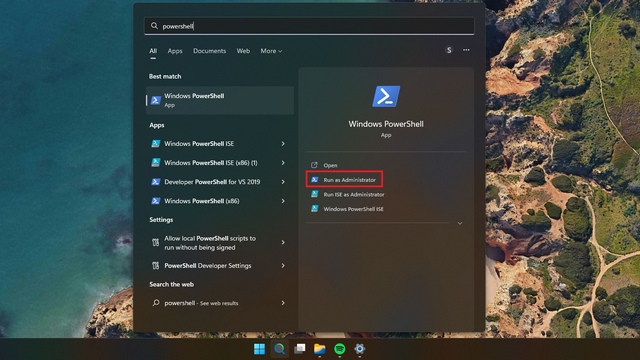
Create Windows 11 Guest Account Using PowerShell
1. Another way to create Windows 11 guest account is using PowerShell. Search “Powershell” in Windows Search and run it as administrator to open an elevated PowerShell window.
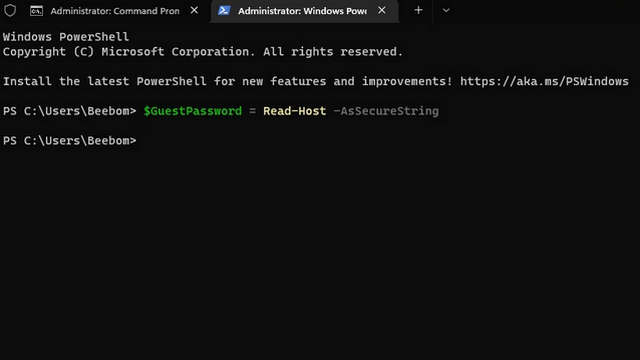
2. Use the command below to set up a password for your guest account.
$GuestPassword = Read-Host -AsSecureString
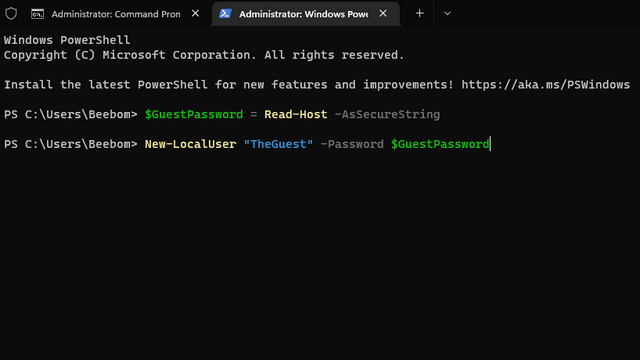
3. Up next, use the command below to set the name for the guest account.
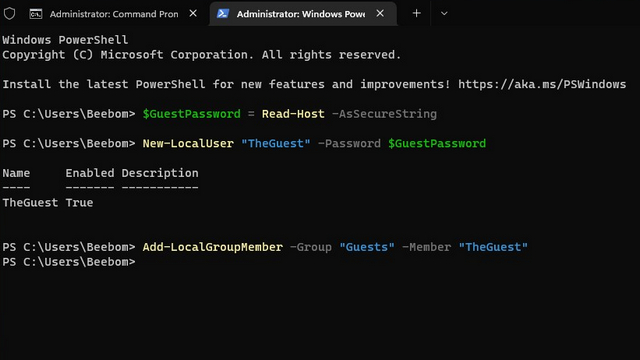
New-LocalUser "TheGuest" -Password $GuestPassword
4. As a final step, use the command below to add the account to the guest user group. You can now share your PC with others using the guest account.
Add-LocalGroupMember -Group "Guests" -Member "TheGuest"
Use Guest Account While Sharing Your PC
So, those are three ways to create a guest account in Windows 11. The option to create a guest account will come in handy, especially if you often find yourself sharing your system with peers or acquaintances. Meanwhile, if you prefer an offline account that’s not associated with your Microsoft account instead, head to our linked guides to create a local account in Windows 11 and remove your Microsoft account from Windows 11.

Microsoft has added plenty of new features to Windows in recent years, but some functionality has been removed in that time.
That includes the ability to create a “Guest” account, separate from any of the main user accounts. Previously, it offered an easy way to share your computer with someone, without risking any of your settings or files being affected.
Not only is the feature unavailable in
Windows 11, it’s also been removed from Windows 10 . This is presumably for security reasons, but the risk when giving access to friends or family is very low.
Fortunately, a workaround means it’s still possible to create an account with these characteristics. It won’t be officially known as a “Guest” account, but it performs in much the same way.
How to create a guest account on Windows 11
There are several ways to do this, but the easiest method is via Settings. The first step involves creating a new local account:
- Open Settings and choose ‘Accounts’ from the left pane
- From the menu that appears, select ‘Family & other users’

- Under ‘Other users’, click the button labeled ‘Add account’

- After a few seconds, you’ll be prompted to enter an email address or phone number. Instead, click ‘I don’t have the person’s sign-in information’ just below where you’d type

- Now, you’ll see three options on the ‘Create account screen’. Choose the one which says ‘Add a user without a Microsoft account’

- Next, provide a name for the account you’d like to create. ‘Visitor’ makes sense, as you still can’t use the ‘Guest’ name here
- Enter the chosen password twice, followed by answers to three security questions

- Click next to complete this process


The newly created account will now be listed under ‘Other users’. To start using it, simply sign out of your current account and sign in to the new one. You’ll need to log in to many apps and services again, but most functions are still accessible.
To make things more restrictive, you’ll then need to add that account to the “Guest” user group:
- Open the ‘Computer Management’ window by searching for it via the taskbar

- From the left pane, choose System Tools > Local Users and Groups > Users
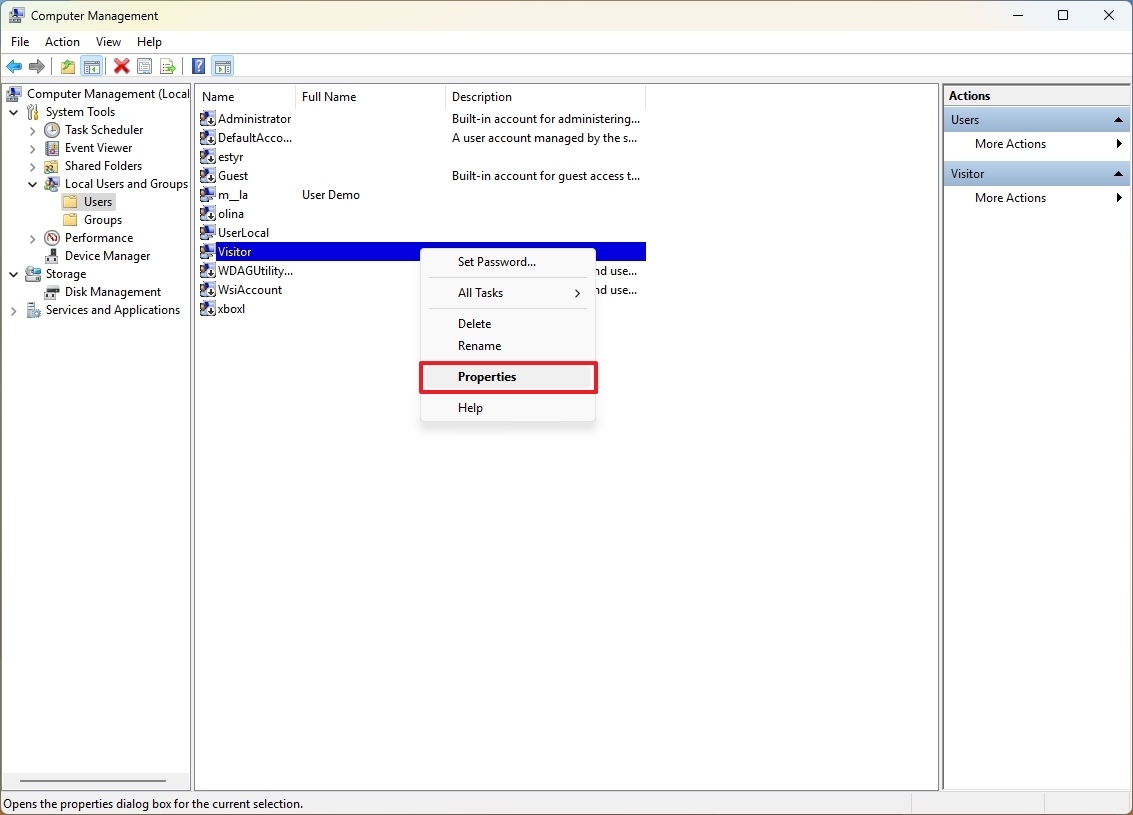
- Locate the newly created account, right-click it and choose ‘Properties’
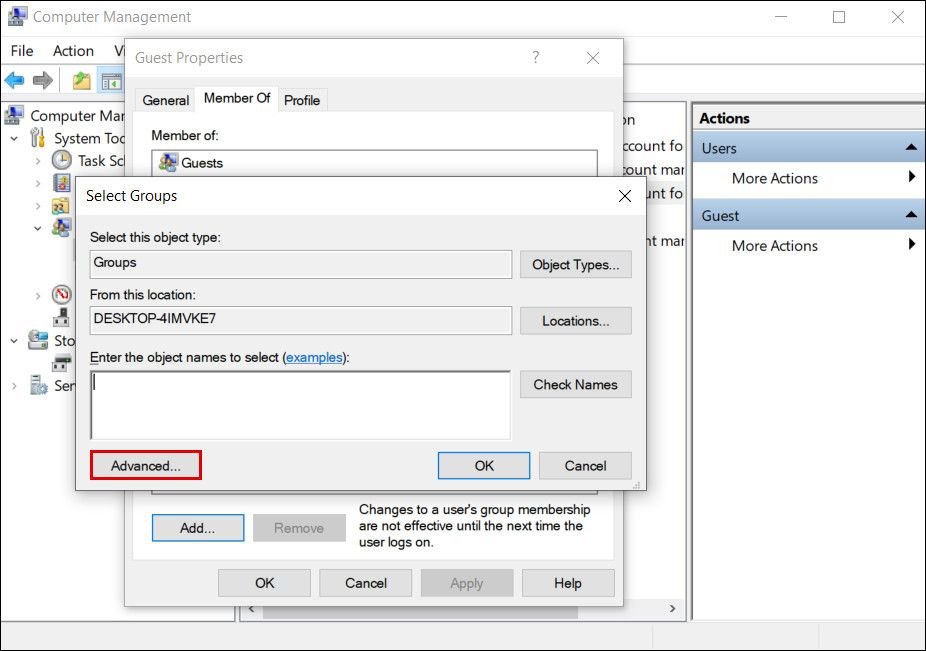
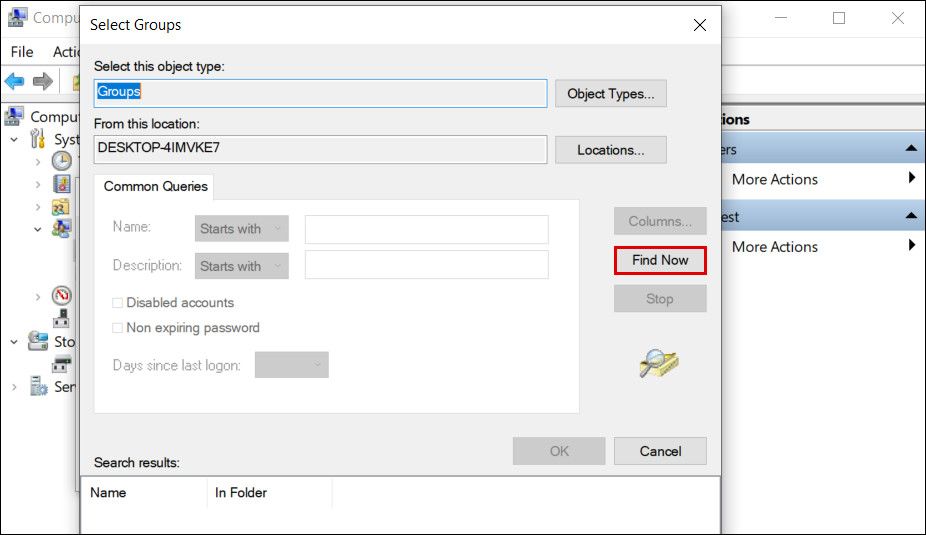
- From the ‘Member Of’ tab, choose ‘Add’, then ‘Advanced’
- Click ‘Find Now’, then scroll down until you find ‘Guests’
- Click it, then hit ‘OK’ twice to confirm
- You’ll now see ‘Guests’ added to the list. Select ‘Users’ and remove it
- Click ‘Apply’, followed by ‘OK’ to confirm changes

If you’re not seeing the ‘Local Users and Groups’ option, there’s a simple solution – just
download ‘lusrmgr’ from GitHub. It opens in a separate window, but the process is roughly the same:
- Click ‘Users’ from the left pane
- Double-click the account and select the ‘Group membership tab’

- Click ‘Add membership…’, then highlight ‘Guests’ and choose ‘Select’

- This will now be added to the list. Next, highlight ‘Users’ and remove it

- Click ‘OK’ to save changes, then log out and log back in again to apply changes


Is creating a guest account on Windows 10 different?
Very slightly. Windows 10 users can follow all the same steps as above, aside from finding the option to add a new user in Settings:
- Head to Settings > Accounts > Other users
- Under ‘Other users’, click ‘Add someone else to this PC’


That’s the only difference. Now, scroll up to the Windows 11 section and start from step 4 of the first section.
There’s no limit on the number of guest accounts you can create. But if you want someone to be able to change Settings or remove files (for example), just follow the steps on creating the local account. Both methods are an effective ways of providing limited access to your personal device.
Related articles for further reading
- How to log in to your Windows PC without the password
- How to remove the password from a Microsoft account
- How to get Windows 11 now
Anyron is Mobile Editor at Tech Advisor, where he’s been a mainstay of the editorial team since 2019. In his current role, Anyron is responsible for all smartphone, tablet and mobile network coverage on the site. A BA Journalism graduate, he has experience with a wide range of consumer tech products and services, including smartphones, tablets, foldables, wearables and more.

Windows, in previous versions, included a «Guest» account that allowed you to create a locked-down environment to safely and temporarily share a computer with other people to run apps and access the internet, but this special account is no longer available on Windows 11 (or Windows 10).
However, it’s still possible to create a limited account on Windows 11 with the same characteristics of a «Guest» account using the Settings app, Computer Management, Command Prompt, and even PowerShell commands.
In this how-to guide, I’ll explain how to create a guest account on your computer.
Recent updates
These instructions have been updated to ensure accuracy and reflect changes to the process.
How to create a guest account using Settings
To create a guest account on Windows 11, use these steps:
- Open Settings.
- Click on Accounts.
- Click the Other users page.
- Click the Add account button under the «Other users» section.
- Click the «I don’t have this person’s sign-in information» option.
- Click the «Add a user without a Microsoft account» option.
- Create a name for the guest account — for example, Visitor.
- Quick note: Although the built-in «Guest» account has been deprecated, it’s still a reserved name, which means that you can’t use the same name.
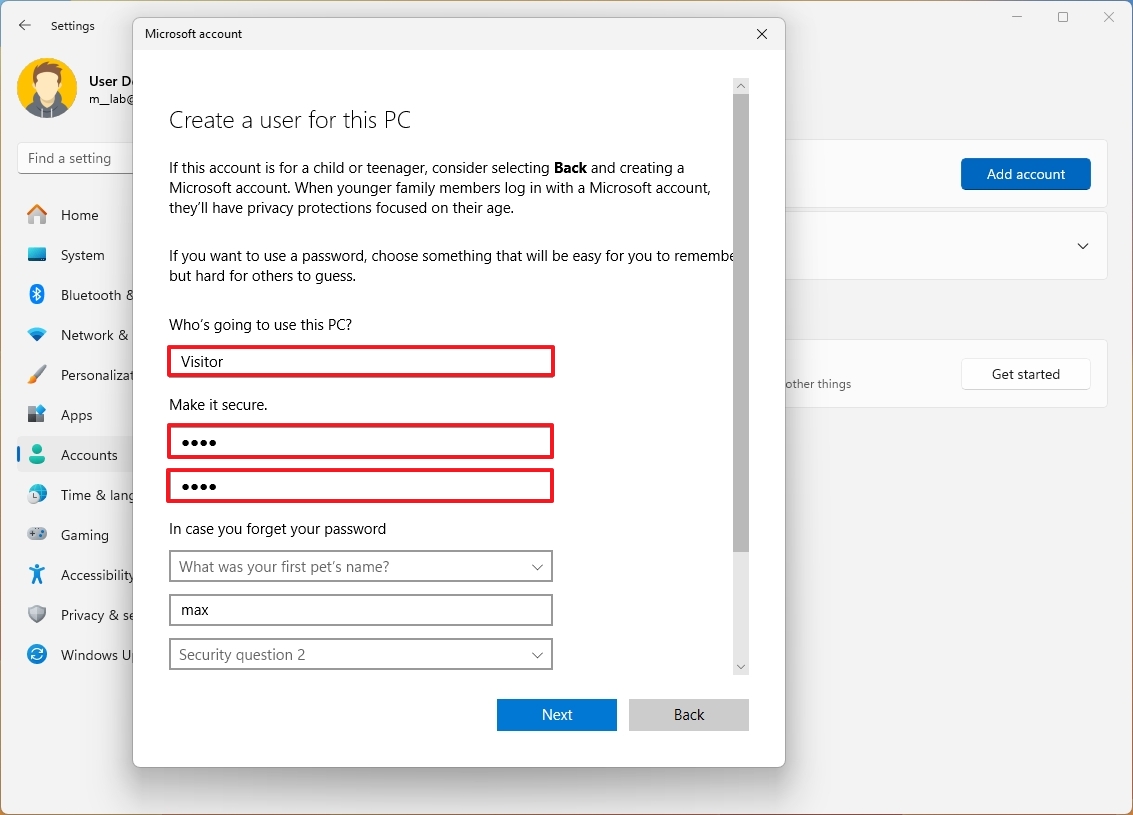
- Create a password for the account.
- Complete the security questions to enable the password recovery feature.
- Click the Next button.
Once you complete the steps, a restricted standard account will be created to share the computer with your guest. The last thing left to do is sign out and sign in with the newly created account.
Although you can always share a computer with a standard account, you can go a step further and add the new account to the «Guest» group to make it more restrictive. However, since it’s impossible to change user groups from within the Settings app, you need to use the Computer Management app or Command Prompt.
Add account to the Guest user group
To add a Windows 11 account to the Guest group with Computer Management, use these steps:
All the latest news, reviews, and guides for Windows and Xbox diehards.
- Open Start.
- Search for Computer Management and click the top result to open the app.
- Browse to the following path: System Tools > Local Users and Groups > Users
- Right-click the account and select the Properties option.
- Click the Member Of tab.
- Click the Add button.
- Click the Advanced button.

- Click the Find now button.
- Select the Guests group.
- Click the OK button.
- Click the OK button again.
- Select the Users group.
- Click the Remove button.

- Click the Apply button.
- Click the OK button.
After you complete the steps, the account will belong to the Guests (more restrictive) system group.
How to create a guest account using Computer Management
To set up a guest account through Computer Management, use these steps:
- Open Start.
- Search for Computer Management and click the top result to open the app.
- Browse to the following path: System Tools > Local Users and Groups > Users
- Click the «Action» menu and select the New user option.
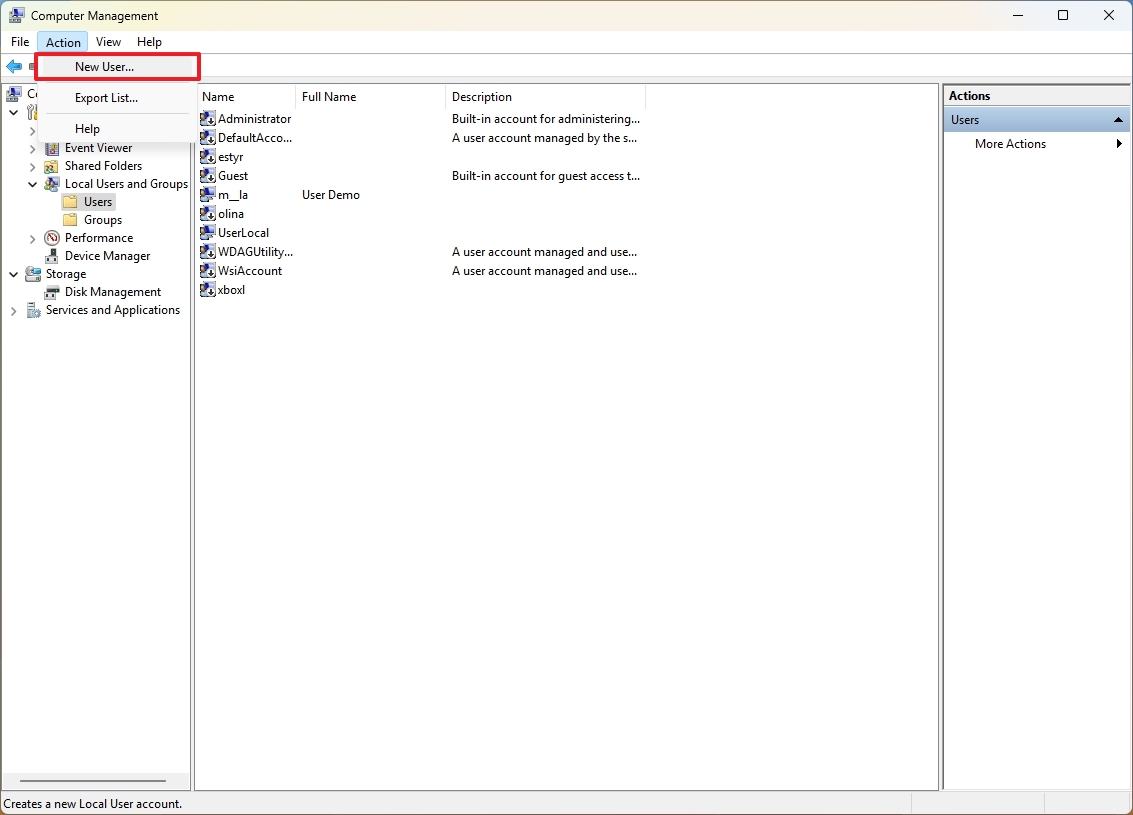
- Create the account name (for example, Visitor) in the «User name» field.
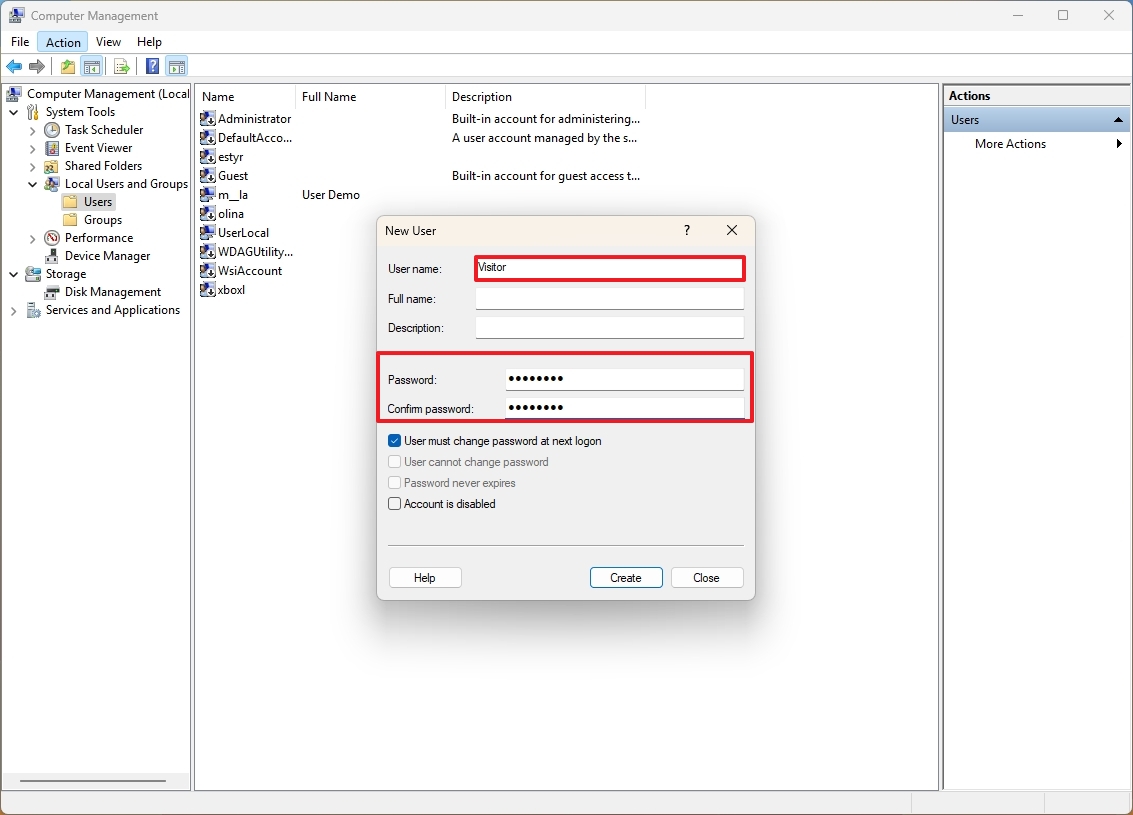
- Create a new password for the guest account.
- Clear the «User must change password at next logon» option.
- Click the Create button.
- Right-click the account and select the Properties option.
- Click the Member Of tab.
- Click the Add button.

- Click the Advanced button.
- Click the Find now button.
- Select the Guests group.
- Click the OK button.
- Click the OK button again.
- Select the Users group.
- Click the Remove button.
- Click the Apply button.
- Click the OK button.
After you complete the steps, the restricted local account will be created to share the computer with other people.
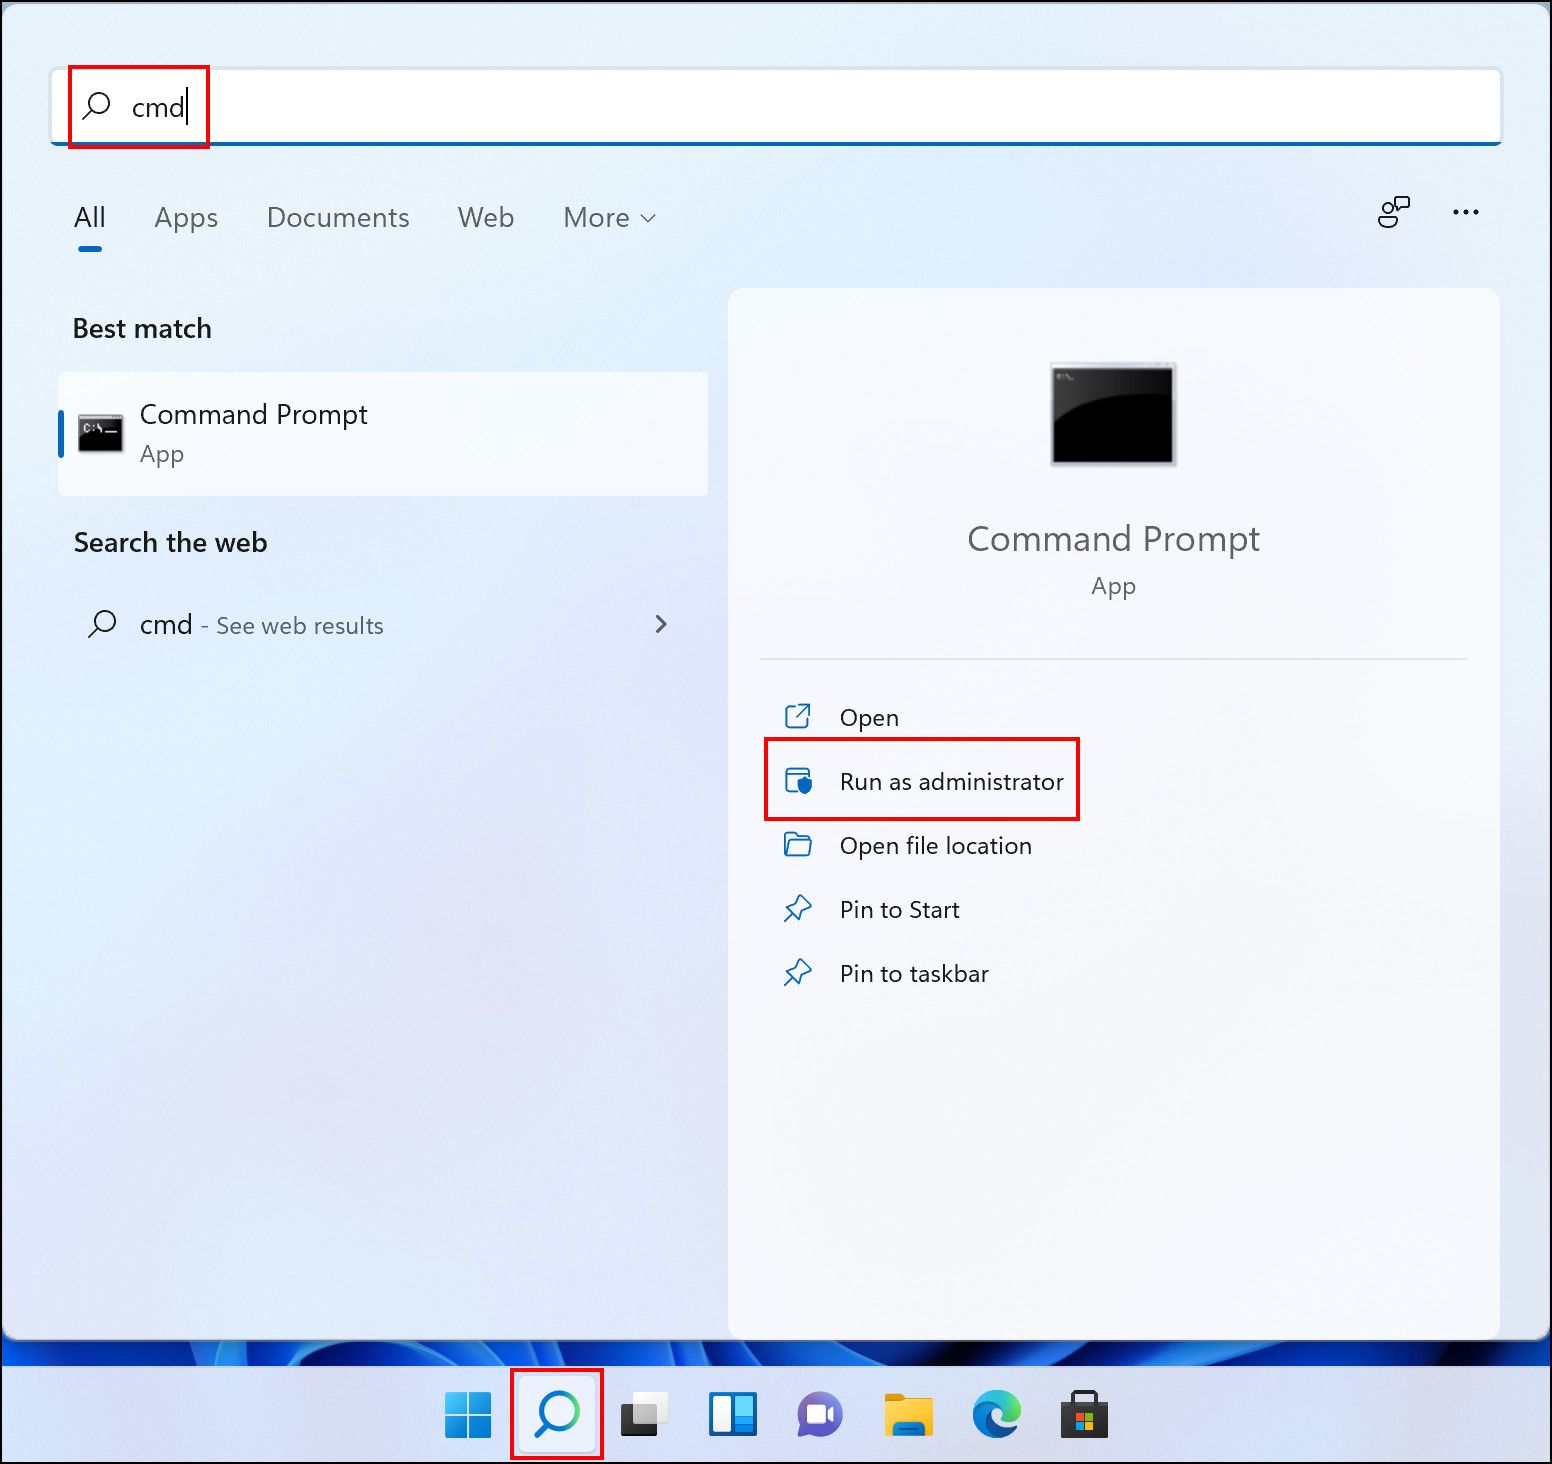
How to create a guest account using Command Prompt
To configure a temporary guest account through Command Prompt, use these steps:
- Open Start.
- Search for Command Prompt, right-click the top result, and select the Run as administrator option.
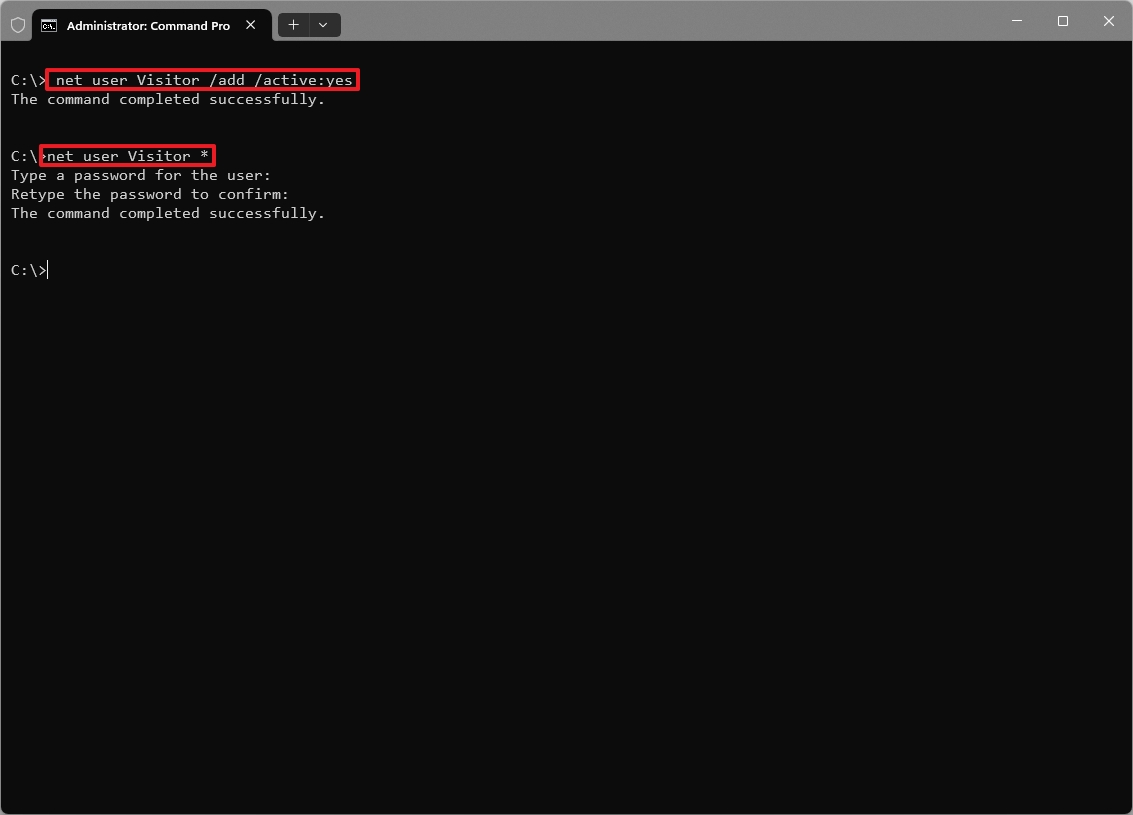
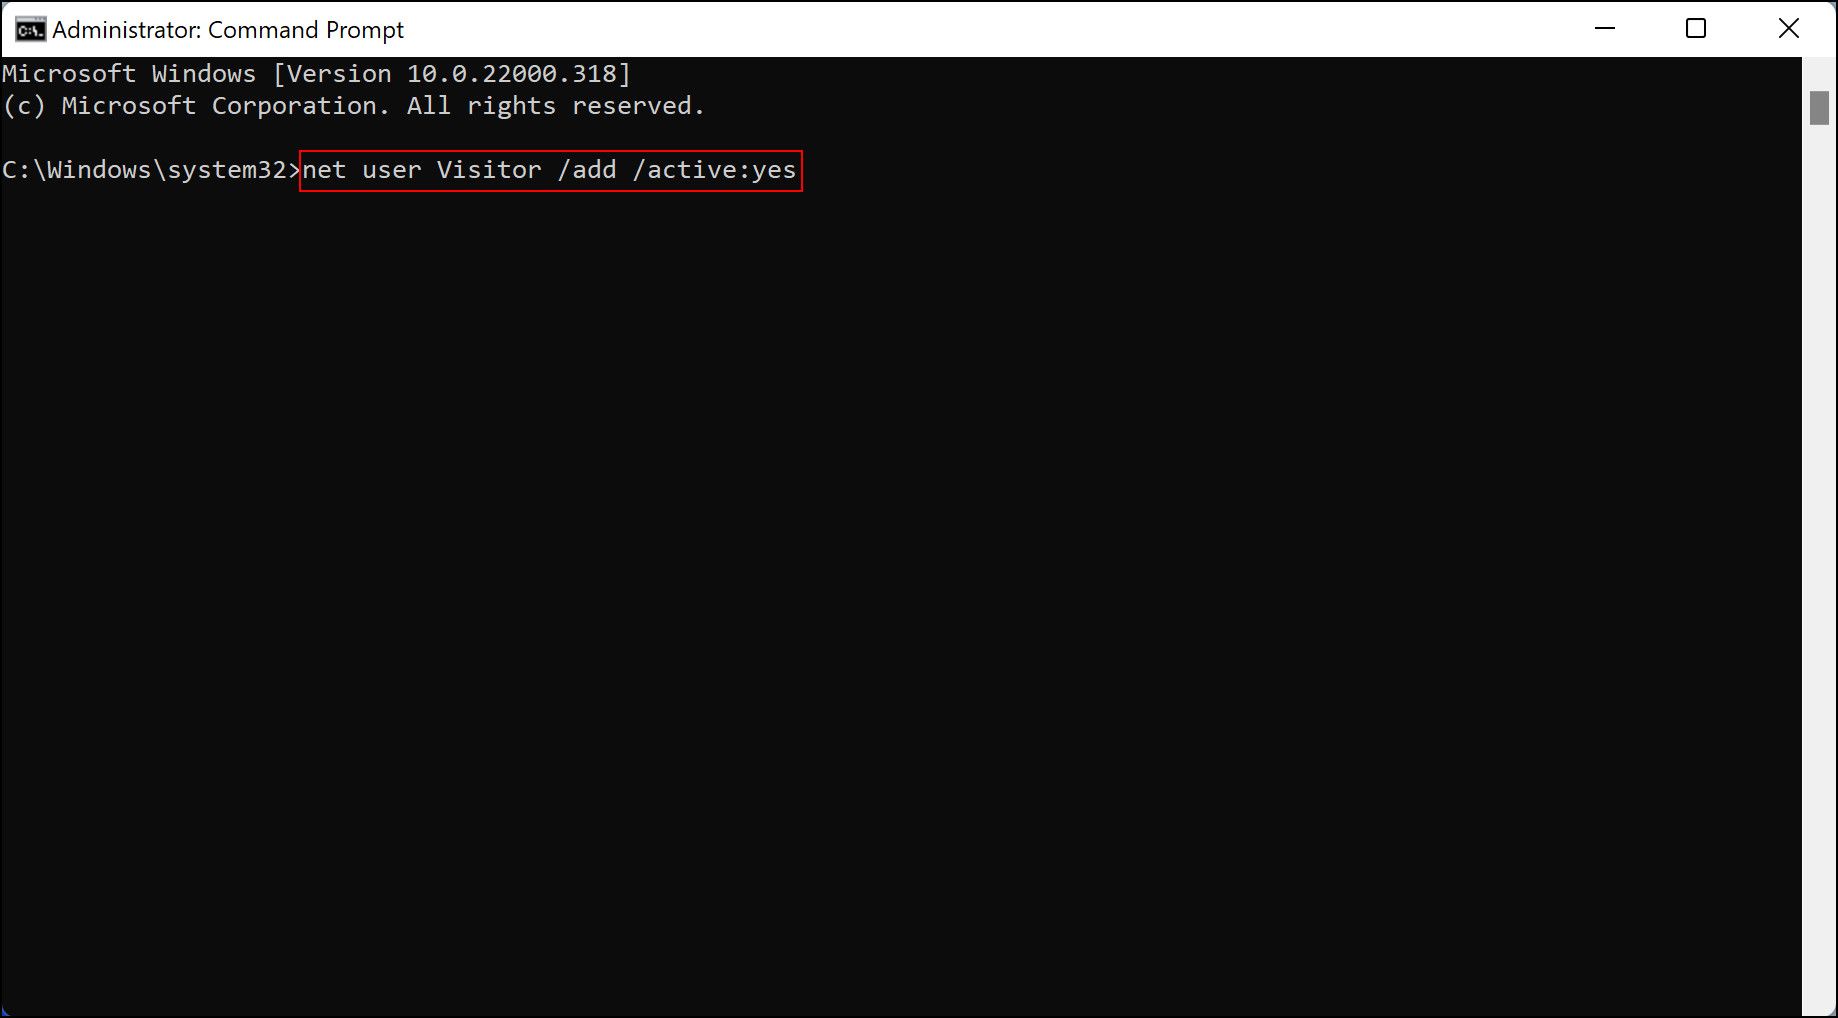
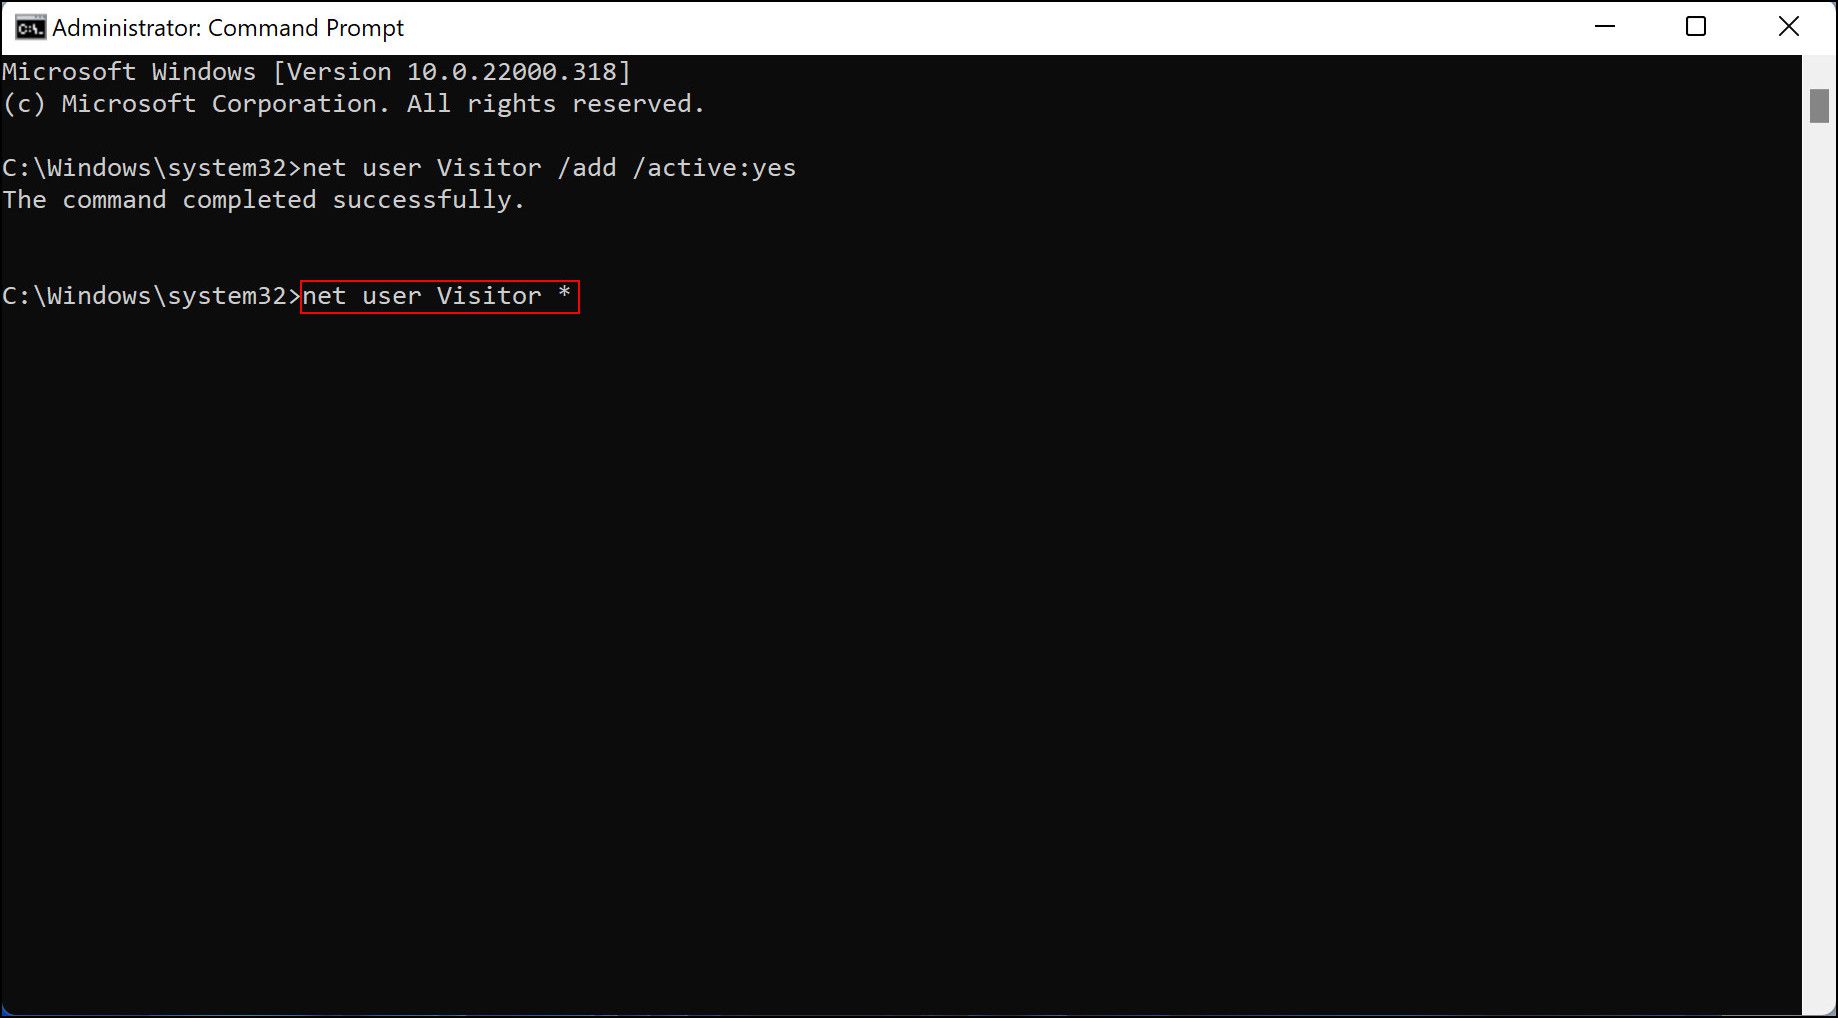
- Type the following command to create a new account and press Enter: net user Visitor /add /active:yes
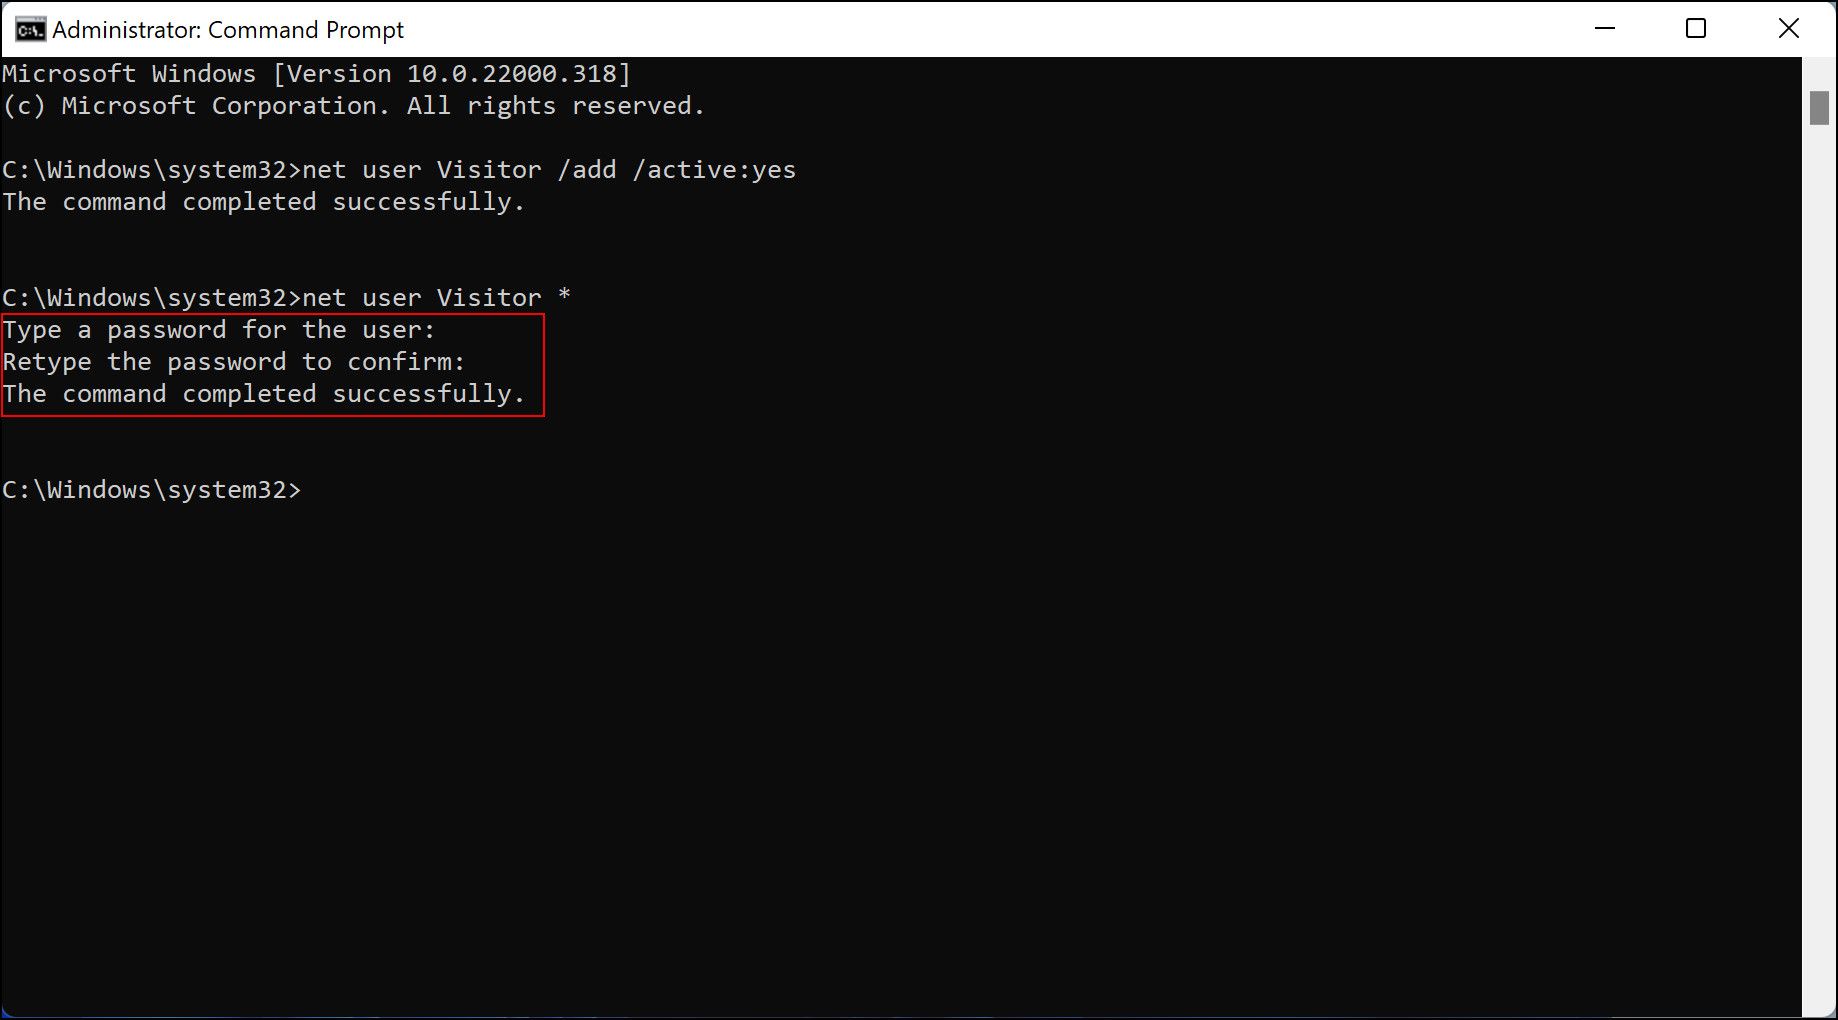
- Type the following command to set up a password for the account and press Enter: net user Visitor *
- Quick note: If this is a temporary guest account, you don’t need to configure a password. You can press «Enter» twice to set a blank password.
- Type the following command to remove the new user account from the «Users» group and press Enter: net localgroup users Visitor /delete
- Type the following command to add the new user account to the «Guests» user group and press Enter: net localgroup guests Visitor /add
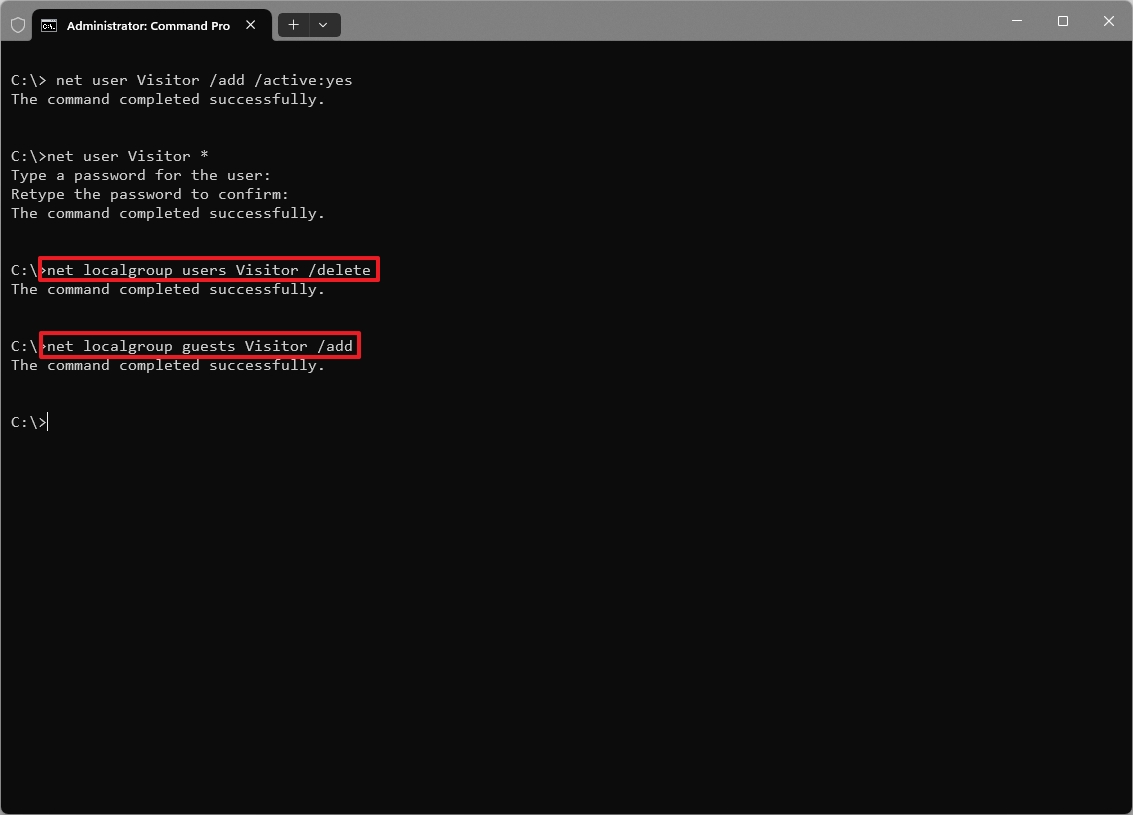
Once you complete the steps, the account will appear on the sign-in screen for anyone to use with the assigned password.
How to create a guest account using PowerShell
To create a guest account with PowerShell commands on Windows 11, use these steps:
- Open Start.
- Search for PowerShell, right-click the top result, and select the Run as administrator option.
- Type the following command to create a password and press Enter: $GuestPassword = Read-Host -AsSecureString
- Create the account password with the blinking cursor.
- Type the following command to create a new account and press Enter: New-LocalUser «Visitor» -Password $GuestPassword
- Type the following command to add the account in the Guests group and press Enter: Add-LocalGroupMember -Group «Guests» -Member «Visitor»
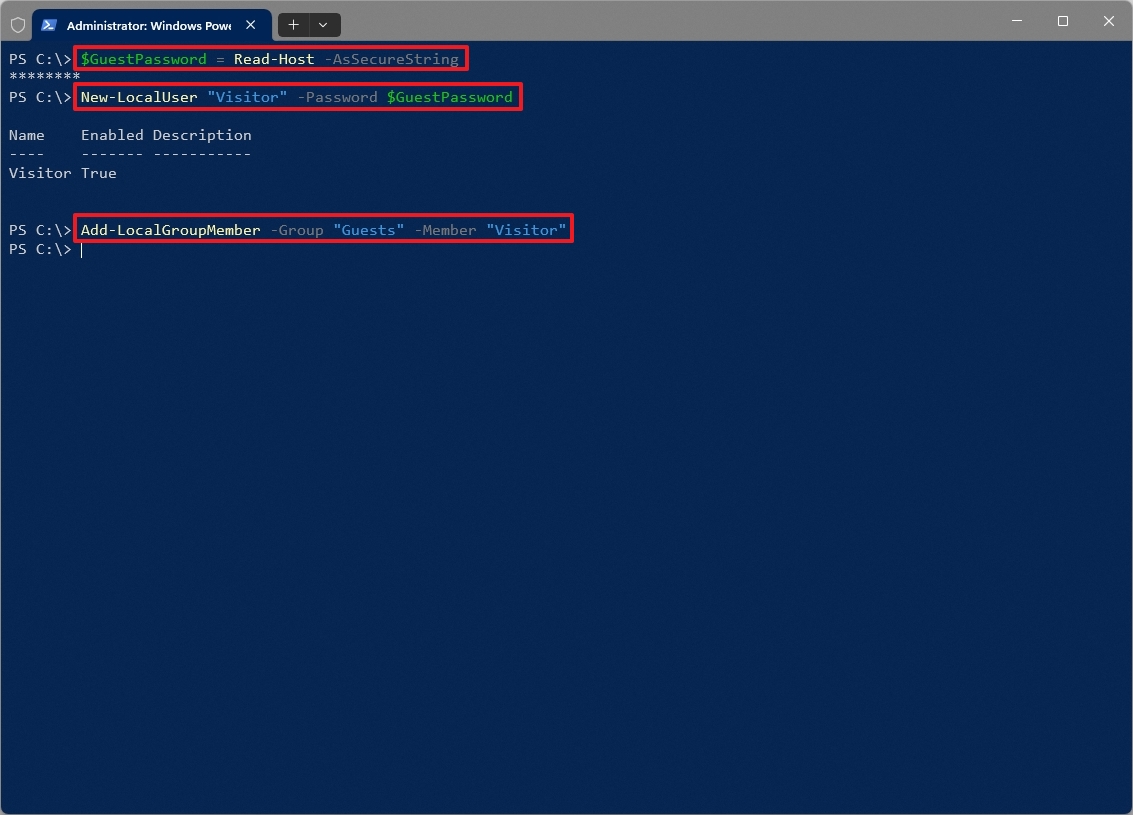
After you complete the steps, PowerShell will create a guest account to share the device with other people.
These steps are meant to set up an account to share a device with visitors temporarily. If you want to share a device more permanently, it’s recommended that you create a standard account for each user with a Microsoft account or offline account.
More resources
For more in-depth insights, troubleshooting tips, and the latest updates on Windows 11 and 10, be sure to explore these resources:
- Windows 11 on Windows Central — All you need to know
- Windows 10 on Windows Central — All you need to know
Mauro Huculak has been a Windows How-To Expert contributor for WindowsCentral.com for nearly a decade and has over 15 years of experience writing comprehensive guides. He also has an IT background and has achieved different professional certifications from Microsoft, Cisco, VMware, and CompTIA. He has been recognized as a Microsoft MVP for many years.
Guest accounts are great for times when you need to lend your PC to someone. By giving them their own account, you don’t need to hover over them to make sure they don’t snoop around or do stuff they aren’t supposed to.
Creating a guest account on Windows 11 isn’t as easy as it was in previous versions of Windows However, that does not mean you cannot create any at all. Below, we have listed two methods of creating a guest account in Windows 11 that will help you set up a temporary account in no time.
What Is a Guest Account?
Keeping your data safe in Windows can be tricky. And while you can hide files and folders on Windows, a guest account is the perfect way to accommodate visitors on your computer.
A guest account is a user account that only offers temporary and limited access to your computer. The users using the guest account cannot install new software, access your files, or make system-level changes on your device. Once the user shuts the PC down after using the guest mode, all the data within the account created during the session is automatically erased.
The Guest mode has been around since Windows 7 and Windows 8. Creating a guest account with a restricted environment in both these versions was quite simple. However, Microsoft hid this feature in Windows 10 and now its successor, Windows 11 does not come with it as well.
Instead, you can create a local guest account in Windows 10 and 11, that offers the same features. This can be done by using the Command Prompt, Windows Settings, Windows Powershell (Admin), and Computer Management. Below are discussed these methods in detail. Proceed with the one that suits your situation the best.
1. Use the Command Prompt
Command Prompt, also known as cmd.exe, is a command-line interface used to communicate with the system. It is often used to perform advanced functions since it takes just a couple of keystrokes to execute the commands.
1. How to Create a Windows 11 Guest Account via Command Prompt
Here is how you can use the Command Prompt to create a guest account on your PC:
-
Type cmd in the search area of your taskbar and click Run as administrator. This will launch Command Prompt with administrative privileges.

-
Inside the Command Prompt window, type the command mentioned below and hit Enter to execute it. This should create a guest account successfully.
net user Visitor /add /active:yes
-
To secure your guest account, you can set up a login password as well, but this is optional. If you wish to proceed, execute the command below in the same window.
net user Visitor *
-
Add and confirm the password in Command Prompt.

- To view the guest account, head over to Windows Settings and navigate to Accounts.
-
Choose Family & other users as shown below.

-
Navigate Other users, and you should see the guest account listed there. The account will now also be shown on your sign-in screen.

2. How to Delete a Windows 11 Guest Account via Command Prompt
If you wish to remove the account either now or any time in the future, you can do so by using Command Prompt again.
Here is what you need to do:
- First, launch Command Prompt with administrative privileges.
-
Type the command mentioned below and hit Enter to execute it inside the Command Prompt window. This should remove the account successfully.
net localgroup users Visitor /delete

2. How to Create a Guest Account Using Windows Settings
Another way to create a local guest account in Windows 11 is via Windows Settings. Follow the steps listed below to proceed with this method.
1. How to Create a Windows 11 Guest Account via Settings
Here is how you can create a guest account using Windows Settings:
- Press Win + I simultaneously to launch Windows Settings.
- Choose Accounts from the left panel and select Family & other users on the right side of the window.
-
Click on the Add account button under Other users.
-
In the dialog box that pops up on your screen, select I don’t have this person’s sign-in information.
-
Then, choose Add a user without a Microsoft account.
-
Add a name and password for the account. You cannot name the account as Guest, so choose any other name.

- Follow the on-screen instructions to proceed.
This should create a guest account on your Windows 11 operating system. However, at this point, this guest account is just a standard account that does not have many limitations. If you want to make the guest account more restrictive and limit what guest users can do, you can do so by making some changes to the Computer Management app.
Follow these steps if you wish to proceed:
- Type Computer Management in the search area of the taskbar and click Open.
- Choose System Tools > Local Users and Groups from the left pane.
-
Next, click on Users on the right side of the window.

- On the right-hand side of the window, locate your guest account and right-click on it.
-
Choose Properties from the context menu.

-
Click on the Member Of tab and hit the Add button.

-
Then, click on the Advanced button.

-
In the next window, hit the Find now button.

- Under Search results, choose Guests and click OK.
- Hit OK again.
-
Next, select Users and click on the Remove button.

- Finally, click Apply and then OK.


You will see that the account becomes more restrictive once you are done.
2. How to Create a Windows 11 Guest Account via Settings
If you longer need the guest account, here is how to remove it using Windows Settings:
- Launch Windows Settings and head over to Accounts.
- Choose Family & other users from the right side of the window.
-
Now, locate the guest account under Other users and click on the Remove button associated with it.

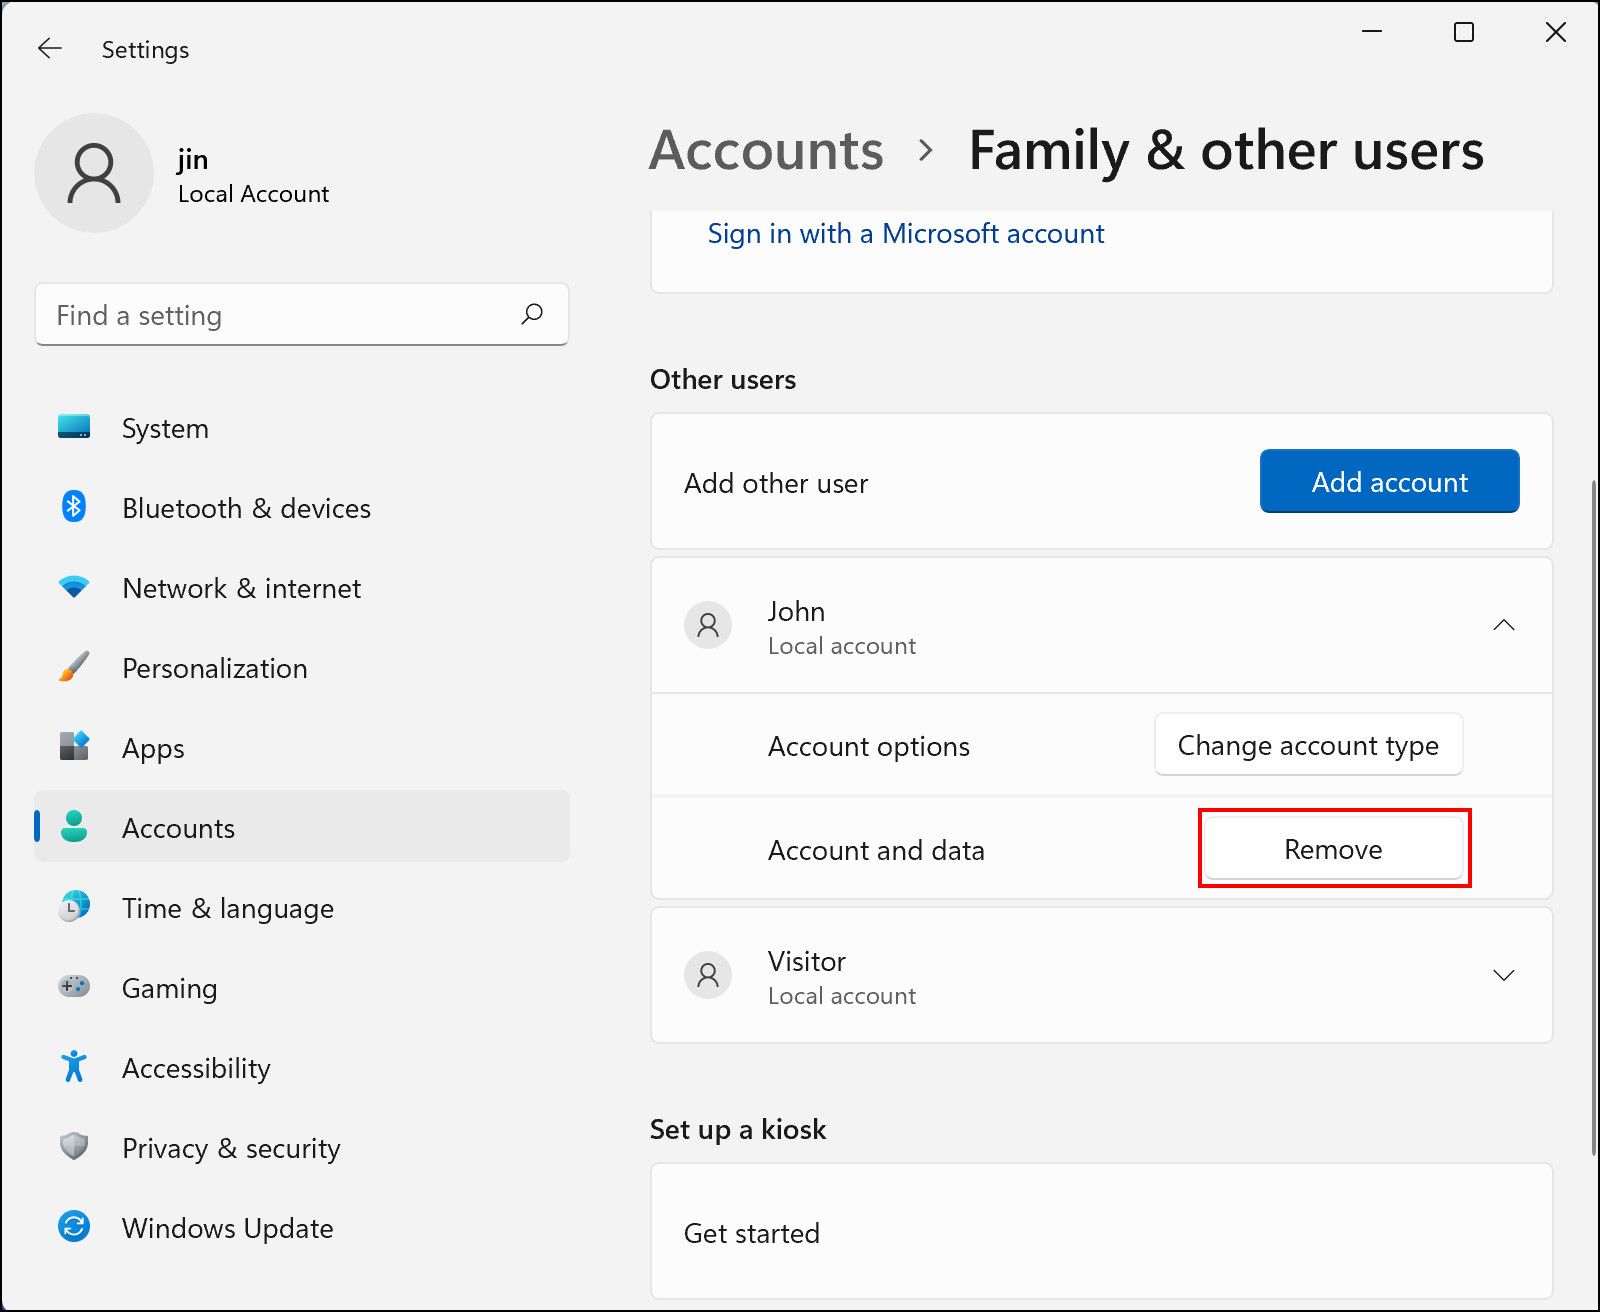
Your account and the data within it shall now be removed.
Make Your Windows 11 PC Secure With a Guest Account
It is cheaper to share a computer, but one of the most common concerns that discourage users from doing so is privacy. Now that you know how to create a separate guest account that offers limited access to the resources, you can let others use your computer without worrying about it.