
Если вы оказались без доступа к чему-либо кроме командной строки или Windows PowerShell и по какой-то причине вам требуется возможность создания или чтения текстовых файлов, это вполне реализуемо, причем более чем одним методом.
В этой инструкции подробно о работе с текстовыми файлами в командной строки или PowerShell (разумеется, можно и в Терминале Windows) — создание и сохранение текстовых файлов, их вывод и чтение в консоли. Если вам требуется вывести результаты выполнения команды в файл, вы можете использовать отдельную инструкцию на эту тему.
Создание текстовых файлов в командной строке
Возможность создания текстовых файлов доступна как в командной строке (cmd.exe), так и в PowerShell. Начнем с первого варианта.
Во всех случаях учитывайте, что при использовании кириллицы потенциально возможны проблемы с кодировкой, а в некоторых случаях кодировка может отличаться при использовании разных команд.
Команда ECHO
Команда командной строки echo предназначена для вывода текстовых сообщений в окне консоли, например, при выполнении сценария в bat-файле, но может быть использована и для вывода текста в файл, благодаря возможности использования оператора «>» для перенаправления вывода из консоли в файл.
Пример команды:
echo Содержимое текстового файла > file.txt
В результате её выполнения в текущей рабочей папке командной строки будет создан файл с именем file.txt и содержимым «Содержимое текстового файла».

COPY CON
Команда copy с параметром con позволяет скопировать содержимое консоли в файл. Использование возможности будет состоять из следующих шагов:
- Введите команду
copy con имя_файла.txt
файл не будет создан, но после выполнения указанной команды у вас появится возможность набрать содержимое этого файла, которое по завершении процесса будет в него сохранено.
- Курсор переместится на строчку ниже, и вы сможете набирать текст так, как делаете это обычно, включая перенос строки.

- Для завершения набора и сохранения текстового файла нажмите сочетание клавиш Ctrl+Z, а затем — Enter. Это добавит отметку конца файла и сохранит его в текущей папке с указанным на 1-м шаге именем.


Создание текстового файла в PowerShell
PowerShell также имеет набор встроенных командлетов для сохранения текстовых данных в файл.
Out-File
Использование Out-File в PowerShell по своей функциональности сходно с оператором перенаправления вывода в командной строке. Вывод консоли перенаправляется в заданный файл.
Пример использования:
"Текстовая строка" | Out-File -FilePath .\file.txt
В этом примере в текущей папке PowerShell будет создан файл с именем file.txt и содержимым «Текстовая строка».
New-Item
Создание нового текстового файла в PowerShell возможно с помощью командлета New-Item. Пример команды, в которой создается текстовый файл file.txt, содержащий «Текстовая строка» в текущем расположении:
New-Item -Path . -Name "file.txt" -ItemType "file" -Value "Текстовая строка"

Set-Content и Add-Content
Ещё два командлета PowerShell для работы с текстовыми файлами:
- Set-Content — перезаписывает содержимое файла
- Add-Content — добавляет содержимое в конце выбранного файла
Их использование можно увидеть на примере следующей команды:
Add-Content -Path .\file.txt -Value "Ещё одна текстовая строка"

Вывод (чтение) текстового файла в командной строке и PowerShell
Теперь перейдем к способам просмотреть текстовые файлы в командной строке или PowerShell. Как и в предыдущем случае, учитывайте, что для файлов, содержащих кириллицу, возможны проблемы с отображением символов в правильной кодировке.
TYPE
Самый простой вариант — использование команды TYPE с указанием пути к файлу, который нужно отобразить в консоли, например:
type file.txt

MORE
Если файл объемный и содержит большое количество строк, используйте команду more, например:
more file.txt
Выполнив команду, вы увидите часть содержимого текста, которая помещается в окне консоли, далее вы можете использовать следующие клавиши:

- Enter — для отображения следующей строки файла.
- Пробел — для отображения следующих строк документа, которые поместятся в активное окно консоли.
- P — Показать следующие N строк. После нажатия этой клавиши с последующим указанием количества строк, будет выведено соответствующее количество строк текстового документа.
- S — пропустить следующие N строк, работает аналогично предыдущему варианту.
- Клавиша «=» — для отображения текущего номера строки.
- Q — для прекращения выполнения команды more.
Get-Content
Вывести содержимое текстового файла в PowerShell можно с помощью Get-Content с указанием пути к файлу, например:
Get-Content file.txt

Также вы можете выводить определенные строки файла, с помощью команд вида (вывод первых или последних 10 строк соответственно):
Get-Content file.txt | Select-Object -First 10
Get-Content file.txt | Select-Object -Last 10
Или присвоить содержимое файла переменной и вывести конкретную строку:
$file_text = Get-Content file.txt
$file_text[2]

Помимо использования ручного ввода команд, вы можете использовать консольные текстовые редакторы — сторонние в версиях для Windows, такие как Vim, Nano, Kinesics Text Editor или даже старый встроенный edit.com (может отсутствовать в вашей версии системы и требовать патча NTVDMx64).
Загрузить PDF
Загрузить PDF
Командная строка — удобный инструмент для быстрого и эффективного выполнения задач в Windows. Это полнофункциональный и часто недооцененный инструмент компьютерной системы. Действия в командной строке осуществляются без мышки, поэтому она идеально подходит для людей, предпочитающих работать за клавиатурой. Из этой статьи вы узнаете, что собой представляет Командная строка и как с ее помощью выполнять базовые задачи. Прочитав данную статью, вам будет намного проще выполнять базовые задачи через Командную строку.
-

Нажмите на меню «Пуск» и найдите строку поиска. Введите в нее «командная строка» или «cmd». Дважды нажмите на Командную строку в списке результатов, чтобы запустить утилиту. По умолчанию Командная строка имеет следующий вид: C:\users\Username>.
-

Воспользуйтесь командой mkdir для создания новой папки. Чтобы создать папку, необходимо ввести «mkdir-> имя папки». В приведенном выше примере новая папка wikihow была создана с помощью команды: mkdir wikihow.
-
Чтобы перейти в другую папку, воспользуйтесь командой «cd», или change directory (изменить каталог). Для этого введите следующее: cd -> название папки. В нашем примере нужно ввести cd wikihow. Как показано на картинке выше, новая строка будет иметь следующий вид: C:\users\Ivan\wikihow>.
-
Чтобы проверить содержимое текущей папки, воспользуйтесь командой dir. Просто введите dir и нажмите Enter, после чего в Командной строке отобразится список содержимого папки.
-
Для этого воспользуйтесь командой cls. Просто введите cls и нажмите ↵ Enter, чтобы очистить содержимое с экрана. Как показано на примере выше, на экране останется лишь командная строка.
-
Чтобы создать новый файл, введите команду NUL >. Введите NUL > название файла и нажмите Enter, чтобы создать новый пустой файл. В приведенном выше примере было введено NUL> newfile.
-
Теперь повторите шаг 6, чтобы создать еще один файл. Назовите этот файл newFile1. Для этого необходимо ввести команду NUL> newFile1.
-
Теперь проверьте содержимое папки с помощью команды dir. Как показано на примере сверху, папка wikihow теперь содержит два новых файла: newFile и newFile1.
-
Чтобы удалить файлы, воспользуйтесь командой del. Введите del -> название файла, чтобы удалить конкретный файл. Введите del newFile, чтобы удалить файл с названием newFile. Теперь проверьте содержимое папки wikihow и убедитесь, что файл newFile был удален. Очистите данные с экрана командой cls.
-
Чтобы выполнить следующий шаг (удалить папку), вам сначала нужно покинуть текущий активный каталог. Для этого воспользуйтесь версией команды для смены папки. Введите команду cd.., чтобы перейти в родительский каталог, не вводя его название. Введите: cd.. как показано на примере выше. Обратите внимание, что в строке теперь написано C:\users\Brian>, а это значит, что вы больше не находитесь в папке wikihow.
-
Чтобы удалить папку, воспользуйтесь командой rmdir. Пока вы находитесь в папке, ее нельзя будет удалить (смотри шаг 10). Если папка пустая (в ней нет файлов), ее можно удалить, просто введя команду rmdir -> имя папки. В нашем примере в папке wikihow все еще находится файл newFile1, так что команда rmdir не сработает. Как показано на примере выше, если папка не пустая, вы получите сообщение об ошибке.
-
Чтобы удалить папку, в которой содержатся файлы, воспользуйтесь измененной командой rmdir. Введите команду rmdir /s wikihow. Введите rmdir /s wikihow и нажмите Enter. Появится окно подтверждения удаления папки, введите Y или N. Введите Y, чтобы подтвердить удаление, или N, чтобы отменить его. Когда вы введете Y, папка и все ее содержимое будут удалены из системы.
Реклама


Советы
- Команды можно вводить как заглавными, так и строчными буквами.
- Используйте команду CLS для регулярной очистки экрана. Так вам будет намного удобнее работать.
Реклама
Предупреждения
- Для работы с командной строкой нужна практика, а также повышенное внимание при удалении или перемещении файлов. Поскольку в командой строке при удалении файлов не бывает предупреждений или второй попытки, убедитесь, что удаляете именно те файлы и что важные документы останутся нетронутыми.
Реклама
Что вам понадобится
- Компьютер, работающий на операционной системе Windows
- Клавиатура
Источники
Об этой статье
Эту страницу просматривали 183 253 раза.
Была ли эта статья полезной?
-
Home
-
News
- How to Create and Delete a File or Folder with CMD
By Alisa |
Last Updated
This tutorial introduces how to create a file or folder/directory with cmd.exe (Command Prompt) on Windows 10. MiniTool software also provides the professional data recovery software to help you recover any deleted/lost files from computer and various storage devices.
- How do you create a file using Command Prompt?
- Which command is used to create a file in DOS?
If you are wondering how to create a file or folder using Command Prompt, this tutorial provides a detailed guide.
How to Create a Folder with CMD
Step 1. Open Command Prompt
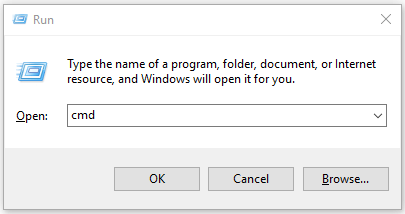
At the beginning, you can press Windows + R to open Run dialog, type cmd in Run, and press Enter to open Command Prompt in Windows 10.
Step 2. Go to the Folder Location
After you enter into Command Prompt, you are at C:\Users\YourName by default. If you want to create a folder in another directory, you can type cd folder path (replace the folder path with the actual folder location), and press Enter to go to the desired directory.
Tip: If the default folder isn’t your target folder and you want to create a file with cmd in anther folder, you should type the whole folder path and hit Enter.
Step 3. Create a Folder with CMD
Then you can type mkdir folder name (replace folder name with the exact name of the folder you want to create), for instance, mkdir work. After you type the command line, you should press Enter key to run this command to create the folder.

How to Delete a Folder in Command Prompt
Step 1. If you want to delete a folder with CMD, you can follow the same instructions above to enter into Command Prompt and go the directory you want to delete a folder.
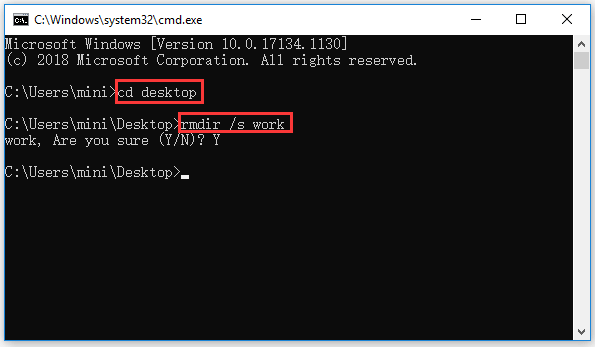
Step 2. Then you can type rmdir /s folder name (replace folder name with the exact folder name you’d like to delete), e.g. rmdri /s work. If the folder name has a space between words, you should place the folder name in quotations, e.g. rmdir /s “work 2020”. Finally hit Enter to execute the command, and type “Y” to confirm the action.
How to Create a File with CMD
Step 1. Still, follow the same operation above to open Command Prompt in Windows 10 and go to the folder path in which you want to create a file.
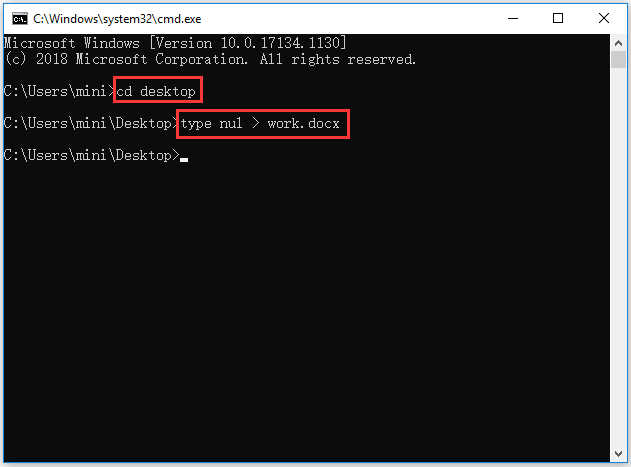
Step 2. Type type nul > filename.fileextension in Command Prompt window and hit Enter, e.g. type nul > work.docx, this will create an empty word file named work.
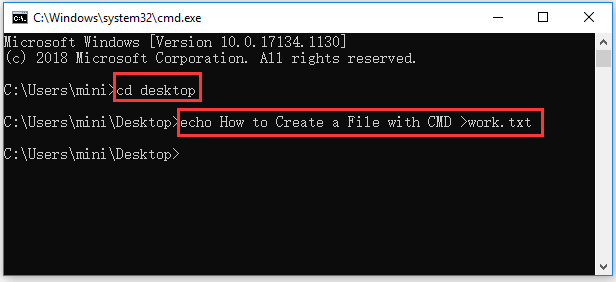
If you want to create a file with some text in it, you can type echo enter your text here >filename.txt. Replace “enter your text here” with the exact text you want to contain in the file and replace the “filename.txt” with the desired file name and extension. For example, echo How to Create a File with CMD >work.txt.
If you want to create a file with a certain file size in CMD, you can type fsutil file createnew filename.docx 1000, replace filename and 1000 with your preferred file name and file byte size.
How to Delete a File in Command Prompt
Step 1. To delete a file with CMD, you can also open Command Prompt and go to the folder path in Command Prompt.
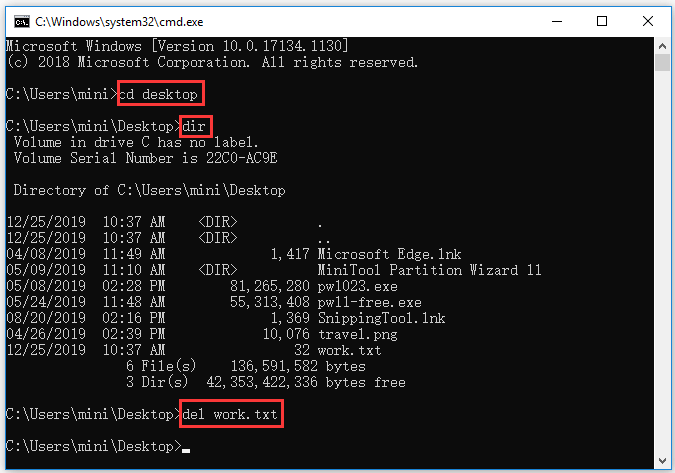
Step 2. Next you can type dir and press Enter to display all the files in the current folder. Find the file you want to delete.
Step 3. Then you can type del filename.fileextension and press Enter to delete the target file with CMD. You should replace the filename with the exact file name and file extension of the deleting file, e.g. del work.txt. If the file name has spaces, you should put the file name into quotations.
If you receive an error message saying that the file can’t be deleted, you can check: how to force delete a file that cannot be deleted.
Note: Deleting a file/folder using Command Prompt in Windows 10 will permanently delete the file and the deleted file will not go to the Recycle Bin, so please be careful with file deletion with CMD.
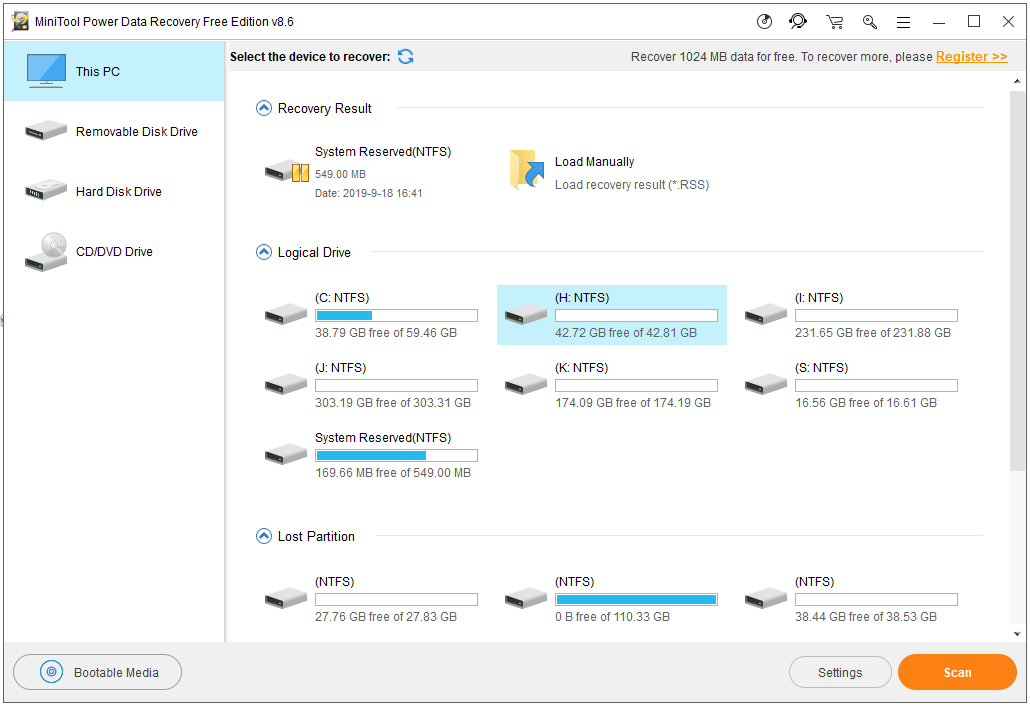
How to Recover a Mistakenly Deleted File/Folder
Using CMD to delete a file or folder will permanently delete the file. If you mistakenly delete a file/folder, you can use MiniTool Power Data Recovery – professional free data recovery software for Windows 10/8/7 – to easily recover any deleted/lost files and folder from computer, external hard drive, SSD, USB, SD card, and more in 3 simple steps.
About The Author
Position: Columnist
Alisa is a professional English editor with 4-year experience. She loves writing and focuses on sharing detailed solutions and thoughts for computer problems, data recovery & backup, digital gadgets, tech news, etc. Through her articles, users can always easily get related problems solved and find what they want. In spare time, she likes basketball, badminton, tennis, cycling, running, and singing. She is very funny and energetic in life, and always brings friends lots of laughs.
This article lists various commands that you can use to manage files and folders through Command-Line in Windows 11/10. We show you how to create, delete, find, rename, compress, hide, move, copy, and manage a file or folder using Command Prompt in Windows 11/10.

Although a lot of users prefer using a graphical user interface to manage files for a hassle-free experience, some also use the command-line interface to perform file management tasks. In any case, it is always better to know alternative solutions to execute a task.
In this guide, I will be creating a list of useful commands that you can use for file or folder management on your Windows PC. To perform a specific task on files or folders, there is a dedicated command that you need to enter in CMD. Let’s check out these commands!
Here are the commands that you should know to manage files and folders using Command Prompt in Windows 11/10:
1] Create a File or Folder using Command Prompt
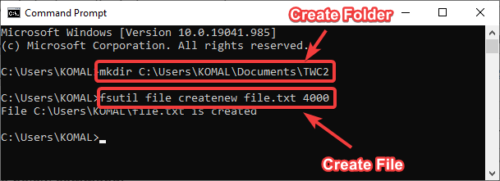
To create a folder, type the folder name with the location where you want to create the folder. Here is the command:
mkdir <folder name with path>
For example;
mkdir C:\Users\KOMAL\Documents\TWC
To create a file of a specific size (in bytes), use the below command:
fsutil file createnew file.txt 4000
In place of file.txt, enter the filename with its extension and full path. And, 4000 is the file size in bytes.
Also read: How to open a File or Folder using Command Prompt or PowerShell
2] Delete Files or Folder using Command Prompt
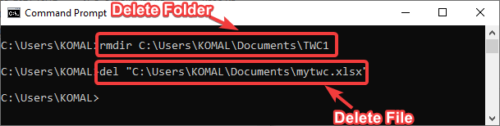
You can remove a folder using the below command:
rmdir <folder name with path>
In order to delete a file, the command is:
del "<filename with path>"
If you want to delete all files from the current folder, enter the command:
del *
To delete files with a specific extension only, say png, use the command:
del *.png
If you want to delete files with a particular string in their filename, e.g., xyz, you can use the below command:
del *xyz*
Related: How to Create Multiple Folders using Command Prompt and PowerShell.
3] Find Files in a Particular Folder using CMD
To find files inside a folder based on different parameters, you first need to navigate to the folder using the command:
cd "<folder name with location>"
Now, you can find files older than n days in a specific folder using the below command:
forfiles /s /m *.* /d -n /c "cmd /c echo @file
Replace -n with the number of days. Like if you want to find files older than 2 days, type -2.
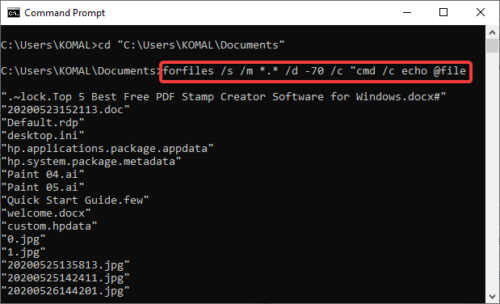
To find files larger than a specific size, use the command:
forfiles /S /M * /C "cmd /c if @fsize GEQ 3741824 echo @path"
In the above command, 3741824 is the file size to search files greater than this size.
Read: Managing Files and Folders in Windows 11 – Tips & Tricks
4] Rename all file extensions present in a folder at once using CMD
You can also batch rename file extensions in CMD. Suppose, you want to rename the file extension of all images to JPG, you can use the below command:
ren *.* *.jpg
5] Get File Creation Time and Date using CMD
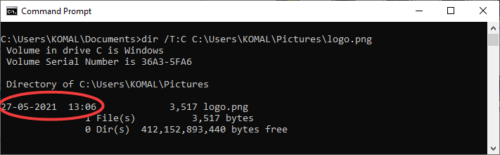
To check the creation time and date of a specific file, use the command:
dir /T:C filename
6] Check for a string inside a file using CMD
To find all lines containing a particular string in a file, you can use the command:
findstr string file-name
For example, to display all lines with “twc” in a text file, you need to enter the command:
findstr twc twc.txt
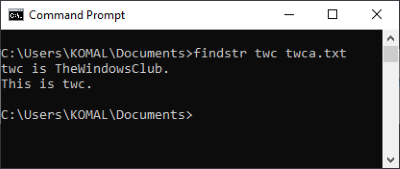
Do remember that the above command is case-sensitive.
To find sentences with any specified string, use a command like:
findstr /C:"string1 string2 string3..." filename
7] Check for all Hidden Files in a Folder using CMD
Use the below command to get a list of hidden files in a directory:
dir /A:H /B
8] Compress a File in CMD
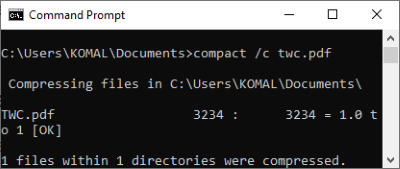
The command to compress a file in a folder is:
compact /c filename
9] Hide or Unhide a file through CMD
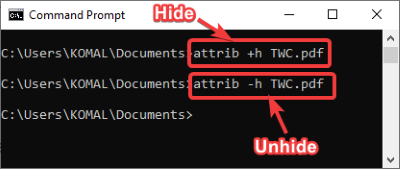
To hide a file, the command used is:
attrib + h filename
You can unhide the file again using the command:
attrib -h filename
10] Set or Unset Read-Only attribute to a file using CMD
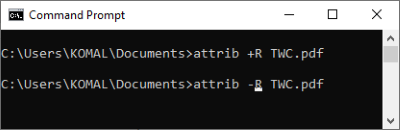
To make a file read-only, the command is:
attrib +R filename
If you want to remove the read-only attribute from a file, the command is:
attrib -R filename
11] Command to Rename a File/Folder
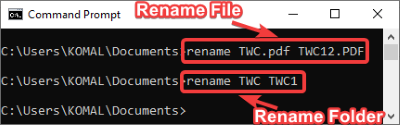
rename oldfilename.pdf newfilename.pdf
12] Read File Content in CMD
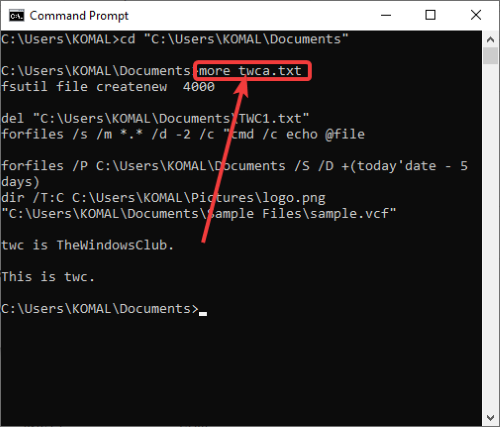
You can read text file content in CMD using the below command:
more filename
13] Open a File in Default Application using CMD
You can open a file in its default application by entering a simple command:
"filename-with-path"
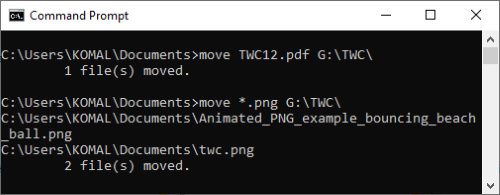
14] Move File or Folder to different Location using CMD
Suppose you want to move TWC12.pdf file to TWC folder in G drive, use below command:
move TWC12.pdf G:\TWC\
Command to move all files with a specific extension:
move *.png G:\TWC\
To move files starting with a particular letter, say A, command is:
move A* G:\TWC\

Similarly, you can move a folder using a command like below:
move foldername <new location>
For example:
move TWC1 G:\TWC\
15] Command to Copy Files
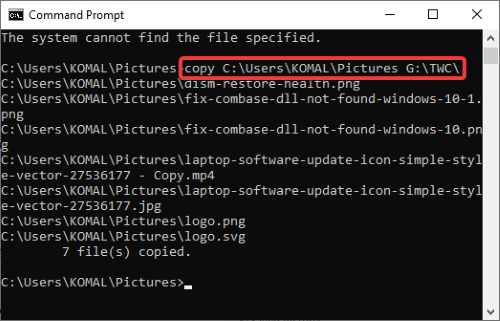
You can copy files from one location to another using command:
copy Sourcefolder DestinationFolder
This post will show you in detail how to copy files using Command Prompt.
I hope this article helps you learn some useful commands to manage files and folders through the command line in Windows 11/10.
Knowing how to conduct rudimentary file management at the Command Prompt comes in useful when you’re starting to code. Any file you make from the Command Prompt persists in multiple areas of Windows—this means that generating an index or document at the prompt fixes things so that you can access, utilize, and control that catalog or record in the Windows platform.
There are two ways to create files from the command line. The first method uses the fsutil command, and the second method uses the echo command.
Create File with Echo Command
|echo some-text > filename.txt
Create File with Fsutil Command
|fsutil file createnew filename number_of_bytes
Step-by-Step Process to Create Files via Command Line
STEP 1: Launch the command prompt.
The quickest way to implement this is to open the search bar by pressing Win + S, type cmd, and then select Command Prompt.
STEP 2: Choose the folder where you wish to save the file.
By default, the prompt will open under C:UsersYourName. Suppose the folder is elsewhere; type the cd path to the folder and hit Enter. Modify the way to the folder with the actual folder path.
STEP 3: Make a blank file.
Type |type nul > filename.txt
Modify filename.txt with a name according to your preference and hit Enter.
The “.txt” extension means that it’s a plain text file.
“.docx” (Word document), “.png” (empty photo), and “.rtf” (rich text document) are other popular file extensions.
All of these file formats may be viewed on any Windows system without the need for extra software.
Step 4: Make a file with certain text in it.
Replace testfile with the appropriate file name in copy con testfile.txt. Hit Enter.
Enter any text. This is a basic text editor, but it’s adequate for brief notes or coding. To move to the following line, use the Enter key.
Press Control + Z after you’re done editing the file.
Hit the Enter key. You should notice “1 file(s) copied,” meaning your file has been saved using the name you chose.
OR
|echo enter your text here > filename.txt.
STEP 5: Make a file of a specific size.
Avoid this step, if you don’t wish to deliver a document of a specific size. Utilize the accompanying order to produce a clear text document dependent on its byte size.
|fsutil file createnew filename.txt 1000
Replace filename with the name of your wish and 1000 with the exact number of bytes you want the document to be.
Other useful articles:
- Basic Windows CMD commands
- Cool CMD Commands Tips and Tricks
- Best CMD Commands for Hacking
- CMD Commands for Wireless Network Speed
- Useful Keyboard Shortcuts for CMD
- What Info about My Laptop Can I Check with CMD and How?
- Getting Started with CMD Windows
- TOP-12 Command-Line Interview Questions (Basic)
- Command-Line Interview Questions (Advanced)
- CMD Commands to Repair Windows
- CMD Commands to Speed Up Computer
- CMD Commands for MAC OS
- How Does the Command Line Work?
- MS-Dos Interview Questions in 2021
- Windows OS Versions and History
- Recent Windows Versions Compared
- Basic Windows Prompt Commands for Every Day
- Windows Command Line Cheat Sheet For Everyone
- Windows Command Line Restart
- Windows Command Line for Loop
- Windows Command — Change Directory
- Windows Command — Delete Directory
- Windows Command Line – Set Environment Variable
- How Do I Run Command Line
- Windows Command Line Create File