
The first test to see whether you can access the database server is to try to create a database. A running PostgreSQL server can manage many databases. Typically, a separate database is used for each project or for each user.
Possibly, your site administrator has already created a database for your use. In that case you can omit this step and skip ahead to the next section.
To create a new database, in this example named mydb, you use the following command:
$createdb mydb
If this produces no response then this step was successful and you can skip over the remainder of this section.
If you see a message similar to:
createdb: command not found
then PostgreSQL was not installed properly. Either it was not installed at all or your shell’s search path was not set to include it. Try calling the command with an absolute path instead:
$/usr/local/pgsql/bin/createdb mydb
The path at your site might be different. Contact your site administrator or check the installation instructions to correct the situation.
Another response could be this:
createdb: error: connection to server on socket "/tmp/.s.PGSQL.5432" failed: No such file or directory
        Is the server running locally and accepting connections on that socket?
This means that the server was not started, or it is not listening where createdb expects to contact it. Again, check the installation instructions or consult the administrator.
Another response could be this:
createdb: error: connection to server on socket "/tmp/.s.PGSQL.5432" failed: FATAL: role "joe" does not exist
where your own login name is mentioned. This will happen if the administrator has not created a PostgreSQL user account for you. (PostgreSQL user accounts are distinct from operating system user accounts.) If you are the administrator, see Chapter 21 for help creating accounts. You will need to become the operating system user under which PostgreSQL was installed (usually postgres) to create the first user account. It could also be that you were assigned a PostgreSQL user name that is different from your operating system user name; in that case you need to use the -U switch or set the PGUSER environment variable to specify your PostgreSQL user name.
If you have a user account but it does not have the privileges required to create a database, you will see the following:
createdb: error: database creation failed: ERROR: permission denied to create database
Not every user has authorization to create new databases. If PostgreSQL refuses to create databases for you then the site administrator needs to grant you permission to create databases. Consult your site administrator if this occurs. If you installed PostgreSQL yourself then you should log in for the purposes of this tutorial under the user account that you started the server as. [1]
You can also create databases with other names. PostgreSQL allows you to create any number of databases at a given site. Database names must have an alphabetic first character and are limited to 63 bytes in length. A convenient choice is to create a database with the same name as your current user name. Many tools assume that database name as the default, so it can save you some typing. To create that database, simply type:
$createdb
If you do not want to use your database anymore you can remove it. For example, if you are the owner (creator) of the database mydb, you can destroy it using the following command:
$dropdb mydb
(For this command, the database name does not default to the user account name. You always need to specify it.) This action physically removes all files associated with the database and cannot be undone, so this should only be done with a great deal of forethought.
More about createdb and dropdb can be found in createdb and dropdb respectively.
Последнее обновление: 23.11.2022
Консольный клиент psql представляет еще один способ взаимодействия с сервером PostgreSQL. Данная программа также, как и pgAdmin, позволяет выполнять команды языка SQL.
Запустим psql. Программа предложит ввести название сервера, базы данных, порта и пользователя. Эти пункты можно прощелкать, так как для них будут использоваться
значения по умолчанию (для сервера — localhost, для базы данных — postgres, для порта — 5432, в качестве пользователя — суперпользователь postres).
Далее надо будет ввести пароль для пользователя (по умолчанию пользователя postgres):

И после удачного подключения можно будет отправлять серверу команды через psql.
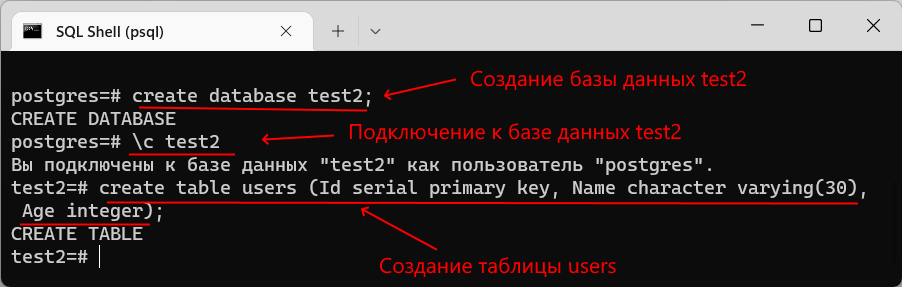
Теперь создадим базу данных с помощью следующей команды языка SQL:
Для создания базы данных применяется команда create database, после которой указывается название бд.
То есть в данном случае название бд — «test2». Причем команда завершается точкой с запятой.
Далее подключимся к этой базе данных для осуществления с ней взаимодействия. Для этого применяется команда \c (сокращение от connect),
после которой указывается имя базы данных:
Затем создадим в этой базе данных таблицу с помощью команды:
create table users (Id serial primary key, Name character varying(30), Age integer);
Данная команда создает таблицу users, в которой будет три столбца — Id, Name и Age.
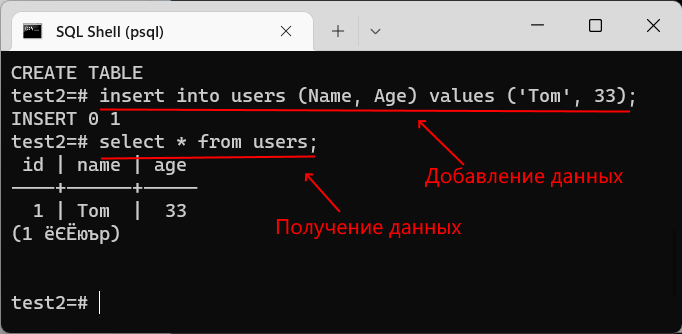
После этого мы можем добавлять и получать данные из выше созданной таблицы. Вначале добавим в таблицу одну строку с помощью следующей команды:
insert into users (Name, Age) values ('Tom', 33);
И в конце получим добавленные данные:
Стоит отметить, что по умолчанию консоль в Windows поддерживает кодировку CP866, тогда как базы данных могут работать совсем с другой кодировкой,
например, 1251. И даже сам клиент psql выводит нам соответствующие сообщения. Кроме того, при получении данных, при выводе информации о базах данных, таблицы и т.д.
некоторая информация может отображаться некорректно. В этом случае перед запуском psql надо установить нужную кодировку и затем из консоли запустить программу psql.
Введение
PostgreSQL известна своей мощностью, гибкостью и поддержкой широкого спектра функций, что делает ее идеальным выбором для разработчиков и администраторов баз данных. Независимо от того, предпочитаете ли вы работать с графическими инструментами или командной строкой, эта статья поможет понять основные шаги и даст практические рекомендации для создания и управления базами данных в PostgreSQL.
Подготовка инфраструктуры
Для начала работы потребуется PostgreSQL. Мы уже рассказывали в Академии Selectel, как развернуть БД самостоятельно на виртуальной машине. А в этой статье рассмотрим управление на основе услуги Облачные базы данных, когда пользователю предоставляется доступ только к БД (без доступа к ОС).
Подробнее, что такое облачные базы данных и в чем отличие от аренды целого сервера, рассказываем ниже в разделе «PostgreSQL на инфраструктуре Selectel».
Как создать БД в панели управления Selectel
Чтобы создать новый кластер БД Selectel, выполните следующее.
- Перейдите в панель управления.
- В левой части окна выберите Облачная платформа.
- В открывшемся окне перейдите на вкладку Базы данных.
- Нажмите Создать кластер.
- Выберите необходимую конфигурацию кластера и нажмите кнопку Создать кластер.
Когда кластер будет создан, он отобразится в той же вкладке Базы данных в статуте Active.

Для организации БД в новом кластере нужно сначала создать нового пользователя.
Примечание
Знакомая всем база данных Postgres и одноименный суперпользователь по умолчанию в Selectel недоступны во избежание инцидентов ИБ.
В своем кластере БД перейдите на вкладку Пользователи и нажмите кнопку Создать пользователя.
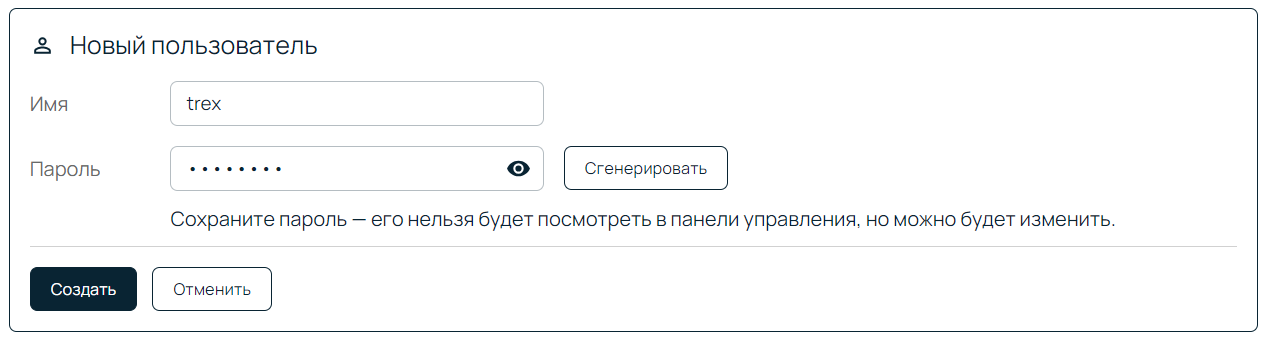
Заполните имя и пароль нового пользователя и нажмите Создать.
Перейдите на вкладку Базы данных.
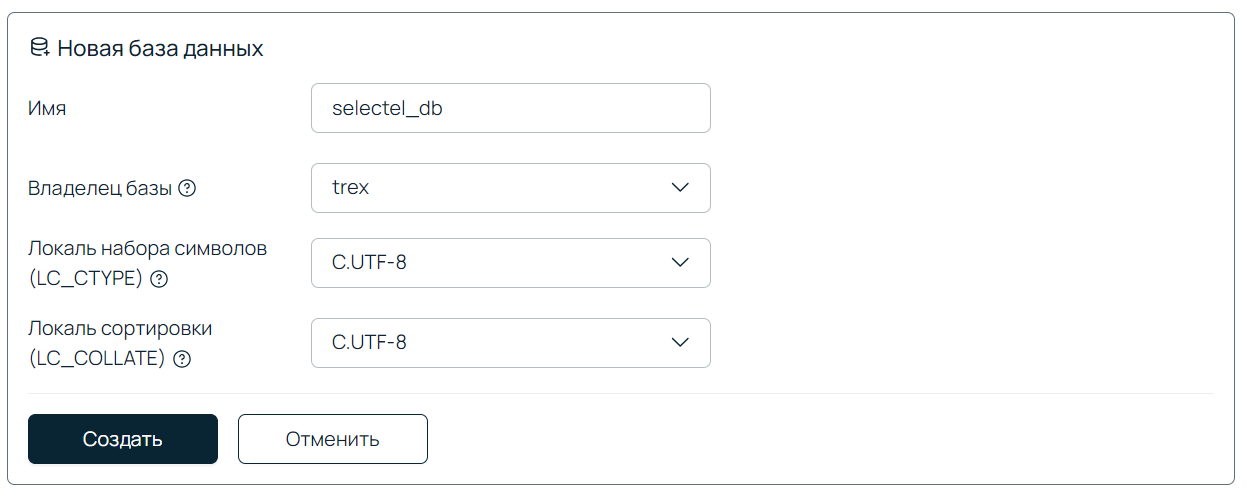
Теперь, чтобы начать работу, создайте базу данных: выберите для нее имя, владельца и локали. К созданной базе вы можете добавить расширения и дать доступ новым пользователям.
Теперь можно подключиться к созданной базе данных и управлять ею любым удобным способом. Другие возможности кластера БД от Selectel описаны ниже и на странице продукта.
Кому подходит СУБД PostgreSQL на инфраструктуре Selectel
DBaaS (Database as a Service) — это облачное решение, которое позволяет пользователям управлять базами данных, не беспокоясь о настройке и обслуживании серверной инфраструктуры. Оно походит тем, кто хочет сосредоточиться на развитии продукта, а не на управлении инфраструктурой.
При аренде сервера пользователь получает полный доступ к ОС и должен самостоятельно устанавливать и настраивать ПО, а также следить за обновлениями, производительностью, резервным копированием и безопасностью.
При использовании DBaaS пользователь получает готовую к работе базу данных с рядом преимуществ.
- Полностью управляемое решение. Selectel берет на себя все задачи по управлению инфраструктурой. Пользователю не нужно думать о настройке, резервировании и безопасности — все автоматизировано.
- Высокая отказоустойчивость. PostgreSQL на платформе Selectel разворачивается в надежных дата-центрах с обеспечением высокой доступности. Если один из узлов откажет, система продолжит работу без простоев, а резервные копии позволят быстро восстановить данные.
- Безопасность. Облачные базы данных соответствуют российским и международным стандартам: закону 152-ФЗ, приказу ФСТЭК № 21, PCI DSS, ISO 27001, 27017, 27018.
- Master Discovery. В услуге представлена встроенная система поиска актуального мастера на базе DNS. При аварийной ситуации и смене мастера система в реальном времени перенаправит запросы клиентского приложения к новому IP-адресу.
- Гибкость и масштабируемость. Вы можете гибкого изменять ресурсы базы данных в зависимости от потребностей приложения. При росте нагрузки просто поменяйте конфигурацию облачного сервера и количество реплик. Доступно как горизонтальное, так и вертикальное масштабирование.
- Интеграция с другими сервисами Selectel. DBaaS легко интегрируется с другими решениями, такими как выделенные серверы, DAVM, Kubernetes, сети и сервисы безопасности. Это позволяет создать полноценную и безопасную экосистему для работы с данными.
- Поддержка и документация. Selectel предоставляет детальную документацию и круглосуточную техническую поддержку, что упрощает процесс использования DBaaS и помогает быстро решать возникающие проблемы.
Как создать БД в графическом инструменте pgAdmin
Для работы с СУБД PostgreSQL через графический интерфейс можно использовать pgAdmin — популярный инструмент для администрирования баз данных.
Установка
Для начала скачайте установочный файл: перейдите на официальный сайт pgAdmin и выберите подходящую версию операционной системы (Windows, macOS или Linux).
После загрузки следуйте инструкции для вашей системы.
Windows. Запустите установочный файл, примите лицензионное соглашение и выберите папку для установки. В процессе убедитесь, что выбраны все компоненты, включая сам pgAdmin и все необходимые зависимости. После завершения установки pgAdmin будет готов к использованию.
macOS. Откройте загруженный файл и перенесите pgAdmin в папку Applications. После этого pgAdmin можно запустить из папки приложений.
Linux. Для установки выполните несколько команд в терминале. Например, для Ubuntu:
- Установите открытый ключ для репозитория.
curl -fsS https://www.pgadmin.org/static/packages_pgadmin_org.pub | sudo gpg --dearmor -o /usr/share/keyrings/packages-pgadmin-org.gpg
- Создайте файл конфигурации репозитория.
sudo sh -c 'echo "deb [signed-by=/usr/share/keyrings/packages-pgadmin-org.gpg] https://ftp.postgresql.org/pub/pgadmin/pgadmin4/apt/$(lsb_release -cs) pgadmin4 main" > /etc/apt/sources.list.d/pgadmin4.list && apt update'
- Установите pgAdmin.
sudo apt install pgadmin4
Запуск и подключение
После успешной установки запустите pgAdmin. При первом запуске вас попросят ввести пароль для администрирования интерфейса pgAdmin. Он будет использоваться для доступа к pgAdmin при каждом запуске.
Теперь, когда pgAdmin запущен, необходимо подключиться к серверу PostgreSQL.
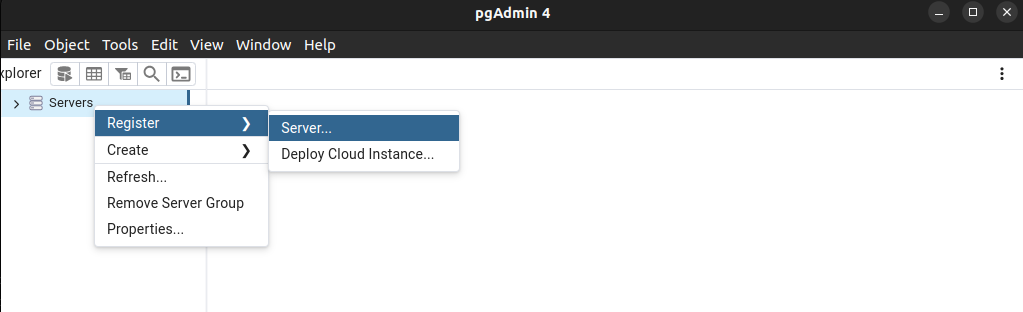
В главном окне pgAdmin нажмите правой кнопкой мыши на Servers и выберите Register → Server...
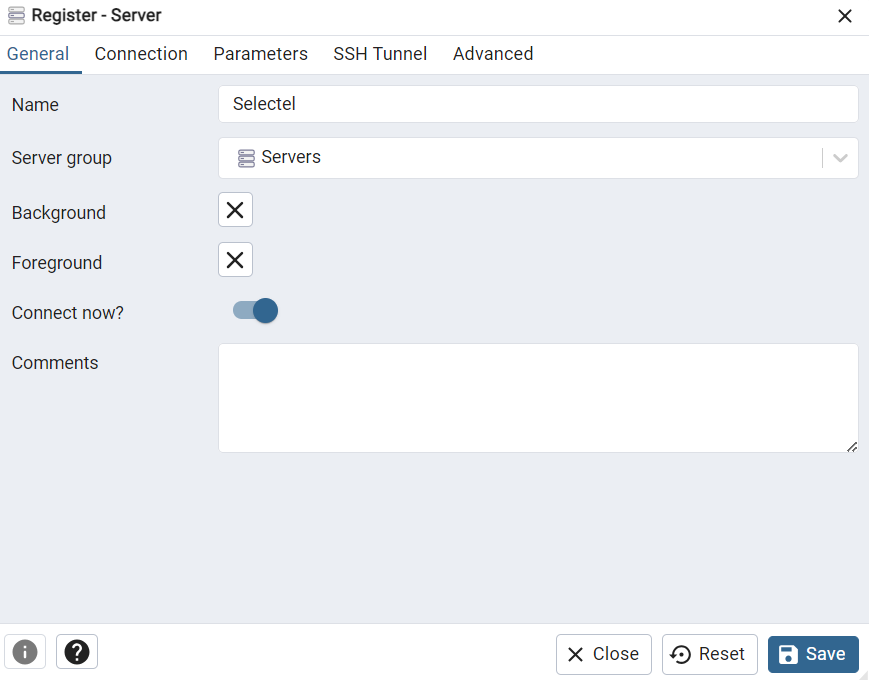
В открывшемся окне создания нового подключения укажите:
- Name — имя для вашего сервера. Например, Selectel.
Перейдите на вкладку Connection и заполните следующие поля.
- Host name/address — адрес сервера PostgreSQL. Если вы работаете локально, используйте localhost.
Примечание
Если требуется добавить сервер PostgreSQL, созданный в кластере БД Selectel, необходимо перейти к своему кластеру, скопировать на вкладке Подключение его DNS-адрес и вставить в pgAdmin в поле Host name/address.
Например, master.6e0c4e3c-f801-445e-ba5c-63ba087f67a1.c.dbaas.selcloud.ru.
Почему мы рекомендуем использовать DNS, а не IP-адреса?
Наша система Master-Discovery реализована на базе доменных имен. Таким образом DNS-адреса соответствуют ролям нод и ведут на актуальные IP-адреса мастера и реплик. IP-адреса соответствуют конкретным нодам. В случае недоступности мастера одна из реплик возьмет на себя его роль. IP-адрес мастера изменится, и подключение по IP перестанет работать.
- Port — порт для подключения к серверу. Мы советуем использовать 5433 – порт для подключения через пулер соединений, который позволяет снизить нагрузку на PostgreSQL.
- Maintenance Database — имя базы данных, которое вы задали в панели управления.
- Username — имя пользователя из панели управления.
- Password — пароль пользователя PostgreSQL.
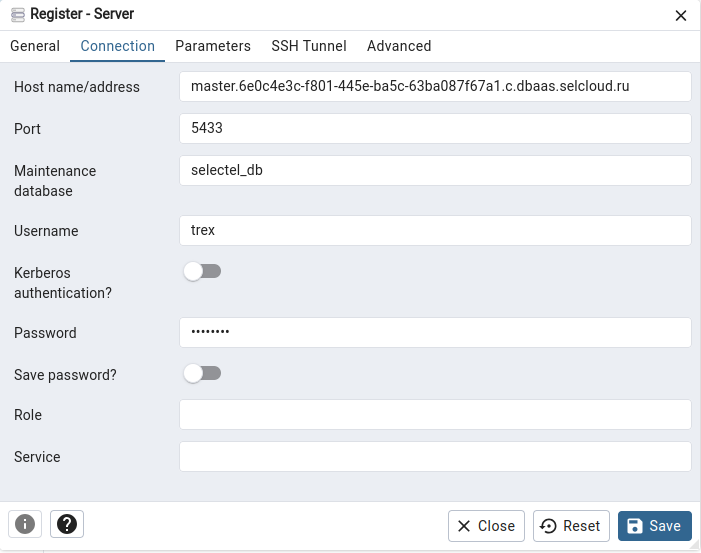
- Нажмите Save, чтобы сохранить подключение. Теперь вы подключены к серверу PostgreSQL и можете управлять базами данных через pgAdmin.
Если при попытке добавления нового сервера вы получаете ошибку вида:
Unable to connect to server: connection failed: connection to server at "127.0.0.1" port 5433 failed: FATAL: password authentication failed for user "postgres" connection to server at "127.0.0.1", port 5433 failed: FATAL: password authentication failed for user "postgres"
… подключитесь к PostgreSQL через терминал и сбросьте пароль для указанного пользователя:
sudo -i -u postgres
psql
\password postgres
[Указать новый пароль]
[Повторить ввод нового пароля]
Создание БД
После подключения к серверу PostgreSQL через pgAdmin для создания новой базы данных выполните следующие шаги:
В левом меню pgAdmin найдите подключенный сервер, нажмите на него правой кнопкой мыши и выберите Create → Database…
В открывшемся окне заполните поля:
- Database. Введите название для новой базы данных, например, database_from_pgadmin.
- Owner. Выберите пользователя, который будет владельцем базы данных. По умолчанию это postgres, но можно выбрать любого другого пользователя.
Нажмите Save, чтобы создать базу данных.
Создание таблицы
Теперь ваша база данных PostgreSQL отображается в списке pgAdmin. Создадим таблицу в одной из схем новой БД.
Схема (schema) — это логическая структура, которая организует таблицы, представления, функции, индексы и другие объекты внутри одной базы данных. Они помогают разделять объекты, обеспечивают более четкую организацию и контроль доступа к данным. Каждая БД может содержать несколько схем, и каждая схема содержит свои объекты.
Разверните список Servers, выберите нужный сервер и базу данных, в которой хотите создать таблицу. Например, Databases → selectel_db → Schemas → public → Tables.
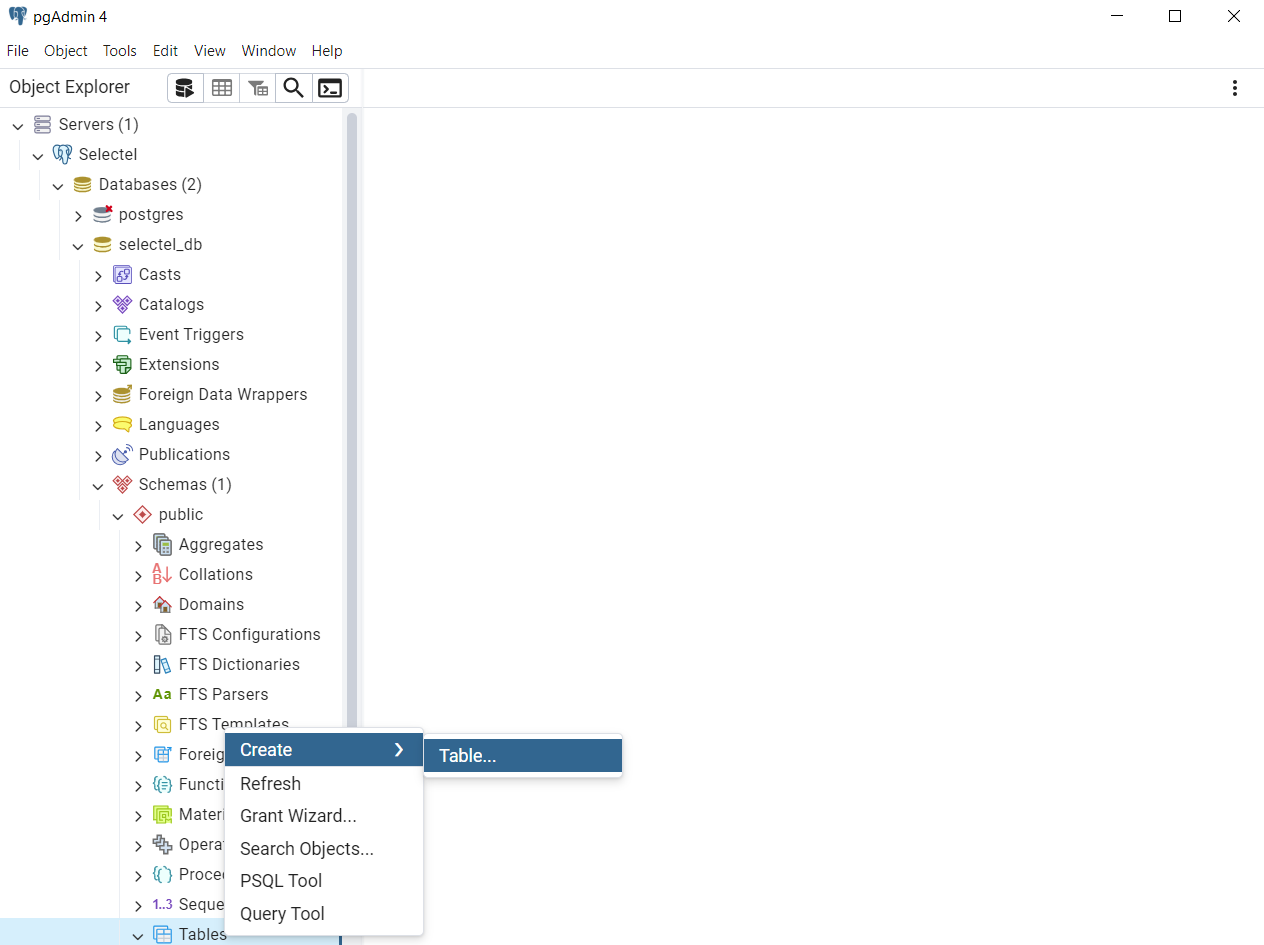
Нажмите правой кнопкой мыши на Tables в дереве объектов и выберите Create → Table…
Заполните следующие поля.
- Name — название таблицы. Например, employees.
- Owner — пользователь, который будет владельцем таблицы.
- Schema — обычно используется схема public, но если у вас есть другие схемы, можете выбрать нужную.
Перейдите на вкладку Columns для определения столбцов таблицы. Нажмите на кнопку +, чтобы добавить новый столбец, и укажите следующие параметры.
- Name — имя столбца, например, id, first_name, last_name, email.
- Data type — тип данных столбца. Например, serial, varchar, integer, и т.д.
- Primary Key? — если это ключевой столбец, например, id, поставьте галочку напротив чекбокса.
- Not NULL? — если столбец должен быть обязательным, отметьте этот параметр.
Повторите процесс для всех столбцов, которые нужно добавить. Затем нажмите Save, чтобы сохранить таблицу.
Как создать БД в командной строке
Для тех, кто предпочитает работу через терминал, PostgreSQL предоставляет утилиту командной строки — psql.
Для установки psql на Linux используйте консольную команду:
sudo apt install postgresql postgresql-contrib
Подключение к БД
- Откройте терминал. Подключитесь к серверу PostgreSQL:
psql -h <IP_server> -p <port> -U <username> -d <db_name>
Примечание
Для подключения к PostgreSQL, расположенной на локальном устройстве, можно просто выполнить команду psql без параметров.
Базовые настройки через psql
После подключения к PostgreSQL с помощью утилиты psql можно приступить к настройке и управлению сервером баз данных. Рассмотрим основные команды, которые помогут настроить начальные параметры и подготовить базу данных к дальнейшей работе.
Параметры конфигурации PostgreSQL
PostgreSQL позволяет настраивать различные параметры конфигурации: кодировку данных, язык сообщений, уровень логирования и многое другое. Для этого используются команды языка SQL. Чтобы изменить текущие настройки сеанса, используйте команду SET. Например, для изменения языка сообщений на русский:
SET lc_messages = 'ru_RU.UTF-8';
Также можете изменить кодировку для работы с текстовыми данными:
SET client_encoding = 'UTF8';
Чтобы увидеть текущее значение настроек, используйте команду:
SHOW lc_messages;
Управление пользователями и ролями
Пользователи и роли в PostgreSQL играют ключевую роль в управлении доступом к базе данных.
Чтобы добавить нового пользователя в PostgreSQL, введите команду CREATE ROLE или CREATE USER. Например:
CREATE USER myuser WITH PASSWORD 'mypassword';
После создания пользователя ему необходимо назначить права на выполнение операций в базе данных. Например, чтобы предоставить права на создание базы данных, выполните следующий код:
ALTER USER myuser CREATEDB;
Получение справки и помощи в psql
Иногда в процессе работы с PostgreSQL бывает нужно быстро получить информацию о доступных командах или синтаксисе. В этом случае утилита psql предоставляет справочную систему.
Команда \help в psql выводит справку по командам SQL. Например, чтобы узнать больше о команде CREATE DATABASE, выполните:
\help CREATE DATABASE
Помимо SQL-команд, psql поддерживает множество встроенных команд, которые начинаются с обратного слэша (\). Вот некоторые из наиболее полезных:
- \l — выводит список всех баз данных;
- \dt — отображает список всех таблиц в текущей базе данных;
- \du — выводит список всех пользователей и ролей;
- \c <db_name> — подключение к конкретной базе данных;
- \dn — выводит список всех схем в базе данных.
Чтобы узнать больше о встроенных командах, используйте \? в терминале psql. Например, чтобы увидеть список всех доступных команд psql:
\?
Создание базы данных: CREATE DATABASE
Теперь перейдем к созданию новой базы данных. В PostgreSQL для этого используется команда CREATE DATABASE:
CREATE DATABASE <db_name>;
После создания базы данных для дальнейшей работы следует подключиться к ней с помощью команды:
\c <db_name>
Работа с таблицами
Создание таблицы: CREATE TABLE
Теперь, когда вы подключены к БД, можно приступить к созданию таблицы. В PostgreSQL таблицы создаются с помощью команды CREATE TABLE.
Для создания таблицы необходимо определить ее структуру: столбцы, их типы данных и возможные ограничения. Пример создания таблицы для хранения информации о сотрудниках:
    CREATE TABLE IF NOT EXISTS employees (
    employee_id SERIAL PRIMARY KEY,
    first_name VARCHAR(50),
    last_name VARCHAR(50),
    department VARCHAR(50),
    hire_date DATE
);
В этом примере создается таблица employees с пятью столбцами:
- employee_id — уникальный идентификатор сотрудника, создается автоматически при помощи типа данных SERIAL;
- first_name и last_name — текстовые поля для хранения имени и фамилии;
- department — строка, обозначающая отдел, к которому относится сотрудник;
- hire_date — дата приема на работу.
Для проверки, что таблица успешно создана, можно использовать команду:
\d employees
Эта команда выведет описание таблицы employees, включая ее структуру и типы данных.
Удаление таблицы: DROP TABLE
Для удаления таблицы из базы данных PostgreSQL используется SQL-запрос:
DROP TABLE <db_name>;
Создание резервной копии БД: pg_dump, pg_restore
Регулярное создание резервных копий баз данных — важная практика, которая помогает избежать потери данных в случае сбоев системы или непредвиденных ситуаций. PostgreSQL предоставляет встроенные инструменты для создания бэкапов с помощью утилиты pg_dump.
Создание
pg_dump -U <username> -h <host> -p <port> -d <database_name> -F c -f /path/to/backup_file.backup
- -U <username> — имя пользователя PostgreSQL;
- -h <host> — адрес сервера базы данных, например, localhost;
- -p <port> — порт для подключения к серверу;
- -d <db_name> — имя базы данных, которую нужно сохранить;
- -F c — формат архива, в данном случае c = custom;
- -f /path/to/backup_file.backup — путь и имя файла для сохранения резервной копии.
Для создания резервной копии базы данных employees на локальном сервере с пользователем postgres следует выполнить команду:
pg_dump -U postgres -d employees -F c -f ~/backups/mydb_backup.backup
Восстановление
Чтобы восстановить базу данных из резервной копии, созданной с помощью pg_dump, можно воспользоваться утилитой pg_restore. Она позволяет восстановить данные из резервной копии, выполненной в формате архива.
Сперва создайте новую базу данных — в нее будут восстанавливаться данные. Для этого используйте команду createdb:
createdb -U <username> -h <host> -p <port> <new_db_name>
Затем восстановите данные из резервной копии. В этом поможет команда pg_restore:
pg_restore -U <username> -h <host> -p <port> -d <new_db_name> /path/to/backup_file.backup
И в конце убедитесь, что данные восстановлены корректно, проверив таблицы в новой БД.
Заключение
В статье подробно рассказали, как создать базу данных в PostgreSQL различными способами: в панели управления Selectel, с помощью графического интерфейса pgAdmin и через командную строку утилитой psql.
Узнать больше о работе с PostgreSQL можно в одном из наших курсов в Академии Selectel.
Whenever someone starts working with Postgres or any other database, one of the very first things is to learn how to create a database. Creating a table allows a user to perform different database operations, such as table creation, data fetching from existing tables, modifying existing tables, and many more. Therefore, PostgreSQL offers various database creation methods, including GUI-based and CLI-based options.
This write-up illustrates the Postgres database creation using the command line.
How to Create a Postgres Database From Command Line
We will explain the following methods to create a Postgres database using the command line:
— Method 1: Using SQL Shell
— Method 2: Using Terminal
So, let’s get started with the default Postgres CLI.
How to Create PostgreSQL Using SQL Shell
Postgres provides a default command line interface, known as “SQL Shell” or “psql”. It allows users to perform database operations using different commands and meta-commands. Follow the below-exhibited steps for a profound understanding:
Step 1: Launch psql
Search for “psql” in the search menu and hit the “Open” button to launch the SQL Shell:
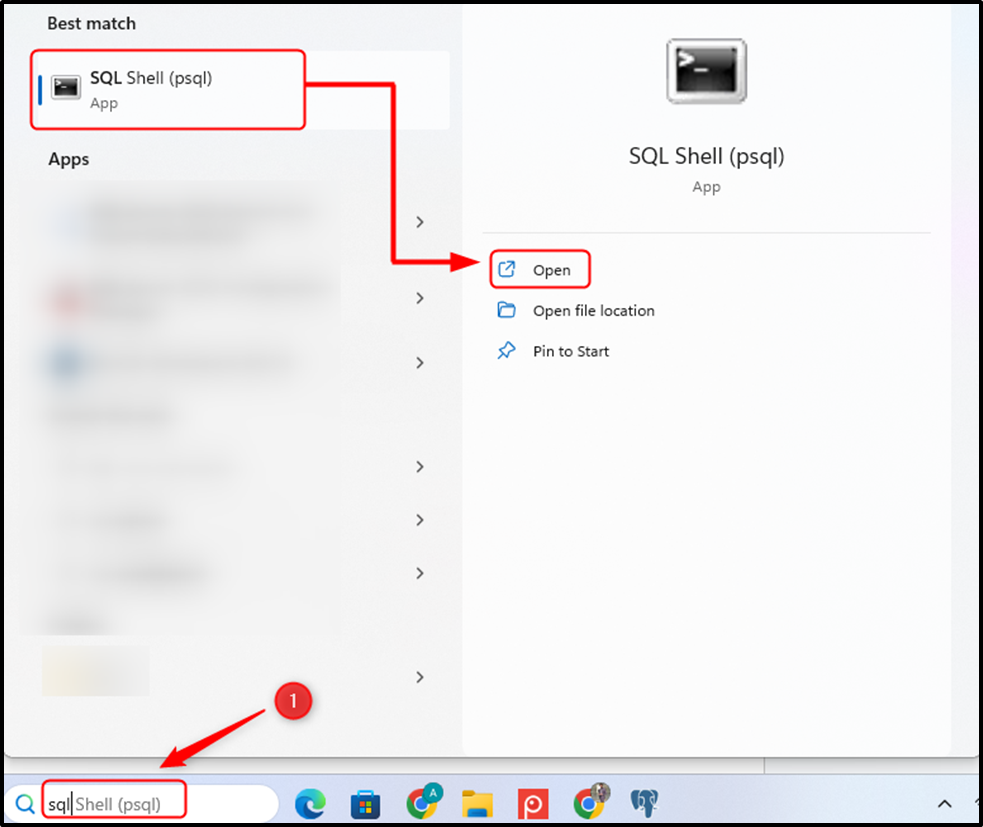
Upon doing so, the SQL Shell will open, provide the login details, and hit the “ENTER” button to access the Postgres:
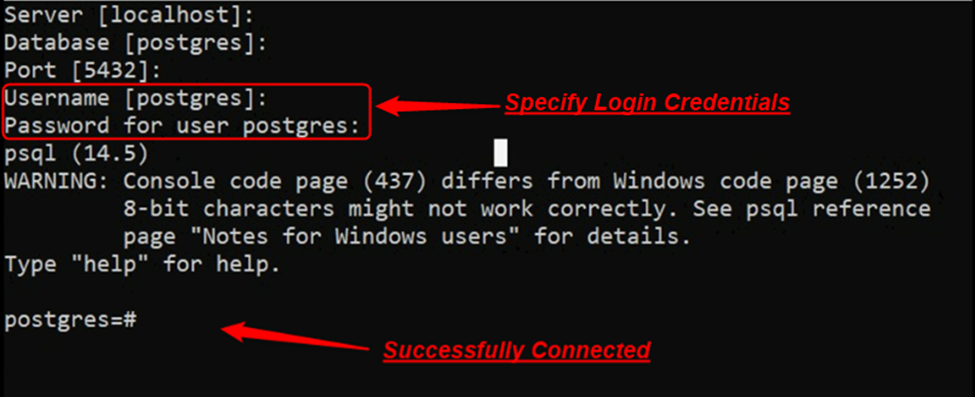
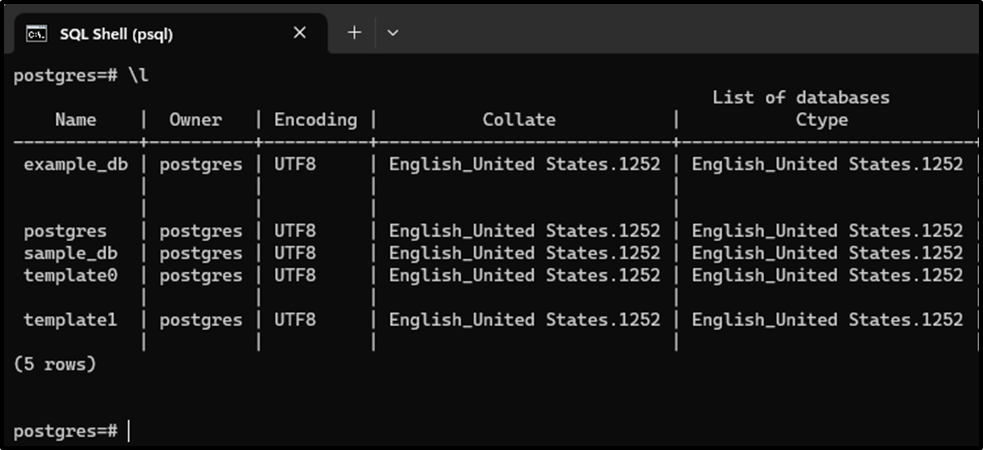
Step 2: Check Available/Existing Databases
Once you are successfully connected to the “postgres” database, use the following meta-command to check the list of available/existing databases:
\l
Step 3: Create a Database Using Postgres Default CLI
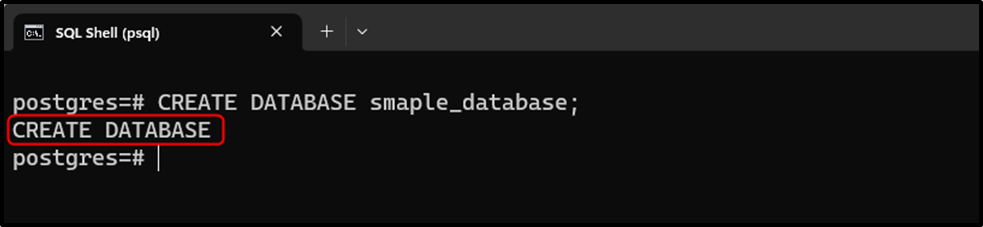
Use the below-demonstrated syntax for the database creation:
CREATE DATABASE name_of_database;
Replace the “name_of_database” with the database name to be created. For instance, in the following snippet, the CREATE DATABASE command creates a new database named “smaple_db”:
CREATE DATABASE smaple_database;
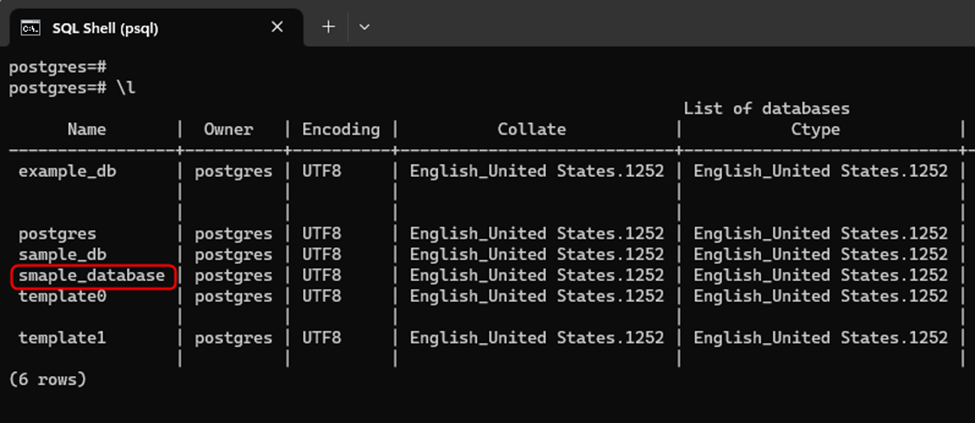
Step 4: Confirm Database Creation
Type the “\l” command and hit the ENTER Key to confirm the database creation:
\l
The following snippet verifies the creation of the desired database:
How to Create PostgreSQL Using SQL Shell
Alternatively, users can execute the “createdb” command to create a database directly from the system’s terminal. For this purpose, use the below-demonstrated syntax:
createdb [option...] [database_name [description]]
Here, the option can be “–help”, “-D”, “-E”, “-e”, “-h”, “-I”, “-O”, “-p”, “-T”, “-U”, “-w”, or “-W”. The use of these options/parameters relies on the users’ requirements. For instance, use the “-h” to show the server’s hostname, use -D to specify tablespace for the database, use “-O” to determine who owns the database, and so on.
Follow the below-exhibited steps for a profound understanding:
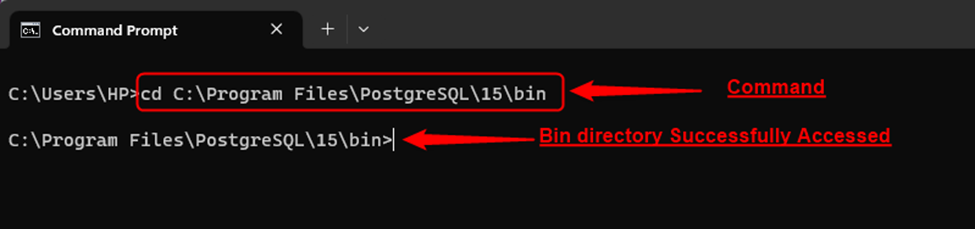
Step 1: Access Postgres’ Bin Directory
Launch CMD and head into the Postgres bin directory by executing the “cd” command:
cd C:\Program Files\PostgreSQL\15\bin
Here, “15” represents the Postgres version; replace it according to the Postgres version installed on your system:
Step 2: Create Database
Type the “createdb” command and hit the “Enter” button to create a new database:
createdb -U postgres sample1_database;
Here, the “-U” option is used to specify the user name to be used for the connection:
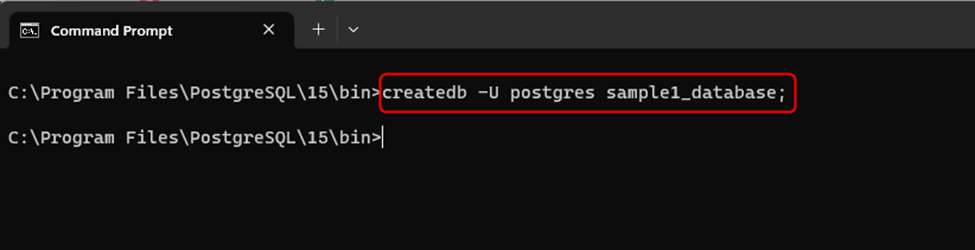
The cursor moves to the next line without throwing any error, which indicates the successful execution of the stated command.
Step 3: Confirm Database Creation
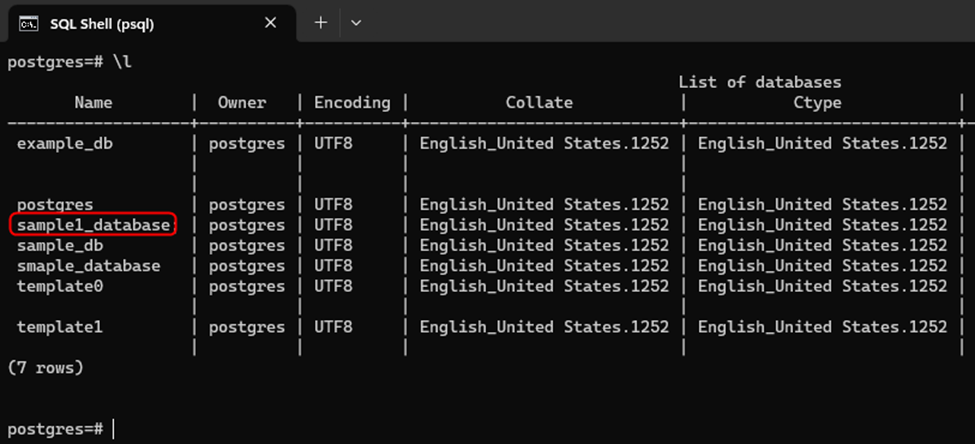
Now open the SQL Shell, type the “\l” command, and hit the ENTER Key to confirm the database creation:
\l
The createdb command confirms the successful creation of the desired database, i.e., “sample1_database”:
That’s all about creating a Postgres database from the command line.
Conclusion
PostgreSQL supports various commands to create a database from the command line, including “createdb” and “CREATE DATABASE”. For instance, executing the “CREATE DATABASE” command from SQL Shell creates a new Postgres database, while executing the “createdb” command from the system’s terminal serves the same purpose. This post has illustrated a couple of methods to create a Postgres database from the command line.
By Gerard Hynes
Now is a great time to learn relational databases and SQL. From web development to data science, they are used everywhere.
In the Stack Overflow 2021 Survey, 4 out of the top 5 database technologies used by professional developers were relational database management systems.
PostgreSQL is an excellent choice as a first relational database management system to learn.
- It’s widely used in industry, including at Uber, Netflix, Instagram, Spotify, and Twitch.
- It’s open source, so you won’t be locked into a particular vendor.
- It’s more than 25 years old, and in that time it has earned a reputation for stability and reliability.
Whether you’re learning from the freeCodeCamp Relational Database Certification or trying out PostgreSQL on your own computer, you need a way to create and manage databases, insert data into them, and query data from them.
While there are several graphical applications for interacting with PostgreSQL, using psql and the command line is probably the most direct way to communicate with your database.
What is psql?
psql is a tool that lets you interact with PostgreSQL databases through a terminal interface. When you install PostgreSQL on a machine, psql is automatically included.
psql lets you write SQL queries, send them to PostgreSQL, and view the results. It also lets you use meta-commands (which start with a backslash) for administering the databases. You can even write scripts and automate tasks relating to your databases.
Now, running a database on your local computer and using the command line can seem intimidating at first. I’m here to tell you it’s really not so bad. This guide will teach you the basics of managing PostgreSQL databases from the command line, including how to create, manage, back up, and restore databases.
Prerequisite – Install PostgreSQL
If you haven’t already installed PostgreSQL on your computer, follow the instructions for your operating system on the official PostgreSQL documentation.
When you install PostgreSQL, you will be asked for a password. Keep this in a safe place as you’ll need it to connect to any databases you create.
How to Connect to a Database
You have two options when using psql to connect to a database: you can connect via the command line or by using the psql application. Both provide pretty much the same experience.
Option 1 – Connect to a database with the command line
Open a terminal. You can make sure psql is installed by typing psql --version. You should see psql (PostgreSQL) version_number, where version_number is the version of PostgreSQL that’s installed on your machine. In my case, it’s 14.1.
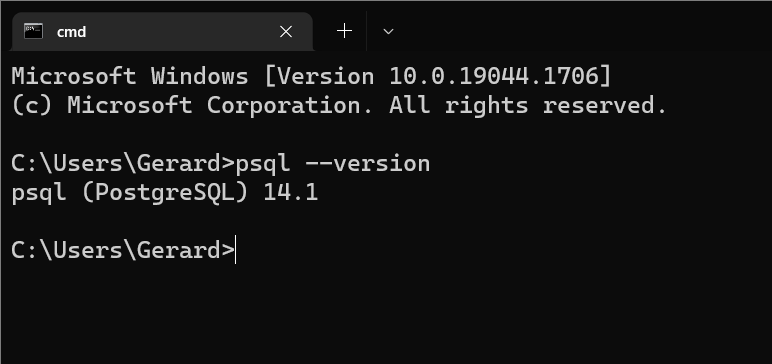
Checking psql version via the command line
The pattern for connecting to a database is:
psql -d database_name -U username
The -d flag is shorter alternative for --dbname while -U is an alternative for --username.
When you installed PostgreSQL, a default database and user were created, both called postgres. So enter psql -d postgres -U postgres to connect to the postgres database as the postgres superuser.
psql -d postgres -U postgres
You will be prompted for a password. Enter the password you chose when you installed PostgreSQL on your computer. Your terminal prompt will change to show that you’re now connected to the postgres database.
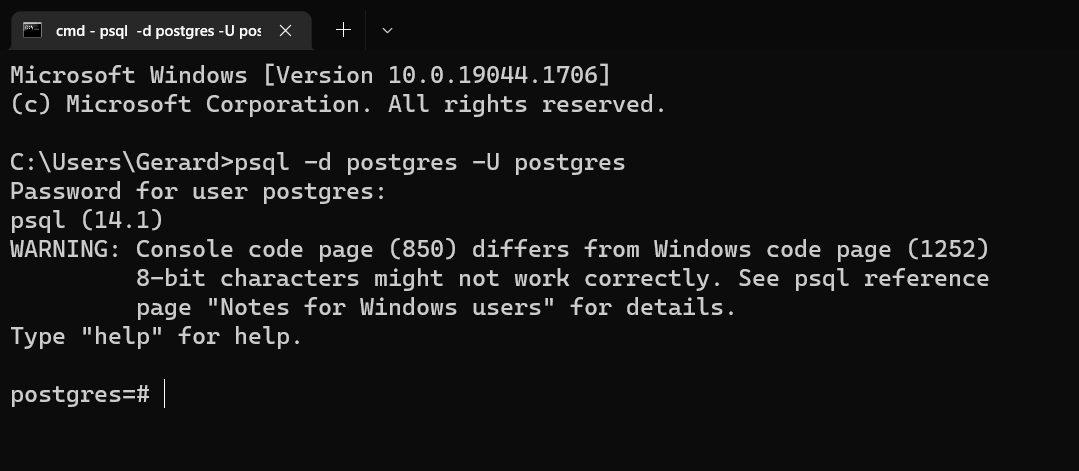
Connecting to a database from the command line with psql
If you want to directly connect to a database as yourself (rather than as the postgres superuser), enter your system username as the username value.
Option 2 – Connect to a database with the psql application
Launch the psql application – it’ll be called «SQL Shell (psql)». You will be prompted for a server, a database, a port and a username. You can just press enter to select the default values, which are localhost, postgres, 5432, and postgres.
Next, you’ll be prompted for the password you chose when you installed PostgreSQL. Once you enter this, your terminal prompt will change to show that you’re connected to the postgres database.

Connecting to a database with the psql application
Note: If you’re on Windows you might see a warning like “Console code page (850) differs from Windows code page (1252) 8-bit characters might not work correctly. See psql reference page ‘Notes for Windows users’ for details.” You don’t need to worry about this at this stage. If you want to read more about it, see the psql documentation.
How to Get Help in psql
To see a list of all psql meta-commands, and a brief summary of what they do, use the \? command.
\?

psql’s help command
If you want help with a PostgreSQL command, use \h or \help and the command.
\h COMMAND
This will give you a description of the command, its syntax (with optional parts in square brackets), and a URL for the relevant part of the PostgreSQL documentation.

psql describing the DROP TABLE statement
How to Quit a Command in psql
If you’ve run a command that’s taking a long time or printing too much information to the console, you can quit it by typing q.
q
How to Create a Database
Before you can manage any databases, you’ll need to create one.
Note: SQL commands should end with a semicolon, while meta-commands (which start with a backslash) don’t need to.
The SQL command to create a database is:
CREATE DATABASE database_name;
For this guide, we’re going to be working with book data, so let’s create a database called books_db.
CREATE DATABASE books_db;
You can view a list of all available databases with the list command.
\l

Listing all databases
You should see books_db, as well as postgres, template0, and template1. (The CREATE DATABASE command actually works by copying the standard database, called template1. You can read more about this in the PostgreSQL documentation.)
Using \l+ will display additional information, such as the size of the databases and their tablespaces (the location in the filesystem where the files representing the database will be stored).
\l+

Listing all databases with additional information
How to Switch Databases
You’re currently still connected to the default postgres database. To connect to a database or to switch between databases, use the \c command.
\c database_name
So \c books_db will connect you to the books_db database. Note that your terminal prompt changes to reflect the database you’re currently connected to.

Switching databases
How to Delete a Database
If you want to delete a database, use the DROP DATABASE command.
DROP DATABASE database_name;
You will only be allowed to delete a database if you are a superuser, such as postgres, or if you are the database’s owner.
If you try to delete a database that doesn’t exist, you will get an error. Use IF EXISTS to get a notice instead.
DROP DATABASE IF EXISTS database_name;

Deleting a database
You can’t delete a database that has active connections. So if you want to delete the database you are currently connected to, you’ll need to switch to another database.
How to Create Tables
Before we can manage tables, we need to create a few and populate them with some sample data.
The command to create a table is:
CREATE TABLE table_name();
This will create an empty table. You can also pass column values into the parentheses to create a table with columns. At the very least, a basic table should have a Primary Key (a unique identifier to tell each row apart) and a column with some data in it.
For our books_db, we’ll create a table for authors and another for books. For authors, we’ll record their first name and last name. For books, we’ll record the title and the year they were published.
We’ll make sure that the authors’ first_name and last_name and the books’ title aren’t null, since this is pretty vital information to know about them. To do this we include the NOT NULL constraint.
CREATE TABLE authors(
    author_id SERIAL PRIMARY KEY,
    first_name VARCHAR(100) NOT NULL,
    last_name VARCHAR(100) NOT NULL
);

CREATE TABLE books(
    book_id SERIAL PRIMARY KEY,
    title VARCHAR(100) NOT NULL,
    published_year INT
);
You will see CREATE TABLE printed to the terminal if the table was created successfully.
Now let’s connect the two tables by adding a Foreign Key to books. Foreign Keys are unique identifiers that reference the Primary Key of another table. Books can, of course, have multiple authors but we’re not going to get into the complexities of many to many relationships right now.
Add a Foreign Key to books with the following command:
ALTER TABLE books ADD COLUMN author_id INT REFERENCES authors(author_id);
Next, let’s insert some sample data into the tables. We’ll start with authors.
INSERT INTO authors (first_name, last_name)
VALUES (‘Tamsyn’, ‘Muir’), (‘Ann’, ‘Leckie’), (‘Zen’, ‘Cho’);
Select everything from authors to make sure the insert command worked.
SELECT * FROM authors;
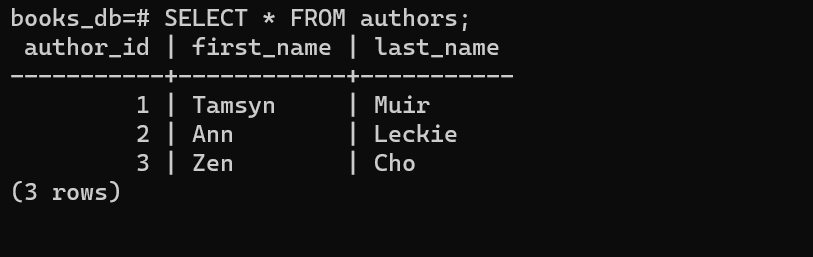
Querying all data from the authors table
Next, we’ll insert some books data into books.
INSERT INTO books(title, published_year, author_id)
VALUES (‘Gideon the Ninth’, 2019, 1), (‘Ancillary Justice’, 2013, 2), (‘Black Water Sister’, 2021, 3);
If you run SELECT * FROM books; you’ll see the book data.

Querying all data from the books table
How to List All Tables
You can use the \dt command to list all the tables in a database.
\dt
For books_db you will see books and authors. You’ll also see books_book_id_seq and authors_author_id_seq. These keep track of the sequence of integers used as ids by the tables because we used SERIAL to generate their Primary Keys.

Listing all tables in a database
How to Describe a Table
To see more information about a particular table, you can use the describe table command: \d table_name. This will list the columns, indexes, and any references to other tables.
\d table_name

Describing the authors table
Using \dt+ table_name will provide more information, such as about storage and compression.
How to Rename a Table
If you ever need to change the name of a table, you can rename it with the ALTER TABLE command.
ALTER TABLE table_name RENAME TO new_table_name;
How to Delete a Table
If you want to delete a table, you can use the DROP TABLE command.
DROP TABLE table_name;
If you try to delete a table that doesn’t exist, you will get an error. You can avoid this by including the IF EXISTS option in the statement. This way you’ll get a notice instead.
DROP TABLE IF EXISTS table_name;
How to Manage Longer Commands and Queries
If you’re writing longer SQL queries, the command line isn’t the most ergonomic way to do it. It’s probably better to write your SQL in a file and then have psql execute it.
If you are working with psql and think your next query will be long, you can open a text editor from psql and write it there. If you have an existing query, or maybe want to run several queries to load sample data, you can execute commands from a file that is already written.
Option 1 – Open a text editor from psql
If you enter the \e command, psql will open a text editor. When you save and close the editor, psql will run the command you just wrote.
\e

Writing commands in a text editor
On Windows, the default text editor for psql is Notepad, while on MacOs and Linux it’s vi. You can change this to another editor by setting the EDITOR value in your computer’s environment variables.
Option 2 – Execute commands and queries from a file
If you have particularly long commands or multiple commands that you want to run, it would be better to write the SQL in a file ahead of time and have psql execute that file once you’re ready.
The \i command lets you read input from a file as if you had typed it into the terminal.
\i path_to_file/file_name.sql
Note: If you’re executing this command on Windows, you still need to use forward slashes in the file path.
If you don’t specify a path, psql will look for the file in the last directory that you were in before you connected to PostgreSQL.

Executing SQL commands from a file
How to Time Queries
If you want to see how long your queries are taking, you can turn on query execution timing.
\timing
This will display in milliseconds the time that the query took to complete.
If you run the \timing command again, it will turn off query execution timing.

Using query execution timing
How to Import Data from a CSV File
If you have a CSV file with data and you want to load this into a PostgreSQL database, you can do this from the command line with psql.
First, create a CSV file called films.csv with the following structure (It doesn’t matter if you use Excel, Google Sheets, Numbers, or any other program).

A spreadsheet with Pixar film data
Open psql and create a films_db database, connect to it, and create a films table.
CREATE DATABASE films_db;

\c films_db

CREATE TABLE films(
    id SERIAL PRIMARY KEY,
    title VARCHAR(100),
    year INT,
    running_time INT
);
You can then use the \copy command to import the CSV file into films. You need to provide an absolute path to where the CSV file is on your computer.
\copy films(title, year, running_time) FROM 'path_to_file' DELIMITER ‘,’ CSV HEADER;
The DELIMITER option specifies the character that separates the columns in each row of the file being imported, CSV specifies that it is a CSV file, and HEADER specifies that the file contains a header line with the names of the columns.
Note: The column names of the films table don’t need to match the column names of films.csv but they do need to be in the same order.
Use SELECT * FROM films; to see if the process was successful.

Importing data from a .csv file
How to Back Up a Database with pg_dump
If you need to backup a database, pg_dump is a utility that lets you extract a database into a SQL script file or other type of archive file.
First, on the command line (not in psql), navigate to the PostgreSQL bin folder.
cd "C:\Program Files\PostgreSQL\14\bin"
Then run the following command, using postgres as the username, and filling in the database and output file that you want to use.
pg_dump -U username database_name > path_to_file/filename.sql
Use postgres for the username and you will be prompted for the postgres superuser’s password. pg_dump will then create a .sql file containing the SQL commands needed to recreate the database.

Backing up a database to a .sql file
If you don’t specify a path for the output file, pg_dump will save the file in the last directory that you were in before you connected to PostgreSQL.

Contents of films.sql backup file
You can pass the -v or --verbose flag to pg_dump to see what pg_dump is doing at each step.

_Running pgdump in verbose mode
You can also backup a database to other file formats, such as .tar (an archive format).
pg_dump -U username -F t database_name > path_to_file/filename.tar
Here the -F flag tells pg_dump that you’re going to specify an output format, while t tells it it’s going to be in the .tar format.
How to Restore a Database
You can restore a database from a backup file using either psql or the pg_restore utility. Which one you choose depends on the type of file you are restoring the database from.
- If you backed up the database to a plaintext format, such as
.sql, use psql. - If you backed up the database to an archive format, such as
.tar, usepg_restore.
Option 1 – Restore a database using psql
To restore a database from a .sql file, on the command line (so not in psql), use psql -U username -d database_name -f filename.sql.
You can use the films_db database and films.sql file you used earlier, or create a new backup file.
Create an empty database for the file to restore the data into. If you’re using films.sql to restore films_db, the easiest thing might be to delete films_db and recreate it.
DROP DATABASE films_db;

CREATE DATABASE films_db;
In a separate terminal (not in psql), run the following command, passing in postgres as the username, and the names of the database and backup file you are using.
psql -U username -d database_name -f path_to_file/filename.sql
The -d flag points psql to a specific database, while the -f flag tells psql to read from the specified file.
If you don’t specify a path for the backup file, psql will look for the file in the last directory that you were in before you connected to PostgreSQL.
You will be prompted for the postgres superuser’s password and then will see a series of commands get printed to the command line while psql recreates the database.
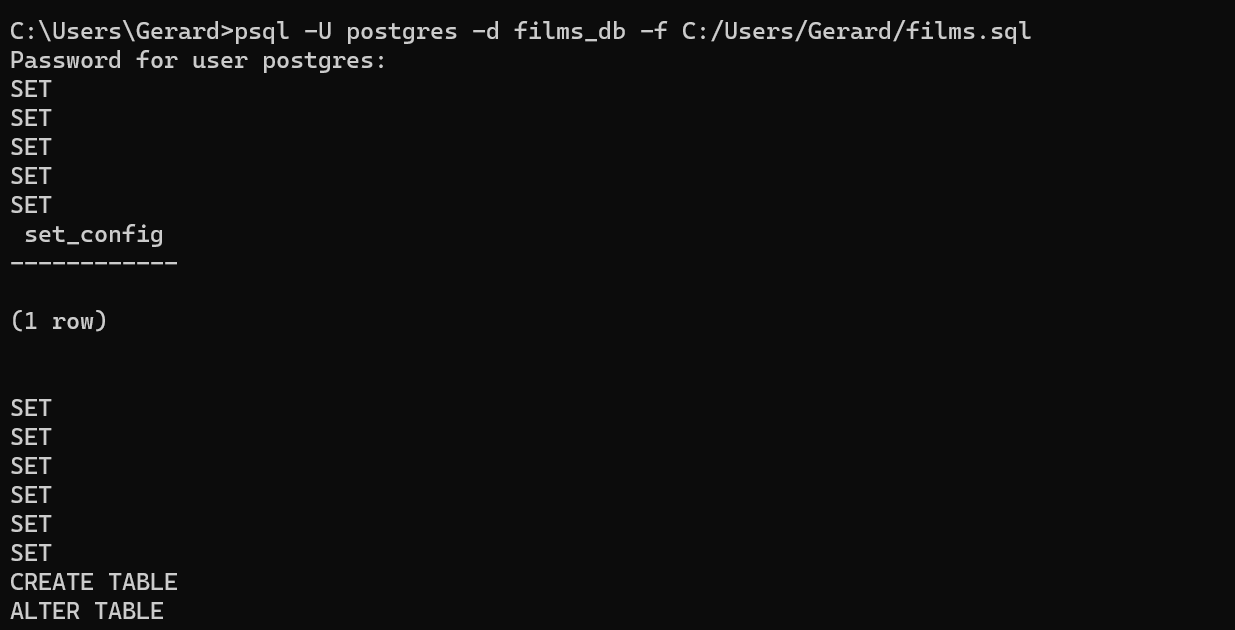
Restoring a database using psql
This command ignores any errors that occur during the restore. If you want to stop restoring the database if an error occurs, pass in --set ON_ERROR_STOP=on.
psql -U username -d database_name --set ON_ERROR_STOP=on -f filename.sql
Option 2 – Restore a database using pg_restore
To restore a database using pg_restore, use pg_restore -U username -d database_name path_to_file/filename.tar.
Create an empty database for the file to restore the data into. If you’re restoring films_db from a films.tar file, the easiest thing might be to delete films_db and recreate it.
DROP DATABASE films_db;

CREATE DATABASE films_db;
On the command line (not in psql), run the following command, passing in postgres as the username, and the names of the database and backup file you are using.
pg_restore -U username -d database_name path_to_file/filename.tar

_Restoring a database using pgrestore
You can also pass in the -v or --verbose flag to see what pg_restore is doing at each step.

_Using pgrestore in verbose mode
How to Quit psql
If you’ve finished with psql and want to exit from it, enter quit or \q.
\q
This will close the psql application if you were using it, or return you to your regular command prompt if you were using psql from the command line.
Where to Take it from Here
There are lots more things you can do with psql, such as managing schemas, roles, and tablespaces. But this guide should be enough to get you started with managing PostgreSQL databases from the command line.
If you want to learn more about PostgreSQL and psql, you could try out freeCodeCamp’s Relational Database Certificate . The official PostgreSQL documentation is comprehensive, and PostgreSQL Tutorial offers several in-depth tutorials.
I hope you find this guide helpful as you continue to learn about PostgreSQL and relational databases.
Learn to code for free. freeCodeCamp’s open source curriculum has helped more than 40,000 people get jobs as developers. Get started